
Template matching is a technique in image processing used to find portions of an input image (a larger image or target image) that matches a template image (reference image or smaller image). Template Matching is commonly used for object detection, image recognition, and pattern recognition tasks. It is the simplest technique to perform these tasks and may have limitations.
In template matching, parts of an input image are compared with a predefined template (a reference image) to identify or locate the areas in the input image that correspond to the template. This method works by sliding the template image over the input image and calculating similarity metric for every position to find the best match.
Template Matching: An Example
OpenCV provides different methods for template matching. The process involves sliding the template over the large image and comparing the template image with overlapping image patches. The following are the main methods used in this process.
- cv2.matchTemplate() function is used to match the template against the main image. This function computes a similarity score for every possible position of the template within the main image.
- cv2.minMaxLoc() function is used to locate the position where the similarity score is the highest or lowest, depending on the different methods discussed in section below.
- cv2.rectangle() function is used to draw bounding box around the best match location.
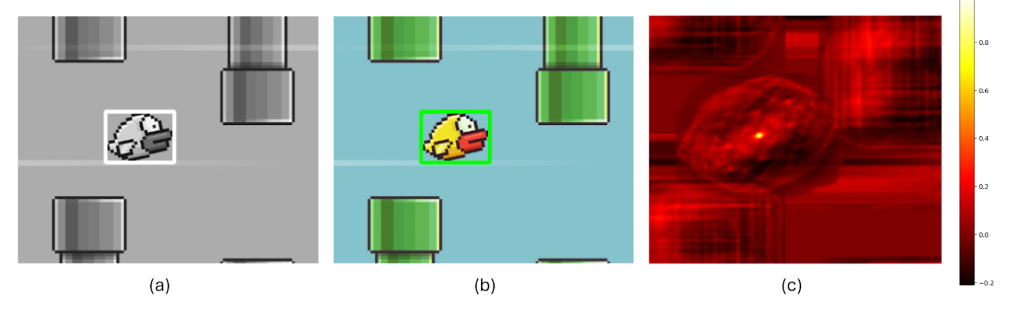
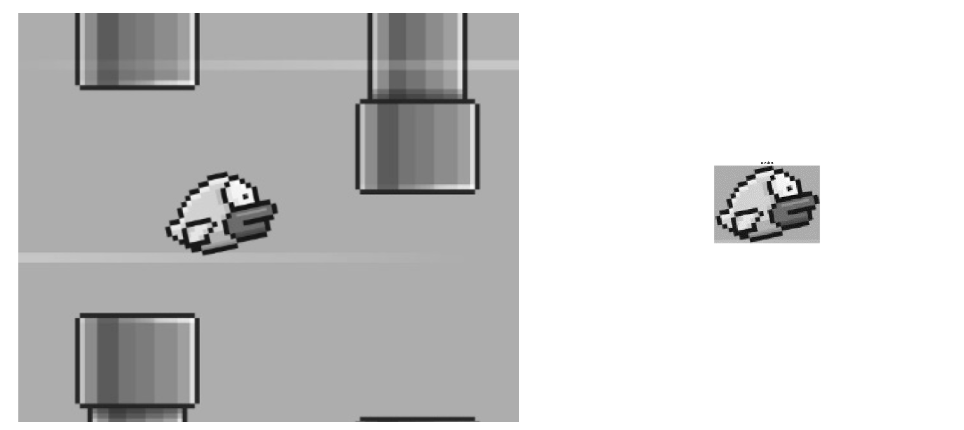
Let’s see an example of template matching using OpenCV. Imagine you have two images:
- A large (input) image (I) of a flappy-bird game screen.
- A template image (T) of a bird that you want to find on the game screen.

We can apply template matching with the code below:
# Load the original images in color and grayscale
color_image = cv2.imread('large_image.jpg')  # Load the main image in color
grayscale_image = cv2.cvtColor(color_image, cv2.COLOR_BGR2GRAY)  # Convert the color image to grayscale
template = cv2.imread('template_image.jpg', 0)  # Load the template image in grayscale

# Get the dimensions of the template
w, h = template.shape[::-1]

# Perform template matching using cv2.matchTemplate
result = cv2.matchTemplate(grayscale_image, template, cv2.TM_CCOEFF_NORMED)

# Find the best match location
min_val, max_val, min_loc, max_loc = cv2.minMaxLoc(result)

# Top-left corner of the match
top_left = max_loc
# Bottom-right corner of the match
bottom_right = (top_left[0] + w, top_left[1] + h)

# Draw rectangles on both grayscale and color images
grayscale_with_bbox = grayscale_image.copy()
color_with_bbox = color_image.copy()

# Draw white bounding box on grayscale image
cv2.rectangle(grayscale_with_bbox, top_left, bottom_right, (255, 255, 255), 2)

# Draw green bounding box on color image
cv2.rectangle(color_with_bbox, top_left, bottom_right, (0, 255, 0), 2)
The results are:
How Template Matching Works
Let’s discuss how the template matching works. Here’s the step-by-step breakdown of template matching process.
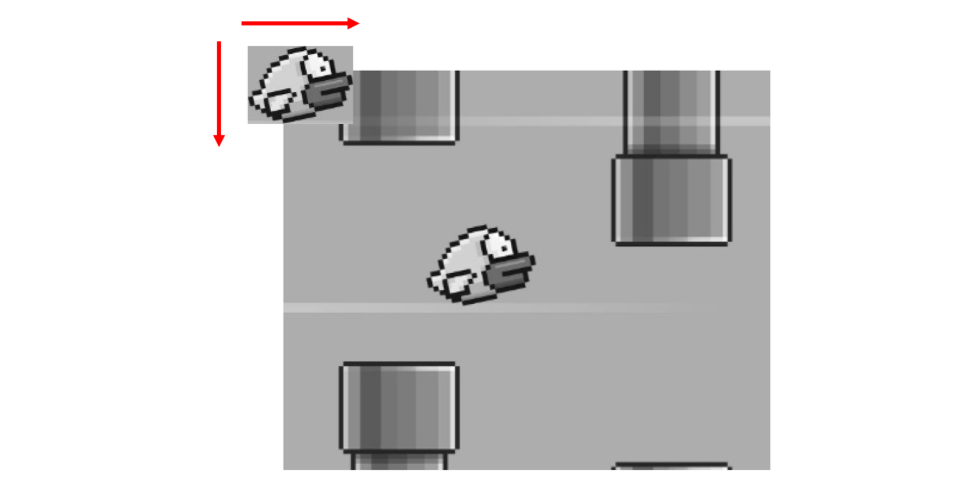
Step #1: Convert Template and Large Image to grayscale
First, both images are converted to grayscale, which simplifies the calculations.
Step #2: Sliding the Template
The algorithm slides the template image over the large (input) image pixel by pixel, left-to-right and top-to-bottom.
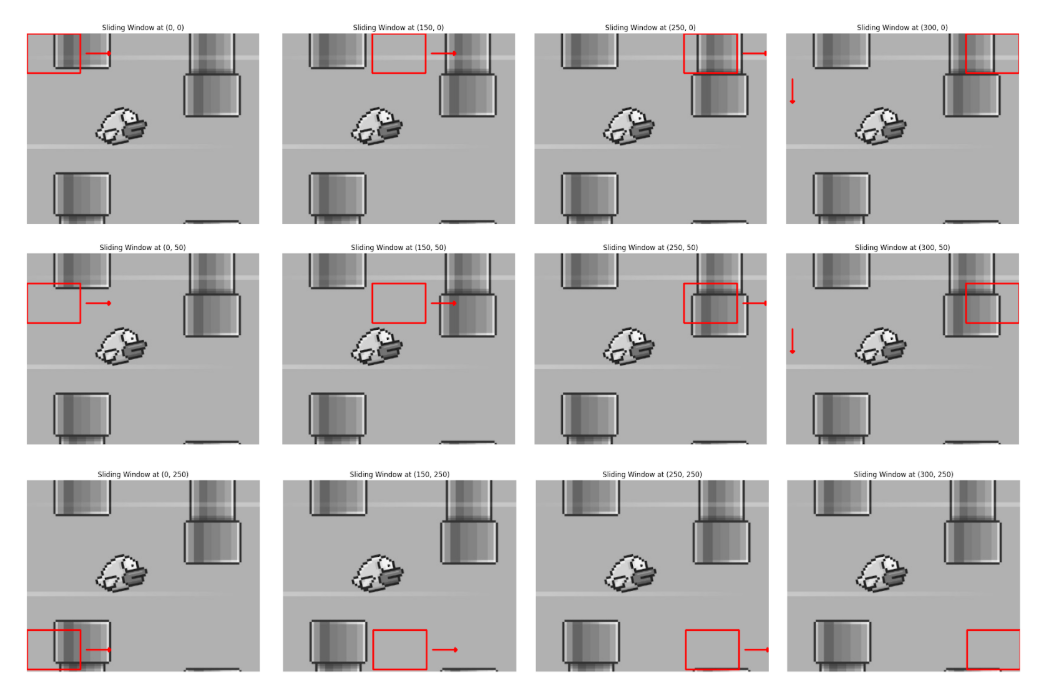
The images below illustrate how the sliding window technique operates by moving the template image (represented by the red rectangle) across the large image. Here the images are displayed at some intervals. The process begins by sliding the template from left to right, one pixel at a time.
Once the template reaches the far right edge, it moves one pixel down and resets to the leftmost position, repeating the left-to-right sliding motion. This continues until the template reaches the bottom-right corner of the larger image. The algorithm slides the template image over the large image, moving it across different parts of the large image.
Comparing Pixels & Calculating Similarity
While sliding, at each position, the algorithm compares the pixel values of the template with the corresponding pixels in the ROI of large image. For each position, the algorithm calculates how similar the template is to the corresponding region in the large image. One of the following different methods is used to calculate the similarity between the template and each region of the large image.
Sum of Squared Differences (SSD)
SSD measures the similarity between a template and a corresponding region in the larger image by calculating the squared difference between corresponding pixel values. The SSD method is simple and straightforward, it sums the squares of the differences between corresponding pixels in the two images. It is mathematically expressed as:

The minimum value of the SSD represents the best match.
Normalized Sum of Squared Differences (NSSD)
NSSD is similar to SSD but introduces a normalization step. This normalization reduces sensitivity to global lighting changes, making the method more robust when brightness varies between the template and the source image. It is mathematically expressed as:

The result is normalized to the range [0, 1]. The minimum value still indicates the best match.
Cross-Correlation (CC)
CC measures the similarity between a template and the corresponding region in the large image by multiplying corresponding pixel values and summing the products. Cross-correlation emphasizes areas with similar intensities and patterns. It is mathematically expressed as:

The maximum value of the cross-correlation indicates the best match.
Normalized Cross-Correlation (NCC)
NCC improves upon cross-correlation by normalizing the results to account for differences in brightness and contrast. It compares the shape of the template to the image region by adjusting for intensity variations. It is mathematically expressed as:

The result is normalized to the range [0, 1], with 1 representing a perfect match. The maximum value represents the best match.
Correlation Coefficient (CCOEFF)
The Correlation Coefficient method measures the linear relationship between the template and the image region. It works by subtracting the mean of the pixel values, thus removing global intensity differences and focusing on the structure of the template and the image region. It is mathematically expressed as:

Where,

The maximum value indicates the best match.
Normalized Correlation Coefficient (NCCOEFF)
NCCOEFF is a further improvement on the correlation coefficient method. It normalizes the results, making it insensitive to both global intensity changes and contrast differences between the template and the image. It is mathematically expressed as:

The result is normalized, typically within the range [-1, 1]. The maximum value (close to 1) indicates the best match.
Finding the Best Match
The algorithm continues sliding the template across the large image and calculates the similarity score at each position. After sliding the template over the entire image, the algorithm finds the position where the similarity score is the smallest (when used SSD, NSSD) or the highest (when used CC, NCC, CCOEFF, NCCOEFF).
Once the position with the best match is found, the algorithm marks that spot in the large image, usually by drawing a bounding box around the matched area.

Matching Methods in OpenCV
OpenCV provides six common methods for template matching as discussed in the “Comparing Pixels & Calculating Similarity” section above. These are the following.
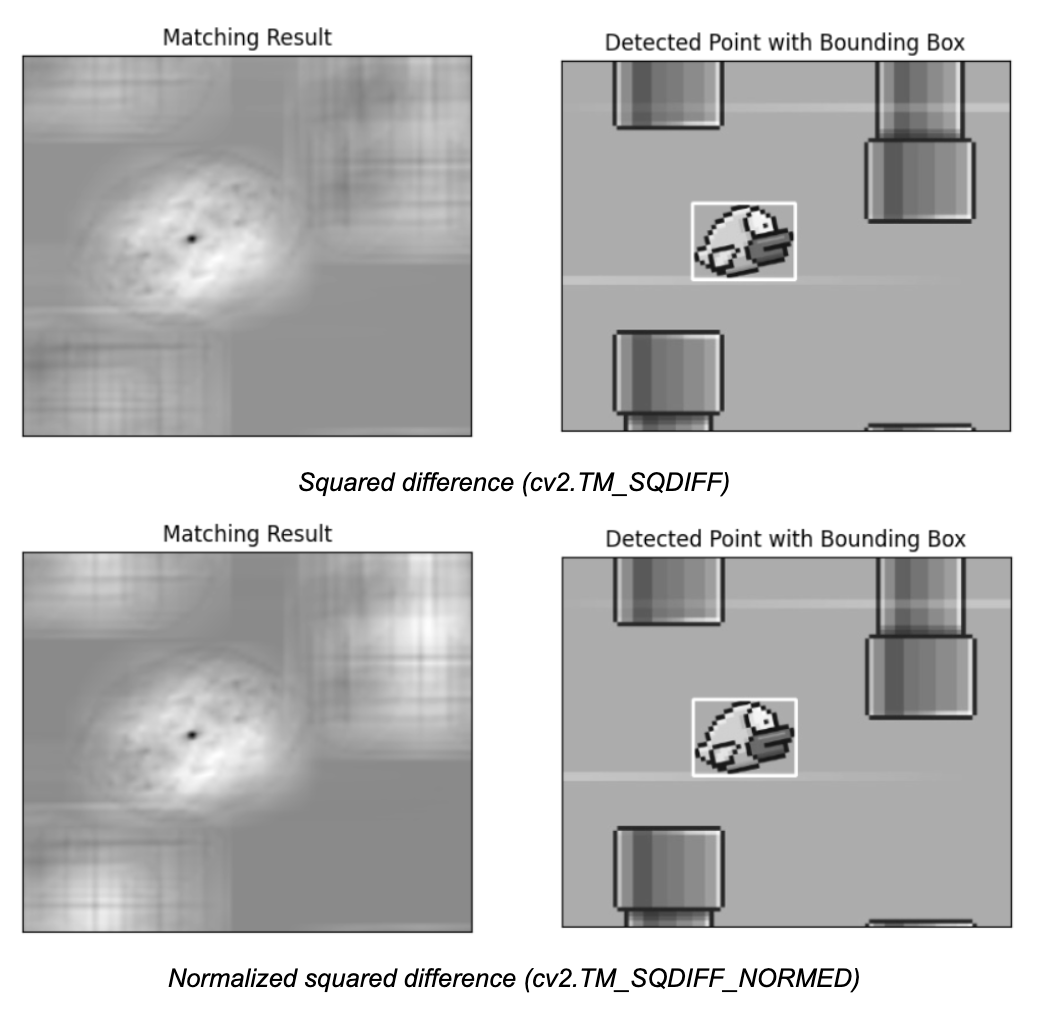
- cv2.TM_SQDIFF: Squared difference.
- cv2.TM_SQDIFF_NORMED: Normalized squared difference.
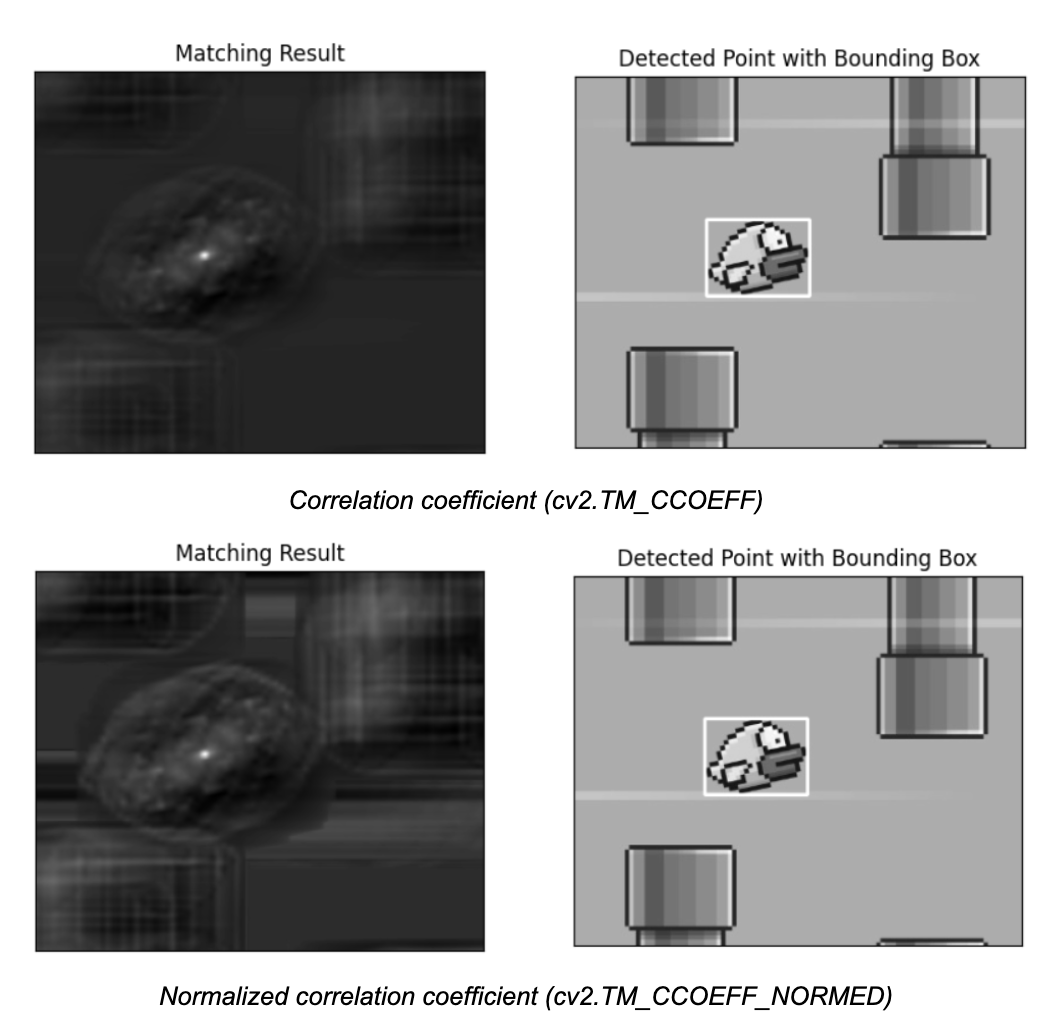
- cv2.TM_CCOEFF: Correlation coefficient.
- cv2.TM_CCOEFF_NORMED: Normalized correlation coefficient.
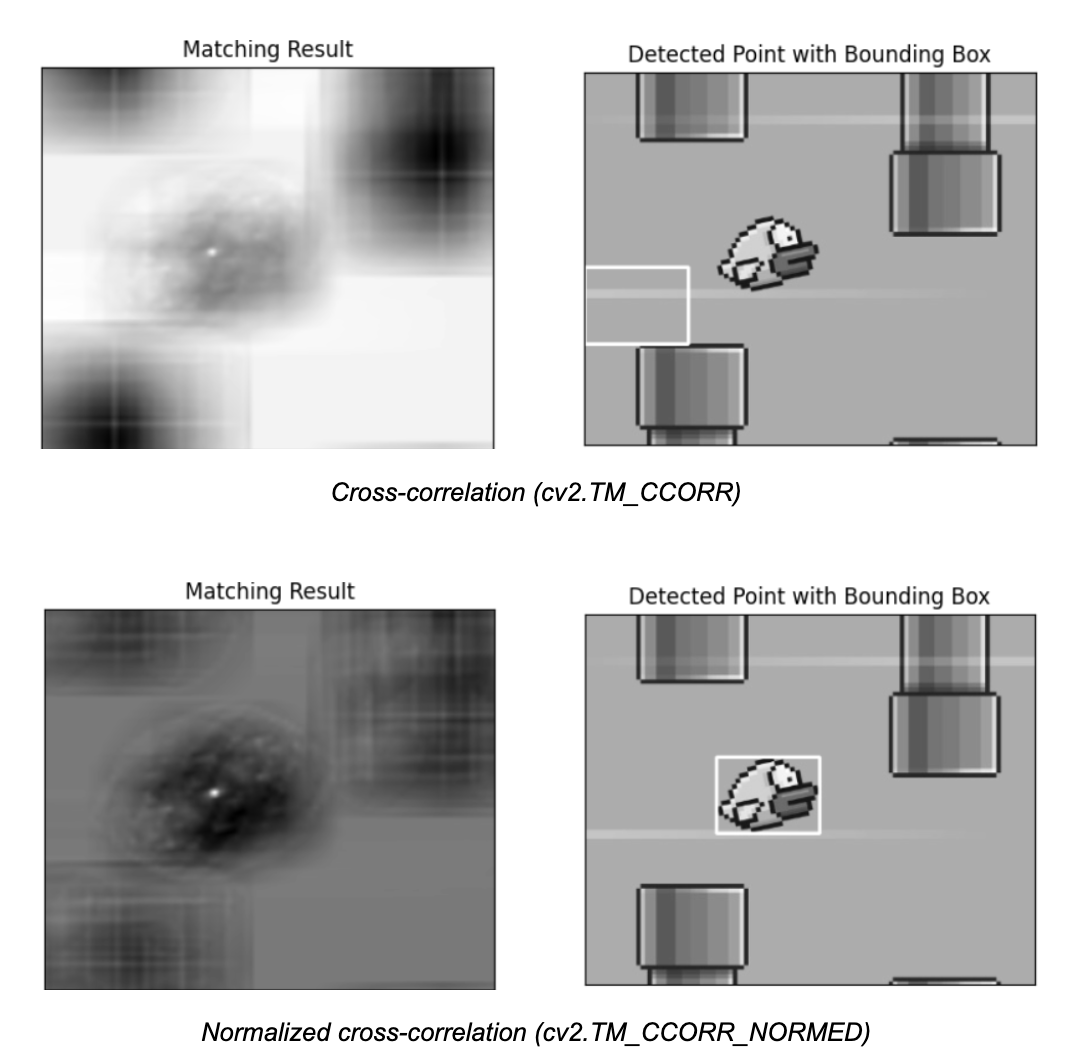
- cv2.TM_CCORR: Cross-correlation.
- cv2.TM_CCORR_NORMED: Normalized cross-correlation.
The following code example performs template matching using six different methods provided by OpenCV and draws rectangles around the detected templates in the main image. Let’s understand the code step-by-step.
Step #1: Load Images
First, we need to load a template and a reference image:
img = cv2.imread('large_image.jpg', cv2.IMREAD_GRAYSCALE)
img2 = img.copy()
template = cv2.imread('template_image.jpg', cv2.IMREAD_GRAYSCALE)
w, h = template.shape[::-1]
In this code:
- large_image.jpg is read in grayscale and stored in img.
- A copy of img is stored in img2 to ensure that each method runs on the original image.
- template_image.jpg is also loaded in grayscale and stored in template.
- Both img and template are checked to ensure they were successfully read.
Step #2: Get Template Dimensions
The width (w) and height (h) of the template are obtained for later use in drawing the bounding box around the detected template.
w, h = template.shape[::-1]Step #3: Define Template Matching Methods
Define the different methods to calculate the similarity between the template and a region of the image differently.
methods = ['TM_SQDIFF', 'TM_SQDIFF_NORMED', 'TM_CCOEFF',
           'TM_CCOEFF_NORMED', 'TM_CCORR',  'TM_CCORR_NORMED']
Step #4: Loop through Methods
For each method in the methods list, getattr(cv2, m) retrieves the corresponding OpenCV function. For example, cv2.TM_CCOEFF is retrieved when m is 'TM_CCOEFF'.
img is reset to the original image (img2) for each iteration so that a fresh image is used for each template matching method.
for m in methods:
    img = img2.copy()
    method = getattr(cv2, m)
Step #5: Perform Template Matching
cv2.matchTemplate(img, template, method) performs template matching and returns a result matrix res. This matrix contains similarity scores for each possible location of the template within the image.
cv2.minMaxLoc(res) finds the minimum and maximum values in the result matrix res and their respective locations (min_loc and max_loc). Depending on the method used, either the minimum or maximum value represents the best match.
    res = cv2.matchTemplate(img, template, method)
    min_val, max_val, min_loc, max_loc = cv2.minMaxLoc(res)
Step #6: Determine Top-Left Corner of the Match
For methods like TM_SQDIFF and TM_SQDIFF_NORMED, lower values indicate better matches, so the location of the minimum value (min_loc) is used as the top-left corner of the bounding box.
For all other methods, higher values indicate better matches, so the location of the maximum value (max_loc) is used.
if method in [cv2.TM_SQDIFF, cv2.TM_SQDIFF_NORMED]:
        top_left = min_loc
    else:
        top_left = max_loc
Step #7: Draw Bounding Box
The bottom-right corner of the bounding box is calculated by adding the width (w) and height (h) of the template to the coordinates of the top-left corner.
A rectangle is drawn around the detected template in the image using cv2.rectangle(). The color is set to white (255) with a line thickness of 2.
    bottom_right = (top_left[0] + w, top_left[1] + h)
    cv2.rectangle(img, top_left, bottom_right, 255, 2)
The code loops through six different template matching methods in OpenCV. It performs template matching for each method and then draws a bounding box around the location with the best match. The result is a set of images, each showing where the template was detected using a specific method. The following is the output generated by code.
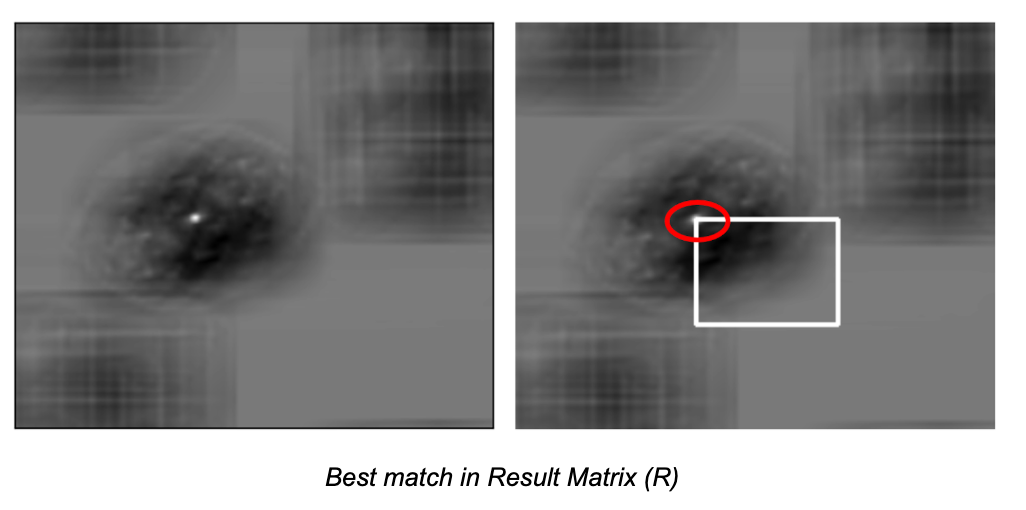
In template matching, the template image slides over the large image, comparing the template image with each part of the large image. For each position, a value is calculated that tells how similar the template image is to that part of the large image. These values are stored in a result matrix (R). Each entry in the result matrix (R) represents how well the template image matches the large image at that specific location. Brighter spots in this result matrix (R) represent better matches.
When you perform template matching using a method like cv2.TM_CCORR_NORMED (Normalized Cross-Correlation), the result is a new image where the brightest spots represent the best matches. For example, the location with the highest value (marked with a red circle in the image below) will be the top-left corner of a rectangle. This width and height of rectangle match the size of the template, showing where the best match is located in the larger image.
Let’s assume that if the size of input image is W x H and the size of template image is w x h, the result of template matching will be an image of size (W - w + 1, H - h + 1). Once you have this result, you can use the cv2.minMaxLoc() function to find the highest or lowest value, depending on the matching method. This point will be the top-left corner of the matching rectangle, and the rectangle's dimensions will match the template's size. This rectangle indicates where the template is found in the input image.
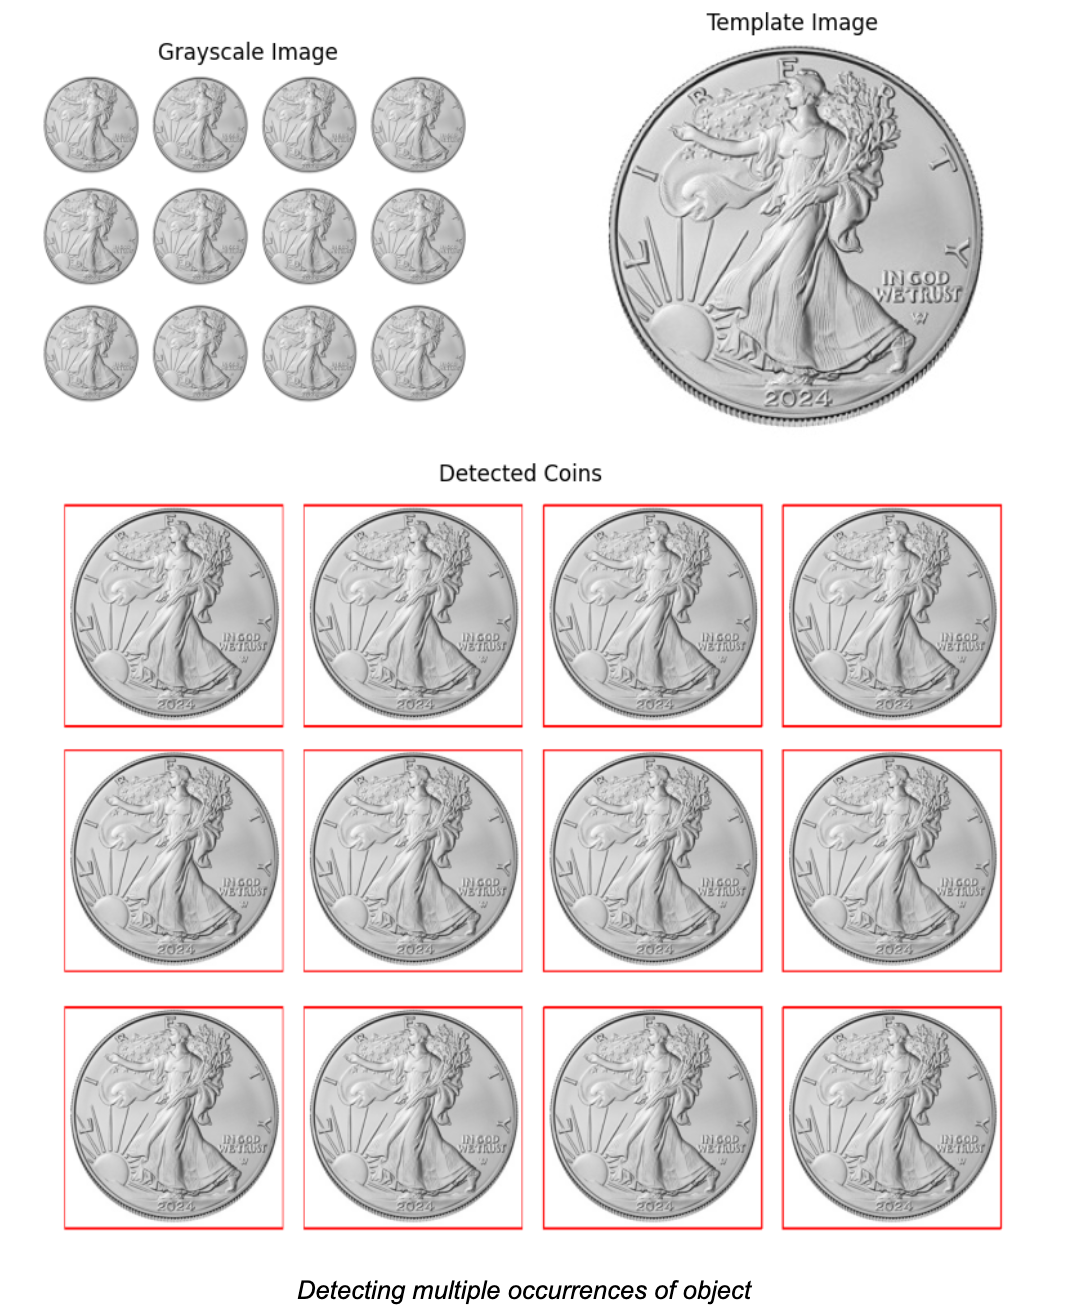
Matching Multiple Objects
Previously, we searched for template image of flappy bird in the large image, which appeared only once. For this, we used cv2.minMaxLoc(), which gave us the location of the best match. However, if an object appears multiple times in the image, cv2.minMaxLoc() will only give the location of one match, not all.
To handle multiple occurrences of an object, like finding all the coins in a large image, we can use thresholding. After matching the template with the image, we apply a threshold to detect all locations that have a high enough match. Then, we can draw rectangles around each matching object.
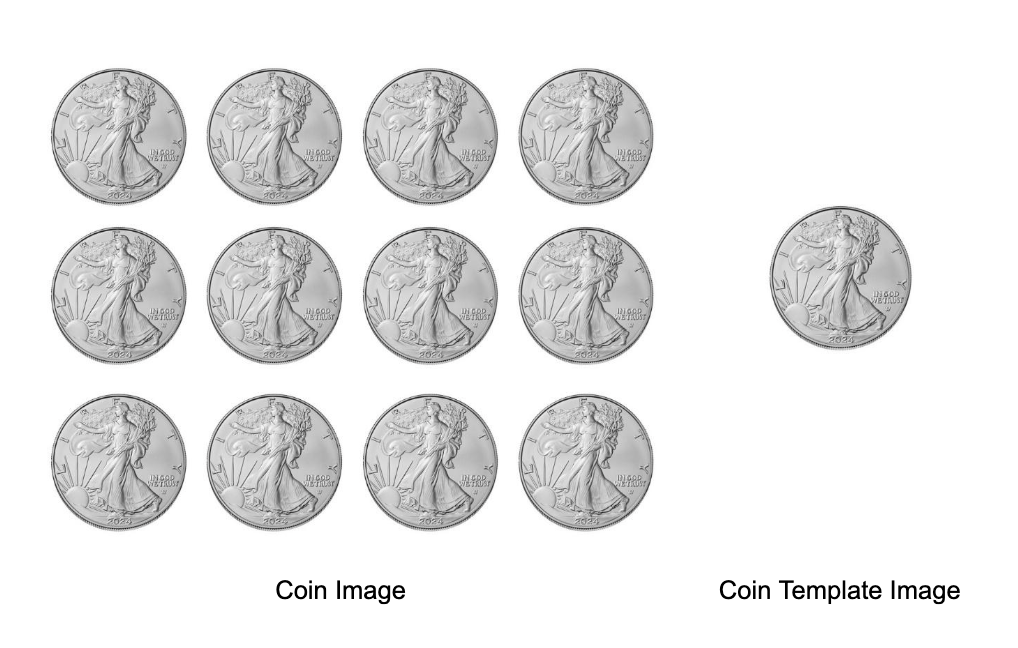
Consider the images below. The large image consists of multiple coins, and template image of coin to be searched.
Here’s the code for detecting multiple occurrences of an object.
# Load the color and grayscale images
img_rgb = cv2.imread('coin_image.jpg')
img_gray = cv2.cvtColor(img_rgb, cv2.COLOR_BGR2GRAY)
template = cv2.imread('coin_template.jpg', cv2.IMREAD_GRAYSCALE)

# Get width and height of the template
w, h = template.shape[::-1]

# Perform template matching
res = cv2.matchTemplate(img_gray, template, cv2.TM_CCOEFF_NORMED)

# Apply a threshold to detect all occurrences
threshold = 0.8
loc = np.where(res >= threshold)

# Draw rectangles around all detected matches
for pt in zip(*loc[::-1]):
    cv2.rectangle(img_rgb, pt, (pt[0] + w, pt[1] + h), (0, 0, 255), 1)
Running the code will produce following output:
Limitations of Template Matching
Template matching is a simple yet powerful technique in computer vision, but it has several limitations. Below are the key limitations:
Sensitivity to Rotation
Basic template matching does not account for rotations. If the object in the template image is rotated compared to the target object in the large image (or vice versa), standard template matching methods will fail to detect the object.
Sensitivity to Scale
Template matching assumes that the object in the large image is the same size as in the template image. If the object is scaled (i.e., bigger or smaller than the template), the match will fail.
Sensitivity to Illumination Changes
Variations in lighting can affect the pixel values, making it difficult for template matching to detect objects reliably. Even slight changes in brightness or contrast between the template image and the large image can lead to poor results or no-match. However, Normalized methods (e.g., cv2.TM_CCOEFF_NORMED or cv2.TM_CCORR_NORMED) can somewhat reduce the impact of lighting differences, but they are not perfect.
Occlusion and Clutter
Template matching works poorly when the object is partially occluded or if the large image contains a lot of clutter (multiple objects, noise). The algorithm looks for an exact match and cannot handle parts of the object being hidden.
Sensitivity to Noise
Template matching is highly sensitive to noise in the image. Even small amounts of noise can drastically affect the results, as pixel-by-pixel matching relies on exact matches in intensity values.
Fixed Shape and Appearance
Template matching assumes the object of interest always appears in a specific form. It struggles when objects are deformable, have variable appearances, or consist of varying textures (e.g., faces or human bodies in different poses).
Conclusion
In this blog, we explored template matching, a simple yet effective form of object detection that doesn't require training a model. It is easy to implement and, despite its limitations, can still be highly useful for certain tasks.
For example, it can be applied in quality control to detect defects in products by comparing them to a template or in gaming to detect specific objects on the screen. Roboflow offers no-code solutions for template matching, making it accessible for various applications. For more information, check out the post How to Do Template Matching with Computer Vision.
This notebook contains all code used in this post.
Cite this Post
Use the following entry to cite this post in your research:
Timothy M. (Oct 8, 2024). What is Template Matching? An Introduction.. Roboflow Blog: https://blog.roboflow.com/template-matching/