
The article below was contributed by Timothy Malche, an assistant professor in the Department of Computer Applications at Manipal University Jaipur.
Manual rebar counting is a time-consuming task and prone to errors and inconsistencies. But, you can automate rebar counting with computer vision. You can use a fine-tuned computer vision model to count individual pieces of rebar, useful for building inventory management and quality verification systems
IIn this blog post we will learn how to use computer vision to automate rebar counting. The rebar counting system we will build uses cameras to capture images of rebar arrangements and apply computer vision model built and hosted using Roboflow to analyse and interpret the visual data.
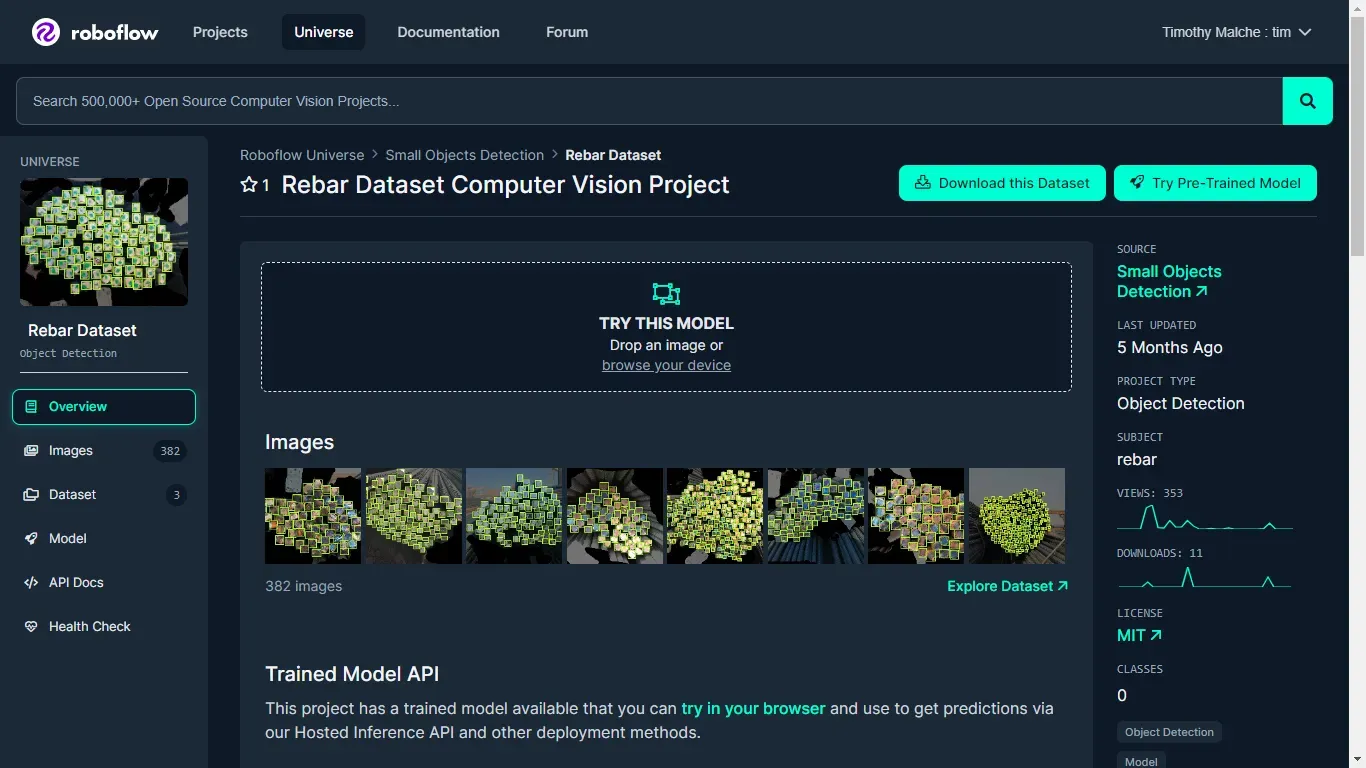
There is already a public model available for rebar counting hosted on Roboflow Universe, so we do not have to train a model. Instead, we can use the existing one.
Here is an example of our application in use:

The Rebar Counting API
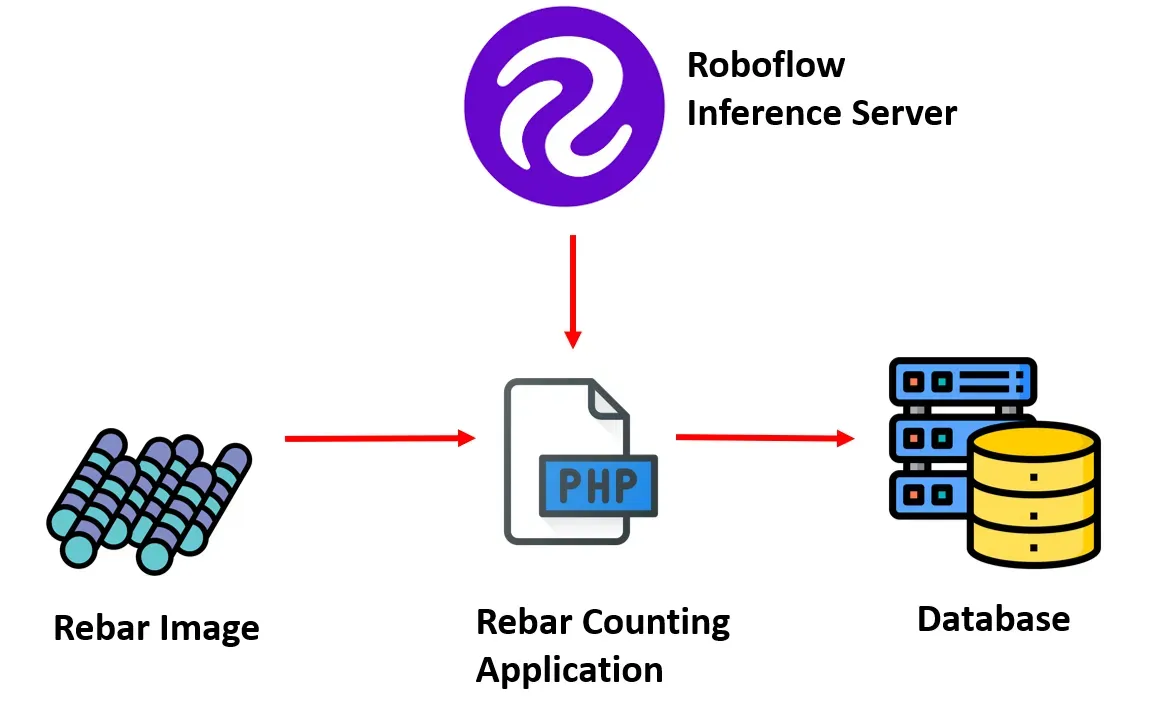
In our final application, a user would real-time images of rebar, which are stored on the server. Following this, we can call our rebar counting mode to detect and count the total number of rebars within each image. The following figure shows the structure of our application.
For this project we will use Rebar Counting API available at Roboflow Universe and Roboflow hosted API for PHP based deployment of rebar counting applications.
The Rebar Counting project from Roboflow Universe is trained on the Rebar dataset. The trained model from this project is available to get predictions via Hosted Inference API and other deployment methods.
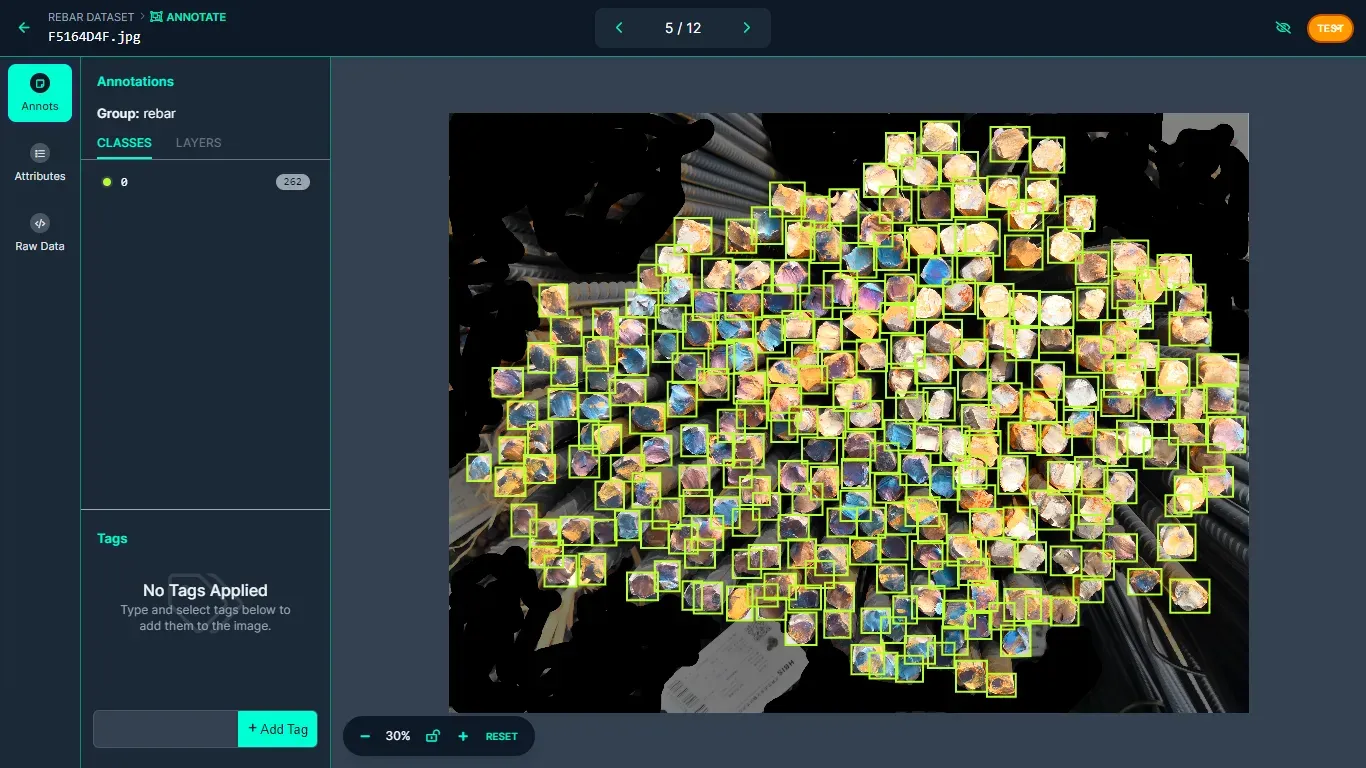
The trained model is able to accurately detect rebar using bounding boxes in the images which can be further utilized to build our application.
Building The Application
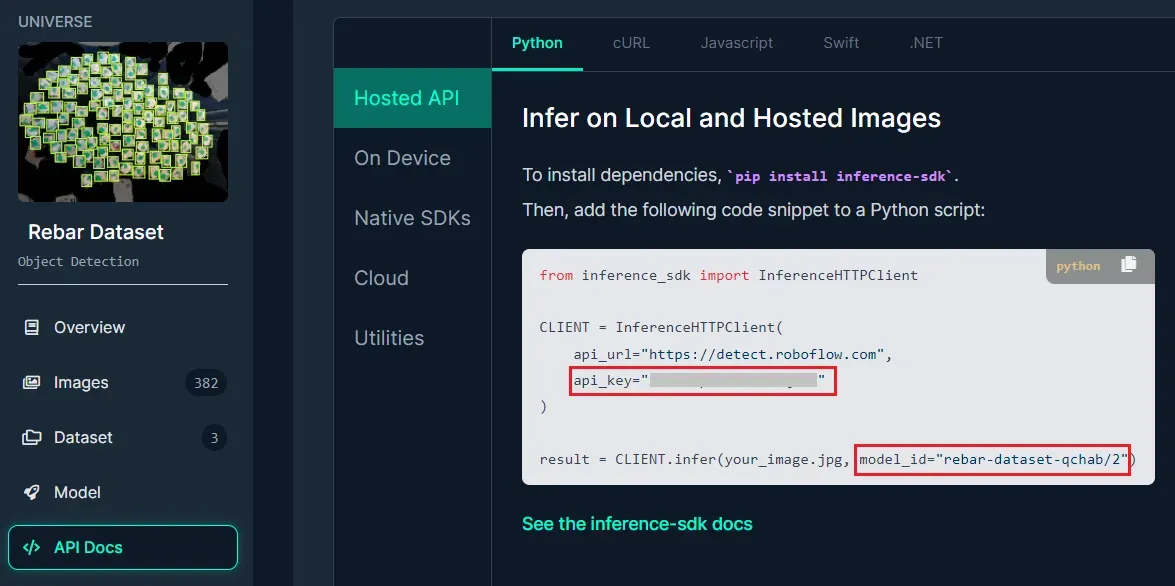
To build the application, we will use Roboflow hosted API in our PHP application. First, we need to obtain the required information such as Model ID and API key which can be done by accessing the API Docs link on the project page.
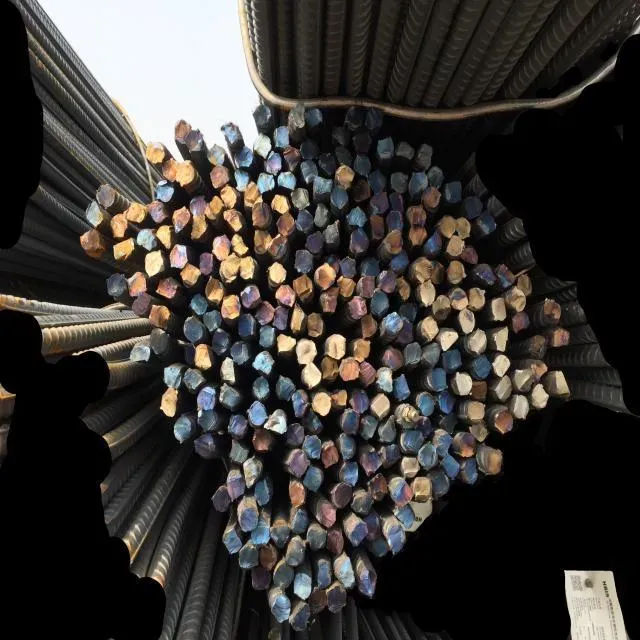
Following is the simple PHP code to test the model. We will use the image below to test the application.
Here is the code we can use to test the model:
<?php

// Base 64 Encode Image
$data = base64_encode(file_get_contents("rebar.jpg"));

$api_key = "API_Key"; // Set API Key
$model_endpoint = "rebar-dataset-qchab/2"; // Set model endpoint (Found in Dataset URL)

// URL for Http Request
$url = "https://detect.roboflow.com/" . $model_endpoint
. "?api_key=" . $api_key
. "&name=rebar.jpg";

// Setup + Send Http request
$options = array(
  'http' => array (
    'header' => "Content-type: application/x-www-form-urlencoded\r\n",
    'method'  => 'POST',
    'content' => $data
  ));

$context  = stream_context_create($options);
$result = file_get_contents($url, false, $context);
echo $result;
?>
Running the above code generates the following output.
{"time":0.05434697300006519,"image":{"width":640,"height":640},"predictions":[{"x":137.5,"y":284.0,"width":21.0,"height":28.0,"confidence":0.8618741035461426,"class":"0","class_id":0,"detection_id":"c146c502-0a99-41c8-b9c1-b62df14dc875"},{"x":248.0,"y":517.0,"width":22.0,"height":30.0,"confidence":0.8511471748352051,"class":"0","class_id":0,"detection_id":"838f948f-93a2-4551-a85e-db9942ad6b80"},{"x":182.5,"y":428.0,"width":21.0,"height":30.0,"confidence":0.8510258197784424,"class":"0","class_id":0,"detection_id":"c4dc9cf0-aec2-4f80-b9c7-ae4cb8fcb93d"},{"x":221.5,"y":498.5,"width":21.0,"height":29.0,"confidence":0.8491973876953125,"class":"0","class_id":0,"detection_id":"eb2fff69-dbf7-496b-b33d-8753bea8a4ae"},

...
The result is returned in JSON format, this information will be used in our PHP code to draw the bounding box on detected rebar instances and count the total number of rebars.
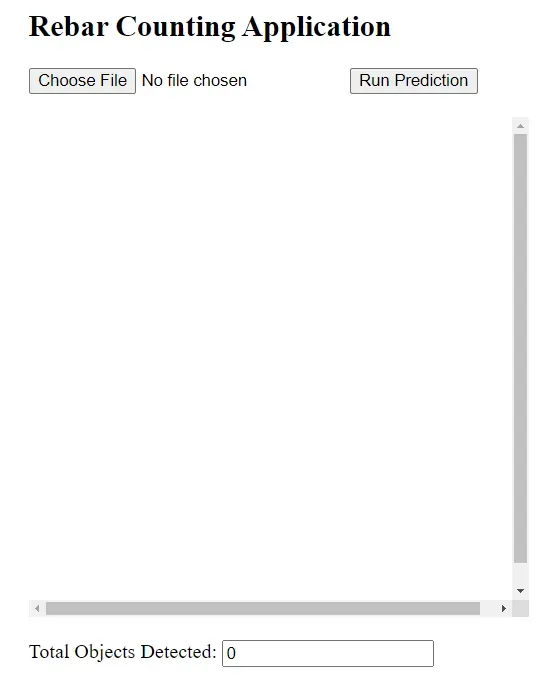
Building a User Interface
We will now build the following interface which will allow users to browse and upload the captured image and then run prediction to detect and count rebar in the image.
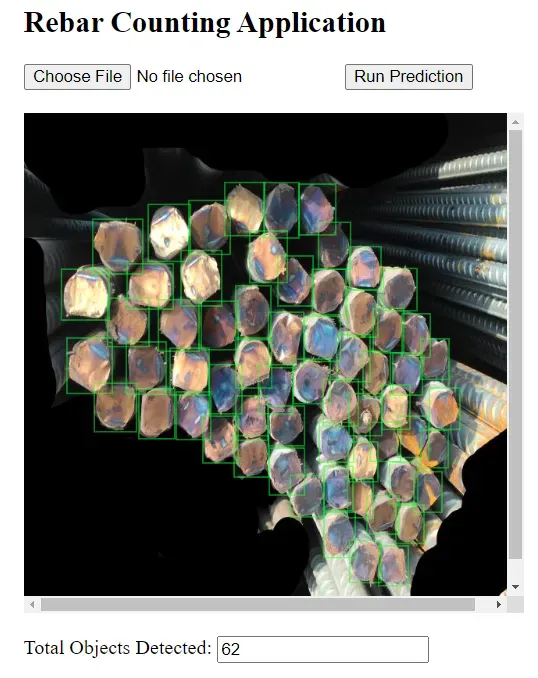
After selecting the image and clicking the "Run Prediction" button, the resulting output is displayed. As shown in the following image, the application draws a bounding box on each detected object and also displays the count of total objects detected.
Let’s now understand the code to build the application. The code is broken down into following parts:
- Form Submission Check
- Image Processing
- HTML Output
- Displaying Results
Form Submission Check: First, we specify a conditional statement to check if the form has been submitted via POST method and if an image file has been uploaded:
if ($_SERVER["REQUEST_METHOD"] == "POST" && isset($_FILES["image"])) {

 // Image processing code

} else {

  // Default response if no image is uploaded
}
This condition ensures that the subsequent code is executed only when the form is submitted with an image file.
Image Processing: Inside the if block, the code processes the uploaded image. Following is the code that processes the image.
$image_data = file_get_contents($_FILES["image"]["tmp_name"]);
    $base64_image = base64_encode($image_data);

    $api_key = "API_KEY"; // Set API Key
    $model_endpoint = "rebar-dataset-qchab/2"; // Set model endpoint (Found in Dataset URL)

    // URL for Http Request
    $url = "https://detect.roboflow.com/" . $model_endpoint . "?api_key=" . $api_key;

    // Setup + Send Http request
    $options = array(
        'http' => array(
            'header' => "Content-type: application/x-www-form-urlencoded\r\n",
            'method' => 'POST',
            'content' => $base64_image
        )
    );

    $context = stream_context_create($options);
    $result = file_get_contents($url, false, $context);

    // Decode JSON response
    $response = json_decode($result, true);
Initially, our code reads the content of the uploaded image file and converts it into a base64-encoded string. Following this, the code sets up essential parameters for accessing a machine learning model endpoint, including the API key and the model endpoint URL from Roboflow.
Our code constructs an HTTP request with necessary headers and content, encapsulating the base64-encoded image data. This request is then dispatched to the specified model endpoint using the POST method. Upon receiving a response from the model endpoint, typically containing information about detected objects within the image, the JSON response is decoded into an associative array for further processing within the application.
HTML Output: The HTML markup is used for displaying a form to upload an image and displaying the processed image in the HTML canvas.
    <h2>Rebar Counting Application</h2>
    <form action="" method="post" enctype="multipart/form-data">
        <input type="file" name="image" accept="image/*">
        <button type="submit">Run Prediction</button>
        <br/><br/>
    </form>

    <div id="canvas-container">
        <canvas id="canvas"></canvas>
    </div>
    <br/>
    <div>
        <label for="object-count">Total Objects Detected:</label>
        <input type="text" id="object-count" readonly value="<?= count($response["predictions"]) ?>">
    </div>
This HTML markup includes a form with an input field to upload an image and a submit button. It also includes a canvas element where the processed image with bounding boxes will be displayed. The text box in the user interface displays the count of objects detected. Additionally, JavaScript code for loading the image and drawing bounding boxes is included within the <script> tag in HTML.
Displaying Results: When the form is submitted with an image, JavaScript code dynamically loads the uploaded image onto the canvas and draws bounding boxes around detected objects:
 <script>
        var canvas = document.getElementById("canvas");
        var ctx = canvas.getContext("2d");

        // Load image if available
        <?php if ($_SERVER["REQUEST_METHOD"] == "POST" && isset($_FILES["image"])): ?>
            var img = new Image();
            img.onload = function() {
                canvas.width = img.width;
                canvas.height = img.height;
                ctx.drawImage(img, 0, 0);

                // Draw bounding boxes
                var predictions = <?= json_encode($response["predictions"]) ?>;
                var color = "rgb(103, 251, 25)"; // Red color for bounding boxes
                predictions.forEach(function(prediction) {
                    var x1 = prediction.x - prediction.width / 2;
                    var y1 = prediction.y - prediction.height / 2;
                    var x2 = prediction.x + prediction.width / 2;
                    var y2 = prediction.y + prediction.height / 2;

                    // Draw bounding box
                    ctx.beginPath();
                    ctx.rect(x1, y1, x2 - x1, y2 - y1);
                    ctx.strokeStyle = color;
                    ctx.stroke();
                });

                // Update object count
                document.getElementById("object-count").value = predictions.length;
            };
            img.src = "data:image/jpeg;base64,<?= $base64_image ?>";
        <?php endif; ?>
    </script>
This JavaScript code is executed only when the form is submitted with an image. It loads the image onto the canvas and draws bounding boxes around detected objects, based on the response received from the model endpoint. You can refer to this guide to understand how to draw bounding boxes from the inference API JSON output.
Below is the complete code for this blog post. Save this code in a .php file and execute it under a web server environment.
<?php

if ($_SERVER["REQUEST_METHOD"] == "POST" && isset($_FILES["image"])) {
    // Base 64 Encode Image
    $image_data = file_get_contents($_FILES["image"]["tmp_name"]);
    $base64_image = base64_encode($image_data);

    $api_key = "API_KEY"; // Set API Key
    $model_endpoint = "rebar-dataset-qchab/2"; // Set model endpoint (Found in Dataset URL)

    // URL for Http Request
    $url = "https://detect.roboflow.com/" . $model_endpoint . "?api_key=" . $api_key;

    // Setup + Send Http request
    $options = array(
        'http' => array(
            'header' => "Content-type: application/x-www-form-urlencoded\r\n",
            'method' => 'POST',
            'content' => $base64_image
        )
    );

    $context = stream_context_create($options);
    $result = file_get_contents($url, false, $context);

    // Decode JSON response
    $response = json_decode($result, true);
} else {
    $response = array("predictions" => []);
}

// Create canvas size
$canvas_width = 400; // Specify canvas width
$canvas_height = 400; // Specify canvas height

// Start HTML output
?>
<!DOCTYPE html>
<html>
<head>
    <title>Image with Bounding Boxes</title>
    <style>
        #canvas-container {
            width: <?= $canvas_width ?>px;
            height: <?= $canvas_height ?>px;
            overflow: auto;
        }
        #canvas {
            width: <?= $canvas_width ?>px;
            height: <?= $canvas_height ?>px;
        }
    </style>
</head>
<body style="padding-left: 50px;">
    <h2>Rebar Counting Application</h2>
    <form action="" method="post" enctype="multipart/form-data">
        <input type="file" name="image" accept="image/*">
        <button type="submit">Run Prediction</button>
        <br/><br/>
    </form>

    <div id="canvas-container">
        <canvas id="canvas"></canvas>
    </div>
    <br/>
    <div>
        <label for="object-count">Total Objects Detected:</label>
        <input type="text" id="object-count" readonly value="<?= count($response["predictions"]) ?>">
    </div>
    <script>
        var canvas = document.getElementById("canvas");
        var ctx = canvas.getContext("2d");

        // Load image if available
        <?php if ($_SERVER["REQUEST_METHOD"] == "POST" && isset($_FILES["image"])): ?>
            var img = new Image();
            img.onload = function() {
                canvas.width = img.width;
                canvas.height = img.height;
                ctx.drawImage(img, 0, 0);

                // Draw bounding boxes
                var predictions = <?= json_encode($response["predictions"]) ?>;
                var color = "rgb(103, 251, 25)"; // Red color for bounding boxes
                predictions.forEach(function(prediction) {
                    var x1 = prediction.x - prediction.width / 2;
                    var y1 = prediction.y - prediction.height / 2;
                    var x2 = prediction.x + prediction.width / 2;
                    var y2 = prediction.y + prediction.height / 2;

                    // Draw bounding box
                    ctx.beginPath();
                    ctx.rect(x1, y1, x2 - x1, y2 - y1);
                    ctx.strokeStyle = color;
                    ctx.stroke();
                });

                // Update object count
                document.getElementById("object-count").value = predictions.length;
            };
            img.src = "data:image/jpeg;base64,<?= $base64_image ?>";
        <?php endif; ?>
    </script>
</body>
</html>
Conclusion
This blog post showcases the utilization of the Rebar Counting API from the Roboflow universe to construct a rebar detection and counting application using a combination of Roboflow hosted API and PHP code.
The application effectively identifies and detects the rebar instances, displaying the total count. To extend its functionality, one could enhance the application by integrating a database to store the batch number of rebar batch along with their respective counts permanently. This stored data could then be utilized in various ways to enhance the application's utility and analytical capabilities.