
I used Roboflow to help solve a public health problem. That's right, I'm referring to dog owners that don't pick up after their dogs do their business.
I live across the street from the elementary school my kids go to. In front of that elementary school is a large yard. I live in a town with a lot of dogs, and that yard is used by many of the dog owners here, myself included. Where as I always pick up after my dog, a lot of owners don't. As a result, kids run the risk of stepping in dog dropping so the way to school.
As odd of a problem as this is, I've often thought about how to solve it. I thought maybe I could put a vision system on my lawn and turn on the sprinklers every time a dog came into the camera. But this didn't seem right. I'm a dog owner. I have absolutely no issues with other dogs or what they do as long as the owners clean up. Next I started to think about how to detect when an owner didn't pick up. But it seemed like a very complex problem.
Note that in this document, I'll use "dropping" to refer to the action the dog is taking… the other words didn't seem as appropriate for a blog post!
Here is a preview of the results:
Design
Building a program to detect whether or not an owner picks up after their dogs requires detecting a complex series of objects and events:
- Detection of a dog
- Detection of a person
- Detecting when the dog is in the "dropping" position
- Timing how long the dog is in the "dropping" position
- Detection of if/when the human is bent over picking up the dropping in the same area for some time afterwards
- Saving a video file based on whether or not the person picked up the dog dropping
At this point, I've been using Roboflow for all of two weeks. I'm still learning the platform, which makes this even more challenging. In fact, I'm relatively new to computer vision in general. But the complexity of this problem made it one that I really wanted to tackle.
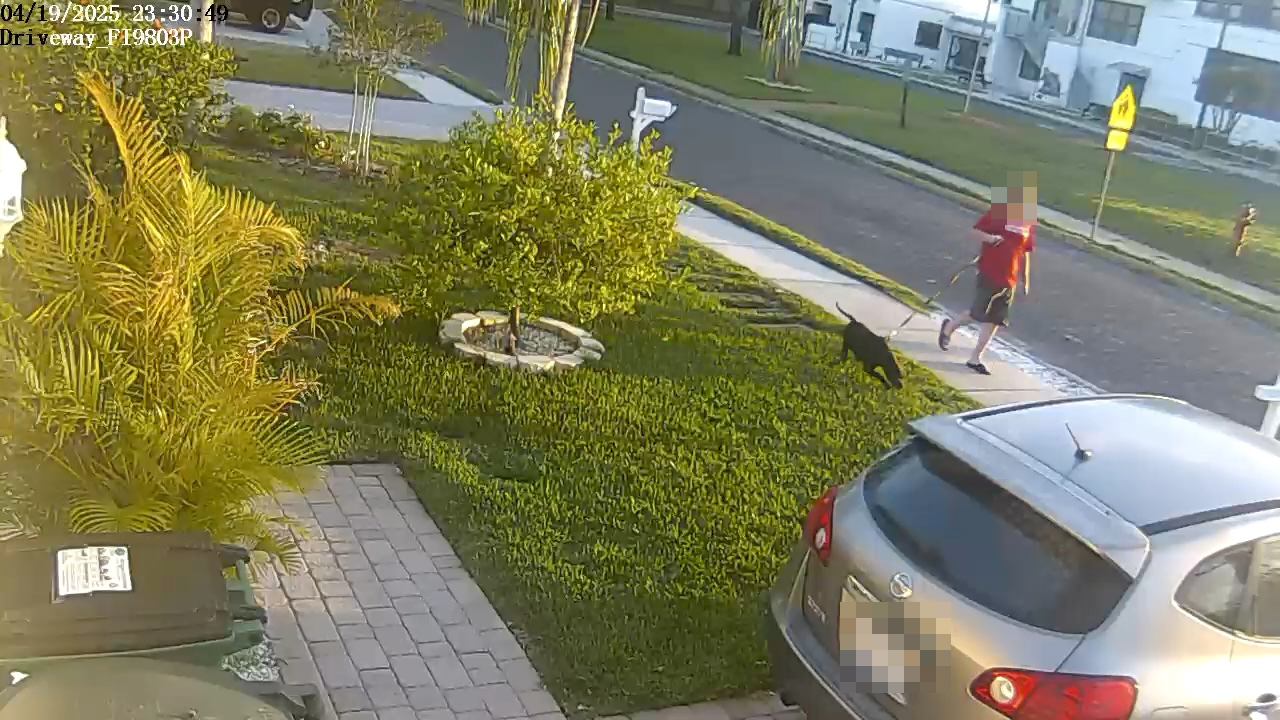
Because I have a security camera aimed at my front yard, I decided to use this for testing and have it represent the yard at the school (which is actually visible on my camera, but a bit too far away). This made acquiring test data quick and easy, which is generally the first hurdle to overcome in a CV project.
Keypoint Detection
Roboflow has various types of models: object detection, segmentation, and more.
I had to develop a model that could both identify a dog and a person as well as their position. I believed there were two ways to do this:
Develop and object detection model that could distinguish between a "dropping" and "non-dropping" dog position, as well as a standing and bent-over human.
Develop a keypoint detection model - a model that identifies both the object and points of interest on the object. I could use the points of interest on the model to identify the position by comparing geometry (angles or ratios).
The benefit of #1 is that it's an ML approach that doesn't require explicitly defining any states. The benefit of #2 is that is likely requires fewer images (although I can't be sure of this without testing) and I'd be able to tweak the geometry determination as needed.
Ultimately, I went with a keypoint detection model as it gave me some flexibility and appeared to be a faster solution.
Amazingly, Roboflow has an extremely accurate keypoint detection model available that can detect a person's position right out of the box. But due to the poor quality of the image on my camera, I couldn't get the model to work as reliably as I would like in all cases. So I decided to build my own.
Hardware
I use inexpensive security cameras all over my house. For my front yard, I have an older model Foscam FI9803P camera. This camera is 720p - much lower resolution than newer cameras. But since I'm trying to build an application capable of monitoring a large yard, I figured the lower resolution was worth the challenge. In addition to this, it's one of my favorites. The camera is a beast. It has a metal housing and has survived several large hurricanes.
Images and Tagging
Because I already had a security camera with motion detection, it was extremely easy for me to gather a large number of images of both people and dogs in my yard.
In addition to this, my own dog Max (a mini straight haired Goldendoodle) was happy to stand in as a model.

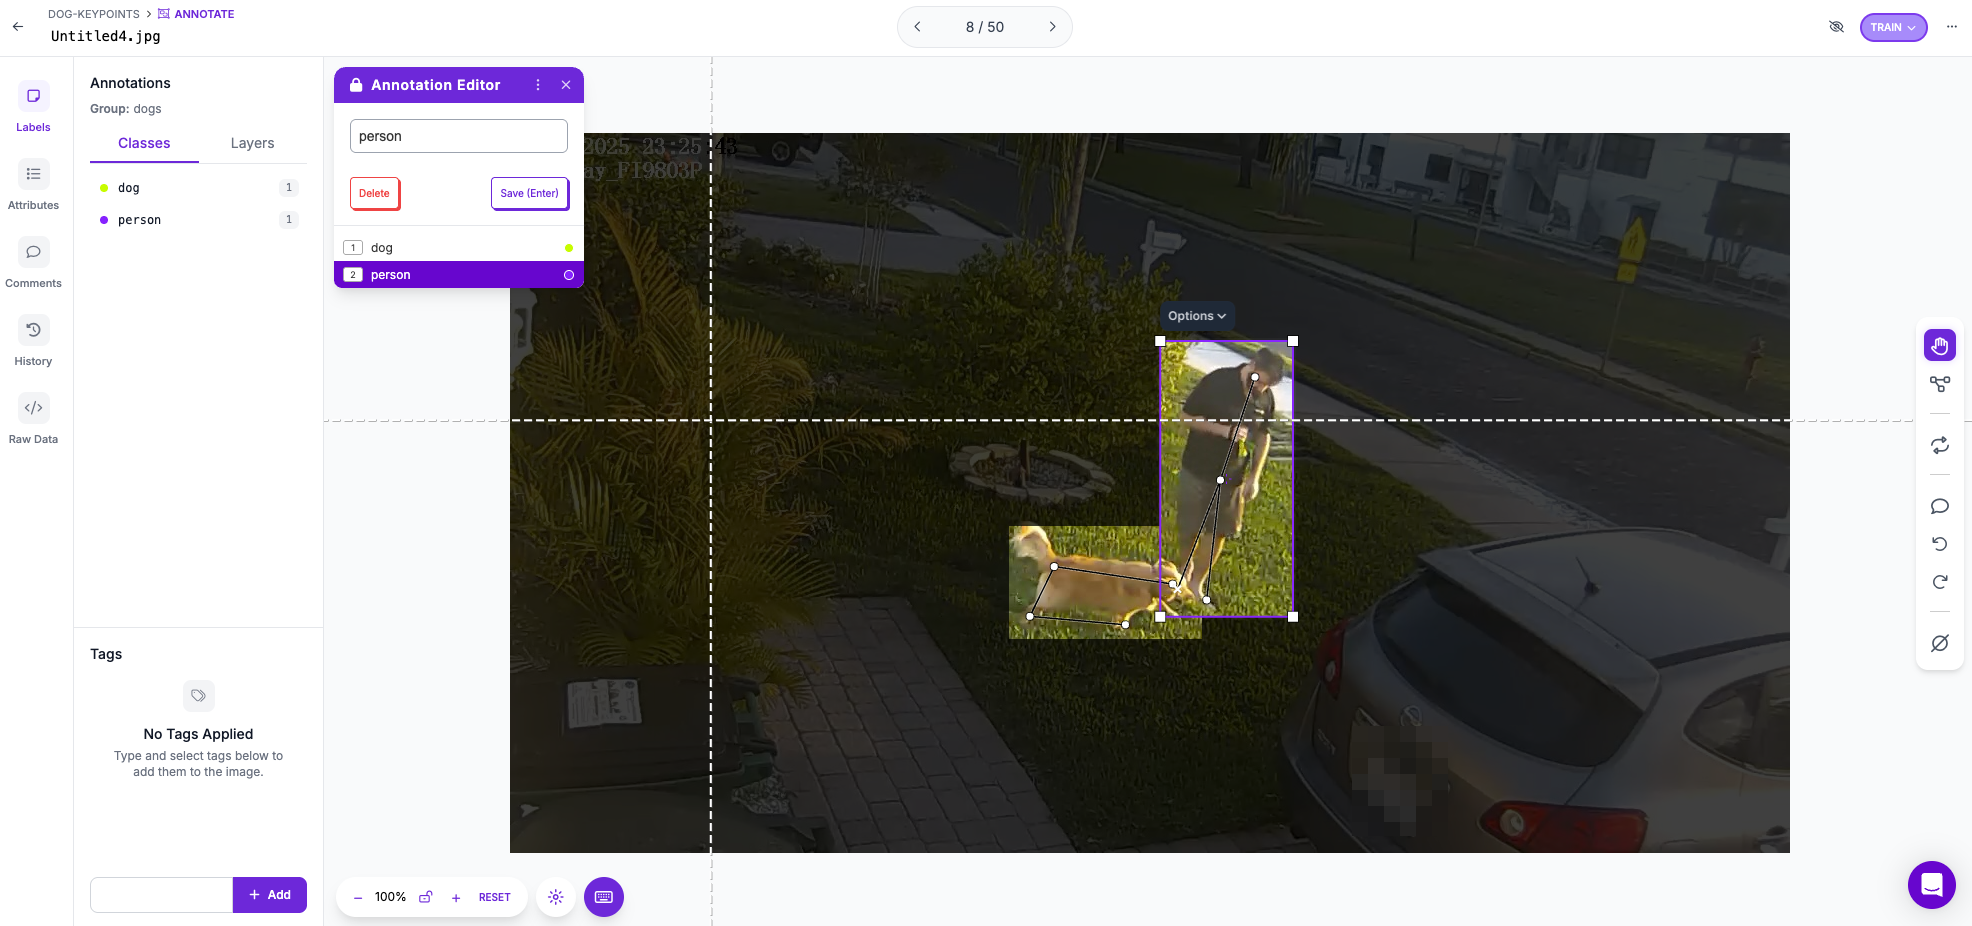
Tagging up a keypoint detection model in Roboflow is simple. Once the image is uploaded, a bounding box is drawn around the picture (similar to object detection) and the keypoints, identified by the user, are then selected in the image.
Because of the small and blurry images, I minimized the number of keypoints to what I believed I needed to determine position:
- Human: head, waist, feet
- Dog: front legs, hind legs, rear, tail
The reason for the dog keypoints was a number of studies I did on my dog Max while he was "dropping." I won't post the image here, but I found that dogs reliably move their legs together while in the act. The ratio of the leg distance as compared to the head-rear distance appeared to be a good indicator.
As for the human, I used the ratio of the y distance from the head to the waste over the ratio of the length from one foot to the waste. The reason I used this and not the angle was so that I could detect a person bent over regardless of orientation to the camera.
Model Building
Early models, consisting of around 100 tagged images, performed extremely well for object detection accuracy. False positives for drawing bounding boxes on people and dogs was rare.
Person keypoint detection also worked well. Detecting keypoints on people is relatively easy. Despite our differences, most of us are the same basic structure - legs, hands, waist, head. And the existing Roboflow base models have already been developed into versions for detecting person keypoints.
For the dog keypoint model, however, this wasn't the case. If the dog was in a profile position with all legs visible, the model worked well. But in cases where the dog was directly facing the camera, completely turned around from that, or too small and blurry, the models did not perform well at all. The keypoints tended to be extremely inaccurate.
Synthetic Data
In order to fix the problem, I had to develop "synthetic images." I found pictures of dogs on the internet, pasted them into an image of my yard, and added those images to my dataset.
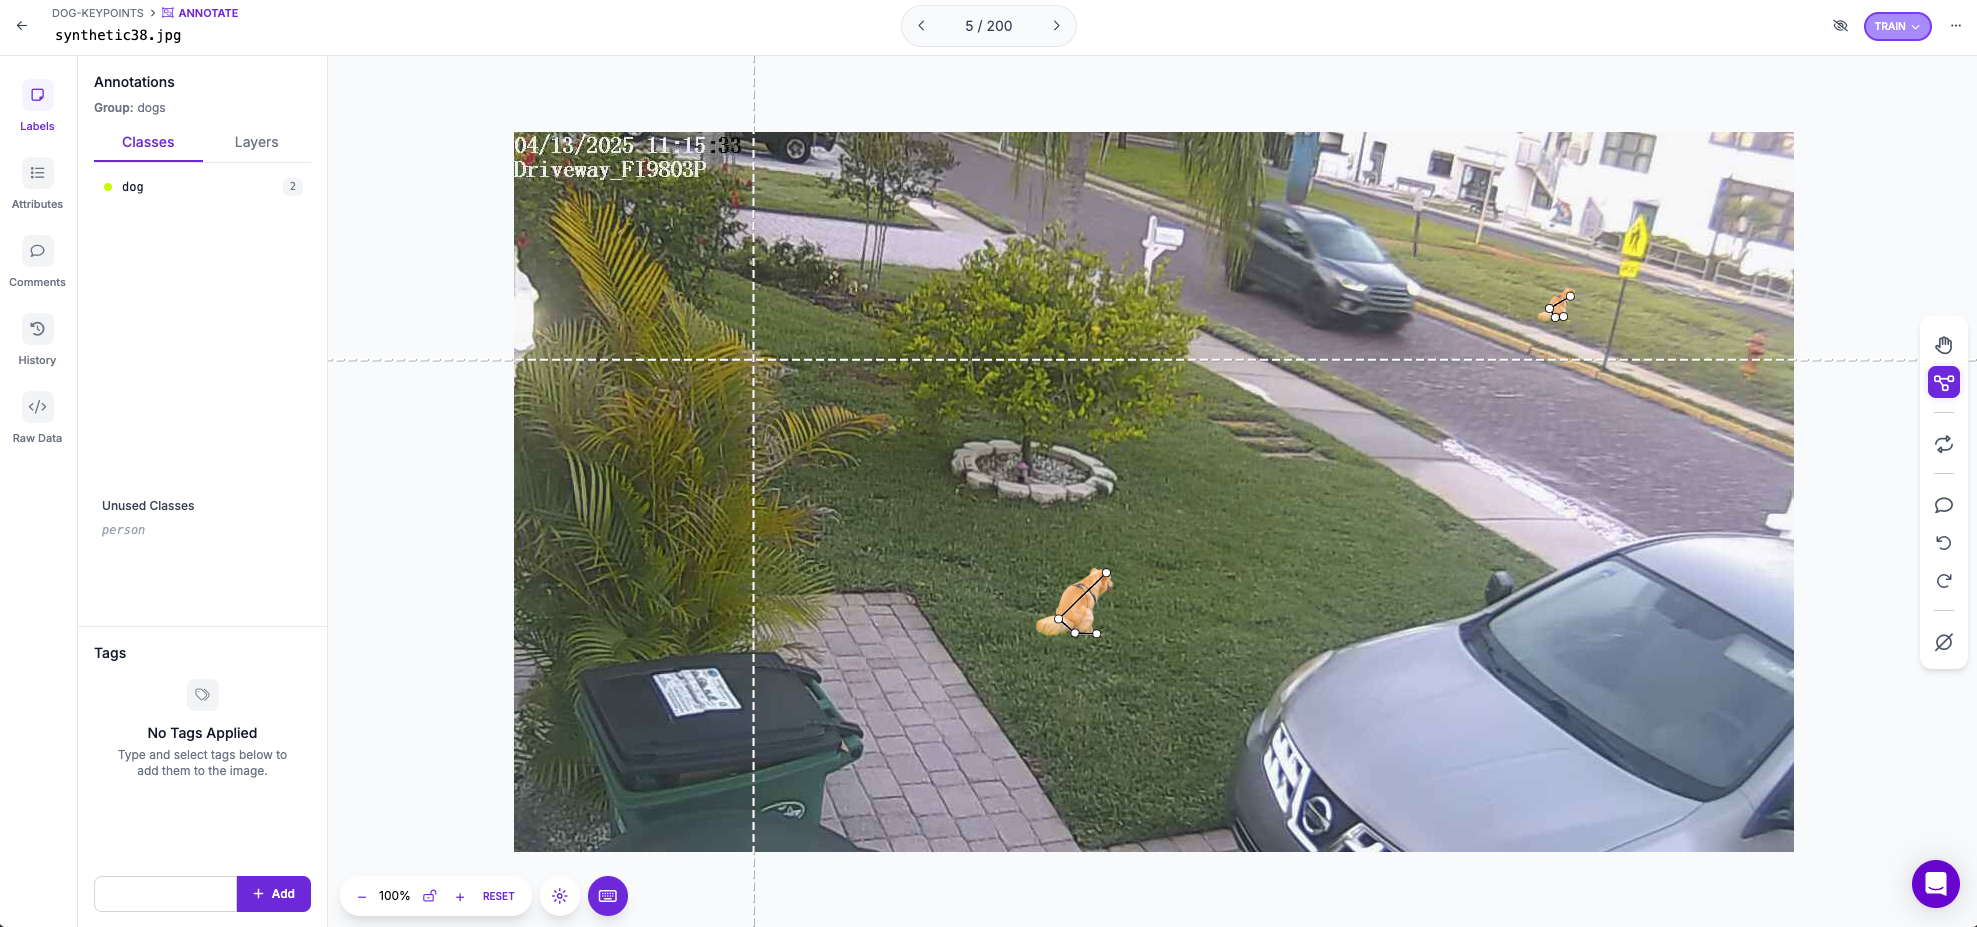
Adding around 50 of these synthetic images to my training mostly solved the problem of the inaccurate keypoints for about 3 out of 4 images.
Finding the Right Balance
The synthetic data was a huge breakthrough for me, and drastically improved the ability of the model to find the correct keypoints in different orientations.
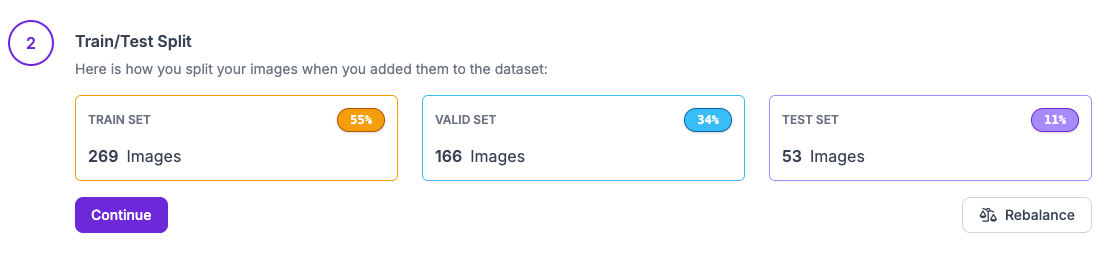
Ultimately I ended up with close to 500 labeled images with 565 people and 271 dogs. About 100 or so of the dogs were synthetic.
Because of the class imbalance (twice as many people as dogs) choosing the correct train/test split was critical. I ended up increasing the size of the valid set to make sure it had more dogs, which also made a significant improvement to my model.
Results
Getting the model more accurate than correctly identifying keypoints on 3 out of 4 dogs was prohibitively difficult due to the nature of a dog. Dog breeds have a great deal of variation: size, color, head shape, tail, legs, etc. Training a keypoint model to pick out so many variations of "dog head," for instance, was a challenge. Additionally, regardless of position, dogs tend to hide their legs depending on sitting position, and those were critical keypoints for me.
In addition to continually adding images, I tried multiple model types, sizes, preprocessing and augmentation for the dataset to improve recall and accuracy. Roboflow provides a simple way to upload an image to a model and evaluate it, so I kept a number of difficult test images on hand.
Ultimately, for this model, I chose Roboflow's medium model and standard size preprocessing and no augmentations as it appeared to give me the best results.
I did, however, try lots of other combinations of model types and augmentations. Augmentations have worked extremely well for me with other models, but with this one I believe my dataset already had enough variation in it (different types of dogs, times of day, orientations, etc) to not require introducing anything else. Plus, because many of the dog features were so small and blurry, the augmentations could actually make the model worse.
Face/Head Blur
Since my plan was to save all videos of offending dog owners, I wanted to blur faces for privacy. I wasn't planning on sending any videos to the authorities, I only wanted to prove that this could be done. And generally I recognize the dogs in the neighborhood anyway.
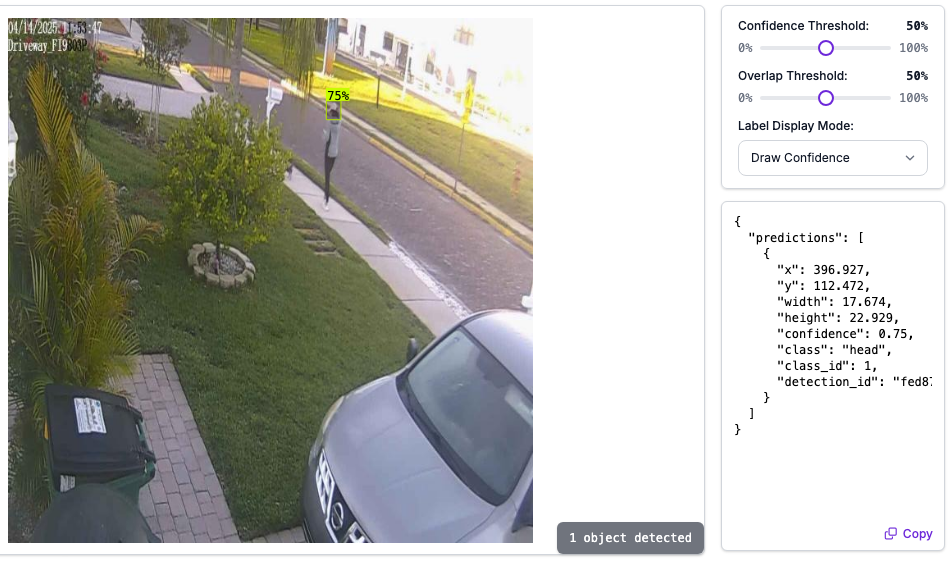
In order to effectively auto-blur faces and heads, I needed a model to detect heads in my camera images.
The first thing I did was to try and find a face or head detection model on Roboflow's Universe that fit my needs. After not having much luck due to the small and blurry nature of the heads on the camera, I decided to build my own using my existing training set.
Auto-Tagging
This was a remarkably quick and simple exercise. First, I uploaded all of my images to a new project. Then using auto-tagging, I asked Roboflow to tag up all of the "human heads" in the images (this sounds a little gory, but that turned out to be the best prompt). Once the images were auto-tagged, I went through them. Auto-tagging will not get every image, and will find some false positives. But it can easily cut down 80% of the work for tagging simple things. After some minor tweaking, I very quickly had a dataset for a new model.
RF-DETR
I would have loved to use Roboflow's newest RF-DETR model for keypoint detection, but it wasn't yet available.
It was, however, available, for object detection and I jumped at the chance to use it for the head/face blurring.
RF-DETR trained rapidly, and the first version was extremely accurate - both precision and recall were over 90% on the first try! During testing, the only times it couldn't identify a face or head was when it was too blurry to need blurring anyway. This is likely the model I'll be using for object detection moving forward.
Results
Thanks to auto-tagging, and the first version of the model working so well, the entire amount of work I put in to a head detection model couldn't have been more than 45 minutes. It really was that fast.
The ability to blur out people and faces is a common need for many use cases, and Roboflow nailed it.
The Workflow
Developing a model (or models) is only half the battle. The best way to apply a model to an application is by combining it with a workflow.
Workflows process individual frames that are fed to them either through loading an image, video, or from a stream (ex. RSTP). Also, while they're triggered by and process individual frames, many of the workflow blocks have temporal analytics capability. Workflow blocks, for instance, can apply a byte tracker to follow objects across various frames, and then determine the speed and velocity of those tracked objects.
Workflows can also contain custom blocks developed with Python code right in the browser!
For my workflow, I needed the following:
- Face blurring on my image
- Keypoint visualizations to get model feedback
- Tracking of objects across multiple frames
- Calculations of ratios to determine position
- Timing of various positions
- Determination if the person picked up the dropping within the time
- Blurring, keypoint visualization, and tracking of objects across multiple frames (using an algorithm called "byte tracker" are all available as workflow blocks).
The more application specific tasks - calculating the ratios, and timing, had to be custom blocks.
The first problem I ran into was the one out of four or so frames on the dogs that had inaccurate keypoint detection. In order to get around this I used a "vote"
I took a moving window of 4 or 5 frames. Because I knew that 3 out of 4 frames were likely to have accurate keypoints, I used the contents of the moving window to vote on the position the dog was in based on the ratio of leg distance to head-rear distance. This worked extremely well, and led to a very accurate dog position evaluation.
In addition to this, I added two more signals to use for determining what the dog was doing:
I set a required time for the dog to be in the dropping position for. This didn't have to be long, just a few seconds.
I checked the smoothed movement speed of the dog. This way I could open up the tolerances on the other factors, and increase the reliability of my detection by only considering a dog dropping while the dog isn't moving very fast.
These factors combined let to a great dropping vs. not dropping detection.
As far as the person detection, I was only interested in two states - the person bent over or not. I figured if the person was bent over we could consider that picking something up. Keypoint detection for people is much easier, and this detection worked reliably from the start and needed no other signals.
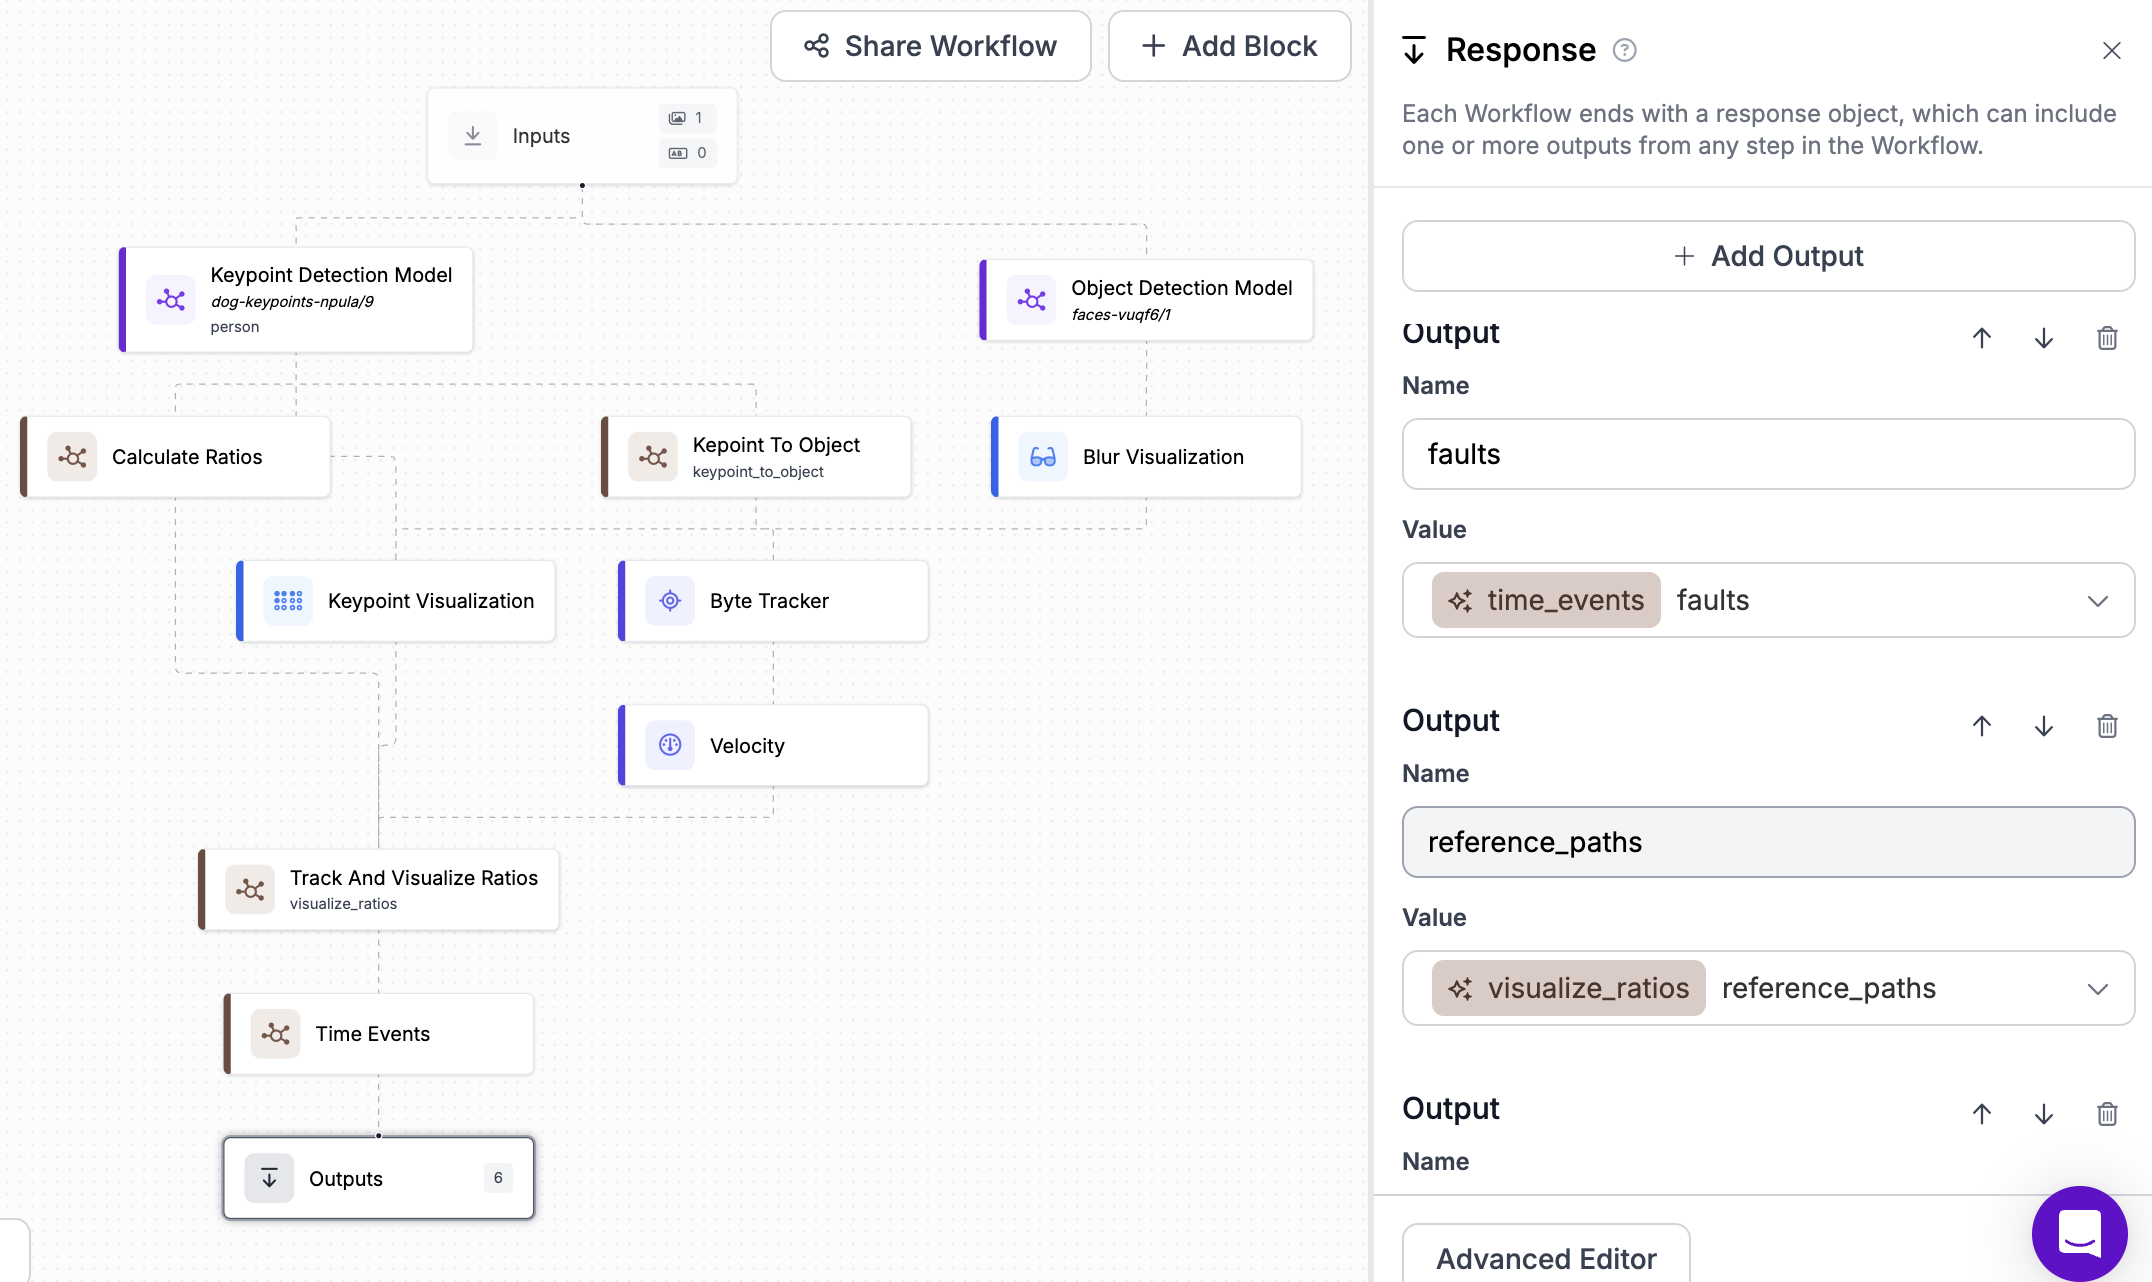
In order to evaluate keypoints reliably, and also blur faces, faces were blurred post keypoint detection. The final workflow looks like this:
The blocks within the workflow are:
- Input: this represents each frame, as well as associated metadata
- Keypoint Detection Model (standard block): this is the keypoint model I built
- Object Detection Model (standard block): this is the model I built to blur faces
- Calculate Ratios (custom block): Python I wrote to find the keypoint ratios
- Keypoint To Object (custom block): Byte tracker wasn't accepting a keypoint model, so I created this to trick it into using one. As of writing this post, however, I've already made a change to inference that fixes this.
- Byte Tracker (standard block): Adds ids to detected objects to track them across frames
- Velocity (standard block): Calculates the speed and velocity of tracked objects
- Track and Visualize Ratios (custom block): tracks changes in ratios of objects as they move to detect position, and also adds the ratios to the image
- Time Events (custom block): adds the timing for how long the dog was in a position for, and if the person bent down over any generated dropping bounding box
In my custom Python code, once the dog dropping position has been detected, I draw a red bounding box. From that point on, the bounding box remains until the dog exits the dropping position. And if the dog moves during this time, the bounding box size increases to include the movement.
Once the dog exits the dropping position, a countdown timer begins. If at any point any person is detected in a bent down position while overlapping the bounding box, it changes to green and we consider it a dropping pickup. If the timer expires, we consider this a violation. The intention is for all violations to result in output video.
Deployment
SInce most of the logic is in the workflow, deployment is the easiest step. Workflows have a "deploy" button that provides boilerplate Python code, that already includes the values to load and run the appropriate workflow.
In this case, since we're running the workflow on a video, we need to use InferencePipeline.
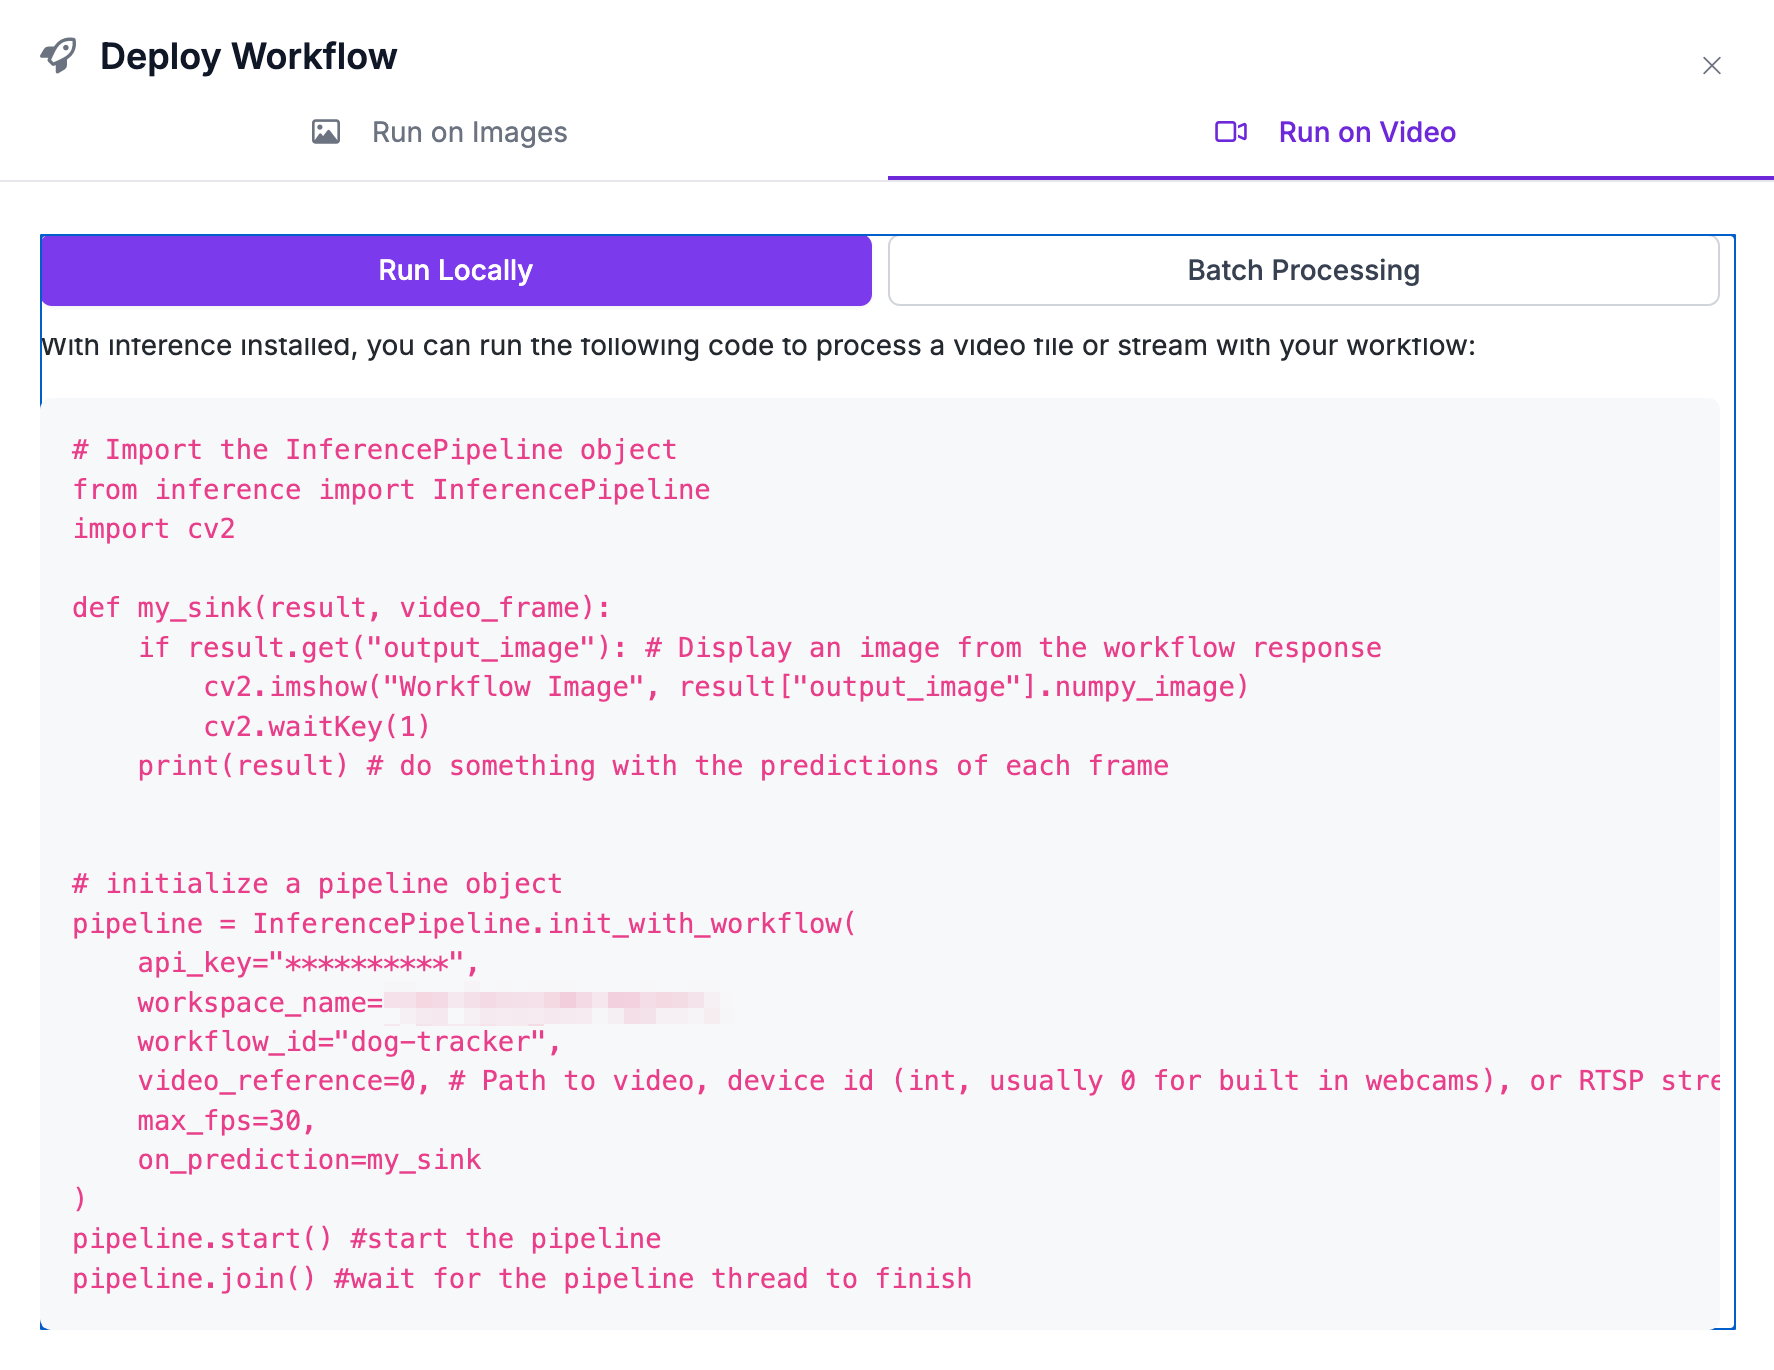
The init_with_workflow function of InferencePipeline has a number of parameters to define the workflow and input stream. The video_reference parameter can be a video file or a stream, such as the RSTP stream from my security camera.
In my case, I used the file input for development and RSTP stream for deployment and testing. Switching between the two was as simple as changing that parameter.
In addition to this, in order to save bandwidth, I can always set up my camera to drop an FTP file on detected motion, and then use a library like Python's Watchdog to run InferencePipeline on new files. Inference is extremely flexible.
One of the parameters in "my_sink" in the boilerplate code above is result. The result is a dictionary that contains all of the workflow outputs.
In my case, one of the workflow outputs contained the start and end times of the detected faults. The final annotated image was in the output as "image." And the raw data, in the form of a numpy array, is accessable via result["image"].numpy_image.
Once we know that a fault happens, we can start appending the numpy images in the output into a list or circular buffer if we want to limit the length. The resulting list can be used with opencv to save the result into a video.
Inference Pipeline
For this project, almost all of the logic was contained within the workflow. The workflow results were used to determine whenever the owner was in fault.
The workflow runs on every frame, so in order to save faults to a video, I simply saved the images during a fault into a list and used OpenCV to write the list of frames to a video file once the fault cleared.
A couple of considerations I included that I found were helpful were to:
Create a circular buffer for a few seconds of video using deque. When the system went into fault, the array was initialized with the contents of the circular buffer.
Once the list of frames is created, I sent it to another thread to save the actual file. I didn't want the file writing to back up the inference handler.
In addition to this, developing a long-running service with inference pipeline means memory leaks need to be considered. For instance, I have a global dictionary in my workflow that's keyed by detection id. Those detection ids need to be removed when they're no longer in use, or unactive for some period of time.
Results
Baseline
The first case to test was the case was the baseline - where a dog was just walking by and didn't sit or drop. This case is fairly easy as the view the camera has of the dog is a profile view and all legs are visible.
Amazingly, this tended to work well even with very tiny dogs at a distance, although the probability of false positives in this case was much higher. While I'm not convinced the detection would be reliable at that point, the results were encouraging enough for me to believe it might be possible with a little more model development.
Generally people don't leave dog droppings in my lawn. It does happen, but it's rare. The frequent ones left at the school were the primary reason I developed this.
For testing, since I can't get my dog to poop on demand, I had to loosen up the "dropping" definition for the dog and make it so that sitting counted. This was the easiest way to test the workflow. But, the distinction between dropping and walking is much better than the distinction between sitting and walking, so this does increase the probability of false positives.
Detection Result
In the test below, I asked my dog to sit for several seconds. The box red box formed, indicating that the dog was dropping. Almost immediately I bent down into the box and it changed to green, indicating I'm a responsible dog owner.
It's difficult to see the bent over state in the video as it only shows up on a single frame, but the code recognizes my position as bent over in order to pick something up.
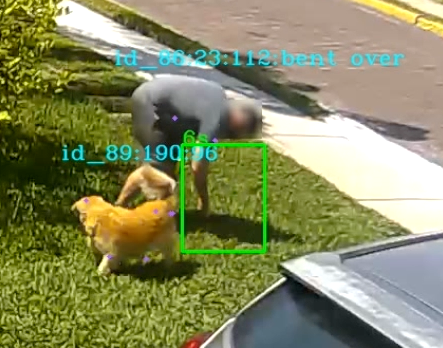
You'll also notice some tracking information next to each subject. The workflow code is written to track multiple dogs and people, and every dog and person gets an id, courtesy of byte tracker (ex. id_89 for Max above). Byte tracker is generally pretty good, and improves with higher framerates, but it can sometimes lose track of the dog depending on it's movements. But since the dog is generally still during the dropping, the low framerates I keep my security cameras on appear to work well.
The other numbers are ratios and speeds for my reference, as well as an indication if the dog is dropping or if the person is bending down. The dots on the images represent the keypoints.
In the next example, I ask my dog to sit and then walk away. In this case the box remains red, and this is considered a fault.
I also decided to stress test this a bit and move further away (next to the yard I referred to in the beginning of this post). This worked pretty well during most tests. Occasionally I did get some false positives, but the dog is so small and blurry at this point that a human might have trouble discerning it's position. A higher quality image would help a lot, and I could try increasing the bit rate of the RSTP stream, as would adjusting the ratios for actual dropping and not sitting. In either case, given the nature of the application, some false positives are tolerable.
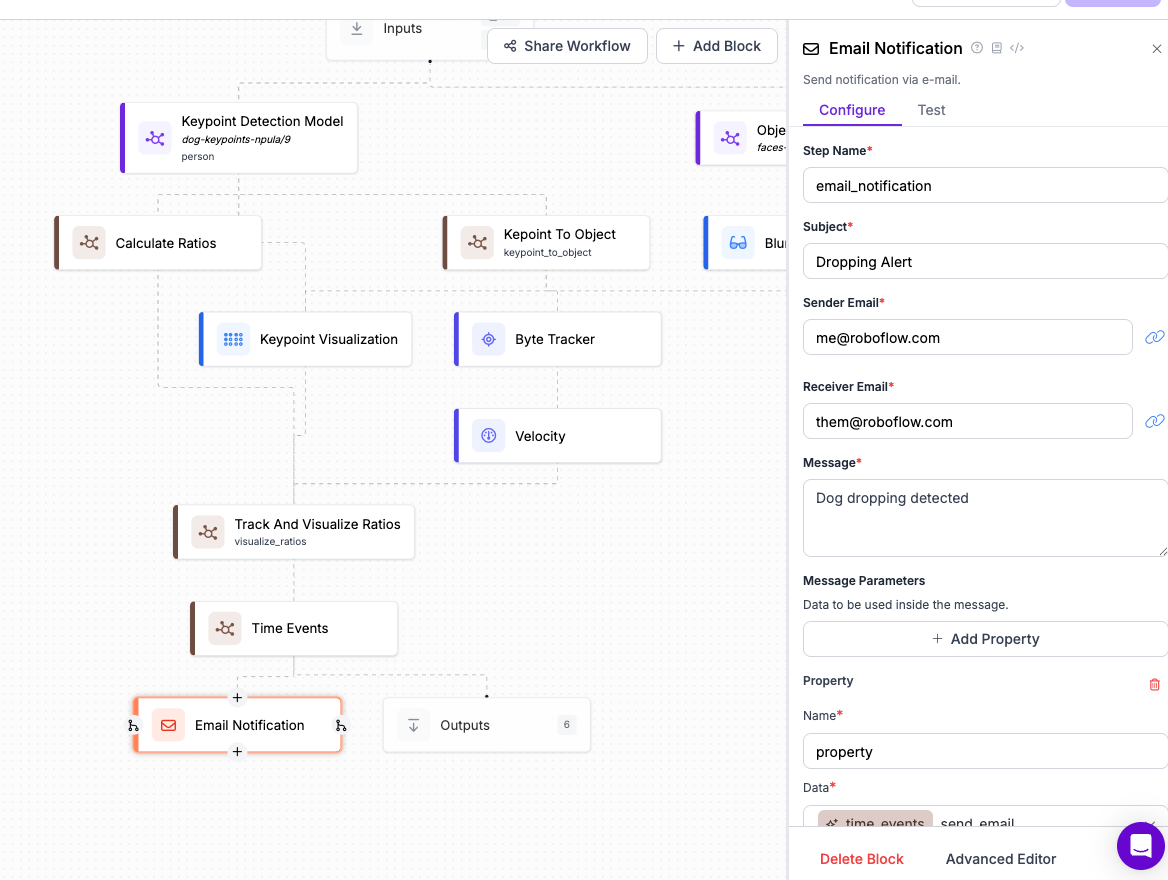
Sending Alerts
My plan for this application was always to save the videos of the offenders. But if someone wants to wire the alert into an e-mail or SMS notification, this capability already exists in workflows.
I'm still considering having it turn on my sprinkler if this is ever detected!
Conclusion
I spent about four days part-time working on this, with elementary knowledge of both CV and Roboflow. The fact that I could put this together in such a short period of time is a testament to Roboflow's ease of use and capability.
In the future, while keypoint detection works very well with people, it was still a challenge with dogs, and I'd love to try and build an object detection model for dogs in various positions to compare the two approaches.
It's very possible local governments would be interested in an application like this to monitor public spaces of this problem. But many of the techniques used here aren't limited to a responsible dog owner app.
For instance:
- Litter detection could use the very reliable human keypoint model combined with watching for littering. The pattern of events would be similar.
- Dog keypoint detection could be used to monitor dog behavior in kennels.
- Face blurring has many applications. For instance, applications to monitor workplace safety violation or elderly care facilities would likely be subject to privacy concerns in many countries. The object detection model I've built here shows how quickly and easily this can be applied.
Cite this Post
Use the following entry to cite this post in your research:
Louis Loizides. (Apr 25, 2025). Making Sure Dog Owners Keep Streets Clean with AI. Roboflow Blog: https://blog.roboflow.com/clean-streets/