
Blurring the region inside a detection bounding box is a practical privacy technique for cases where a computer vision model captures sensitive content alongside its target. This tutorial shows how to use OpenCV's cv2.GaussianBlur to extract the region of interest from prediction coordinates and replace it with a blur, demonstrated with a parking enforcement scenario where pedestrian faces need to be obscured before saving an image.
Consider a scenario where you are building a model to detect cars on a street. If a car is parked on a street designated with no parking, you want to take a photo so that you can track the license plate of the car.
But, taking a photo would include all of the pedestrians in the background. In this case, you could identify both cars and faces. When your model finds a car, a photo can be saved of the car and all faces can be blurred in the background. This transformation will ensure that no personal information – the faces of people on the street – is saved alongside the photo.
To accomplish this, you can blur the contents of the bounding box that you draw around a prediction returned by a computer vision model.
In this guide, we’re going to talk about how to blur a bounding box in Python. We’ll use an example of a model that predicts cars and pedestrians. When a pedestrian is identified in a photo, their body will be blurred.
Here will be the final results from running our code:

How to Blur a Bounding Box in Python
To blur all of the people in our image, we need to draw a bounding box and then blur its contents. To draw a bounding box, you need the coordinates of every corner of the bounding box. Then, you can draw the box and fill it in with a blur effect. We’ll use the cv2 library to draw the bounding box and blur its contents.
We want to blur all of the people in this image:

We’ll need the coordinates of each corner of the area that we want to blur. We can retrieve this using the following code:
import cv2

predictions = {"predictions": [...]}

for prediction in predictions[“predictions”]:
    blur_x = int(prediction['x'] - prediction['width'] / 2)
    blur_y = int(prediction['y'] - prediction['height'] / 2)
    blur_width = int(prediction['width'])
    blur_height = int(prediction['height'])

    roi = img[blur_y:blur_y+blur_height, blur_x:blur_x+blur_width]
    blur_image = cv2.GaussianBlur(roi,(51,51),0)

    img[blur_y:blur_y+blur_height, blur_x:blur_x+blur_width] = blur_image

    cv2.imwrite("example_with_blur.jpg", image)
In the code above, we first calculate the x and y coordinates of each bounding box, and make sure that the height and width of our predictions are integers. We then calculate a “Region of Interest” (ROI), which is the area that we want to blur. Next, we draw a Gaussian blur box.
Finally, our code replaces the region on our image that we want to blur with our Gaussian blur box. We then save the revised image to a file called “example_with_blur.jpg”.
Let’s run our code and see what happens:
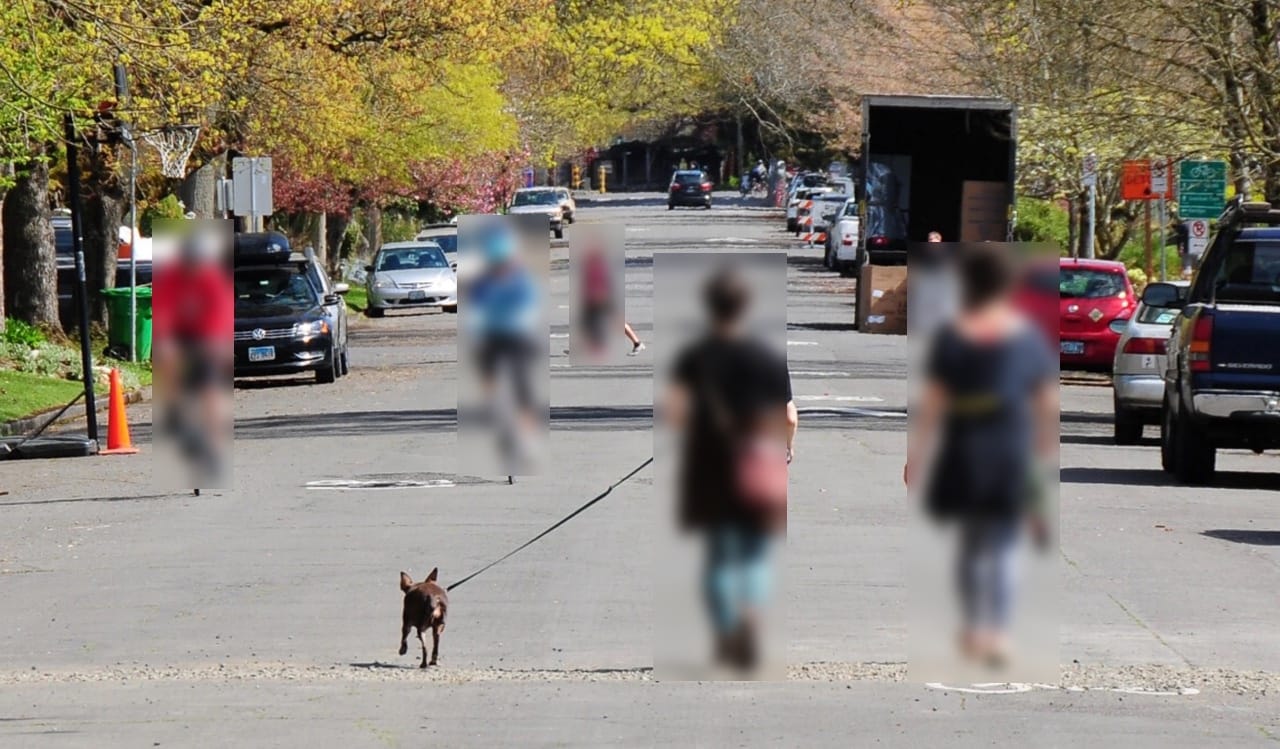
All of the pedestrians in our image have been blurred out.
Our code works!
Configuring a Model (Optional)
If you don’t already have a model on which to test blurring bounding boxes, we have you covered! Above, we use a model that yields predictions about the location of a pedestrian in an image. A model to identify cars and pedestrians already exists on Roboflow Universe, an open-source gallery of over 110,000 image datasets. For this guide, we’re going to use the “Pedestrian” dataset.
We can test our dataset to make sure it returns predictions as expected by using the “Deploy” tab on Roboflow Universe:
0:00/1×
Our model works!
Before we can use our model, we’ll need to install the Roboflow pip package:
pip install roboflowWe’ll also need a Roboflow account. You can sign up for one on the Roboflow website. Scroll down further on the Deploy tab on the dataset page and copy the code that you see in the “Python” section. Then, paste the code at the top of the file where you want to draw bounding boxes:
from roboflow import Roboflow

rf = Roboflow(api_key="KEY")
project = rf.workspace().project("people-detection-general")

model = project.version(5).model
Your API key will be automatically added to the code snippet from Roboflow Universe.
We can retrieve predictions from our model using the following code:
predictions = model.predict(“image1.jpg”, confidence=50).json()

print(predictions)
This will display a JSON object with the predictions found by the model. Only predictions with a confidence level larger than 50% will be displayed. Here’s an example result:
{'predictions': [{'x': 983.5, 'y': 462.5, 'width': 153.0, 'height': 441.0, 'confidence': 0.8825094699859619, 'class': 'person', 'image_path': image1.jpg', 'prediction_type': 'ObjectDetectionModel'}...]}You can use the “predictions” variable directly with the code we discussed earlier to blur all of the bounding boxes in an image.
Conclusion
In this guide, we have discussed how to blur a bounding box in Python using the cv2 library. We showed how the cv2.GaussianBlur method lets you create a blur effect that you can then apply to an image. You can use the code above to blur sensitive information in images, from license plates to faces to pieces of paper.
Now you have the knowledge you need to start blurring bounding boxes with Python!
Cite this Post
Use the following entry to cite this post in your research:
James Gallagher. (Jan 19, 2023). How to Blur a Bounding Box in Python. Roboflow Blog: https://blog.roboflow.com/how-to-blur-a-bounding-box-python/