
MobileNetV4 is a state-of-the-art convolutional neural network architecture designed for efficient mobile and edge device performance, offering a balance between high accuracy and low computational cost.
MobileNetV4 was developed by Google. With that said, Google have not yet released pre-trained weights using the architecture. Hugging Face, however, have trained their own weights using the MobileNetV4 architecture. The Hugging Face weights achieve strong accuracy on classification tasks, so we will use them in this guide to demonstrate MobileNetV4 in use.
In this article, we will guide you through the process of using MobileNetV4 for classification. We will focus on using pre-trained weights in this guide. We will not cover fine-tuning your own model.
Without further ado, let's get started!
What is MobileNetV4?
MobileNetV4 is an image classification model developed by Google. It is an iteration of the model family MobileNetV4, which are computer vision models that are built for smaller (mobile) applications. The model was trained on the ImageNet-1k dataset, and presents SOTA results despite its lack of size and resources.
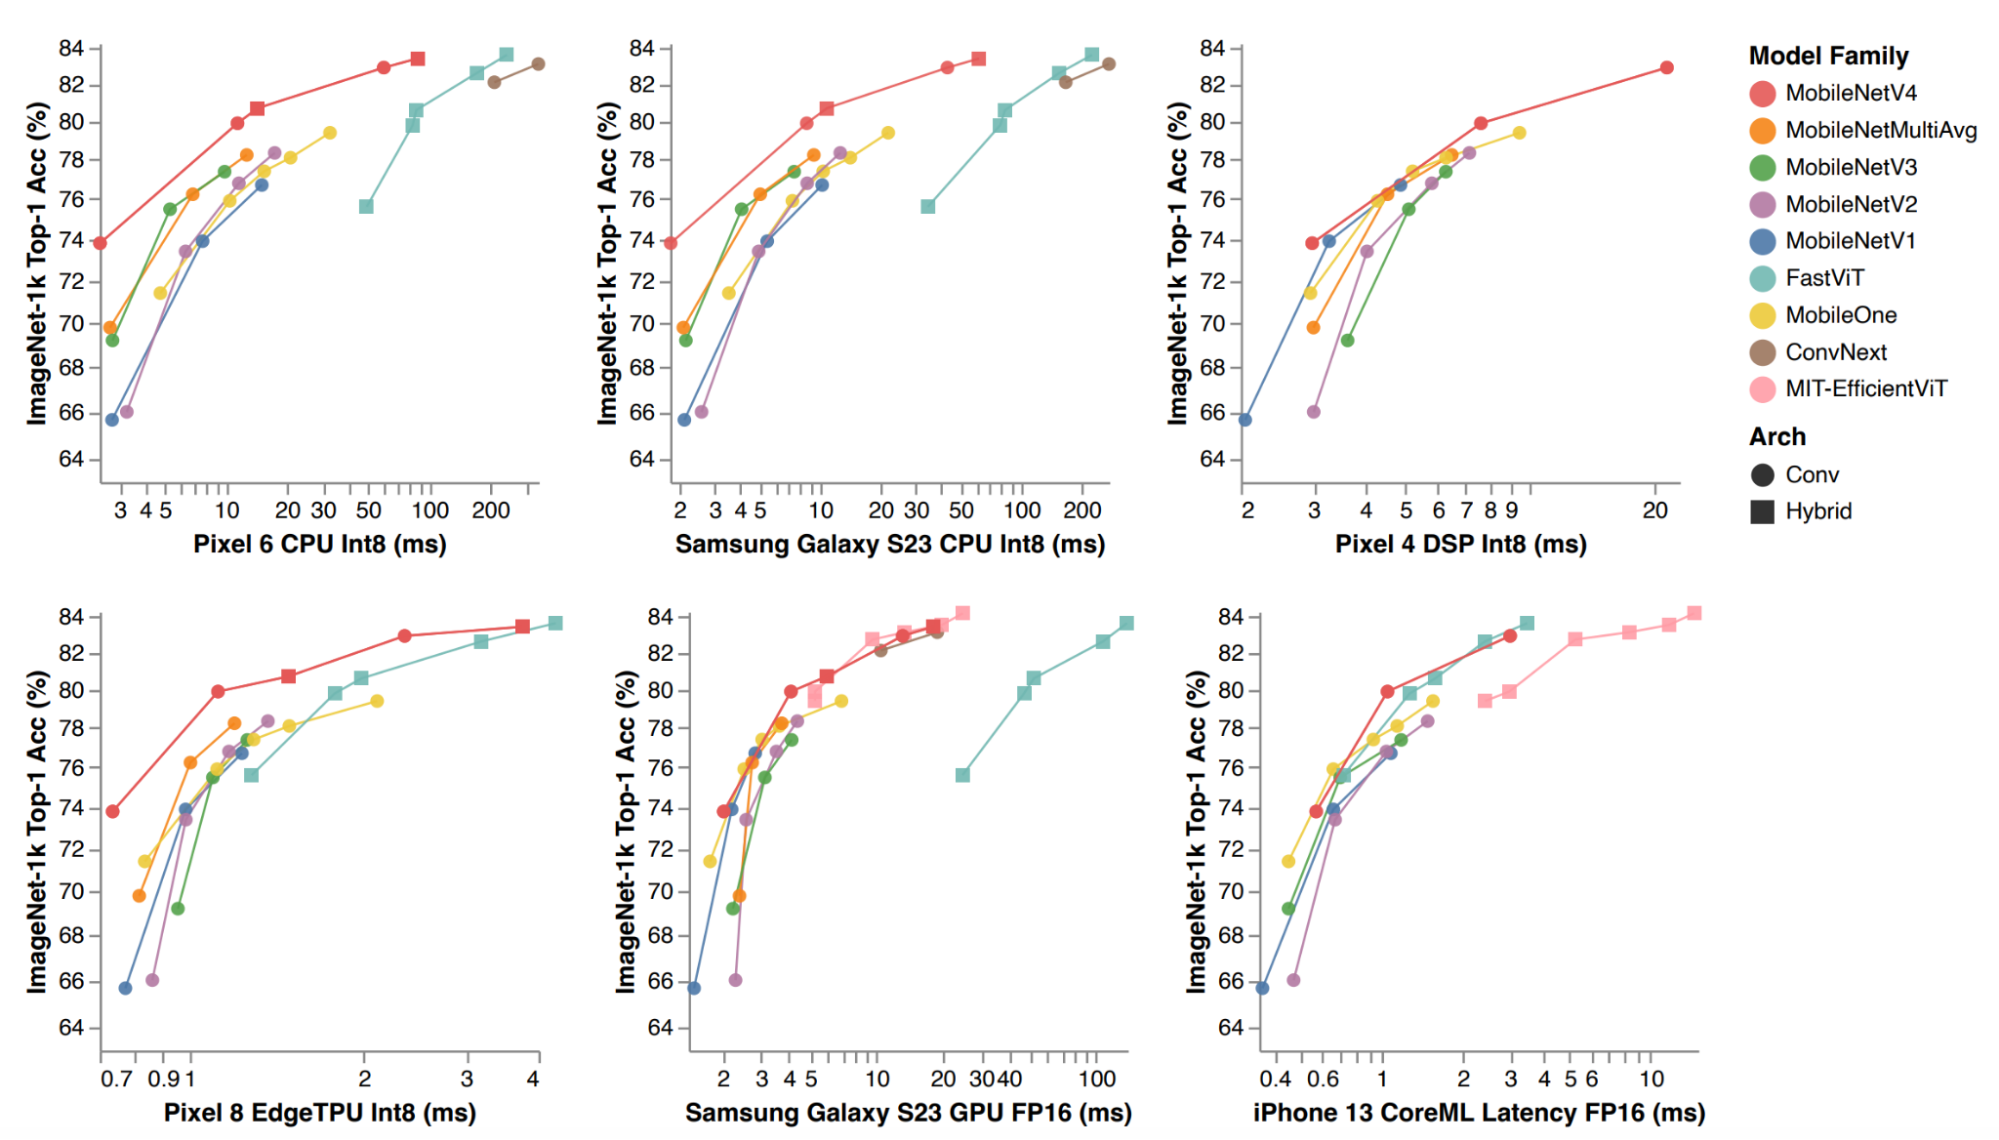
On different mobile devices, MobileNetV4 outperforms many other image classification models in terms of accuracy, from MobileNetMultiAvg to FastViT. MobileNetV4 achieves up to 75% reduction in the number of parameters used, significantly lowering its size. The model is also 3-4 times faster than previous mobileNet models as well as other light weight models.
Step #1: Download libraries
First, we need to download the dependencies that we will use in our project. Run the following command to install the dependencies:
!pip install transformers timm torch pillowStep #2: Import libraries
Next, add the following lines of code to import the libraries we need.
from urllib.request import urlopen
from PIL import Image
import timm
import torch
Step #3: Get the Image
This step will help us get the image through a link using Pillow, one of our installed libraries.
test_img_url1 = 'https://huggingface.co/datasets/huggingface/documentation-images/resolve/main/beignets-task-guide.png'
test_img1 = Image.open(urlopen(test_img_url1))
test_img1
In the code snippet above, add a url to the image you need. Run the code in colab to view the image.

Step #4: Get Labels
ImageNet4V was trained on Imagenet-1k. Therefore, we need the labels from Imagenet. Gather them from this GitHub.
The labels gathered will consist of many different categories. They range from animals like the red fox, to objects like kites and cappuccinos. However, most are animal-related.
Link the dictionary to a variable called “image_net_labels”.
Step #5: Build detection model
In this step, we build a function that will run MobileNetV4 on any image.
def predict_with_ImageNetV4(img):
 # Load the pretrained MobileNetV4 model from timm
 model_name = "hf_hub:timm/mobilenetv4_hybrid_large.ix_e600_r384_in1k"
 model = timm.create_model(model_name, pretrained=True)
 model = model.eval()
 # Get model specific transforms (normalization, resize)
 data_config = timm.data.resolve_data_config({}, model=model)
 transform = timm.data.create_transform(**data_config)

 # Apply the transforms and add batch dimension
 input_tensor = transform(img).unsqueeze(0)

 # Forward pass through the model
 with torch.no_grad():
     output = model(input_tensor)
 # Get the top-5 probabilities and class indices
 top5_probabilities, top5_class_indices = torch.topk(output.softmax(dim=1), k=5)

 # Convert probabilities to percentages
 top5_probabilities = top5_probabilities * 100

 # Print the top-5 probabilities and class indices
 print("Top-5 probabilities:")
 print(top5_probabilities)

 print("Top-5 class indices:")
 print(top5_class_indices)

 top5_class = top5_class_indices[0]
 list_form_c = top5_class.tolist()

 top5_prob = top5_probabilities[0]
 list_form_p = top5_prob.tolist()

 # map the class indices to the related word in image_net-1k
 predictions=[]
 for i in range(5):
   predictions.append([image_net_labels[list_form_c[i]], round(list_form_p[i], 2)])
 print(predictions)
The code above:
- Uses timm to load the model from HuggingFace hub
- Gets output from the model
- Retrieves the data and gets the first 5 classes and probabilities
- Map the classes to the labels
Step #6: Test the model
Use the function below to run inference on various different images. Here, I call the function on test_img1, which will give the resulting image:
predict_with_ImageNetV4(test_img1)

Based on ImageNetV4, the model accurately predicts the image to be an espresso, with a confidence level of around 58%.
Conclusion
In this guide, we demonstrated how to use MobileNetV4 using an unofficial version of the model implemented by HuggingFace. By following the steps above, you can use MobileNetV4 for classification tasks.
You can check out some notebooks and tutorials for more content on models.
Cite this Post
Use the following entry to cite this post in your research:
Nathan Y.. (Jul 22, 2024). How to use MobileNetV4 for Classification. Roboflow Blog: https://blog.roboflow.com/how-to-use-mobilenetv4-for-classification/