
Image resizing (also called image scaling or resampling) is the process of changing the dimensions of a digital image by either increasing (upscaling) or decreasing (downscaling) its size. This is a fundamental operation in image processing and computer vision. In the image resizing process the dimension of an image is altered to meet specific requirements in image processing and computer vision tasks.
Image resizing involves changing the number of pixels in the image, which affects both its visual size, and the amount of data needed to represent it.
In this guide, we are going to talk about the basics of image resizing and how to resize images with the open source OpenCV Python package.
Let’s get started!
How Does Image Resizing Work?
When an image is resized, either new pixels are created (during enlargement) or some pixels are removed (during reduction). The key challenge in resizing is determining how to map the pixel values from the original image to the resized image in a way that maintains visual quality.
There are two primary processes involved in resizing:
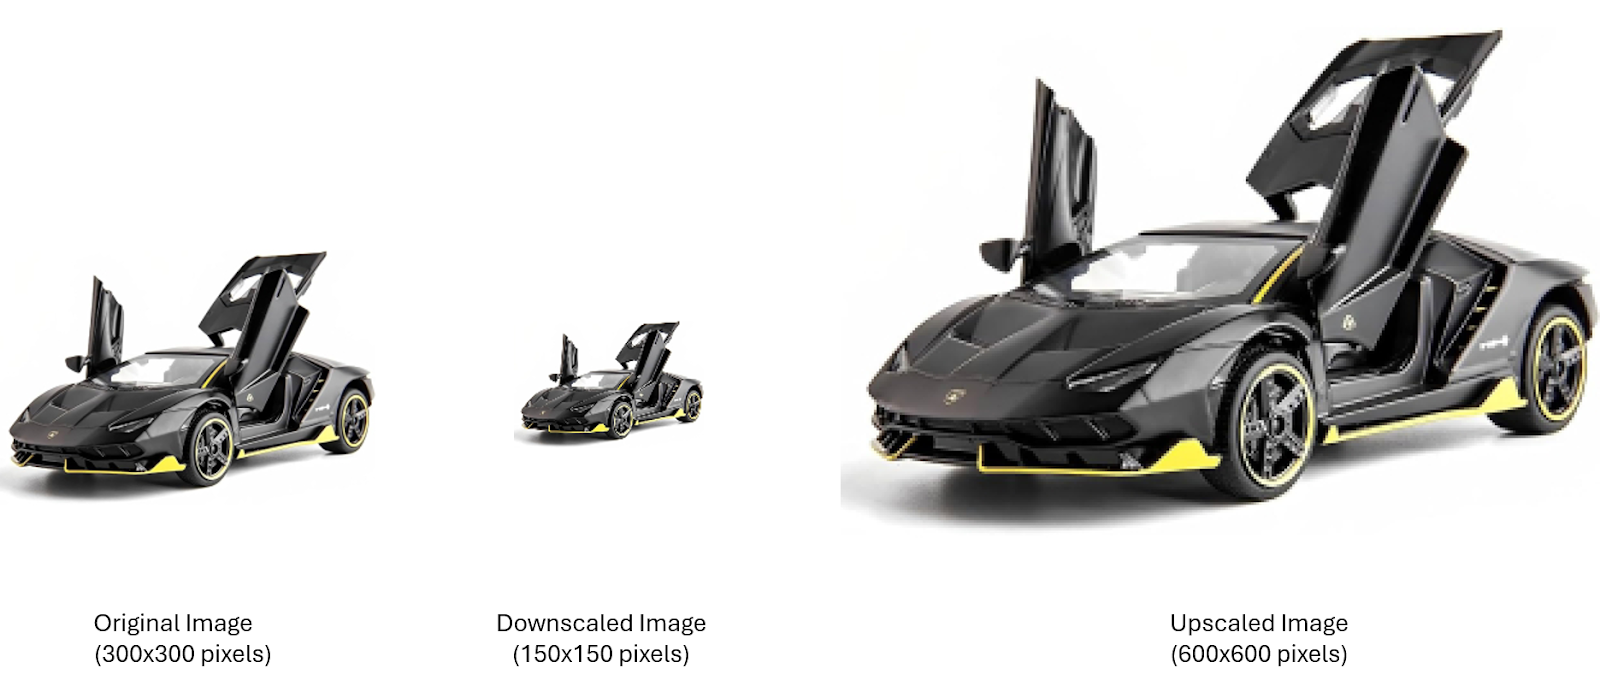
- Downsampling: It is a technique to reduce the number of pixels in the image. Downsampling is often used when the original image is too large for a specific purpose, or when you need to reduce the amount of data required for processing or storage.
- Upsampling: Is a technique to increase the number of pixels in an image. Upsampling can make images appear sharper and more detailed. Some image processing techniques require larger images for optimal results.
Both processes rely heavily on interpolation techniques to approximate the color and intensity values of pixels in the resized image. When removing pixels, interpolation is used to estimate the color and intensity values of the remaining pixels based on the surrounding pixels. When adding pixels, interpolation is used to estimate the color and intensity values of the new pixels based on the existing pixels.
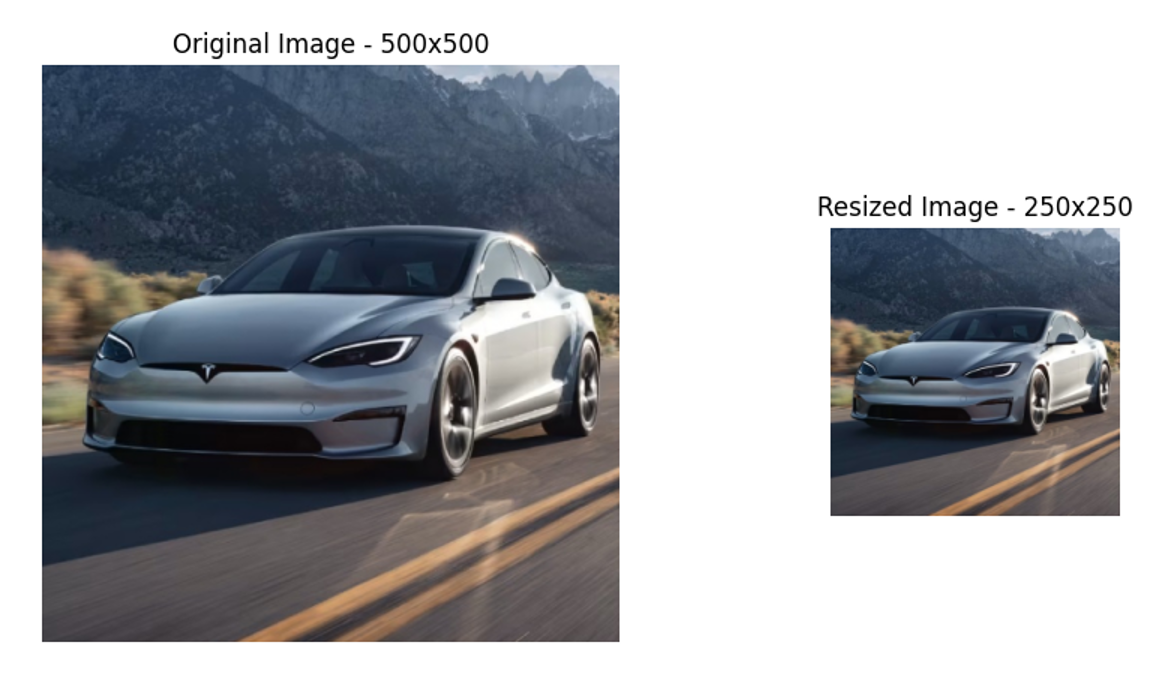
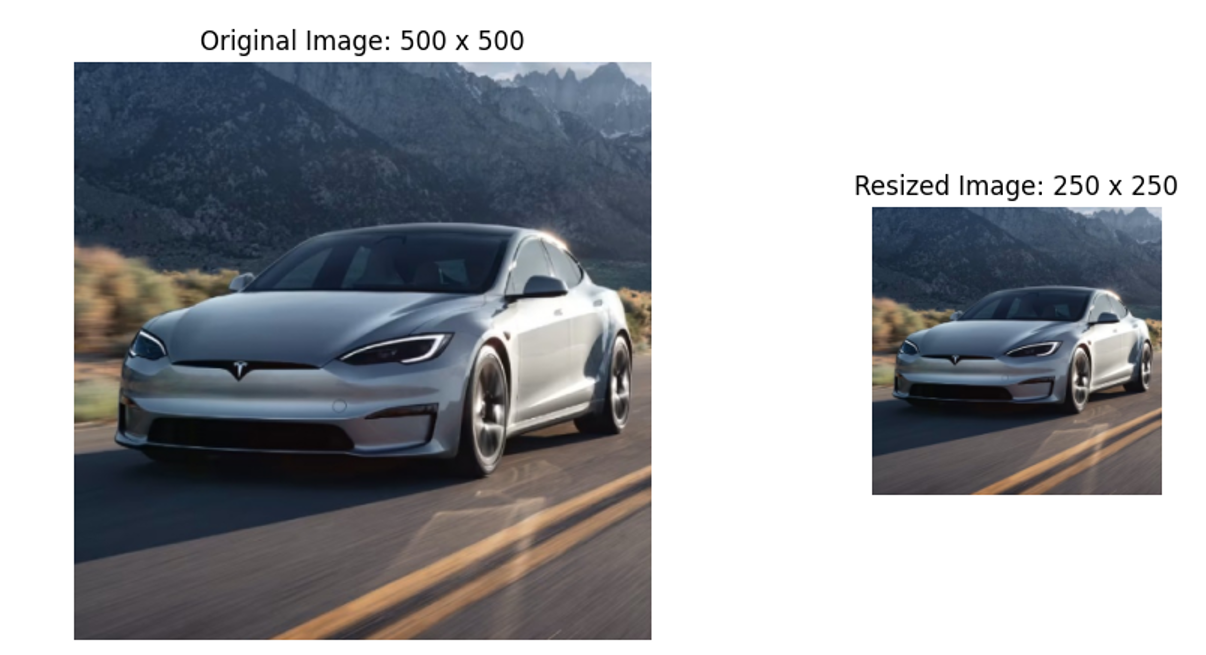
The following is the simple example of image resizing in which the original image of size 500x500 pixel is resized (downscaled) to 250x250 pixels.
Using the OpenCV resize() Function
The OpenCV library provides cv2.resize() function to resize images. It allows you to resize images by specifying either the desired dimensions or the scaling factors. The general syntax to this function is given below.
resized_image = cv2.resize(src, dsize[, dst[, fx[, fy[, interpolation]]]])The parameters within square brackets [] are optional. Here's the expanded syntax with parameter defaults:
resized_image = cv2.resize(src, dsize, dst=None, fx=0, fy=0, interpolation=cv2.INTER_LINEAR)
Let's explore each of the parameters used in this function.
src (Required)
Type: numpy.ndarray
It specifies source image you want to resize. This is the input image represented as a NumPy array, which can be a grayscale or color image.
Example: src = cv2.imread('input_image.jpg')
dsize (Required in certain cases)
Type: tuple of two integers (width, height)
This parameter specifies the desired size of the output image in pixels. It is specified as a tuple (width, height), representing the dimensions of the resized image. Dsize must be specified if both fx and fy are zero (or not specified). If dsize is set to (0, 0), then fx and fy must be specified to determine the size. The order is (width, height), which corresponds to (columns, rows).
Example: dsize = (800, 600) # Resize image to 800x600 pixels
dst (Optional)
Type: numpy.ndarray
The destination image. It allows you to specify the destination image, where the resized result will be stored. In Python, this parameter is usually omitted because the function returns the resized image directly.
fx (Optional)
Type: float
The default value is 0 (interpreted as not set). This parameter specifies the scale factor along the horizontal axis (width). It is a multiplier that scales the width of the image. If dsize is specified, fx is ignored. If dsize is not specified or set to (0, 0), fx must be provided. The new width is calculated as:
width = src.shape[1] * fx.
Example: fx = 0.5 # Reduce the width by half
fy (Optional)
Type: float
The default value is 0 (interpreted as not set). The scale factor along the vertical axis (height). It is a multiplier that scales the height of the image. If dsize is specified, fy is ignored. If dsize is not specified or set to (0, 0), fy must be provided. The new height is calculated as:
height = src.shape[0] * fy.
Example: fy = 0.5 # Reduce the height by half
interpolation (Optional)
Type: int (enumerated flag in OpenCV)
Default value is cv2.INTER_LINEAR. Specifies the interpolation method to be used when resizing the image. Interpolation is a method of estimating new pixel values when scaling images up or down. There are various interpolation methods (cv2.INTER_NEAREST, cv2.INTER_LINEAR, cv2.INTER_CUBIC, cv2.INTER_AREA, cv2.INTER_LANCZOS4) discussed in section below.
Example: interpolation = cv2.INTER_AREA # Use area based interpolation for shrinking
Image Resizing Techniques
In this section we will learn different image resizing techniques that we can apply to resize an image.
Resize by Specifying Dimensions
Resizing an image by specifying dimensions involves changing the image's width and height to exact pixel values you provide. This method is useful when you need images of specific sizes.
We can accomplish this using the following code:
# Load the image
image = cv2.imread('car_2.jpg')

# Get original dimensions
original_height, original_width = image.shape[:2]

# Specify new dimensions (width, height)
new_width = 800
new_height = 600
resized_image = cv2.resize(image, (new_width, new_height))
The output for this code is:
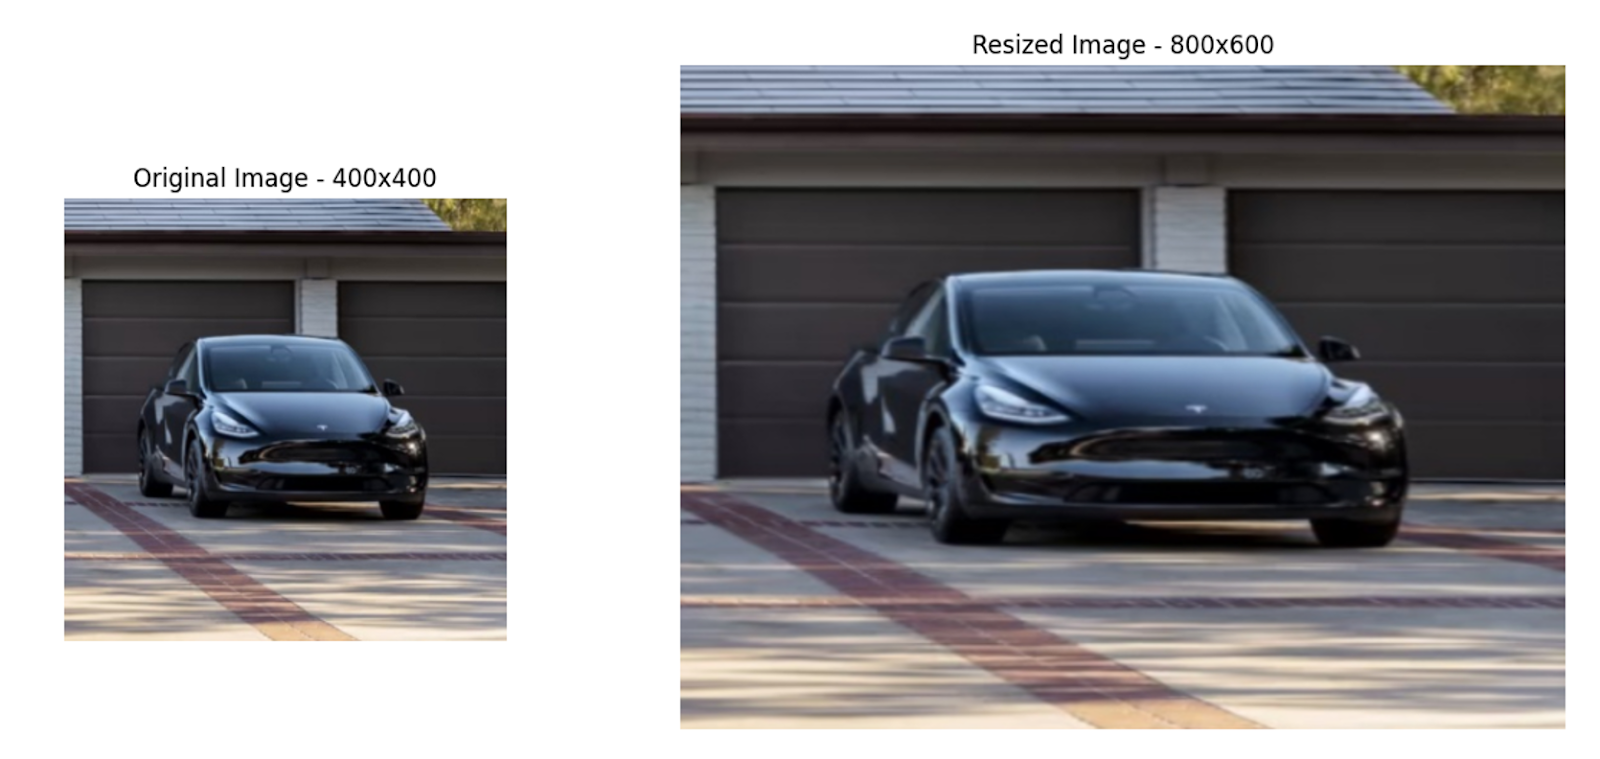
In this example, the aspect ratio (the proportional relationship between the image's width and height) is not preserved when resizing the image to specific dimensions (300x200). This can cause the image to appear stretched or squashed, leading to distortion of the original content.
Resize by Specifying Scaling Factors
The image can also be resized using scaling factor instead of specifying exact dimensions. We can scale the image by providing factors for width and height. Resizing by specifying scaling factors means changing the size of an image by multiplying its width and height by specific values, called scaling factors.
Here scaling factor is a number that determines how much you want to increase (upsample) or decrease (downsample) the size of the image.
- Scaling Factor > 1: Enlarges (upsamples) the image.
- Scaling Factor < 1: Shrinks (downsamples) the image.
- Scaling Factor = 1: Keeps the image size the same.
When resizing an image, you can specify different scaling factors for width (horizontal) and height (vertical). OpenCV uses these factors to compute the new size of the image by multiplying the original dimensions.
Let's say the image is 500x500 pixels. If you want to increase the size, you will use a scaling factor of > 1 for both width and height. In the example below, we use scaling factor of 1.5.
New Width = 500 * 1.5 = 750 pixels
New Height = 500 * 1.5 = 750 pixels
Here is an example in code:
# Load the image
image = cv2.imread('car_1.jpg')

# Convert BGR (OpenCV default) to RGB for displaying with matplotlib
image_rgb = cv2.cvtColor(image, cv2.COLOR_BGR2RGB)

# Get the original size
original_size = image.shape[:2]

# Resize by a scale factor (0.5 means reduce size by half)
scale_factor_x = 1.5
scale_factor_y = 1.5
resized_image = cv2.resize(image, None, fx=scale_factor_x, fy=scale_factor_y)
resized_image_rgb = cv2.cvtColor(resized_image, cv2.COLOR_BGR2RGB)
resized_size = resized_image.shape[:2]
The output of the code is:

If you want to reduce the size by half, you would use a scaling factor of 0.5.
New Width = 500 * 0.5 = 250 pixels
New Height = 500 * 0.5 = 250 pixels
We can resize the image using the following code:
# Convert BGR (OpenCV default) to RGB for displaying with matplotlib
image_rgb = cv2.cvtColor(image, cv2.COLOR_BGR2RGB)

# Get the original size
original_size = image.shape[:2]

# Resize by a scale factor (0.5 means reduce size by half)
scale_factor_x = 0.5
scale_factor_y = 0.5
resized_image = cv2.resize(image, None, fx=scale_factor_x, fy=scale_factor_y)
resized_image_rgb = cv2.cvtColor(resized_image, cv2.COLOR_BGR2RGB)
resized_size = resized_image.shape[:2]
The output of this code is:
Scaling factors maintain the aspect ratio of the image, as long as the same scaling factor is applied to both the width (horizontal) and height (vertical). Aspect ratio is the proportional relationship between an image's width and height, defined as:

If you use the same scaling factor for both width and height, the aspect ratio remains unchanged, meaning the image will be enlarged or reduced proportionally without stretching or squashing.
Interpolation Methods for Resizing
In image processing, interpolation refers to the method used to estimate or calculate new pixel values when resizing, rotating, or transforming an image. Since resizing often requires changing the image’s resolution, interpolation helps in determining the pixel values for positions. The following are the interpolation methods used in OpenCV for resizing image.
- Nearest-neighbor interpolation (cv2.INTER_NEAREST)
- Bilinear interpolation (cv2.INTER_LINEAR)
- Bicubic interpolation (cv2.INTER_CUBIC)
- Lanczos interpolation (cv2.INTER_LANCZOS4)
- Area interpolation (cv2.INTER_AREA)
When you resize an image, new pixels need to be created or existing ones need to be removed, which raises the question, how do we decide the color or intensity values of these new or modified pixels? This is where interpolation comes into play.
OpenCV provides several interpolation methods that control how pixel values are computed when resizing. OpenCV provides several methods for resizing an image, using different interpolation techniques to calculate pixel values for the new dimensions. These methods can affect the quality of the resized image and are suitable for different tasks like upscaling or downscaling. Below are the various methods available in OpenCV.
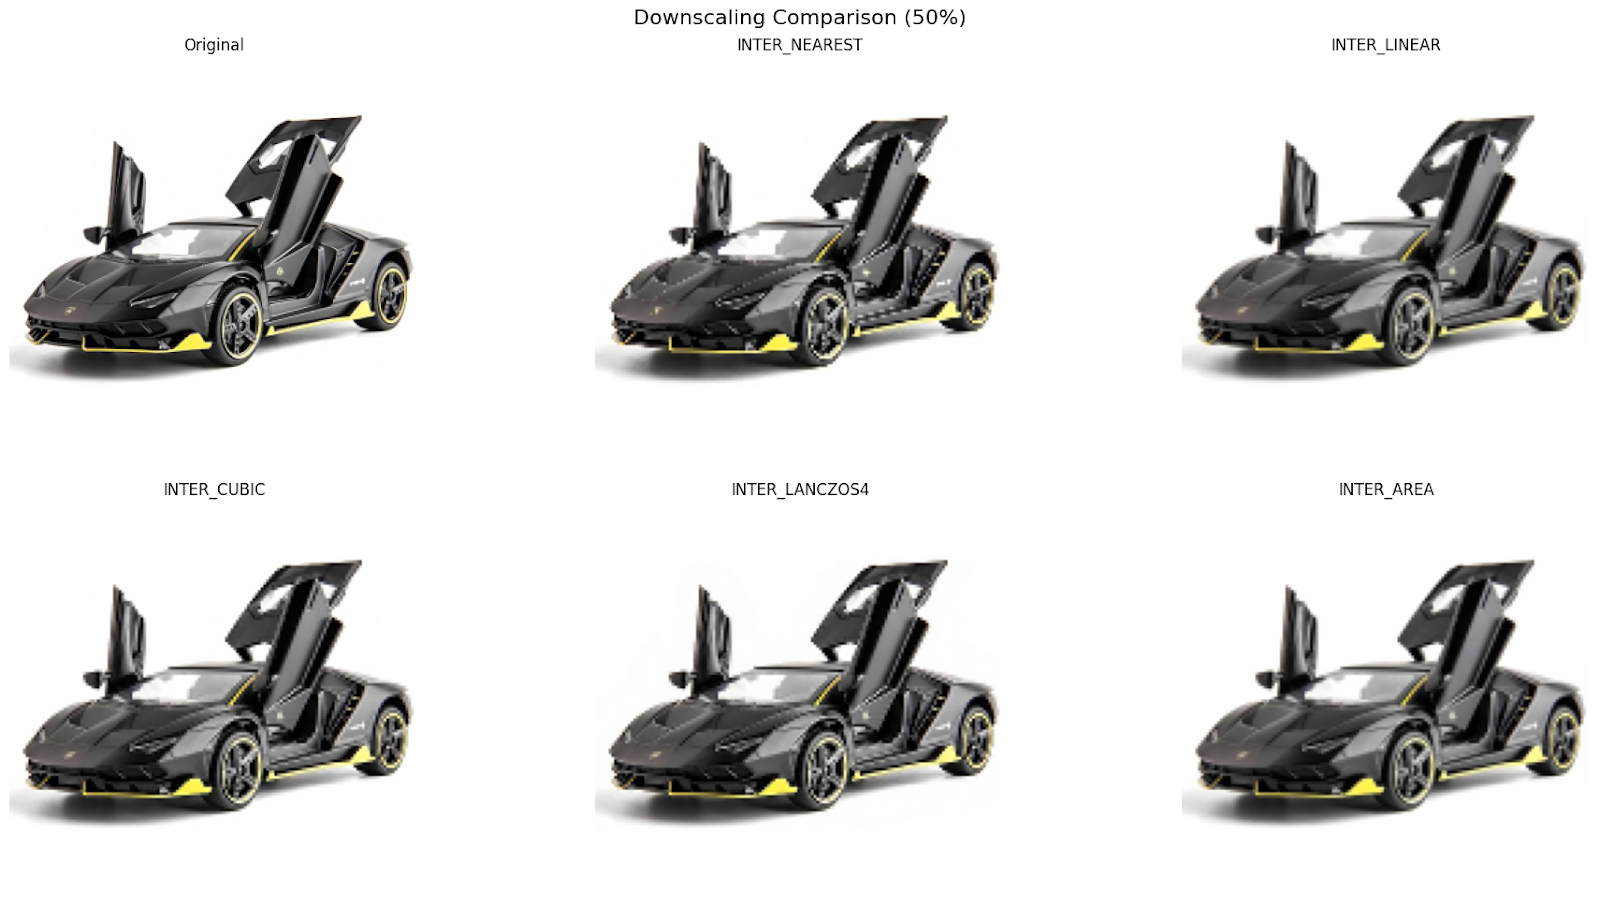
Nearest Neighbor Interpolation (cv2.INTER_NEAREST)
Nearest neighbor interpolation is one of the simplest and fastest methods for resizing an image. This technique selects the value of the nearest pixel from the original image and assigns it to the corresponding pixel in the resized image. This method is the simplest form of interpolation. The pixel value of the closest pixel in the original image is assigned to the corresponding pixel in the resized image. It is fast but can produce blocky, pixelated results, especially when enlarging the image.
Here is an example in code:
# Read the image
img = cv2.imread('car_5.jpg')

# Resize the image
downscaled_img = cv2.resize(img, (0, 0), fx=0.5, fy=0.5,
                           interpolation=cv2.INTER_LINEAR)
upscaled_img = cv2.resize(img, (0, 0), fx=2.0, fy=2.0,
                         interpolation=cv2.INTER_LINEAR)
The output is:
Resize using Nearest Neighbor Interpolation
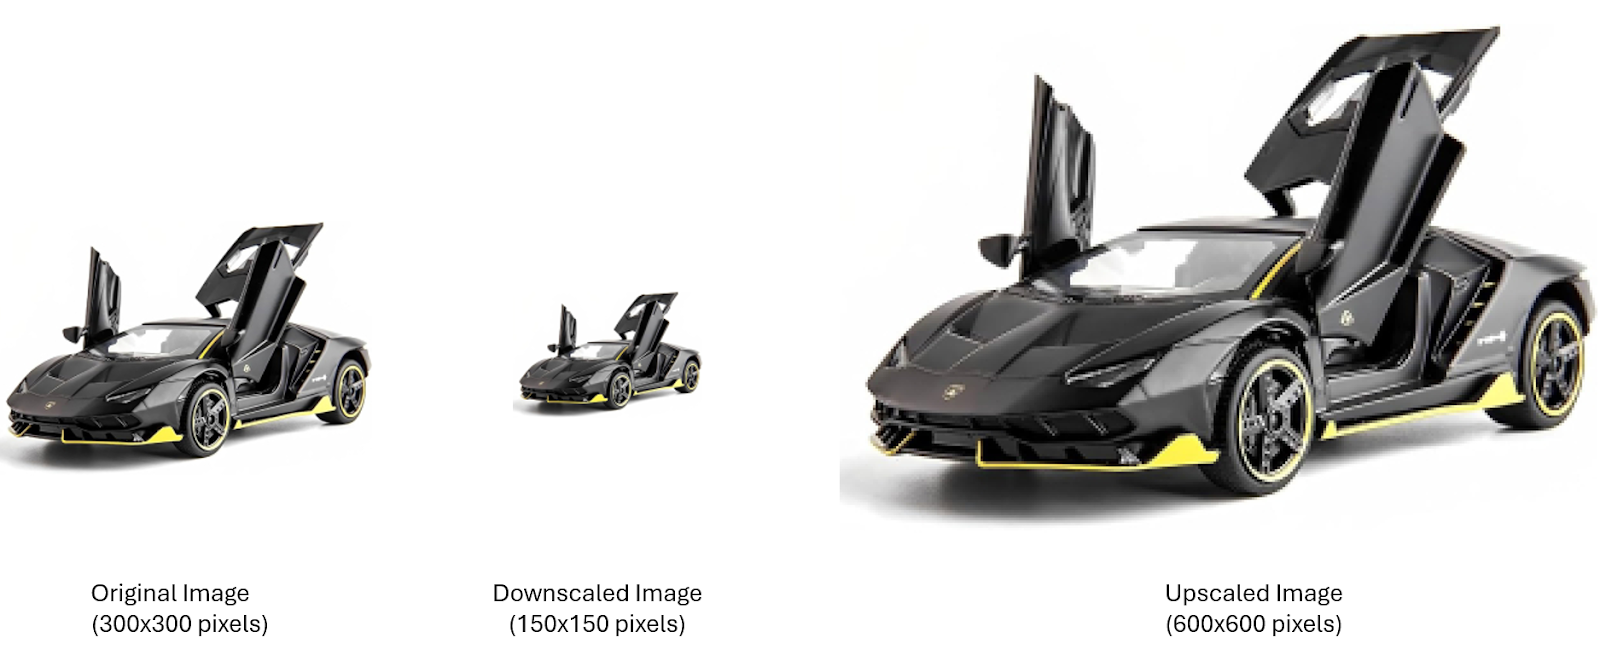
Bilinear Interpolation (cv2.INTER_LINEAR)
Bilinear interpolation considers the 4 nearest pixel (2x2 neighborhood) values surrounding the calculated position. It then performs a weighted average based on the distance of these four pixels from the interpolated point. This results in smoother transitions between pixels compared to nearest neighbor, but can indeed cause some blurring, especially when enlarging images significantly. This is the default method for cv2.resize().
Here is an example in code:
# Read the image
img = cv2.imread('car_5.jpg')

# Resize the image
downscaled_img = cv2.resize(img, (0, 0), fx=0.5, fy=0.5,
                           interpolation=cv2.INTER_LINEAR)
upscaled_img = cv2.resize(img, (0, 0), fx=2.0, fy=2.0,
                         interpolation=cv2.INTER_LINEAR)
The output of this code is:
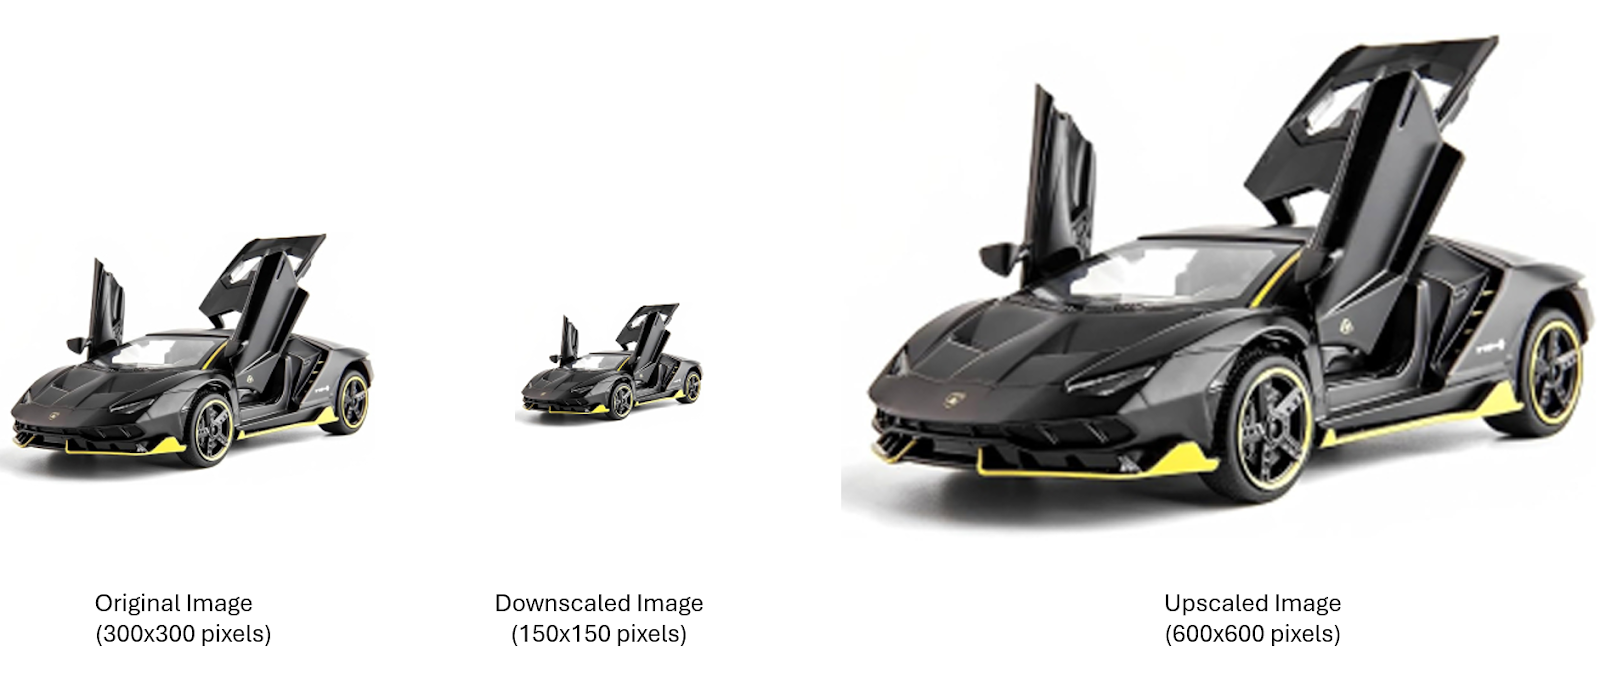
Bicubic Interpolation (cv2.INTER_CUBIC)
This method uses a 4x4 pixel neighborhood (16 pixels total) and cubic polynomials to calculate the new pixel value. It considers more surrounding pixels than bilinear interpolation, which leads to smoother results. This method provides smoother, higher-quality results, especially for image enlargement.
Here is an example in code:
# Read the image
img = cv2.imread('car_5.jpg')

# Resize the image
downscaled_img = cv2.resize(img, (0, 0), fx=0.5, fy=0.5,
                           interpolation=cv2.INTER_CUBIC)
upscaled_img = cv2.resize(img, (0, 0), fx=2.0, fy=2.0,
                         interpolation=cv2.INTER_CUBIC)
The output of this code is:
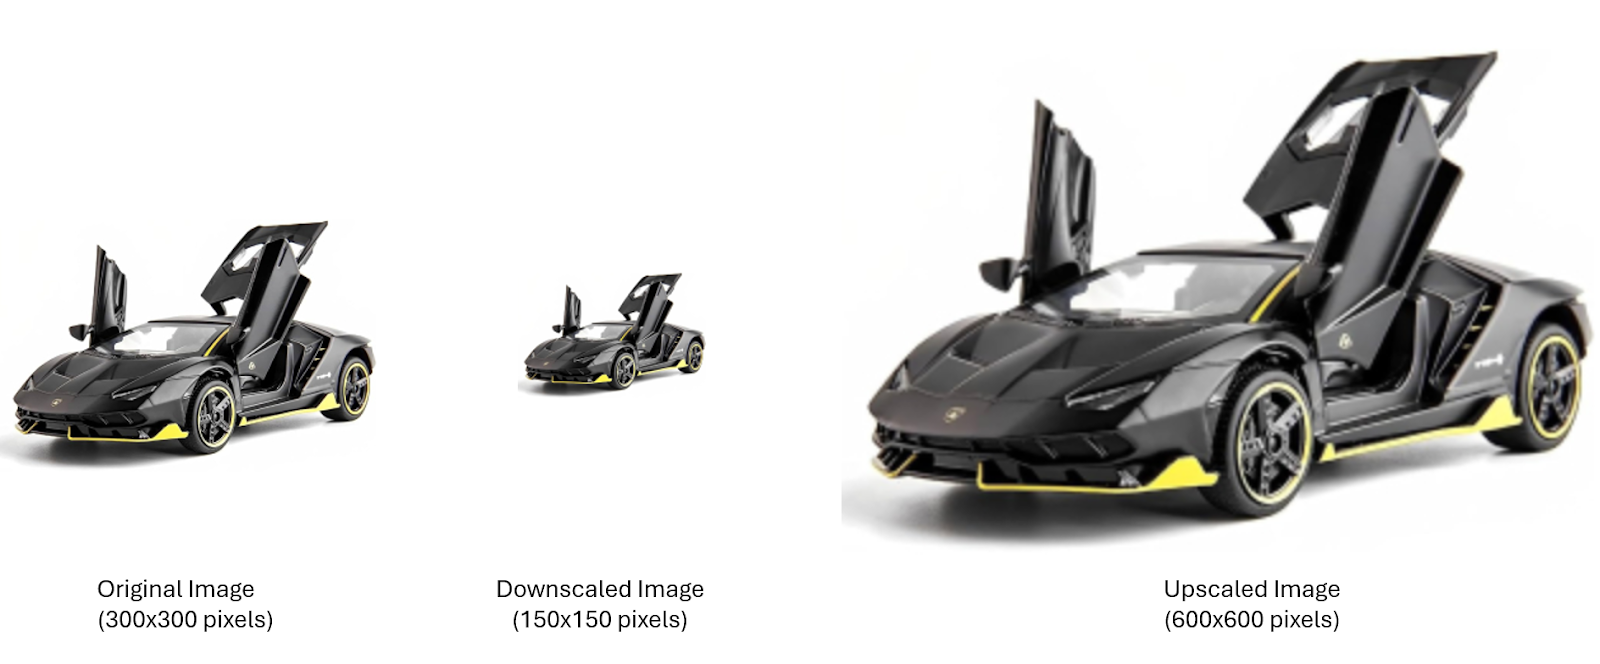
Lanczos Interpolation (cv2.INTER_LANCZOS4)
This method uses an 8x8 pixel neighborhood and a sinc function to compute new pixel values. This method is particularly effective for image downscaling, as it excels at preserving details and minimizing aliasing artifacts.
It also performs well for moderate image enlargement. Lanczos interpolation often produces sharper and more detailed results compared to simpler methods like bilinear or bicubic interpolation, especially when reducing image size. It can occasionally produce slight ringing artifacts near sharp edges.
Here is an example in code:
# Read the image
img = cv2.imread('car_5.jpg')

# Resize the image
downscaled_img = cv2.resize(img, (0, 0), fx=0.5, fy=0.5,
                           interpolation=cv2.INTER_LANCZOS4)
upscaled_img = cv2.resize(img, (0, 0), fx=2.0, fy=2.0,
                         interpolation=cv2.INTER_LANCZOS4)
The output of this code is:
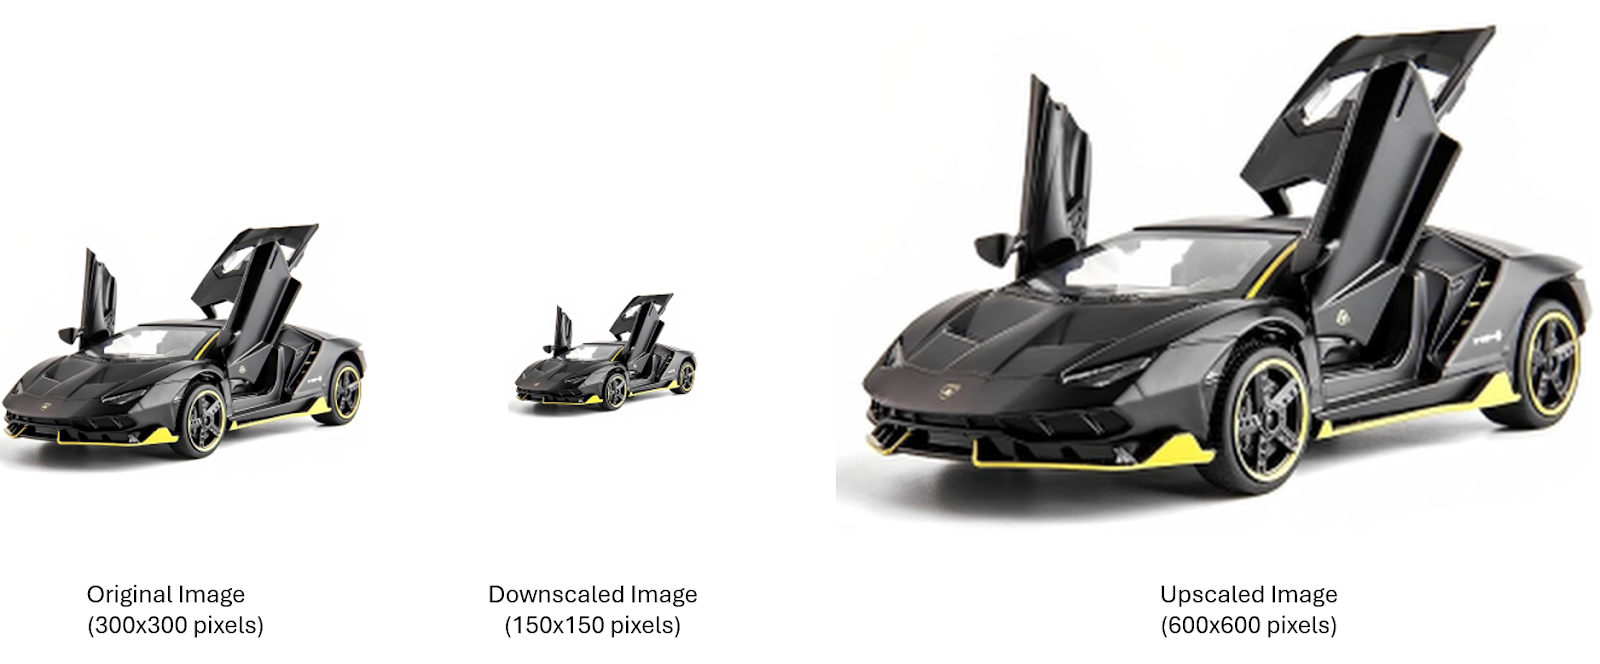
Area Interpolation (cv2.INTER_AREA)
This method is specifically designed for downscaling images. It computes the pixel value by taking a weighted average of pixels in the corresponding area of the original image. This method is best for downscaling, preserving details and avoiding aliasing or moiré patterns.
Here is an example in code:
# Read the image
img = cv2.imread('car_5.jpg')

# Resize the image
downscaled_img = cv2.resize(img, (0, 0), fx=0.5, fy=0.5,
                           interpolation=cv2.INTER_AREA)
upscaled_img = cv2.resize(img, (0, 0), fx=2.0, fy=2.0,
                         interpolation=cv2.INTER_AREA)
The output of this code is:
The following images show an overall comparison of all interpolation methods.

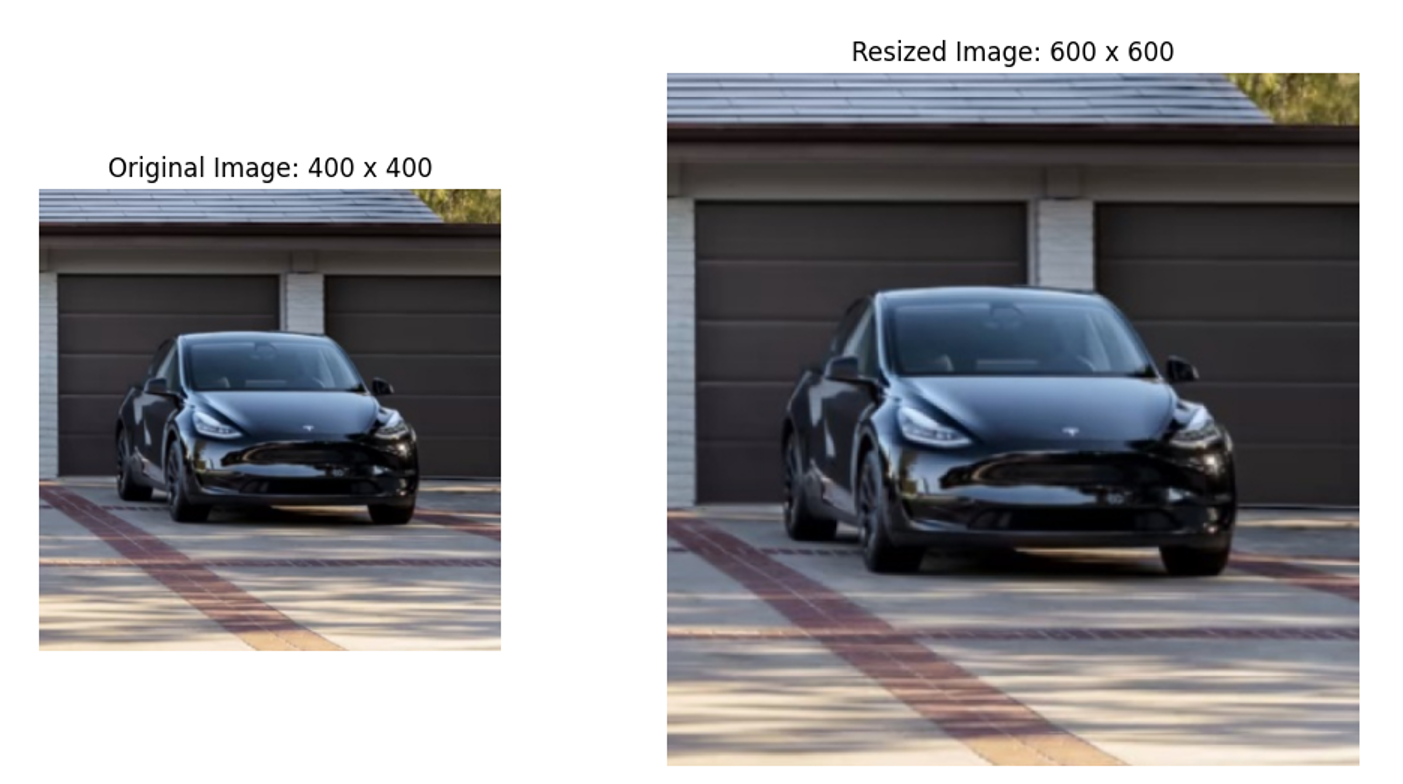
Resizing While Preserving Aspect Ratio
An image can be resized while maintaining its original aspect ratio, you can calculate the new dimensions based on the desired width or height of the image. To maintain the aspect ratio of an image, we calculate the new dimensions based on a single scaling factor (either width or height).
When resizing an image using a single scaling factor, the same factor is applied to both the width and height to maintain the aspect ratio. This method ensures that the resized image doesn't look stretched or squashed, as both dimensions are scaled proportionally. In the following example we have used width as scaling factor.
Let’s assume you have image with original size 400x400 and new width should be 600 then using the formula we can calculate the new height.
new_height = ((new_width / original_width) * original_height)Therefore, the new size of resized image will be 600x600.
Here is an example:
# Load the image
image = cv2.imread('car_4.jpg')
original_height, original_width = image.shape[:2]

# Set the new width and calculate the height to maintain the aspect ratio
new_width = 600
new_height = int((new_width / original_width) * original_height)

# Resize the image
resized_image = cv2.resize(image, (new_width, new_height), interpolation=cv2.INTER_AREA)
The output of the code is:
Considerations When Resizing Images
There are challenges while resizing an image as discussed below.
Loss of Quality
When resizing image, you may experience loss of quality. For example, when an image is reduced in size, many pixels are discarded, which can result in a loss of detail, sharpness, and overall image quality. Similarly, when an image is enlarged, new pixels need to be interpolated, often resulting in a loss of sharpness and the introduction of visual artifacts such as blurring or noise.
Artifacts
When resizing, especially when using interpolation methods like nearest neighbor or bilinear, artifacts like aliasing (jagged edges) or blurring can be introduced. Advanced interpolation methods like bicubic and Lanczos can help mitigate these artifacts, but they are more computationally expensive.
Image Resizing Use Cases
In this section, we discuss the practical applications of image resizing. Resizing images in computer vision is a common dataset preprocessing technique used to ensure consistency across input data and improve the performance of machine learning models. Resizing ensures that all images in a dataset have consistent dimensions, which is important for feeding them into neural networks that expect inputs of a fixed size.
The following are some important reasons why image resizing is needed in training computer vision models.
- Most models, like YOLO, SSD, or Faster R-CNN, require a specific input size (e.g., 640x640, 416x416, 224x224 etc.). Resizing helps make sure all images conform to this requirement.
- Machine learning models perform better when trained on images with consistent sizes, making it easier for them to learn from the data.
- Reducing the image size can help speed up both training and inference while also reducing memory usage.
Therefore, it's essential to resize images correctly. We will explore some of the key image resizing techniques commonly used during the preprocessing step in training computer vision models.
Non-Aspect Ratio Preserving Resize (Stretch to)
The "Stretch to" method resizes an image to the exact target dimensions without preserving its original aspect ratio. This can cause the image to be stretched or compressed along one or both axes (width and height) to fit the specified size. This approach forces the image to meet the required dimensions by distorting it if necessary. A custom implementation example of this technique is given in this notebook.
If you have an image with dimensions 941x584 and you resize it to 400x400 using the "Stretch to" method, the image will be distorted. In this case, the width would shrink significantly (from 941 to 400), and the height would be stretched (from 584 to 400). As a result, objects in the image might appear compressed horizontally and elongated vertically.
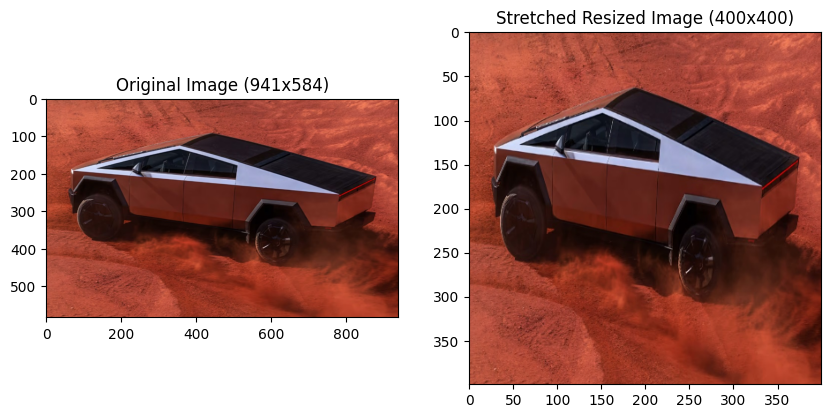
“Stretch to” resizing
Center Crop
It is the process of cropping the image to the desired size by focusing on the central portion of the image. It removes any excess parts from the sides, top, or bottom, retaining the center part of the image. A custom implementation example of this technique is given in this notebook.
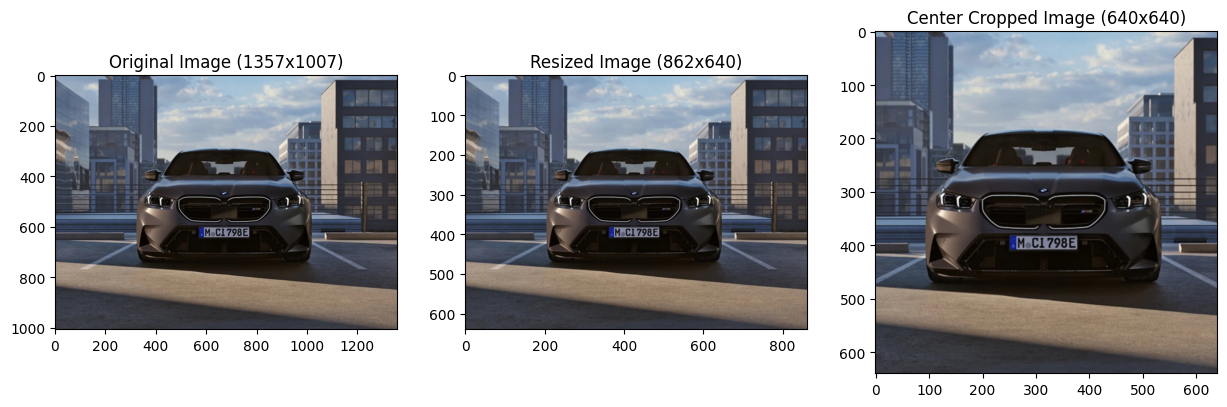
“Center crop” resizing
Aspect Ratio Preserving Resize (Fit within)
The "Fit within" method resizes an image to fit within specified target dimensions while preserving the original aspect ratio. This ensures that the image is not distorted or stretched, but it may not completely fill the target size. Instead, the resized image fits as much as possible within the target dimensions, leaving the remaining space unfilled.
The image is scaled down (or up) until one of its sides matches the target dimension (either width or height), while the other dimension is scaled proportionally to maintain the aspect ratio. A custom implementation example of this technique is given in this notebook
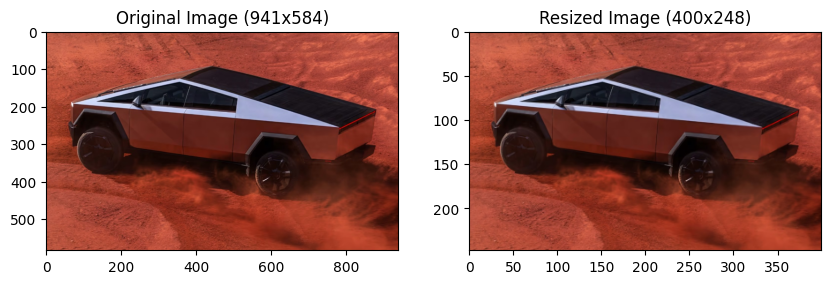
If you have an image with dimensions 941x584 and you want to resize it to fit within 400x400 using the "Fit within" method. The image would be scaled down proportionally, with its width reduced to 400 pixels. However, since the height is only 584 pixels and preserving the aspect ratio, it will result in a final height of 248 pixels (to avoid distortion).
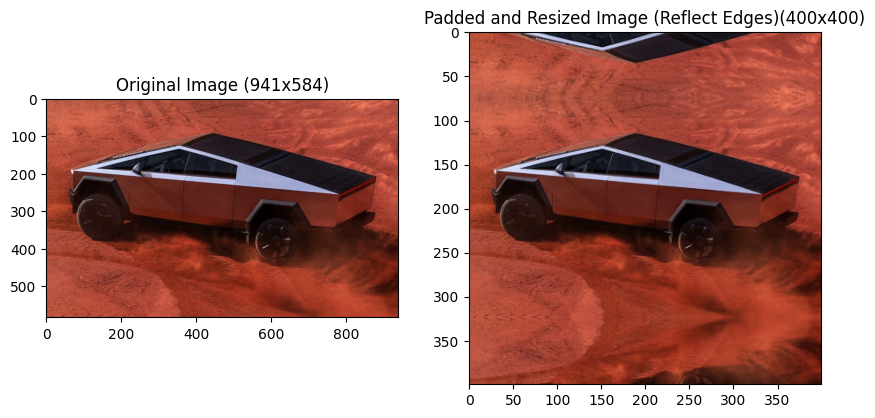
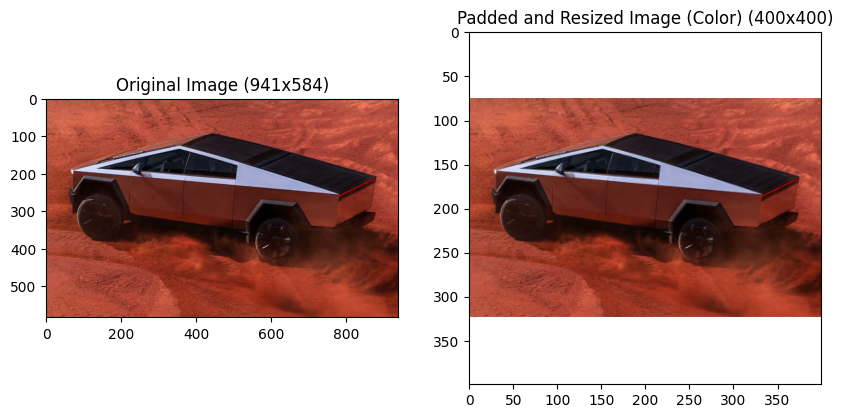
Aspect Ratio Preserving Resize (Pad and Resize)
This technique maintains the original aspect ratio of the image and pads the shorter side with pixels (usually black or white or reflective edges) to meet the target dimensions. This avoids distorting the image while ensuring it fits the required size. A custom implementation example of this technique is given in this notebook.
Conclusion
In this blog post we have covered the concept of image resizing and explored different resizing methods, including commonly used image resizing techniques during preprocessing in training computer vision models. These include "Stretch to," which resizes images to exact dimensions with potential distortion, and "Fit within," which preserves the aspect ratio by adding padding.
Image resizing is a key step in preparing data for training computer vision models, as it ensures consistency in input size, improves computational efficiency, and helps models learn effectively by standardizing images without compromising key visual information. Proper resizing improves model performance and helps avoid issues like distortion or loss of detail during training.
All the code for this blog post can be found in this notebook.
Cite this Post
Use the following entry to cite this post in your research:
Timothy M. (Oct 14, 2024). What is Image Resizing? A Computer Vision Guide.. Roboflow Blog: https://blog.roboflow.com/image-resizing/