
Resizing images is a critical preprocessing step in computer vision. Principally, our machine learning models train faster on smaller images. An input image that is twice as large requires our network to learn from four times as many pixels, and that time adds up. Moreover, many deep learning model architectures require that our images are the same size and our raw collected images may vary in size.
But all resize strategies are not created equally.
How to Resize Images Without Distortion
How small of an image is too small? If you have some images that are significantly larger than others, how should you handle the differences? If you need images to be square but have rectangles, should you stretch the images to a new shape? If you maintain the aspect ratio of the raw image to a resized image, how do you fill the newly created padding?
In fairness, there are not objectively correct answers for each of these questions in every situation. But there are tips that help based on our context.
How Small Is Too Small?
There is not a magic set of dimensions. The good news, however, is starting smaller is generally easier than starting bigger. A good strategy to employ is progressive resizing. Our first set of models will be generally experimental. And we can save time by starting with smaller image inputs. Even better, we can use the learned weights from our small models to initiate training on our larger input models.
Progressive resizing is straightforward: train an initial model with very small input images and gauge performance. Use those weights as the starting point for the next model with larger input images.
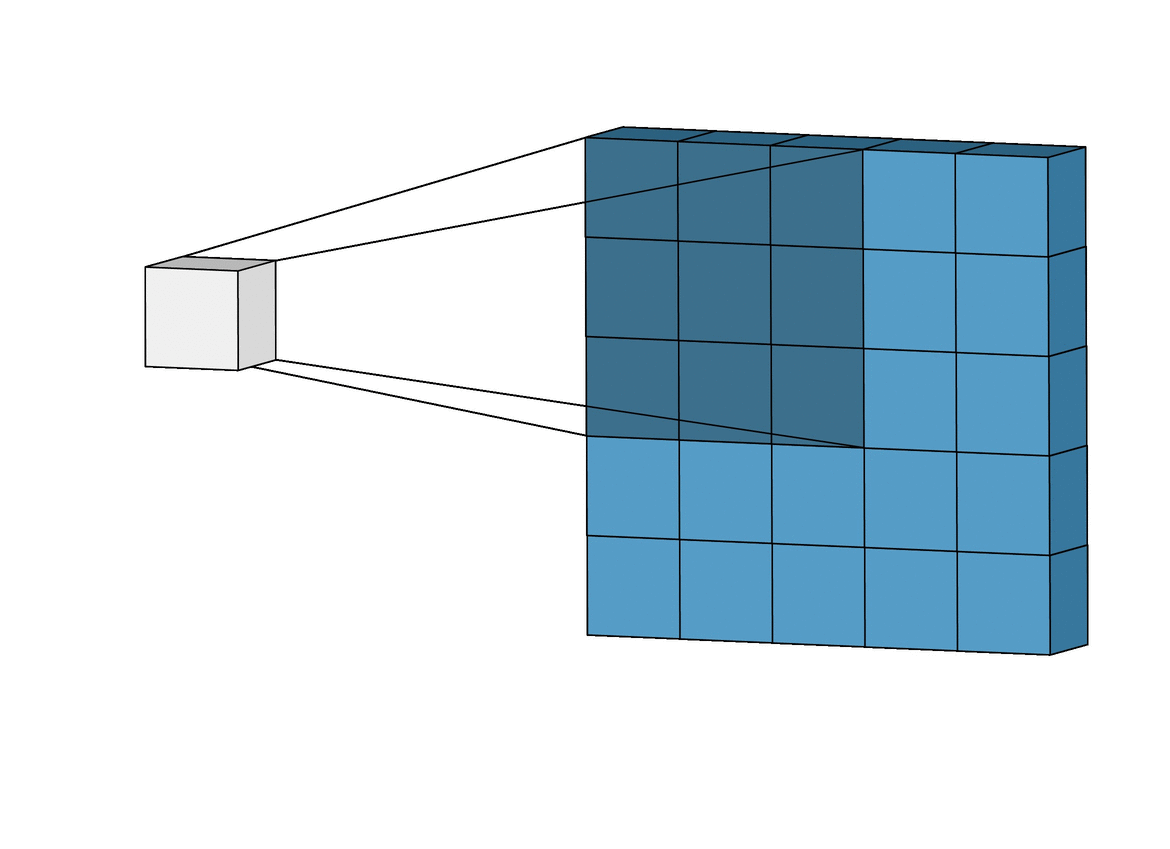
Now, how small to start is a function of your specific problem. If you’re detecting objects or classifying images where the area of the distinguishing attributes is the majority of your captured images, downsizing is less likely to be as hindering to performance. Consider attempting a model as small as, arbitrarily, 80 x 80 before increasing input sizes.
What If My Images Vary in Size?
In circumstances where we do not control the specific camera being used to capture images for inference and deployment, we may find ourselves with images of various input sizes.
How varied in image size plays a crucial role. If a small handful (say, less than 5 percent) of overall images are dramatically misshapen compared to the rest and those images do not overwhelmingly represent a single class or other attribute, there may be a case for removing them from our dataset.
If we have varied image sizes but all within comparable aspect ratios (say, no image is greater than 50 percent larger on one dimension than any other image in the dataset), we should consider resizing to the smallest input variable.
Downsizing larger images to match the size of smaller images is often a better bet than increasing the size of small images to be larger.
If we increase small images to be larger, we stretch small image pixels. This can obscure our model’s ability to learn key features like object boundaries. There is active research on using generative techniques to intelligently create new pixels rather than stretch existing ones.
What If Images Need to be Square?
Converting images from rectangles to squares presents two options: either maintain the existing aspect ratio and add padding to the newly resized image or stretch a raw image to fill the desired output dimensions.
Let’s consider stretching an image to fit. If the aspect ratio of the input does not matter, stretching can be an ok way to make use of the most pixels fed to the network. However, this also requires that our production model receives comparably stretched images. (Said another way: if we teach our model that a very stretched out looking car is what a car looks like, we need to assure our model always sees very stretched out cars for identification.)
If we are keeping a consistent aspect ratio, we will need to check which raw image dimensions is greater, scale that dimension to be equivalent to the max dimension of our output, and modify the second dimension to scale proportionally. For example, if we’re rescaling 1000x800 images to be 416x416, the 1000 edge becomes 416, and the 800 becomes 332.8. The space between 332.8 and 416 becomes padding that we fill.
In general, it is safer to maintain the raw image aspect ratio and resize proportionally.
How Should I Fill Padding Pixels?
Padding refers to the pixels between our raw image content and the edge of the image we’re feeding to our network. In our aspect resize example, we’ve generated new ‘dead pixels’ between the edge of our proportionally resized image and edge of the square image.
Often, padding is filled with either black or white pixels. A third option exists: filling padding with a reflection of the image content. As is often the case, results vary, but the technique is particularly promising for some classification tasks.
Consider running small batch experiments of different types of padding, including reflection padding.
Implementing Resize
Roboflow Train makes it easy to resize a dataset in just a few clicks during model training, while also adjusting annotations proportionally.
After selecting a model architecture in Roboflow Train, you can apply Resize preprocessing by simply toggling it on, as shown below. You can also create a new dataset version with this preprocessing step applied to all images in the dataset.
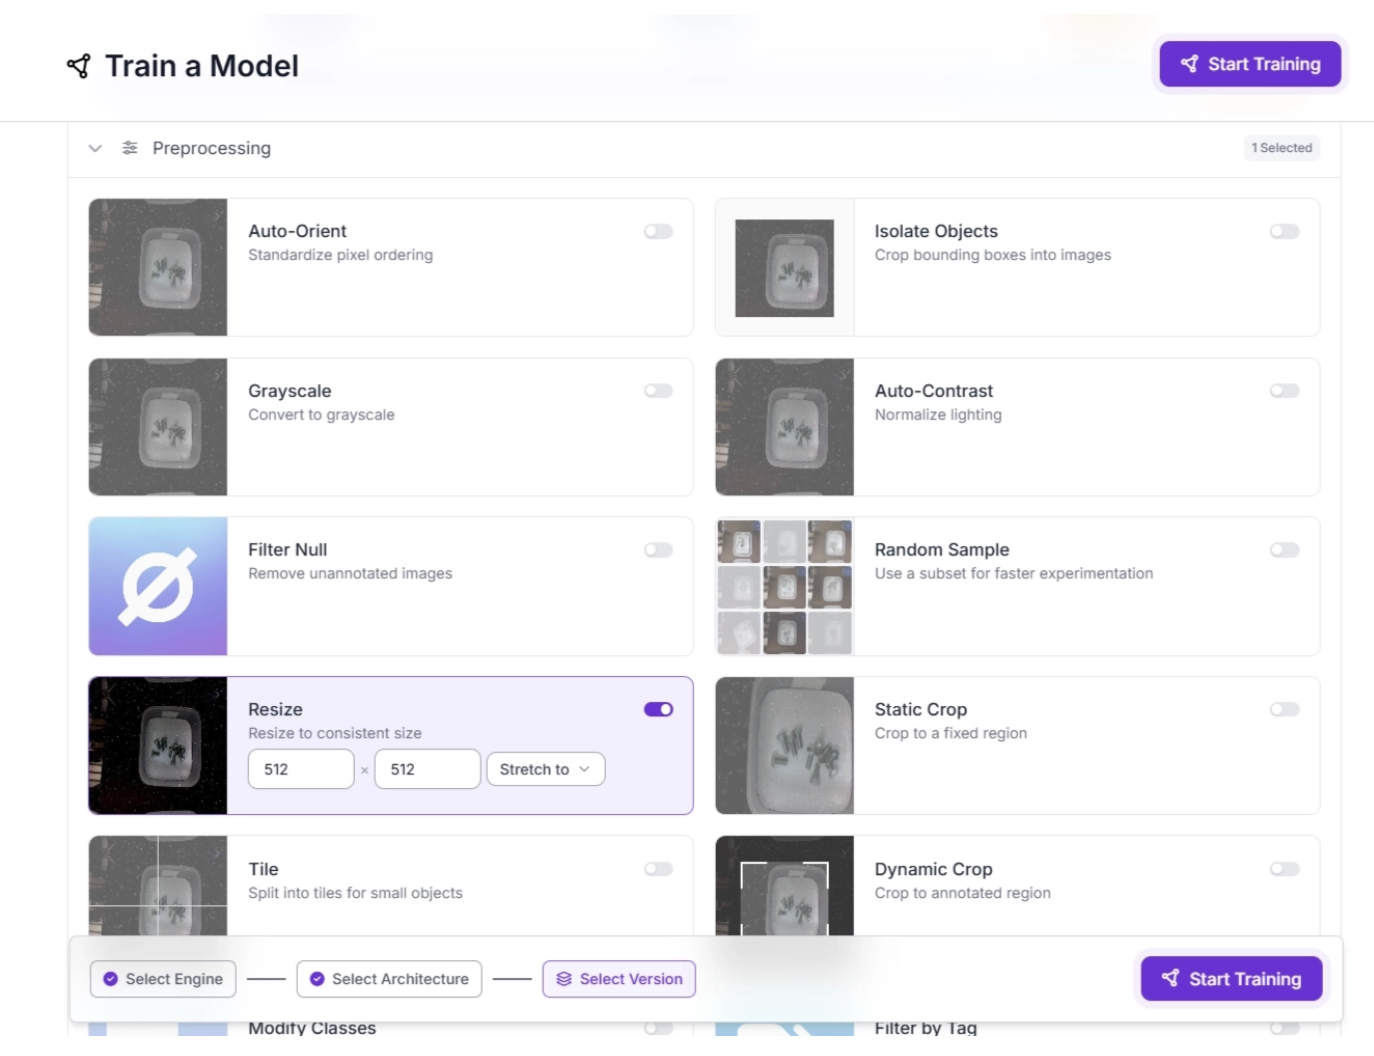
Roboflow supports resizing to any required width and height, with several options that control how the image is scaled:
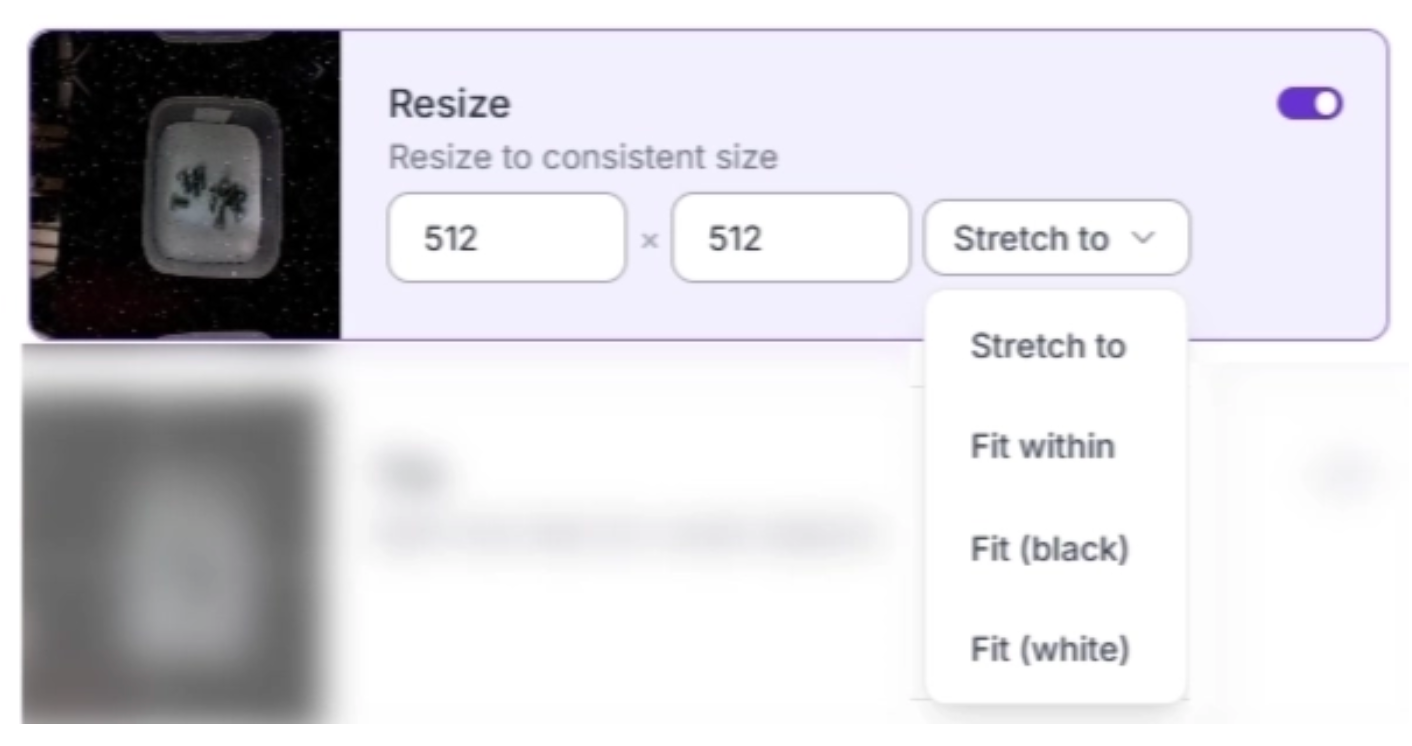
Where:
- Stretch to: Resizes the image to the exact target dimensions, which can distort the aspect ratio.
- Fit within: Scales the image to fit within the target dimensions while preserving the original aspect ratio. For example, a 2600×2080 image resized to 640×640 becomes approximately 640×512. The image is not forced to be square.
- Fit (black): Scales the image while preserving aspect ratio, then adds black padding to reach the target size. For example, resizing 2600×2080 to 416×416 results in 416×335.48(approx.) with black padding filling the remaining space.
- Fit (white): Same as “Fit (black edges) in,” but uses white padding instead. For example, resizing 2600×2080 to 416×416 results in 416×335.48(approx.) with white padding filling the remaining space.
Answers to Common Questions about How to Resize Images Without Distortion
1. How can I detect if resizing has already distorted my dataset or hurt model performance?
Distortion usually reveals itself in two ways: visually and statistically. Look for stretched shapes, warped edges, or labels that no longer align cleanly with objects. Then compare model performance before and after resizing: drops in precision or recall, especially on small objects or fine details, often indicate that resizing is obscuring important features. Roboflow’s dataset visualization and model evaluation tools make this easy to spot.
2. What’s the best way to resize images in batches or pipelines (OpenCV, PIL, PyTorch, TensorFlow)?
Most resizing libraries work well, but they’re not all equivalent. OpenCV is extremely fast and ideal for large pipelines, PIL is straightforward for Python scripts, and PyTorch/TensorFlow built-ins ensure your training loop stays GPU-friendly. What matters most is consistency: use the same method across your whole dataset so your model learns from predictable, distortion-free inputs.
3. How do I choose the right final image size for my specific model architecture?
Check the requirements of any pretrained models you are using. Many architectures have recommended input dimensions. Transformer-based detectors like RF-DETR commonly use square inputs such as 560×560 or 640×640, classification networks like ResNet use 224×224, and other transformer-based models often require standardized square inputs. Modify the size to stay within the memory and processing limits of your hardware. As a rule of thumb, match the expected size of your model family, and adjust only if you see meaningful performance gains during experimentation.
Resizing Your Images Correctly
Resizing is a foundational step in training computer vision models, and the choices you make here directly shape both model performance and training efficiency.
While there is no single “correct” configuration, starting small, experimenting with different approaches such as padding or stretching, and validating results using performance metrics will help you find the right balance.
With tools provided by Roboflow, resizing can be done during dataset preparation or training in just a few clicks, making it easy to apply consistent transformations across all images. Happy building!
How can I resize images without distortion?
To resize images without distortion, maintain the original aspect ratio by scaling the image proportionally rather than stretching it to fit a new shape. You can then fill any remaining empty space with black, white, or reflection padding.
Cite this Post
Use the following entry to cite this post in your research:
Dikshant Shah. (Jan 5, 2026). You Might Be Resizing Your Images Incorrectly. Roboflow Blog: https://blog.roboflow.com/you-might-be-resizing-your-images-incorrectly/