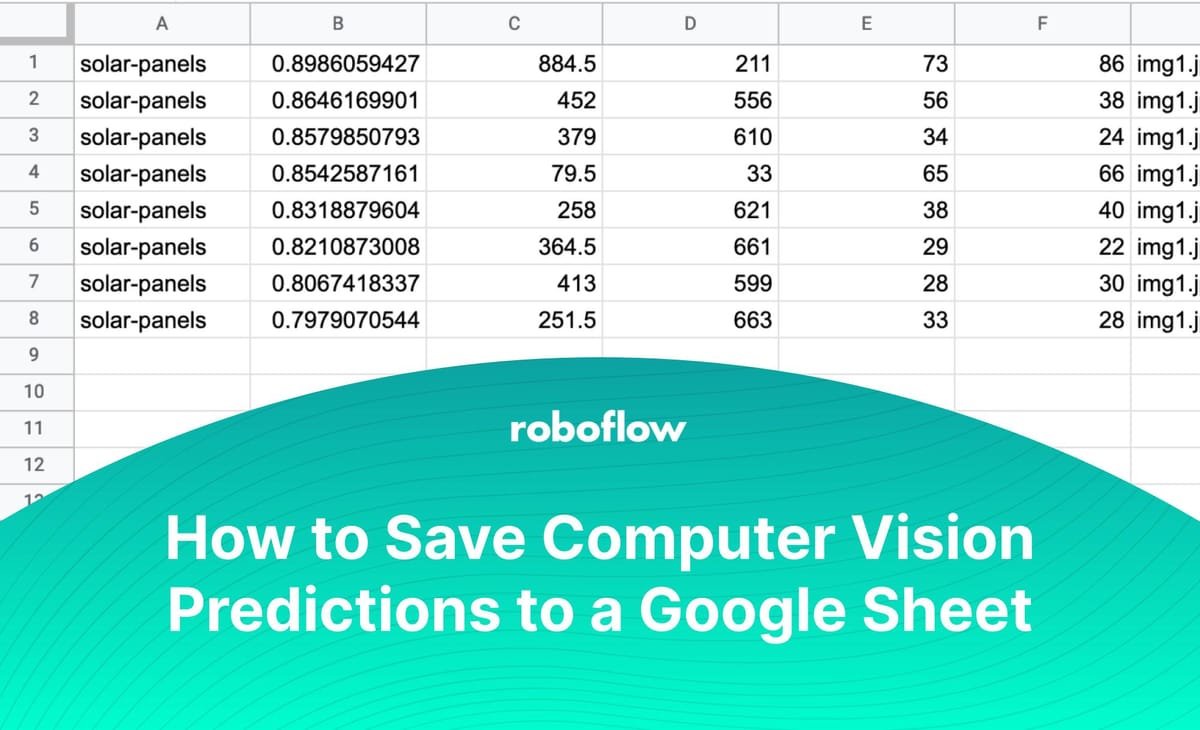
Spreadsheets are an effective way to log the results of a computer vision model. Using a spreadsheet, you can keep track of what positive identifications were made by your model, on what file (or from what camera feed), and at what time the prediction was made.
Consider a scenario where you are doing a project to survey how many solar panels are in a district. You could use a spreadsheet to log all identifications and then, combined with metadata, calculate how many solar panels there are in specific areas.
In this guide, we’re going to talk through how to log computer vision predictions to a Google Sheet using Python. This project uses predictions from a solar panel detection model hosted on Roboflow and saves them to a sheet.
By the end of this project, we’ll have a sheet that looks like this:

Let’s start building!
Retrieve Model Predictions from Roboflow (Optional)
First, we need to retrieve our model predictions in code. If you have a project hosted on Roboflow, you can run inference on images stored on your machine using our Python package. To install the package, execute this command:
pip install roboflowNow that we have the Roboflow library installed, we can import our model into our code. For this example, we’ll be using the Aerial Solar Panels project hosted on Roboflow Universe. To import the model into our code, we can navigate to the Model tab on our model page on Roboflow Universe and copy the code snippet at the bottom of the page.
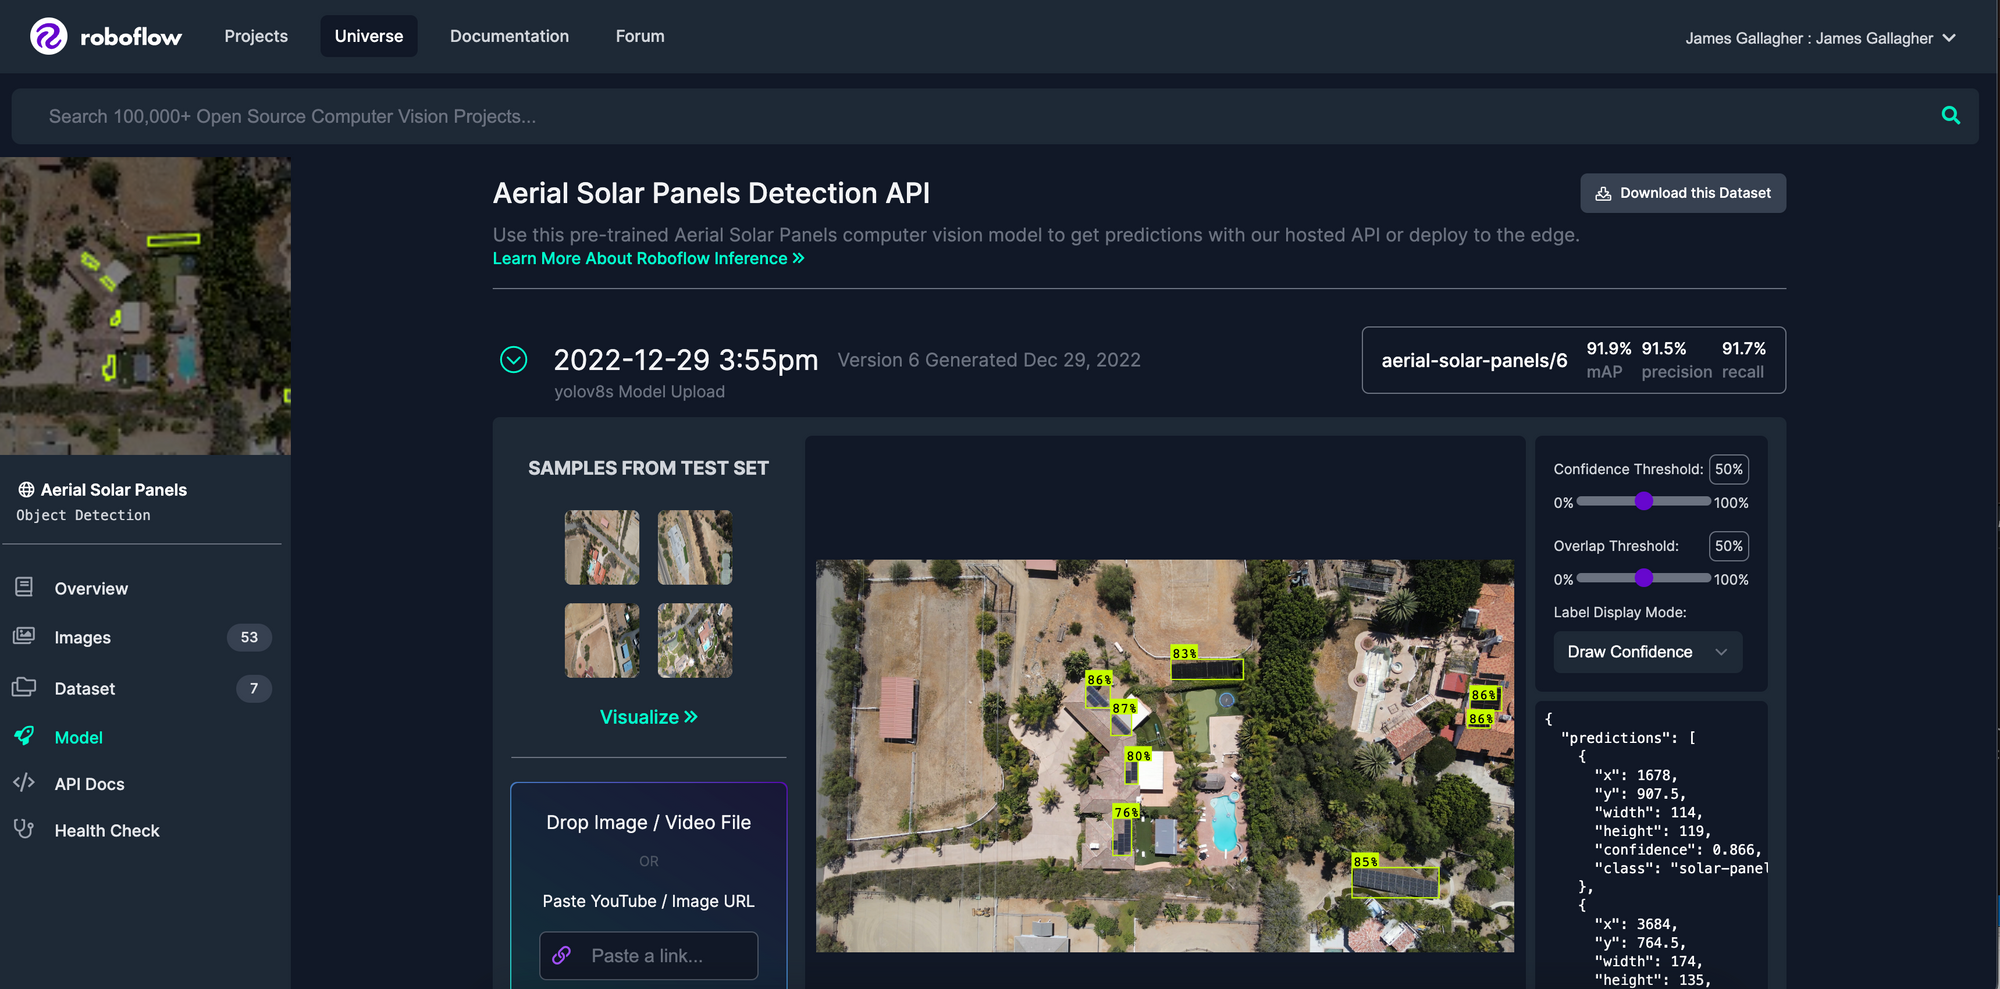
The “Hosted API” section contains a code snippet with our API key and the name of the project on which we can run inference. If you have built your own model, you can access this information from the “Deploy” tab for your model on the Roboflow dashboard.
Here’s what the snippet will look like:
from roboflow import Roboflow

rf = Roboflow(api_key="API_KEY")
project = rf.workspace().project("aerial-solar-panels")
model = project.version(6).model
NB: You should save your Roboflow API key in an environment variable so it is not readable in your project source code.
This code runs inference on one image. For this project, we want to run inference on multiple files. We’ll enable this by writing a function that iterates over all of the images in a specified folder and retrieves predictions from the Roboflow API:
import datetime
import os

IMAGE_DIR = "data"

def get_all_predictions() -> list:
    all_images = os.listdir(IMAGE_DIR)

    all_predictions = []

    for i in range(len(all_images)):
        predictions = model.predict(os.path.join(IMAGE_DIR, all_images[i]), confidence=70).json()

        predictions["datetime"] = datetime.datetime.now().strftime("%Y-%m-%d %H:%M:%S")

        all_predictions.append(predictions)

    return all_predictions
In this code, we state a constant called IMAGE_DIR which contains the location of all of our images. In this case, all of our images are stored in a folder called “data”. We specify that the model should only return predictions with a confidence level of 70% or greater.
This function returns a list with all of our predictions. Each prediction object contains the coordinates of the prediction, the class identified, the name of the file on which inference was run, and the date and time at which the prediction was made.
Here’s an example object:
{'predictions': [{'x': 884.5, 'y': 211.0, 'width': 73.0, 'height': 86.0, 'confidence': 0.8986059427261353, 'class': 'solar-panels', 'image_path': 'data/example.jpg', 'prediction_type': 'ObjectDetectionModel'}, 'image': {'width': '1280', 'height': '720'}, 'datetime': '2023-01-31 09:25:26'}]Now that we have our data, we can begin saving it to Google Sheets!
Prepare Google Sheets Access
We’re going to use the Google Sheets API to log predictions to a spreadsheet. To use this API, you will need:
- A Google account.
- A blank spreadsheet.
- A Google Cloud account on which you can enable access to the Sheets API.
There are a few preparation steps that you must follow before you can start saving data to spreadsheets in your code after you have met the three aforementioned requirements. When you have a Google Cloud account ready, you’ll need to enable the Google Sheets API, retrieve credentials from Google, and install the requisite library.
Google has an extensive tutorial with buttons that take you to the exact pages in their dashboard that you need to prepare for using their Python package. Follow their Python Quickstart tutorial up to the “Configure the sample” section.

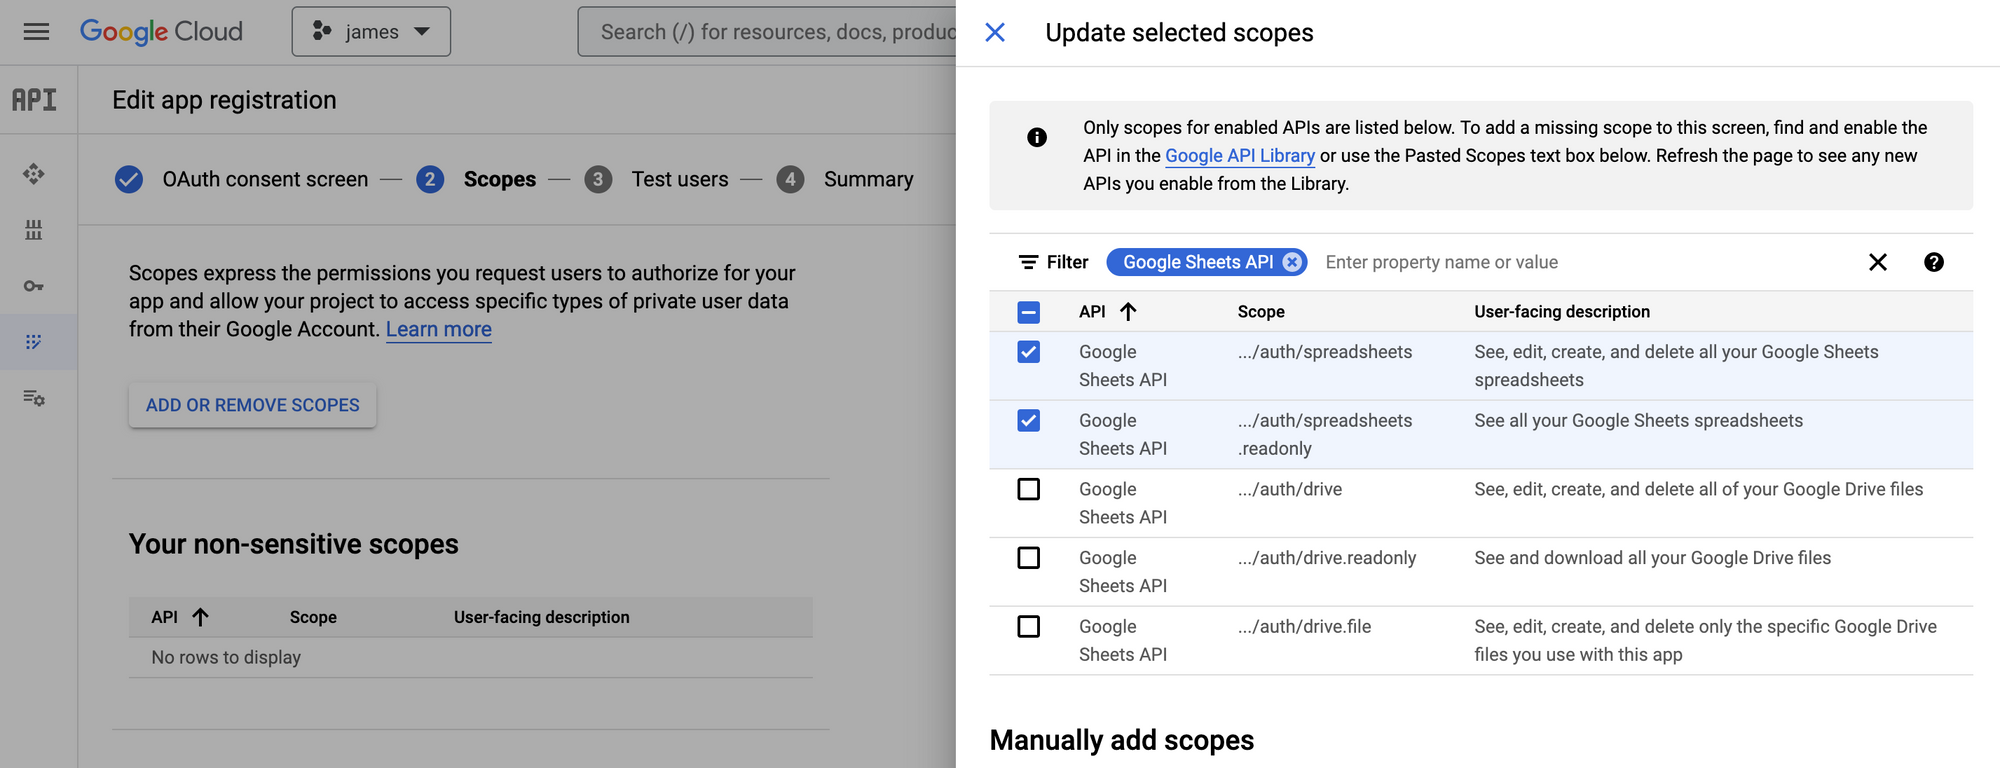
When you are setting up the OAuth Consent Screen, make sure that you add the ".../auth/spreadsheets" and ".../auth/spreadsheets/readonly" scopes. This will give you the permission you need to read from and write to a spreadsheet.
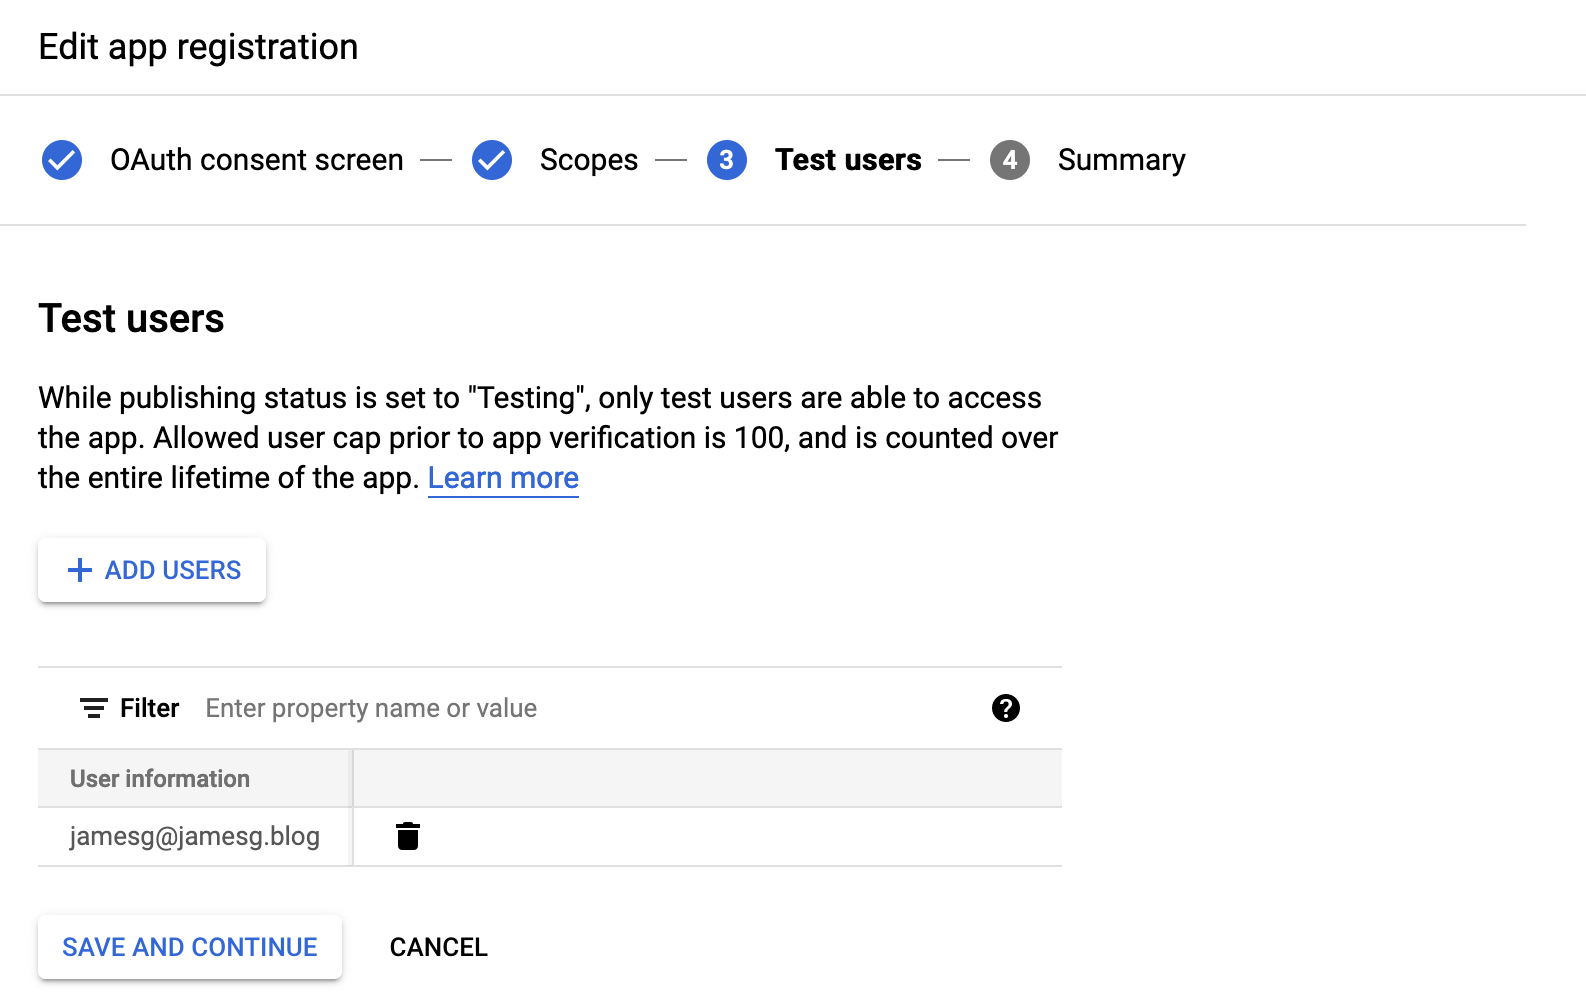
In addition, make sure you add the email address you are going to use with your application to the "Test users" section:
Once you have followed the Quickstart tutorial, come back to follow the rest of this tutorial.
Write a Script to Save Predictions
Once you have followed the Google Quickstart tutorial, you will have authorization configured so that you are able to interface with the Google Sheets API. After creating an OAuth 2.0 Client ID, you will be prompted to download a JSON file and save it as “credentials.json”. This file contains data that our Python script will use to authenticate.
Let’s go back to the script we were writing earlier. At the beginning of the script, add the following lines of code:
from google.auth.transport.requests import Request
from google.oauth2.credentials import Credentials
from google_auth_oauthlib.flow import InstalledAppFlow
from googleapiclient.discovery import build
from googleapiclient.errors import HttpError

SCOPES = ["https://www.googleapis.com/auth/spreadsheets"]
SAMPLE_SPREADSHEET_ID = ""
SPREADSHEET_RANGE = "Predictions!A:Z"
This code imports the requisite Google API libraries and defines three constants:
- Scopes, which refers to the permissions you request in your application. The above code specifies that we want read/write access to spreadsheets. You can leave this value as it is in the code above.
- Sample spreadsheet ID, which is the ID associated with a spreadsheet. You can retrieve this ID by copying the long text in a Google Sheets URL. For example, the ID in “https://docs.google.com/spreadsheets/d/1iKKN0ATvuARwBm_WN7P3gAjIcJq-C3AkACZQkEwrmwk/edit#gid=0” is “1iKKN0ATvuARwBm_WN7P3gAjIcJq-C3AkACZQkEwrmwk”.
- Spreadsheet range, which refers to the tab and range in the spreadsheet that you want to access. You should replace “Predictions” with the name of the tab in your spreadsheet.
There is one step remaining before we can save our predictions: authenticate the user.
Google’s Python API requires that you authenticate as a user via the web when you first set up your application. Authentication follows a standard OAuth flow. This is necessary to grant the permissions your application needs to access and update spreadsheets.
Let’s define a new function called save_to_spreadsheet(). This function will first authenticate with the Google Sheets API using code from Google’s “Quickstart” guide. When you run the script for the first time, you’ll be asked to authenticate. After authentication, a file is created called “token.json” which contains credentials that you can use in all subsequent runs of your program. Then, we’ll use the API to save all of our predictions to a spreadsheet:
def save_to_spreadsheet(all_predictions) -> None:
    """Shows basic usage of the Sheets API.
    Prints values from a sample spreadsheet.
    """
    creds = None
    # The file token.json stores the user's access and refresh tokens, and is
    # created automatically when the authorization flow completes for the first
    # time.
    if os.path.exists("token.json"):
        creds = Credentials.from_authorized_user_file("token.json", SCOPES)

    # If there are no (valid) credentials available, let the user log in.
    if not creds or not creds.valid:
        if creds and creds.expired and creds.refresh_token:
            creds.refresh(Request())
        else:
            flow = InstalledAppFlow.from_client_secrets_file("credentials.json", SCOPES)
            creds = flow.run_local_server(port=0)
        # Save the credentials for the next run
        with open("token.json", "w") as token:
            token.write(creds.to_json())

    service = build("sheets", "v4", credentials=creds)

    try:
        # Call the Sheets API
        sheet = service.spreadsheets()

        for p in all_predictions:
            for bounding_box in p["predictions"]:
                sheet.values().append(
                    spreadsheetId=SAMPLE_SPREADSHEET_ID,
                    range=SPREADSHEET_RANGE,
                    valueInputOption="USER_ENTERED",
                    body={
                        "values": [
                            [
                                bounding_box["class"],
                                bounding_box["confidence"],
                                bounding_box["x"],
                                bounding_box["y"],
                                bounding_box["width"],
                                bounding_box["height"],
                                bounding_box["image_path"],
                                p["datetime"],
                            ]
                        ]
                    },
                ).execute()

    except HttpError as err:
        print(err)

 if __name__ == "__main__":
    all_predictions = get_all_predictions()
    save_to_spreadsheet(all_predictions)
This code expects that predictions are in the following format:
[{"predictions": [...], "file_name": "", datetime: ""}, ...]This is the same format we coded in the “Retrieve Model Predictions from Roboflow” section. Adjust your code as necessary so that all of the values you want to add to your spreadsheet are saved in the “body” value of the sheet.values.append() request.
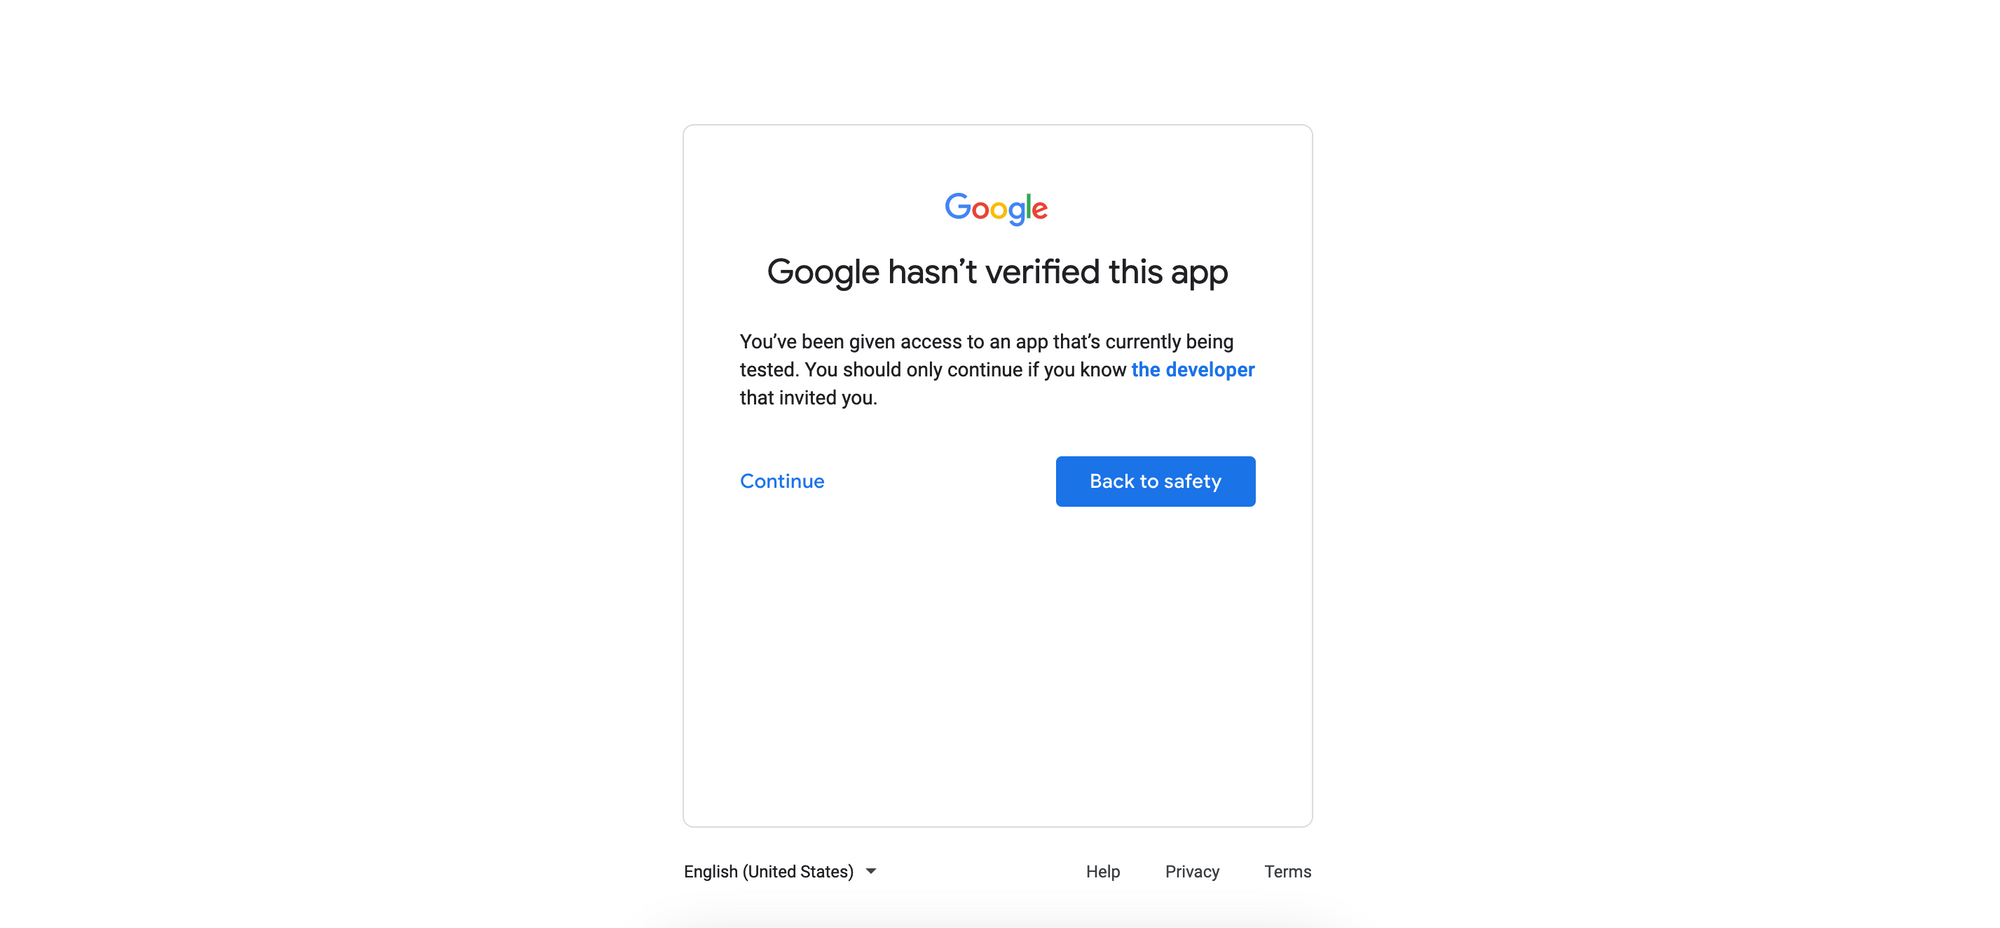
Let’s run our code and see what happens! On the first run, we are redirected to a page that asks us to authenticate with our demo application. We will first be asked to choose an account, and then confirm that we want to use a testing application. This question will be asked if you chose "Testing" while setting up your Google OAuth account. Click "Continue":
Click "Continue" to grant the requisite permissions for your application to function:
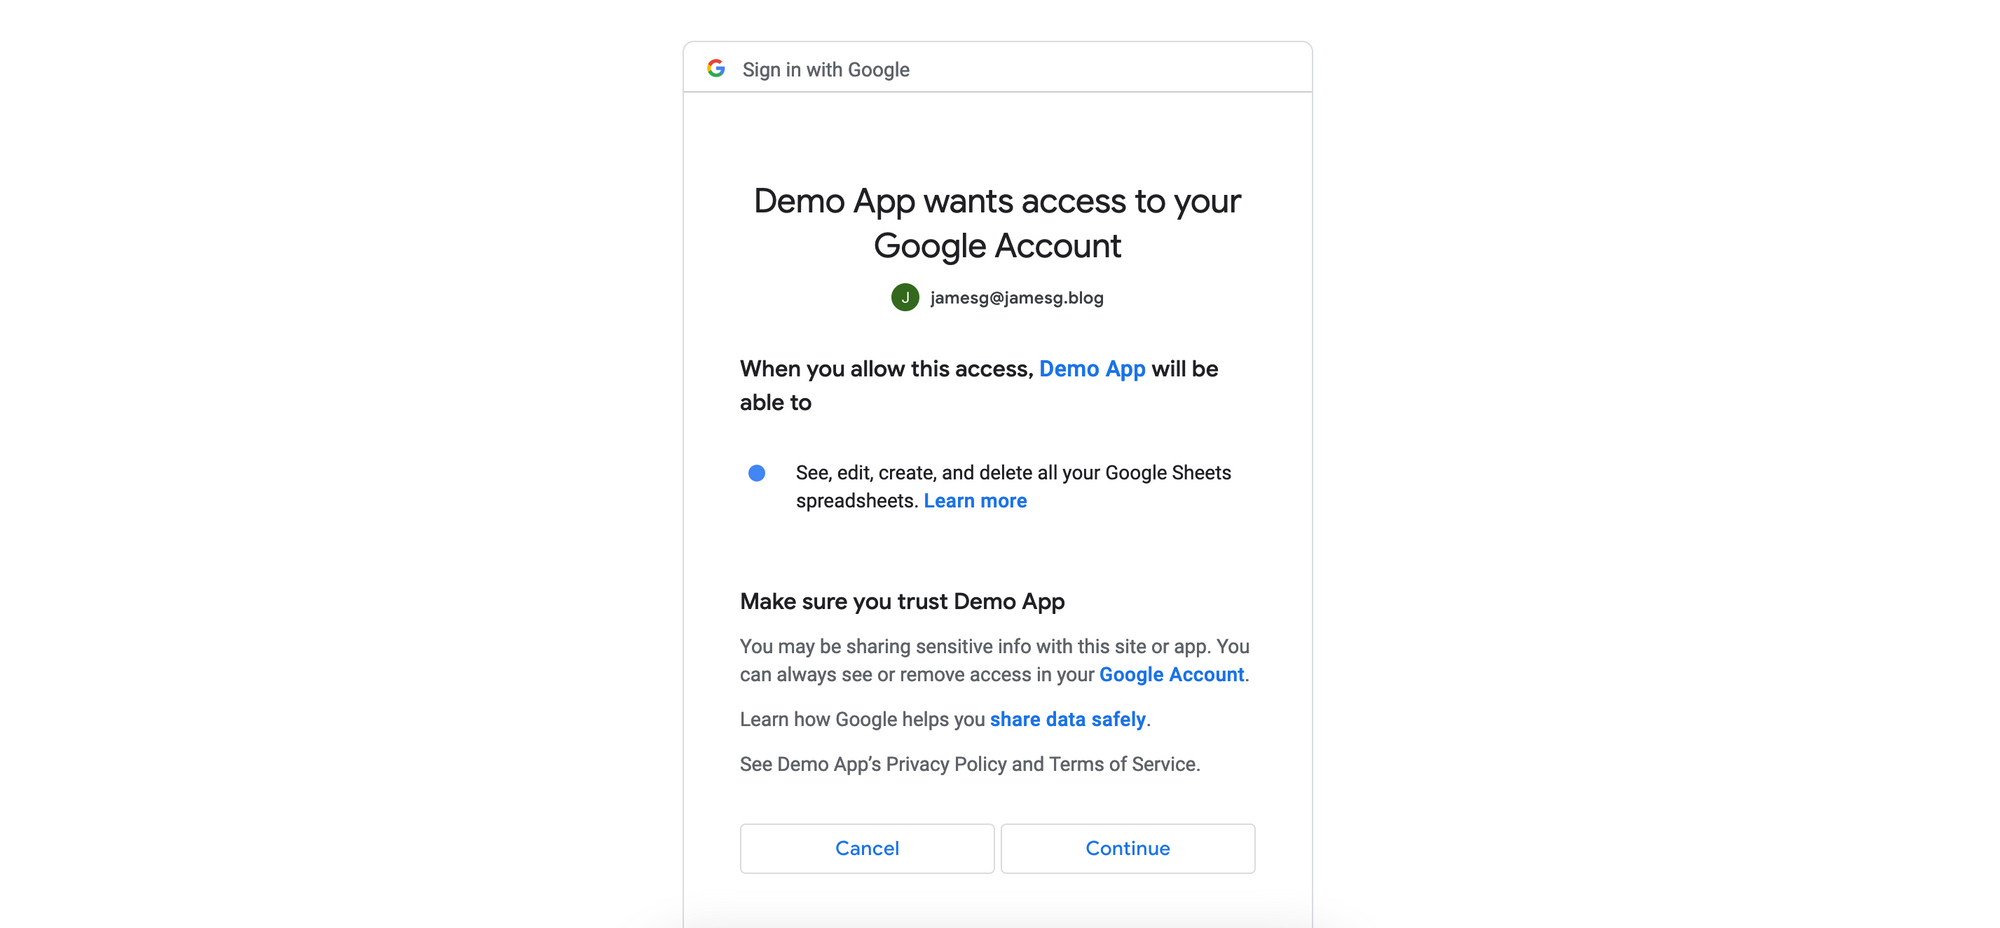
After clicking "Continue", authentication is complete. Our predictions for each file in the “data” directory are saved to our spreadsheet whose ID we retrieved earlier in this section:

When we run our script again, we are not asked to authenticate. Predictions are saved to the spreadsheet without any user intervention. Excellent! We have successfully saved our computer vision model predictions to a spreadsheet.
Conclusion
In this guide, we have walked through how to save predictions from a computer vision model to a Google Sheet. We retrieved predictions from the Roboflow API for all of the images in a folder, recorded the time at which a prediction was made, and saved the result to a Python dictionary.
We then set up an application with the Google Sheets API for use in a Python script. Finally, we authenticated with the API and saved the prediction data we collected to a Google Sheet. Now you have the resources you need to build this workflow into your computer vision projects!
Cite this Post
Use the following entry to cite this post in your research:
James Gallagher. (Jan 31, 2023). How to Save Computer Vision Predictions to a Google Sheet. Roboflow Blog: https://blog.roboflow.com/save-computer-vision-predictions-google-sheets/
