

A confusion matrix organizes a model's predictions into four cells: True Positives, False Positives, True Negatives, and False Negatives, giving you a structured way to see not just how often a model is correct but what kinds of errors it makes. For binary classification tasks, the balance between false positives and false negatives carries real operational cost, so understanding which cell to optimize is more useful than chasing overall accuracy. The post also walks through computing a confusion matrix on an object detection dataset using the Supervision library's ConfusionMatrix.benchmark() method.
When you have a binary classification problem, you’re going to run into confusion matrices at some point. During evaluation, you’ll use a confusion matrix to understand whether your model performs in accordance with your requirements. But what is a confusion matrix? What knowledge can you infer from a confusion matrix? Those are questions we’re going to answer in this guide.
In this tutorial, we will talk through what a confusion matrix is, what their contents mean, and how confusion matrices apply to binary classification problems.
We will also show you how to create a confusion matrix for popular object detection models, including RF-DETR, YOLOv8, YOLO11, YOLOv12, YOLOv5, and Detectron2 using the open source Supervision Python package. Let’s begin!
What Is a Confusion Matrix?
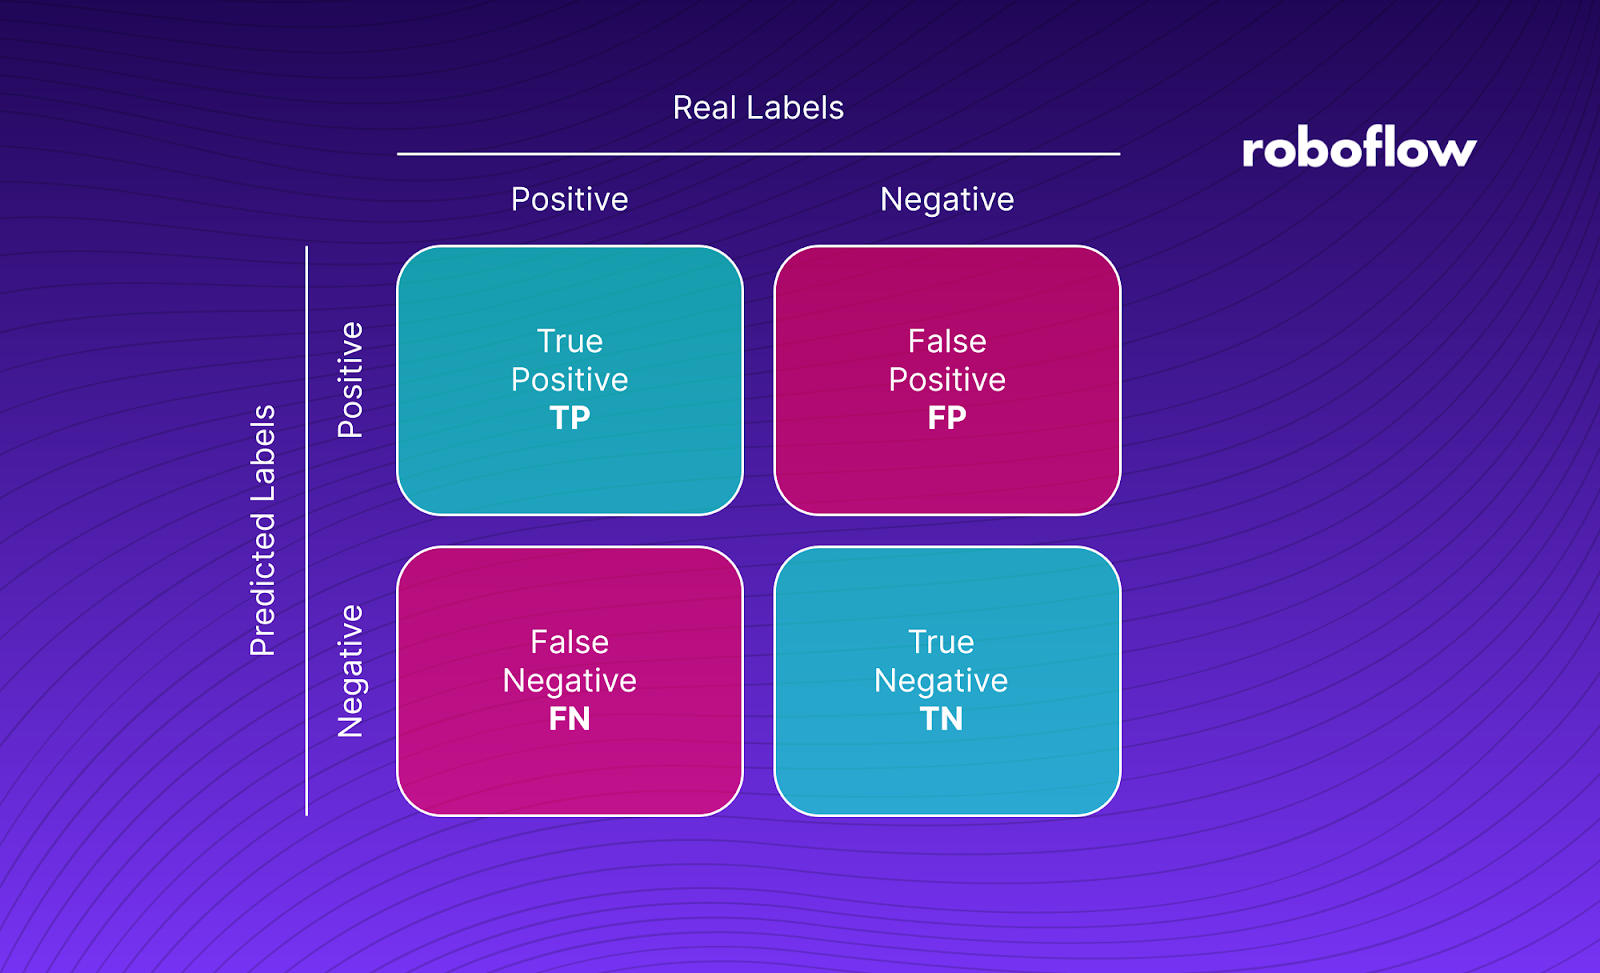
A confusion matrix is a grid of information that shows the number of True Positives [TP], False Positives [FP], True Negatives [TN], and False Negatives [FN] returned when applying a test set of data to a classification algorithm. Using a confusion matrix, you can learn how many times your model makes correct and false predictions.
Confusion matrices can be used in both single-label and multi-label classification. Single-label classification is where a single label is assigned to classify an image. Single-label classification algorithms will be plotted on a 2x2 confusion matrix. Multi-label classification is where multiple labels can be assigned to classify an image. This method of classification will be plotted on a larger matrix, depending on how many labels should be assigned to each image.
Let’s talk through an example. Suppose you want to classify whether an image contains diseased plant material. This is going to be used as part of a quality control process to prevent dangerous plant diseases entering a farm. If a plant disease enters the farm, the yield of both the farm itself and neighboring farms could be compromised.
The Atlantic reported that between 2012 and 2017, coffee leaf rust – a disease that impacts coffee plants and can be carried through infected plants moved to a farm caused more than $3 billion in damage and “forced almost 2 million farmers off their land.” This shows the extent to which infected plants can impact food and beverage production.
As part of our checks, we could build a binary classification model. This model would return “yes” when a plant is likely to contain diseased material, and “no” when a plant appears fine.
When we have our model ready, we have an important question to ask: how effectively does the model work? That’s where a confusion matrix comes in handy.
The Confusion Matrix: A Deep Dive
The confusion matrix gives us four pieces of information about our classifier.
True Positive
A True Positive [TP] is when an image is successfully assigned the correct class. In our example earlier, a TP refers to the number of times an image of a plant is classified as diseased if the plant is diseased and not diseased if the plant is healthy.
False Positive
A False Positive [FP] is when an image is identified as containing something that is not actually in the image. In our case, an FP is an image of a healthy plant that is marked as diseased.
True Negative
A True Negative [TN] is an image that is identified as not part of a class when it is not part of that class. In our example, an image of a healthy plant that is identified as healthy is a true negative.
False Negative
A False Negative [FN] is an image that has been classified as not part of a class when it is part of that class. In our plant example, an image of a diseased plant that is classified as healthy is a false negative.
Evaluating the Confusion Matrix
How you evaluate a confusion matrix depends on the nature of the problem you are solving. No model is perfect. As a result, there may be a specific category of classification for which you want to optimize. This means tweaking your model so that you get a higher rate of a certain class (i.e. False Positive) and a lower rate of another class (i.e. False Negative).
In general, you want to maximize the number of correct identifications. This means you want to have a high True Positive and True Negative rate. The higher the rates of correct identification, the more accurate your model is.
Where evaluation gets tricker is with the other two classes: False Positive and False Negative.
In some scenarios, a higher false positive rate is desirable, even if having a higher false positive rate impacts your true positive rate. Consider our earlier scenario where we need to detect whether a coffee plant is diseased. If a plant is flagged as diseased when it is healthy (a False Positive), all this means is we would have a researcher check a plant manually that is fine.
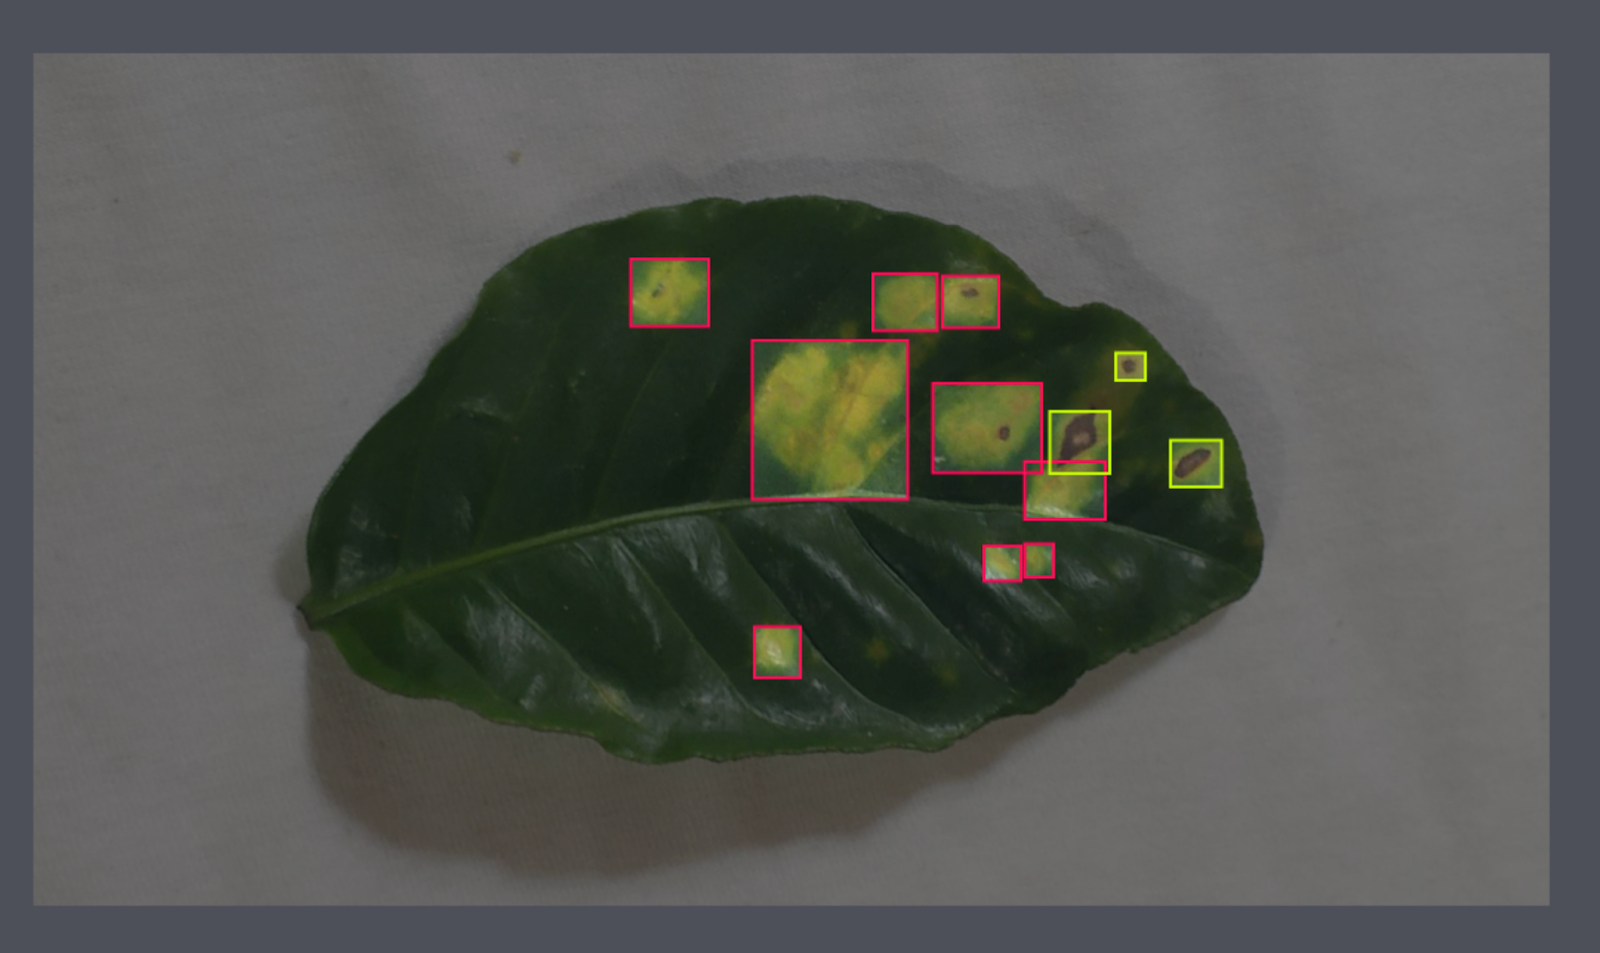
However, consider what would happen if our model had a high False Negative rate. A diseased plant could be marked as healthy and enter the farm to be planted. This has a high cost for the farm. They may have to cordon off part of their farm, hire an agricultural specialist for assistance, and may lose part or all of their farm if the diseased plant is not spotted early enough.
Indeed, the quadrants of the matrix for which you want to optimize depend on cost. Here are two points to think about:
- If the cost of your model being wrong is high, you want to reduce the false negative rate as much as possible, even if that means you have a higher false positive rate.
- If the cost of your model being wrong is low, you might be fine with more false negatives so long as your model is still accurate.
For example, let’s say we are building a classifier to identify whether plants for a supermarket are properly watered after a disease check. Discolored leaves are a sign of under or overwatering, which could be a sign of a potential quality assurance issue in the factory. If plants are not properly watered, a manager could be informed to check on watering schedules. Supermarkets would reject underwatered goods.
It may be acceptable to have a higher False Negative rate (when a plant is not discolored but is marked as discolored) if your model also has a higher true positive rate. This is because it would be less costly for you to miss an underwatered or overwatered plant every now and again if this means reducing the amount of plants that require manual review.
Measuring Overall Model Performance: Accuracy and Precision
With the metrics we discussed above, we can calculate two important statistics that inform us of the overall performance of our model. These statistics are accuracy and precision.
What is Accuracy in Computer Vision?
Accuracy tells us what percentage of predictions the model got right. Using this information, we can roughly guess how many of our future predictions will be wrong if our model is deployed in production. The higher the accuracy, the better.
Accuracy uses the following formula:
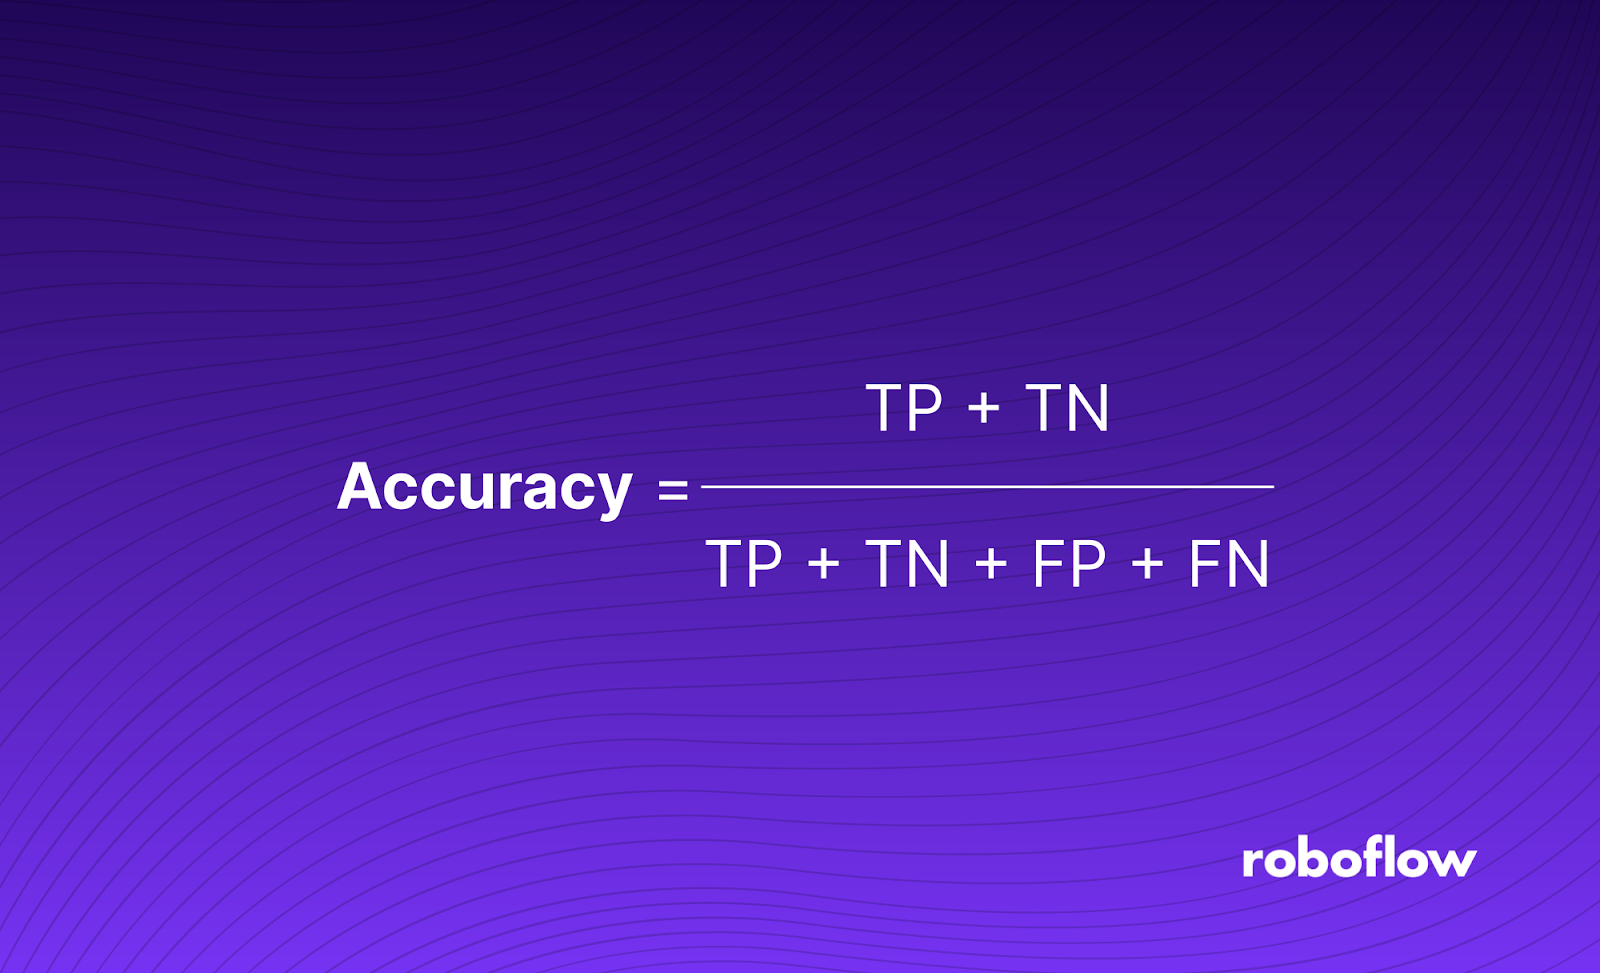
Stated in another way, this formula says that accuracy is equal to the number of correct predictions (TP + TN), divided by the number of predictions made. Accuracy is usually given as a number between 0 and 1, and then converted to a percentage.
But, you cannot look at accuracy without considering the context in which the number is given. Let’s go back to our plant disease identification example from earlier. Let’s say our model has a 0.94 accuracy rate (94%). That’s great! That means that out of 100 predictions, 94 will be correct.
Wait a minute… 94 will be correct? That means that for every 100 plants that enter the lab, 6 of them will contain disease. While some may not be too harmful to the collection, all it takes is one plant with a bad disease to cause serious damage to the lab.
On the other hand, if you are identifying whether an image contains birds (i.e. for a wildlife survey), undercounting 6 out of 100 may be acceptable.
What is Precision in Computer Vision?
Precision is a percentage of the positive identifications made by a model that are correct. Using precision, we can understand how many images that were said to contain an object actually did contain the object the model identified.
Let’s go to our plant example. A model with a high precision rate would have been right in more cases where an image was said to contain disease.
The formula for calculating precision is the number of true positives divided by the sum of all true positives and false positives. As is the case with accuracy, precision is measured as a number between 0 and 1 and usually converted to a percentage.
Here is the formula written out:

Suppose that our plant identification model has a precision rate of 0.75. This means that 75% of True Positive predictions were true. 25% of True Positive predictions in this case are incorrectly classified, which means that the plant in the image does not contain disease.
In the case of identifying plants, a lower precision value is not too big of a deal because a human can manually verify that a plant doesn’t have disease and move it into the lab. Thus, we care more about optimizing for accuracy – ensuring our model makes more correct guesses – than precision. If it means we have to ask people to review more plant samples, that is an acceptable risk for our example.
Calculate a Confusion Matrix on an Object Detection Task
You can use the supervision Python package to calculate a confusion matrix that shows how your model performs on given data. You can compute a confusion matrix in a few lines of code.
First, install supervision:
pip install supervisionTo compute a confusion matrix, you will need:
- An evaluation or test set to use with your confusion matrix, and;
- A model on which to run inference.
Create a new Python file and add the following code:
import supervision as sv
from rfdetr import RFDETRBase

dataset = sv.DetectionDataset.from_coco(...)

model = RFDETRBase()
def callback(image: np.ndarray) -> sv.Detections:
    return model.predict(image)

confusion_matrix = sv.ConfusionMatrix.benchmark(
    dataset = dataset,
    callback = callback
)

print(confusion_matrix.matrix)
# np.array([
#     [0., 0., 0., 0.],
#     [0., 1., 0., 1.],
#     [0., 1., 1., 0.],
#     [1., 1., 0., 0.]
# ])
print(confusion_matrix.classes)
In this code, we initialize an RF-DETR model. We then load a dataset in the COCO JSON format using the supervision.DetectionDataset API. Then, we define a callback that runs inference on an image and returns sv.Detections. These detections can be used to calculate a confusion matrix.
Finally, we calculate our confusion matrix using the ConfusionMatrix.benchmark() method. This returns 2D np.ndarray of shape (len(classes) + 1, len(classes) + 1) containing the number of TP, FP, FN and TN for each class. You can see an ordered list of classes that correspond with the matrix in the classes attribute of our initialized confusion matrix.
To visualize the matrix instead of reading the raw array, call the plot() method:
confusion_matrix.plot()
This draws the matrix as a heatmap with one row and column per class, plus a final row and column for background. Predictions that landed on the diagonal are correct. Anything off the diagonal shows which class the model confused with which, and the background row and column show missed objects and false detections.
Create a Confusion Matrix for YOLOv8, YOLO11, YOLOv12, YOLOv5, and Detectron2
The workflow above is the same for any object detection model. The only thing that changes is the callback: Supervision has a from_*() loader for every popular model family, so you swap the inference call and the loader and leave the rest alone.
Every example below assumes a dataset in YOLO format loaded with sv.DetectionDataset.from_yolo(), with the paths to your images, labels, and data.yaml filled in. If your evaluation set is in COCO JSON or Pascal VOC, use from_coco() or from_pascal_voc() instead.
Here is how to create a confusion matrix for five of the most popular models.
YOLOv8 confusion matrix
YOLOv8 runs through the ultralytics package. Pass each image to the model, take the first result, and convert it with sv.Detections.from_ultralytics():
import numpy as np
import supervision as sv
from ultralytics import YOLO

dataset = sv.DetectionDataset.from_yolo(...)

model = YOLO("yolov8n.pt")

def callback(image: np.ndarray) -> sv.Detections:
    result = model(image)[0]
    return sv.Detections.from_ultralytics(result)

confusion_matrix = sv.ConfusionMatrix.benchmark(
    dataset = dataset,
    callback = callback
)

confusion_matrix.plot()
Replace yolov8n.pt with the path to your trained YOLOv8 weights (for example runs/detect/train/weights/best.pt). The same code works for segmentation models trained with YOLOv8.
YOLO11 confusion Mmatrix
The easiest way to evaluate YOLO11 is through Roboflow Inference, which loads YOLO11 weights by model ID. sv.Detections.from_inference() converts the result:
import numpy as np
import supervision as sv
from inference import get_model

dataset = sv.DetectionDataset.from_yolo(...)

# replace with the ID of any YOLO11 model weights uploaded to Roboflow
model = get_model(model_id="yolo11s-640")

def callback(image: np.ndarray) -> sv.Detections:
    result = model.infer(image)[0]
    return sv.Detections.from_inference(result)

confusion_matrix = sv.ConfusionMatrix.benchmark(
    dataset = dataset,
    callback = callback
)

confusion_matrix.plot()
yolo11s-640 is the pre-trained COCO checkpoint. To evaluate your own model, upload your YOLO11 weights to Roboflow and use the project ID and version number instead (for example my-project/3). The YOLOv8 code above works too if you prefer to load the .pt file directly.
YOLOv12 confusion matrix
YOLOv12 follows the same Inference pattern as YOLO11:
import numpy as np
import supervision as sv
from inference import get_model

dataset = sv.DetectionDataset.from_yolo(...)

# replace with the ID of any YOLOv12 model weights uploaded to Roboflow
model = get_model(model_id="yolo12s-640")

def callback(image: np.ndarray) -> sv.Detections:
    result = model.infer(image)[0]
    return sv.Detections.from_inference(result)

confusion_matrix = sv.ConfusionMatrix.benchmark(
    dataset = dataset,
    callback = callback
)

confusion_matrix.plot()
Swap yolo12s-640 for the ID of your own YOLOv12 model on Roboflow to evaluate custom weights.
YOLOv5 confusion matrix
YOLOv5 weights load through the same package as YOLOv8, so the code is identical apart from the weights file:
import numpy as np
import supervision as sv
from ultralytics import YOLO

dataset = sv.DetectionDataset.from_yolo(...)

model = YOLO("yolov5su.pt")

def callback(image: np.ndarray) -> sv.Detections:
    result = model(image)[0]
    return sv.Detections.from_ultralytics(result)

confusion_matrix = sv.ConfusionMatrix.benchmark(
    dataset = dataset,
    callback = callback
)

confusion_matrix.plot()
Point YOLO() at your trained YOLOv5 .pt file. If you trained with the original YOLOv5 repository rather than the ultralytics package, load the model with torch.hub.load("ultralytics/yolov5", "custom", path="best.pt") and convert results with sv.Detections.from_yolov5() instead.
Detectron2 confusion matrix
For Detectron2, build a DefaultPredictor from your config and weights, then convert its output with sv.Detections.from_detectron2():
import numpy as np
import supervision as sv
from detectron2.engine import DefaultPredictor
from detectron2.config import get_cfg

cfg = get_cfg()
cfg.merge_from_file("path/to/config.yaml")
cfg.MODEL.WEIGHTS = "path/to/model_weights.pth"
predictor = DefaultPredictor(cfg)

dataset = sv.DetectionDataset.from_yolo(...)

def callback(image: np.ndarray) -> sv.Detections:
    result = predictor(image)
    return sv.Detections.from_detectron2(result)

confusion_matrix = sv.ConfusionMatrix.benchmark(
    dataset = dataset,
    callback = callback
)

confusion_matrix.plot()
Set the config path and weights path to the files produced by your Detectron2 training run.
Other models
Supervision ships loaders for many more frameworks: from_transformers() for DETR and other Hugging Face models, from_yolo_nas() for YOLO-NAS, from_tensorflow() for TensorFlow Hub models, from_deepsparse() for DeepSparse, and from_lmm() for Florence-2 and PaliGemma.
Whichever model you use, the pattern is the same: write a callback that returns sv.Detections, hand it to ConfusionMatrix.benchmark(), and call plot(). See the Supervision Detections documentation for the full list.
Conclusion
The confusion matrix is an essential tool in image classification, giving you four key statistics you can use to understand the performance of your computer vision model. Confusion matrices contain True Positive, False Positive, False Negative, and True Negative boxes.
When you are building a binary classification tool, it is essential that you understand the cost of having a higher rate in the False Positive and False Negative boxes. This information will help inform what parts of the quadrant you want to optimize.
And when you move from classification to object detection, the Supervision package computes and plots a confusion matrix for YOLOv8, YOLO11, YOLOv12, YOLOv5, Detectron2, RF-DETR, and any other model in a few lines of code, so you can see exactly which classes your model confuses and fix your data accordingly.
Remember: no model is perfect, so it’s key to try to shape your model to your needs and to mitigate risk rather than striving for perfection.


Cite this Post
Use the following entry to cite this post in your research:
James Gallagher. (Jul 1, 2026). What Is A Confusion Matrix?. Roboflow Blog: https://blog.roboflow.com/what-is-a-confusion-matrix/