
Vision-Language Models (VLMs) have become essential tools for building AI systems that understand both images and natural language. Whether you're asking a model to describe an image, identify objects based on a question, or extract structured information from visual scenes, VLMs bridge the gap between language and vision.
In Roboflow Workflows, VLMs can now be used as part of your pipeline, allowing you to connect image inputs to language-based outputs and route that information to other blocks like uploads, triggers, or additional models.
For this guide, we'll be analyzing frames of NBA games and doing OCR to recognize jersey numbers.
Additionally, fine-tuning VLMs in a multimodal model provides valuable benefits that we'll see later on.
Let’s get started!
Building an VLM-OCR Workflow
For this demonstration, we're going to be building a program that will be able to detect jersey numbers from a snapshot of a basketball game-in other words, OCR. For the bulk of these functionalities, we will be creating a Workflow.
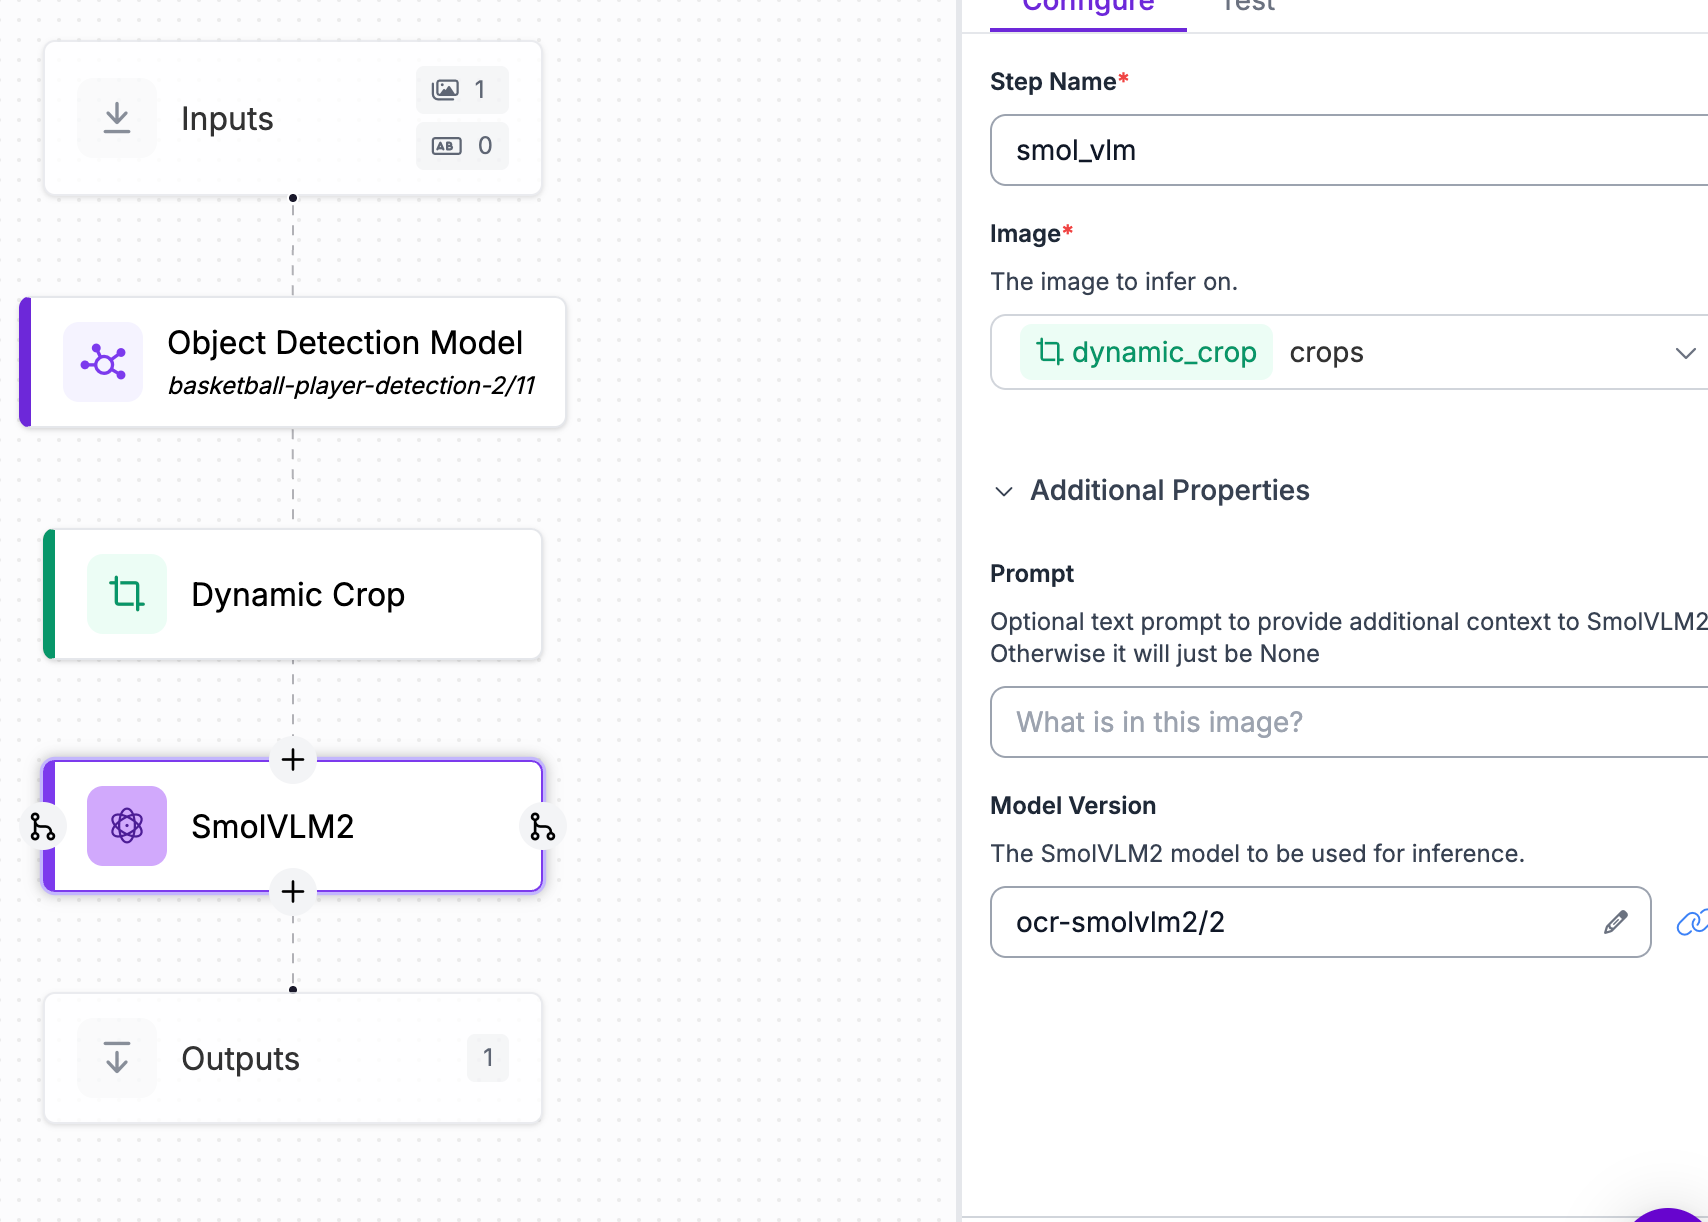
First, head over to Roboflow and create a new workspace and Workflow. In this Workflow, we will be chaining together an object detection model and SmolVLM2, a powerful VLM that can answer questions about an image we provide (from the object detection model). It makes the entire process of OCR more straightforward, and, as we’ll see, highly effective.
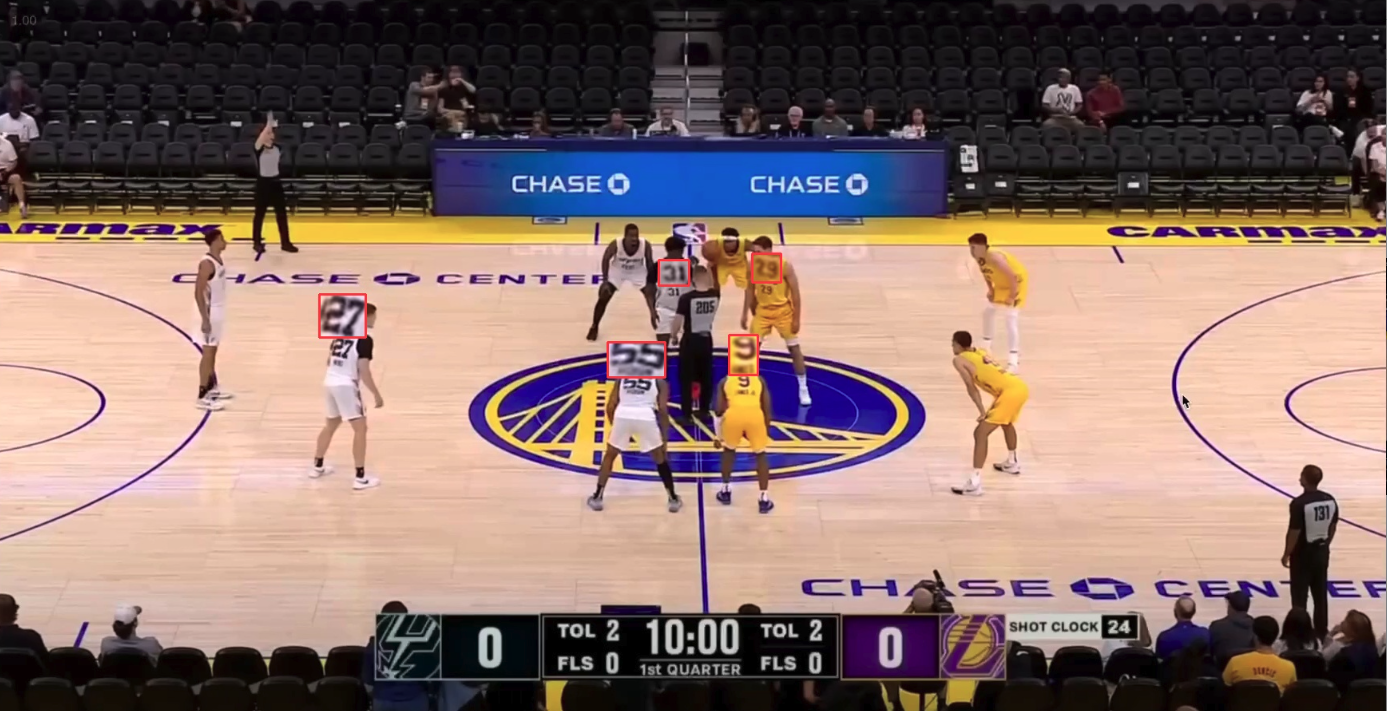
Using Universe, you can find plenty of models that can suit your needs. For this guide, we'll be using an object detection model that can detect all players, jersey number sections, as well as the referee and basketball in any frame of an NBA game.
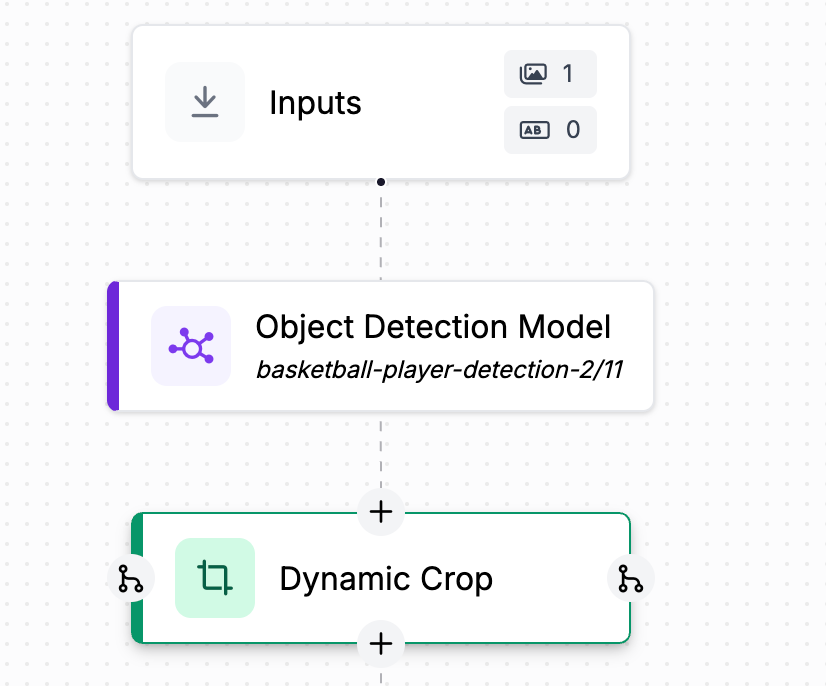
Start by attaching the model as a block in your Workflow. Additionally, since we're only operating on the jersey numbers, add a class filter that will make sure that you only get jersey number bounding boxes as set up for the next block.
From here, we need to crop the image to the jersey number bounding boxes, so attach the dynamic crop block to get cropped images of the jersey numbers themselves in preparation for OCR.
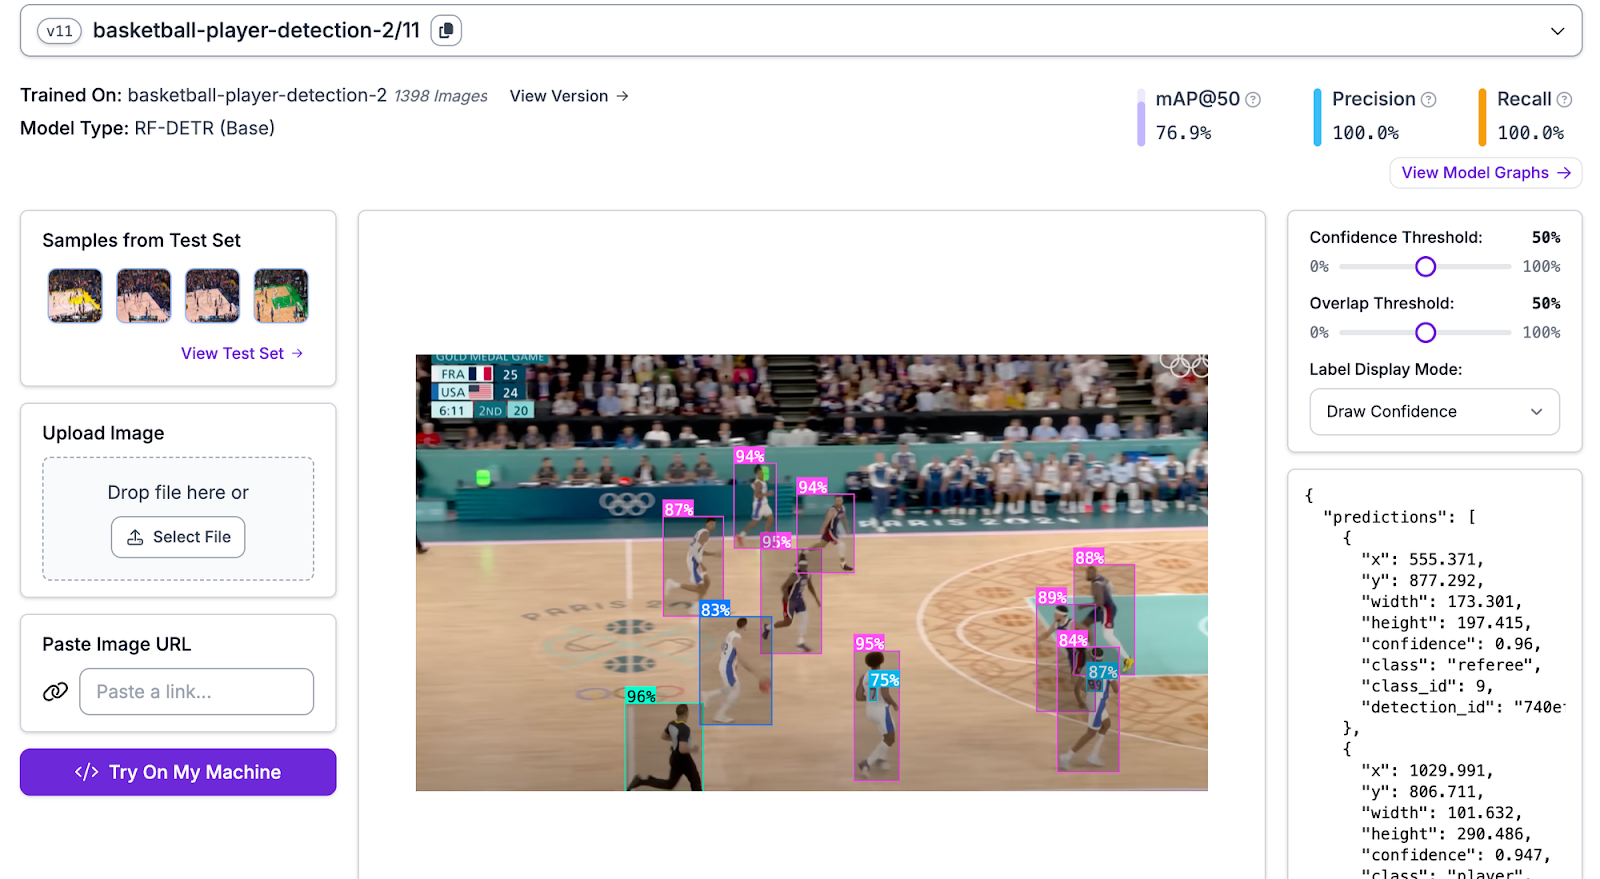
Now, we can attach the SmolVLM2 block, which takes the images of the numbers and recognizes them. Since we are using the base weights which have not yet been fine-tuned for our use case, we have to add a prompt like “What number is shown here?” to help it understand what to do with the data.
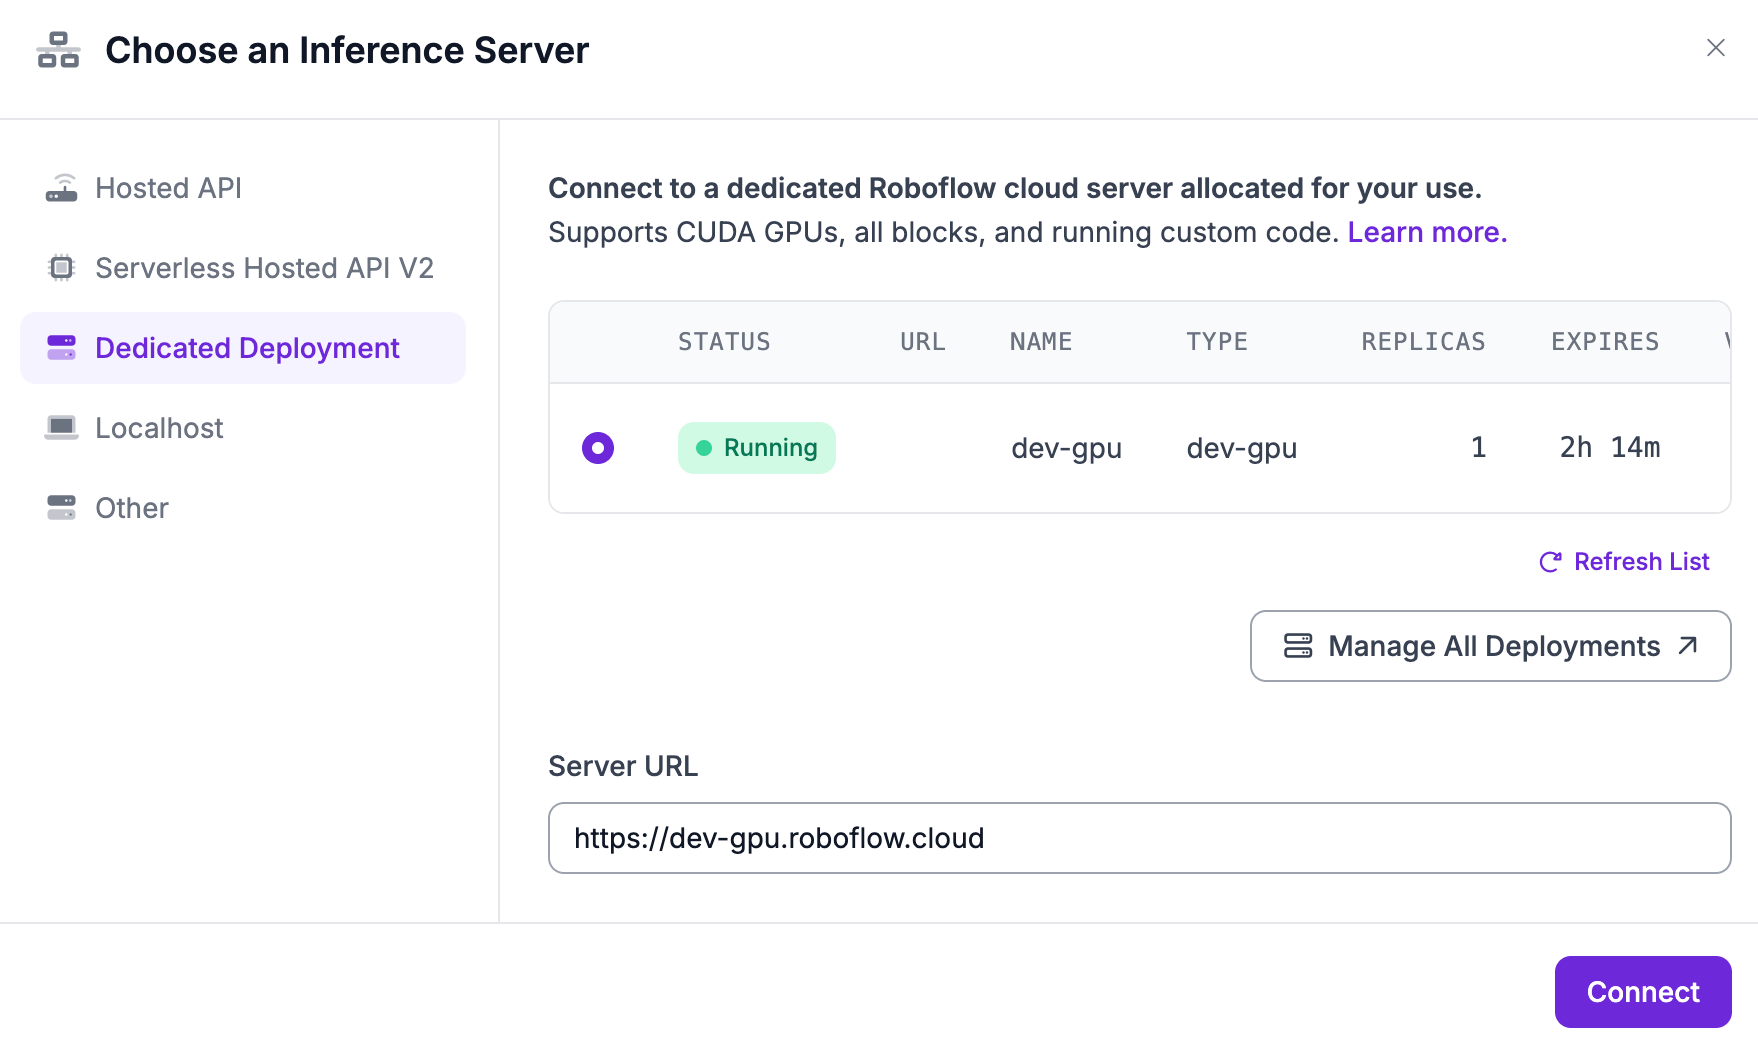
Before we can test this Workflow, we’ll need to change the inference server. As of right now, SmolVLM2 requires a dedicated deployment to run, so we’ll have to create a dedicated deployment.
Keep in mind that since this is a development deployment, the server’s close after a duration (shown in the deployment settings). If you want to put your application into production, a production deployment is more suitable. However, we can now test the model.
You might notice that testing this workflow with various images, that the text that you get as an output is unstructured, giving you a response with a bunch of extra text, like an LLM. While this is to be expected, along with a noticeable delay for predictions, with Roboflow you can fine tune these models easily. Let’s check that out!
Fine-Tuning SmolVLM2 for OCR
Before proceeding, I strongly recommend visiting our dataset preparation with Workflows guide. This guide demonstrates the unique use cases of Workflows, one of them being using them to preprocess data for other Workflows/models. The referenced guide also perfectly demonstrates the setup for fine-tuning SmolVLM2 in the context of the jersey OCR project.
After following the steps and logic in that guide, you should have a bunch of uploaded images to your multimodal project, we can start the fine-tuning process.
I’d also like to reference this guide teaching how to fine-tune SmolVLM2. It documents the process of fine-tuning start to finish, and the only difference is that we’ll be dealing with numbers instead of JSON data-far simpler.
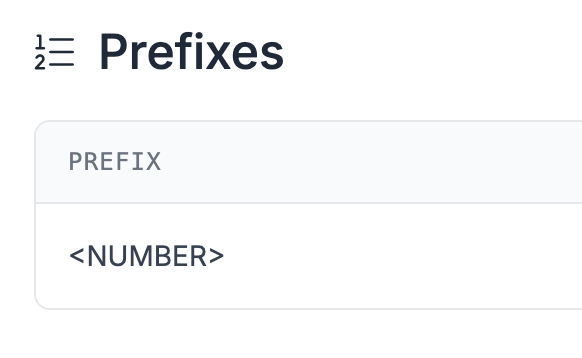
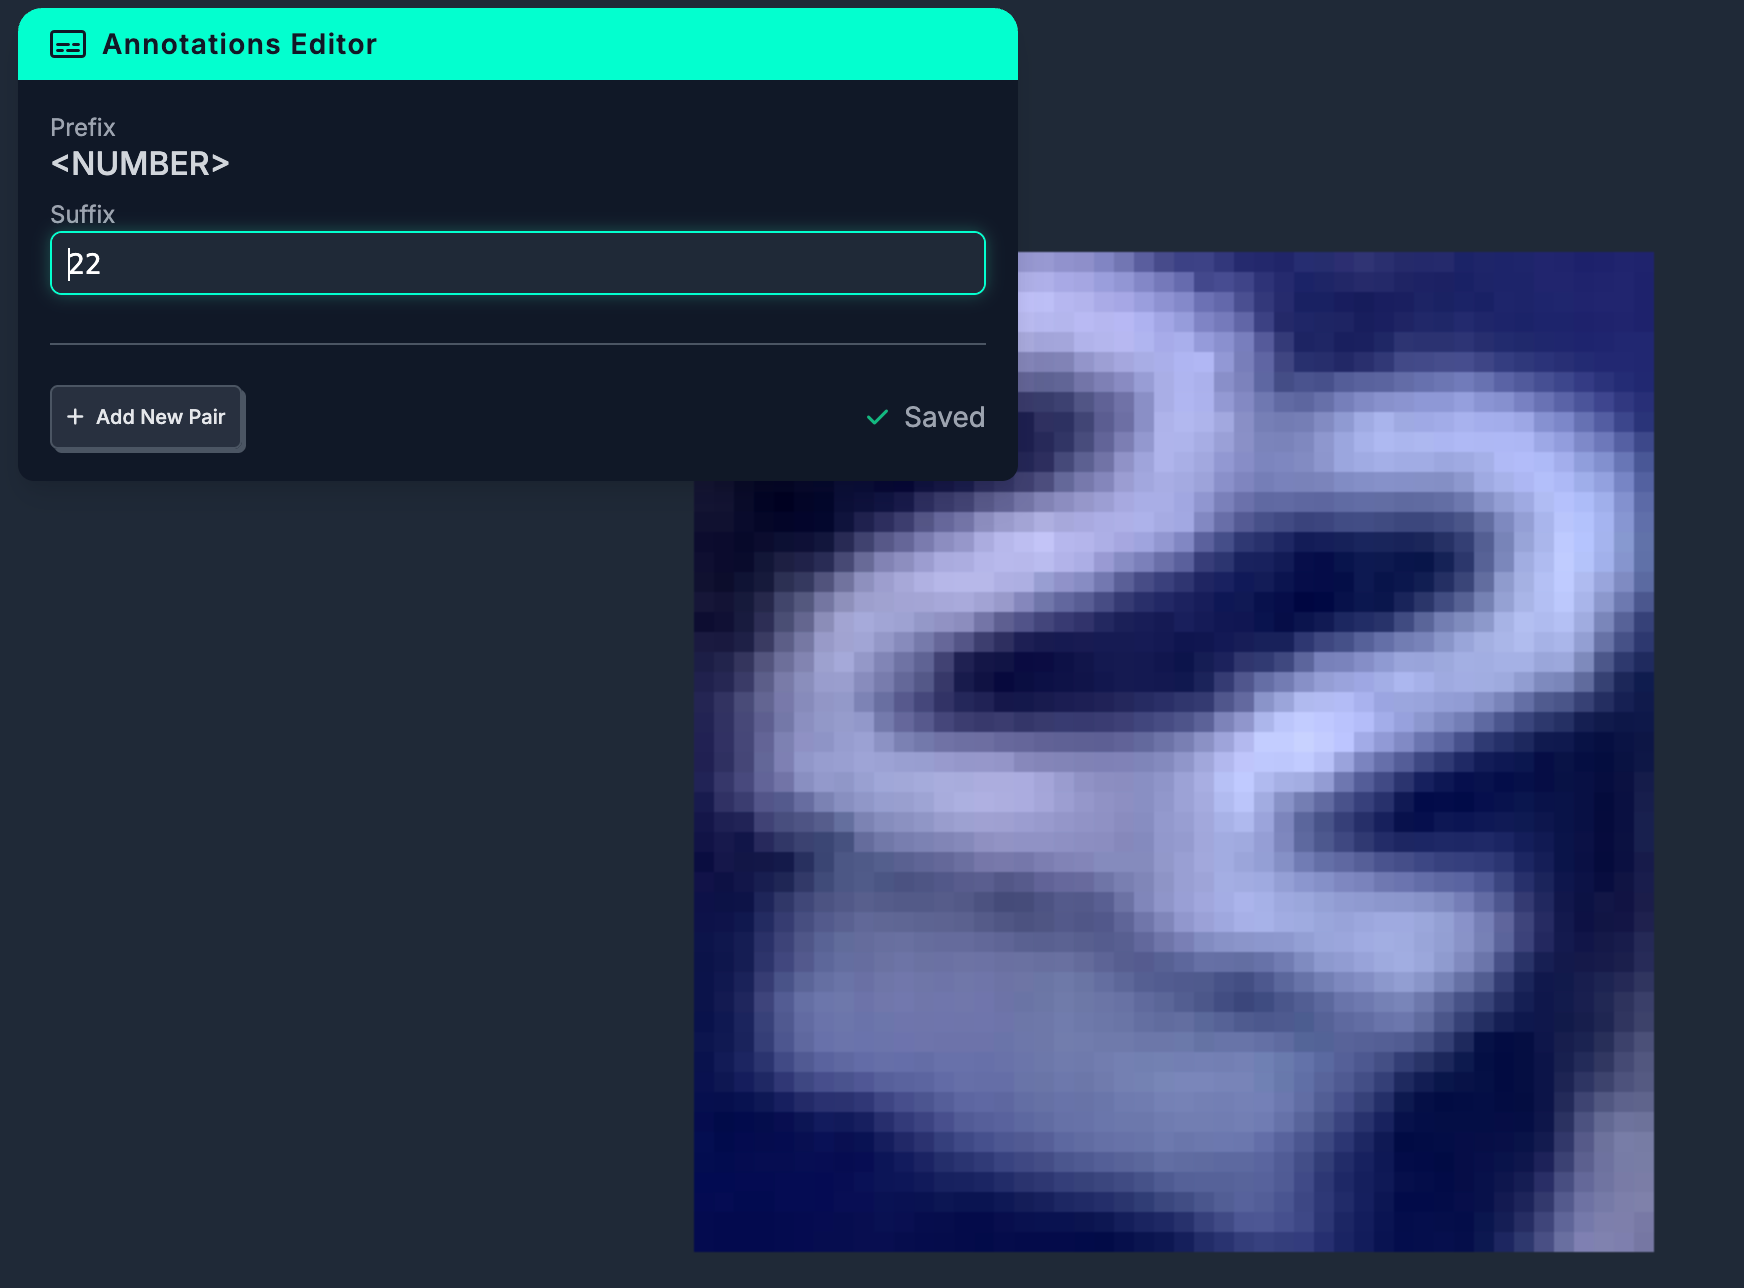
Head over to prefixes, and create a <NUMBER> prefix, this will allow us to set the number a specific image has in the annotation editor.
Repeat this process for more images. The more you annotate, the better the VLM will be able to understand what you’re asking it to do. Since the task is relatively simple, I found that annotating around 80 images and applying relevant augmentation steps yielded great results.
You can then train the model, making sure to choose SmolVLM2. During training, add the following augmentation steps:
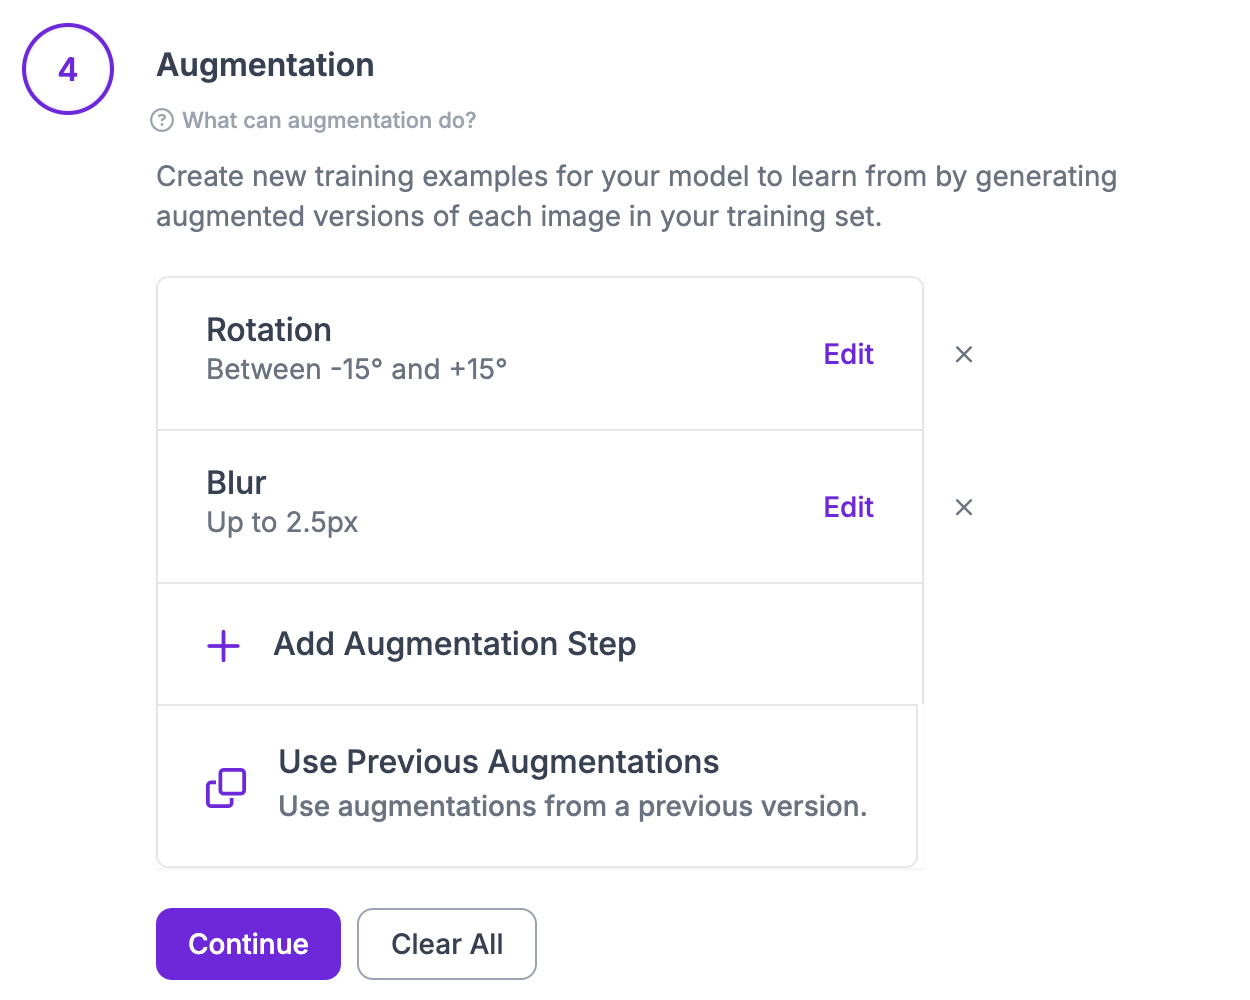
These transformations are accurate representations of potential future images. Although its not necessary to do augmentation, it almost always provides better results during training.
Let the model train, and in the meantime we can create the fine-tuned Workflow. First, go back to the Workflows tab and add a new Workflow. This new Workflow is exactly the same as the one we create for preprocessing, except instead of an upload block, add the fine-tuned VLM we just made (multimodal model).
To test, once again, connect to the dedicated deployment created with the first Workflow. With these two Workflows, we can now use them to perform OCR on videos/frames of NBA games.
Comparing Base and Fine-Tuned SmolVLM2
For this tutorial, I’ll show how to incorporate both workflows, fine-tuned and base, into a program, and then run a simulation to compare the two.
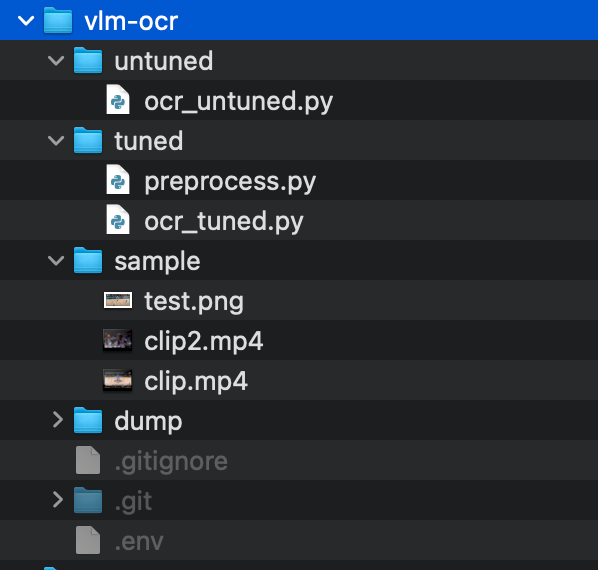
The base weights and fine-tuned weights directories hold the respective Workflows, and the sample folder stores all of the data we intend to test on. Dump is a place to store all of the frames extract during the testing process.
Next, deploy both your Workflows, and depending on what data you’ll be using, the boilerplate code will vary. For this tutorial, I chose to run both workflows images, with the serverless api (varies for fine-tuned Workflow as we’ll see)
Paste the boilerplate code into their respective files, and make sure that your fine-tuned workflow is running on a dedicated deployment server, either development or production. Once it is, substitute the server url in the deployment as your api_url for ocr_tuned.py.
In ocr_base.py, which holds the Workflow with the base weights, we need to parse the responses that we get from inferences, and we can do this with regex. Additionally, add a program timer, which will later allow for the two Workflows to be compared.
from inference_sdk import InferenceHTTPClient
import os
import re
from dotenv import load_dotenv
import cv2
import time

# Start timer
start_time = time.time()

# Load environment variables
load_dotenv()

# Initialize the inference client
client = InferenceHTTPClient(
    api_url=os.getenv("API_URL"),
    api_key=os.getenv("API_KEY")
)

# Regex pattern to find Assistant numbers
pattern = re.compile(r"Assistant:\s*([0-9]+)")
player_set = set()

# Load video and determine frames
video_path = "sample/clip.mp4"
cap = cv2.VideoCapture(video_path)
frame_count = int(cap.get(cv2.CAP_PROP_FRAME_COUNT))
total_frames = 2
step = max(frame_count // total_frames, 1)
frame_indices = [i * step for i in range(total_frames)]

current_frame = 0
frame_id = 0

while cap.isOpened():
    ret, frame = cap.read()
    if not ret:
        break

    if current_frame in frame_indices:
        # Save frame as jpg
        frame_path = f"dump/frame_{frame_id}_{time.time()}.jpg"
        cv2.imwrite(frame_path, frame)

        # Run inference using the saved file
        result = client.run_workflow(
            workspace_name="dev-m9yee",
            workflow_id="vlm-ocr-base",
            images={"image": frame_path},
            use_cache=True
        )
        print(f"{frame_id + 1}/{total_frames}")

        # Extract player numbers
        for res in result[0]["smol_vlm"]:
            m = pattern.search(res)
            if m:
                number = m.group(1)
                player_set.add(number)

        frame_id += 1

    current_frame += 1

cap.release()

# End timer
end_time = time.time()
duration = end_time - start_time

print("Unique Player Numbers:", player_set)
print(f"Total Time Elapsed: {duration:.2f} seconds")
This code also adds quality of life features for testing, such as standardizing the number of frames, regardless of the source. Additionally, I have stored both my API URL and my API key in environment variables. If you wish to do this, I suggest following this guide documenting that process. Finally, running this code should give updates as inferences are being made through the Workflow that uses the base weights.
There is a similar set up for ocr_tuned.py. Except now, regex parsing is not necessary due to the fine-tuning.
from inference_sdk import InferenceHTTPClient
import os
import re
from dotenv import load_dotenv
import cv2
import time

# Start timer
start_time = time.time()

# Load environment variables
load_dotenv()

# Initialize the inference client
client = InferenceHTTPClient(
    api_url=os.getenv("API_URL"),
    api_key=os.getenv("API_KEY")
)

player_set = set()

# Load video and determine frames
video_path = "sample/clip.mp4"
cap = cv2.VideoCapture(video_path)
frame_count = int(cap.get(cv2.CAP_PROP_FRAME_COUNT))
total_frames = 2
step = max(frame_count // total_frames, 1)
frame_indices = [i * step for i in range(total_frames)]

current_frame = 0
frame_id = 0

while cap.isOpened():
    ret, frame = cap.read()
    if not ret:
        break

    if current_frame in frame_indices:
        # Save frame as jpg
        frame_path = f"dump/frame_{frame_id}_{time.time()}.jpg"
        cv2.imwrite(frame_path, frame)

        # Run inference using the saved file
        result = client.run_workflow(
            workspace_name="dev-m9yee",
            workflow_id="vlm-ocr-finetune",
            images={"image": frame_path},
            use_cache=True
        )
        print(f"{frame_id + 1}/{total_frames}")

        # Extract player numbers
        for res in result[0]["smol_vlm"]:
            player_set.add(res)

        frame_id += 1

    current_frame += 1

cap.release()

# End timer
end_time = time.time()
duration = end_time - start_time

print("Unique Player Numbers:", player_set)
print(f"Total Time Elapsed: {duration:.2f} seconds")
Next, fill the sample folder with clips/screenshots of NBA games, which we now want both Workflows to make inferences on, and compare their performances. Notice the path to the video in both files. Depending on what you're testing on this will change.
From here, running both programs reveal interesting results that we’re about see!
Conclusion
In this guide, we fine-tuned a SmolVLM2 model to read jersey numbers on players.
We found that our fine-tuned model was both faster and more accurate than the base SmolVLM2 model. The model was faster because the fine-tuned model is quantized. The model was more accurate because we trained the model on our specific use cases.
Our fine-tuned model got 5/6 numbers correct in our limited test; the base model got three numbers correct. The fine-tuned, quantized model took 23.14 seconds to process three distinct video frames; the base model took 27.97 seconds.
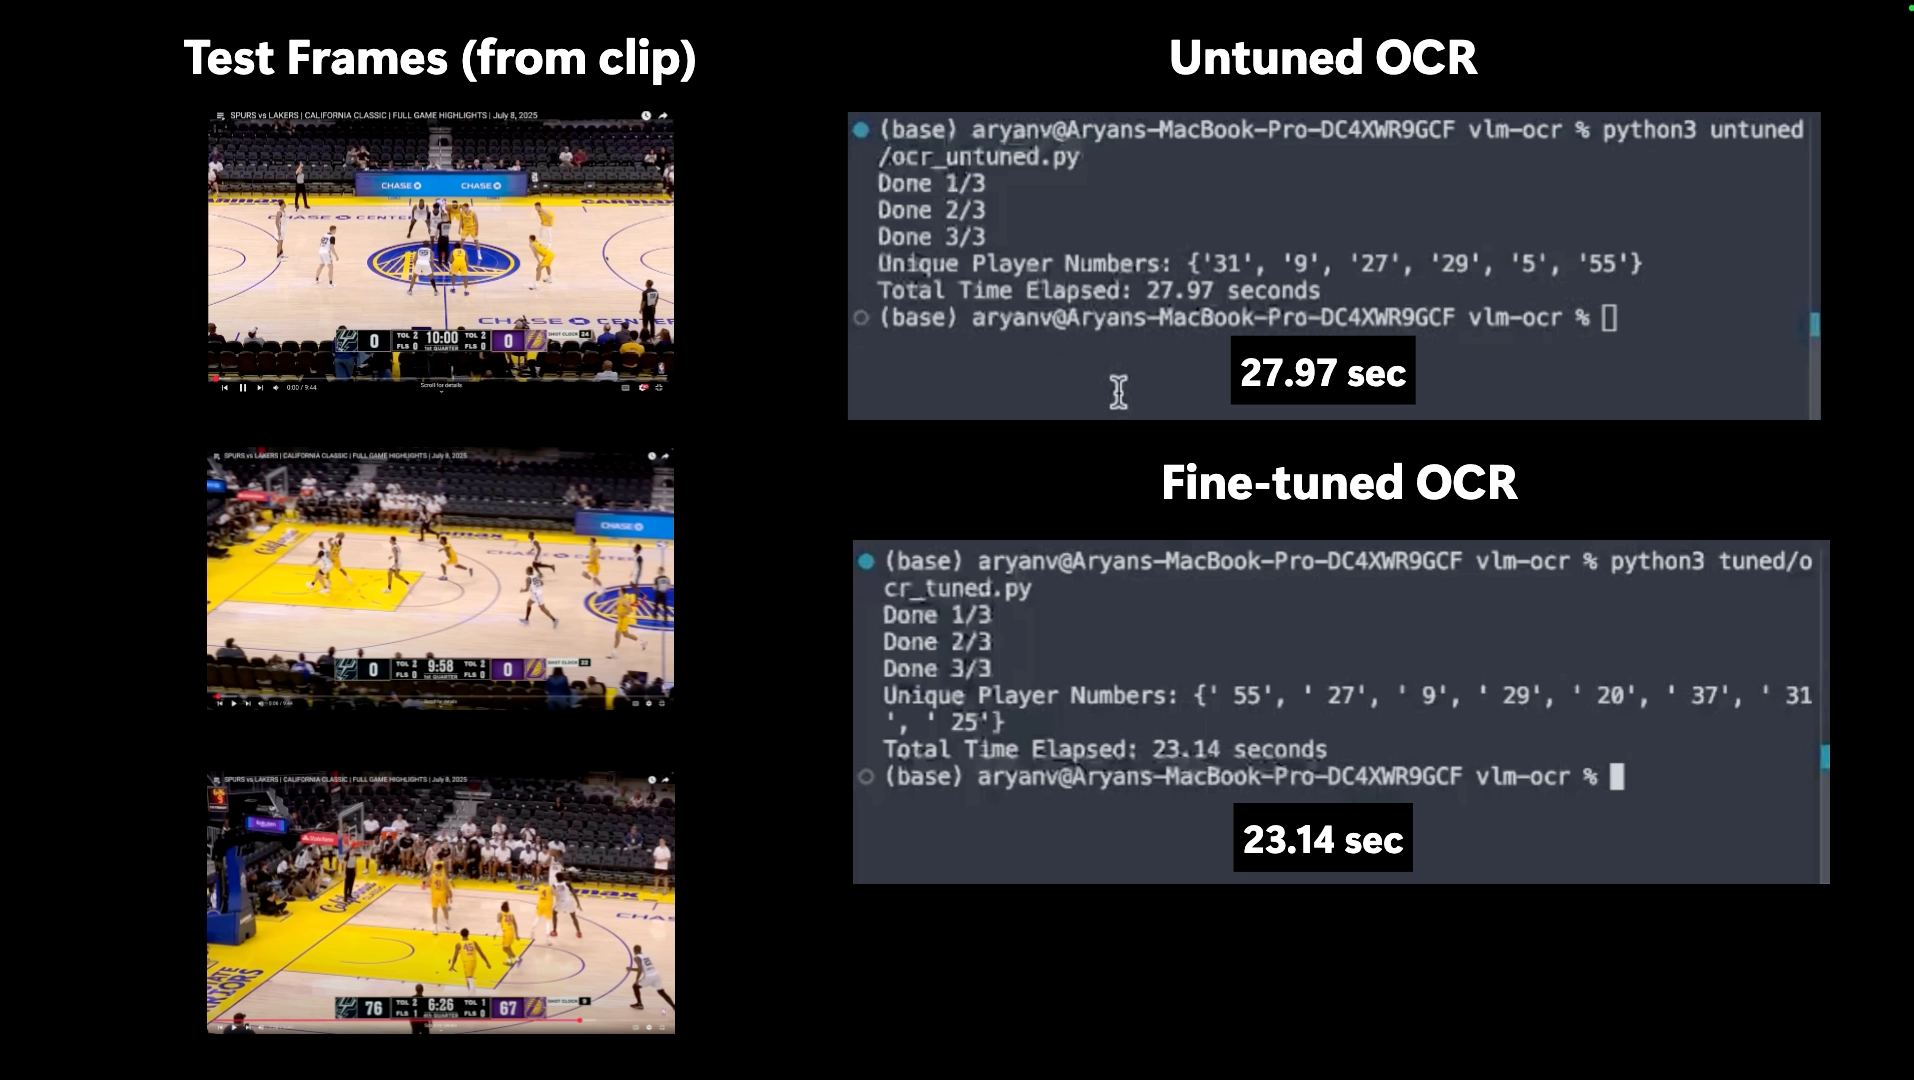
Here, the program was run on the sample clip of an NBA game, and you can see that the fine-tuned model performed a sizeable 26% faster than the base model.
Both models operate on frames with bounding boxes similar to the ones highlighted in the image above, however, due to the nature of fine-tuning and its improvements regarding accuracy, it is able to more accurately perform OCR on these crops.
Fine-tuning SmolVLM2 allowed for the fine-tuned model to perform faster and with greater accuracy (identified more players correctly) when compared to the base model.
Overall, fine-tuning VLMs are shown with this project to provide meaningful improvements regardless of how complex the task.
If you have any questions about the project, you can check out the Github repository over here.
Cite this Post
Use the following entry to cite this post in your research:
Aryan Vasudevan. (Jul 14, 2025). Comparing Base and Fine-Tuned SmolVLM2 for OCR. Roboflow Blog: https://blog.roboflow.com/base-vs-fine-tuned-smolvlm2-ocr/