
How a lightweight, client-side pipeline estimates gaze in real time - and what it enables for UX research, HCI, and rapid prototyping.
Eye tracking has historically required specialized hardware and native applications. That’s great for laboratory-grade studies, but it adds friction if you want to run quick UX tests remotely, prototype gaze-aware interactions, or explore human–computer interaction (HCI) ideas without deploying heavy infrastructure.
This project - HueVision - explores a different path: real-time, browser-based eye tracking using commodity webcams and modern vision tooling. The goal isn’t to replace research-grade hardware; it’s to make fast, reproducible experiments possible for practitioners who care about what users look at and when - directly in the browser, on ordinary laptops.
Key design constraints:
- Client-side only (privacy-preserving; no video leaves the machine)
- Low setup friction (open a page, allow camera, start)
- Explainable pipeline (clear architecture you can adapt or extend)
What the Real-Time Eye Tracking System Does
At a glance, the system:
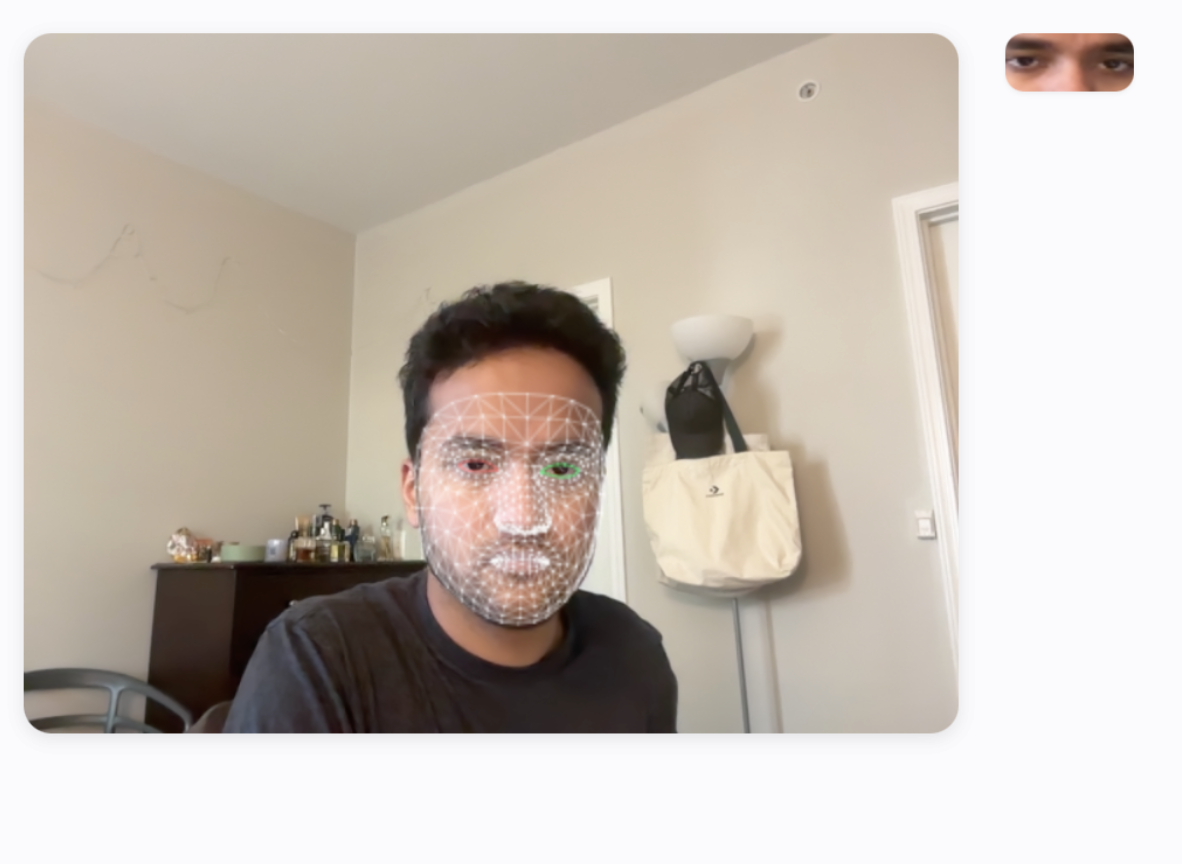
- Detects a face and dense facial landmarks (including the irises) in each camera frame.
- Extracts eye regions and computes features that correlate with gaze direction.
- Calibrates with on-screen targets to learn the mapping from eye features → screen coordinates.
- Predicts gaze point in real time and visualizes a heatmap/reticle overlay.
- Runs entirely in the browser with MediaPipe FaceMesh and TensorFlow.js.
This enables quick usability tests (what regions of a page draw attention), exploratory prototypes (gaze-aware UI elements), and accessibility experiments (hands-free interactions), all without installing native software.
From clmtrackr → MediaPipe FaceMesh: Why the Switch?
The earliest iterations used clmtrackr for 2D facial landmarks. It’s lightweight and easy to wire up, but for consistent eye tracking you quickly run into three issues:
- Landmark fidelity: coarse landmarks around the eyes don’t localize irises well.
- Stability: small head movements and lighting changes produce jitter.
- Generalization: performance varies across faces, webcams, and backgrounds.
MediaPipe FaceMesh improved all three:
- Dense landmarks (468+ points) including iris landmarks - critical for gaze cues.
- Robustness to pose and lighting variation through a stronger underlying model.
- Browser-friendly runtime with a well-documented API and built-in drawing utils.
The tradeoff is modestly higher compute than clmtrackr. With sensible throttling and canvas drawing strategies, the result is a smooth, more accurate signal suitable for real-time gaze estimation on commodity hardware.
System Architecture to Build a Real-Time Eye Tracking App
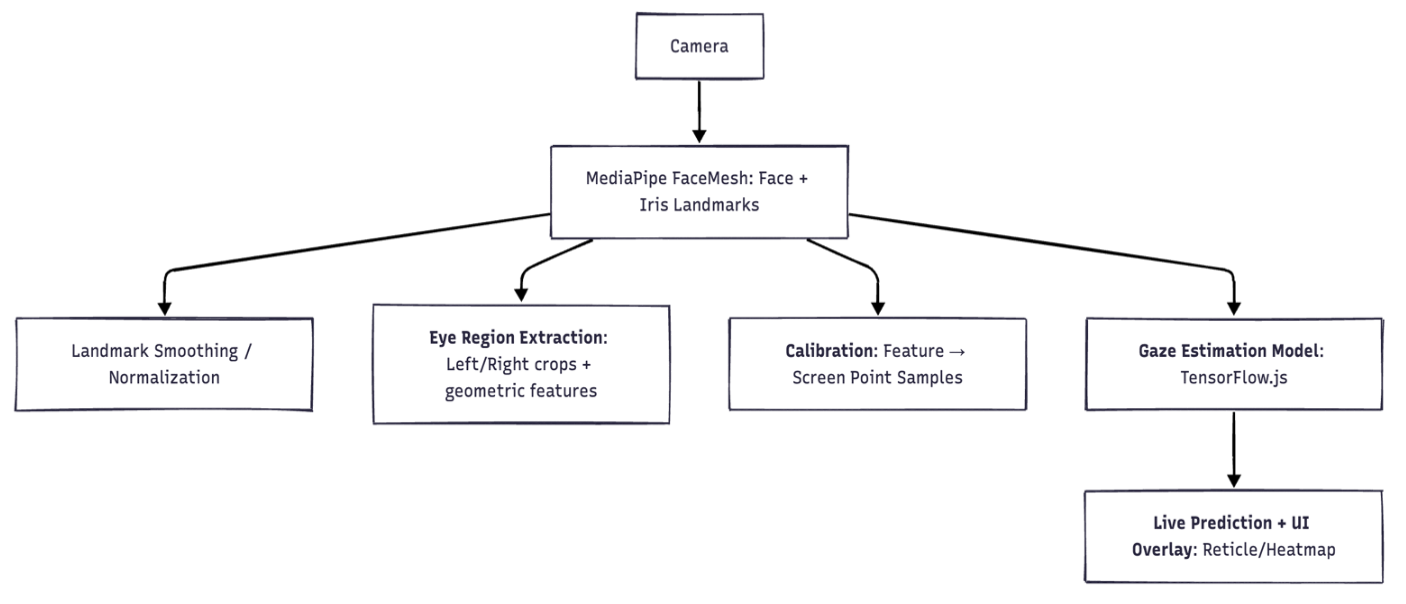
Core Components of Real-Time Eye Tracking in the Browser
- Face & Iris Tracking (facetracker.js) Initializes MediaPipe FaceMesh, streams webcam frames, returns stable landmark arrays at interactive frame rates.
- Dataset Builder (dataset.js) Captures paired samples during calibration: eye features ↔ known screen coordinates (targets). Stores and serves data for model training.
- Model & Training (training.js) A compact TensorFlow.js model learns the mapping from the extracted eye features to normalized screen coordinates. Trains in the browser.
- Visualization & UI (ui.js, heat.js) Renders the reticle/heatmap overlay, guides the user through calibration, and provides simple metrics to verify stability.
- App Shell (index.html, main.js, style.css) Wires the pipeline together, manages lifecycle (start/stop), and handles responsive canvas layout.
How Eye Features Become Gaze
1. Landmark Detection
For each frame, FaceMesh yields dense facial landmarks plus LEFT_IRIS and RIGHT_IRIS points. These are the anchors for gaze inference.
2. Eye Region Extraction
From landmarks, we:
- compute iris centers relative to eye corners,
- normalize by inter-ocular distance (scale invariance),
- derive geometric features (e.g., iris offset vectors, eyelid openness).
You can also crop fixed eye windows and learn features directly from pixels, but geometric features are compact and resilient.
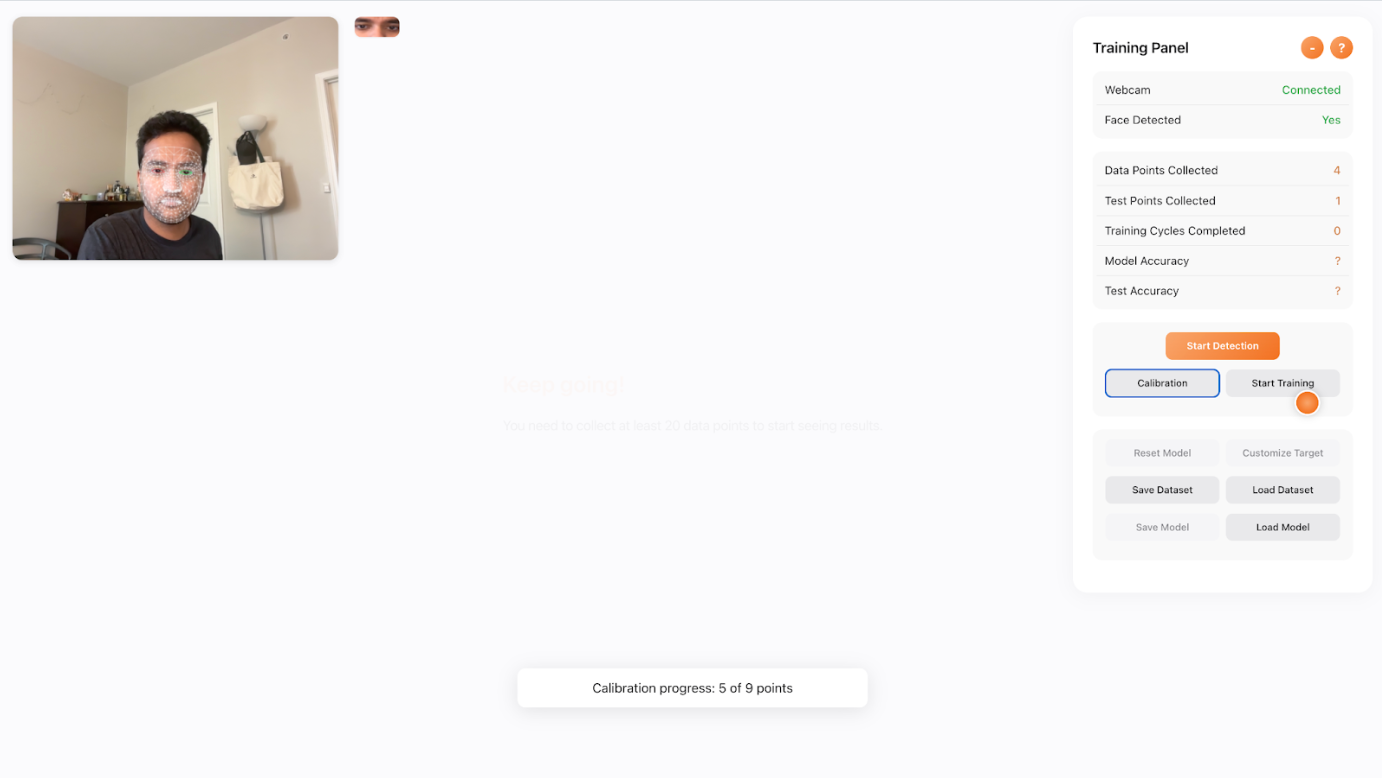
3. Calibration
Gaze mapping is person- and setup-specific. The system guides users to look at several on-screen targets (e.g., corners + center + a few random points). For each target, it records:
- eye feature vector (left/right combined),
- the known screen coordinate of the target.
This builds a small supervised dataset in real time.
4. Learning the Mapping (TF.js)
A small regression model (e.g., MLP on feature vector, or shallow ConvNet on cropped eye patches) learns feature → screen mapping:
- Input: concatenated eye feature vector or small crops
- Output: normalized (x, y) gaze coordinates in screen space
- Loss: mean squared error (MSE)
- Training: a few epochs, seconds in the browser
Because the features are well-structured and the dataset is calibration-specific, the model converges quickly.
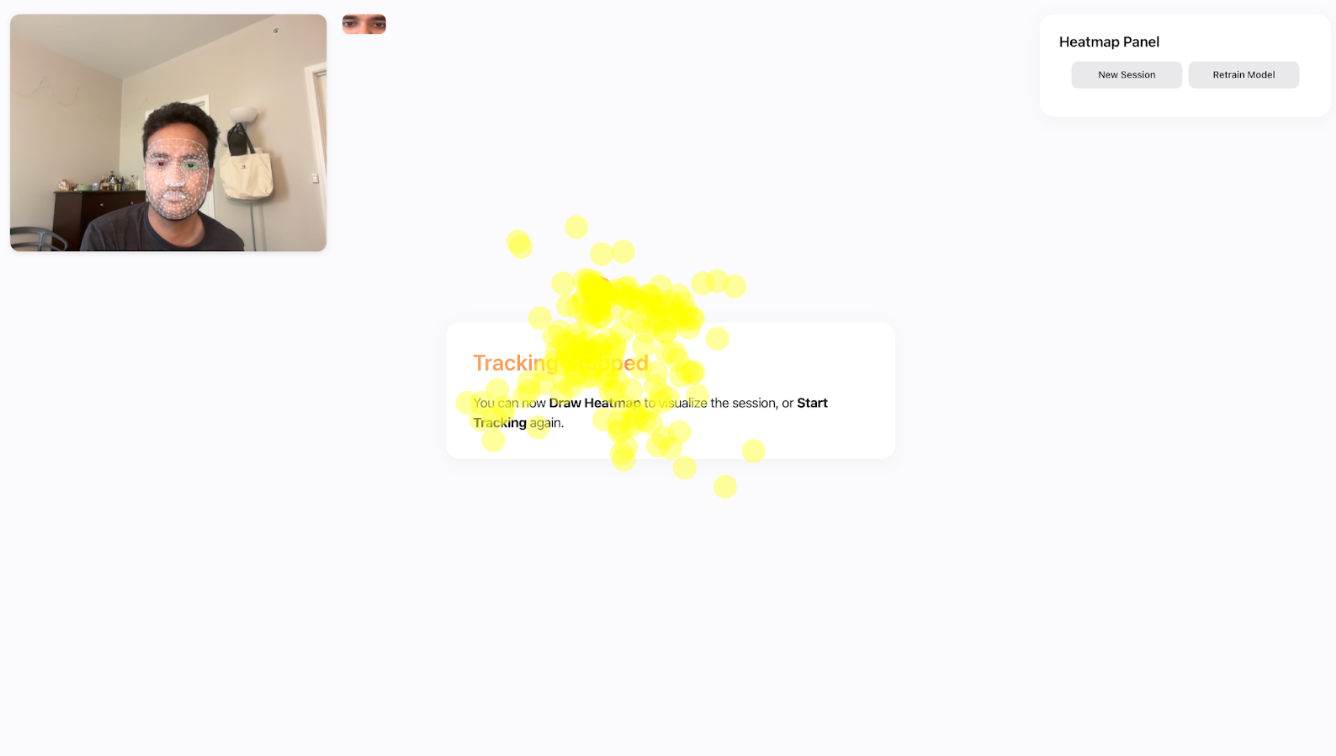
5. Real-Time Inference & Overlay
On each new frame, the model predicts (x, y); UI renders a reticle at that location. Aggregating recent predictions yields a heatmap that reveals attention clusters without recording video.
A short demo video of HueVision in action can be viewed here.
It shows the full workflow - from face and iris detection to calibration and live gaze tracking - running entirely in the browser with MediaPipe FaceMesh and TensorFlow.js.
Implementation Notes
Initializing FaceMesh (conceptual excerpt):
const faceMesh = new FaceMesh({ locateFile: (file) =>
  `https://cdn.jsdelivr.net/npm/@mediapipe/face_mesh/${file}` });

faceMesh.setOptions({
  maxNumFaces: 1,
  refineLandmarks: true, // enables iris landmarks
  minDetectionConfidence: 0.5,
  minTrackingConfidence: 0.5
});

// In a frame loop:
faceMesh.onResults(({ multiFaceLandmarks }) => {
  if (!multiFaceLandmarks?.length) return;
  const landmarks = multiFaceLandmarks[0];
  // Extract eye/iris landmarks and compute features...
});
A compact TF.js regression head (conceptual):
const model = tf.sequential();
model.add(tf.layers.dense({ units: 64, activation: 'relu', inputShape: [featureDim] }));
model.add(tf.layers.dropout({ rate: 0.1 }));
model.add(tf.layers.dense({ units: 32, activation: 'relu' }));
model.add(tf.layers.dense({ units: 2, activation: 'linear' })); // x, y

model.compile({ optimizer: 'adam', loss: 'meanSquaredError' });

// Train on calibration samples (features → screen coords)
await model.fit(trainX, trainY, { epochs: 20, batchSize: 32, shuffle: true });
These snippets are illustrative; the repo wires them into a full interactive experience with calibration UI and heatmap visualization.
Performance, Stability, and Practical Trade-Offs
Frame Rate & Latency: With FaceMesh’s refined landmarks and careful canvas updates, you can achieve 20–30 FPS on typical laptops. Throttle drawing and avoid expensive per-frame allocations.
Lighting & Pose: Even robust models are sensitive to lighting and head pose. Encourage users to sit facing a diffuse light source. Apply a simple temporal smoothing (moving average or 1-euro filter) to tame jitter without adding lag.
Normalization: Always normalize by inter-ocular distance and, if you use crops, consider padding to make eye windows consistent across users.
Calibration Design: More diverse calibration points → better mapping. A practical minimum is 5–9 points (corners, edges, center). For UX hotspots, 9–12 points yields visibly better stability.
Privacy: Everything runs locally. If you record anything (e.g., heatmap matrices), make it explicit and store client-side by default. It’s trivial to keep sessions ephemeral for sensitive studies.
What You Can Use This For
- UX Research (lightweight): Validate whether hero content or CTAs actually draw attention; compare A/B variants quickly without lab hardware.
- Gaze-Aware Prototyping: Build interactions that react to focal attention (e.g., dwell-based hints, delayed reveals).
- Accessibility Experiments: Explore hands-free control primitives for users with limited mobility.
- Education & Demos: Teach students the end-to-end of landmark-based gaze estimation in a single, self-contained web app.
Remember: this isn’t a medical-grade or research-lab replacement. It’s a fast, privacy-friendly way to get directional insight and build gaze-aware ideas.
Reproducing or extending the setup
- Clone the repo & serve locally. Any static server works. Enable camera permissions.
- Try the default calibration. Follow the on-screen targets; collect 5–9 points. Watch the heatmap accumulate as you navigate.
- Tune features & model.
- Swap geometric features for small eye crops and try a tiny ConvNet if you prefer learning from pixels.
- Adjust smoothing and reticle damping to trade lag for stability.
- Instrument your UI. Add event hooks (e.g., element IDs under gaze) to log attention dwell time on regions of interest.
- Keep it client-side. If you store anything, default to local persistence (or session-only) and be explicit with users.
Limitations
- Head motion & off-axis views degrade accuracy without re-calibration or additional head-pose normalization.
- Webcam quality matters; low-light cameras exacerbate jitter.
- Single-user focus: multi-face support is possible but requires additional logic for identity tracking and per-user calibration.
- Screen geometry changes (zoom level, window resizing) can break the learned mapping - re-calibrate when layout changes.
What This Teaches Us About Browser-Based Vision
- Modern landmark models (like MediaPipe FaceMesh) unlock tasks that previously felt out of reach without native apps.
- Client-side ML + simple learning heads are powerful, especially when you can collect small, personalized datasets on the fly.
- A clear calibration interaction is often more impactful than a more complex model; UX matters as much as ML here.
Try It, Fork It, Build Your Real-Time Eye Tracking in the Browser App
If you adapt this for UX analytics, accessibility, or creative experiments, consider contributing a note or small PR back. Real-world adaptations are where this approach shines.
Written by Suvrat Jain, a Data Scientist and AI/ML Engineer specializing in computer vision and applied machine learning. His work spans building large-scale visual recognition systems, automation pipelines, and real-time intelligence tools for industrial environments.
Beyond his professional work, Suvrat explores creative applications of AI through open-source projects that blend vision, interaction, and accessibility - like HueVision, which experiments with browser-based eye tracking using MediaPipe and TensorFlow.js.
He holds a Master’s degree in Data Science from Rochester Institute of Technology and has contributed to published research on machine-learning-driven vision systems for sustainable manufacturing and part identification. Suvrat is passionate about bridging cutting-edge research with practical, user-focused engineering.
Cite this Post
Use the following entry to cite this post in your research:
Suvrat Jain. (Oct 21, 2025). How to Build Real-Time Eye Tracking in the Browser. Roboflow Blog: https://blog.roboflow.com/build-eye-tracking-in-browser/