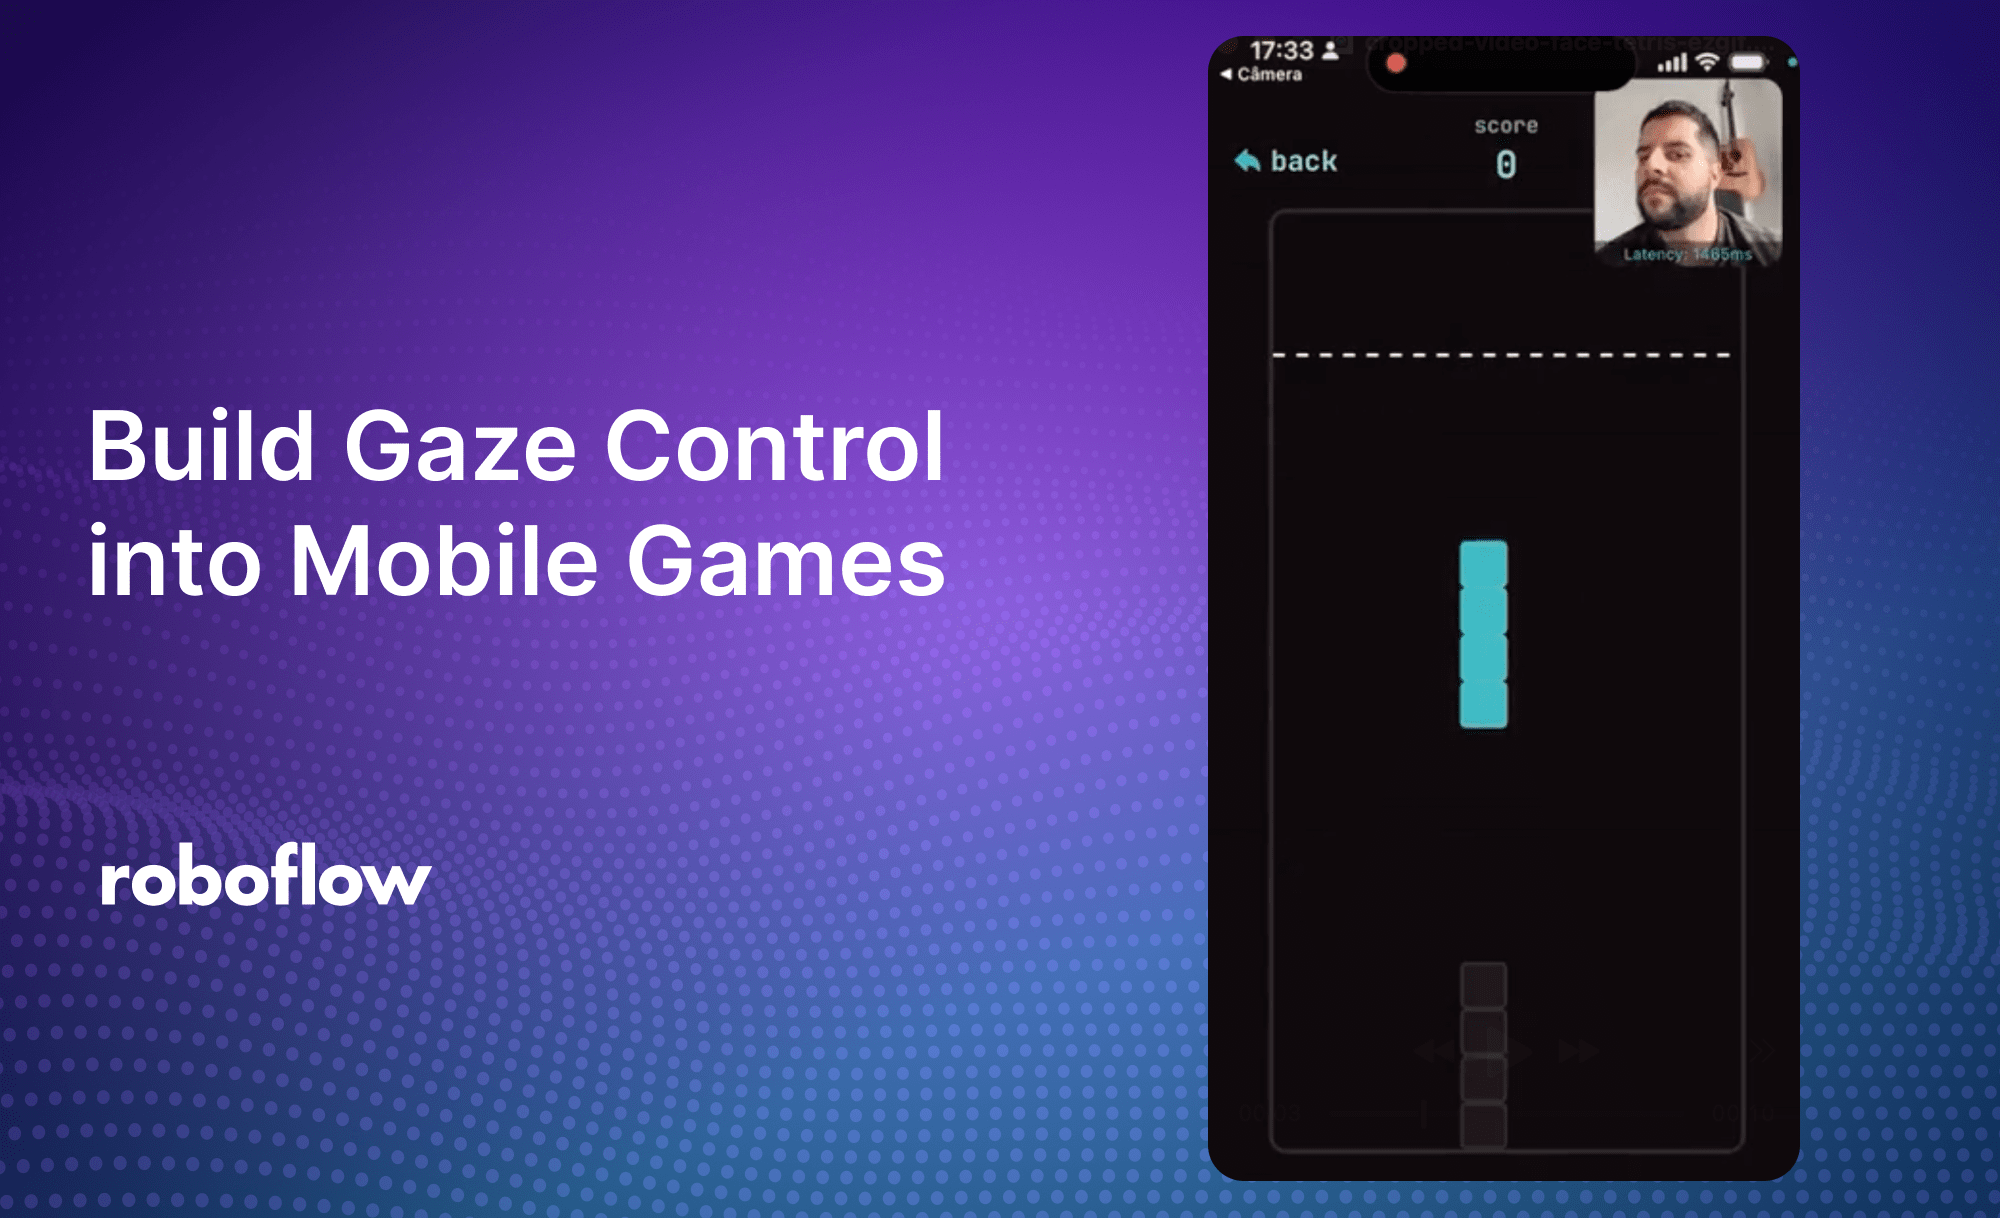
Ever wanted to control a game just by moving your head? In this tutorial, I'll show you how to create a gaze controlled Tetris game using Expo, React Native and Roboflow Workflows.
Want to try it before continuing? You can download it in the app store (iOS only for now).
What we're building
A Tetris game with two control modes:
- Classic touch controls
- Gaze controls (look to the left/right to move, up to rotate, down for soft drop)
The game - what do we need?
To build such a game, we will need to set up:
- A mobile development environment.
- The computer vision logic to run in the camera feed and help us control the actions.
- The game event loop to catch player's actions and react to them.
- The game logic itself - in this case, Tetris.
For that we will be using Expo + React Native to develop and test our mobile app, RxJS to handle the game loop and Roboflow Workflows to build and deploy the computer vision app.
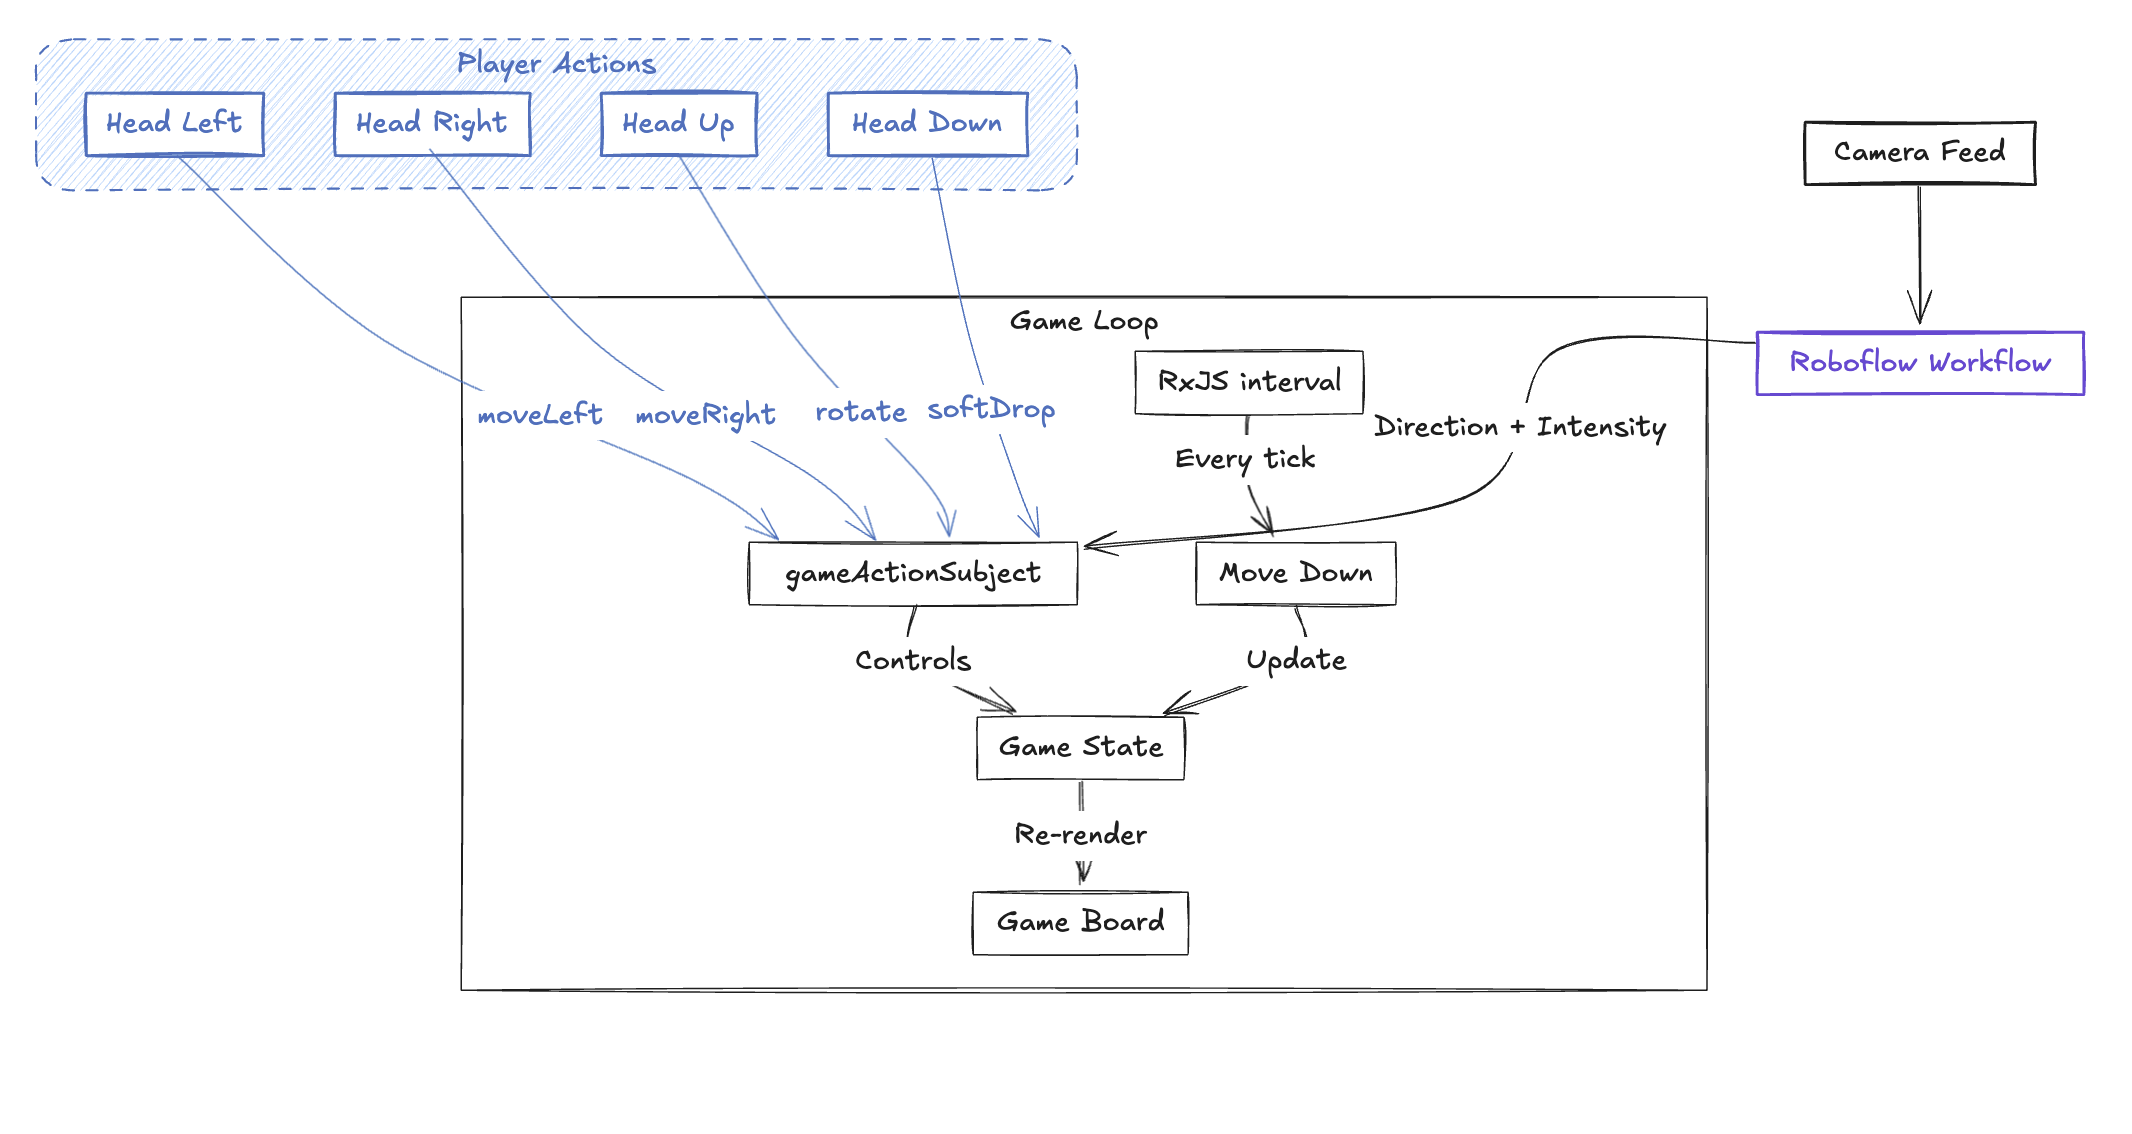
Here is a high-level diagram of the final architecture for the game.

Creating the mobile app development environment
To set up the mobile development environment we will use Expo. You can check the documentation on how to do that here. Expo will allow us to develop, test and deploy apps using React Native for multiple platforms - including Android and iOS.
Building and deploying the computer vision app
The problem we want to solve with computer vision is: given a frontal phone camera feed, how can we read a person's face to interpret the gaze into controller actions?
The Workflow
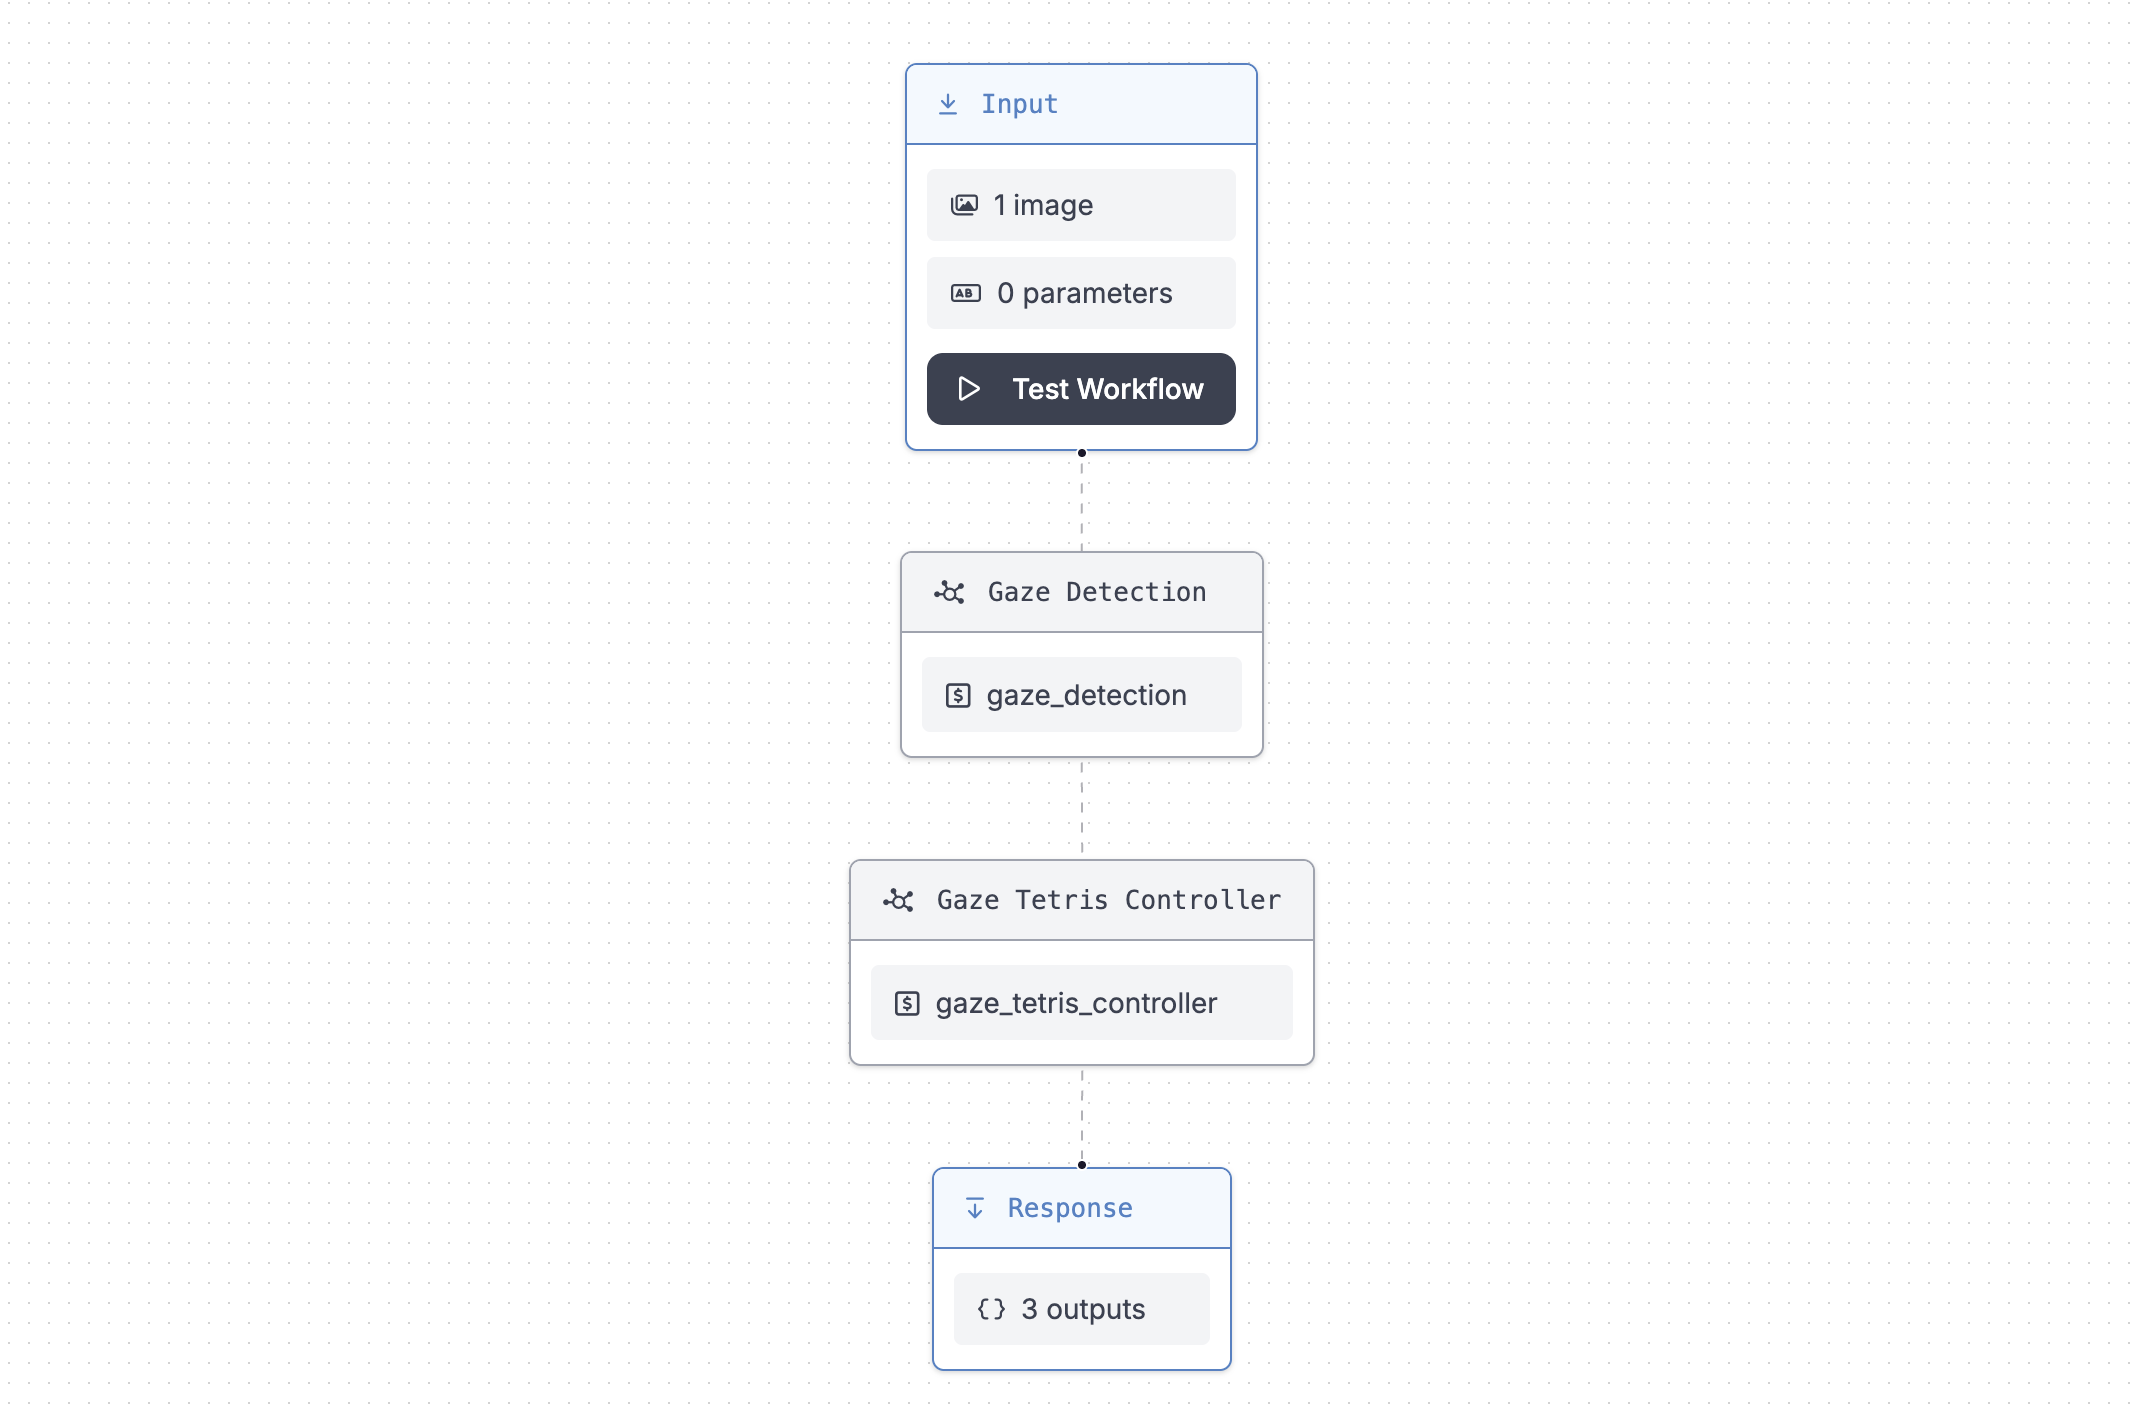
We can easily do that by using Workflows - it turns our model inferences and application logic into a single API call, removing all the complexity from the application layer. This is our Workflow:

It has two steps: the Gaze Detection - which will try to infer where the person is looking at and return angles like yaw and pitch - and the Controller that's going to interpret these values against thresholds and return the command given: if the person is looking to their left, right, up or down.
For the Controller logic, we will use the flexibility of a Dynamic Python Block to write code that gets the values of yaw and pitch and compares them to give a face direction output.
Building the Dynamic Python Block (Gaze Tetris Controller)
This is an example of how we can benefit of having custom python code running in our computer vision workflow. It creates flexibility so we don't need to bring computer vision logic inside our React application.
At the end, we will have an endpoint that receives an image and returns whether the intended action is left, right, up or down.
# Function definition will be auto-generated based on inputs
# Expected function output: {"action": None}

def safe_get_first_list_value(my_list, default_value):
    if not isinstance(my_list, list):
        return my_list if my_list is not None else default_value
    if len(my_list) == 0:
        return default_value
    return my_list[0]

def run(self, yaw_degrees, pitch_degrees, left_threshold, right_threshold, up_threshold, down_threshold) -> BlockResult:
    # yaw means left and right
    # pitch means up and down
    # yaw and pitch come as arrays, but we only need the first value
    yaw = safe_get_first_list_value(yaw_degrees, 0)
    pitch = safe_get_first_list_value(pitch_degrees, 0) + 10 # need to correct because people often look down to their phones

    right_score = 0
    left_score = 0
    up_score = 0
    down_score = 0

    if yaw > 0 and yaw > right_threshold:
        right_score += yaw - right_threshold
    elif yaw < 0 and yaw < -left_threshold:
        left_score += abs(left_threshold + yaw)
    elif pitch > 0 and pitch > up_threshold:
        up_score += pitch - up_threshold
    elif pitch < 0 and pitch < -down_threshold:
        down_score += abs(down_threshold - pitch)

    # normalize scores relative to the threshold
    right_score = right_score / right_threshold
    left_score = left_score / left_threshold
    up_score = up_score / up_threshold
    down_score = down_score / down_threshold

    if right_score == left_score == up_score == down_score:
        return { "action": "center"}

    # returns the action with the highest score
    if right_score > left_score and right_score > up_score and right_score > down_score:
        return { "action":"looking_right"}
    elif left_score > right_score and left_score > up_score and left_score > down_score:
        return { "action":"looking_left"}
    elif up_score > right_score and up_score > left_score and up_score > down_score:
        return { "action":"looking_up"}
    elif down_score > right_score and down_score > left_score and down_score > up_score:
        return { "action":"looking_down"}
    return { "action": "center"}
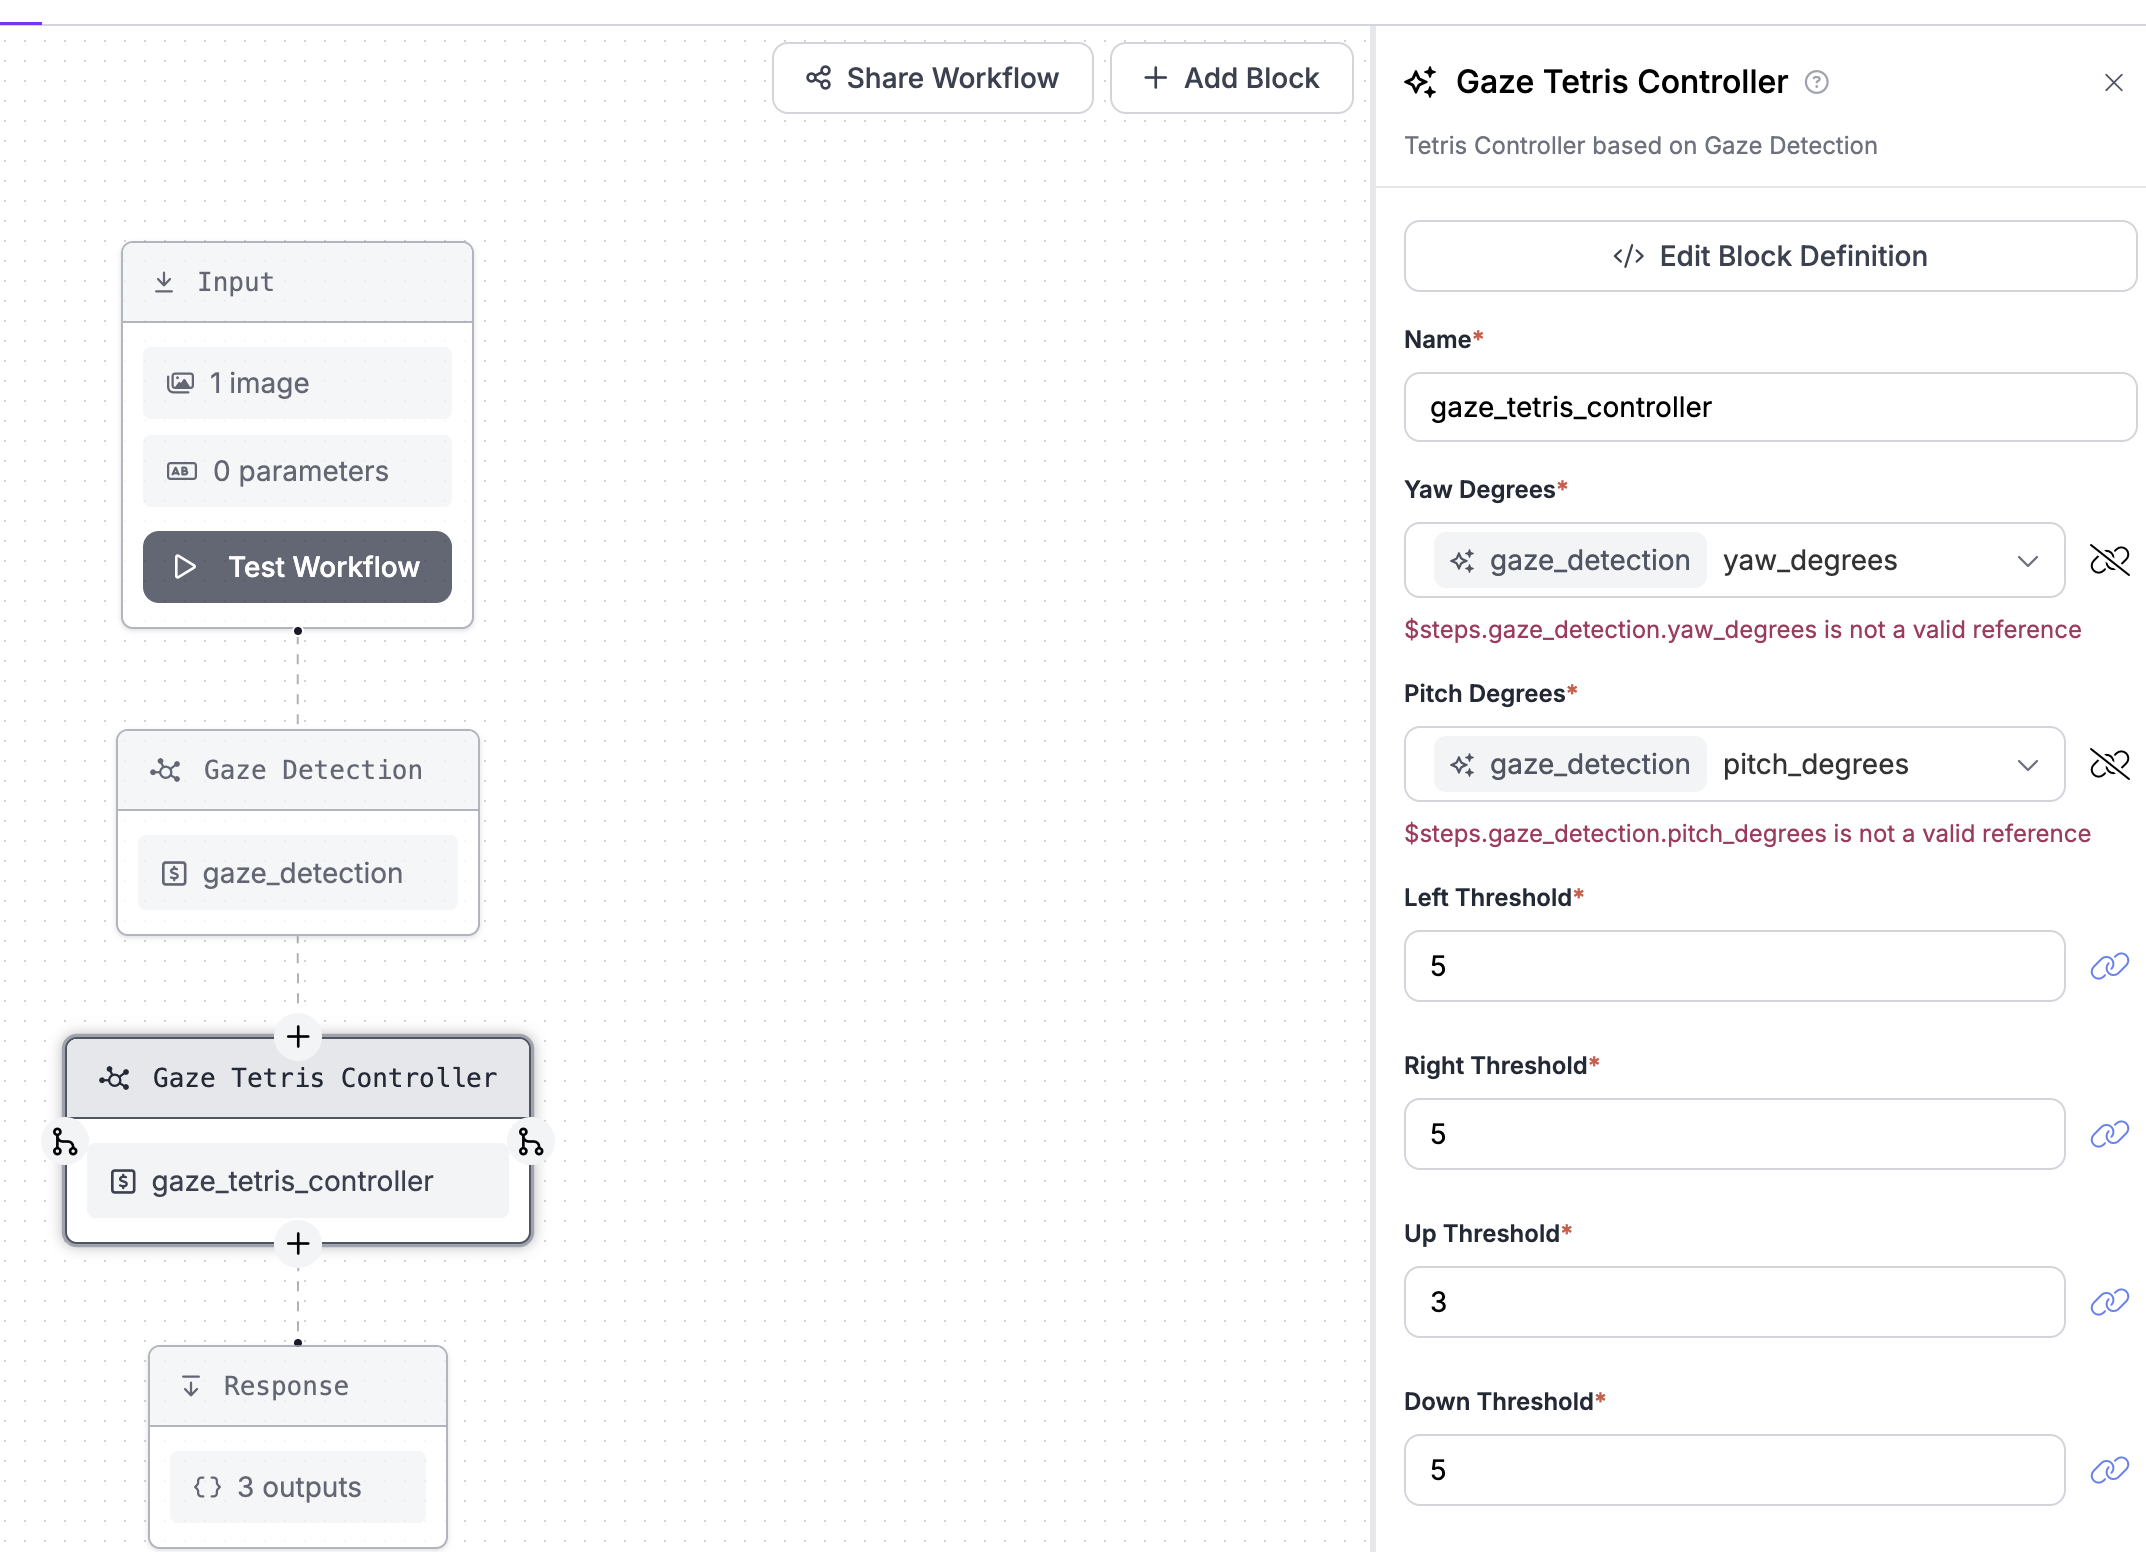
This is how our dynamic python block looks in the UI.

The application
The application itself has two routes: the home screen with a "Play" button and the game tab. I did spend some time making those components look better, adding some styling and animations.
The home screen
The home screen should be just a container with the game title and a play button. Here's a look at how it works:
import Title from "./components/AnimatedTitle";
import PlayButton from "./components/AnimatedPlayButton";

export default HomeScreen() {
  return (
    <View>
      <Title />
      <PlayButton />
    </View>
  )
}
In order to use the phone's camera, we need to ask for the user permission on the component mount. We can do that in the following way:
import { useEffect } from "react"
import { useCameraPermissions } from "expo-camera";

export default function HomeScreen() {
  const [permission, requestPermission] = useCameraPermissions();

  useEffect(() => {
    // Request camera permission on mount, if not granted
    if (!permission?.granted) {
      requestPermission();
    }
    // ... the rest of our component
}
So the PlayButton component pushes to the game route!
The game screen
The main game component combines two elements:
- Game state management using React's useReducer hook
- A reactive game loop powered by RxJs
Here's a look at how it works:
// 1. Game State Management
const [gameState, dispatch] = useReducer(gameReducer, initialState);

// 2. RxJS Game Loop
useEffect(() => {
  const gameLoop$ = interval(dropSpeed).pipe(
    takeUntil(gameOver$),
    filter(() => !gameState.isGameOver)
  );

  const subscription = gameLoop$.subscribe(() => {
    dispatch({ type: "MOVE_DOWN" });
  });
});

// 3. Control System
return (
  <View style={styles.container}>
    <TetrisBoard gameState={gameState} />

    {/* Show face controls or touch controls based on mode */}
    {showFacialControls ? (
      <CameraPreview />
    ) : (
      <TouchControls dispatch={dispatch} />
    )}
  </View>
);
The magic happens in how these pieces work together:
- The game loop constantly moves pieces down
- Player actions dispatch state updates
- The board re-renders smoothly with each state change
To catch the player actions and dispatch them to update the game loop, we need to look into the camera feed and interact with it. This is done in the CameraPreview component. It handles three tasks:
- Captures camera frames
- Sends them to our Workflow API
- Converts face movements into game actions
Here's a look at how it works:
function CameraPreview() {
  // Capture frames every 100ms
  useEffect(() => {
    const subscription = interval(100).pipe(
      switchMap(async () => {
        // 1. Capture frame from camera
        const photo = await camera.takePictureAsync();

        // 2. Send to workflow API
        const response = await axios.post(WORKFLOW_URL, {
          image: photo.base64
        });

        // 3. Convert API response to game action
        const gameAction = mapFaceDirectionToGameAction({
          action: response.data.outputs[0].action,
        });

        // 4. Send action to game
        if (gameAction) {
          gameActionSubject.next(gameAction);
        }
      })
    ).subscribe();
  }, []);

  return (
    <View>
      <CameraView ref={cameraRef} />
    </View>
  );
}
This gives us a translator that gets the image input from the camera, calls an API, and sends an event to the game loop with the corresponding control.
Running everything together
After putting some animations and styling into the screens and wrapping everything up, here's the repository for the full app: https://github.com/joaomarcoscrs/face-tetris
Since the workflow has a Dynamic Python Block step, we need to run it against our own local inference server and you can check the documentation on how to deploy an inference server locally.
Once you're in the main repository folder, just run
npx expo install && npm start
Expo generates a QRCode you can read to run the app in your device.
If you want to give it a shot before running everything together, here's the link for the iOS app in the app store.
After that, enjoy the game!
Cite this Post
Use the following entry to cite this post in your research:
Joao Marcos Cardoso Ramos da Silva. (Dec 18, 2024). How to Build Gaze Control into Mobile Games. Roboflow Blog: https://blog.roboflow.com/build-gaze-control-mobile-game/
