
In this project, we will develop an Egg Counting and Tracking System using computer vision and a camera node. The system is designed to monitor and count eggs at home (or any other place where inventory is required), helping you maintain an accurate inventory and automatically placing orders when the quantity is low.
Here’s how the system would work when deployed:
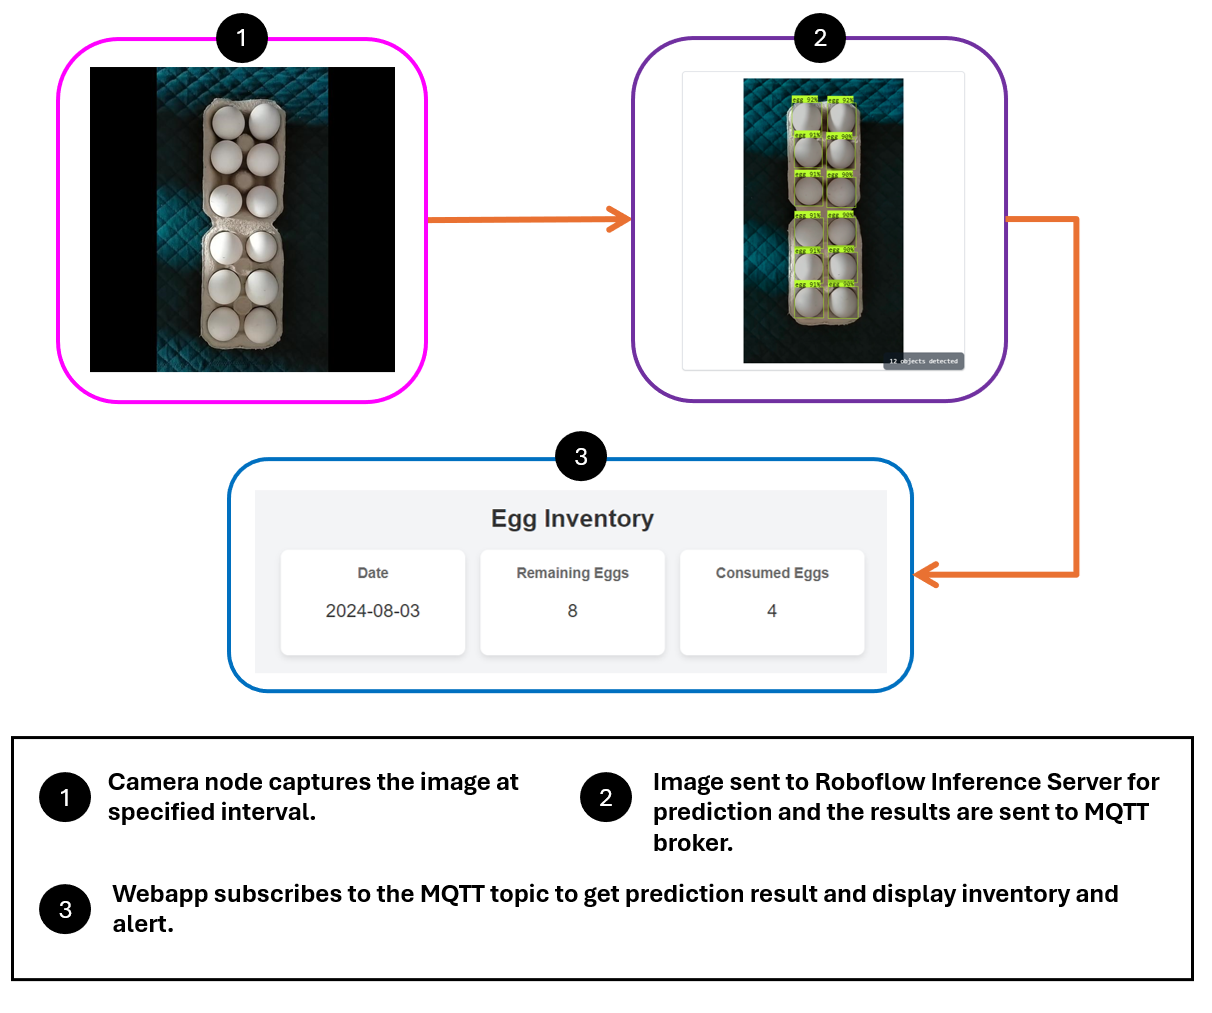
- A camera is installed in the location where eggs are stored, such as an egg tray, pantry etc. This camera is connected to a processing unit that runs the python script to communicate with computer vision model at Roboflow Inference server.
- The system is scheduled to take a snapshot of the egg storage area once a day at a specified time. This helps in maintaining a regular check on the egg inventory.
- The captured image is processed using a computer vision model developed with Roboflow. This model is trained to recognize and count the eggs present in the image.
- The model analyzes the image and outputs the number of eggs detected. This count is then compared to a predefined threshold, which represents the minimum number of eggs that should be available at any given time.
- If the egg count falls below the predefined threshold, the system triggers an alert.
- The communication in the application is done via MQTT message to notify the user about egg count or directly interface with an online grocery ordering service to automatically place an order for eggs.
- The system integrates with a user interface that allows the user to monitor the egg inventory (i.e. eggs consumed & remaining for particular time period).
The following diagram shows how the system works:
Steps for building the project
Following are the steps to build this project:
- Collect and label dataset
- Build computer vision model
- Write inference script to detect and count eggs
- Build the JavaScript App to receive data
Step #1: Collect and label dataset
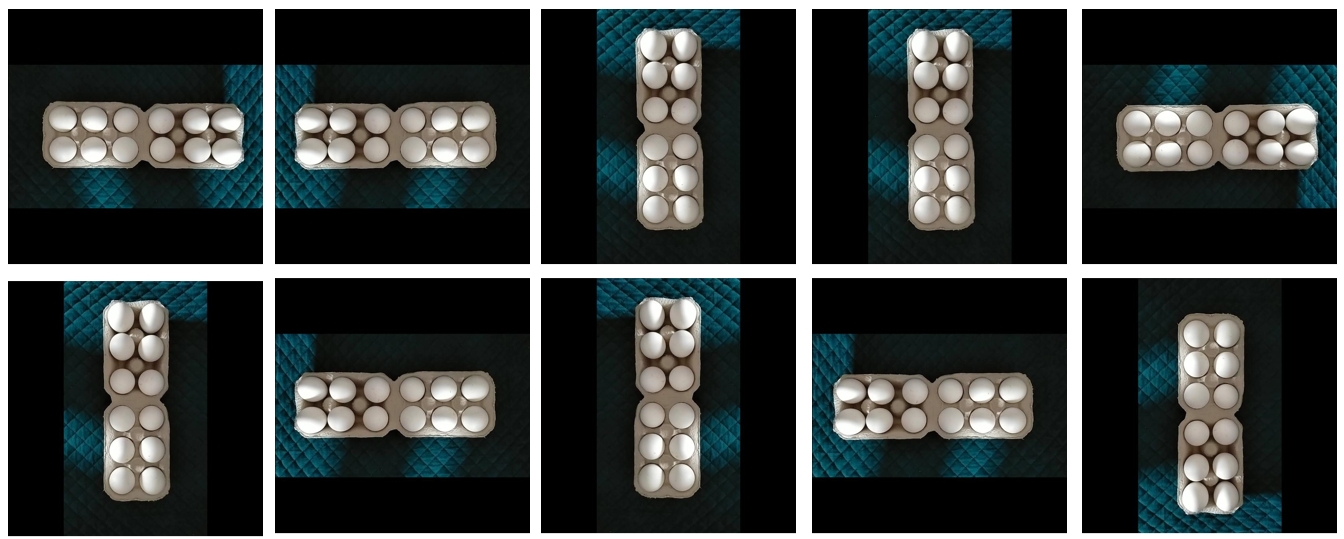
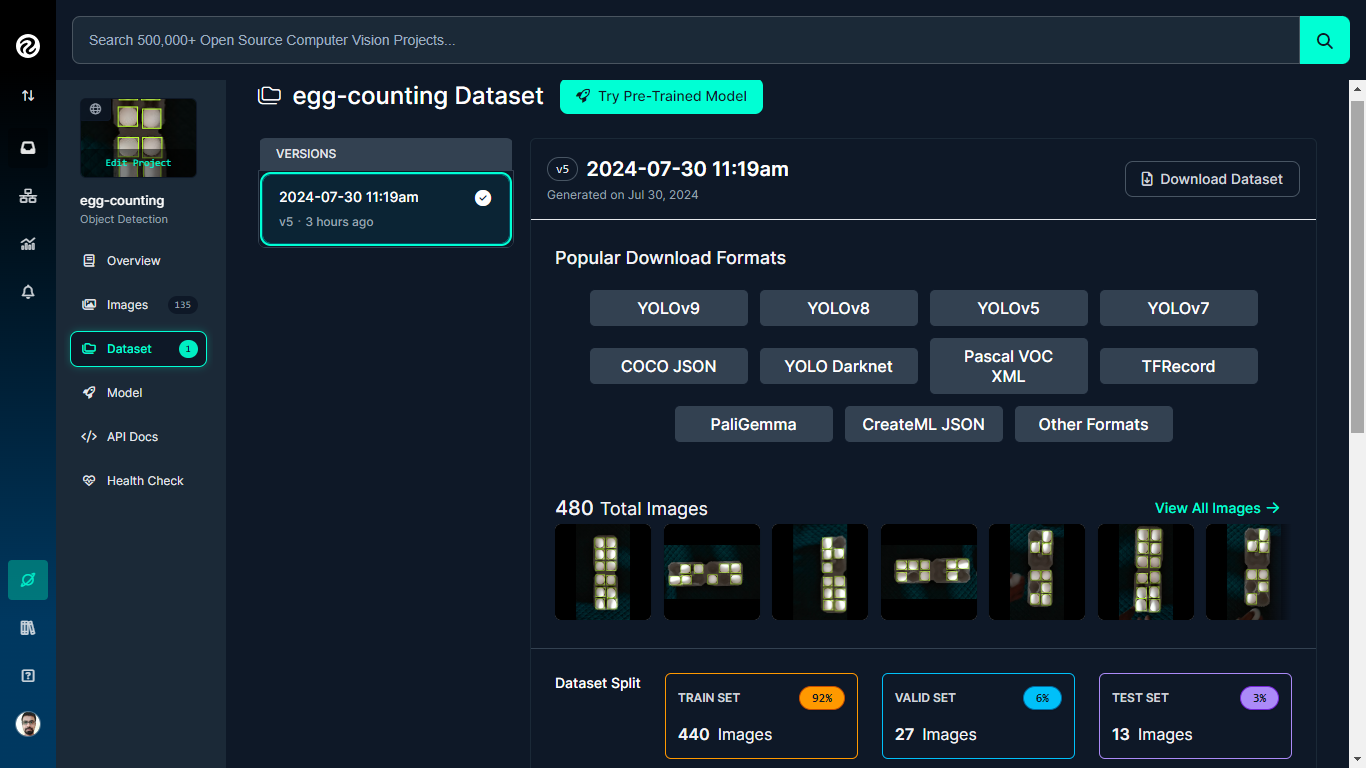
To build the computer vision model to detect eggs, I have collected the dataset of eggs and uploaded them to a Roboflow project.
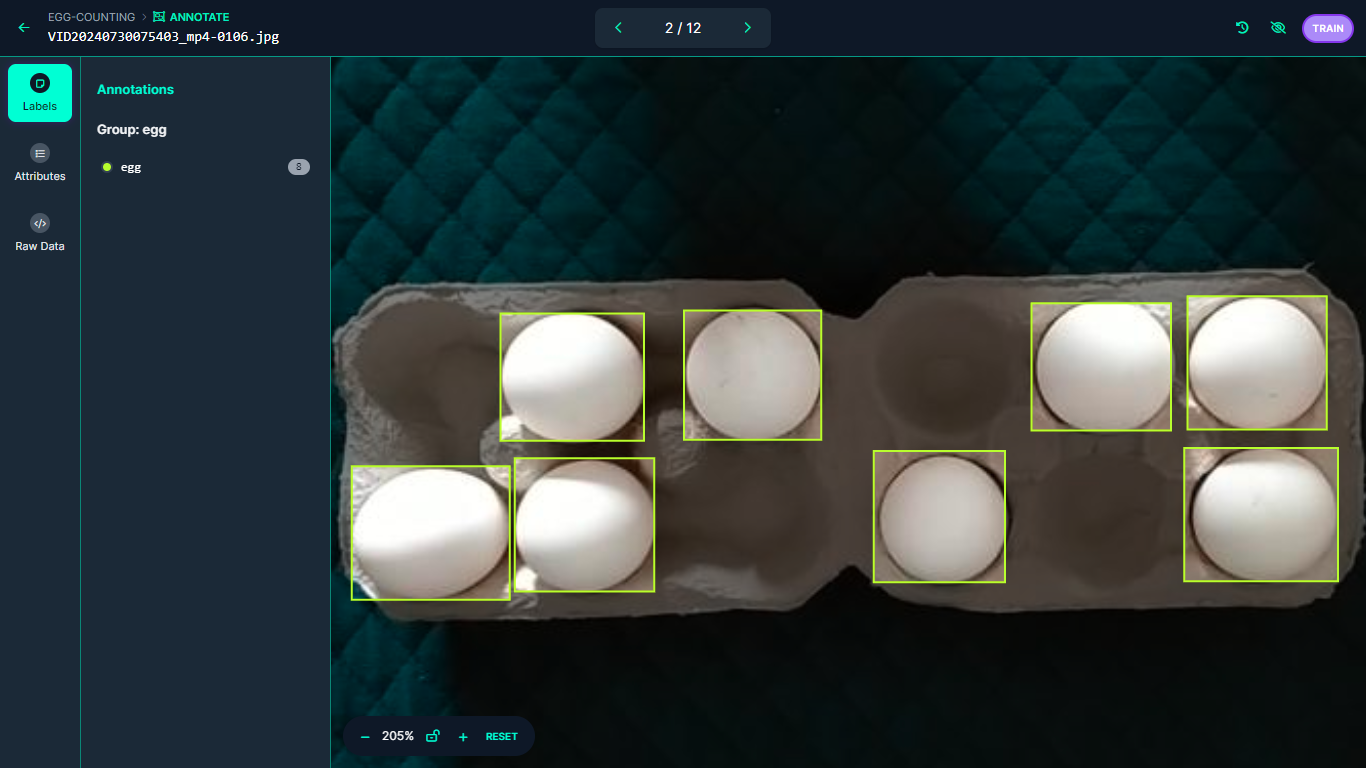
Once the dataset is uploaded, I labelled each egg in all the images using bounding box annotation as shown in the following figure.
After labelling all the images, I created the version of the dataset with following preprocessing and augmentation applied.
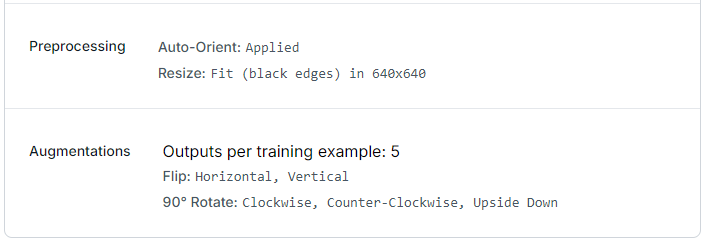
The version of the dataset is generated consisting of 450+ images.
Step #2: Build computer vision model
After dataset is generated, I trained the model using the Roboflow auto-training option, achieving a training accuracy of 99.5%. I trained this model by choosing the model type as Roboflow 3.0 Object Detection (Fast) and checkpoint COCOn in the Roboflow autotraining.

The model is automatically deployed to a cloud API. Roboflow provides various options for testing and deploying the model, such as live testing in a web browser and deployment to edge devices. The image below demonstrates the model being tested via Roboflow’s web interface. You can test it by clicking the “Visualize” tab on left pane.

Model Testing
Step #3: Write inference script to detect and count eggs
In this step, we will create a Python inference script that interacts with the Roboflow inference API to run predictions on images captured by a camera at specified intervals (once a day in our example). The prediction results are then sent to an MQTT server for consumption by a client application.
The Roboflow automatically hosts the model once the training is completed and can be accessed using the inference API. In our code, we will use inference SDK to run hosted image inference. There is other inference options that you may try. Copy the following code in the egg_counter.py file.
import cv2
import schedule
import time
from datetime import datetime
from inference_sdk import InferenceHTTPClient
import paho.mqtt.client as mqtt

# Qubitro MQTT client setup
broker_host = "broker.hivemq.com"
broker_port = 1883

# The callback for when the client receives a CONNACK response from the server.
def on_connect(client, userdata, flags, reason_code, properties):
    print(f"Connected with result code {reason_code} {flags}")


def on_publish(client, userdata, mid, reason_code, properties):
    print(f"Message published: {mid}")
    print(reason_code)

# Initialize the MQTT client
mqtt_client = mqtt.Client(mqtt.CallbackAPIVersion.VERSION2)
mqtt_client.on_connect = on_connect
mqtt_client.on_publish = on_publish
mqtt_client.connect(broker_host, broker_port)

# Inference client setup
CLIENT = InferenceHTTPClient(
    api_url="https://detect.roboflow.com",
    api_key="ROBOFLOW_API_KEY"  # Add your API key here
)

# Capture an image from the webcam
def capture_image_from_webcam():
    cap = cv2.VideoCapture(0)
    if not cap.isOpened():
        print("Error: Could not open webcam.")
        return None

    ret, frame = cap.read()
    if ret:
        image_path = f"webcam_image_{datetime.now().strftime('%Y%m%d_%H%M%S')}.jpg"
        cv2.imwrite(image_path, frame)
        print(f"Image saved to {image_path}")
    else:
        print("Error: Could not read frame.")
        image_path = None

    cap.release()
    return image_path

# Perform inference on the captured image
def perform_inference(image_path):
    if not image_path:
        print("No image to process.")
        return None

    result = CLIENT.infer(image_path, model_id="egg-counting-j0tz0/5")
    predictions = result['predictions']
    egg_count = len(result["predictions"])

    print("Total Eggs:", egg_count)
    return egg_count

# Task to capture image, perform inference, and send data to Qubitro
def daily_task():
    print("Running daily task...")
    image_path = capture_image_from_webcam()
    egg_count = perform_inference(image_path)
    # Starting the loop
    mqtt_client.loop_start()
    mqtt_client.publish("eggs/total", egg_count, qos=2)
    mqtt_client.publish("eggs/time", datetime.now().date().isoformat(), qos=2)

# Schedule the daily task at 9:00 AM
schedule.every().day.at("16:28").do(daily_task)

# Keep the script running to check for scheduled tasks
while True:
    schedule.run_pending()
    time.sleep(60)
The code sets up a system to periodically capture an image from a webcam, perform egg counting inference using an Roboflow inference API, and publish the results to an MQTT broker (broker.hivemq.com). It initializes both an MQTT client for communication and an inference client for image processing. A scheduled task is defined to run daily at a specified time, capturing an image, processing it to count eggs, and then publishing the egg count and the current date to MQTT topics. The main loop ensures that the scheduled tasks are executed at the appropriate times.
Step #4: Build the JavaScript App to receive data
In this final step, we will build a JavaScript app. The app displays a web-based GUI for an egg inventory application with nutritional tracking features. It uses the Paho MQTT client library to subscribe to topics for receiving updates on egg counts and dates from an MQTT broker.
The interface includes three main sections: one for displaying the current date, the number of remaining eggs, and the number of consumed eggs. Below these, a series of progress bars visually represent the nutritional content of the consumed eggs, including protein, fat, carbohydrates, and energy.
The JavaScript code handles MQTT connections, updates the displayed values and progress bars based on incoming messages, and calculates nutritional facts based on a number of eggs consumed. The progress bars are updated dynamically to reflect the nutritional content.
Following is the code for our app. Copy the code and save it in a file named webapp.html.
<!DOCTYPE html>
<html>
<head>
  <script src="https://cdnjs.cloudflare.com/ajax/libs/paho-mqtt/1.0.1/mqttws31.min.js" type="text/javascript"></script>
  <style>
    body {
      font-family: Arial, sans-serif;
      background-color: #f3f4f6;
      text-align: center;
      padding: 50px;
    }
    h1 {
      color: #333;
    }
    #container {
      display: flex;
      justify-content: center;
      gap: 20px;
      margin-bottom: 30px;
    }
    .box {
      background-color: #fff;
      padding: 20px;
      border-radius: 10px;
      box-shadow: 0 4px 8px rgba(0, 0, 0, 0.1);
      width: 200px;
    }
    .box h3 {
      margin: 0;
      color: #666;
    }
    .box p {
      font-size: 1.5em;
      color: #333;
    }
    #nutrition {
      max-width: 800px;
      margin: auto;
      background-color: #fff;
      padding: 20px;
      border-radius: 10px;
      box-shadow: 0 4px 8px rgba(0, 0, 0, 0.1);
      text-align: left;
      display: flex;
      flex-wrap: wrap;
      gap: 20px;
    }
    .nutrition-heading {
      width: 100%;
      text-align: center;
    }
    .nutrition-item {
      flex: 1 1 45%;
      margin: 10px 0;
    }
    .nutrition-item span {
      display: inline-block;
      width: 150px;
    }
    .progress-bar {
      background-color: #e0e0e0;
      border-radius: 13px;
      padding: 3px;
      margin: 10px 0;
      width: 100%;
    }
    .progress-bar div {
      height: 20px;
      border-radius: 10px;
      text-align: right;
      padding-right: 5px;
      color: white;
      font-weight: bold;
    }
    #protein-bar { background-color: #76c7c0; }
    #fat-bar { background-color: #f39c12; }
    #carbs-bar { background-color: #3498db; }
    #calories-bar { background-color: #e74c3c; }
    #alert {
      background-color: #f8d7da;
      color: #721c24;
      border: 1px solid #f5c6cb;
      border-radius: 10px;
      padding: 20px;
      margin-top: 20px;
      display: none;
    }
  </style>
</head>
<body>
  <h1>Egg Inventory</h1>
  <div id="container">
    <div class="box">
      <h3>Date</h3>
      <p id="date">NA</p>
    </div>
    <div class="box">
      <h3>Remaining Eggs</h3>
      <p id="remaining-eggs">NA</p>
    </div>
    <div class="box">
      <h3>Consumed Eggs</h3>
      <p id="consumed-eggs">NA</p>
    </div>
  </div>
  <div id="nutrition">
    <h3 class="nutrition-heading">Nutrition Facts of Consumed Eggs</h3>
    <div class="nutrition-item">
      <span>Energy:</span>
      <div class="progress-bar">
        <div id="calories-bar" style="width: 0;">0kcal</div>
      </div>
    </div>
    <div class="nutrition-item">
      <span>Carbohydrates:</span>
      <div class="progress-bar">
        <div id="carbs-bar" style="width: 0;">0g</div>
      </div>
    </div>
    <div class="nutrition-item">
      <span>Protein:</span>
      <div class="progress-bar">
        <div id="protein-bar" style="width: 0;">0g</div>
      </div>
    </div>
    <div class="nutrition-item">
      <span>Fat:</span>
      <div class="progress-bar">
        <div id="fat-bar" style="width: 0;">0g</div>
      </div>
    </div>
  </div>
  <div id="alert">
    <strong>Alert!</strong> Egg quantity is below the defined threshold. Please restock soon.
  </div>

  <script type="text/javascript">
    var TOTAL_EGGS = 12;
    var THRESHOLD = 4; // Define your threshold here
    var result_date = "";
    var result_count = 0;

    // Create a client instance
    client = new Paho.MQTT.Client("broker.hivemq.com", 8884, "egg-client-001");

    // set callback handlers
    client.onConnectionLost = onConnectionLost;
    client.onMessageArrived = onMessageArrived;

    // connect the client
    client.connect({onSuccess: onConnect});

    // called when the client connects
    function onConnect() {
      console.log("onConnect");
      client.subscribe("eggs/time");
      client.subscribe("eggs/total");
    }

    // called when the client loses its connection
    function onConnectionLost(responseObject) {
      if (responseObject.errorCode !== 0) {
        console.log("onConnectionLost:" + responseObject.errorMessage);
      }
    }

    // Function to handle MQTT messages
    function onMessageArrived(message) {
      var topic = message.destinationName;
      var payload = message.payloadString;

      if (topic === "eggs/time") {
        result_date = payload;
        document.getElementById("date").innerHTML = result_date;
      } else if (topic === "eggs/total") {
        result_count = parseInt(payload);
        document.getElementById("remaining-eggs").innerHTML = result_count;
        updateConsumedEggs();
        checkThreshold();
      }
    }

    function updateConsumedEggs() {
      var consumed = TOTAL_EGGS - result_count;
      document.getElementById("consumed-eggs").innerHTML = consumed;

      // Calculate nutrition facts
      var nutritionFacts = calculateNutritionFacts(consumed);

      // Update progress bars and values
      updateProgressBar('calories-bar', nutritionFacts.calories, 'kcal');
      updateProgressBar('carbs-bar', nutritionFacts.carbs, 'g');
      updateProgressBar('protein-bar', nutritionFacts.protein, 'g');
      updateProgressBar('fat-bar', nutritionFacts.fat, 'g');
    }

    function calculateNutritionFacts(consumed) {
      return {
        protein: 6.5 * consumed,
        fat: 5 * consumed,
        carbs: 1 * consumed,
        calories: 78 * consumed
      };
    }

    function updateProgressBar(elementId, value, unit) {
      var element = document.getElementById(elementId);
      var cappedValue = Math.min(value, 100); // Cap the value to 100 for the progress bar width
      element.style.width = cappedValue + "%";
      element.innerHTML = value + unit;
    }

    function checkThreshold() {
      if (result_count < THRESHOLD) {
        document.getElementById("alert").style.display = "block";
      } else {
        document.getElementById("alert").style.display = "none";
      }
    }
  </script>
</body>
</html>
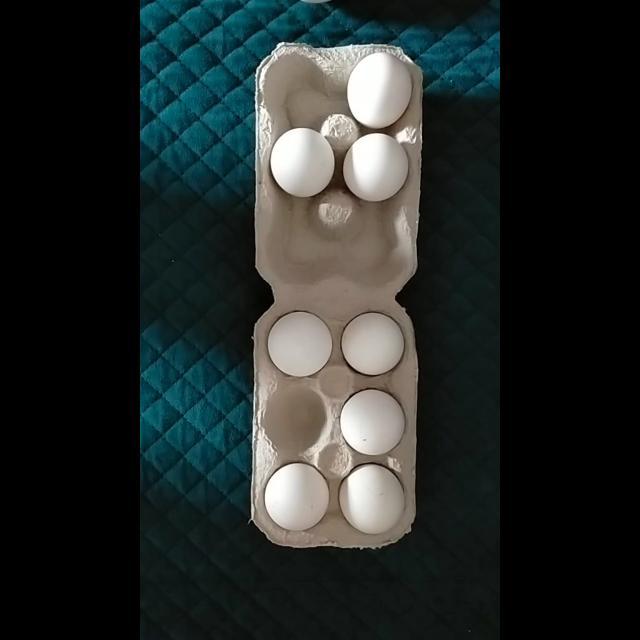
To run the project, first run the python inference script, egg_counter.py, and then open the webapp.html in the browser. Assume that if the following is the input image to the model.
You will see the following output on the web app.
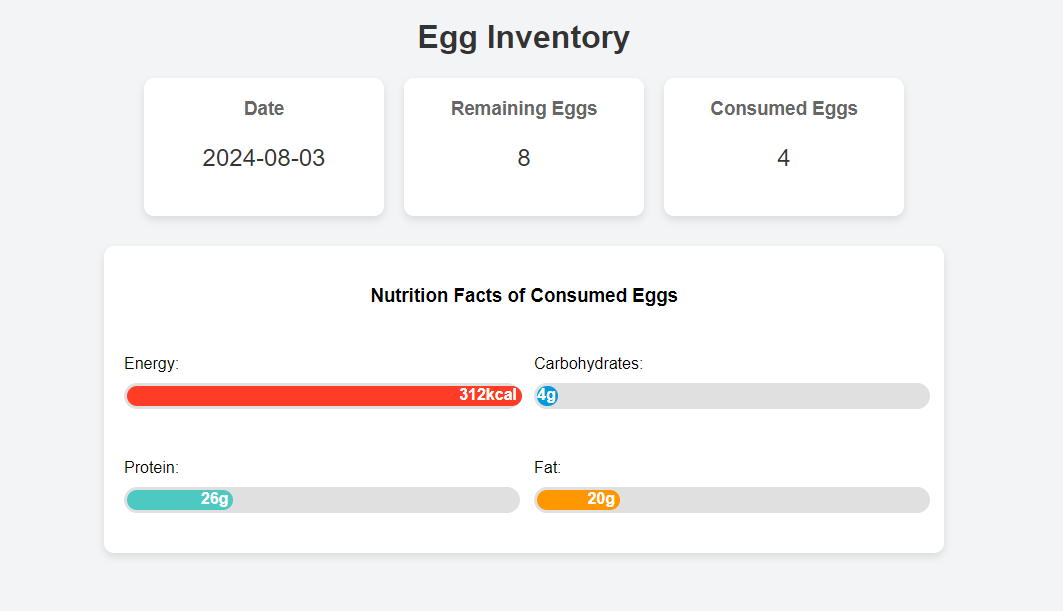
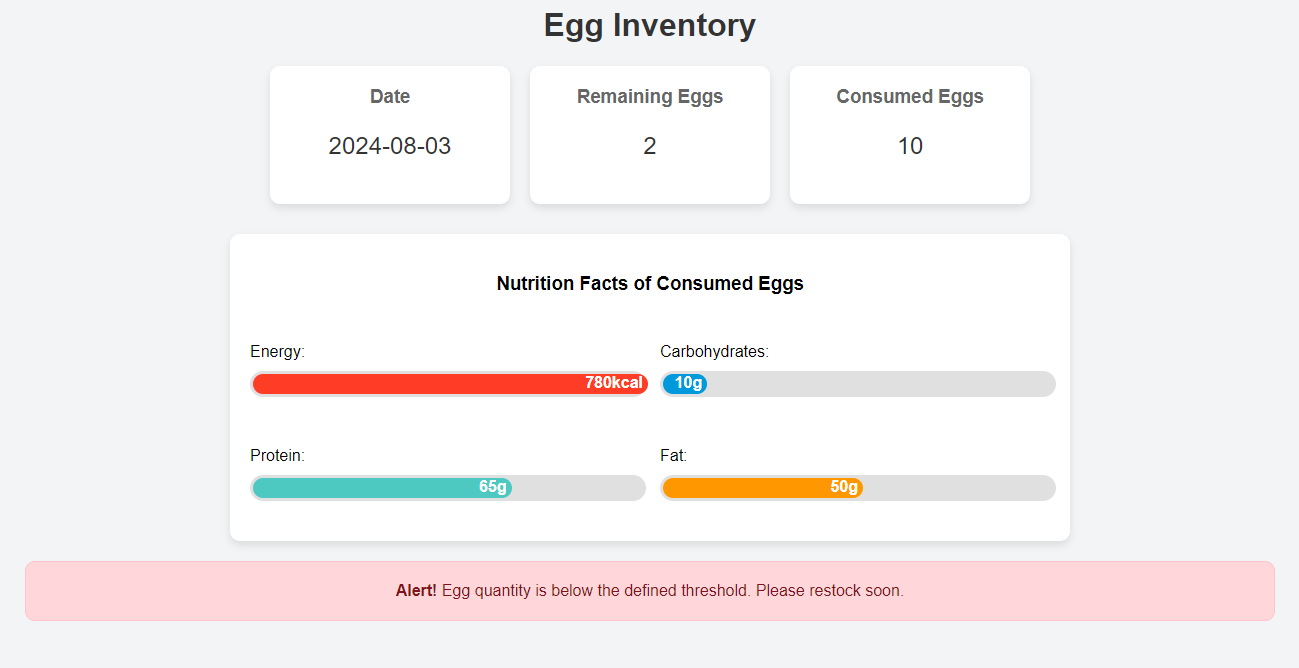
The system also generates an alert in the app if the egg quantity is less than the defined threshold, 4 in our example.
Conclusion
In this blog post, we have learned to develop an egg inventory management application using computer vision to automate and enhance inventory tracking. By using computer vision, the system can accurately detect and count eggs in real-time from camera snapshots, eliminating the need for manual counting and reducing human error.
The system uses a camera and computer vision model to count eggs, triggers alerts via MQTT when stock falls below a threshold and presents this data through an intuitive user interface.
Looking ahead, there is significant potential to enhance this system by integrating it with grocery services for automatic reordering. Such an integration could enable the system to place orders directly with online grocery providers as soon as inventory levels drop, thereby ensuring a continuous supply of eggs without manual intervention. This future enhancement would streamline inventory management further, reducing the risk of stockouts and optimizing the overall supply chain.
Moreover, the system can be integrated with a database to store past records, enabling detailed analysis of consumption patterns and trends over time. This data can provide valuable insights for optimizing inventory management and purchasing decisions.
Cite this Post
Use the following entry to cite this post in your research:
Timothy M. (Aug 26, 2024). Build an Egg Counting System with Computer Vision. Roboflow Blog: https://blog.roboflow.com/computer-vision-egg-counting/