TensorFlow expedites the machine learning process markedly. From abstracting complex linear algebra to including pre-trained models and weights, getting the most out of TensorFlow is a full-time job.
However, when it comes to loading data in ways that TensorFlow expects in order to perform as efficiently as it does, every developer will inevitably come across a troublesome TFRecord file format.
As a serialized data format specific to the TensorFlow framework, TFRecords are both enigmatic and indispensable.
So, what are TFRecords, and how does one work with them effectively? How does one create a TFRecord from PASCAL VOC XML labels? Or what about COCO JSON to TFRecord for object detection? Does Keras require TFRecords too?
We’ll break it down in this post: the what, why, and how of TFRecords for computer vision.
Want to skip the coding?
Roboflow generates TFRecords from any annotation format in three clicks.
Jump to the bottom of this post to see how.
What is a TFRecord?
The TensorFlow documentation describes TFRecords succinctly:
The TFRecord format is a simple format for storing a sequence of binary records.
But why create a new file format? Especially one as seemingly complex as a TFRecord. TFRecords are opaque: as serialized files, one cannot easily open them in a text editor to inspect their contents.
What’s the method for the madness?

In introducing TFRecords, Google is playing a game of tradeoffs. While TFRecords are “incompatible” with other file readers, they come with few core benefits:
- As binary file formats, a TFRecord file takes up less disk space, which means every read/write operation that needs to be performed is faster.
- TFRecord files are optimized to handle component parts of a larger dataset. So, for example, if a given dataset exceeds the size of a given machine’s memory, streaming a subset of the dataset is easily done. This is exactly what happens when training on a single batch of data: the machine is using a subset of the overall data.
- TFRecord files are also optimized for stored sequenced data. This is particularly important for word or time sequences, similar to how data can be easily broken into component pieces and streamed.
All said, the tradeoffs of serialization do provide significant advantages in the form of faster training. Working with a TFRecord file does require a learning curve.
How Do We Create a TFRecord File?
Intrinsic in creating a TFRecord file is knowing what is contained within a TFRecord file. If it’s a serialized representation of a dataset, how do we create that serialized interpretation?
While TFRecord files exist for any type of data -- tabular, text, time series -- this particular posts focuses on using TFRecords in the context of computer vision, and especially classification and object detection problems.
A TFRecord file contains our training data. In the context of deep learning, that often includes having both an annotation and an image. Images are encoded to integer representations. Annotations are encoded to describe where in an image a given bounding box is, and an integer representation of that bounding box’s class.
Critically, because we are converting our annotations into integer representations as well, we need a dictionary that maps our integers back to our string value object names. This is what is called a label_map.pbtxt.
Creating TFRecord Files with Code
The TensorFlow documentation walks through a few image encoding examples. In all their examples, however, the images are not being converted from one format to another.
Most often we have labeled data in PASCAL VOC XML or COCO JSON. Creating a TFRecord file from this data requires following a multistep process: (1) creating a TensorFlow Object Detection CSV (2) Using that TensorFlow Object Detection CSV to create TFRecord files.
Dat Tran has published a great code example on converting VOC XML to a TensorFlow Object Detection CSV and into TFRecord files.
However, his generate_tfrecord.py file presumes the user is only working with a single class. A slight modification is required. The section labeled #TO-DO requires that the user match their label map against the class names, replacing “class_name_one” with their class name string in the script below.
"""
Usage:
  # From tensorflow/models/
  # Create train data:
  python generate_tfrecord.py --csv_input=data/train_labels.csv  --output_path=train.record
  # Create test data:
  python generate_tfrecord.py --csv_input=data/test_labels.csv  --output_path=test.record
"""
from __future__ import division
from __future__ import print_function
from __future__ import absolute_import

import os
import io
import sys
import pandas as pd
import tensorflow as tf

from PIL import Image
from object_detection.utils import dataset_util
from collections import namedtuple, OrderedDict

flags = tf.app.flags
flags.DEFINE_string('csv_input', '', 'Path to the CSV input')
flags.DEFINE_string('output_path', '', 'Path to output TFRecord')
flags.DEFINE_string('image_dir', '', 'Path to images')
FLAGS = flags.FLAGS


# TO-DO replace this with label map
def class_text_to_int(row_label):
    if row_label == 'class_one_name':
        return 1
    if row_label == 'class_two_name':
        return 2
    if row_label == 'class_three_name':
        return 3
    else:
        None

def split(df, group):
    data = namedtuple('data', ['filename', 'object'])
    gb = df.groupby(group)
    return [data(filename, gb.get_group(x)) for filename, x in zip(gb.groups.keys(), gb.groups)]


def create_tf_example(group, path):
    with tf.gfile.GFile(os.path.join(path, '{}'.format(group.filename)), 'rb') as fid:
        encoded_jpg = fid.read()
    encoded_jpg_io = io.BytesIO(encoded_jpg)
    image = Image.open(encoded_jpg_io)

    width, height = image.size

    filename = group.filename.encode('utf8')
    print(filename)
    image_format = b'jpg'
    xmins = []
    xmaxs = []
    ymins = []
    ymaxs = []
    classes_text = []
    classes = []

    for index, row in group.object.iterrows():
        xmins.append(row['xmin'] / width)
        xmaxs.append(row['xmax'] / width)
        ymins.append(row['ymin'] / height)
        ymaxs.append(row['ymax'] / height)
        classes_text.append(row['class'].encode('utf8'))
        classes.append(class_text_to_int(row['class']))

    tf_example = tf.train.Example(features=tf.train.Features(feature={
        'image/height': dataset_util.int64_feature(height),
        'image/width': dataset_util.int64_feature(width),
        'image/filename': dataset_util.bytes_feature(filename),
        'image/source_id': dataset_util.bytes_feature(filename),
        'image/encoded': dataset_util.bytes_feature(encoded_jpg),
        'image/format': dataset_util.bytes_feature(image_format),
        'image/object/bbox/xmin': dataset_util.float_list_feature(xmins),
        'image/object/bbox/xmax': dataset_util.float_list_feature(xmaxs),
        'image/object/bbox/ymin': dataset_util.float_list_feature(ymins),
        'image/object/bbox/ymax': dataset_util.float_list_feature(ymaxs),
        'image/object/class/text': dataset_util.bytes_list_feature(classes_text),
        'image/object/class/label': dataset_util.int64_list_feature(classes),
    }))
    return tf_example


def main(_):
    writer = tf.python_io.TFRecordWriter(FLAGS.output_path)
    path = os.path.join(FLAGS.image_dir)
    examples = pd.read_csv(FLAGS.csv_input)
    grouped = split(examples, 'filename')

    # added
    file_errors = 0

    for group in grouped:
        try:
            tf_example = create_tf_example(group, path)
            writer.write(tf_example.SerializeToString())
        except:

            # added
            file_errors +=1
            pass

    writer.close()

    # added
    print("FINISHED. There were %d errors" %file_errors)

    output_path = os.path.join(os.getcwd(), FLAGS.output_path)
    print('Successfully created the TFRecords: {}'.format(output_path))


if __name__ == '__main__':
    tf.app.run()
Similarly, converting COCO JSON to TFRecord Files has an open source code solution, even officially maintained by TensorFlow available here.
Generating TFRecord Files With Three Clicks
Both of these methods are fairly tedious and mean you have to write a bunch of boilerplate code for every single format you want to convert into a TFRecord.
But it doesn't have to be that way. Roboflow automatically generates TFRecord files from COCO JSON, VOC XML, LabelBox, and other annotation formats with a few simple clicks.
Here’s how:
First, create a free Roboflow account.
Second, create a dataset and name your dataset whatever is apt, and describe the annotation group. (For example, a self-driving car dataset might use "obstacles" as its annotation group. The best way to choose an annotation group is to fill in the blank: "I labeled all of the ___ in these images.")
Third, drop your images and annotations directly onto the blank upload space. Your annotations can be Darknet TXT, TensorFlow CSV, or any other annotation format.
Next, click "Start Uploading" in the upper right. You're given the option to optionally create training, validation, and testing sets. If you choose to create splits, Roboflow will create one set of TFRecord files for each split (train, valid, and test).
After uploading, you'll be at the "mission control" page for your dataset. You may experiment with one-click preprocessing and/or augmentation steps here to improve your model's performance.
If you want to export your images exactly as you uploaded them, you can turn all of these options off.
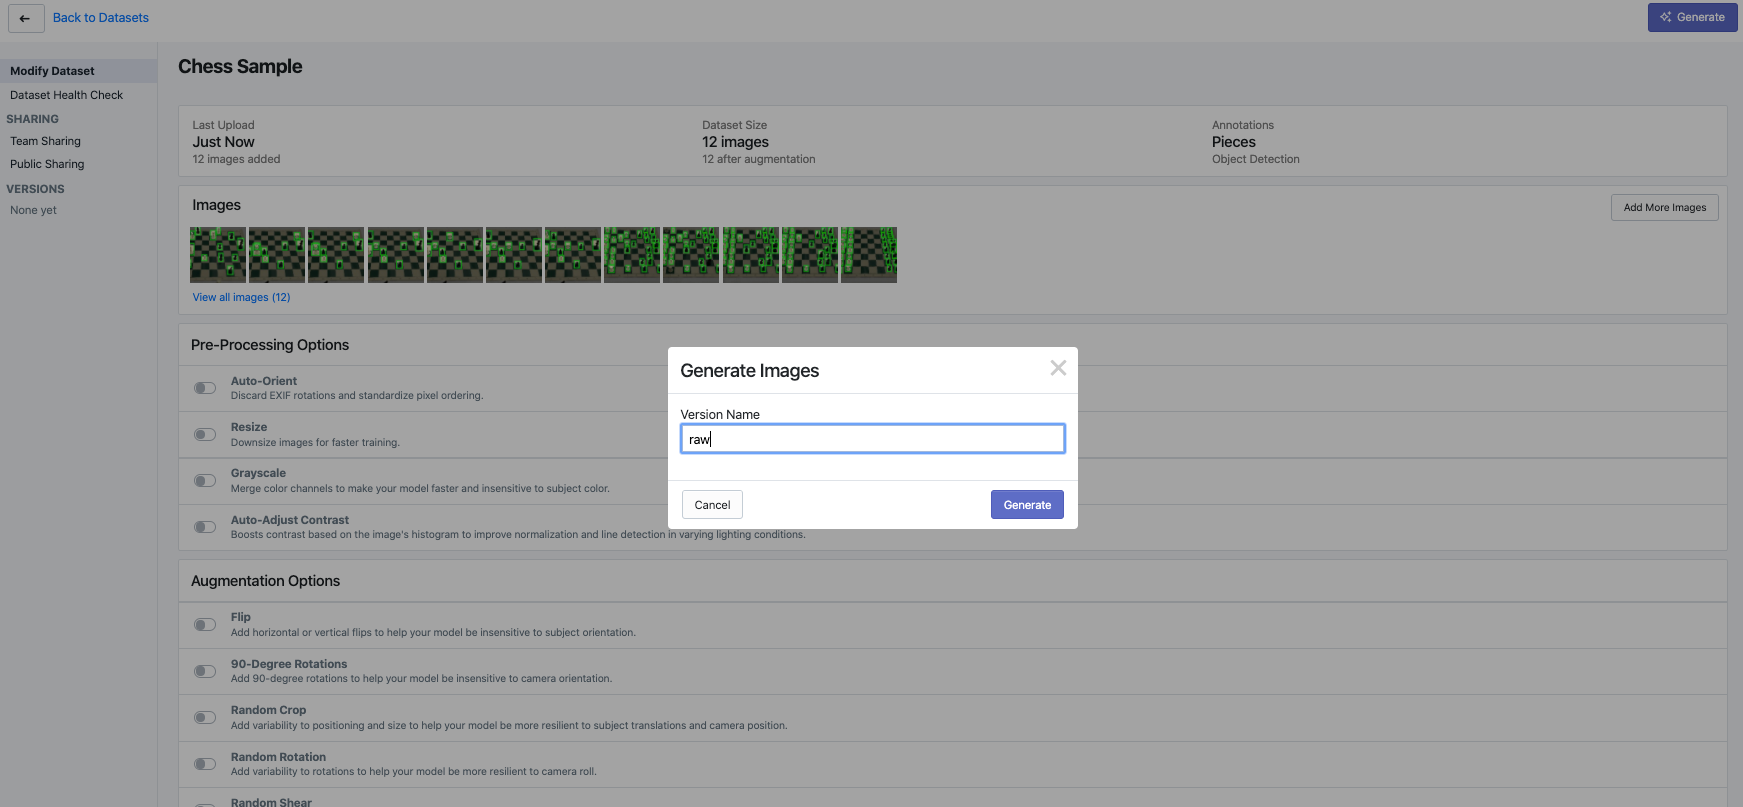
Then, click "Generate" in the upper right hand corner. Either give your generated dataset version a name (perhaps raw) or let it default to the current timestamp.

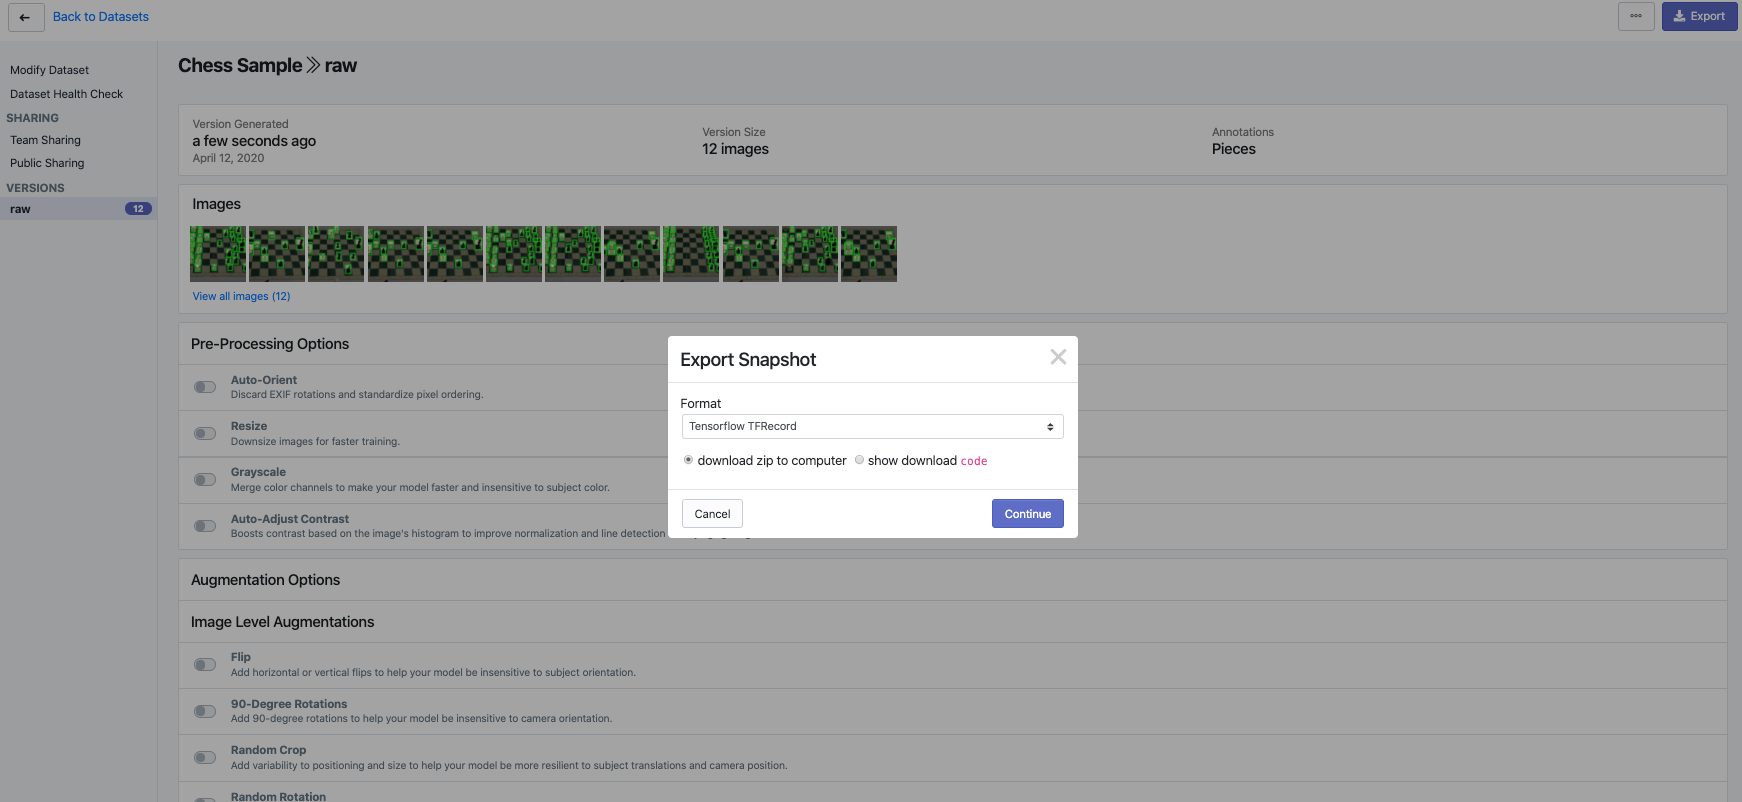
Once the version is generated, it appears on the left-hand side. You are automatically directed to a download page to choose your export format.
From the dropdown menu, note that you can create any data format you may need: TensorFlow Object Detection CSV, COCO, VOC, YOLO Keras, YOLO Darknet, and, of course, TFRecord.

Select TFRecord. You may download the data locally to your computer as a zip, or show the download code. Showing the download code enables you to easily drop a link to the data into a Jupyter or Colab notebook.
And that's it! If you downloaded your files locally, note that Roboflow includes your TFRecord file, label_map.pbtxt file, and a README about the version of the dataset you downloaded.
It's that easy! Just sign up with Roboflow to get started.
Cite this Post
Use the following entry to cite this post in your research:
Joseph Nelson. (Apr 6, 2020). How to Create to a TFRecord File for Computer Vision and Object Detection. Roboflow Blog: https://blog.roboflow.com/create-tfrecord/
