
Depth estimation is a computer vision technique used to determine the distance of objects in a scene from the camera. It converts a 2D image into a depth map, helping machines understand the 3D structure of the environment from a single or multiple images.
Depth Anything V2 is a state-of-the-art deep learning model for monocular depth estimation. It predicts accurate depth maps from a single image using a transformer-based architecture and a teacher-student training approach, making it highly generalizable to real-world scenes.
In this post, you'll learn what depth estimation is and how Depth Anything V2 works behind the scenes.
We'll go hands-on to:
- Use Depth Anything V2 in Roboflow Workflows.
- Measure the real-world distance to objects using just one image.
- Build a depth-aware blur effect that mimics smartphone portrait mode.
By the end of this post, you’ll not only understand the concept how Depth Anything v2 works, but also how to apply it in real-world scenarios, no complex setup or multi-camera systems required.
Let’s dive into the world of 3D understanding with just a single image!
What is depth estimation (depth understanding)?
Depth estimation, also called depth understanding, is the task in computer vision where the goal is to estimate how far objects in an image are from the camera. In simple terms, it helps a machine or AI system understand the 3D structure of a scene from 2D input, like a photo or video frame.
For example, if a robot sees a cup and a table in an image, depth estimation tells it how far away each object is, helping it avoid collisions, grasp objects, or navigate safely.
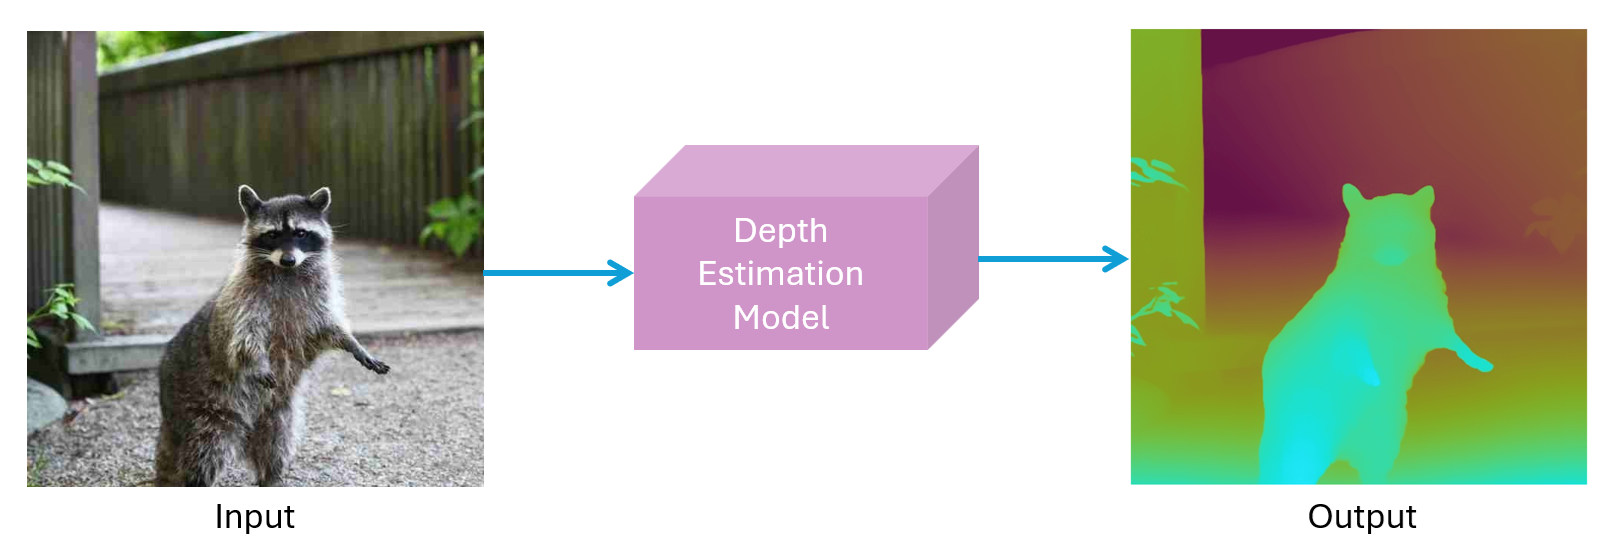
So, depth estimation is the task of determining how far away each point in a scene is from the camera, across an image. The output of depth estimation is depth map which is a 2D image where every pixel's value corresponds to distance. Brighter or darker intensities indicate nearer or farther objects depending on the encoding
What is a depth map?
A depth map is a type of 2D image that shows how far each point in a scene is from the camera. Each pixel in the image represents a depth value, the distance between that point and the camera. This depth is usually shown using grayscale or colored shading:
- Darker shades often mean the object is closer.
- Lighter shades indicate the object is farther away.
Depth maps mainly capture the visible surface structure of objects in a scene. When a depth image is combined with a regular color image, the result is called an RGB-D image (Red-Green-Blue-Depth). An RGB-D image combines a color (RGB) image with a depth (D) map, where each pixel in the depth map aligns with the RGB image.
Depth maps can be categorized into two main types:
Relative Depth Map
It shows the depth differences between points in the scene, relative to a reference point or baseline. Depth is often shown using intensity values (commonly 8-bit grayscale from 0 to 255, though other bit depths like 16-bit or 32-bit float are also used) where the values represent ordinal relationships:
- Lower values = farther away (or closer, depending on convention)
- Higher values = closer (or farther, depending on convention)
Relative depth map is commonly used in traditional depth estimation methods, and it does not provide exact physical distances, just comparisons between objects in the scene.
Absolute Depth Map
It shows the actual distance from each pixel point to the camera. Depth values have real-world units like meters or millimeters, and it directly reflects the 3D spatial structure of the scene. Absolute depth maps is often used in deep learning and self-supervised learning, where accurate reconstruction of the scene is needed. Absolute depth can be converted into relative depth.
What is Depth Anything V2?
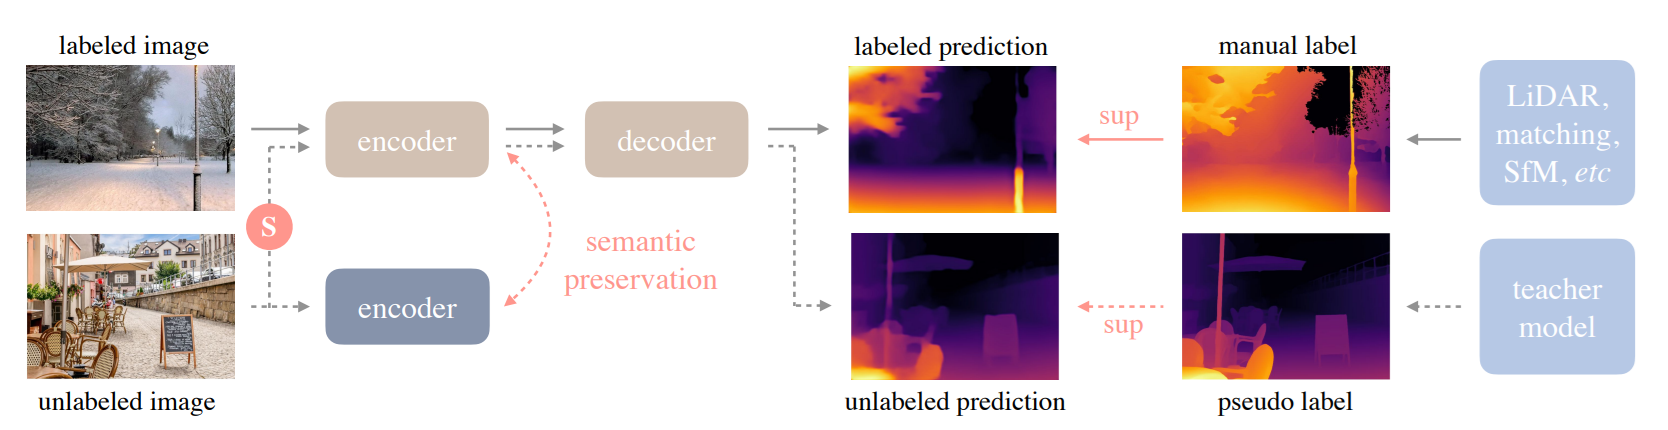
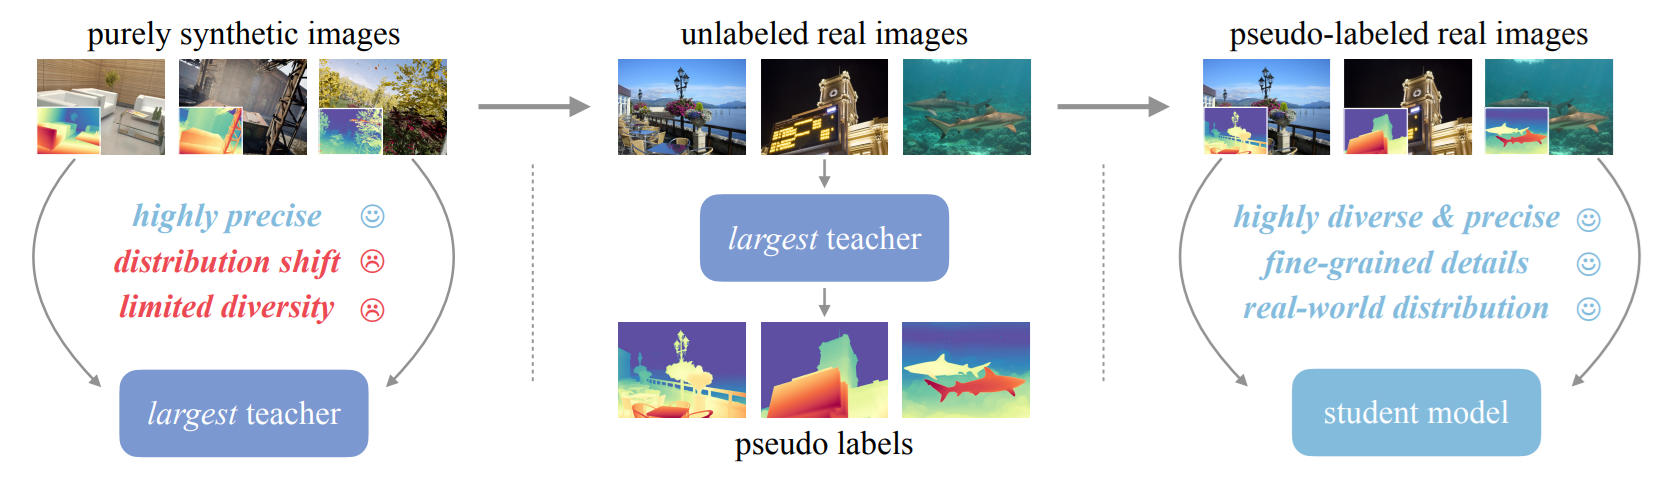
Depth Anything V2 is a state-of-the-art monocular depth estimation model, meaning it can predict depth information from a single image, without needing multiple cameras. It achieves this by training a powerful "teacher" model on synthetic images and then using it to generate pseudo-labels for a large set of real-world unlabeled images. These pseudo-labels are then used to train "student" models, resulting in a model that generalizes well to various scenes and conditions.
Let’s understand Depth Anything V2 architecture, its framework components, and the overall pipeline:
Depth Anything V2 architecture and core components
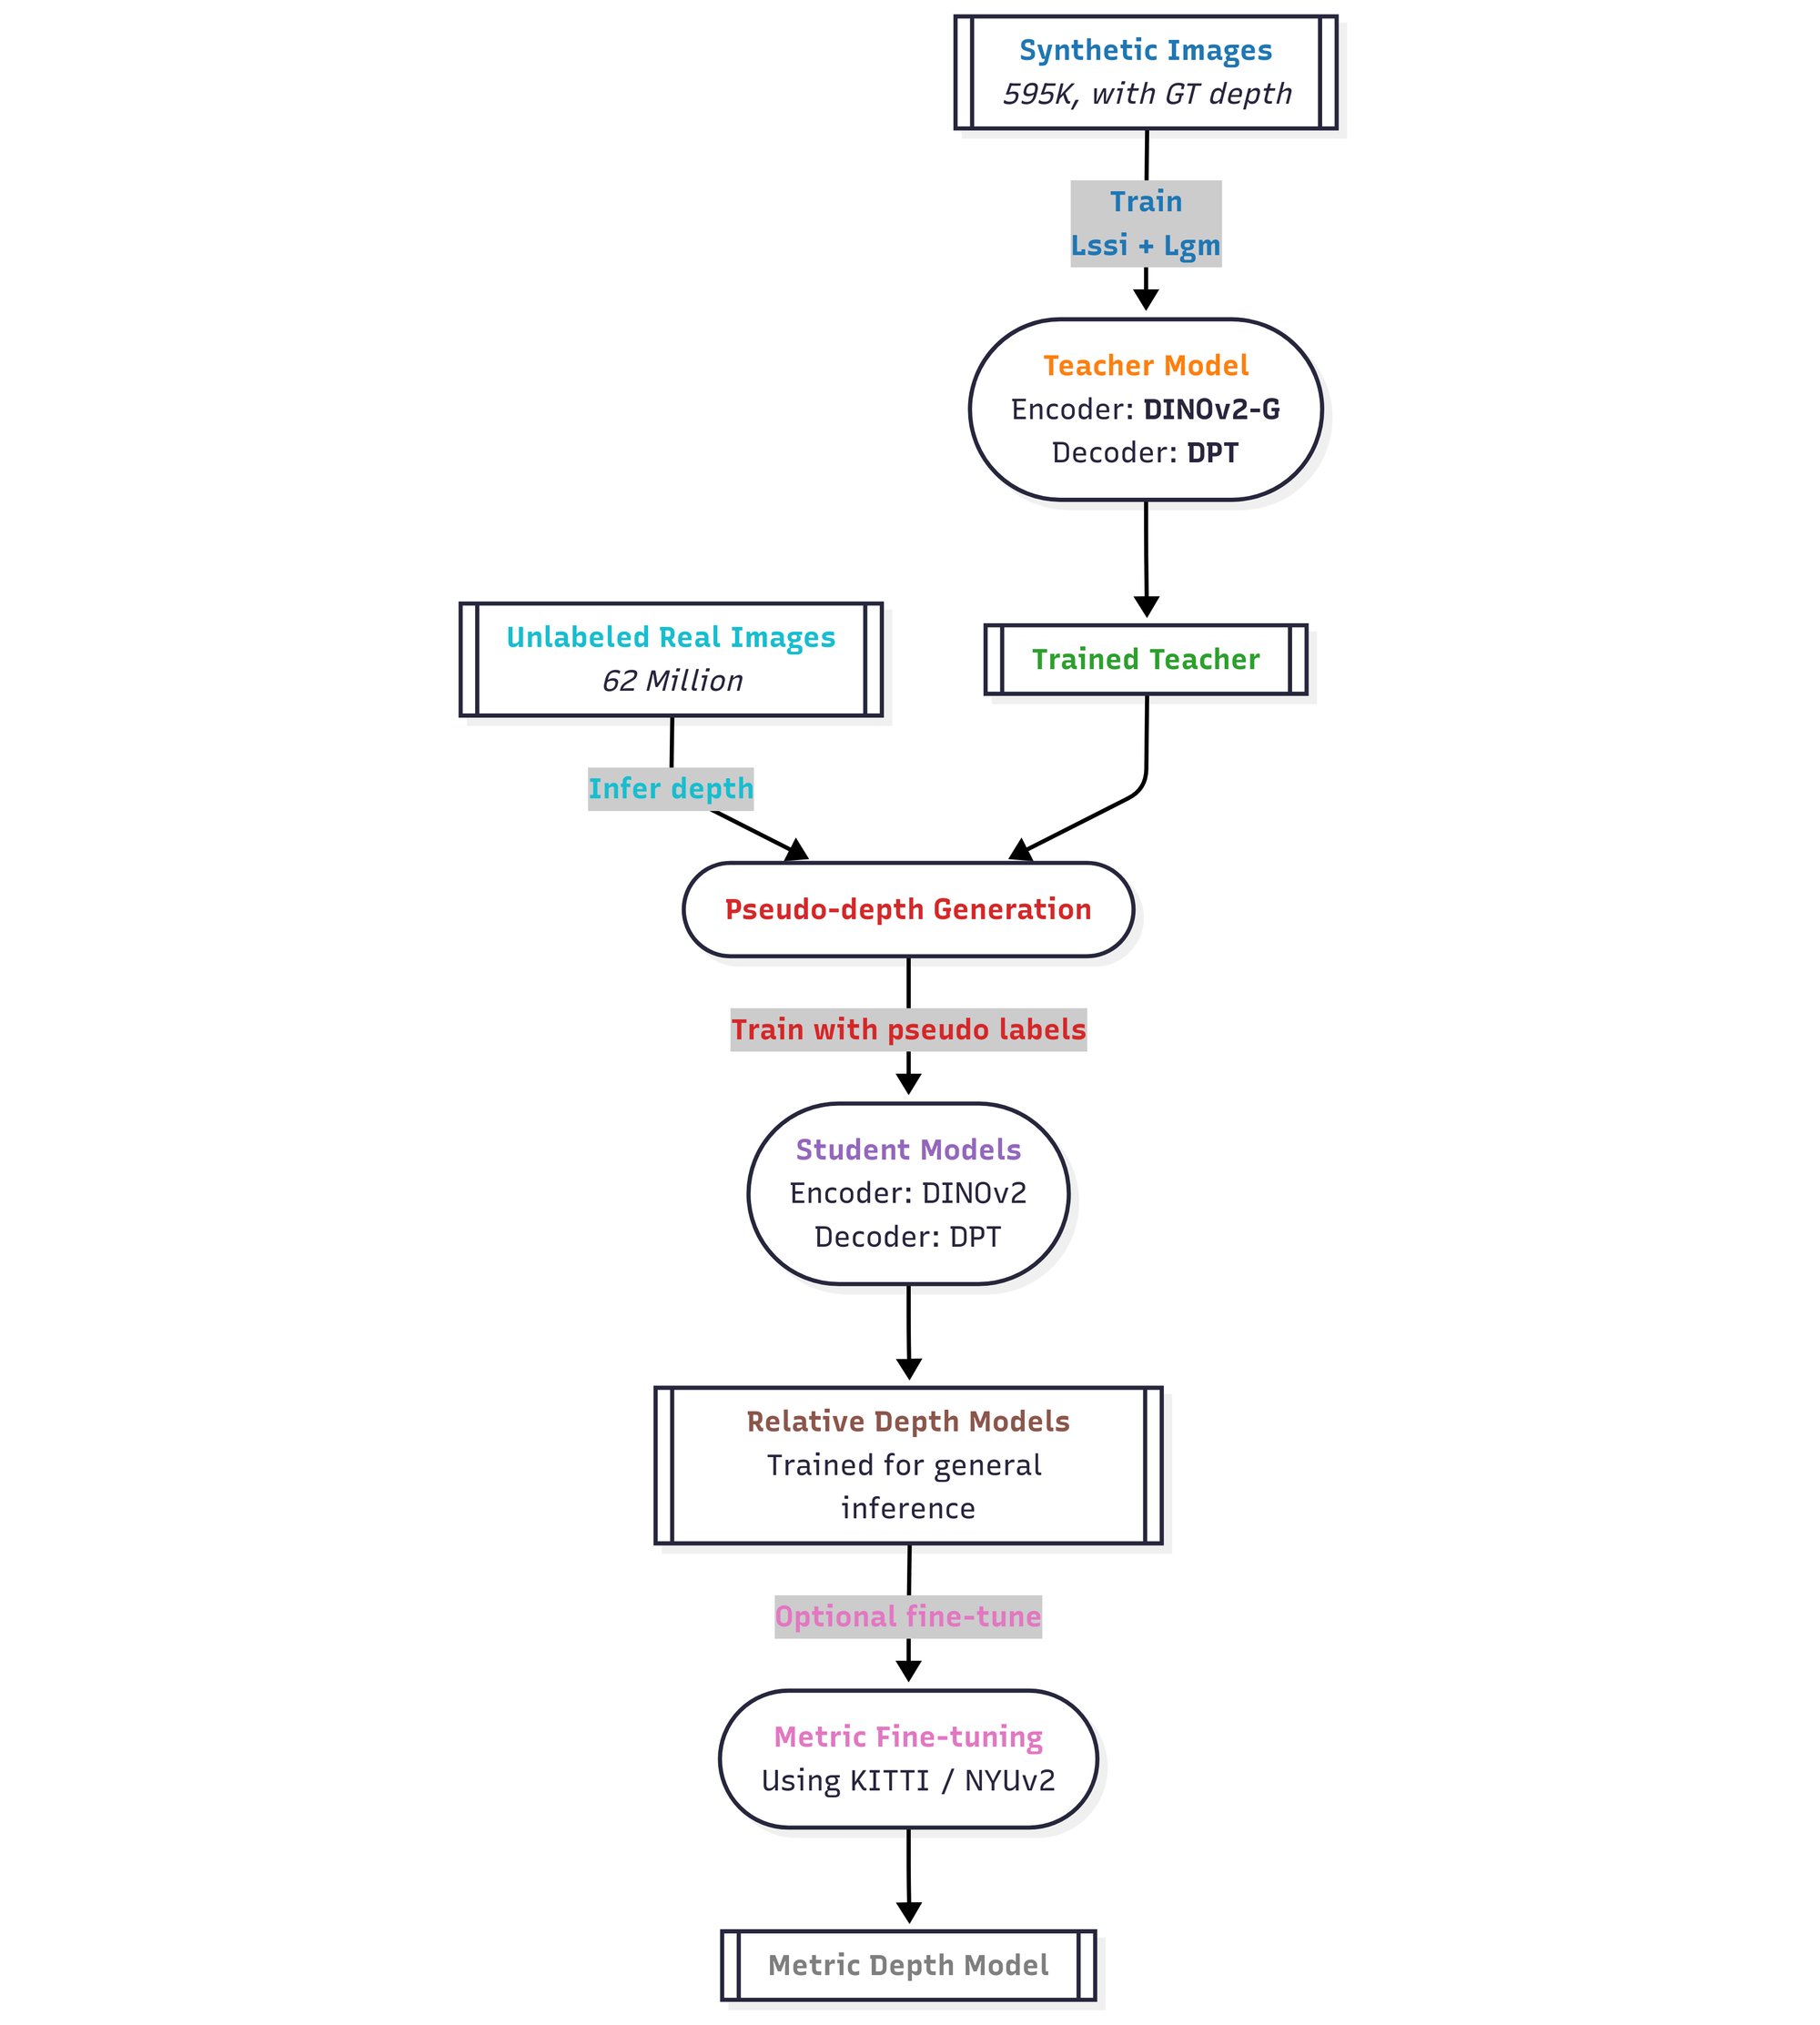
Depth Anything V2 architecture combines a powerful transformer-based encoder (DINOv2), a decoder built on DPT, and a multi-stage training process, including synthetic pre-training, large-scale pseudo-label distillation, and optional metric fine-tuning, to deliver robust performance across both synthetic and real-world imagery. Following are the main components:
Encoder: It is built on DINOv2 (Vision Transformer-based), typically using ViT variants (Small, Base, Large, Giant). It encodes raw RGB images into multi-scale feature representations.
Decoder: Decoder is built on DPT (Dense Prediction Transformer), aggregates multi-scale encoder features to generate dense depth maps at pixel level. It is inspired by DPT architecture designed for monocular depth estimation.
Loss Functions: The architecture uses following loss function on training-time only:
- Scale-and-Shift-Invariant Loss (Lssi): It is used to ensures depth consistency regardless of global scale or offset.
- Gradient Matching Loss (Lgm): It is used to sharpen edges and preserves object boundaries accurately.
These two losses are combined with a typical weight ratio of:

Training framework for Depth Anything V2
Depth Anything V2 uses multi stage training framework as shown in the figure below.
The following are the main stages of Depth Anything V2 training framework:
Stage 1 Teacher Pre-training: It train a large teacher model (e.g., DINOv2-G/Vit‑Giant) on pure synthetic depth data (595K images). The purpose is to teach robust depth cues and fine-grained details from perfect ground truth.
Stage 2 Pseudo-label Generation: This stage use the trained teacher on unlabeled real images (~62 million). It automatically generate pseudo-ground-truth depth maps to mitigate synthetic-to-real domain shift.
Stage 3 Student Training: It then train student models (Smaller: 25M, Base: 97M, Large: 335M parameters) on pseudo-labeled real data. This stage produces result containing realistic, robust depth estimation that generalizes well.
Stage 4 Metric Finetuning: This is optional stage. It is further fine-tune on metric-labeled datasets (e.g., NYUv2, KITTI, Virtual KITTI). This enables accurate absolute depth output.
Examples of using Depth Estimation V2 with Roboflow Workflows
In this section we will explore how to use Depth Estimation/Depth Understanding in Roboflow Workflows. You will learn how to leverage Depth Anything V2 model for depth estimation task.
Example #1: Using Depth Anything v2
Using Depth Anything v2 on Roboflow Workflows is very simple. You just need to add Depth Estimation block as shown below.
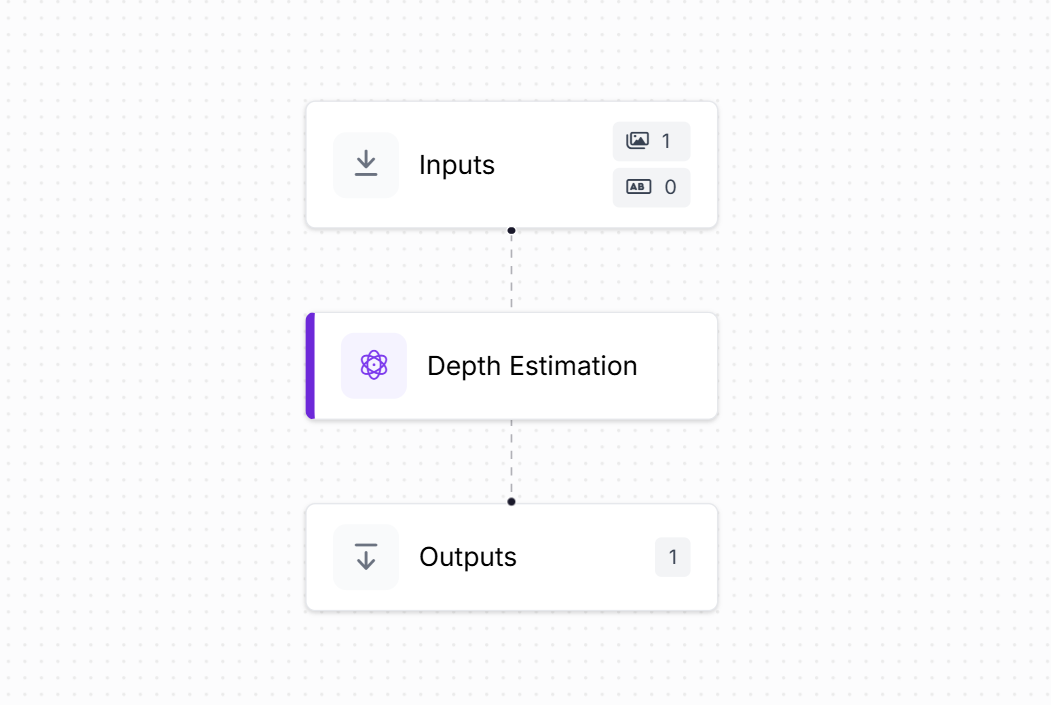
Configure the output block to show output. You may choose to display all_properties, image, or normalized_depth. Choose image for output.

Now you can run the Workflow. You should see output similar to following.
Example 2: Calculating object distance from camera
In this example, we will build an application that estimates the real-world distance of an object from the camera, measured in units such as centimeters.
The approach involves a simple calibration step using the Depth Anything model:
- Reference Calibration: First, place the object at a known fixed distance from the camera (e.g., 1.5 feet or 45 centimeters). Using the Depth Anything model, record the predicted depth value at this distance. This depth value will serve as the reference depth for calibration.
- Distance Estimation: After calibration, you can estimate the distance of the same or similar object placed at different positions. The model's depth output for the new position is compared to the reference depth, and a scaling formula is applied to convert it into real-world distance (in centimeters).
By following this method, the camera is effectively calibrated using a known reference, allowing consistent distance measurement for future predictions using the same depth estimation model.
Step #1: Reference Depth Calibration Workflow
To accurately calculate real-world distances using a monocular depth estimation model, it is essential to calibrate the system by determining a reference depth. This reference value acts as a baseline for converting depth map values into real-world units (such as centimeters).
To calculate how far an object is from the camera (like in centimeters), we first need to "teach" the system what a known distance looks like. This is called calibration.
Here's the idea:
- Take a picture of the object (like a bottle) while holding it at a known distance from the camera, let’s say 1.5 feet.
- Use an object detection model YOLOv8 (or any other model) to find where the object is in the image. It gives us a box around the object.
- Then find the center point of that box, which roughly points to the middle of the object.
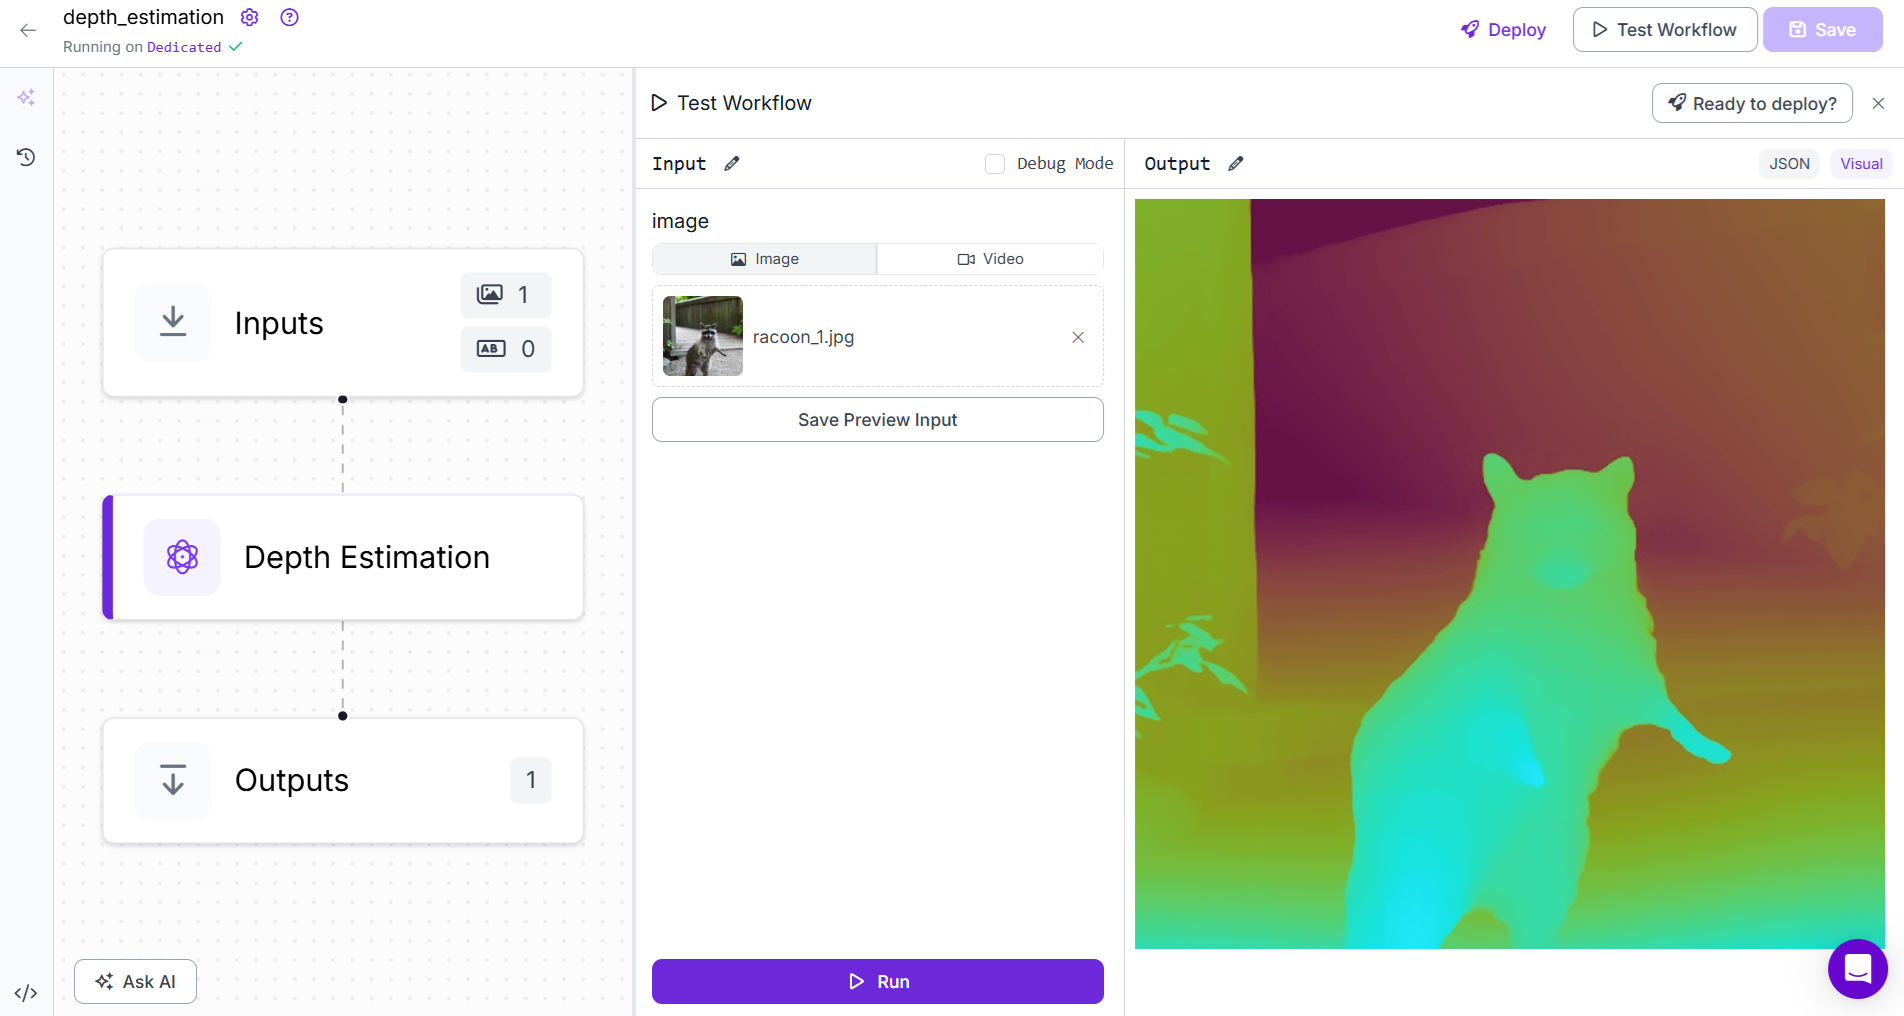
- Next, use a depth estimation model Depth Anything v2 to get the depth values for every pixel in the image.
- From this depth map, pick the depth value at the center point of the object.
- That number becomes our reference depth, a value from the depth model that matches a real distance of 1.5 feet.
Later, when the same object is at a different place, we can use the depth value at its center again and compare it with the reference depth to figure out how far it is in real-world units.
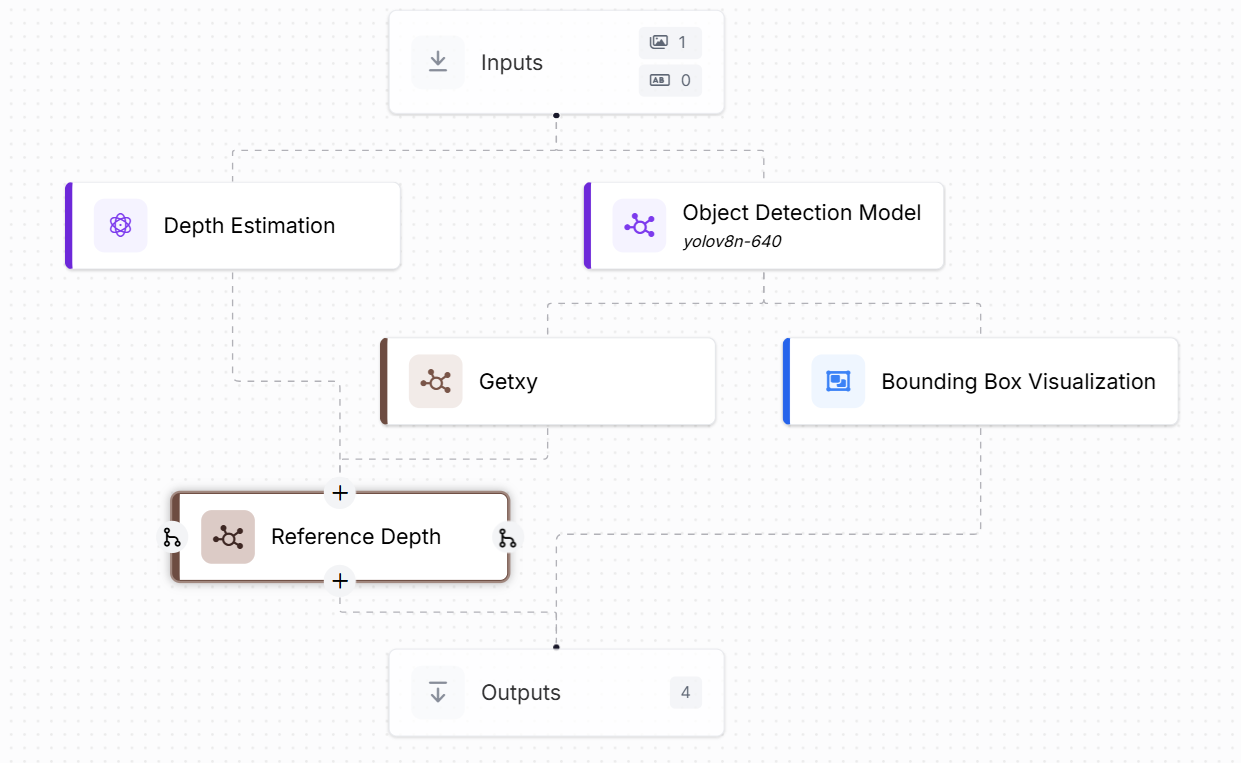
This workflow is designed to calculate the reference depth of an object (e.g., a bottle) placed at a known real-world distance from the camera. It combines object detection and depth estimation, with two custom code blocks to extract the center of the object and look up the corresponding depth value.
Use the following steps:
- Add Depth Estimation Block. This block uses a depth estimation model Depth Anything v2 to process the input image and generate a depth map. The depth map is a 2D array where each pixel holds a normalized depth value (closer = darker/smaller, farther = lighter/larger).
- Add Object Detection Block. An object detection model, configured with YOLOv8n-640, runs on the input image. It detects objects (in our case, a "bottle") and returns bounding box coordinates for each detection.
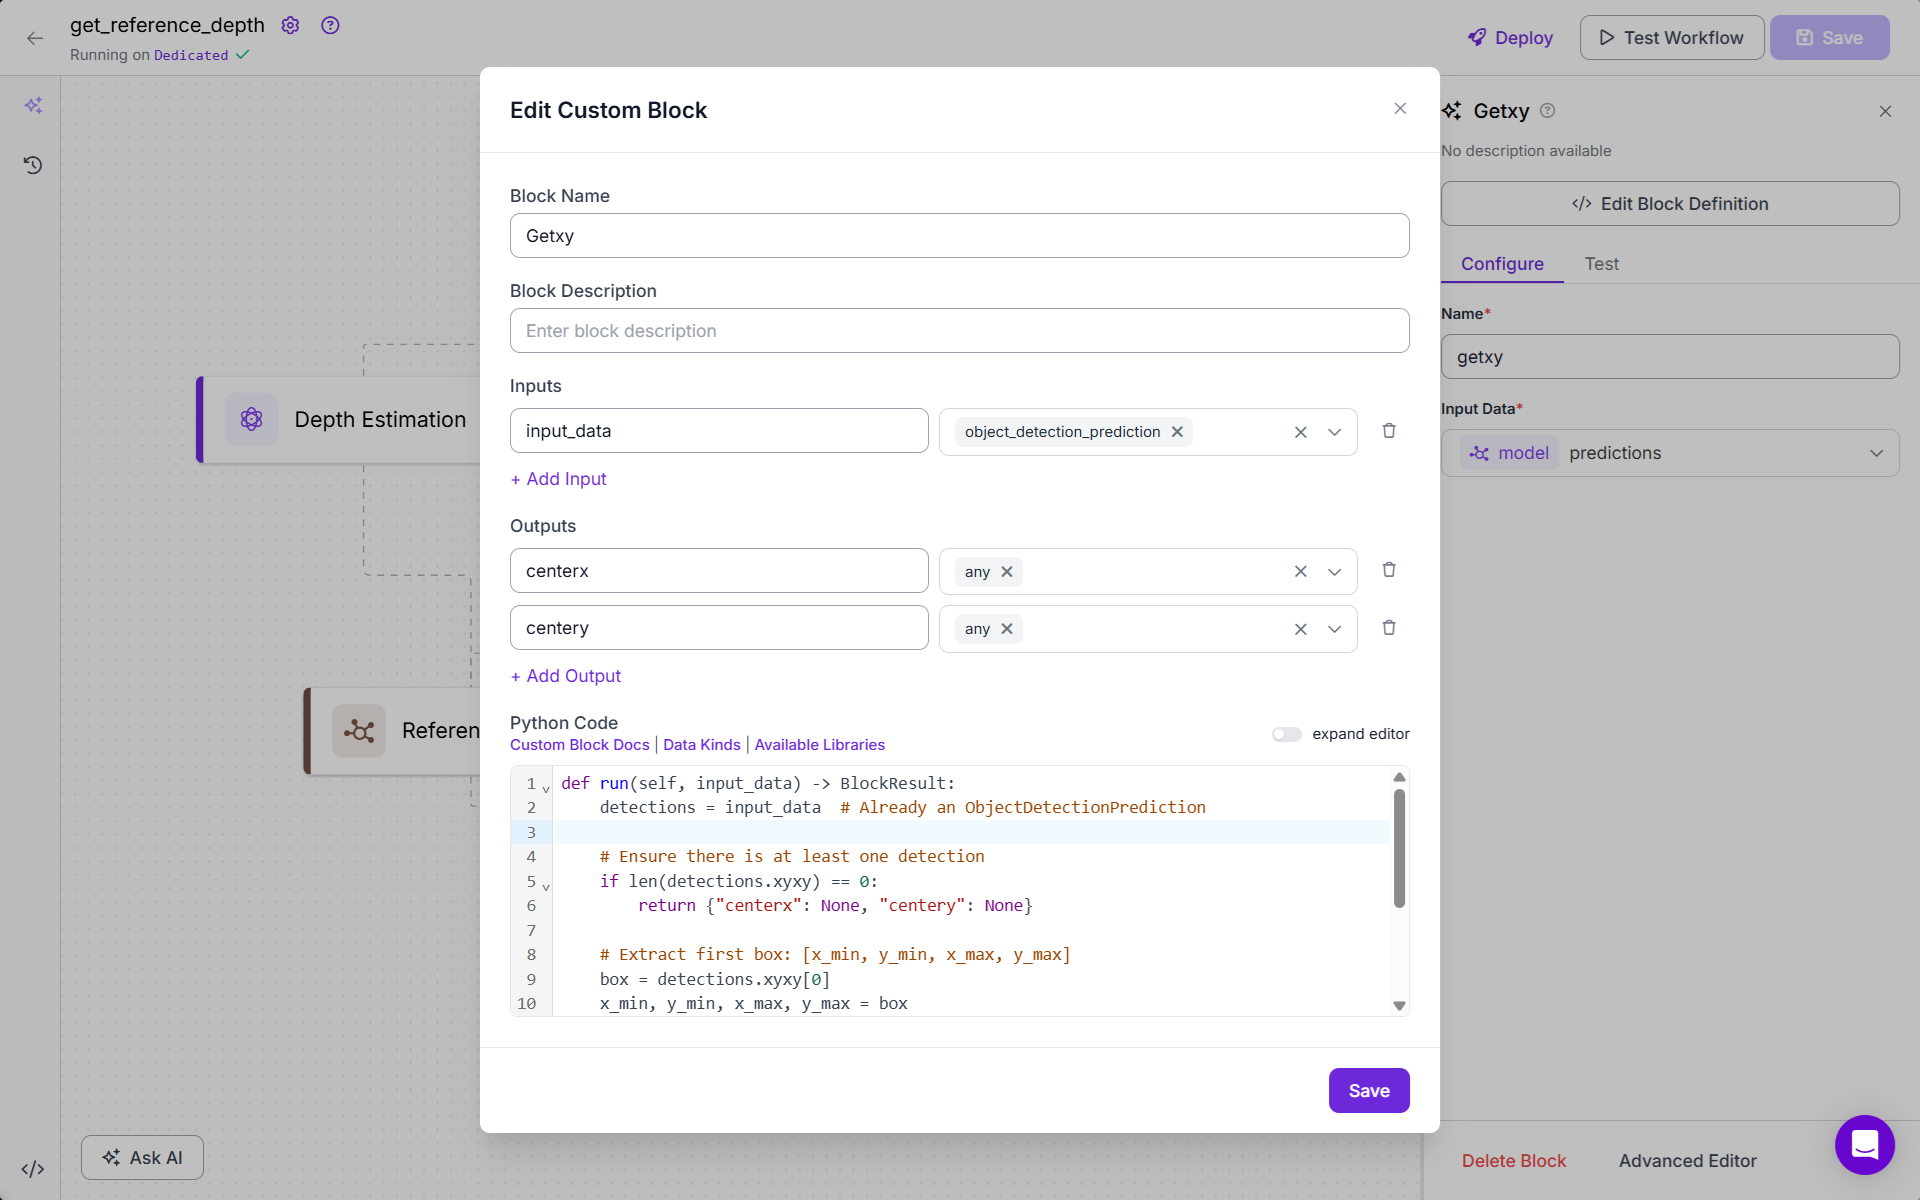
- Add Getxy block (Custom Python Code). This custom block extracts the center of the detected object from the bounding box. Following is the code for this block:
def run(self, input_data) -> BlockResult:
    detections = input_data  # Already an ObjectDetectionPrediction
    # Ensure there is at least one detection
    if len(detections.xyxy) == 0:
        return {"centerx": None, "centery": None}
    # Extract first box: [x_min, y_min, x_max, y_max]
    box = detections.xyxy[0]
    x_min, y_min, x_max, y_max = box
    # Compute center
    center_x = (x_min + x_max) / 2
    center_y = (y_min + y_max) / 2
    return {"centerx": float(center_x), "centery": float(center_y)}
It picks the first detected object (assumes one object of interest). Calculates the center (x, y) of the bounding box. Returns it as centerx, centery.
- Add the Reference Depth Block (Custom Python Code). This block looks up the depth value from the depth map using the center coordinates provided by Getxy. Following is the code for this block:
def run(self, depth_map, centerx, centery) -> BlockResult:
    # Ensure coordinates are integers
    x = int(round(centerx))
    y = int(round(centery))
    height, width = np.shape(depth_map)

    # Check bounds
    if x < 0 or x >= width or y < 0 or y >= height:
        return {"reference_depth": None}

    reference_depth = float(depth_map[y][x])
    return {"reference_depth": reference_depth}
It converts the floating-point center coordinates into integer pixel indices. Uses them to fetch the depth value from the depth map at that location. Returns this value as the reference_depth.
reference_depthThis value is stored and used later to convert future depth values to real-world distances (e.g., using proportion scaling).
- Optionally add a visualization block to show the detected bounding box on the image for validation.
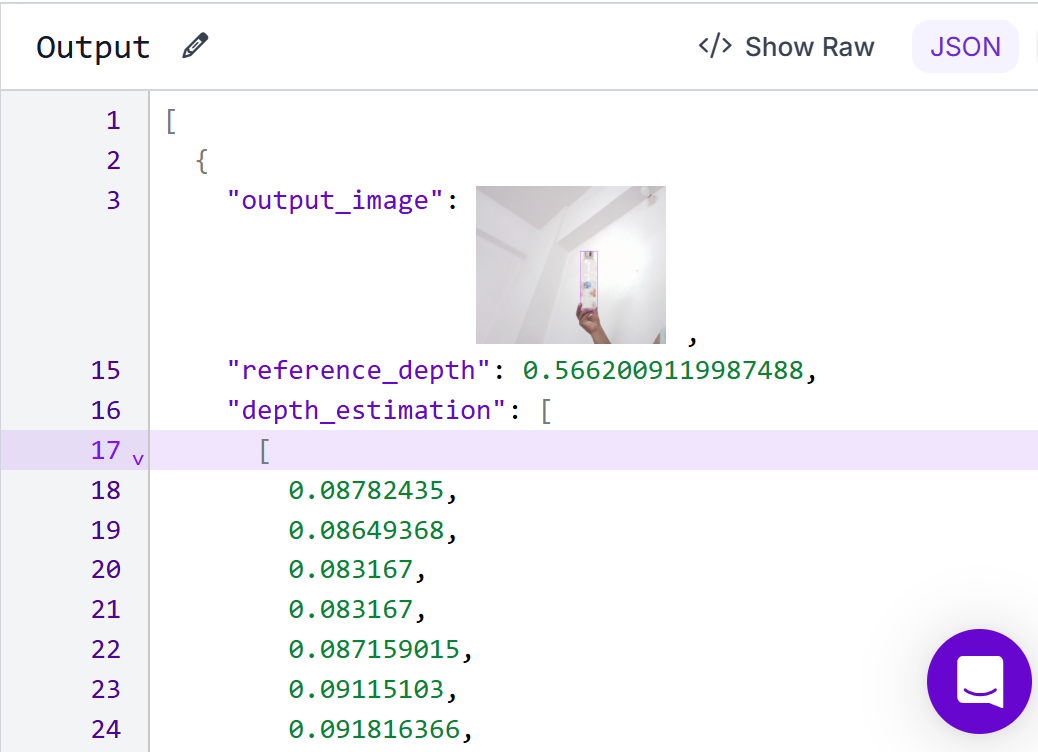
- The final outputs of the Workflows include, the reference depth and the depth map. Optionally, the image with bounding box and center coordinates.
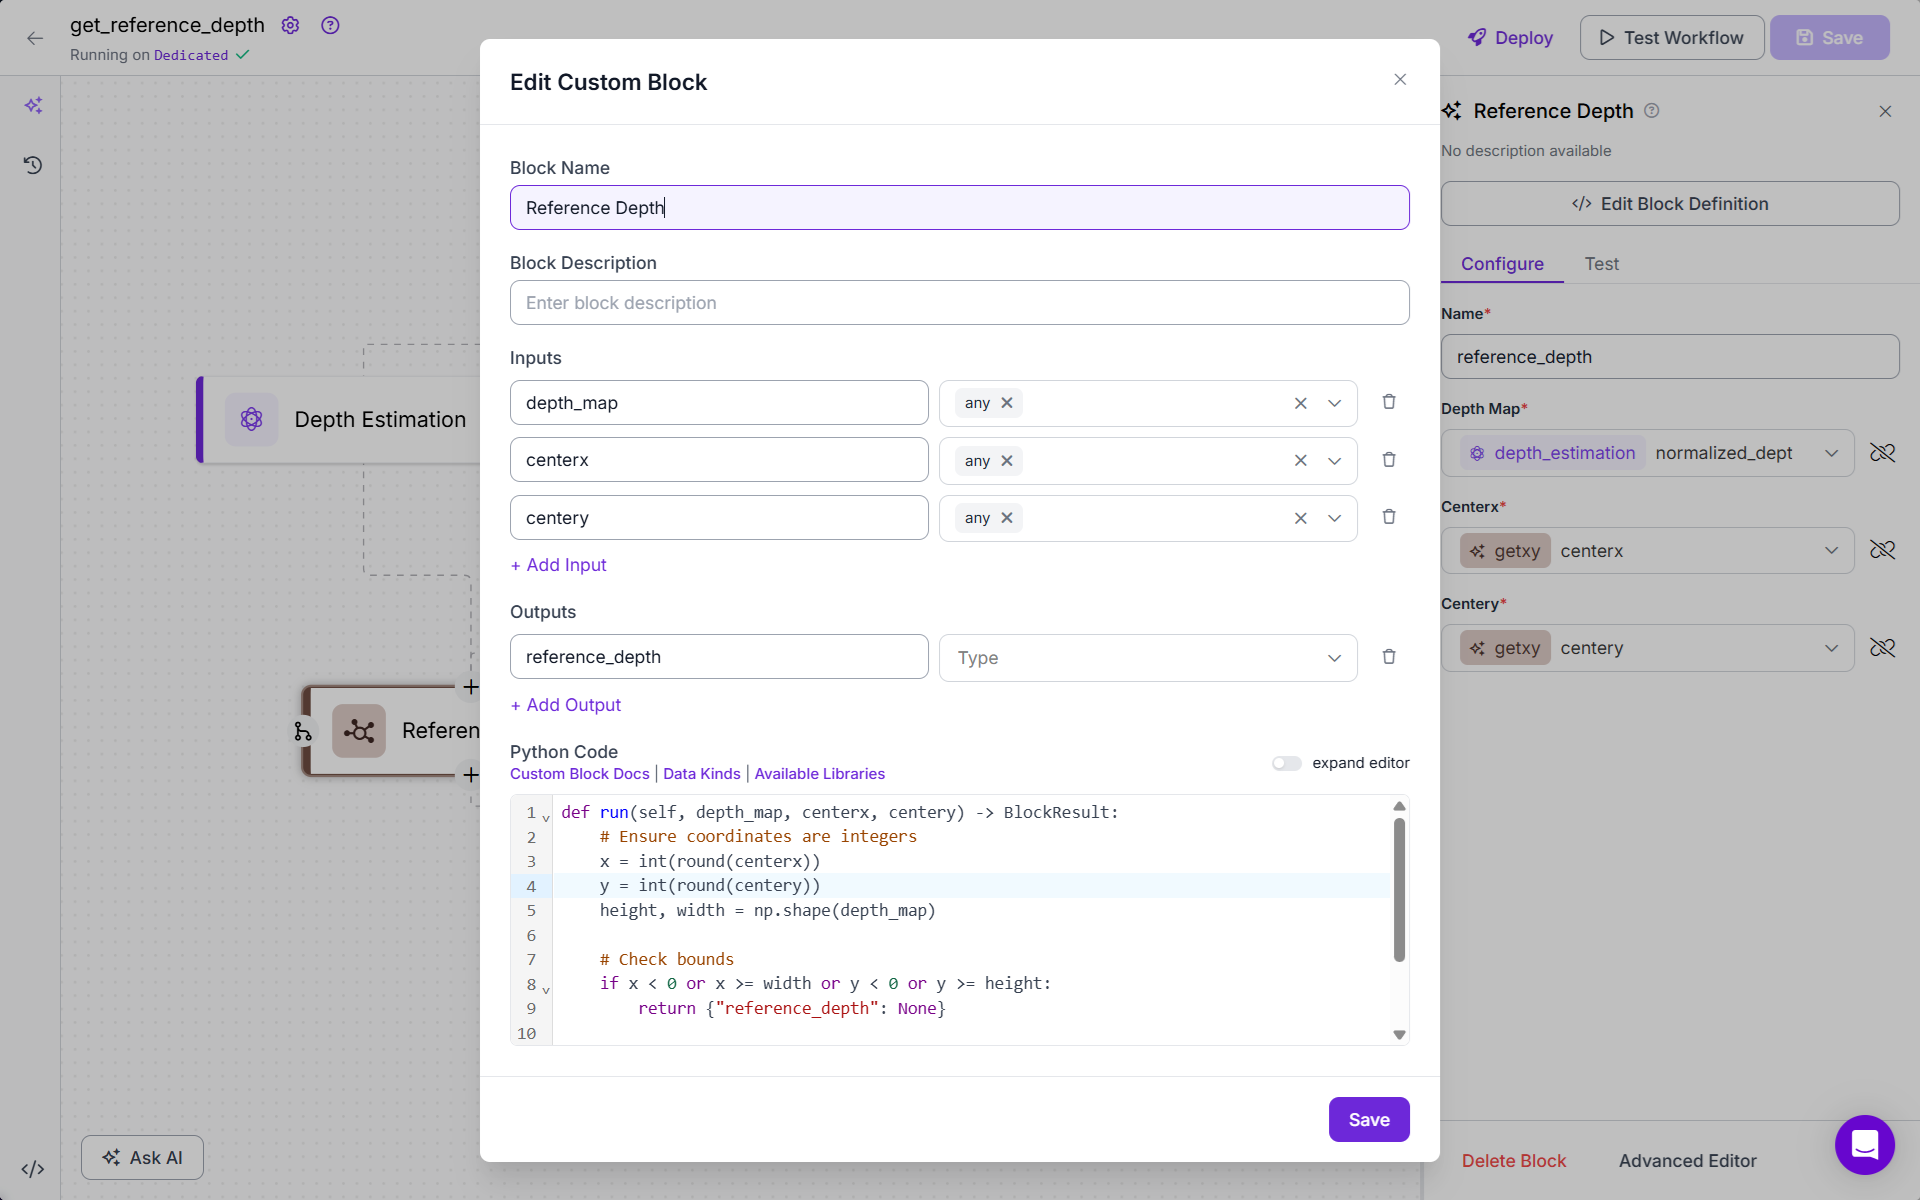
Step 2: Camera to Object Distance Workflow
This workflow builds on the first calibration step. Now that we’ve already captured the reference depth for an object at a known distance (e.g., 45 cm), we use that value to estimate how far the object is from the camera in any new image.
The main goal is to calculate the real-world distance (in centimeters) of the object from the camera. The process is based on the same technique used in calibration. We locate the object in the image, find the center of its bounding box, extract the depth value at that point, and then compare it to the reference depth to calculate real-world distance. Follow the steps below assuming that we already have Depth Estimation, Object Detection and Getxy blocks from the calibration workflow:

Now add Get_Distance Block (Custom Code Block). This block retrieves the object’s actual depth value from the depth map using the center coordinates. It checks whether the pixel is within bounds. Then returns the depth at the center of the object. Here is the code:
def run(self, depth_map, centerx, centery):
    """
    depth_map: 2D list or numpy array of depth values (normalized: 0-1)
    centerx, centery: center coordinates (should be integers and correspond to depth_map indices)
    """
    import numpy as np
    # Convert to int pixel coordinates if necessary
    x = int(round(centerx))
    y = int(round(centery))
    # Ensure coordinates are within depth map bounds
    height, width = np.shape(depth_map)
    if x < 0 or x >= width or y < 0 or y >= height:
        return {"object_depth": None}
    object_depth = depth_map[y][x]
    return {"object_depth": float(object_depth)}
The block should look like following.
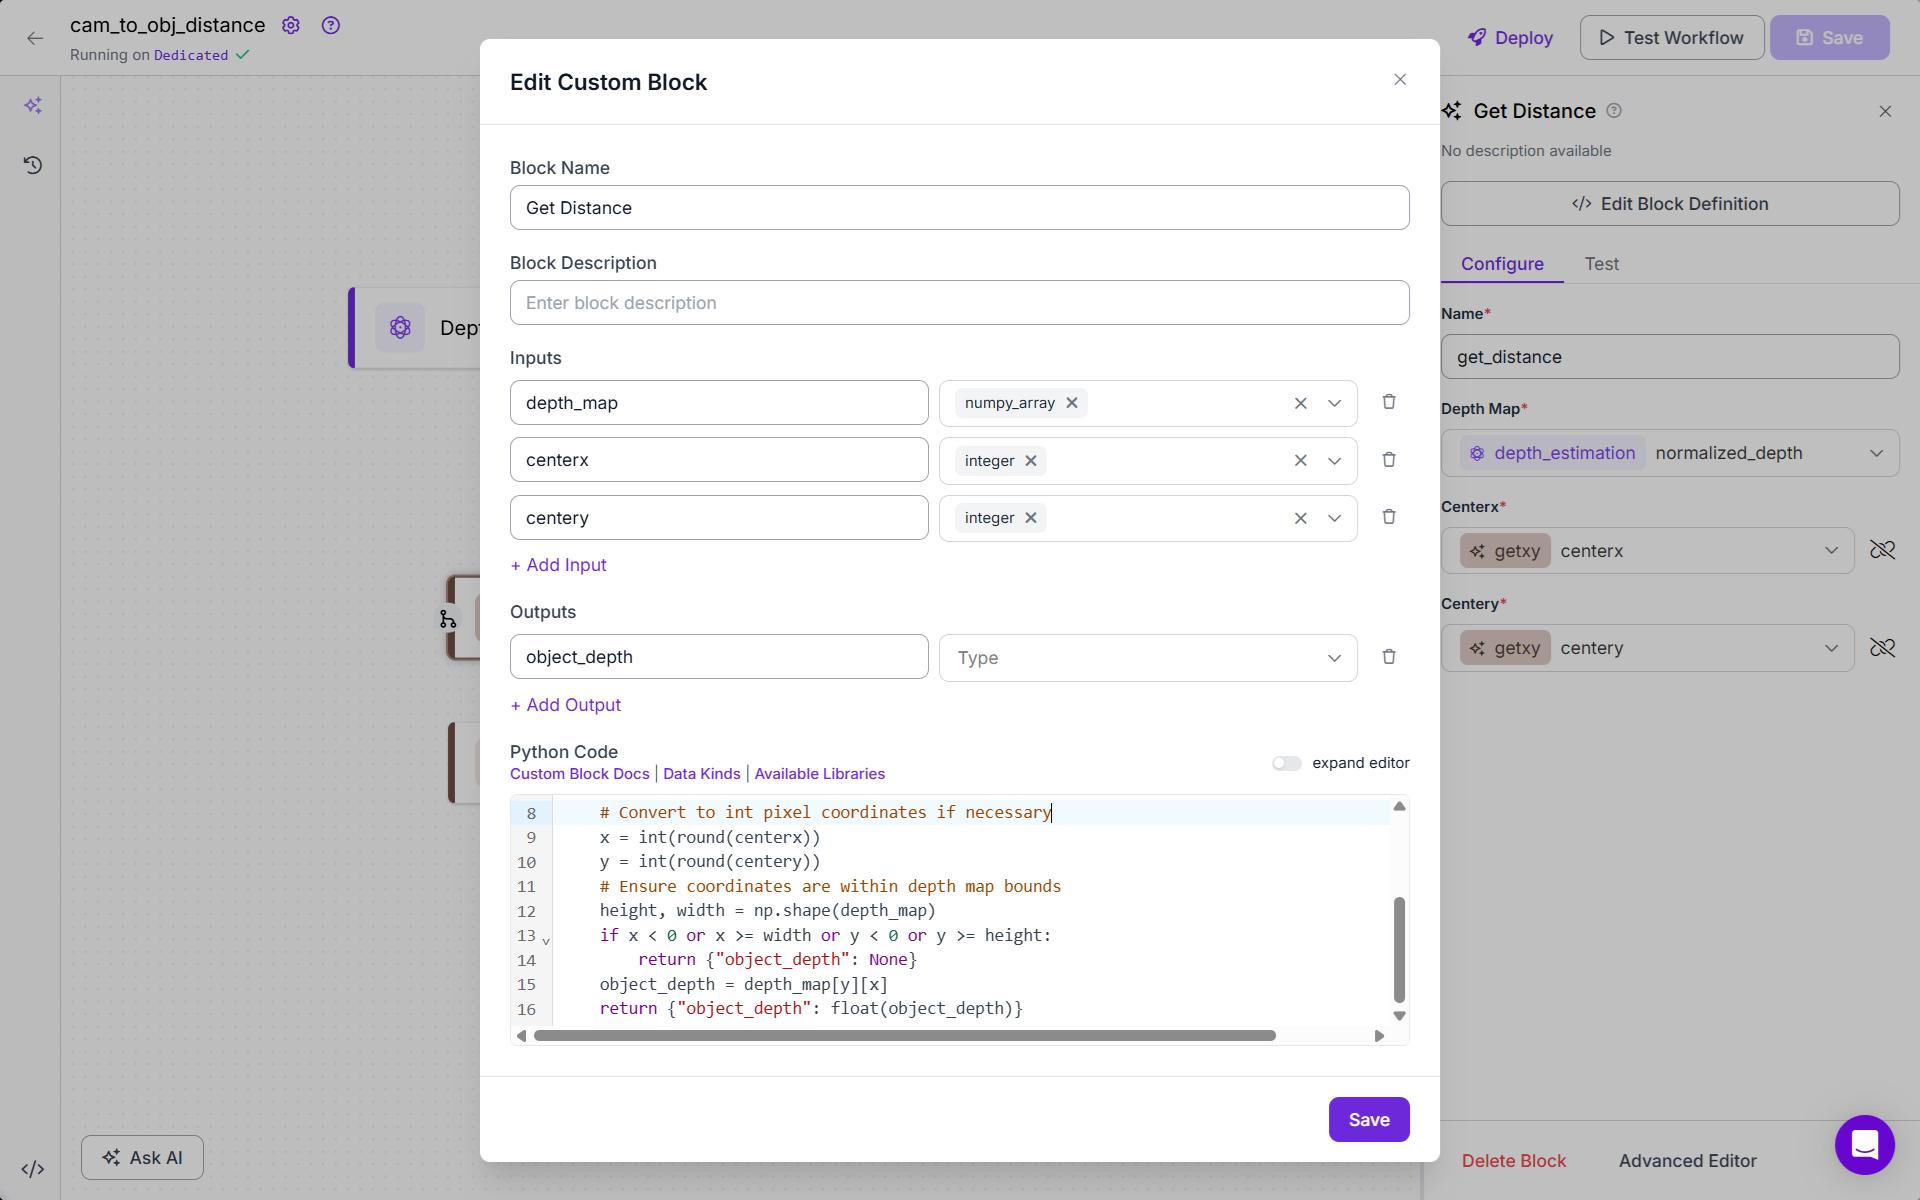
Add Get_Distance_Cm Block (Custom Code Block). This block converts the normalized depth value into a real-world distance in centimeters, using the reference depth recorded earlier.
estimated_distance_cm = (reference_depth / object_depth) * reference_distance_cmhere:
reference_depth: model's depth value at a known distance (e.g., 0.5662 at 45 cm)object_depth: depth value of the object in current imagereference_distance_cm: physical distance used during calibration (e.g., 45 cm)
This ratio gives the actual estimated distance from the camera in cm. Here is the full code.
def run(self, object_depth) -> BlockResult:
    # Calibrated reference point
    reference_depth = 0.5662009119987488  # Model depth at 55 cm
    reference_distance_cm = 45.0

    if object_depth is None or object_depth == 0:
        return {"distance": None}

    #estimated_distance_cm = (object_depth / reference_depth) * reference_distance_cm
    estimated_distance_cm = (reference_depth / object_depth) * reference_distance_cm
    return {"distance": estimated_distance_cm}
The block looks like following.
You can test the workflow. Now deploy this workflow with following code:
import cv2
import matplotlib.pyplot as plt
from inference_sdk import InferenceHTTPClient
# Load image
image_path = "/content/bottle.jpg"
img = cv2.imread(image_path)
# Convert BGR to RGB for matplotlib
img_rgb = cv2.cvtColor(img, cv2.COLOR_BGR2RGB)
client = InferenceHTTPClient(
api_url="https://timwk.roboflow.cloud",
api_key="API_KEY"
)
result = client.run_workflow(
workspace_name="tim-4ijf0",
workflow_id="camtoobjdistance",
images={
"image": image_path
},
use_cache=True # cache workflow definition for 15 minutes
)
# Extract values
center_x = int(result[0]['getxy']['centerx'])
center_y = int(result[0]['getxy']['centery'])
distance_cm = result[0]['get_discance_cm']
depth_value = result[0]['get_distance']
# Draw center point
cv2.circle(img_rgb, (center_x, center_y), radius=6, color=(0, 255, 0), thickness=-1)
# Annotate text
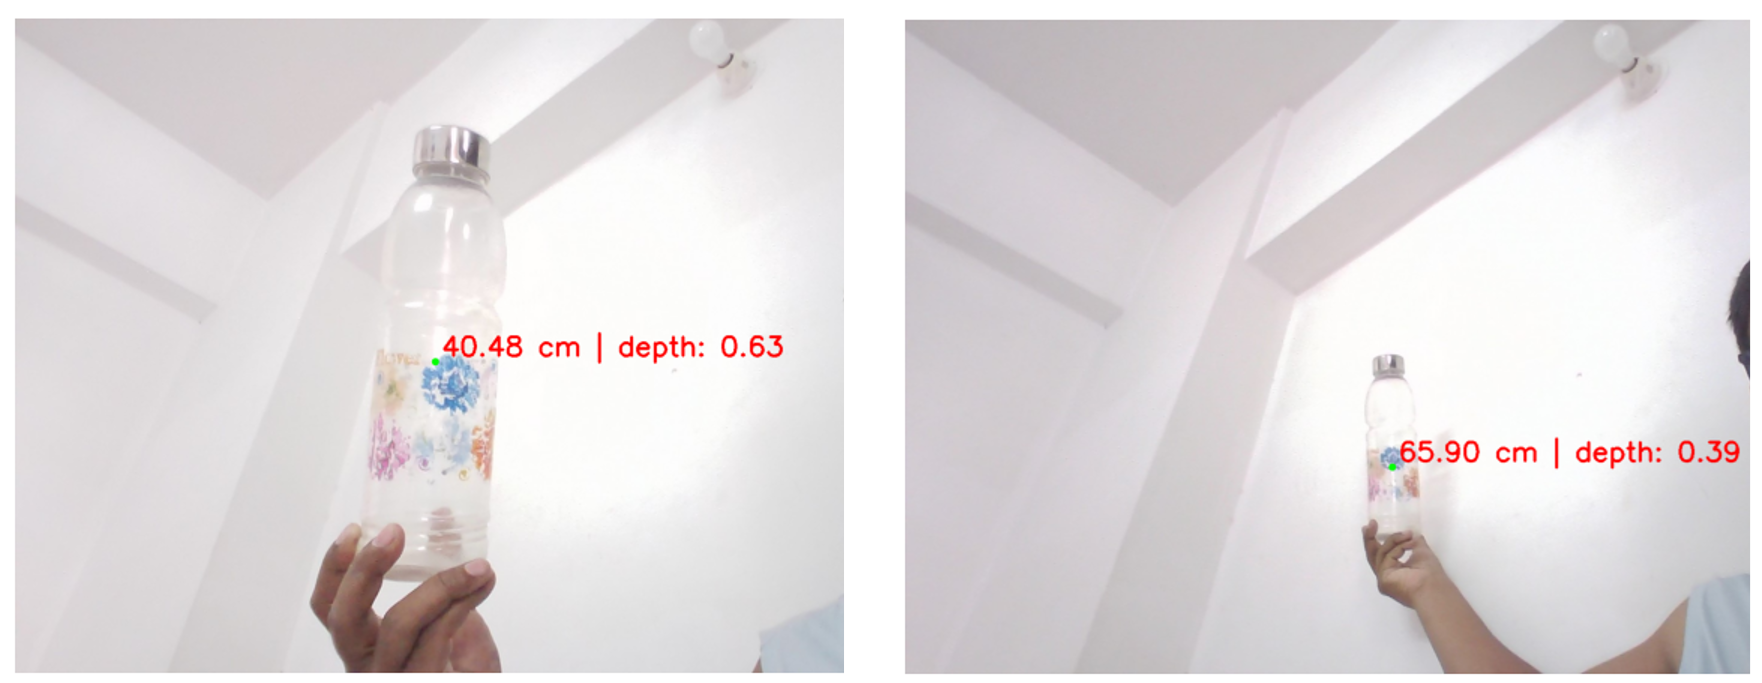
text = f"{distance_cm:.2f} cm | depth: {depth_value:.2f}"
cv2.putText(img_rgb, text, (center_x + 10, center_y - 10), cv2.FONT_HERSHEY_SIMPLEX,
0.6, (255, 0, 0), 2)
# Display result
plt.figure(figsize=(10, 8))
plt.imshow(img_rgb)
plt.axis("off")
plt.title("Center Point and Distance")
plt.show()
Running with different images, you should see output similar to following.
You can also deploy the workflow to work with video.
from inference import InferencePipeline
import cv2
import numpy as np

# Output video configuration
output_path = "output_with_distance.mp4"
video_writer = None  # Will initialize when the first frame arrives

def my_sink(result, video_frame):
    global video_writer

    # Get the frame (prefer model-generated, fallback to raw)
    frame = result.get("output_image").numpy_image if result.get("output_image") else video_frame.image.numpy()

    # Extract center and distance from top-level keys
    center = result.get("getxy", {})
    dist_cm = result.get("get_discance_cm")
    depth = result.get("get_distance")

    # Draw annotations
    if center and dist_cm is not None:
        cx, cy = int(center['centerx']), int(center['centery'])
        cv2.circle(frame, (cx, cy), radius=6, color=(0, 255, 0), thickness=-1)
        label = f"{dist_cm:.2f} cm | depth: {depth:.2f}"
        cv2.putText(frame, label, (cx + 10, cy - 10), cv2.FONT_HERSHEY_SIMPLEX,
                    0.6, (255, 0, 0), 2)

    # Initialize the video writer only once
    if video_writer is None:
        height, width = frame.shape[:2]
        fourcc = cv2.VideoWriter_fourcc(*'mp4v')  # For .mp4 output
        video_writer = cv2.VideoWriter(output_path, fourcc, 30, (width, height))

    # Write the annotated frame
    video_writer.write(frame)

# === Initialize and run pipeline ===
pipeline = InferencePipeline.init_with_workflow(
    api_key="API_KEY",  #  Your Roboflow API Key
    workspace_name="tim-4ijf0",
    workflow_id="camtoobjdistance",
    video_reference="bottle_video.mp4",
    max_fps=30,
    on_prediction=my_sink
)

pipeline.start()
pipeline.join()

# Finalize and release the video file
if video_writer:
    video_writer.release()

print("Full output video saved to:", output_path)
This code takes a video and runs each frame through “Camera to Object Distance” Roboflow workflow, which includes object detection and depth estimation. For each frame, it detects the object (a bottle), finds its center point, gets the depth value at that point, and then calculates the real-world distance using the reference depth value. It then draws a small circle on the object and adds a label showing the distance in centimeters on the video frame. All these annotated frames are saved into a new output video, which shows how far the object is from the camera in each frame.
Example 2: Focus Nearest Object and Blur Background Using Segmentation + Depth
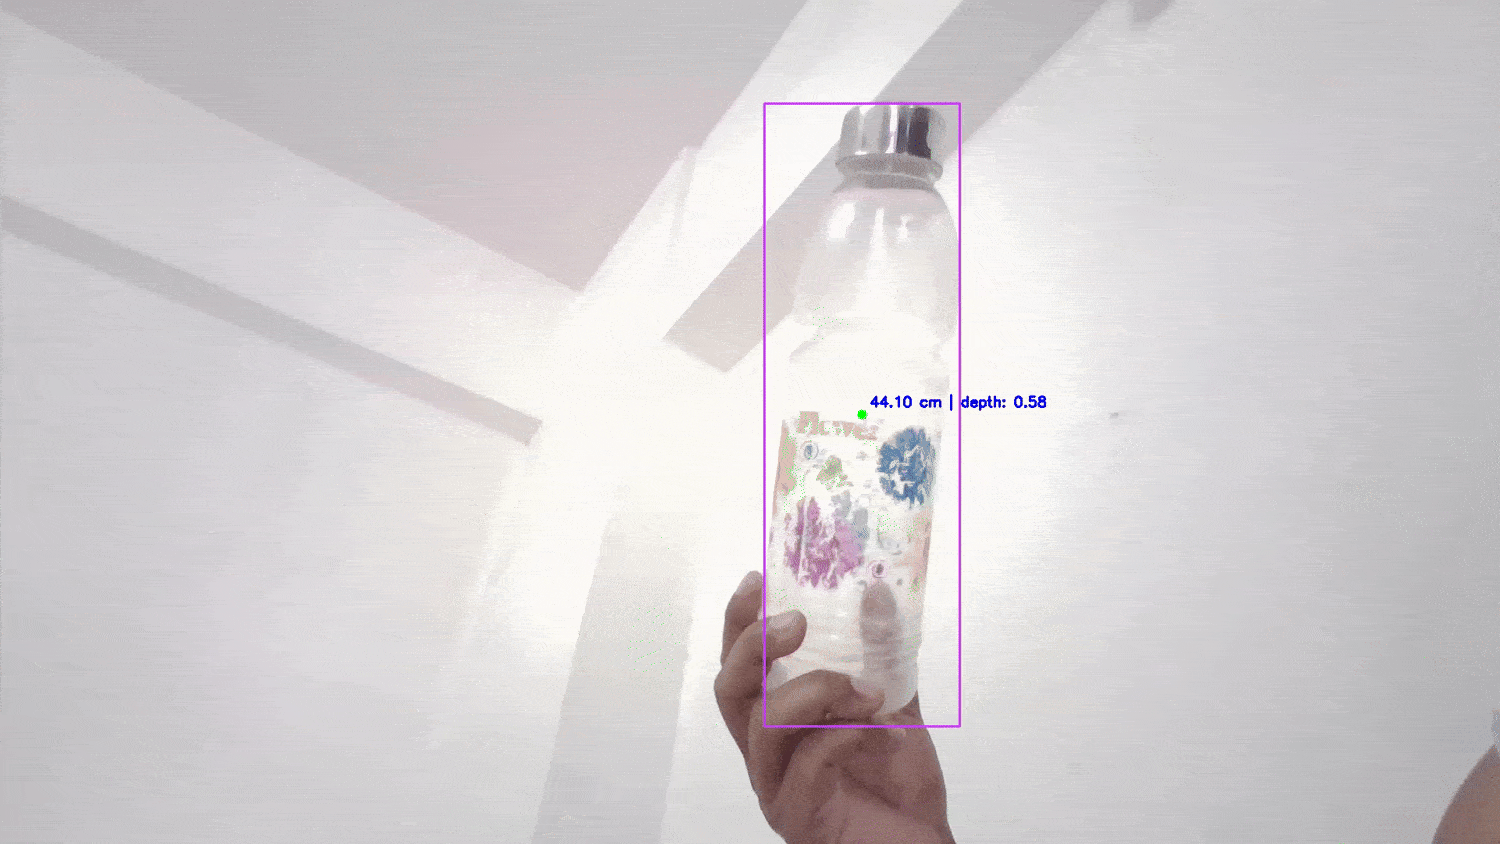
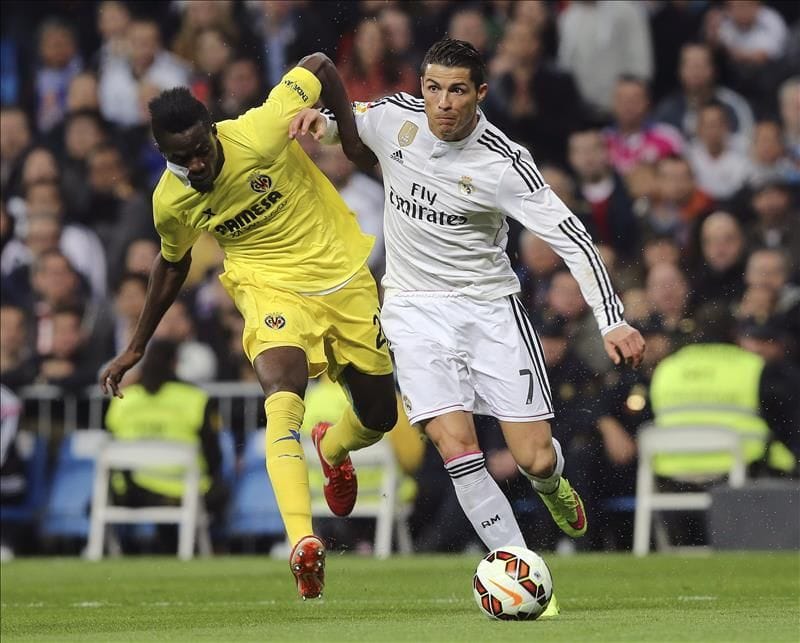
In this example, we demonstrate how to create a visually compelling depth-aware focus effect, similar to portrait mode on modern smartphone cameras. The goal is to focus only on the segmented object closest to the camera, while blurring the rest of the background based on both semantic segmentation and depth estimation.
This is particularly useful in tasks such as human-centered visual effects, robotic perception, or AR applications, where isolating foreground subjects accurately is essential.
To achieve this, we use two outputs from a multi-task Roboflow Workflows, a depth map and segmentation polygons. The depth map provides pixel-level distance information, allowing us to determine how far each part of the image is from the camera. The segmentation output gives us precise contours of objects within the scene, such as people, cars, or animals.
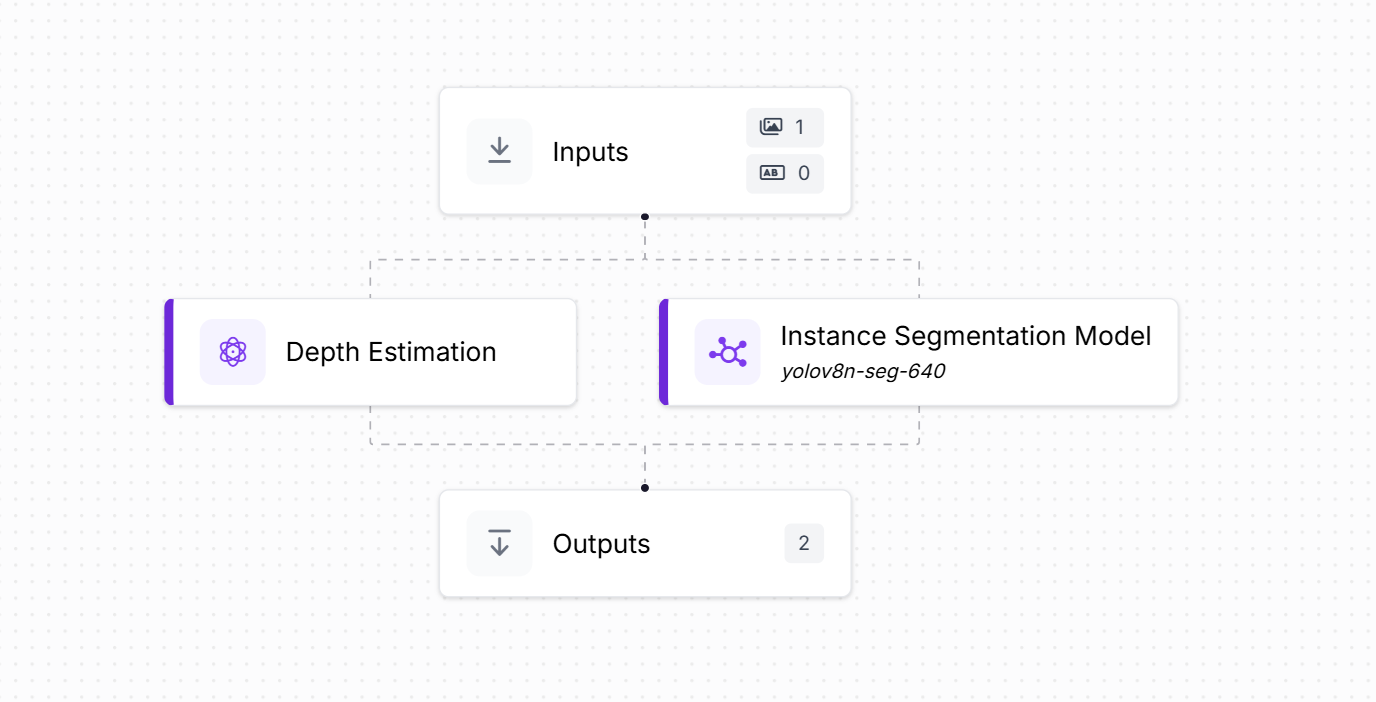
Build the Roboflow Workflows as shown below using two blocks:
- Depth Estimation Block: Generates a pixel-wise depth map from the input image.
- Instance Segmentation Block: Uses YOLOv8 Instance Segmentation model to detect and segment the object (e.g., person, bottle) in the image with polygon-shaped masks.
These two outputs are used together in the custom Python script to filter the depth map and apply background blur.
Now, deploy the workflow with following code.
import cv2
import numpy as np
from PIL import Image, ImageDraw
import matplotlib.pyplot as plt
from inference_sdk import InferenceHTTPClient
# Load original image
image_path = "soccer.jpg"
image = cv2.imread(image_path)
image_rgb = cv2.cvtColor(image, cv2.COLOR_BGR2RGB)
# Run Roboflow workflow
client = InferenceHTTPClient(
api_url="https://timwk.roboflow.cloud", # Change if using different endpoint
api_key="API_KEY" # <-- Insert your Roboflow API key here
)
result = client.run_workflow(
workspace_name="tim-4ijf0",
workflow_id="custom-workflow-25",
images={"image": image_path},
use_cache=True
)
# Extract and normalize depth map
depth_map = np.array(result[0]["depth_estimation"])
depth_norm = cv2.normalize(depth_map, None, 0, 255, cv2.NORM_MINMAX)
depth_uint8 = depth_norm.astype(np.uint8)
depth_resized = cv2.resize(depth_uint8, (image.shape[1], image.shape[0]))
# Display Depth Map
plt.figure(figsize=(6, 4))
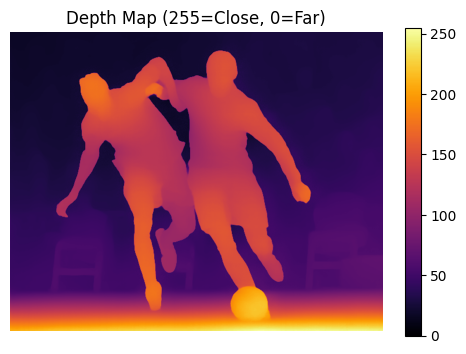
plt.imshow(depth_resized, cmap='inferno')
plt.title("Depth Map (255=Close, 0=Far)")
plt.colorbar()
plt.axis("off")
plt.show()
# Create composite segmentation mask (all objects)
all_objects_mask = np.zeros((image.shape[0], image.shape[1]), dtype=np.uint8)
for pred in result[0]["segmentation_data"]["predictions"]:
polygon = [(pt["x"], pt["y"]) for pt in pred["points"]]
mask = Image.new("L", (image.shape[1], image.shape[0]), 0)
ImageDraw.Draw(mask).polygon(polygon, outline=255, fill=255)
all_objects_mask = cv2.bitwise_or(all_objects_mask, np.array(mask))
# Display All Segmented Areas
plt.figure(figsize=(6, 4))
plt.imshow(all_objects_mask, cmap='gray')
plt.title("Segmentation Mask (All Objects)")
plt.axis("off")
plt.show()
# Find the closest object (highest depth)
closest_polygon = None
max_avg_depth = float("-inf")
for pred in result[0]["segmentation_data"]["predictions"]:
polygon = [(pt["x"], pt["y"]) for pt in pred["points"]]
mask = Image.new("L", (image.shape[1], image.shape[0]), 0)
ImageDraw.Draw(mask).polygon(polygon, outline=255, fill=255)
mask_np = np.array(mask)
masked_depth = cv2.bitwise_and(depth_resized, mask_np)
object_depth_values = masked_depth[mask_np > 0]
if len(object_depth_values) == 0:
continue
avg_depth = np.mean(object_depth_values)
if avg_depth > max_avg_depth:
max_avg_depth = avg_depth
closest_polygon = polygon
if closest_polygon is None:
raise ValueError("No valid object found in segmentation.")
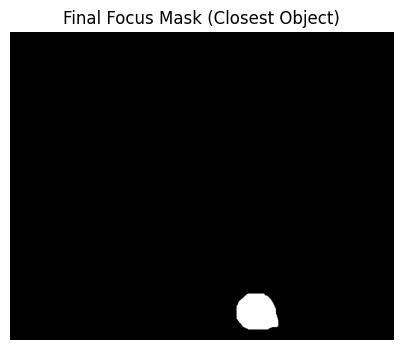
# Create mask for the closest object
closest_mask_img = Image.new("L", (image.shape[1], image.shape[0]), 0)
ImageDraw.Draw(closest_mask_img).polygon(closest_polygon, outline=255, fill=255)
closest_mask_np = np.array(closest_mask_img)
# Extract depth values of closest object
masked_depth = cv2.bitwise_and(depth_resized, closest_mask_np)
object_depth_values = masked_depth[closest_mask_np > 0]
min_depth = int(np.min(object_depth_values))
max_depth = int(np.max(object_depth_values))
lower_depth = max(min_depth - 10, 0)
upper_depth = min(max_depth + 10, 255)
# Create refined depth mask
depth_mask = cv2.inRange(depth_resized, lower_depth, upper_depth)
combined_mask = cv2.bitwise_and(closest_mask_np, depth_mask)
# Display Final Focus Mask
plt.figure(figsize=(6, 4))
plt.imshow(combined_mask, cmap='gray')
plt.title("Final Focus Mask (Closest Object)")
plt.axis("off")
plt.show()
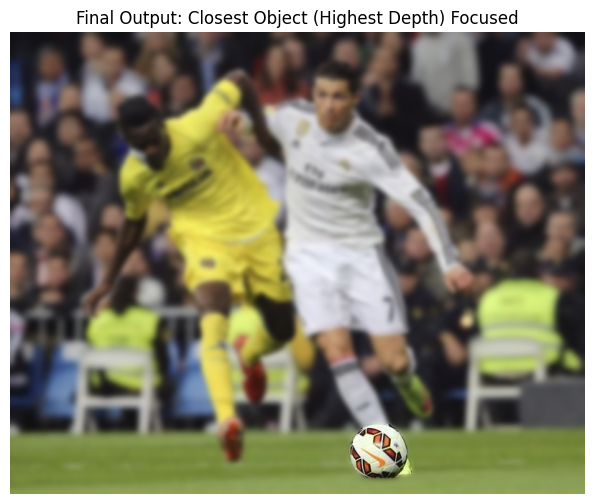
# Blur background and compose final image
blurred_image = cv2.GaussianBlur(image_rgb, (21, 21), 0)
mask_3ch = cv2.merge([combined_mask] * 3)
inverse_mask = cv2.bitwise_not(mask_3ch)
foreground = cv2.bitwise_and(image_rgb, mask_3ch)
background = cv2.bitwise_and(blurred_image, inverse_mask)
final_result = cv2.add(foreground, background)
# Display Final Result
plt.figure(figsize=(12, 6))
plt.imshow(final_result)
plt.title("Final Output: Closest Object (Highest Depth) Focused")
plt.axis("off")
plt.show()
This code creates an automated portrait mode effect by identifying and focusing on the closest object in an image while blurring the background. Here's what it does step by step:
The code takes an image and automatically creates a depth-of-field effect similar to portrait mode on smartphones.
Key steps involved are following:
- Loads and processes the image, converts from BGR to RGB format for proper display.
- Generates depth and segmentation data using Roboflow's Workflow to:
- Create a depth map (showing which parts of the image are closer/farther)
- Segment objects in the image (identify separate objects with precise boundaries)
- Analyzes depth information. The depth map uses values where 255 = closest and 0 = farthest from camera.
- Finds the closest object. It iterates through all segmented objects and calculates which one has the highest average depth values (closest to camera).
- Creates a precise focus mask. Combines the segmentation boundary of the closest object with its depth range to create an accurate selection.
- Applies the portrait effect. Keeps the closest object sharp and in focus, applies Gaussian blur to everything else (background) and composites the sharp foreground with blurred background.
- Visualize the results. It displays the depth map (showing distance information), all segmented object masks, the final focus mask for the closest object and the final portrait mode result.
This is an AI powered version of what modern smartphone cameras do automatically when you select "Portrait Mode". It intelligently identifies the subject and creates professional-looking background blur.
Following is the input image.
You will see output similar to following.

Depth Estimation in Computer Vision
Depth estimation helps machines understand the 3D structure of the world from 2D images. By estimating how far each pixel is from the camera, applications can achieve richer scene understanding that enables tasks like object-focus, 3D reconstruction, obstacle avoidance, distance understanding and many more.
The Depth Anything V2 model offers a powerful and general-purpose solution for monocular depth estimation. Trained on a massive amount of data using a teacher-student learning pipeline, it generalizes well across real-world scenes without needing camera-specific calibration. Its ability to predict fine-grained and consistent depth maps from a single image makes it especially valuable for consumer-level vision applications.
Integrating Depth Anything V2 into real-world applications becomes significantly more accessible with Roboflow. By combining various other computer vision models and depth estimation in a unified workflow, Roboflow simplifies the process of building intelligent vision pipelines.
Cite this Post
Use the following entry to cite this post in your research:
Timothy M. (Jul 24, 2025). What Is Depth Anything V2: Depth Estimation. Roboflow Blog: https://blog.roboflow.com/depth-anything/