
The Aquarium Combined model on Roboflow Universe detects seven aquatic classes, including fish, sharks, jellyfish, and stingrays, and achieves a 74.0% mAP and 78.5% precision on its test set. This guide shows how to query that model using the Roboflow Python SDK, retrieve JSON bounding-box coordinates for each detection, and render the predictions visually on an image. The same underlying dataset can be extended with additional annotated images to cover more species for fishery monitoring, aquarium management, or marine research applications.
Detecting fish is a common use case for computer vision. You can feed the output from an underwater camera through a computer vision model to solve problems such as understanding the different species of fish available in an area, measuring fish population, and more.
Before you can start building applications that require information on the fish in a given area – whether that area is a fishery, an aquarium, or another body of water – you need a model that can identify the presence of fish and the species of each fish.
Roboflow offers a free-to-use fish detection model that acts as a starting point for fish detection and recognition applications. This model can identify seven classes of fish, but the underlying data could be used in addition to more annotated images to identify a broader range of fish.
In this guide, we’re going to show how to use the Roboflow fish detection API to detect the presence of fish in a body of water. By the end of this tutorial, we’ll have JSON data that represents the location of all fish in an image, in addition to a visual representation of the predictions returned by our detection model. Here’s what our detections will look like when plotted onto an image:

Without further ado, let’s get started!
Test the Fish Detection API
In this guide, we will use the “Aquarium Combined” dataset on Roboflow Universe, a community where you can find more than 100,000 open-source datasets and 11,000 trained models that you can use to solve problems with computer vision. The Aquarium Combined model has been trained to recognize seven types of fish, which are:
- Fish (general)
- Jellyfish
- Penguin
- Puffin
- Shark
- Starfish
- Stingray
You can copy the data from this model and create your own to recognise new fish. To learn more about creating your own model, check out our getting started guide.
The model we’ll be using has a 74.0% mAP score and 78.5% precision. To get started, create a free Roboflow account. This account will give you an API key you can use to query the public models on Universe such as the fish detection model with which we will be working.
We can test the model to make sure it meets our needs by going to the “Model” tab on Roboflow Universe. This tab offers an interactive widget through which we can test our model.
We can select from existing images from the test set associated with the project, upload our own images or videos on which to run inference, use your webcam, or paste in a URL of an image or video.
Use the Fish Detection API
Now that we have tested our model, we can begin using it in an application! At the bottom of the Model page on Universe, below the testing widget, there will be a section with a range of deployment options available.
Using Roboflow, you can deploy your model to a range of environments, including:
- Luxonis OAK;
- Raspberry Pi;
- NVIDIA Jetson;
- A Docker container;
- A web page and;
- A Python script using the Roboflow SDK.
For this guide, we’ll focus on using the model in a Python script.
To use the model, copy the code in the Python tab under the “Infer on Local and Hosted Images" heading on Universe into a new file:
from roboflow import Roboflow
rf = Roboflow(api_key="API_KEY")
project = rf.workspace().project("aquarium-combined")
model = project.version(5).model

# infer on a local image
print(model.predict("your_image.jpg", confidence=40, overlap=30).json())

# visualize your prediction

model.predict("your_image.jpg", confidence=40, overlap=30).save("prediction.jpg")
Your code snippet will have your API key prefilled. This script:
- Imports the Roboflow package;
- Creates an object through which you can interface with the Roboflow API and;
- Runs inference on version 1 of the model on an image on your local machine.
Uncomment the line of code after the “visualize your prediction” comment. This line of code will create a new file called “prediction.jpg” that shows the location of all of the predictions returned by the model.
Let’s test the script on the following image:

Our image contains three fish. Let’s run our code and see how our model performs. Our code will only return predictions with a confidence level of 20% or greater, as defined in the “confidence” value set earlier. We can tweak this value to be higher if there are low-confidence predictions that are not useful.
Here's an excerpt from the JSON object that our model returned:
{'predictions': [{'x': 283.0, 'y': 1222.0, 'width': 218.0, 'height': 132.0, 'confidence': 0.905432939529419, 'class': 'fish', 'image_path': 'new1.jpg', 'prediction_type': 'ObjectDetectionModel'}...], 'image': {'width': 1080, 'height': 1920}}We can confirm the coordinates returned by the object map to the positions of the fish on our image by opening the “prediction.jpg” file that we asked our program to create earlier:
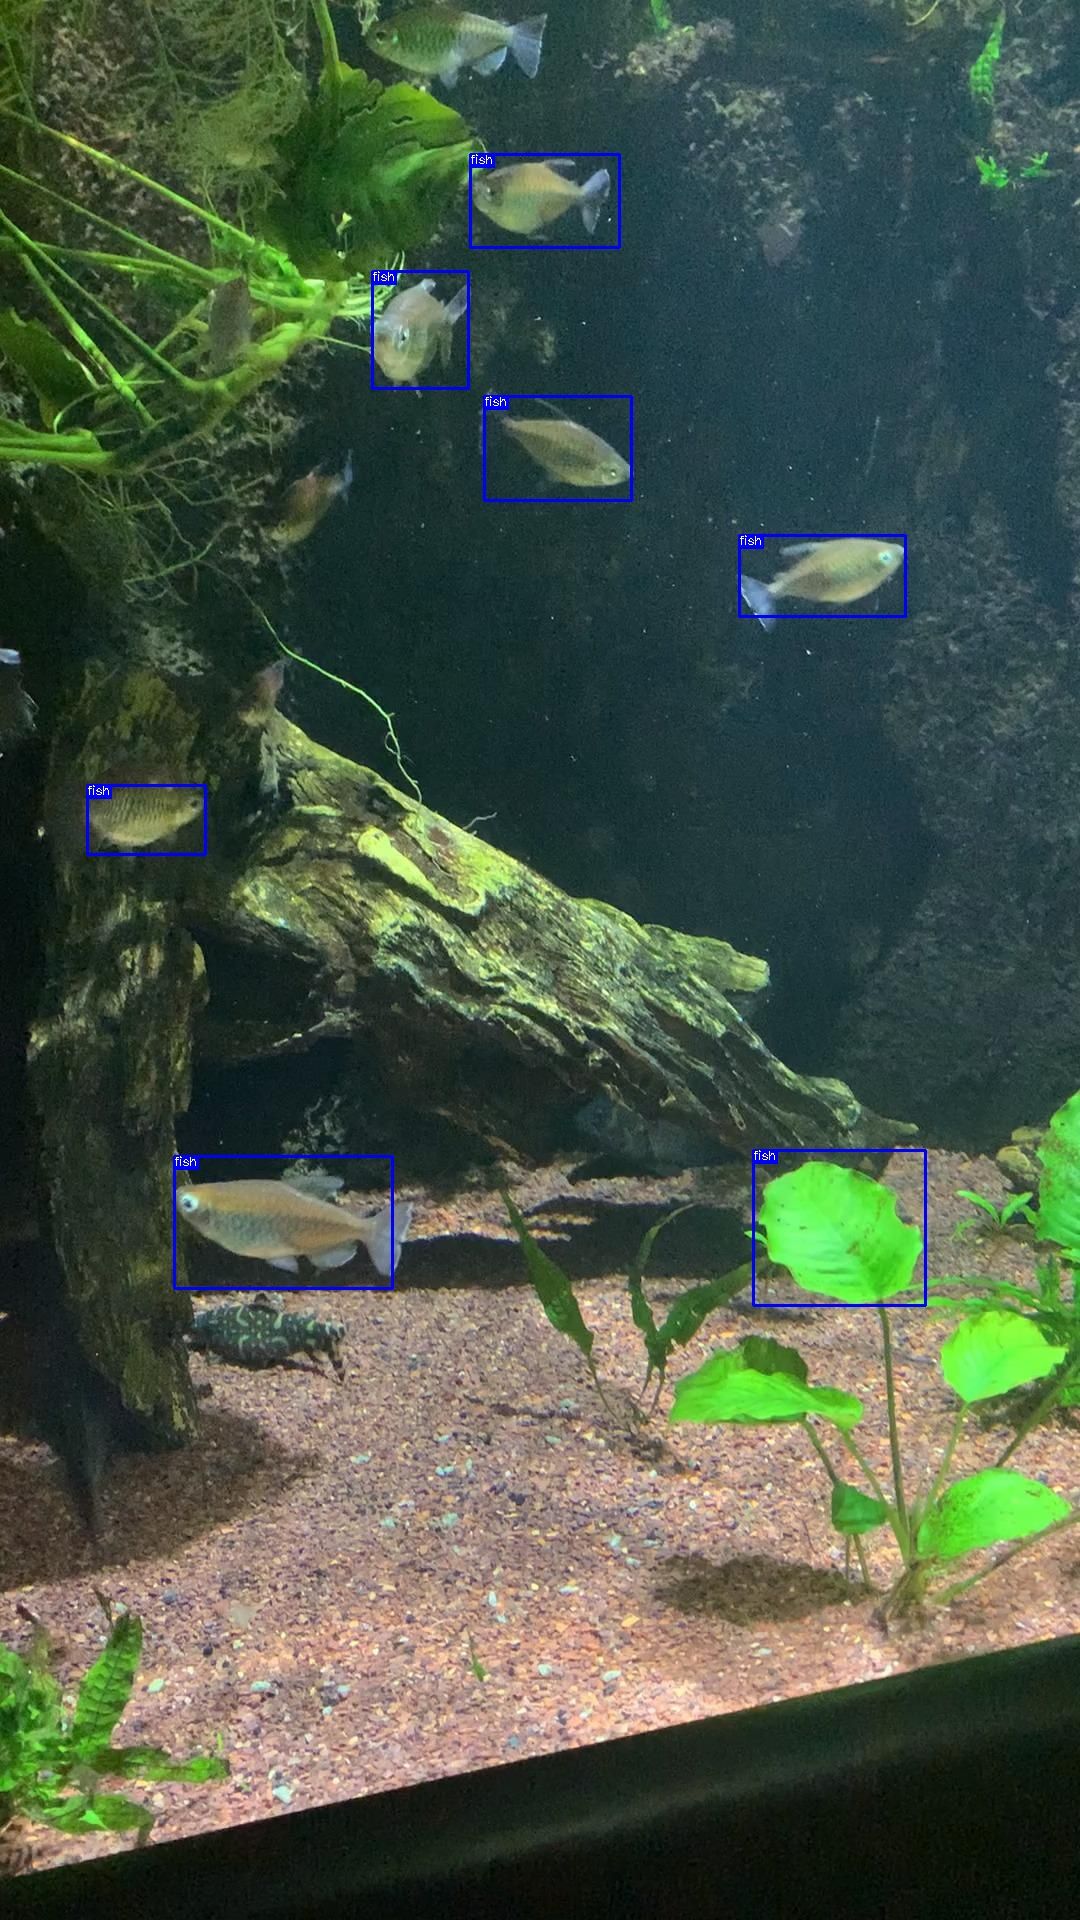
Our model has successfully identified the fish in the image, although one leaf was incorrectly identified as a fish. This could be addressed by adding more representative labelled data to the model.
To run predictions on a video of fish, we could pass each frame of the video through the Roboflow API using the “model” object we created and run inference.
Use Cases for the Fish Detection API
How could you use a fish detection API? That’s a great question. Here are a few projects that are enabled by a computer vision model that can detect fish like the one with which we have worked in this article:
- Build an application that tells lets someone take a photo of a fish in an aquarium and returns information about the fish;
- Monitor the different species of fish in a given area;
- Count the number of fish in a controlled area;
- Monitor for the presence of predators in a controlled area;
- And more.
To build these applications, you can use the basic model that we have created and expand it by adding annotated images of different fish.
Roboflow provides a range of tools to help you efficiently build your own model, from label assist that lets you use an existing model – and previous versions of a model you have built – to help speed up your annotation, to advanced augmentation tools to help you increase the size of your dataset in a way that will help improve model performance.
Conclusion
In this guide, we have discussed how to use the Roboflow fish detection API to identify various different types of fish in an image.
We used the test widget on Roboflow Universe to explore how the model works, then we used the Roboflow Python SDK to run the model on an example image. We retrieved both the JSON coordinates of all of the predictions made and created an image that visualizes our predictions. With the capability to detect fish, there are plenty of different projects you can build. Happy creating!
Cite this Post
Use the following entry to cite this post in your research:
James Gallagher. (Feb 21, 2023). How to Use the Roboflow Fish Detection API. Roboflow Blog: https://blog.roboflow.com/fish-detection-api/