
Running a Roboflow model against a live USB webcam feed in Python requires OpenCV to capture frames, base64 encoding to send them to the hosted inference API, and a display loop to render annotated results in real time. The post covers both a simple synchronous implementation (around 4 frames per second on the hosted API) and a parallelized async version that keeps a frame buffer in memory to increase throughput and display consistency.
Computer vision models are normally trained to give you predictions on a single image at a time. The input to these models are often individual photos or frames from recorded videos collected asynchronously. But oftentimes you'll want to get predictions from a camera feed in realtime.
We previously showed how to use images from your Nest Camera with your Roboflow models in Node.js and in your web browser with Tensorflow.js.
In this post, we'll demonstrate how to pipe your webcam data to your Roboflow Trained model for realtime inference using Python and a USB webcam connected to your computer.
The Final Code
 roboflow-ai
The final code for this demo can be found in our API Snippets Github Repo.
Prerequisites
We'll be using a custom-trained Roboflow model for this tutorial so you will need to train one first by following the steps here.
Setup
We'll need Python 3.7+ for this demo. Then install
opencv-pythonto connect to your webcam and transform the image data.numpyto convert the pixel data to an array and back.requeststo send the image to your model API and retrieve the resulting prediction.
pip3 install opencv-python numpy requestsInstall the dependencies
Coding the Demo
We first create a file called infer.py and initialize it with our Roboflow model info (train a model with Roboflow Train first and obtain your API Key from your Roboflow Settings) and the packages we just installed.
ROBOFLOW_API_KEY = "FILL YOUR API KEY HERE"
ROBOFLOW_MODEL = "FILL YOUR MODEL ID HERE" # eg xx-xxxx--#
ROBOFLOW_SIZE = 416

import cv2
import base64
import numpy as np
import requests
Initialize infer.py
Then we'll construct our model's API endpoint URL. This example uses the Hosted Inference API but you can also use our on-device deployments by swapping out https://detect.roboflow.com/ with its IP address (eg http://127.0.0.1:9001):
upload_url = "".join([
    "https://detect.roboflow.com/",
    ROBOFLOW_MODEL,
    "?access_token=",
    ROBOFLOW_API_KEY,
    "&format=image",
    "&stroke=5"
])
Next we'll open up a connection to our webcam with OpenCV:
video = cv2.VideoCapture(0)And define an infer function that will be the core logic of our program. It performs the following operations each time you call it:
- Retrieve the current image from the webcam.
- (Optional) Resizes it to our model's input size to save bandwidth and increase speed.
- Converts it to a base64-encoded string.
- Sends a POST request to our trained model's API endpoint.
- Parses the resulting predictions and returns them as an image we can display.
# Infer via the Roboflow Infer API and return the result
def infer():
    # Get the current image from the webcam
    ret, img = video.read()

    # Resize (while maintaining the aspect ratio) to improve speed and save bandwidth
    height, width, channels = img.shape
    scale = ROBOFLOW_SIZE / max(height, width)
    img = cv2.resize(img, (round(scale * width), round(scale * height)))

    # Encode image to base64 string
    retval, buffer = cv2.imencode('.jpg', img)
    img_str = base64.b64encode(buffer)

    # Get prediction from Roboflow Infer API
    resp = requests.post(upload_url, data=img_str, headers={
        "Content-Type": "application/x-www-form-urlencoded"
    }, stream=True).raw

    # Parse result image
    image = np.asarray(bytearray(resp.read()), dtype="uint8")
    image = cv2.imdecode(image, cv2.IMREAD_COLOR)

    return image
The core logic of our script.
Then we will call this function in a loop and display the current prediction image until we detect that the q key is pressed on the keyboard.
# Main loop; infers sequentially until you press "q"
while 1:
    # On "q" keypress, exit
    if(cv2.waitKey(1) == ord('q')):
        break

    # Synchronously get a prediction from the Roboflow Infer API
    image = infer()
    # And display the inference results
    cv2.imshow('image', image)
And finally, after the loop is broken by the q key we will release the webcam resource and clean up our visualization resources.
# Release resources when finished
video.release()
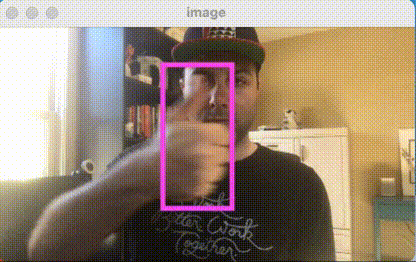
cv2.destroyAllWindows()And that's it! If you run infer.py you'll see predictions from your model displayed on your screen overlayed atop images from your webcam. You can download the code for this simple synchronous webcam inference example here.
Speeding Things Up
This implementation is pretty simple; it gets predictions from the model sequentially which means it waits to send the next image until it has received the results of the previous one.
The exact speed it will infer at depends on your model and network connection but you can expect about 4 frames per second on the Hosted API and 8 frames per second on an NVIDIA Jetson Xavier NX running on your local network.
We can significantly increase our speed by parallelizing our requests. Keeping a buffer of images in memory adds a little bit of latency but improves the consistency with which we can display the frame. We have an example async webcam inference script demonstrating this approach here.
Conclusion
The full code is available on our Github. Excited to see what you build!
Cite this Post
Use the following entry to cite this post in your research:
Brad Dwyer. (Mar 30, 2021). How to Use Your Webcam with Roboflow Models. Roboflow Blog: https://blog.roboflow.com/python-webcam/