
Developing a user-friendly interface for computer vision models can be challenging. This is where Gradio comes in. Gradio is a framework for making web interfaces for machine learning models. Gradio comes with a wide range of out-of-the-box components you can use to assemble a web page to build a model playground.
In this article, we will explore how to build a computer vision application using Gradio and discuss the UI components it provides to facilitate this process.
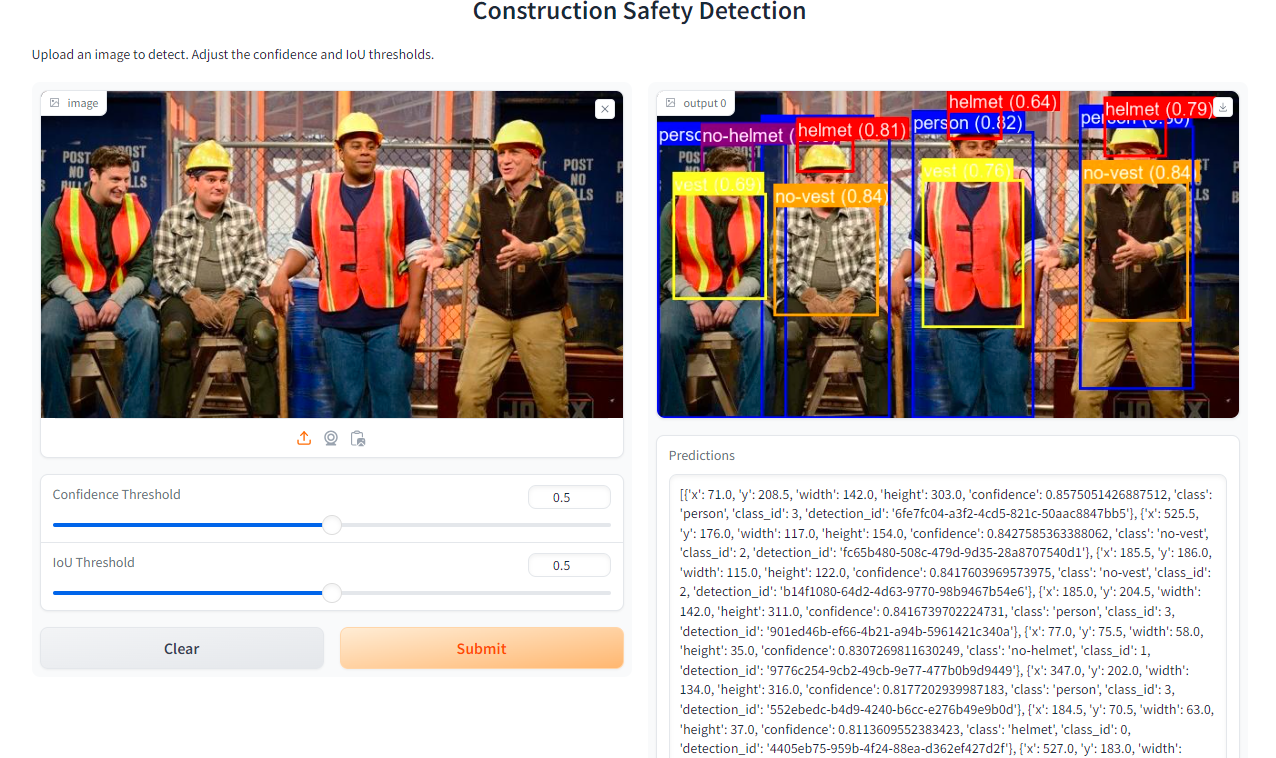
Here is an example of an interface built with Gradio that runs a Roboflow model:
What is Gradio?
Gradio is an open-source Python library that allows you to quickly create customizable UI components for your machine learning models. It provides an easy way to integrate these models into web applications, enabling users to interact with them directly through their browser. Gradio supports a wide variety of inputs and outputs, making it an excellent choice for building computer vision applications.
Install Gradio
To get started with Gradio, First, you need to install Gradio. You can do this using pip:
pip install gradio
Understanding Gradio Components
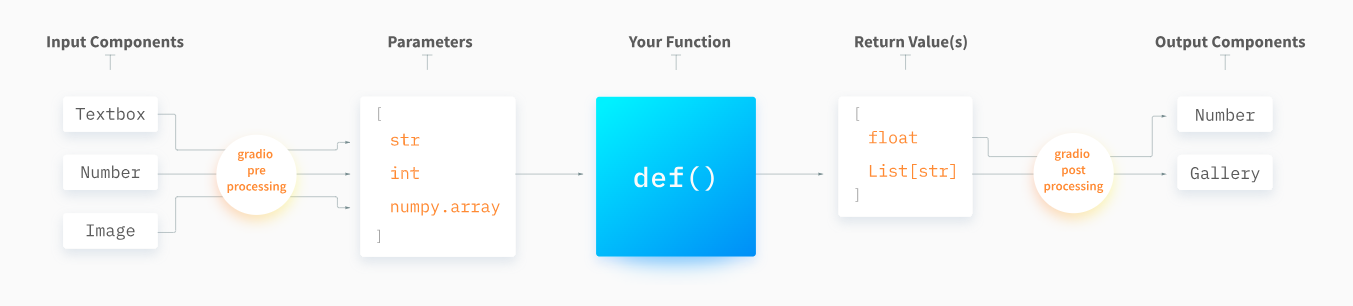
Gradio provides different pre-built components that we may use in the Gradio interface of blocks to build the user interface. All of these components include built-in preprocessing steps that transform user data submitted through the browser into a format suitable for a Python function. These components also include postprocessing steps to convert the function's output into a format that can be displayed in the browser.
For example, consider an application with three inputs (Textbox, Number, and Image) and two outputs (Number and Gallery). Below is a diagram illustrating how preprocessing will prepare the data for the function and what post processing will do with the function's output.
You can see a full list of components you can use to build a Gradio app on the official Gradio interface documentation.
Create a Computer Vision App with Gradio
In this section, we will learn how to create a computer vision app using Gradio. We will explore two examples: one for making predictions on image data and another for video data. The common steps we will follow to build these examples are as follows.
- Prepare your model
- Define a prediction function
- Create the interface
- Launch the interface
Example #1: Inference on image data
Step #1: Prepare Your Model
Before developing a Gradio app, it's essential to have a computer vision model ready. You can quickly create and host a computer vision model using Roboflow. Follow their getting started guide to learn how to build your computer vision model with ease.
In our example, we will use Construction Safety Detection model API from the Roboflow universe.
Step #2: Define Your Prediction Function
In this step, we'll define a function to perform inference on an image. We'll use code from the Roboflow Inference SDK for our prediction function. The function infer_image processes an input image to perform inference using a computer vision model deployed on Roboflow. First, it saves the uploaded or captured image to a local file named "uploaded_image.jpg".
Then, it uses the Roboflow client SDK to infer predictions on this image, specifically targeting a model identified by the ID " construction-safety-gsnvb/1".
The predictions, which include bounding box coordinates, class labels, and confidence scores, are extracted from the result. Each predicted object's bounding box is drawn on the image in different colors based on predefined class-color mappings.
Additionally, labels indicating the class name and confidence level are overlaid on each bounding box. This annotated image, along with the prediction details, is returned by the function.
# import the necessary libraries
from inference_sdk import InferenceHTTPClient, InferenceConfiguration
import gradio as gr
from PIL import Image, ImageDraw, ImageFont
import os

# initialize the client
CLIENT = InferenceHTTPClient(
    api_url="https://detect.roboflow.com",
    api_key=os.environ["ROBOFLOW_API_KEY"]
)

# define a prediction function to infer on an image
def infer_image(image, confidence, iou_threshold):
    # save the uploaded or captured image to a file
    image_path = "uploaded_image.jpg"
    image.save(image_path)

    # set custom configuration
    custom_configuration = InferenceConfiguration(confidence_threshold=confidence, iou_threshold=iou_threshold)

    # infer on the image using the client
    with CLIENT.use_configuration(custom_configuration):
        result = CLIENT.infer(image_path, model_id="construction-safety-gsnvb/1")

    # extract predictions
    predictions = result.get('predictions', [])

    # define a color map for different classes of the model
    class_colors = {
        "helmet": "red",
        "person": "blue",
        "vest": "yellow",
        "no-helmet": "purple",
        "no-vest": "orange"
        # Add other classes and their corresponding colors here
        # "class_name": "color",
    }

    # draw bounding boxes on the image
    draw = ImageDraw.Draw(image)
    try:
        font = ImageFont.truetype("arial.ttf", 20)
    except IOError:
        font = ImageFont.load_default()

    for pred in predictions:
        x = pred['x']
        y = pred['y']
        width = pred['width']
        height = pred['height']
        left = x - width / 2
        top = y - height / 2
        right = x + width / 2
        bottom = y + height / 2

        # get the color for the class
        color = class_colors.get(pred['class'], "green")  # default to green if class is not in the color map

        draw.rectangle([left, top, right, bottom], outline=color, width=3)

        # Draw the label
        label = f"{pred['class']} ({pred['confidence']:.2f})"
        text_size = draw.textbbox((0, 0), label, font=font)
        text_width = text_size[2] - text_size[0]
        text_height = text_size[3] - text_size[1]
        text_background = [(left, top - text_height - 4), (left + text_width + 4, top)]
        draw.rectangle(text_background, fill=color)
        draw.text((left + 2, top - text_height - 2), label, fill="white", font=font)

    return image, str(predictions)
Set your your Roboflow API key in your environment like so:
export ROBOFLOW_API_KEY=""
Learn how to retrieve your Roboflow API key.
Step #3: Create the Interface
Now that we have defined our prediction function, we will create the user interface for our app using gradio.Interface and Gradio components.
The code snippet initializes a Gradio interface (iface) for a computer vision application focused on detecting hand control features in uploaded images. It includes input components for uploading images as PIL objects, and sliders to adjust confidence and IoU thresholds. Outputs consist of the processed image with annotated bounding boxes and textual predictions. The interface is titled " Construction Safety Detection" with a description guiding users to upload images for detection while adjusting thresholds as needed.
# create a Gradio interface
myInterface = gr.Interface(
    fn=infer_image,  # function to process the input
    inputs=[
        gr.Image(type="pil"),  # input type is an image
        gr.Slider(0.0, 1.0, value=0.5, step=0.1, label="Confidence Threshold"),
        gr.Slider(0.0, 1.0, value=0.5, step=0.1, label="IoU Threshold")
    ],
    outputs=[
        gr.Image(type="pil"),  # output is an image
        gr.Textbox(label="Predictions")  # output is text
    ],
    title="Construction Safety Detection",
    description="Upload an image to detect. Adjust the confidence and IoU thresholds.",
)
Step #4: Launch the Interface
The final step will be to launch your interface locally to test it. Gradio will create a local server and open the app in your web browser. To run the app, save the following script to a file, for example, gradio_app.py.
Add the following code to the end of the file:
# launch the Gradio app
if __name__ == "__main__":
    myInterface.launch()
Then, run:
python gradio_app.py
This will start a local web server, and you will see a URL in the terminal that you can open in your web browser to interact with the app. You can upload images or capture from the webcam, and it will display the predictions made by your inference model.
When you run the code, the following output will be generated.
Example #2: Inference on video data
Step #1: Prepare Your Model
In this example, we will use Hand Detection model API from the Roboflow universe. You can also train your own model using Roboflow.
Step #2: Define Your Prediction Function
In this step, we'll define a prediction function to perform inference on a video. We'll use code from the hosted video inferencing for our prediction function. The infer_video function is designed to perform inference on a video using a machine learning model from Roboflow to detect hand control features. The function begins by initiating a prediction job through the model.predict_video method, specifying the frames per second (fps) and prediction type. This method returns a job ID, a signed URL, and an expiration time for the prediction. The function then enters a polling phase, where it continuously requests the prediction results until they are ready.
Once the results are obtained, the function extracts the predictions and the corresponding frame offsets. These predictions are specific to each frame where the model has detected features. The video is then opened using OpenCV’s VideoCapture, and its properties such as frame width, height, and fps are retrieved. To prepare for saving the processed video, a video writer is initialized with the H264 codec.
The function processes each frame of the video in a loop. If the video source is from a webcam, each frame is flipped horizontally using cv2.flip to correct the mirrored effect typically seen in webcam recordings. For frames with predictions, bounding boxes are drawn around the detected features. This is achieved by converting the OpenCV frame to a PIL image, drawing the bounding boxes using ImageDraw.Draw, and then converting the PIL image back to an OpenCV frame. If the source is a webcam, the x-coordinates of the bounding boxes are adjusted to account for the horizontal flip.
After processing, each frame with the annotated bounding boxes is written to the output video using the video writer. This loop continues until all frames are processed. The video capture and writer resources are then released. The function compiles a textual summary of the predictions, including the time of each prediction and the details of the detected features. Finally, it returns the path to the output video and the summary of the results.
# Import the necessary libraries
from roboflow import Roboflow
import gradio as gr
from PIL import Image, ImageDraw
import os
import cv2
import numpy as np

# Initialize the Roboflow client
rf = Roboflow(api_key=os.environ["ROBOFLOW_API_KEY"])
project = rf.workspace().project("egohands-public")
model = project.version("9").model


# Define a prediction function to infer on a video
def infer_video(video_path, source="upload"):
    # Predict the video using Roboflow
    job_id, signed_url, expire_time = model.predict_video(
        video_path,
        fps=5,
        prediction_type="batch-video",
    )

    # Poll for the results
    results = model.poll_until_video_results(job_id)

    # Extract the predictions and frame offsets
    predictions = results['egohands-public']
    frame_offsets = results['frame_offset']

    # Open the original video
    cap = cv2.VideoCapture(video_path)

    # Get the video properties
    frame_width = int(cap.get(cv2.CAP_PROP_FRAME_WIDTH))
    frame_height = int(cap.get(cv2.CAP_PROP_FRAME_HEIGHT))
    fps = int(cap.get(cv2.CAP_PROP_FPS))

    # Create a video writer to save the output video
    video_writer = cv2.VideoWriter('output_video.mp4', cv2.VideoWriter_fourcc(*'h264'), fps, (frame_width, frame_height))

    current_frame = 0
    pred_index = 0

    while cap.isOpened():
        ret, frame = cap.read()
        if not ret:
            break

        # Flip the frame horizontally if the source is webcam
        if source == "webcam":
            frame = cv2.flip(frame, 1)

        # Check if there are any predictions for the current frame
        if pred_index < len(predictions) and current_frame == frame_offsets[pred_index]:
            prediction = predictions[pred_index]

            # Convert the frame to a PIL image
            image = Image.fromarray(cv2.cvtColor(frame, cv2.COLOR_BGR2RGB))

            # Draw bounding boxes on the frame
            draw = ImageDraw.Draw(image)
            for pred in prediction['predictions']:
                x = pred['x']
                y = pred['y']
                width = pred['width']
                height = pred['height']

                # Adjust the x coordinate for the flipped frame if the source is webcam
                if source == "webcam":
                    x = frame_width - x

                left = x - width / 2
                top = y - height / 2
                right = x + width / 2
                bottom = y + height / 2
                draw.rectangle([left, top, right, bottom], outline="red", width=3)

            # Convert the PIL image back to an OpenCV image
            frame = cv2.cvtColor(np.array(image), cv2.COLOR_RGB2BGR)

            pred_index += 1

        # Write the frame with boxes to the output video
        video_writer.write(frame)

        current_frame += 1

    cap.release()
    video_writer.release()

    # Extract relevant results for display
    display_results = ""
    for pred in predictions:
        display_results += f"Time: {pred['time']}\n"
        for box in pred['predictions']:
            display_results += f"Class: {box['class']}, Confidence: {box['confidence']:.2f}\n"

    # Return the output video and the display results
    return 'output_video.mp4', display_results
Set your your Roboflow API key in your environment like so:
export ROBOFLOW_API_KEY=""
Learn how to retrieve your Roboflow API key
Step #3: Create the Interface
Now that we have defined our prediction function, we will create the user interface for our app using gradio.Interface and Gradio components.
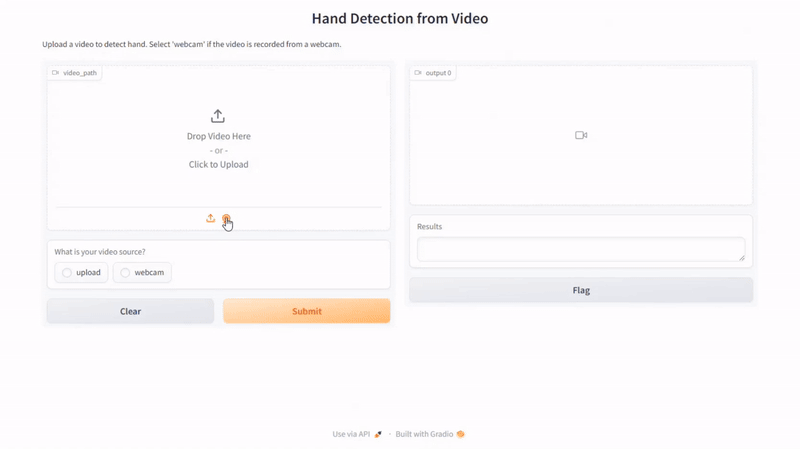
The code below creates a Gradio interface for a video processing application that detects hand features in videos. The interface is set up with the gr.Interface function, which specifies various components and their configurations. The function infer_video is assigned to process the input video.
The input components include a video input element (gr.Video) and a radio button (gr.Radio) labeled "What is your video source?" with options "upload" and "webcam." This allows users to either upload a video file or specify that the video is recorded from a webcam, providing flexibility in the source of the video data.
The outputs of the interface are defined as a video (gr.Video) and a textbox (gr.Textbox) labeled "Results." The video output will display the processed video with the detected hand features, while the textbox will show a textual summary of the detection results.
# Create a Gradio interface
myInterfcae = gr.Interface(
    fn=infer_video,  # Function to process the input
    inputs=[gr.Video(), gr.Radio(["upload", "webcam"], label="What is your video source?")],  # Input type is video and a radio button for source
    outputs=[gr.Video(), gr.Textbox(label="Results")],  # Output is video and text
    title="Hand Detection from Video",
    description="Upload a video to detect hand. Select 'webcam' if the video is recorded from a webcam."
)


if __name__ == "__main__":
    myInterfcae.launch()
Step #4: Launch the Interface
The final step will be to launch your interface locally to test it. Gradio will create a local server and open the app in your web browser. To run the app, save the following script to a file, for example, gradio_app.py, and execute it:
python gradio_app.py
Here is the result of our script:
Conclusion
Creating a computer vision app with Gradio is both accessible and efficient, thanks to its intuitive interface and robust integration capabilities. By using Roboflow for model training and Gradio for app deployment, we demonstrated how to build and deploy powerful applications for both image and video inference. Gradio offers a variety of components suitable for computer vision apps beyond the basic image and video inputs.
The gradio.Gallery component can be used to display multiple images in a grid format, useful for applications that require comparison of results or showcasing multiple examples. The gradio.File and gradio.UploadButton component supports uploading various file types, which can be beneficial for batch processing scenarios.
For visualizing data and predictions, Gradio's gradio.Plot component can be particularly useful. By using these diverse Gradio components, you can create comprehensive and versatile computer vision apps. Whether working with images, videos, or real-time data, Gradio's easy-to-use interface and extensive component library empower developers to create robust interfaces for computer vision applications.
Cite this Post
Use the following entry to cite this post in your research:
Timothy M. (Jul 10, 2024). Build Computer Vision Applications with Roboflow and Gradio. Roboflow Blog: https://blog.roboflow.com/roboflow-gradio/