
Roboflow provides everything you need to label, train, and deploy computer vision solutions.
You can use the information you learn in this guide to build a computer vision model for your own use case.
As you get started, reference our Community Forum if you have feedback, suggestions, or questions.
We have two examples:
- A quickstart video you can follow in a few minutes where we show identifying several objects with a vision model, and;
- Our written example which walks through training a model to identify screws, showing how vision could be used as part of a quality assurance system (i.e. ensuring the number of screws is correct in an assembled kit).
You can follow whatever tutorial you want, but the fundamentals are the same.
Quickstart Tutorial
Connect Your Coding Agent with the Roboflow MCP
The fastest way to get started with Roboflow is using your coding agent. Agents like Claude Code, Codex, and Cursor are great at writing code and pulling context from across your stack. With the Roboflow MCP Server, they can build computer vision too, no prior experience required.
The Model Context Protocol (MCP) is an open standard that lets AI agents call external tools the same way developers call APIs. The Roboflow MCP Server makes Roboflow one of those tools: a single hosted endpoint at mcp.roboflow.com that exposes most of what you'd normally do in the Roboflow app.
Connect once and your agent can create projects, upload and auto-label images, pull datasets from Roboflow Universe, train and evaluate models, build Workflows, and deploy to the cloud or edge, all from natural-language prompts. Because the tools live at a single URL, every agent picks up the latest capabilities the moment it connects. There's no SDK to install and no version to pin.
Getting connected takes one command. Grab a Roboflow API key from your workspace settings, then add the server to your agent. For Claude Code:
claude mcp add -s user roboflow \
  --transport http https://mcp.roboflow.com/mcp \
  --header "x-api-key: YOUR_ROBOFLOW_API_KEY" \
  --header "Accept: application/json, text/event-stream"
For Codex, Cursor, Claude Desktop, and other MCP clients, see the full installation instructions at mcp.roboflow.com. Once connected, start a session in a folder that contains your images and describe what you want, for example: "I have some images of screws in this folder. Can Roboflow help me train a model that counts them?" Your agent takes it from there, creating the project, running auto-label, walking you through training options, and standing up a deployable pipeline.
If you'd rather build directly in the Roboflow app, the rest of this guide walks through that step by step.
Add Data to Roboflow
To get started, create a free Roboflow account.
After reviewing and accepting the terms of service, you can choose either Premium Trial Plan, or Public Plan. For this tutorial you can choose either one. You can optionally add collaborators to help you annotate images or manage the vision projects in your workspace.
Then, you will be able to create a project.
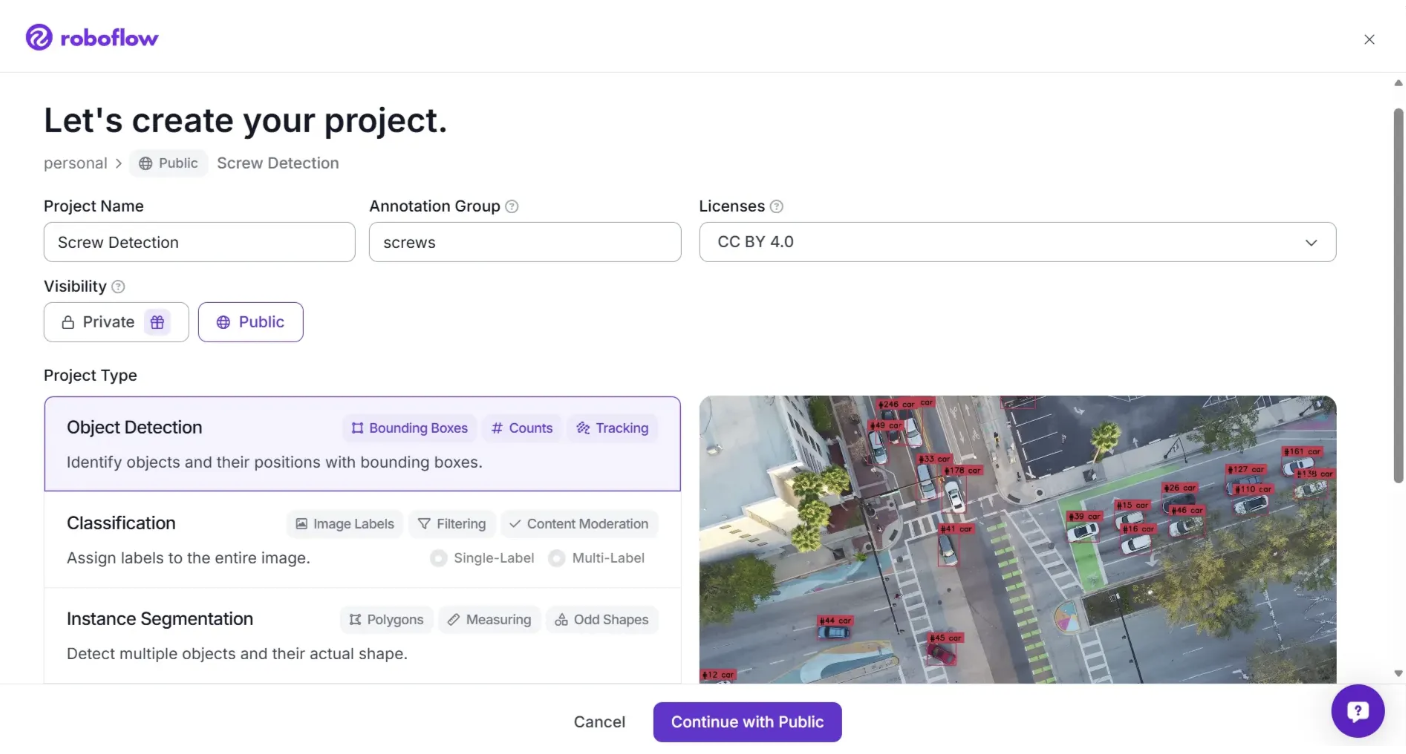
For this example, we will be using a dataset of screws to train a model that can identify screws in a kit. This model could be used for quality assurance in a manufacturing facility. With that said, you can use any images you want to train a model.
Leave the project type as the default "Object Detection" option since our model will be identifying specific objects and we want to know their location within the image.
For this walkthrough we'll use "Traditional" Tool (not Rapid), so choose that and click "Create Public Project". A page like this should open:
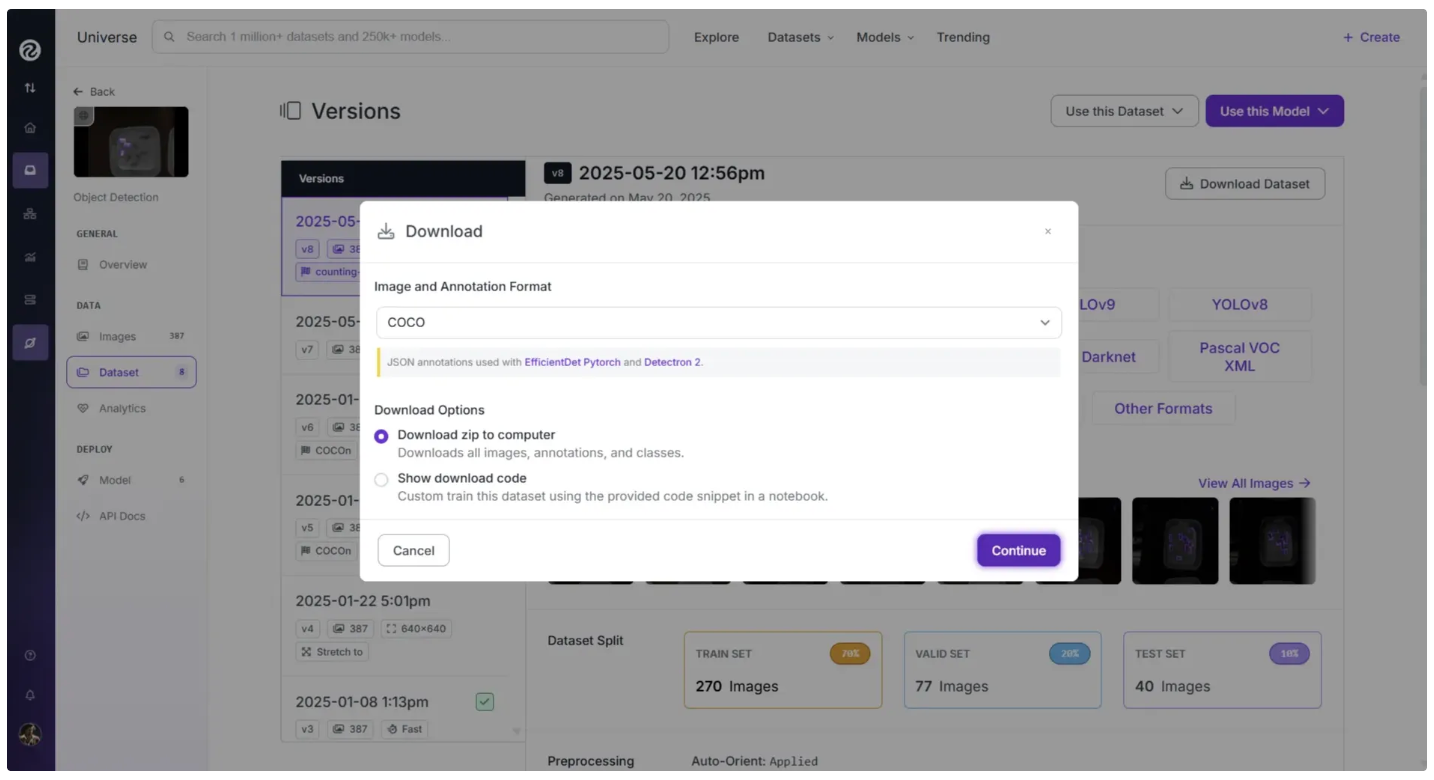
For this walkthrough, we’ll use a Roboflow provided sample screws dataset. You can download the dataset from Roboflow Universe as shown below:
Download it as a Zip folder and pick the COCO JSON format, one of 40+ computer vision formats Roboflow supports:
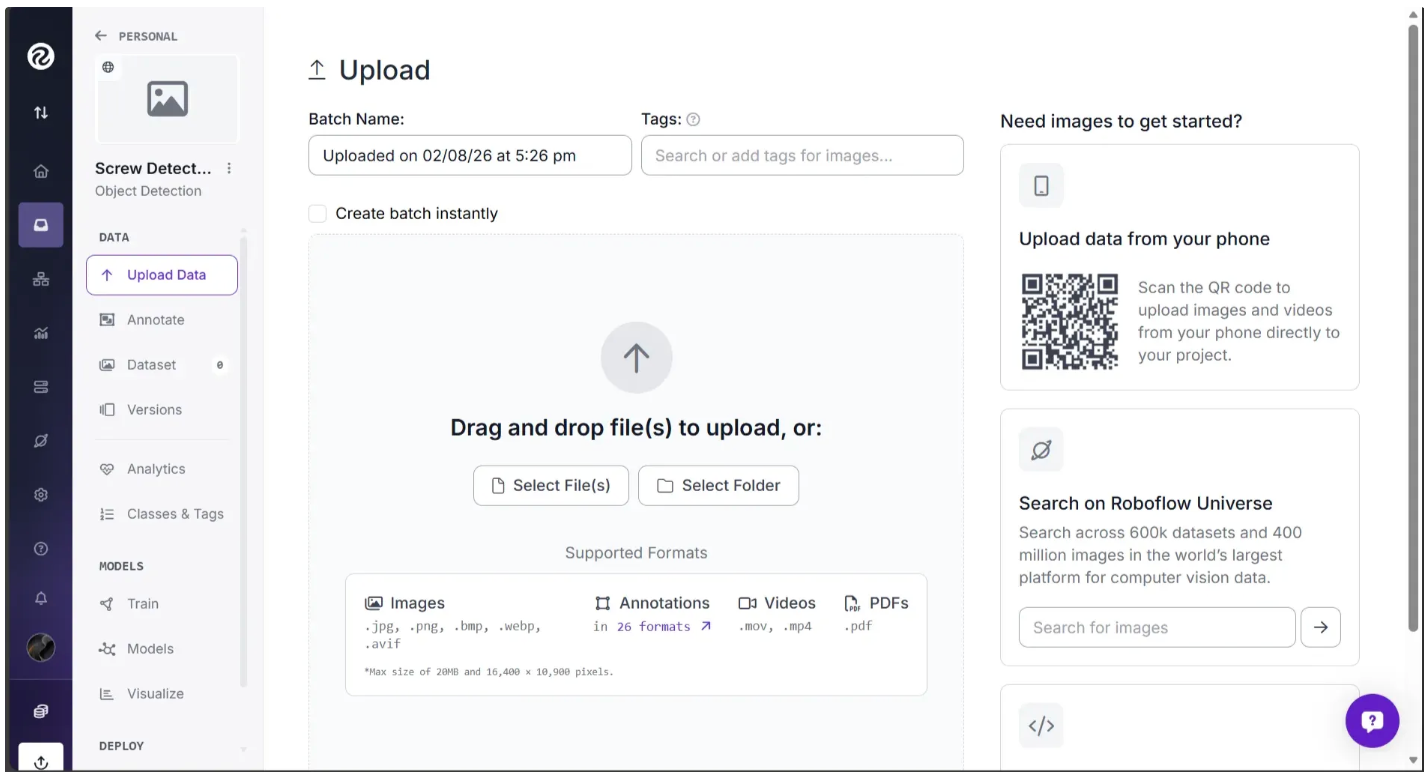
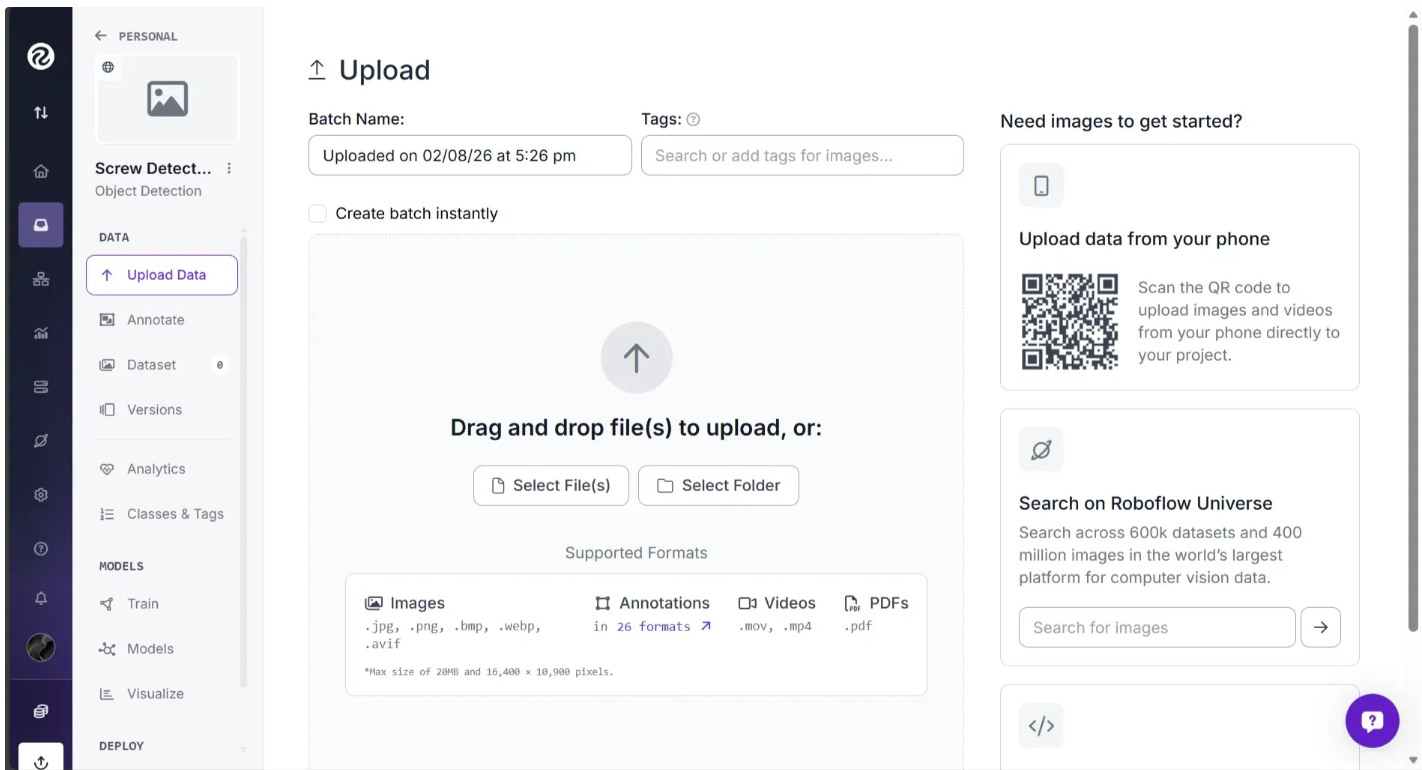
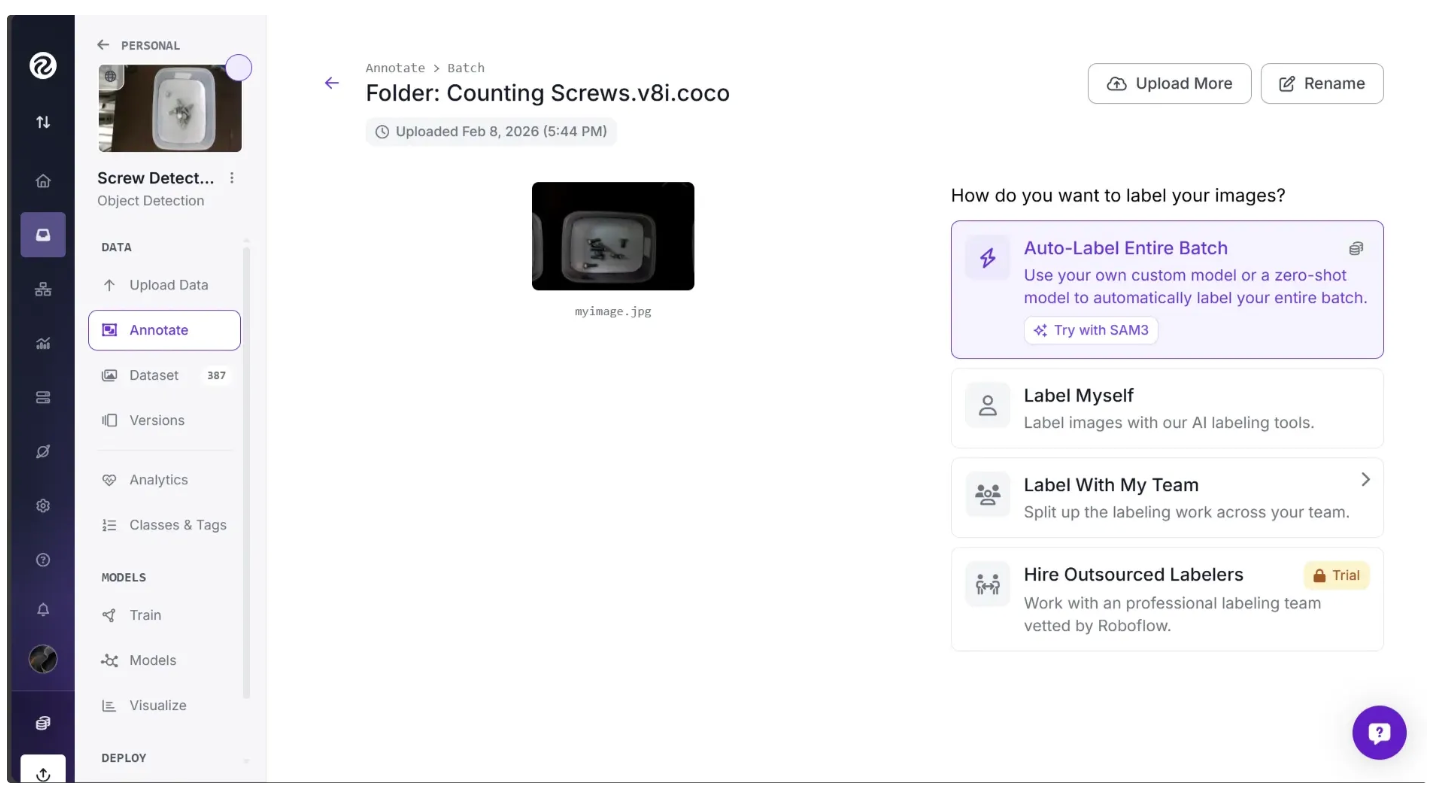
Once you have downloaded the dataset, unzip the file. Then click and drag the entire unzipped dataset folder, Counting Screws.v8i.coco, from your local machine into the highlighted upload area shown below:
The Counting Screws.v8i.coco folder contains 387 images and their annotations. Once you drag and drop this folder into Roboflow, the images and annotations are processed, and you can see the annotations overlaid on the images, as shown below:
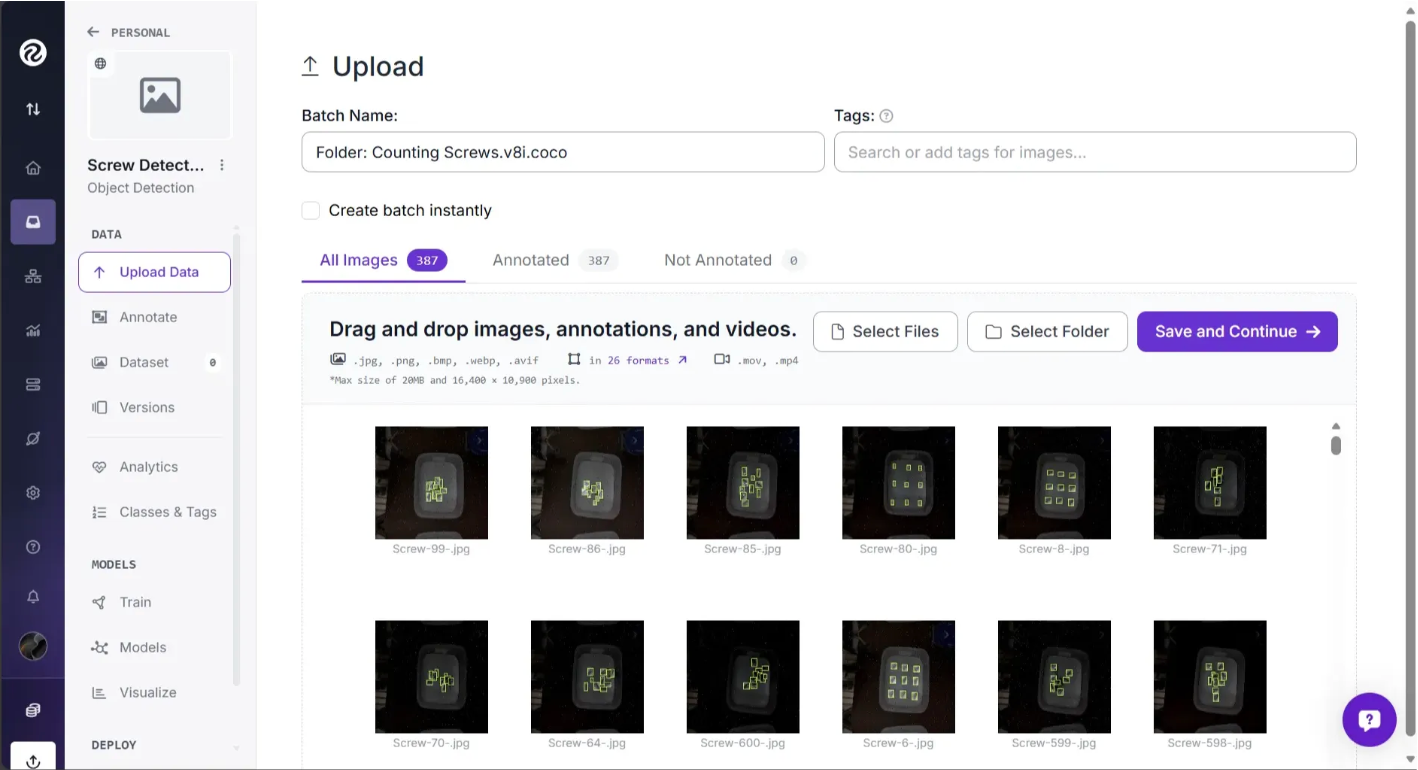
You can also drag and drop additional images to include them in the model dataset. In the screenshot below, the first image, myimage.jpg, is an unannotated image that I added to the dataset for the model:
Note: For use cases where an annotated dataset is not available in Roboflow Universe, we recommend starting with at least 5–10 images that include a balanced representation of the classes you want to identify. For example, if you want to detect two types of objects—a screw and a nut—you should have at least 5–10 images that show both objects.
If any of your annotations have errors, Roboflow alerts you. For example, if some of the annotations improperly extended beyond the frame of an image, Roboflow intelligently crops the edge of the annotation to line up with the edge of the image and drops erroneous annotations that lie fully outside the image frame.
In the same “Upload Data” page, we can confirm that all the images are the ones we want in our dataset and that the annotations are being parsed correctly. Any unwanted image can be removed by hovering over it and clicking the trash icon.
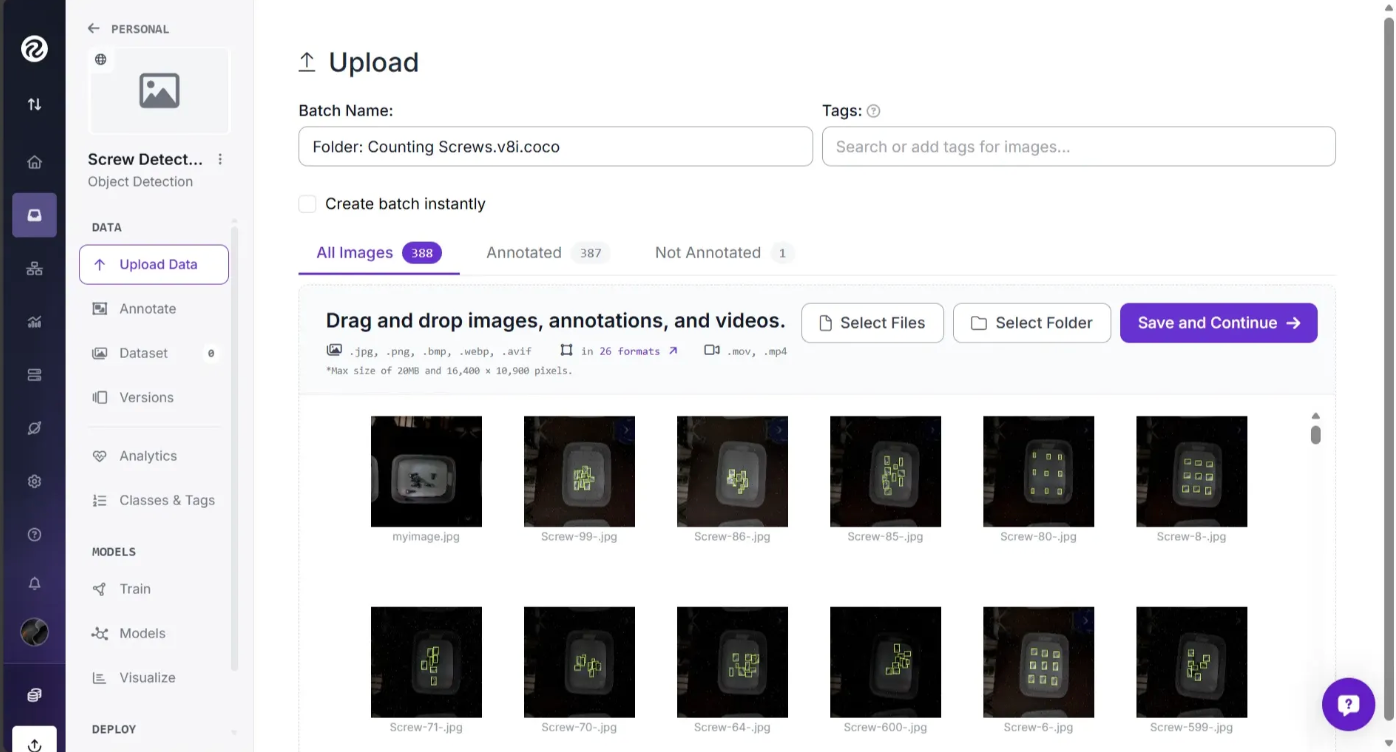
Note that the myimage.jpg I added is marked as "Not Annotated" on the dashboard. We’ll annotate this image in the next section.
Everything now looks good. Click “Save and Continue” in the upper right-hand corner to upload your data.
Then you will be asked to choose a dataset split. This refers to how the images will be divided into three sets: Train, Test, and Valid. You can set your own custom splits with Roboflow or, if one is available, use an existing split in a dataset.
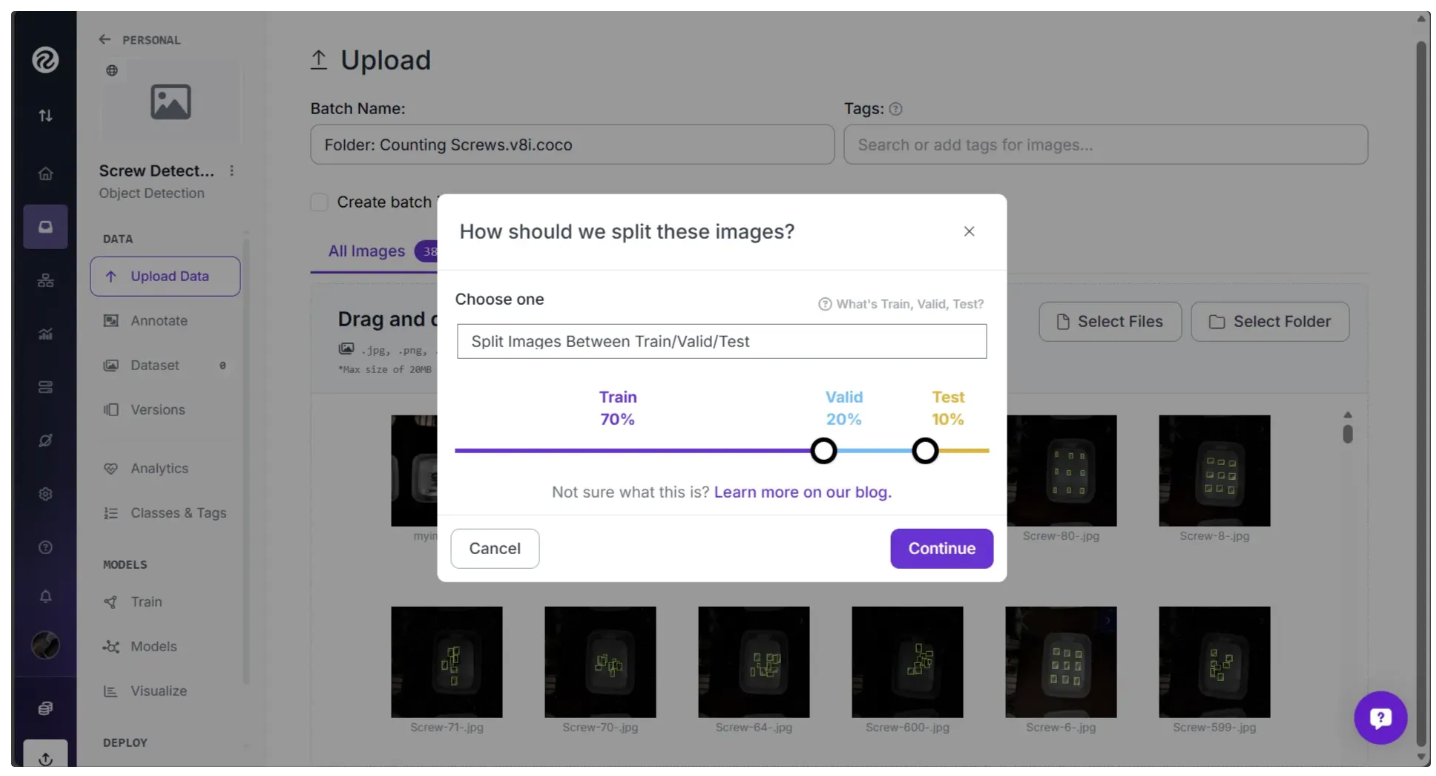
Your train set contains the images that will be used to train your model. Your valid set will be used during training to validate performance of your model. Your test set contains images you can use to manually test the performance of your model. Learn more about image dataset splits and why to use them.
Then after you’ve confirmed your split by clicking “Continue”, Roboflow should now open a page as shown below asking you to annotate not annotated image.
You can do this in various ways. In our case, since it is just one image, we will annotate it ourselves. To do this, click the “Label Myself” option, which will let you annotate images yourself either manually, or with AI-assisted tools.
Annotate Images in Roboflow
Annotations are the answer key from which your model learns. The more annotated images we add to the dataset, the more information our model has to learn from.
Use your cursor to draw a box around the area of the image you want to manually annotate a bounding box. A popup will appear where you can enter the label. In the example below, we will draw a box around a screw and assign the corresponding class:
You can also label object detection datasets with polygons. Roboflow offers a few tools to help with labeling with polygons. You can manually label polygons using Smart Polygon.
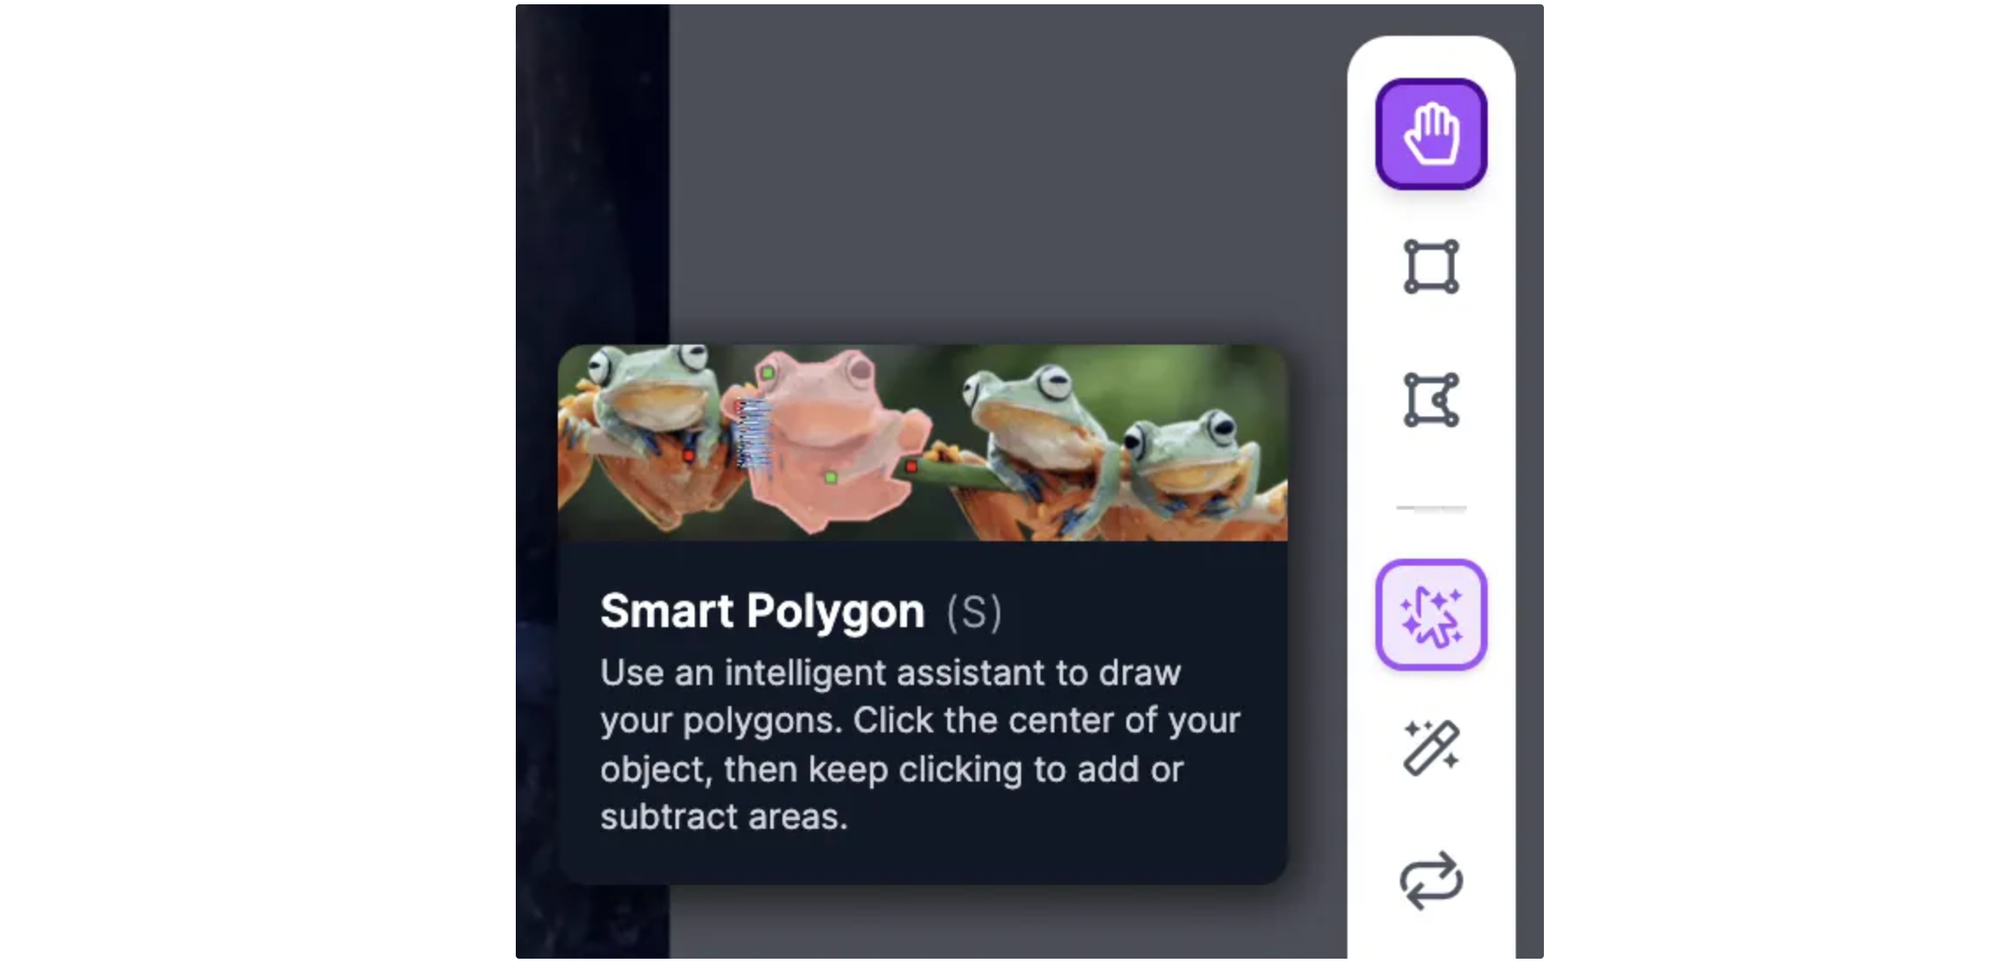
With Smart Polygon you can point and click anywhere on an image to create a label. When you hover over an object, a red mask will appear that lets you see what region of the object Smart Polygon will label if you click.
Add Images to Dataset
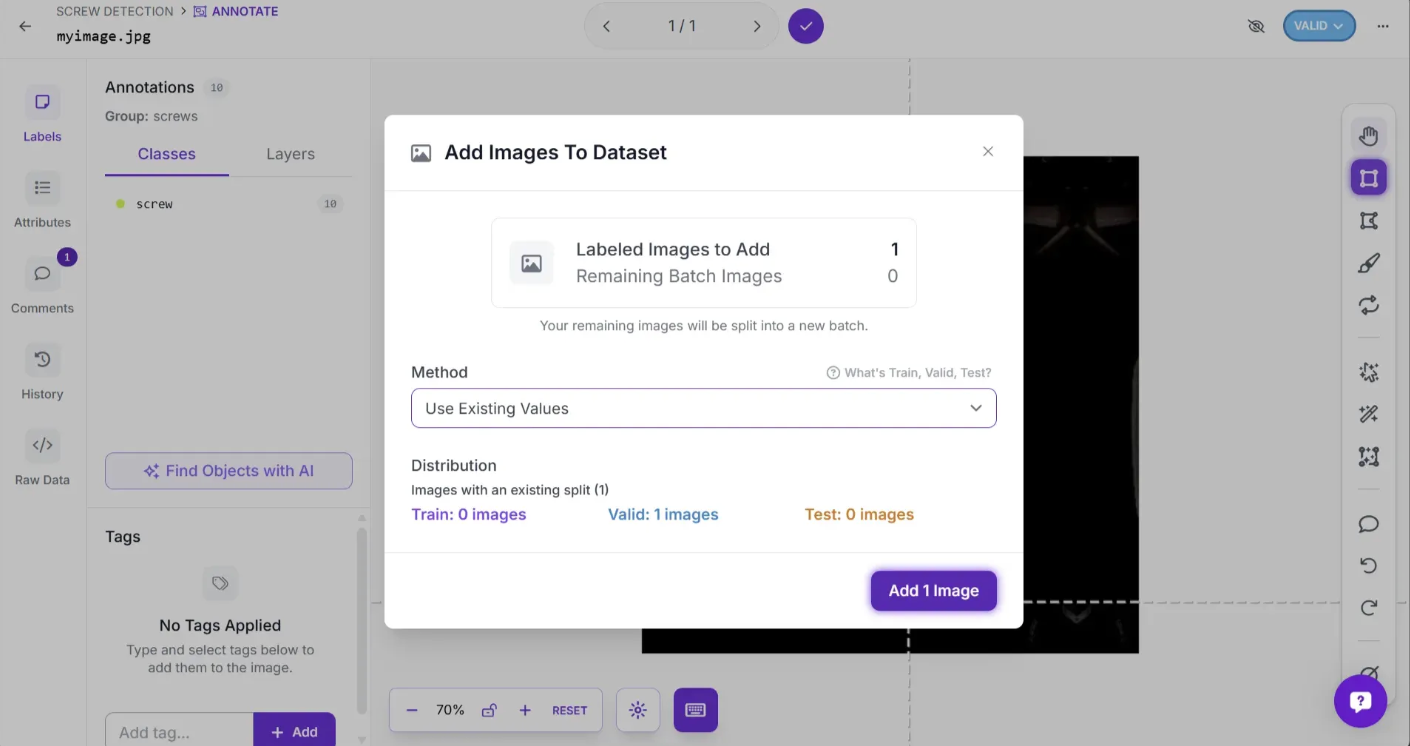
Once you’ve annotated your image, you need to add it to your dataset. The dropdown button in the top right corner, labeled “TRAIN”, “TEST”, or “VALID”, determines how this image will be used in model training. You can change its setting by clicking the button.
To add the image to your dataset, click the tick mark at the top. A popup will appear where you can then click “Add 1 Image”. This will add the image to your dataset for model training.
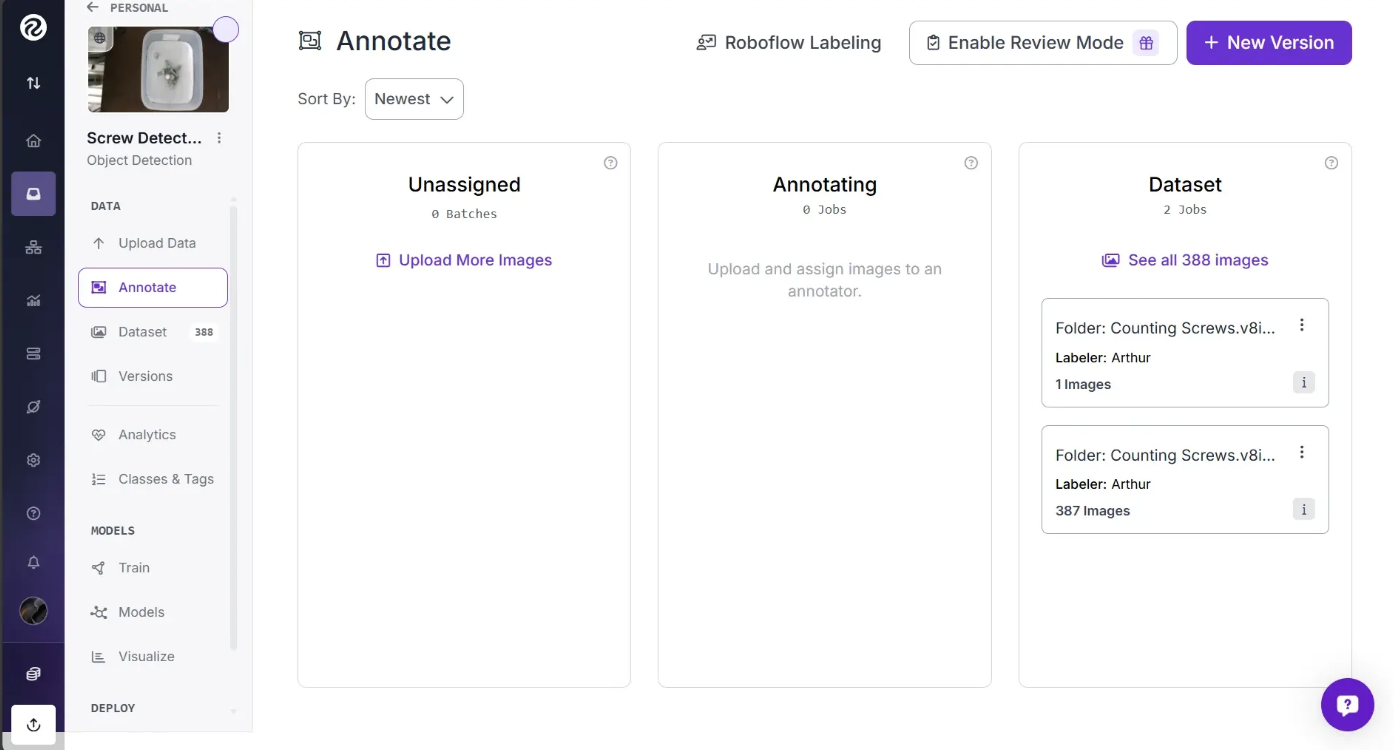
If you exit the Roboflow Annotation tool, you’ll see three columns under the “Annotate” section: “Unassigned”, “Annotating”, and “Dataset.” The Dataset column contains fully annotated images ready for model training, Annotating shows the images you are currently annotating, and Unassigned lists recently uploaded images that still need to be annotated.
You can search the images in your dataset by clicking "Dataset" in the sidebar. The search bar runs a semantic search on your dataset to find images related to your query. For example, if we had images with nuts, bolts, screws, and plastic assembly parts, we could search through them with ease.
Preprocessing and Augmentations in Roboflow
After you’ve finished annotating and added your image to the dataset, proceed to generate a new version of your dataset. This creates a point in time snapshot of your images processed in a specific way, think of it like version control for data. To create the new version, start by navigating to the “Versions” section of the page as shown below:

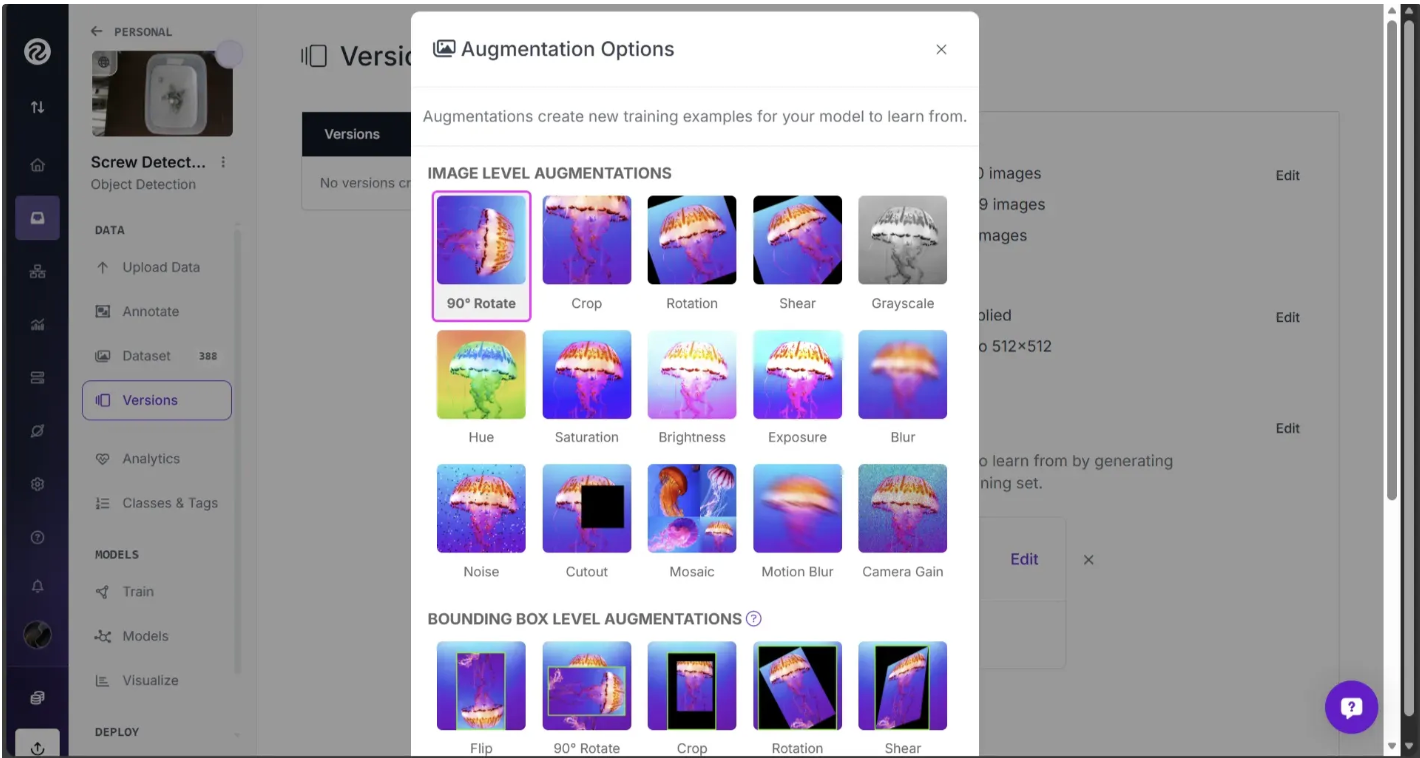
From here, we can apply any preprocessing and augmentation steps that we want to our images. Roboflow seamlessly makes sure all of your annotations correctly bound each of your labeled objects – even if you resize, rotate, or crop.
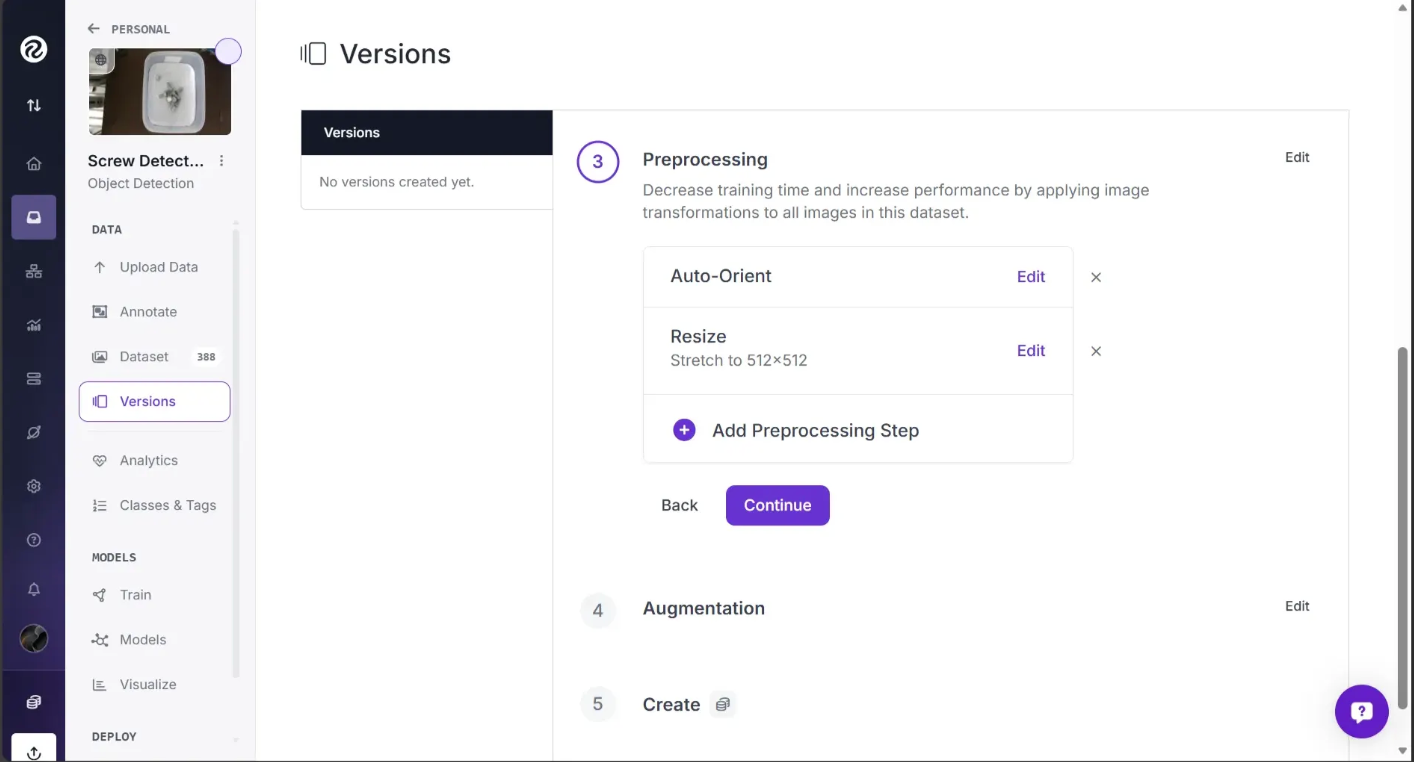
You can also choose to augment your images which generates multiple variations of each source image to help your model generalize better.
Roboflow supports auto-orient corrections, resizing, grayscaling, contrast adjustments, random flips, random 90-degree rotations, random 0 to N-degree rotations, random brightness modifications, Gaussian blurring, random shearing, random cropping, random noise, and much more. To better understand these options, refer to our documentation.
We usually recommend applying no augmentations on your first model training job. This is so that you can understand how your model performs without augmentations. If your model performs poorly without augmentations, it is likely you need to revisit your dataset to ask questions like: Are all my images labeled? Are my images consistently labeled? Do my images contain a balance of the classes I want to identify?
With that said, we have done some experimentation so you can achieve the best performance without tinkering with augmentation for this screw dataset.
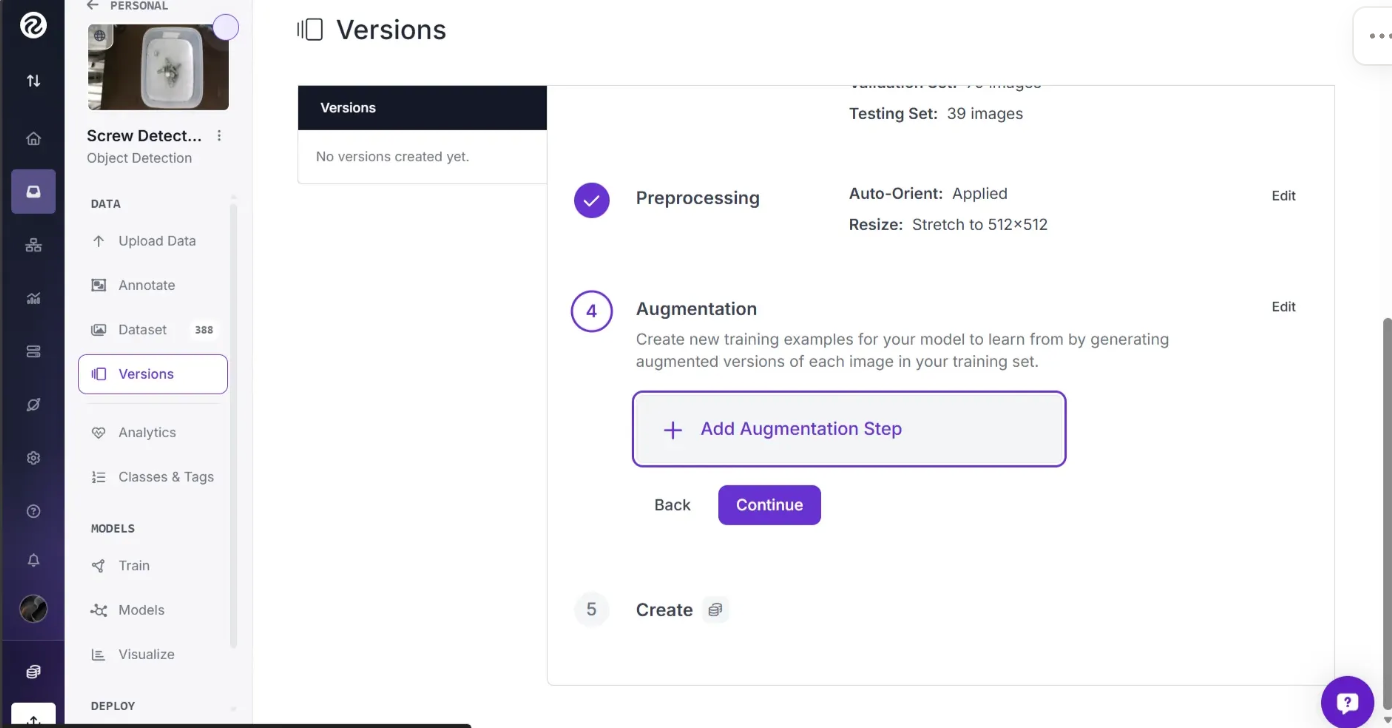
For this project, we are going to apply two augmentations: Flip and Rotate. We recommend these augmentations for our screw dataset since screws can appear at any angle and we want to identify a screw no matter how it is positioned.
To apply these augmentations, click on the “+ Add Augmentation Step” button:
This should open a popup with various augmentation options, as shown below:
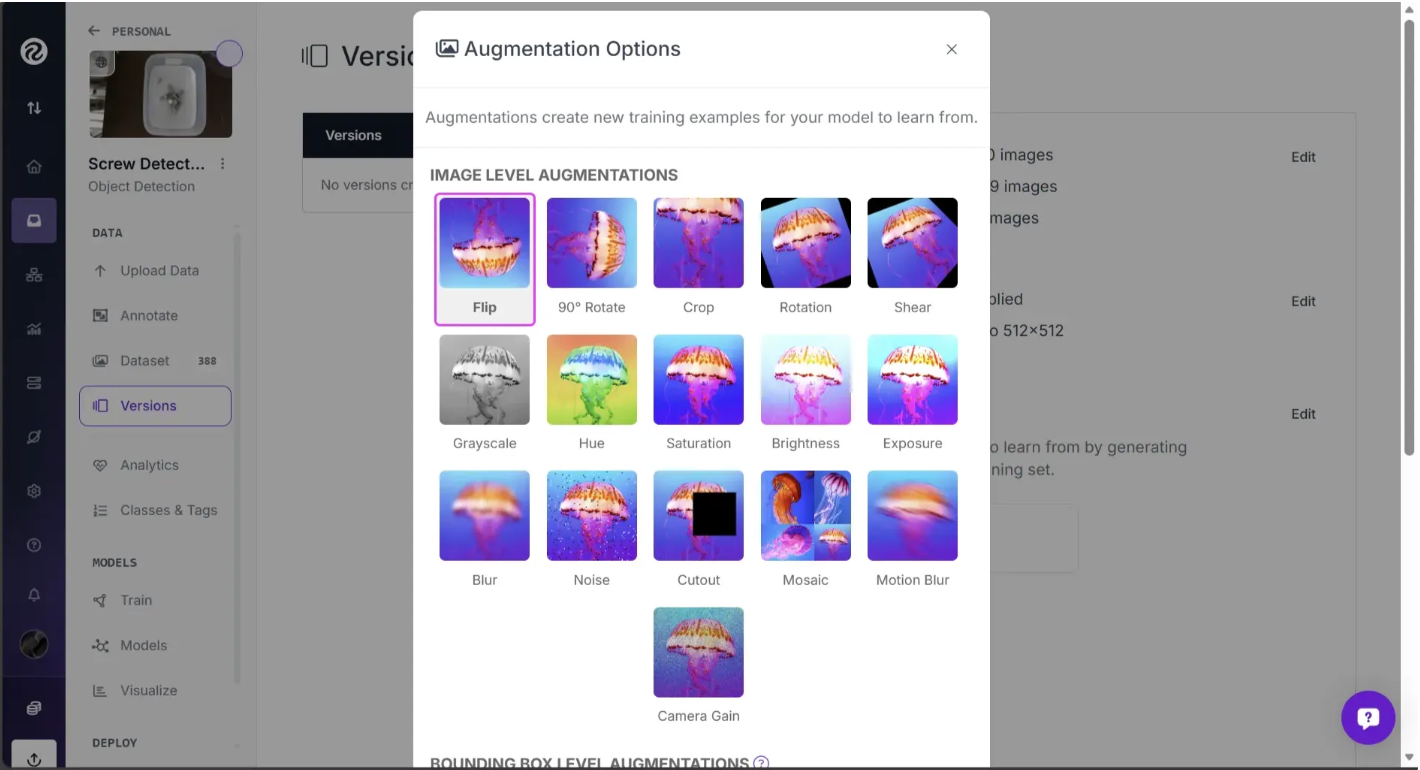
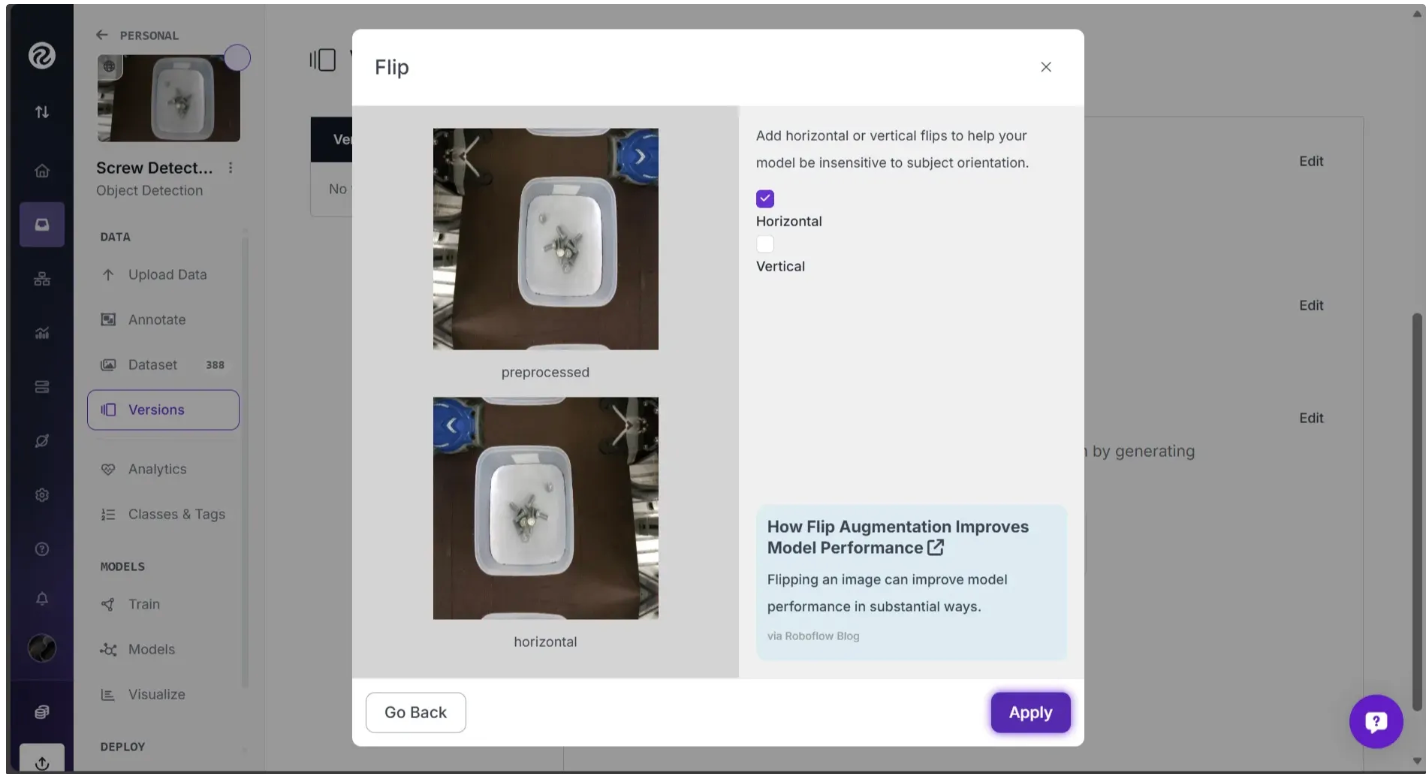
You can select the Flip option, choose “Horizontal”, and apply the effect.
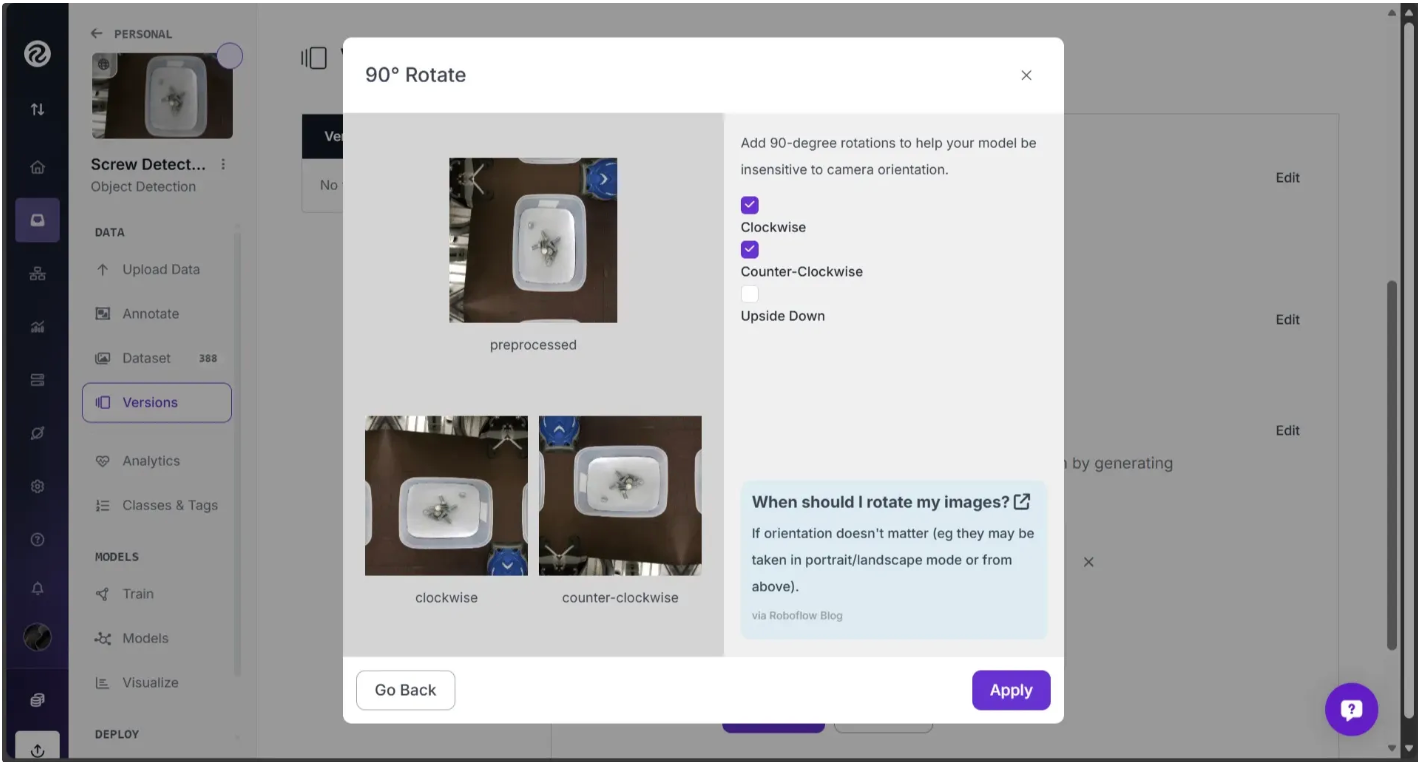
Similarly, you can apply a 90-degree rotation as another augmentation:
Select “Clockwise” or “Counter-Clockwise”, and apply the effect.
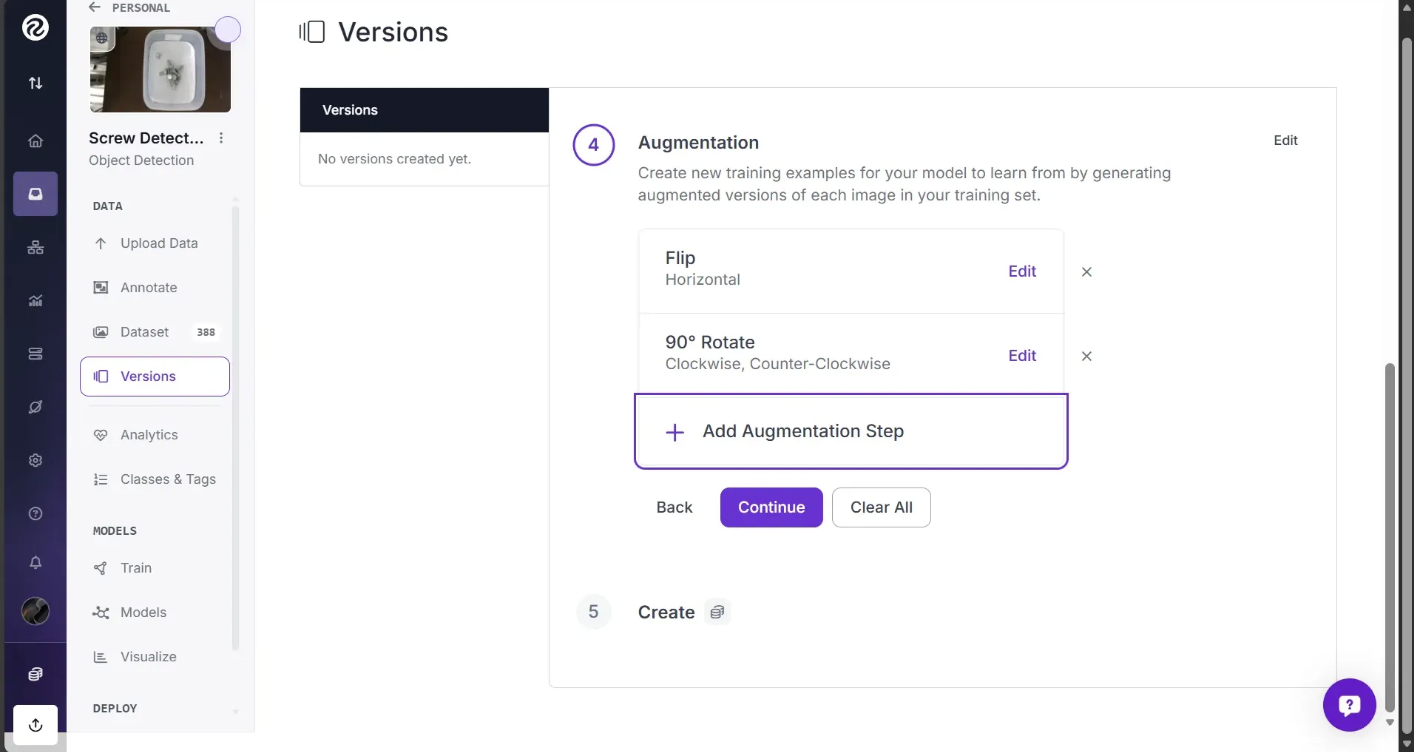
The augmentations should appear as shown below:
With that said, these augmentations may not work for your data. If you are identifying an object that will only appear at one orientation (such as might be the case on an assembly line), a flip augmentation will not help as much as others.
To learn more about applying augmentations, refer to our image augmentation and preprocessing guide.
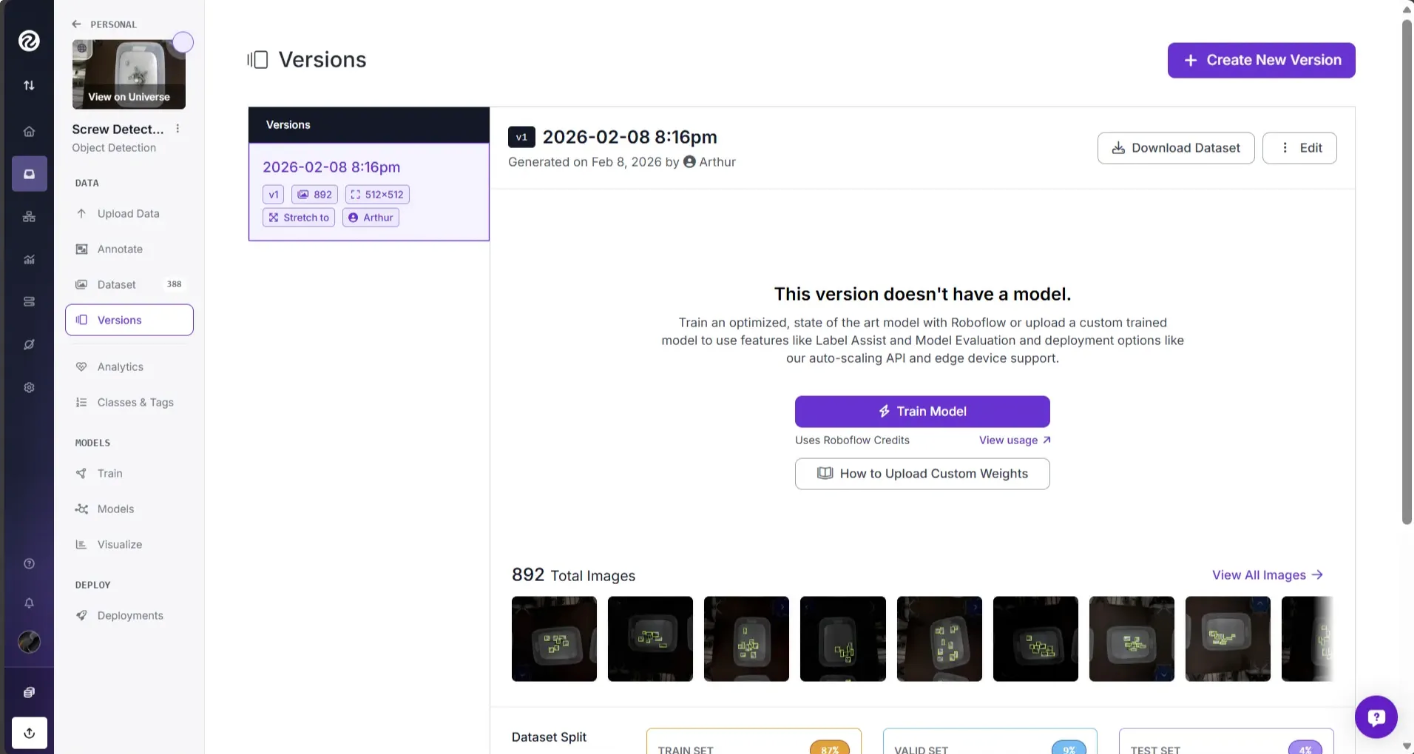
To generate your dataset, click the "Create" button at the bottom of the page.
It will take a few moments for your dataset to be ready. Then, you can use it to start training a model.
Model Training in Roboflow
Once you’ve generated a new version of your dataset, you can use it to train a model on the Roboflow platform.
Roboflow Train offers model types that you can train and host using Roboflow. We handle the GPU costs and provide access to out-of-the-box, optimized deployment options, which we’ll cover later in this guide.
Your trained model can then be used in several powerful ways:
- Model-assisted labeling speeds up labeling and annotation when adding more data to your dataset
- Rapid prototyping or testing your model on real-world data to evaluate performance (explained in the next section)
- Deploying to production using out-of-the-box options optimized to run your model across multiple devices (explained in the next section)
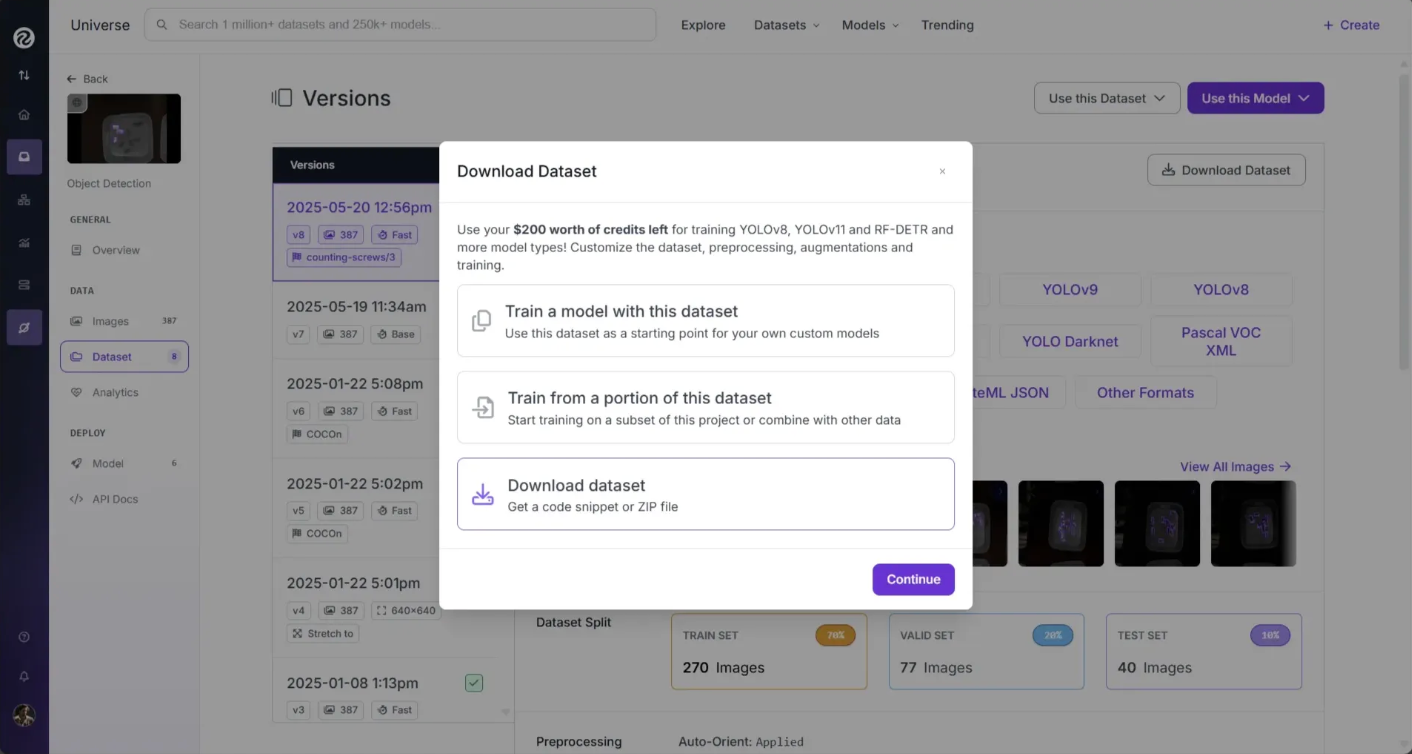
You can also export your dataset to train a model on your own hardware. To export your data, click “Download Dataset” on the Versions page and select your desired export format.
For this guide, let's train a model on the Roboflow platform. To get started, click the "Train with Roboflow" button.
A window will appear where you can configure your model training job. You’ll be asked to choose which model to train, and each model has performance trade-offs that you’ll want to evaluate for your specific use case.

For this guide, choose “Roboflow 3.0” with the “Fast” model size. You’ll then be asked to choose which checkpoint you want to train from.
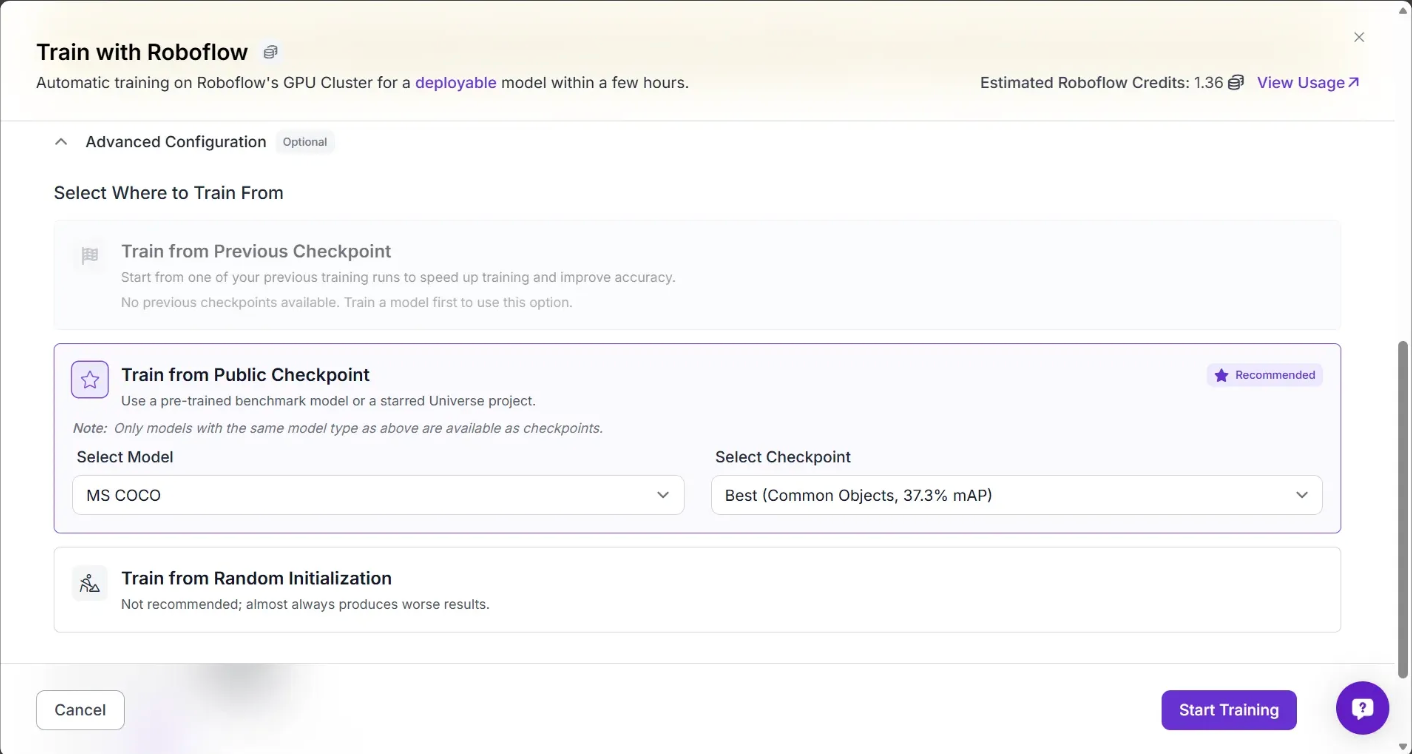
For the first version of a new model, we recommend training from the MS COCO checkpoint, as shown above. This uses a model trained on the Microsoft COCO dataset as a "checkpoint" from which your model will start training. This should lead to the best performance you can achieve in your first model training job.
When you have trained a version of a model, you can train using your last model as a checkpoint. This is ideal if you have trained a model that performs well that you are looking to improve. You can also use models you have starred from Universe as a checkpoint.
Click "Start Training" to start training your model.
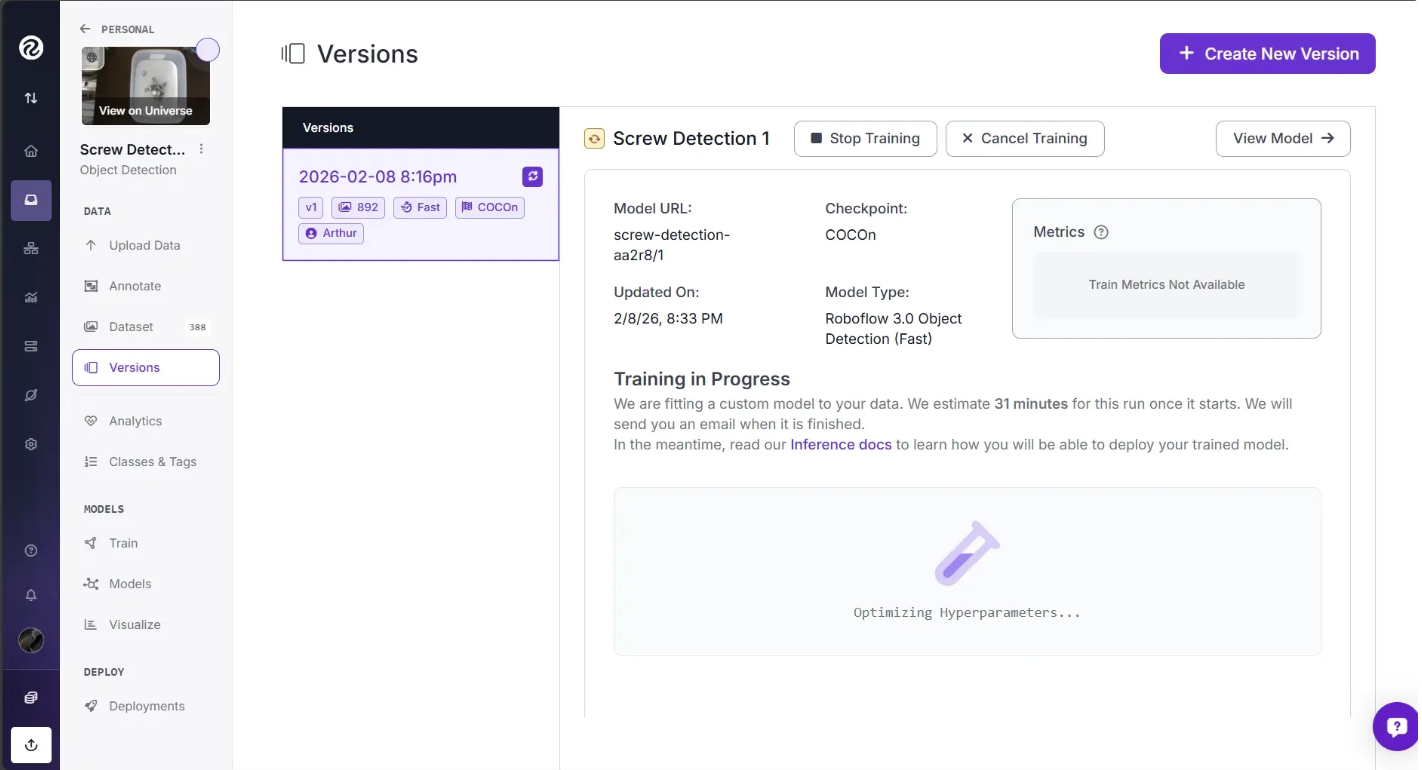
This will take between a few minutes and a day depending on how many images are in your dataset.
When you start training your model, an estimate will appear showing roughly how long the training is expected to take. You’ll see the message “Training machine starting…” while your training job is being allocated to a server, which may take a few moments. This message then changes to others, such as “Optimizing Hyperparameters…”, once the allocation is complete, as shown below.
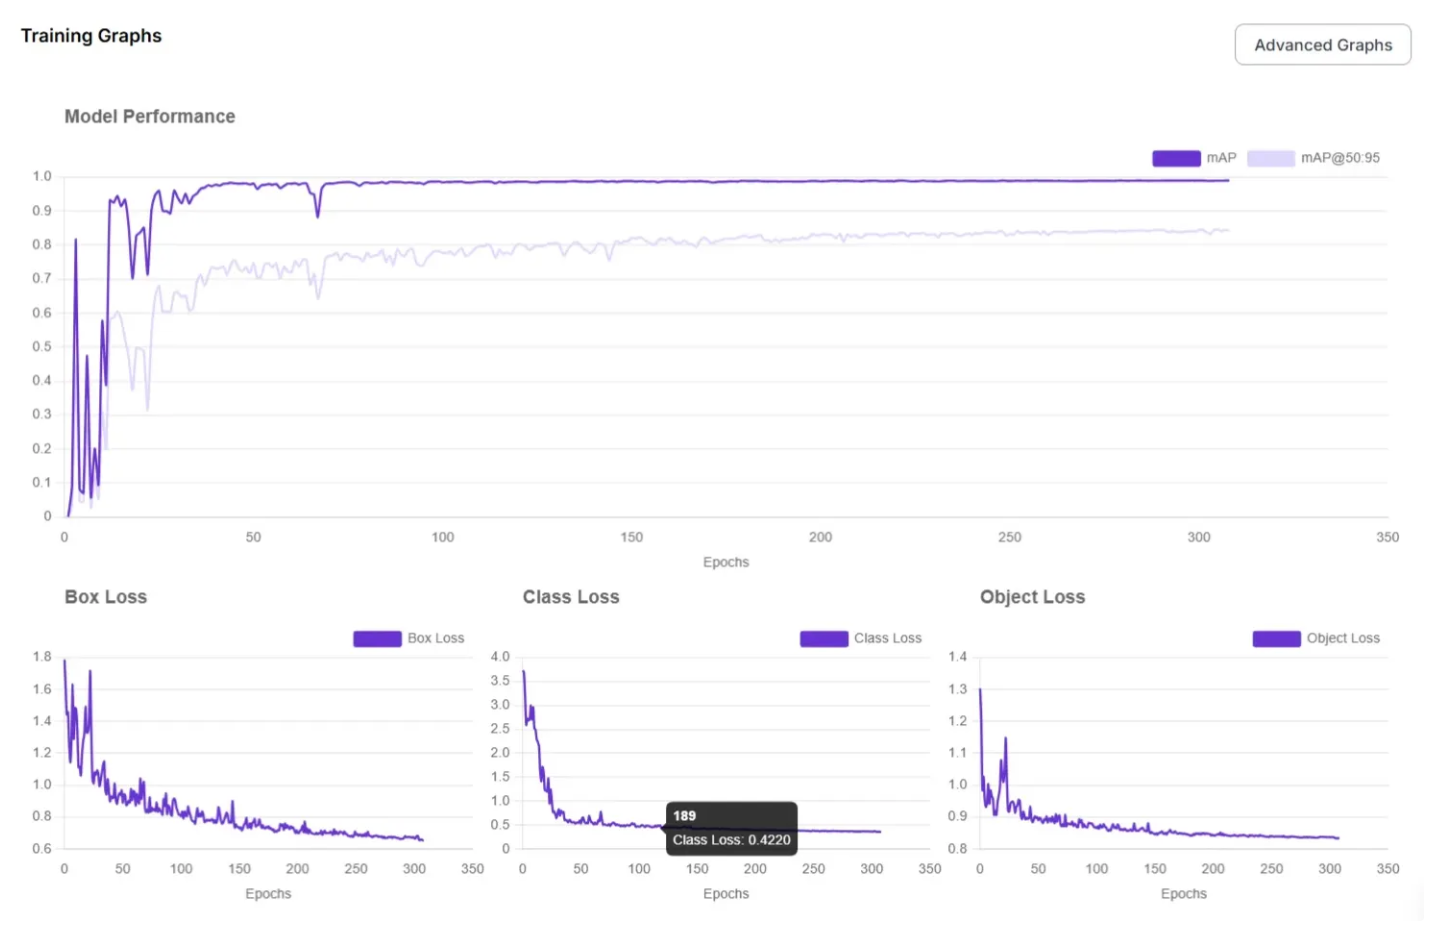
When a machine has been assigned your dataset for model training, a graph will appear on the page. This graph shows how your model is learning in real time. As your model trains, the numbers may fluctuate, but over time, the lines should trend higher on the chart.
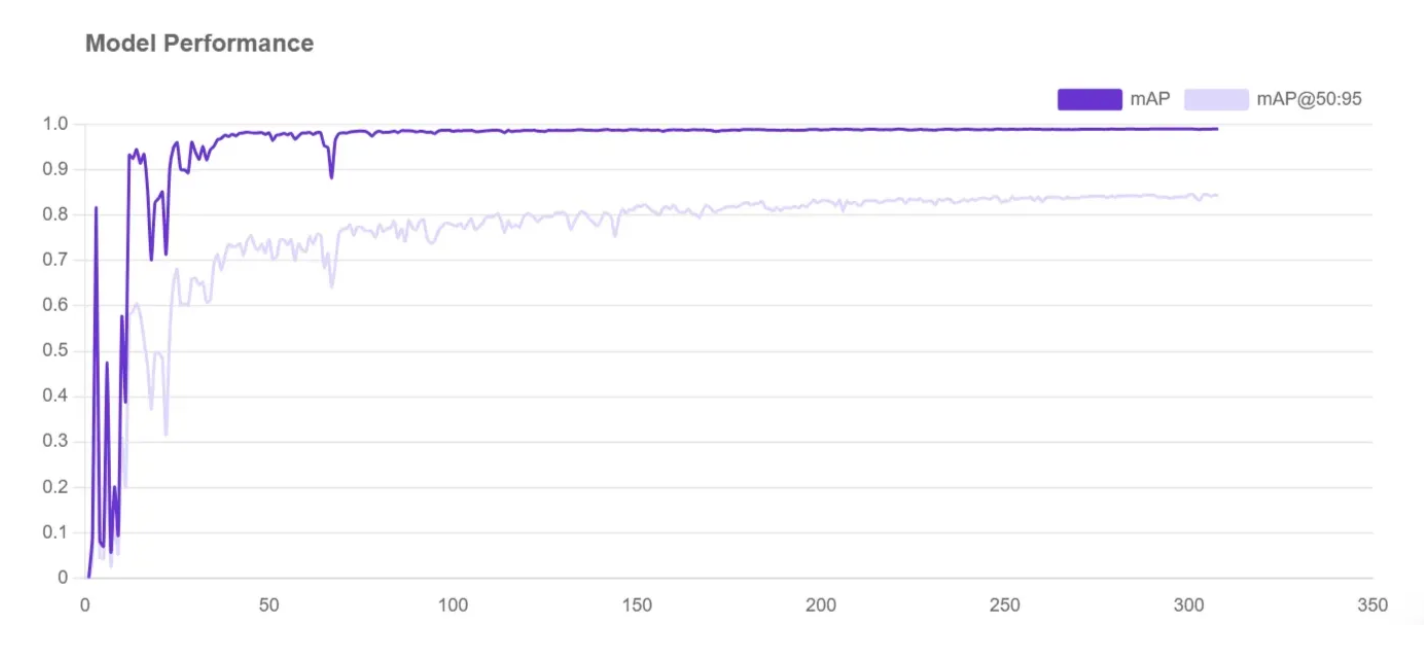
The higher the mean average precision (mAP) is, the better.
The mAP, precision, and recall statistics tell us about the performance of our model. You can learn more about what these statistics tell you in our guide to mAP, precision, and recall.
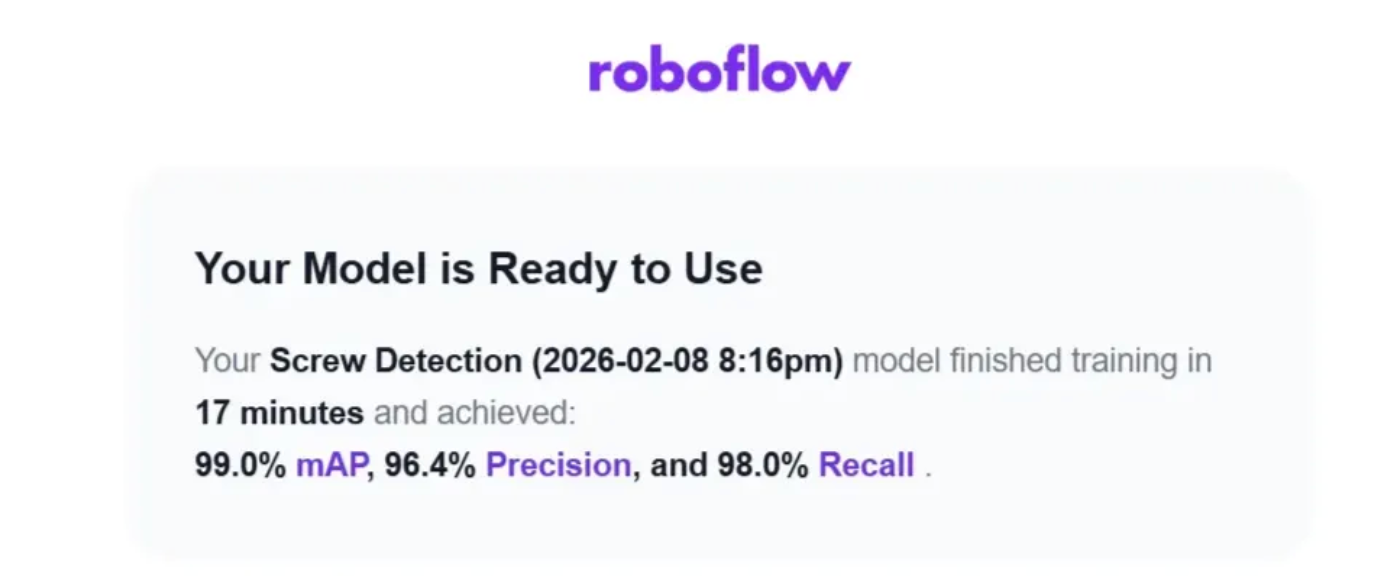
You'll receive an email once your model has finished training. The email contains the training results for you to see how the model performed. If you need to improve performance, we have recommendations on how to do that.
View your training graphs for a more detailed view of model performance.
Testing Your Model
To test the new model, click the “Visualize” option and drag and drop an image into the Roboflow dashboard, as shown below.
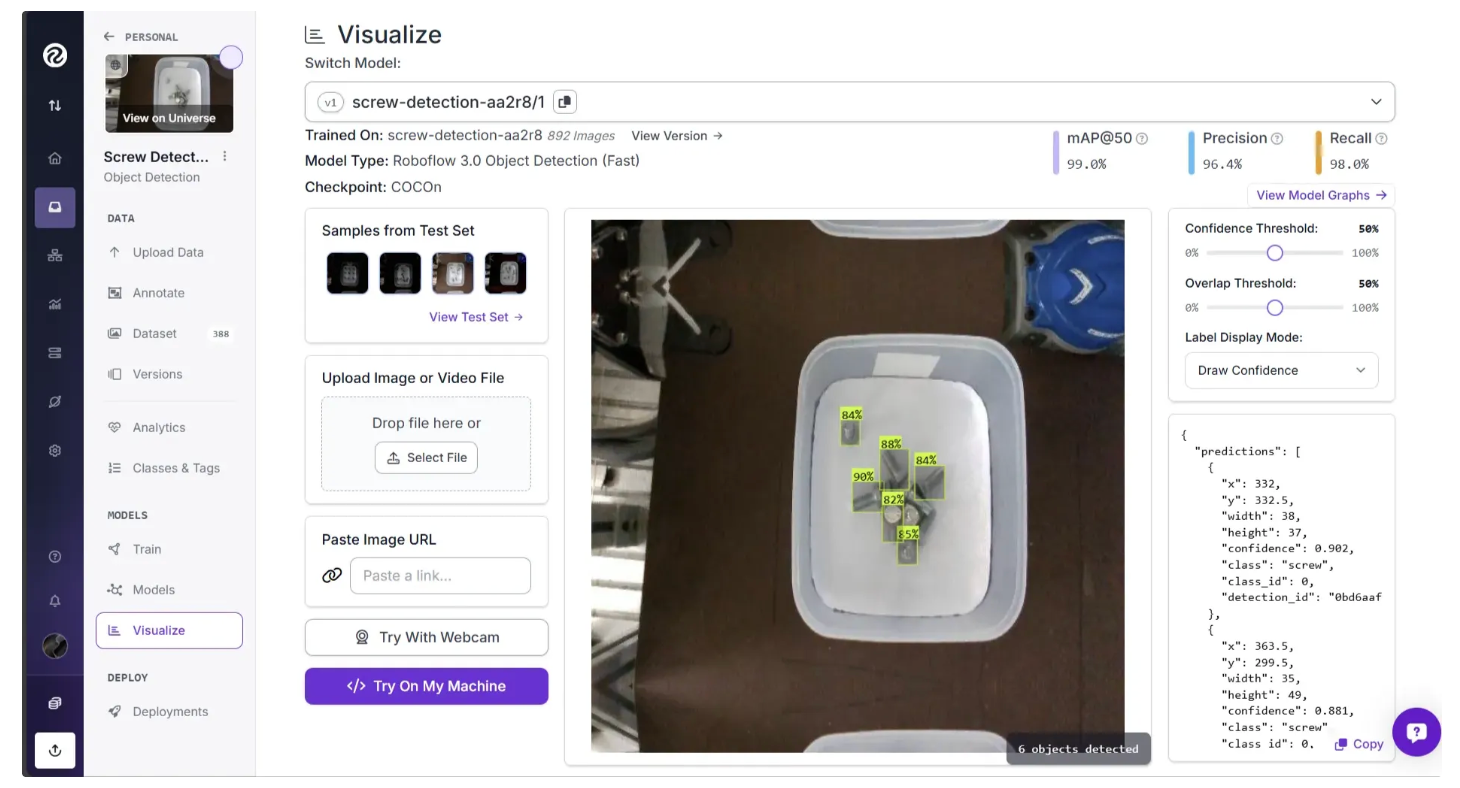
The several ways available to test your new model include:
- Drag-and-drop an image onto the screen to see immediate inference results.
- Use your webcam to see real-time inference results with our sample app and then dive deeper into how to use a webcam in production.
- Try the example web app to try an image URL.
In the test shown in the image above, our model successfully identified six screws. You could further connect this model to business logic to solve real-world use cases. And this is where Roboflow Workflows fits in, enabling you to connect your model to downstream logic and deployment.
Build a Workflow in Roboflow
Roboflow Workflows is a web-based tool for building end-to-end computer vision pipelines that run inference on your model.
For example, you can create a Workflow that saves your model’s results for use in future training sets, or a Workflow that returns PASS or FAIL depending on the number of detections produced by your model.
In this guide, we will build a Workflow that runs inference on the previously trained model and outputs a visualized image showing the detected objects, in our case, screws. Here is the workflow we're building.
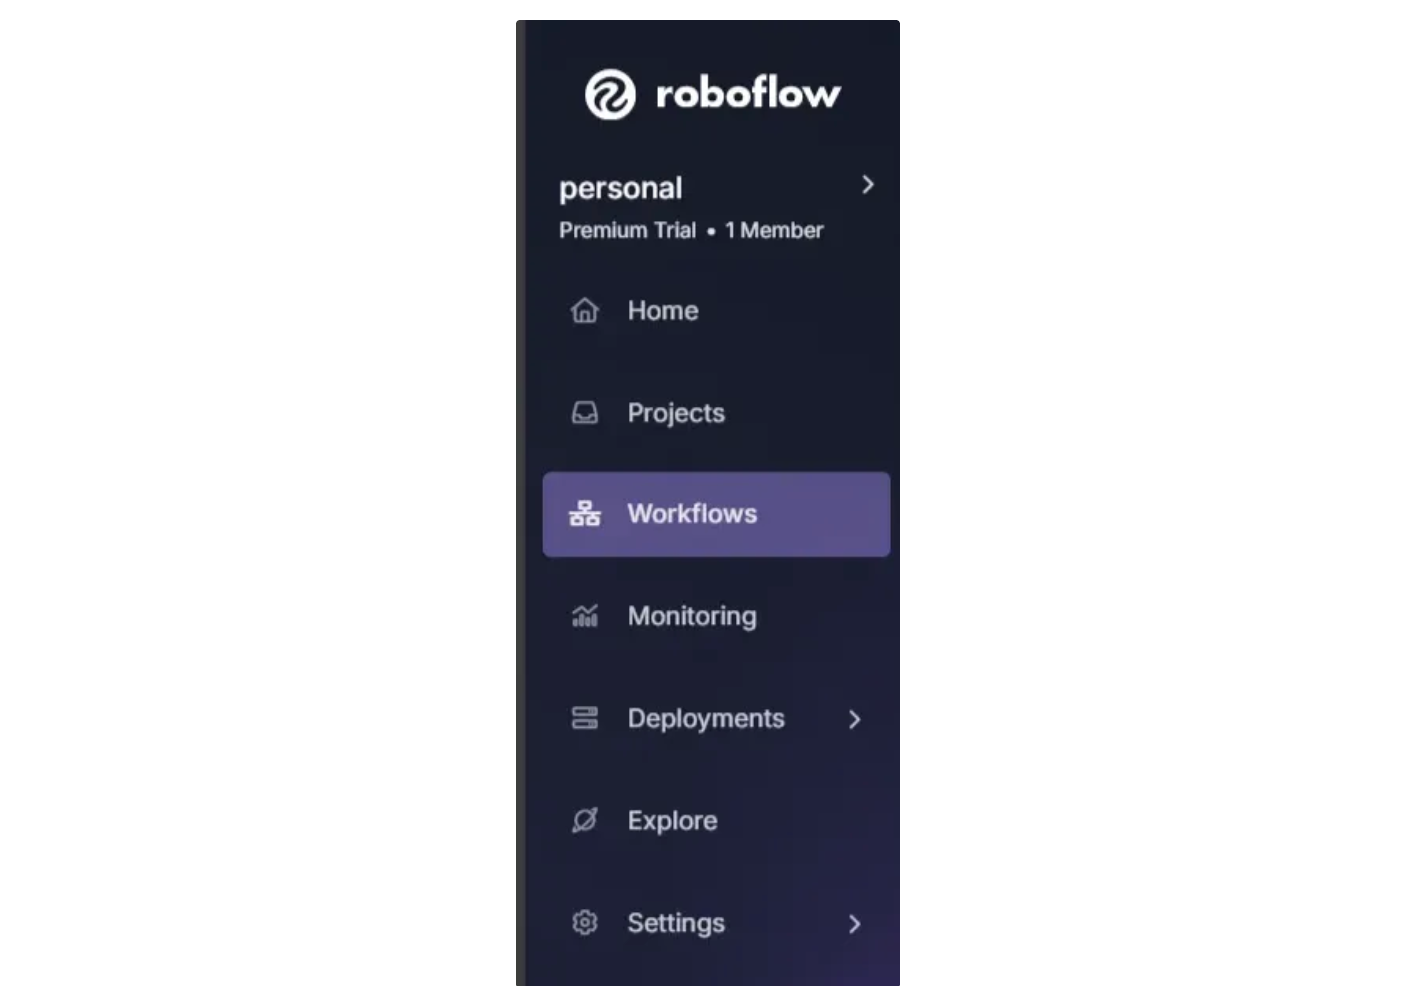
To create a workflow, click the “Workflows” option in the left sidebar of the Roboflow dashboard:
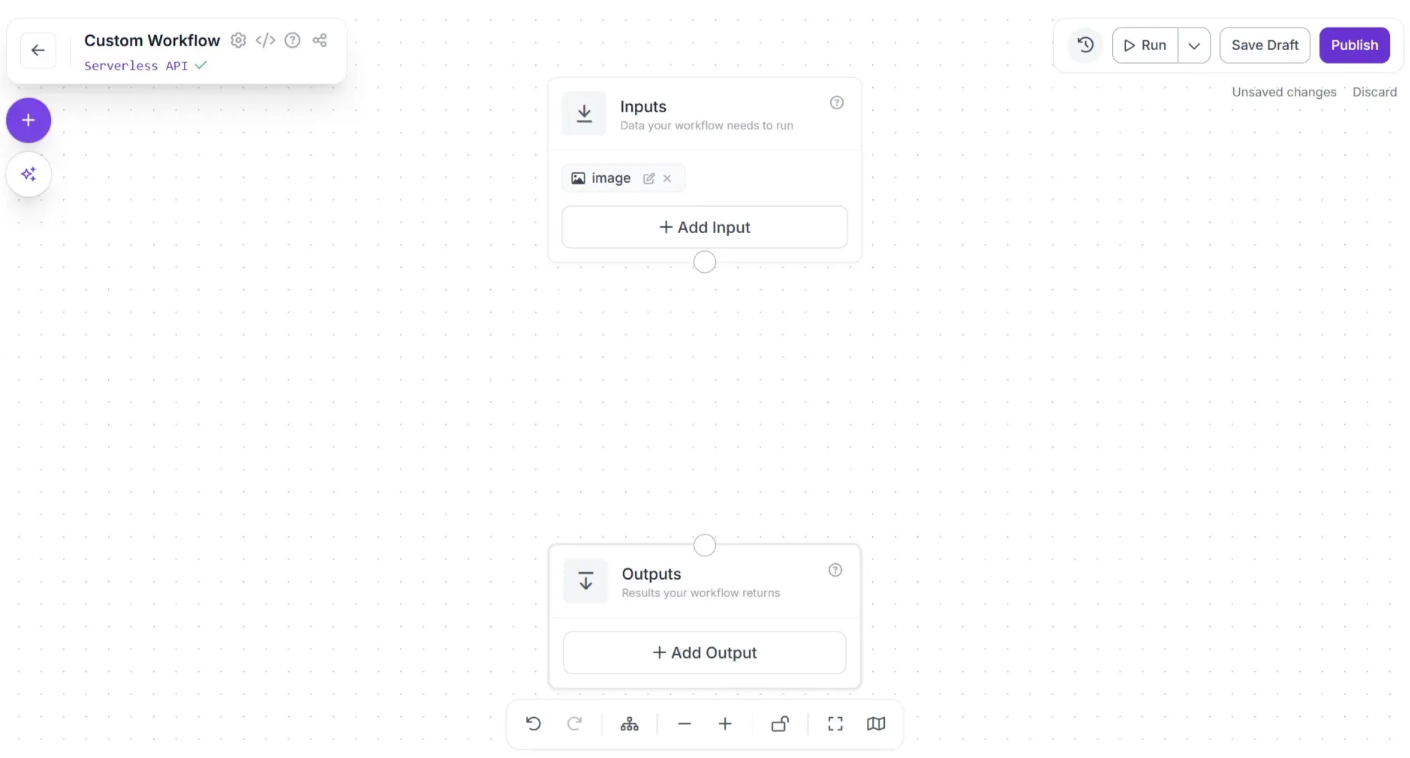
Then, click the “Create Workflow” button that appears on the page. The workflow web editor will open, allowing you to start building your workflow:
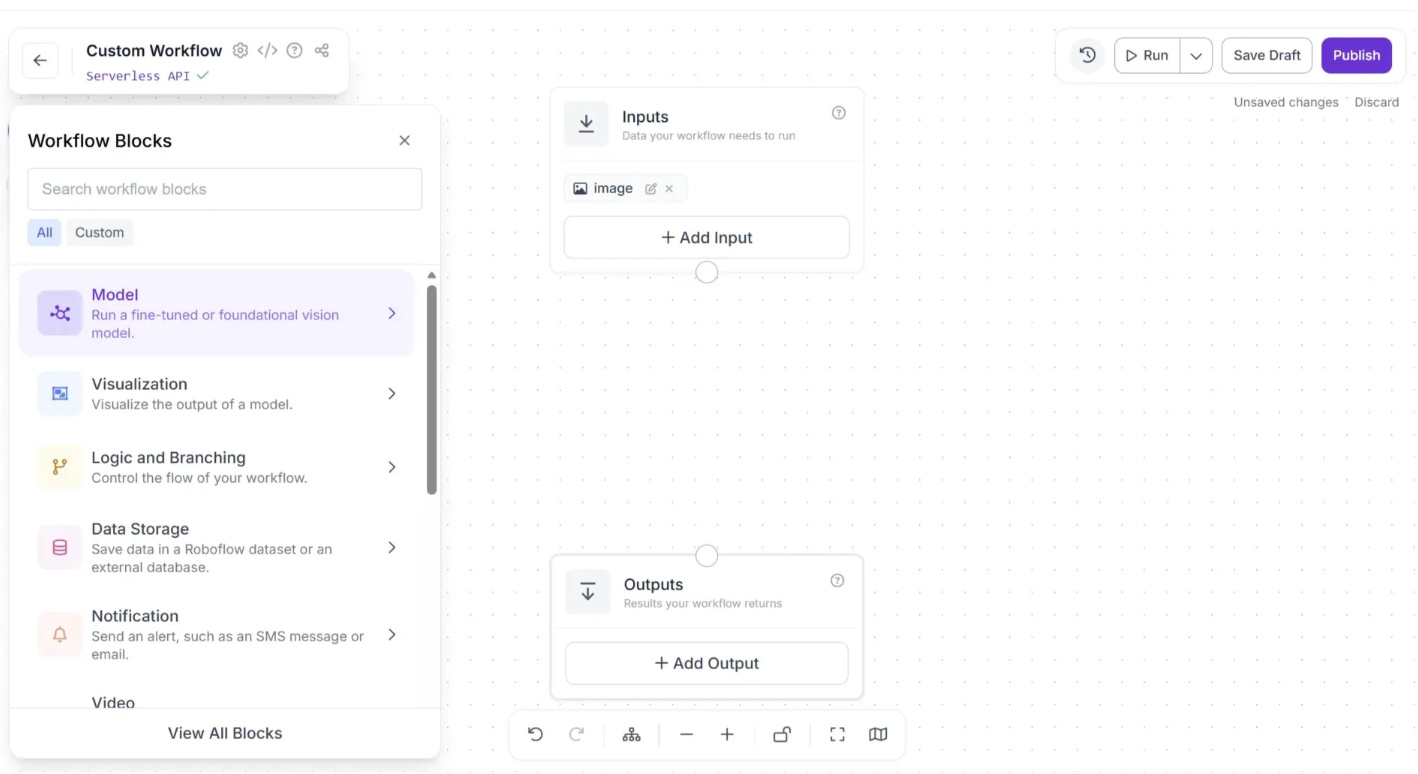
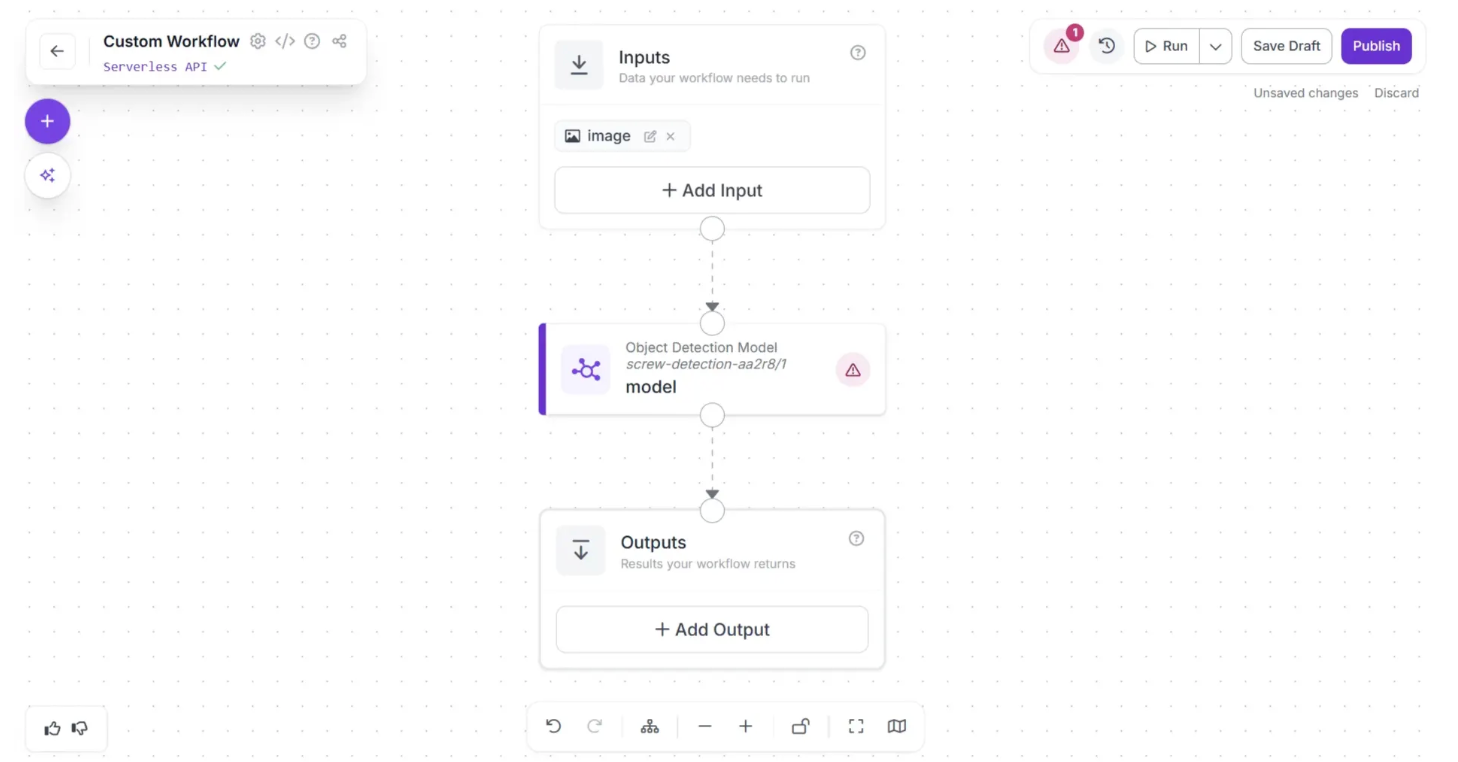
In order to use the trained model, you first need to add a Object Detection Model block to the workflow. To add this block, click the “+” button in the top-left corner of the workflow editor. A popup menu with workflow blocks will appear, as shown below. From there, click the “Model” option as shown below:
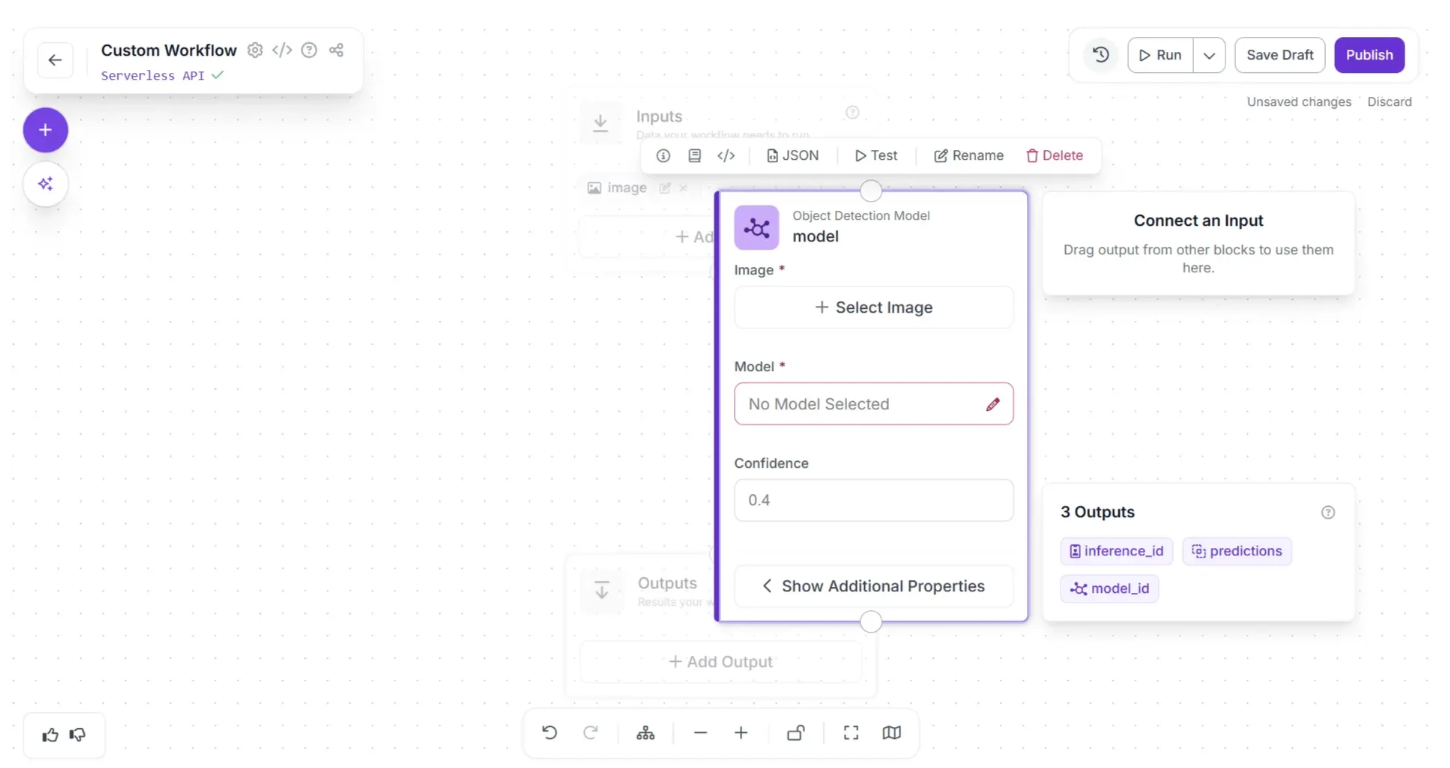
The Object Detection Model block should now appear on the workflow editor, as shown below. Click the pencil icon (✏️) in the block to open a popup where you can select the model to use in the workflow.
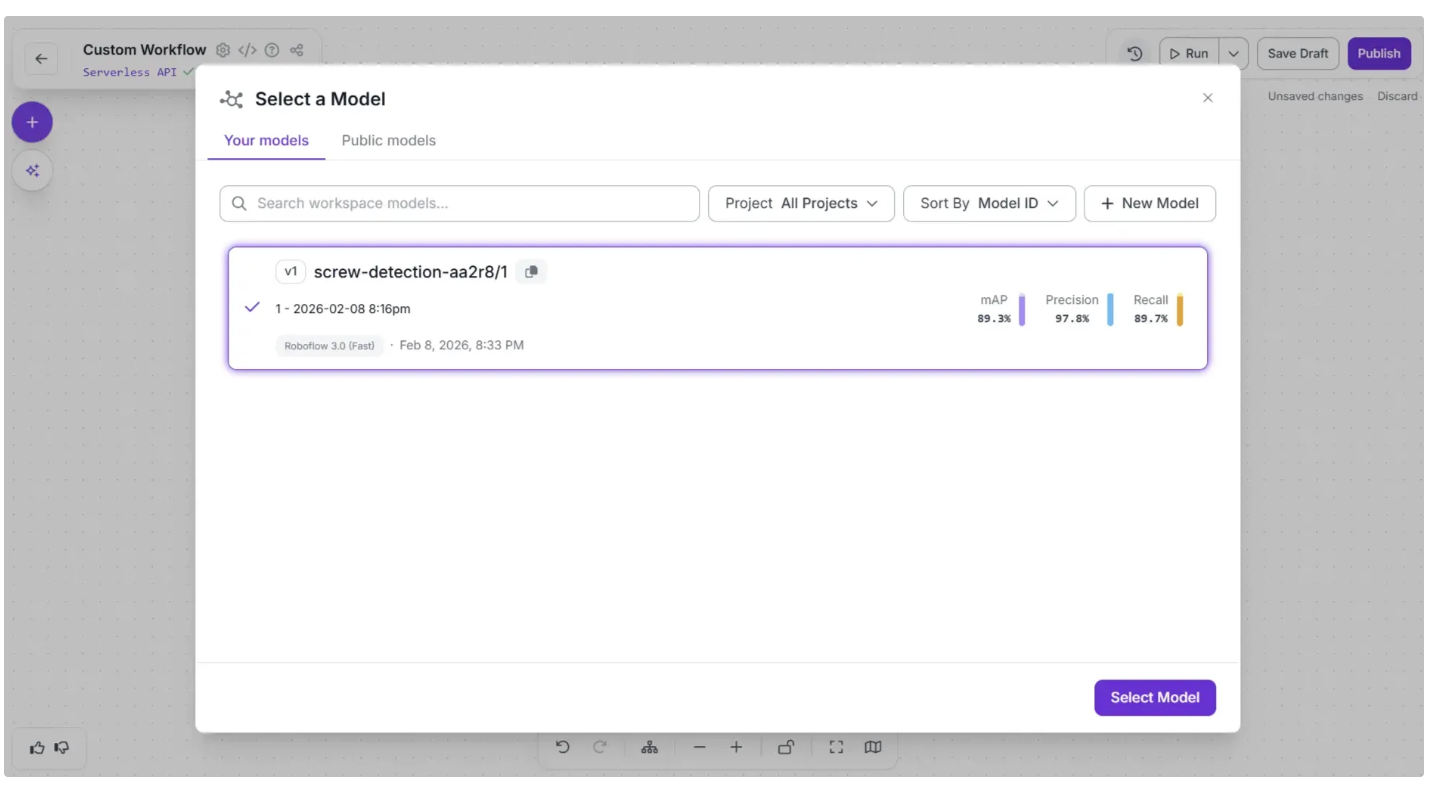
The popup for selecting a model should look similar to the image below. Under “Your models”, the screw detection model should be listed as an option. Select this model and click the “Select Model” button.
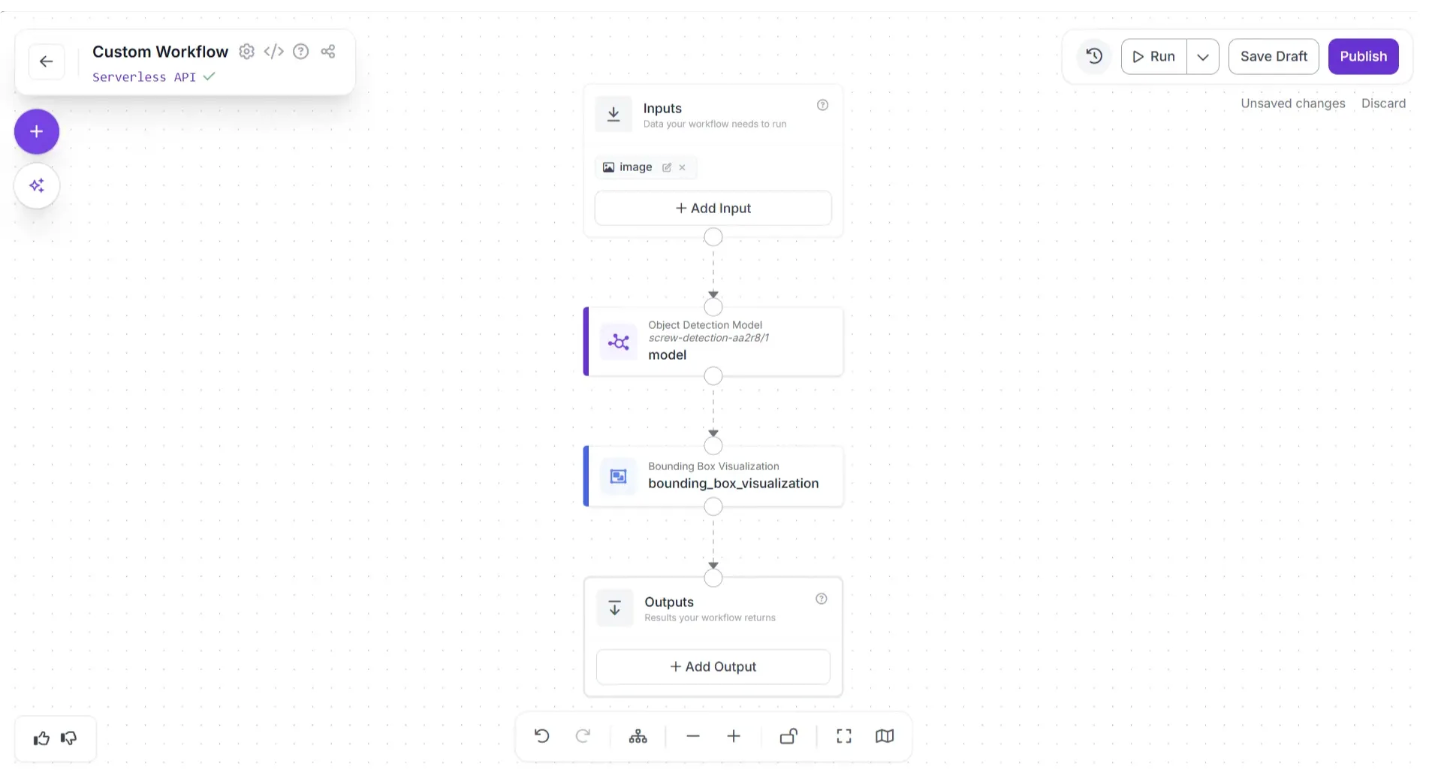
Now, create a connection from the Inputs block to the Object Detection Model block, and then from the Object Detection Model block to the Outputs block as shown below:
After making the connections, use the Auto Layout button, located to the left of the Zoom In and Zoom Out controls in the bottom menu, to automatically organize the workflow layout as shown below:
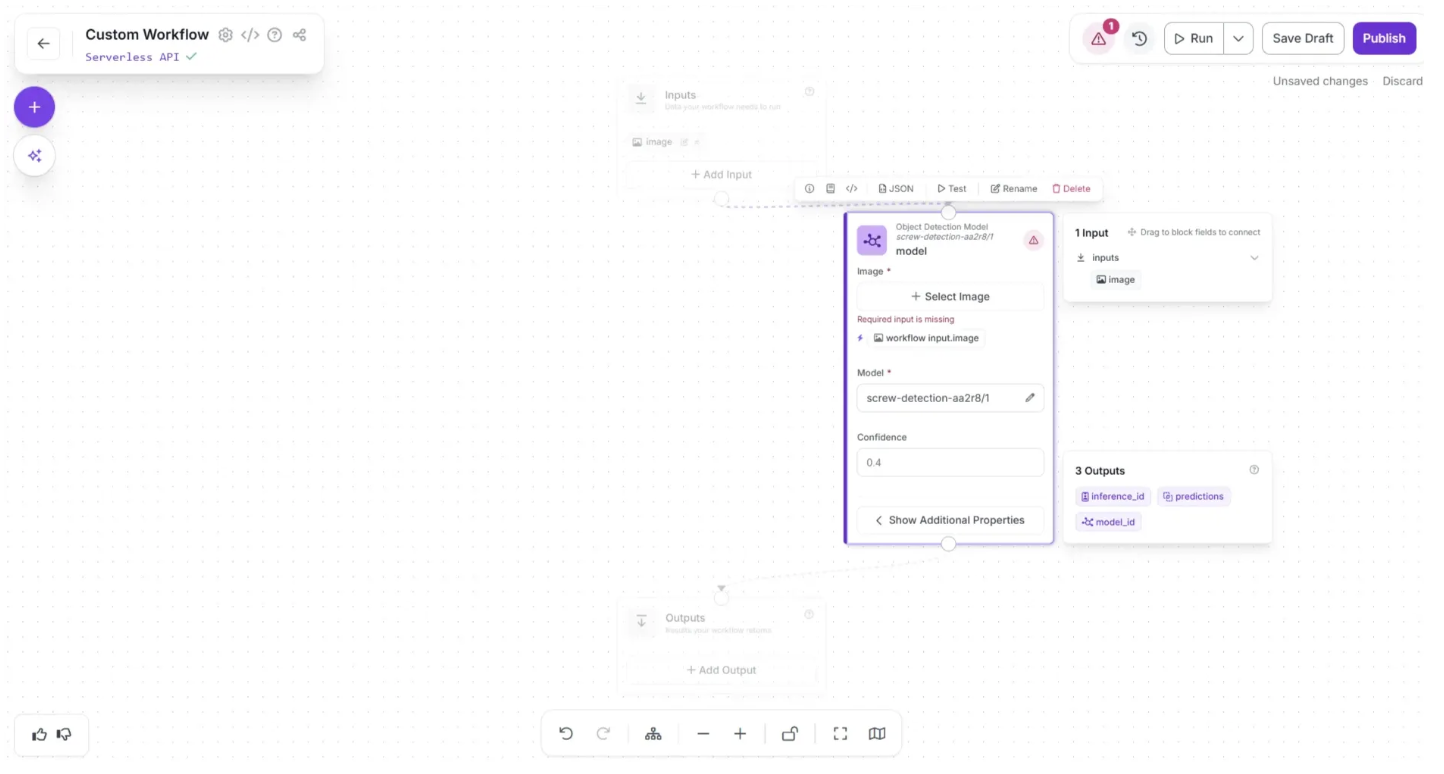
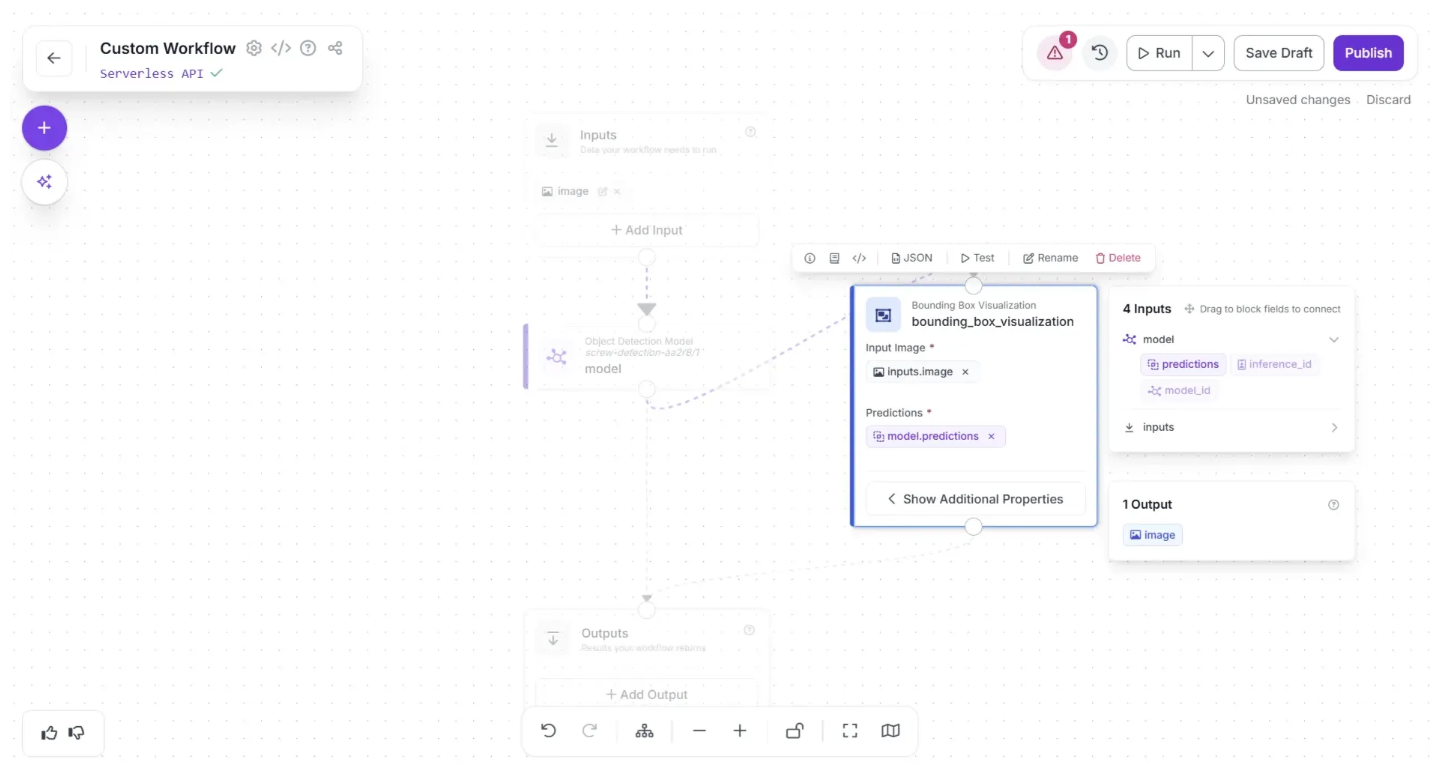
Now configure the Object Detection Model block to use the input image from the Inputs block as the model input. To do this, first click the Object Detection Model block to display its configurable options, then click the lightning (⚡) icon below the Image parameter, as shown below:
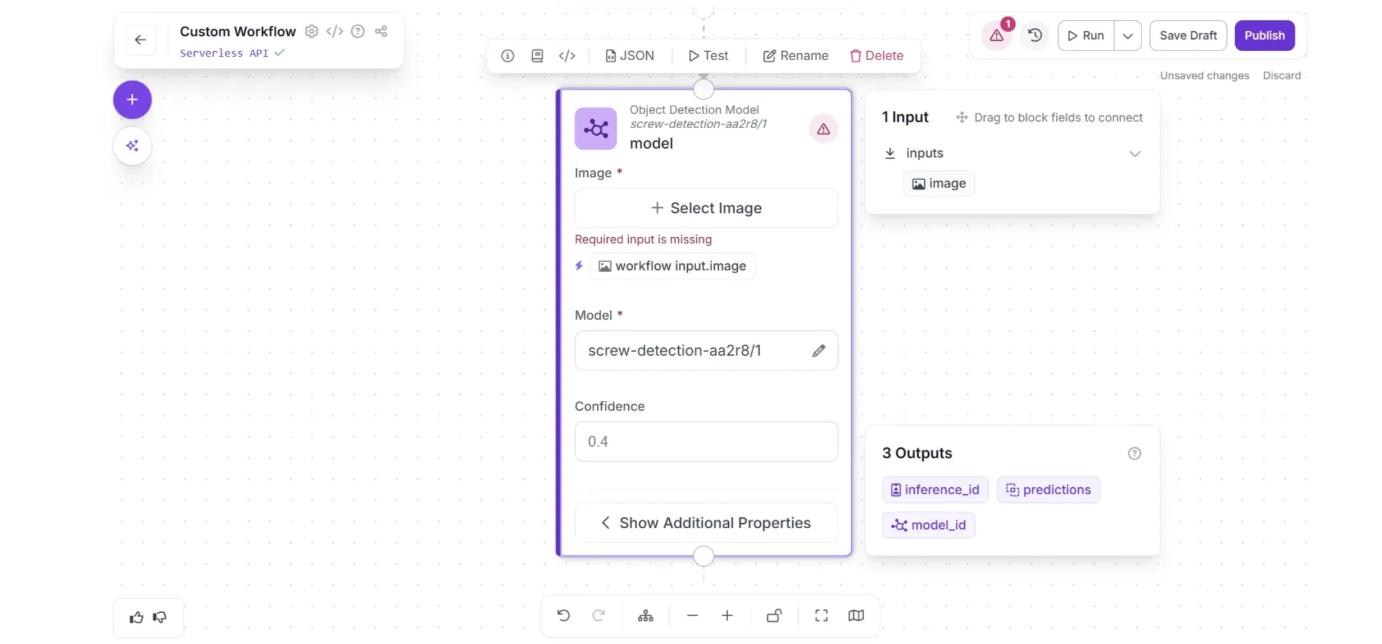
Once you do that, the model will use the input image for inference. It should appear as shown below, with the warning (⚠️) icon that indicated missing fields disappearing.

You can then extend your Workflow with different capabilities. Let's add a block that visualizes the results from the chosen model.
Click the “+” button in the top-left corner of the workflow editor. A popup menu with workflow blocks will appear, as shown below:
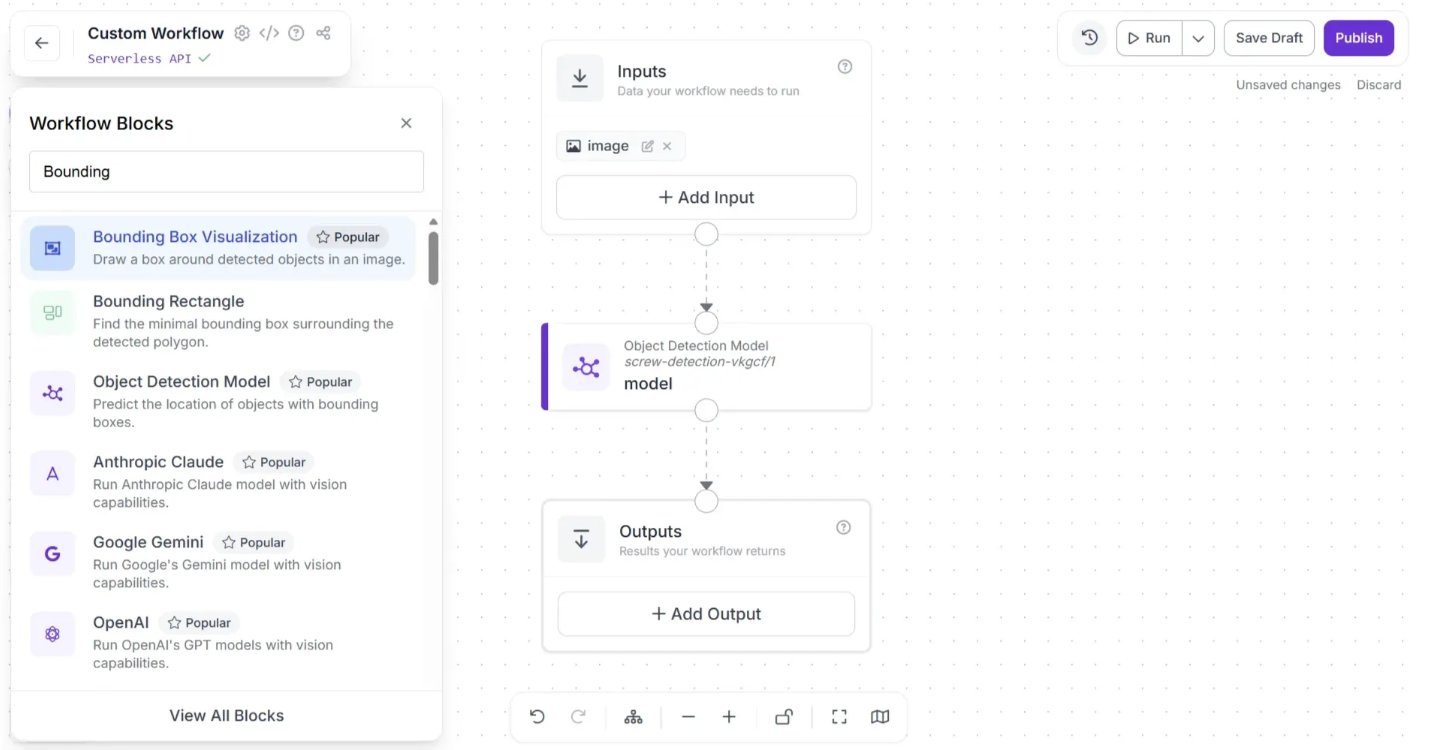
Choose “Bounding Box Visualization”; this will add it to the workflow editor. This block displays the results of an object detection model on the image passed through the workflow.
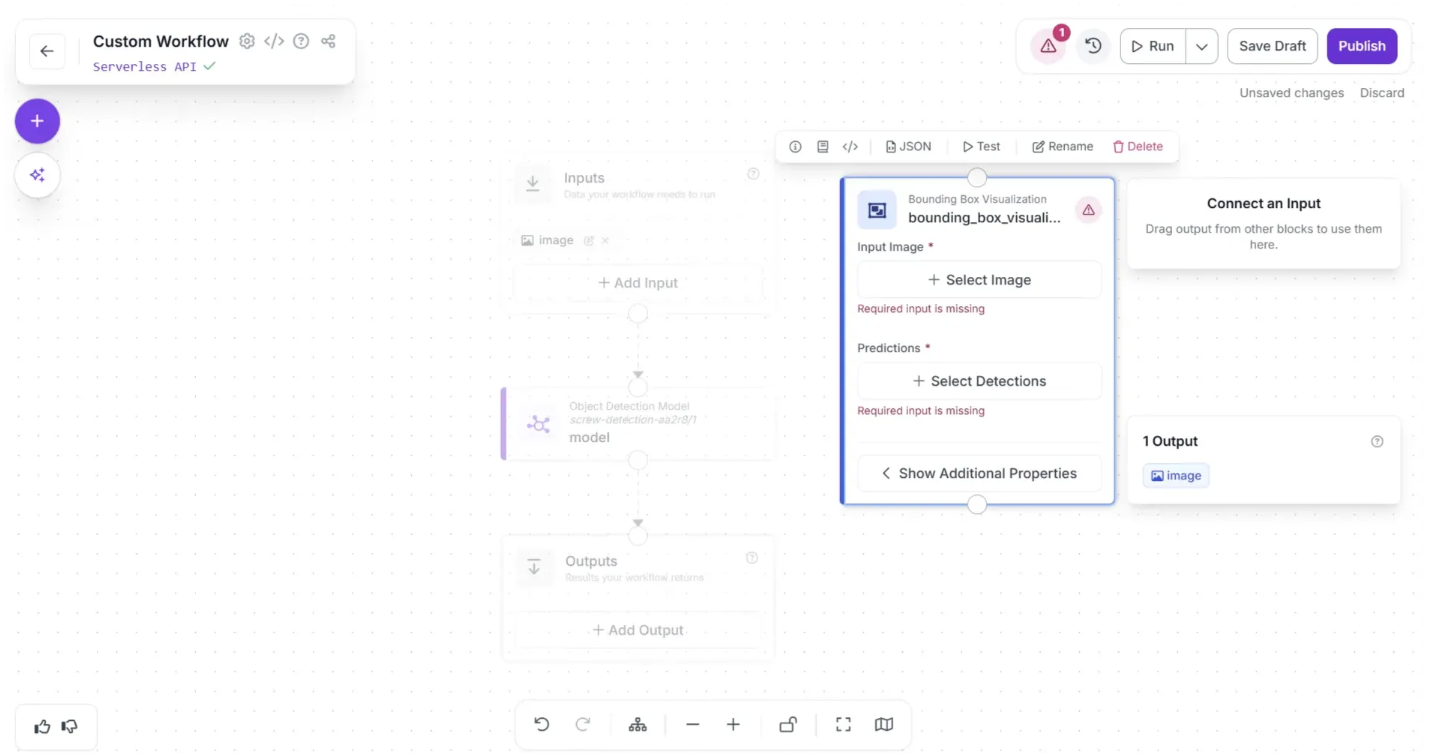
Now, create a connection from the Object Detection Model block to the Bounding Box Visualization block using the visual editor, and then connect the Bounding Box Visualization block to the Outputs block so that the visualization is returned in our workflow response.
You can remove the direct connection from the Object Detection Model block to the Outputs block by hovering over the connection and clicking the “×” icon.
After making the connections, click the Auto Layout. Your workflow should then look as shown below:
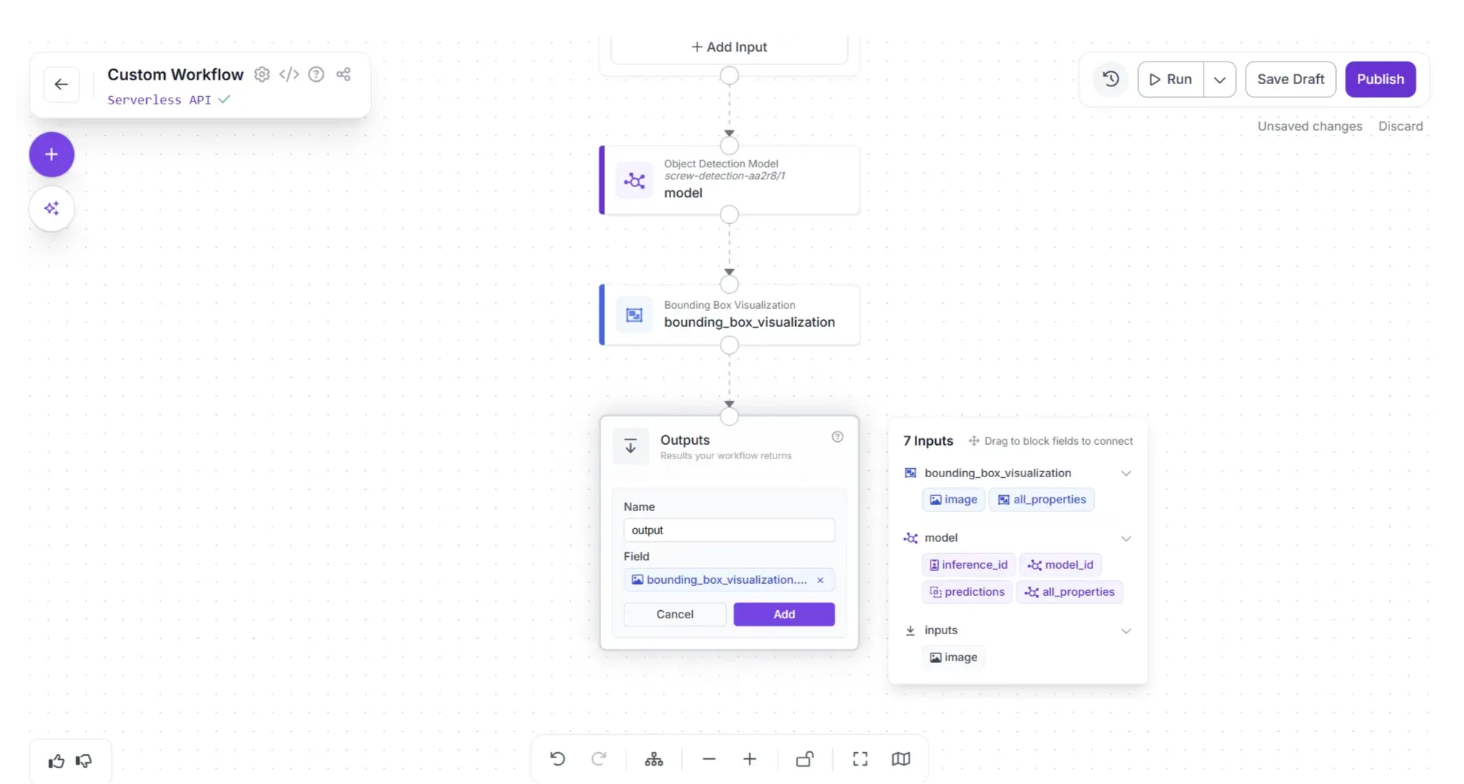
The Bounding Box Visualized image produced by the Bounding Box Visualization block serves as the final output of our workflow. To set this as the workflow output, we need to add it to the Outputs block.
Click on the Outputs block and enter ‘output’ in the Name field. In the Field section, drag and drop the ‘image’ under the ‘bounding_box_visualization’ section of the popup that appears when the Bounding Box Visualization block is clicked, then click Add, as shown below:
Once added, the workflow should appear like this:
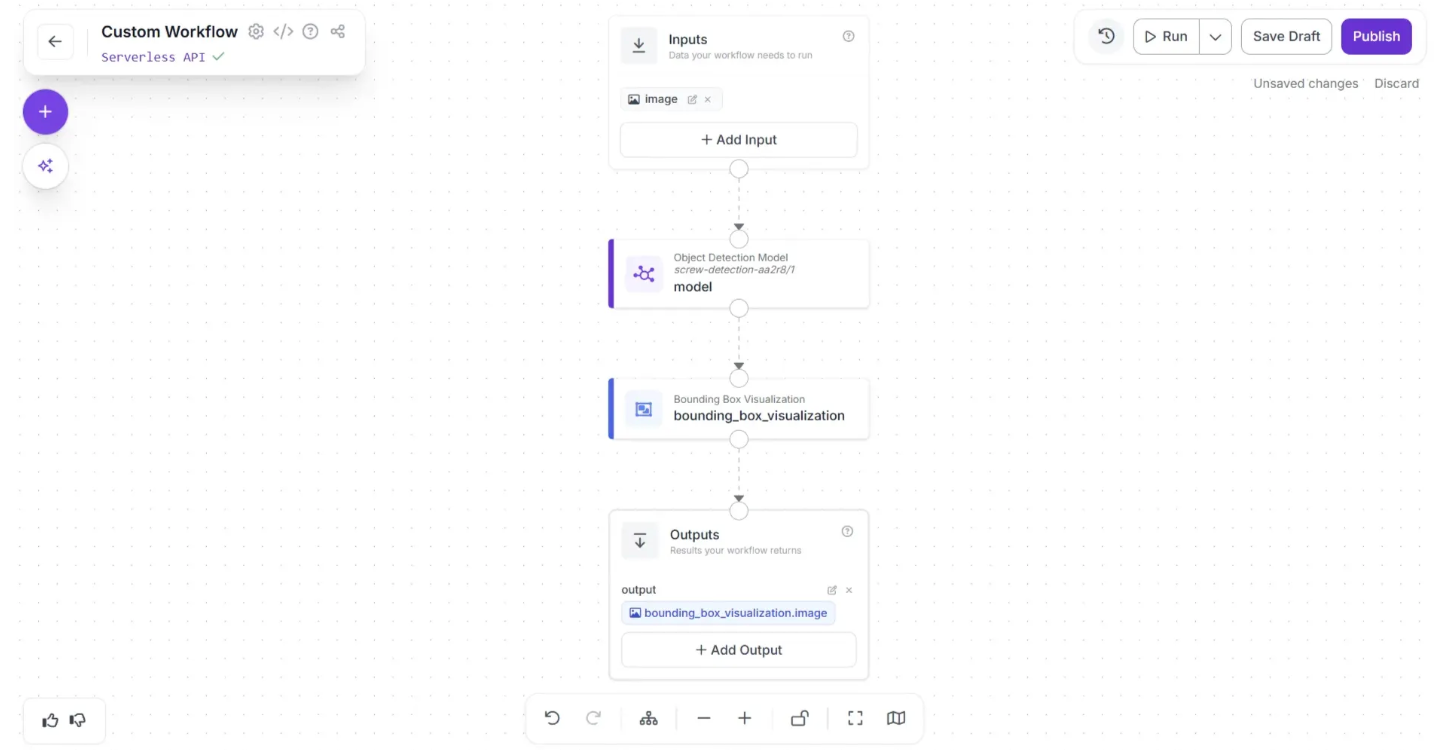
This is our completed workflow. We are now ready to run it.
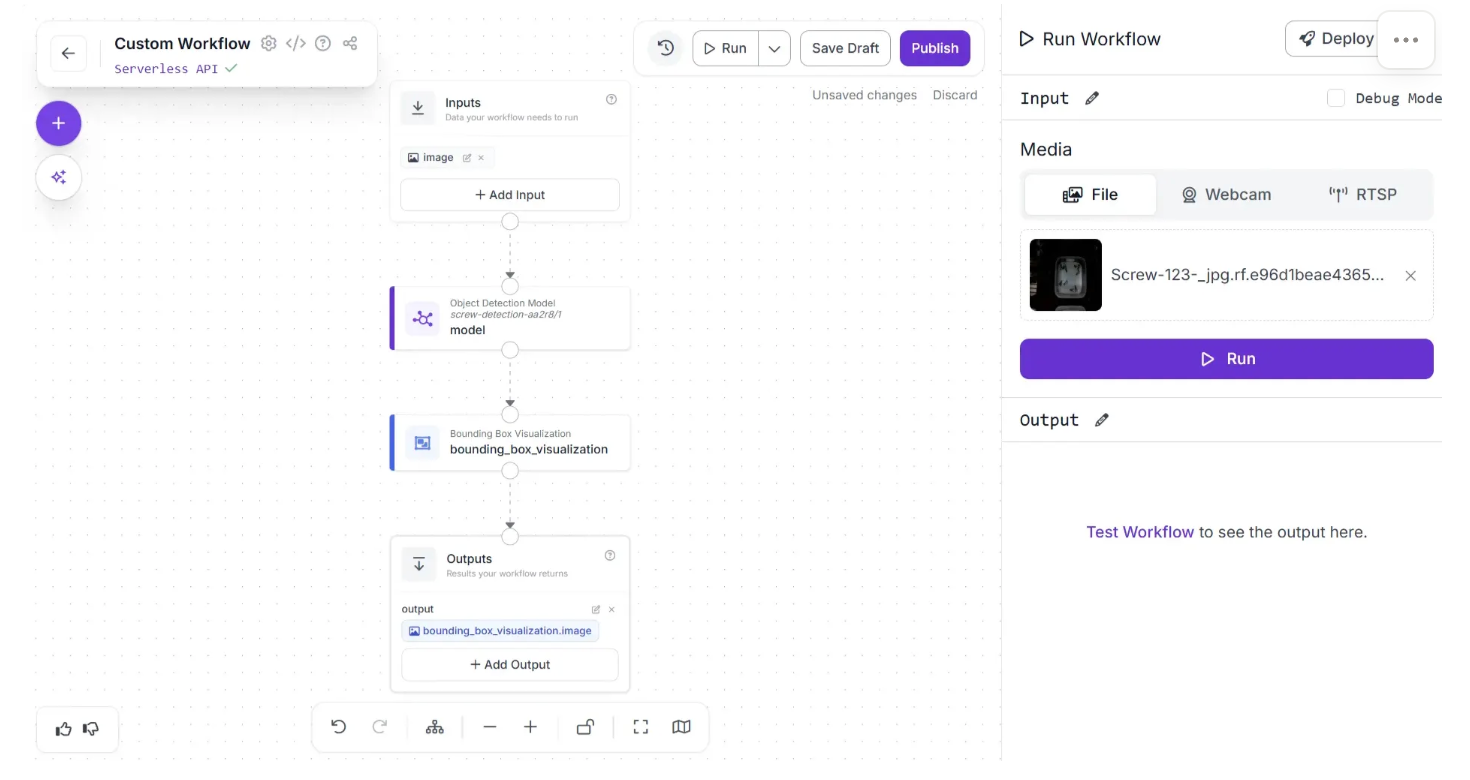
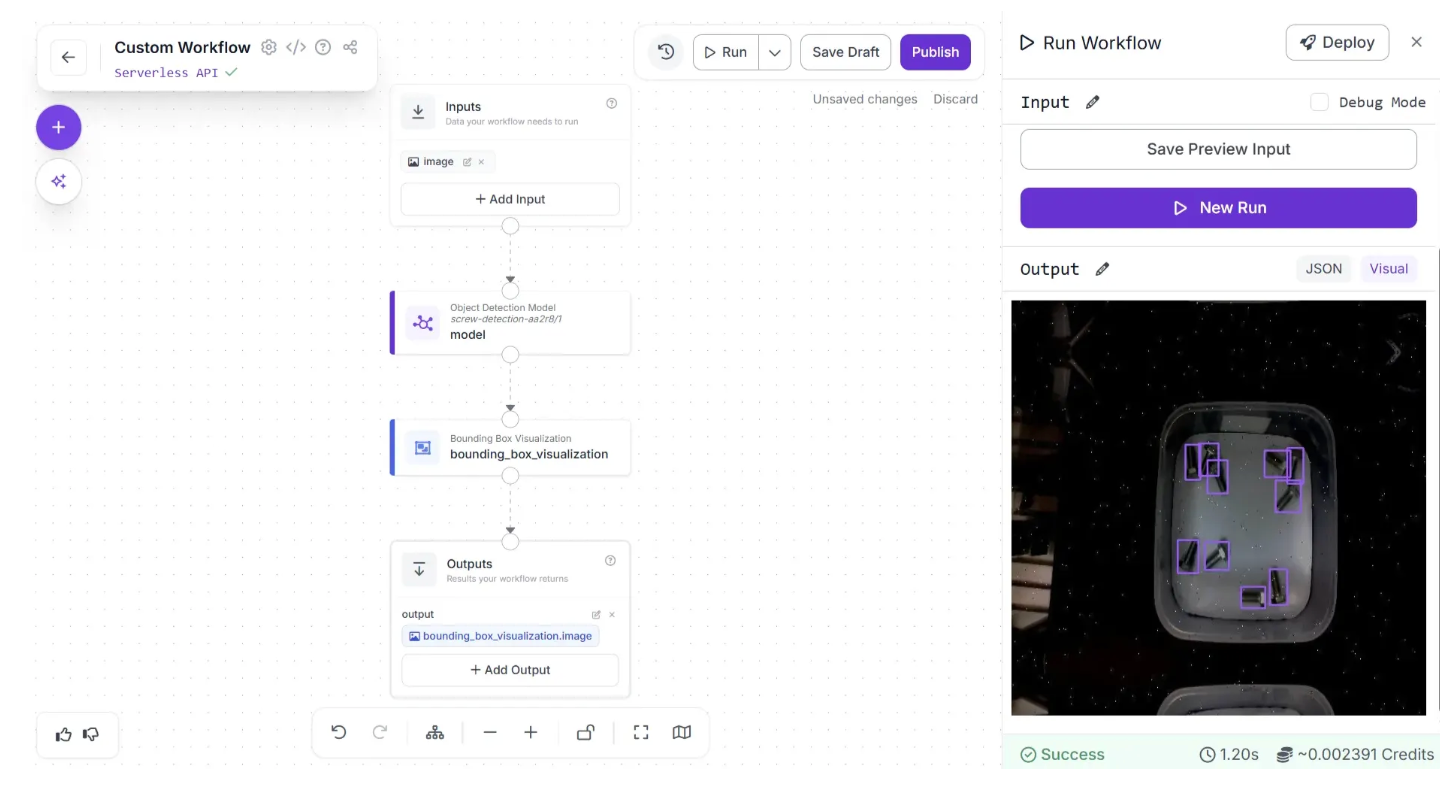
Click the "Run Preview" button to preview the Workflow in your web browser. Drag and drop the image you want to use in your Workflow:
Then, click "Run Preview". Our Workflow will return the predictions from our model visualized on the input image. Here is the visual output from our Workflow, retrieved by clicking "Show Visual":
Deploying Workflows
To learn how to deploy your Workflow, click "🚀 Deploy" button in the navigation bar. A window will then appear, providing instructions on how to deploy your workflow on images using the API, a local server, and other options.
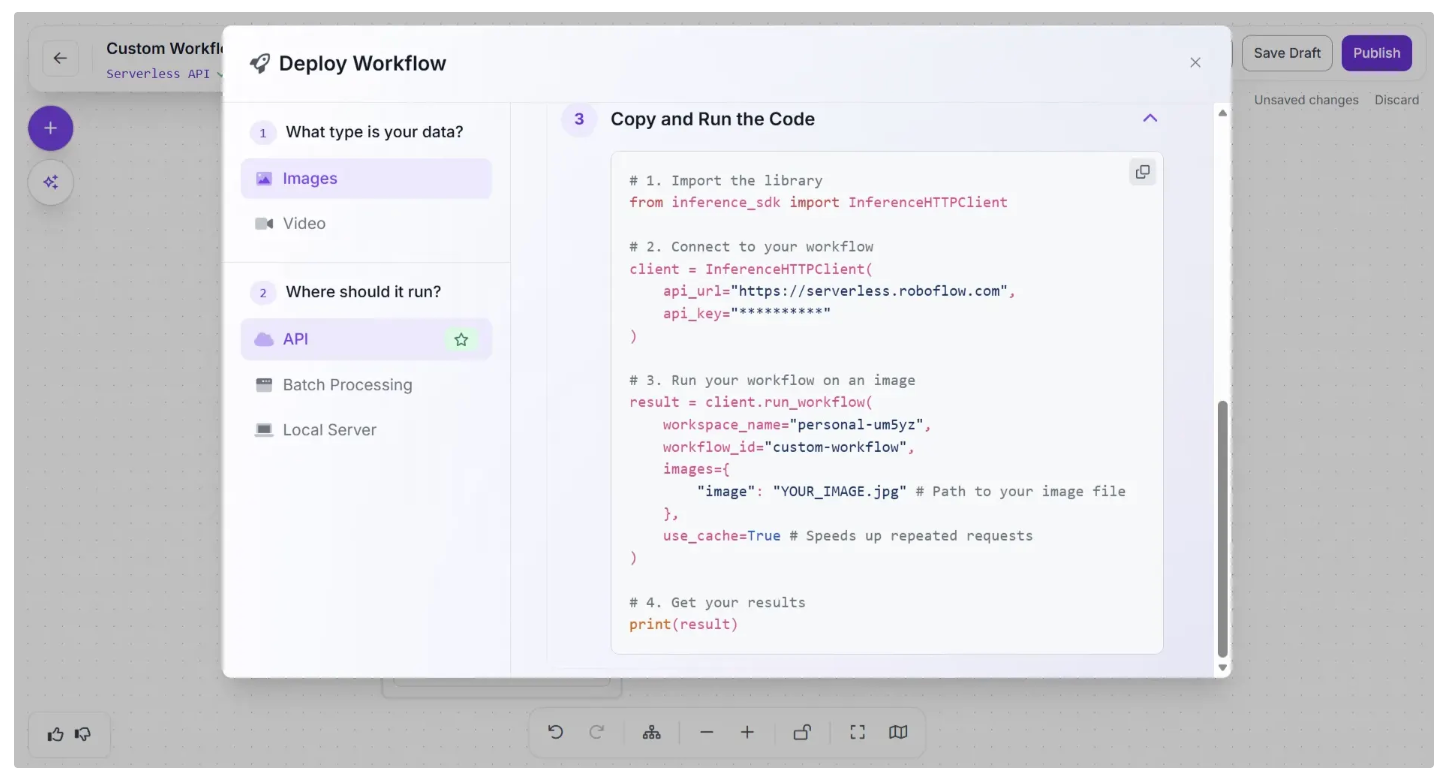
There are multiple options to deploy Workflows:
- Using API: Serverless API or Dedicated Deployment
- Batch Processing: the async, cost-effective way. Get's processed within 24 hours
- Self-hosting the Inference server yourself (on the edge, or "bring your own cloud" approach)
Deploying a Single Model Endpoint
Single model inferencing is similar to Workflows deployment, so you have multiple ways to run inference:
- Using our Hosted API: Serverless API or Dedicated Deployment
- On the edge, by self-hosting Inference server
If you're unsure of where might be best to deploy your model, we have a guide that lists a range of deployment methods and when they are useful that can be used to navigate that decision.
Deploy through Hosted API
Let's first deploy a model via the Serverless API (an Inference server hosted by Roboflow). For that, we'll install Inference SDK, which is a lightweight client wrapper that communicates with an Inference server, and OpenCV:
pip install inference-sdk opencv-pythonBefore running the code below, download this image, replace the "path/to/image" string, and replace the API Key string with your Roboflow's API Key (you can find it here after creating a free Roboflow account).
from inference_sdk import InferenceHTTPClient
import supervision as sv
import cv2
client = InferenceHTTPClient(
api_url="https://serverless.roboflow.com",
api_key="[MY_API_KEY]",
)
# load image with opencv
image = cv2.imread("path/to/image-1357.webp")
results = client.infer(image, model_id="screw-detection-whnpu/2")
print(results)
# Load raw results into supervision
dets = sv.Detections.from_inference(results)
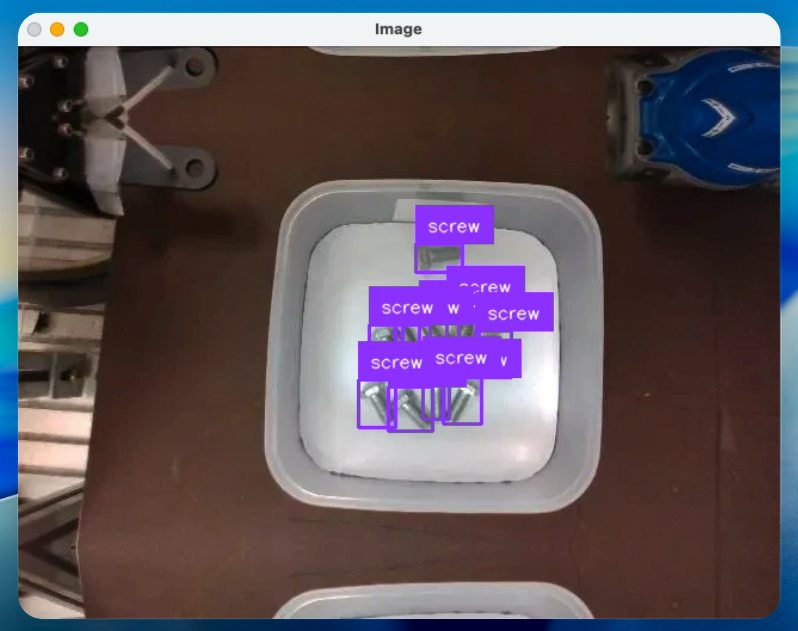
print(len(dets), "screws found on the image.")The code above should output this in the terminal:
10 screws found on the image.Inference visualization
To visualize annotated detections (bounding boxes, labels) we can use Supervision:
pip install supervisionWe can add Supervision annotation logic at the end:
from inference_sdk import InferenceHTTPClient
import supervision as sv
import cv2

client = InferenceHTTPClient(
    api_url="https://serverless.roboflow.com",
    api_key="[MY_API_KEY]",
)

# load image with opencv
image = cv2.imread("path/to/image-1357.webp")
results = client.infer(image, model_id="screw-detection-whnpu/2")

# Load raw detection results into supervision
dets = sv.Detections.from_inference(results)

# Create annotators
box_annotator = sv.BoxAnnotator()
label_annotator = sv.LabelAnnotator()

# Annotate and display the image
annotated_image = box_annotator.annotate(scene=image, detections=dets)
annotated_image = label_annotator.annotate(scene=annotated_image, detections=dets)
cv2.imshow("Image", annotated_image)
cv2.waitKey(0)
cv2.destroyAllWindows()
This will run inference on Serverless API and annotate the image with inference results:
On-Device Inference
You can also self-host the Inference server. The easiest way to do that is through inference-cli. First make sure you have Docker installed and running:
pip install inference-cli && inference server start --port 9001Inference server will run your model on CPU (supports x86/ARM), or GPU if NVIDIA GPU and is available and the NVIDIA Container runtime is installed (included with JetPack on Jetson devices). More information here.
The inference server start will start a Docker container with Inference Server (using GPU if available). Now we can replace the api_url when initializing the InferenceHTTPClient :
client = InferenceHTTPClient(
    api_url="http://localhost:9001", # use local inference server
    api_key="[MY_API_KEY]",
)
You can try replacing the api_url in the code we wrote above!
More information
With Inference, you can run models trained on or uploaded to Roboflow. This includes your own trained models, as well as any of the 250,000+ pre-trained vision models available on Roboflow Universe. You can also run foundation models like CLIP, SAM, and DocTR.
To learn more about using Inference to deploy models, refer to the Inference documentation.
For example, here is an example of a football player detection model where frames were processed on-device with Inference:
Regardless of your deployment method, we suggest taking a data-centric approach to improving your model over time by using active learning.
The benefit of using Roboflow Train and Roboflow Deploy is that we make it easy for you to test deployment options, change deployment options, or use multiple deployment options in your application.
As always, reference our Documentation or Community Forum if you have feedback, suggestions, or questions.
We’re excited to see what you build with Roboflow!
Cite this Post
Use the following entry to cite this post in your research:
Brad Dwyer, James Gallagher. (Jan 1, 2026). Getting Started with Roboflow. Roboflow Blog: https://blog.roboflow.com/getting-started-with-roboflow/