
Roboflow Instant is a free, quick-to-train, few-shot model that requires as few as a half-dozen labelled images to produce an accurate object detection model. Instant models can be deployed in production with Roboflow Workflows, with Roboflow Inference, via a serverless API, and used as an AI-based labeling assistant in Roboflow Annotate.
With Instant, you can deploy a model within minutes and it does not consume or require training credits. Instant models are free to train – you can experiment with Instant without thinking about cost.
Here is an example of an Instant model trained with three images that detects defects in metal:
With only three images, the model has already started to learn the location of the scratch; with a dozen more images, performance would substantially improve.
Roboflow Instant is available for object detection projects on Roboflow.
In this guide, we are going to walk through how to train and deploy an Instant model.
Let’s get started!
Curious to see how you can build a computer vision application in 10 minutes with Instant? Check out our demo where a member of the Roboflow team created an AI-powered self-service checkout application live in around 10 minutes.
Train an Instant Model
To train an Instant model, you first need to label images. You can train an Instant model for any new or existing Roboflow project.
To learn how to annotate data in our platform, refer to our Roboflow Annotate documentation.
Automatically Train an Instant Model
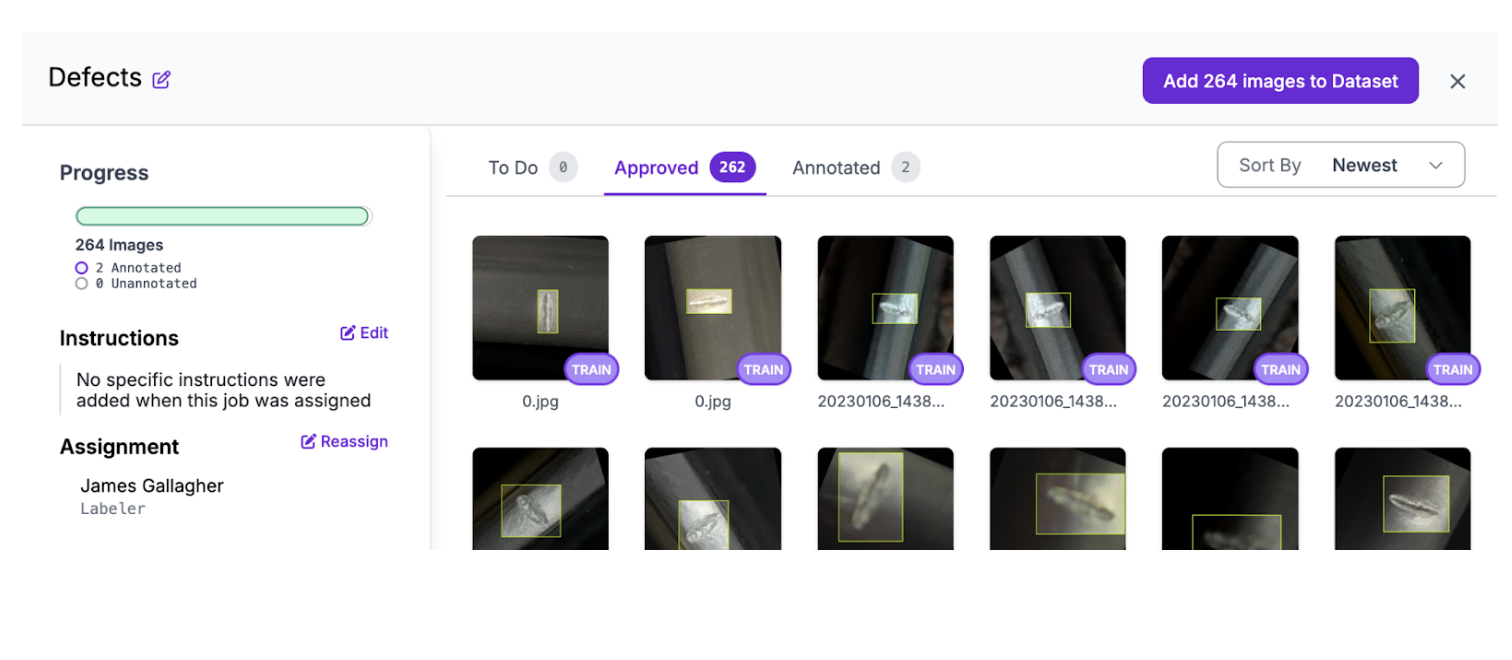
Roboflow Instant models automatically train when you add a batch of annotated images to your dataset. Go to any job in the Annotating column of your dataset, approve annotations that you want to use in your Instant model, then click “Add to Dataset”:
Manually Train an Instant Model
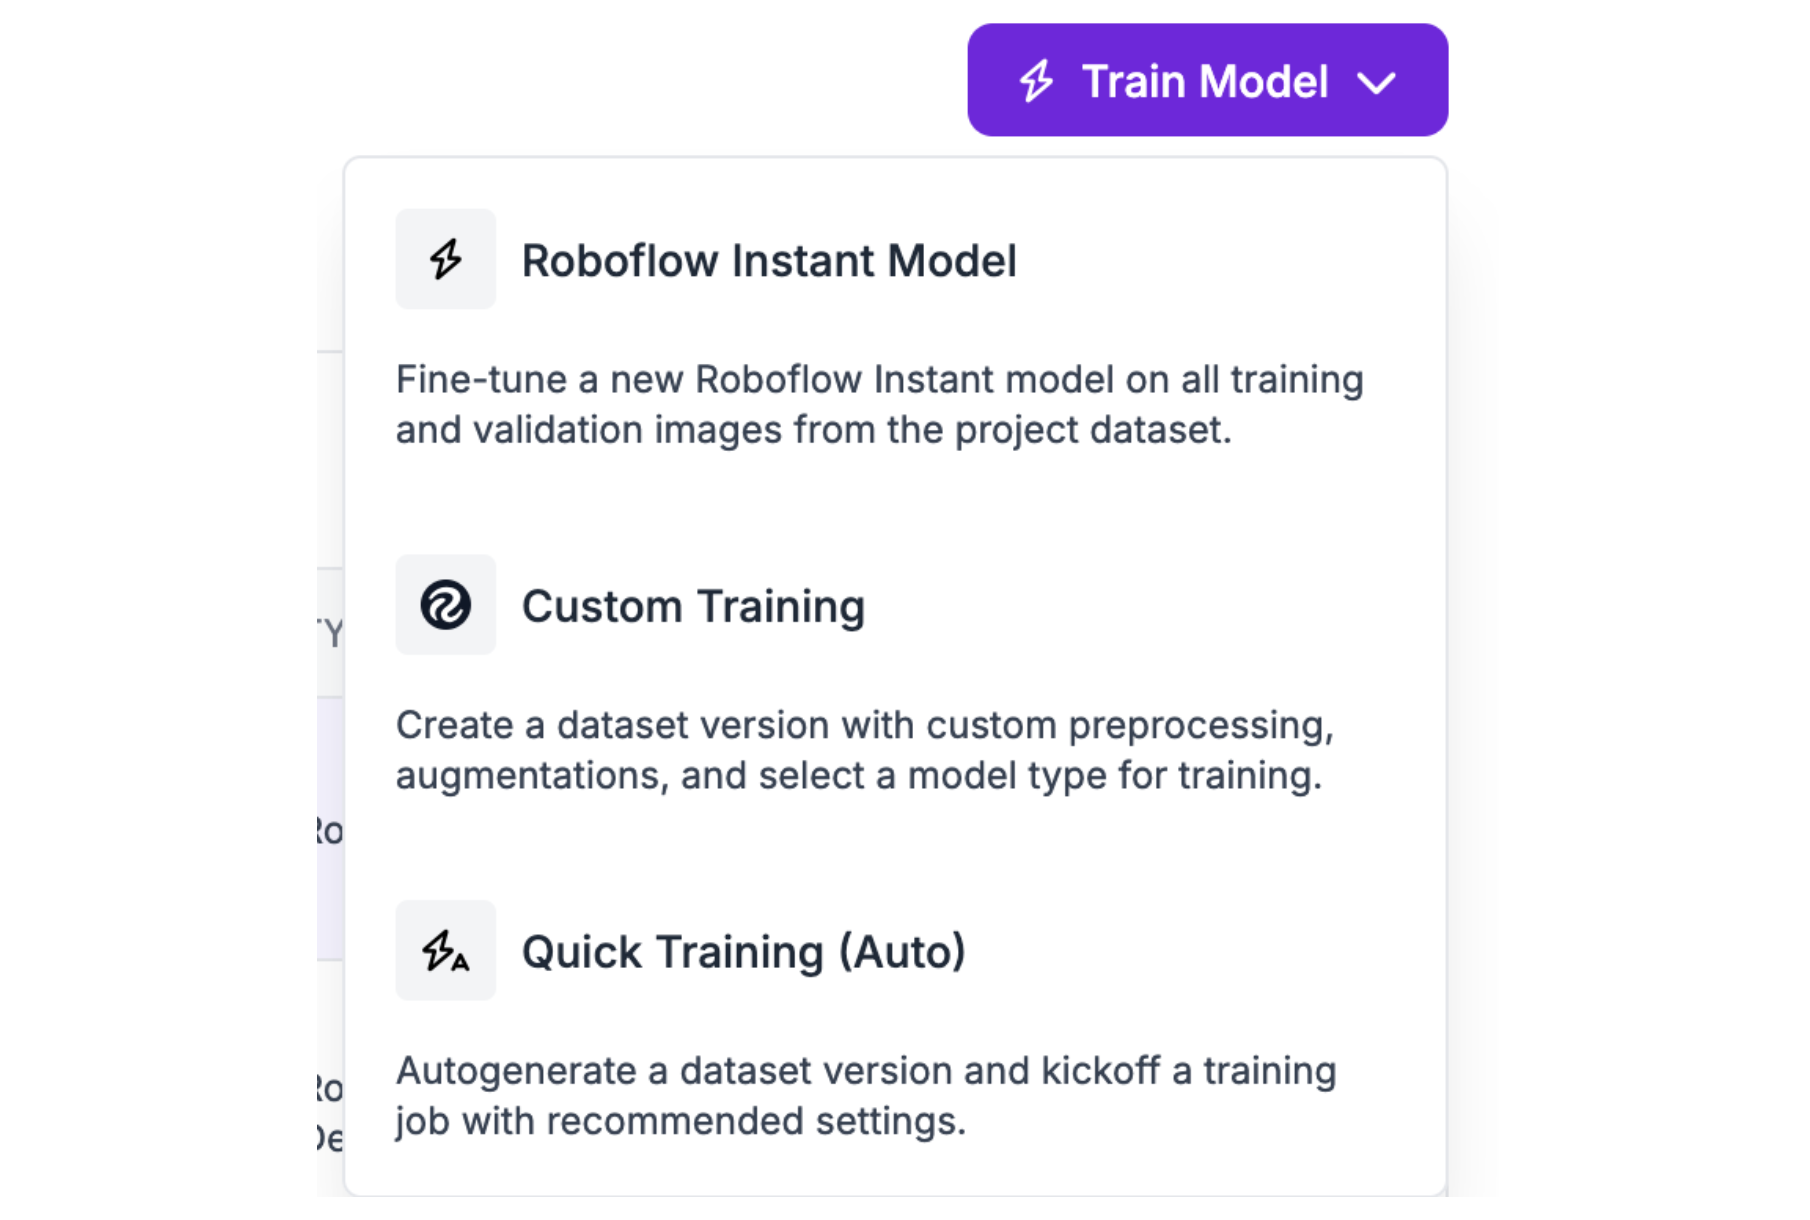
You can also manually train an Instant model by clicking the “Train Model” button on your Models page. The Models page is accessible by clicking Models in the left sidebar of your Roboflow project.
In the dropdown that shows training options, click “Roboflow Instant Model”:
You will then be asked to confirm that you want to start the training job, after which point Instant training will begin. You can train an Instant model with one or more images. We recommend labeling 10 or so images before training your first Instant model.
Test an Instant Model
All Instant models trained with your dataset will be listed on your dataset Models page. Here is an example of an Instant model:

The version of the Instant model will appear after the words “Roboflow Instant”. This refers to the number of Instant models you have trained using data from your project. Every time you approve images or manually train a new Instant model, this number will go up.
All previous Instant models will still be available as you train new Instant models.
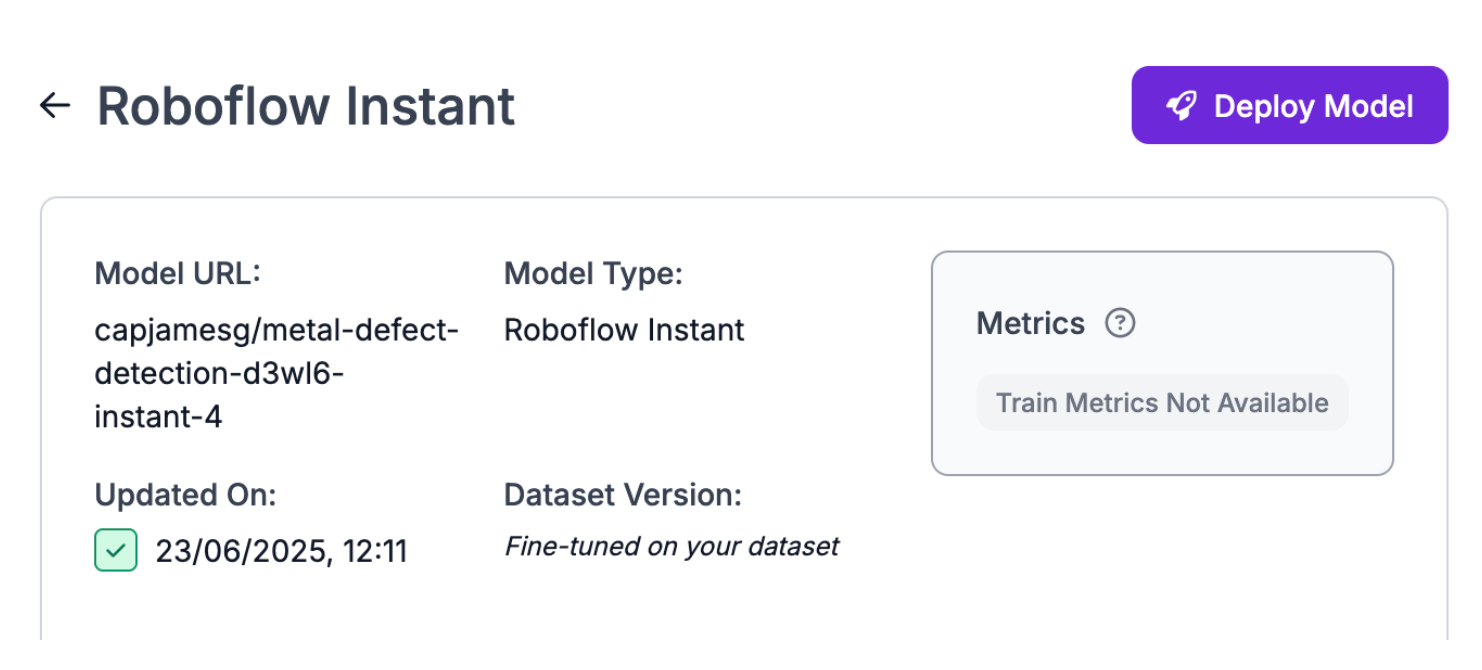
You can click on the Instant model row to find out more about and test the model.
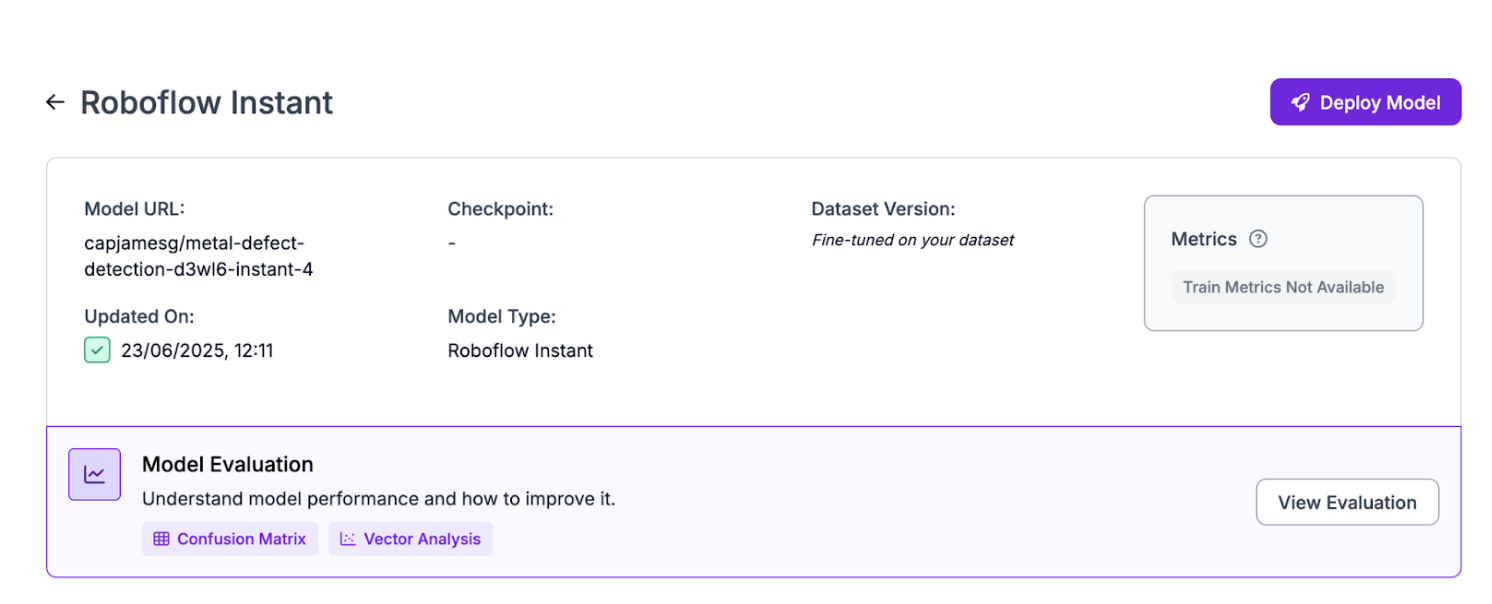
On your Instant model page, you can see your model ID, the status of the model evaluation job that will let you see how your Instant model performs on your dataset, and a place where you can preview images on your dataset.
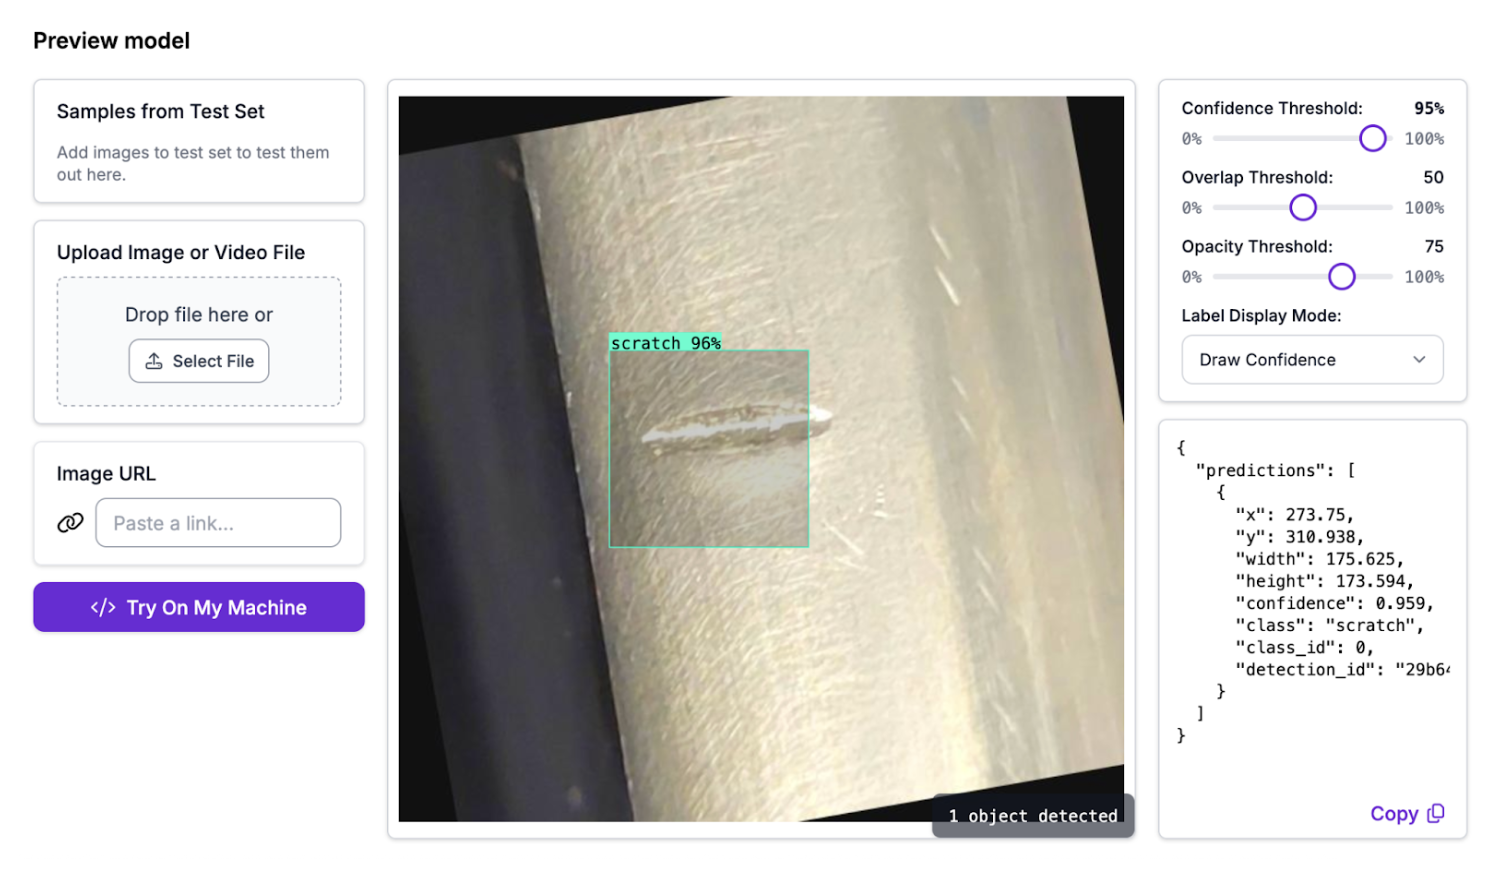
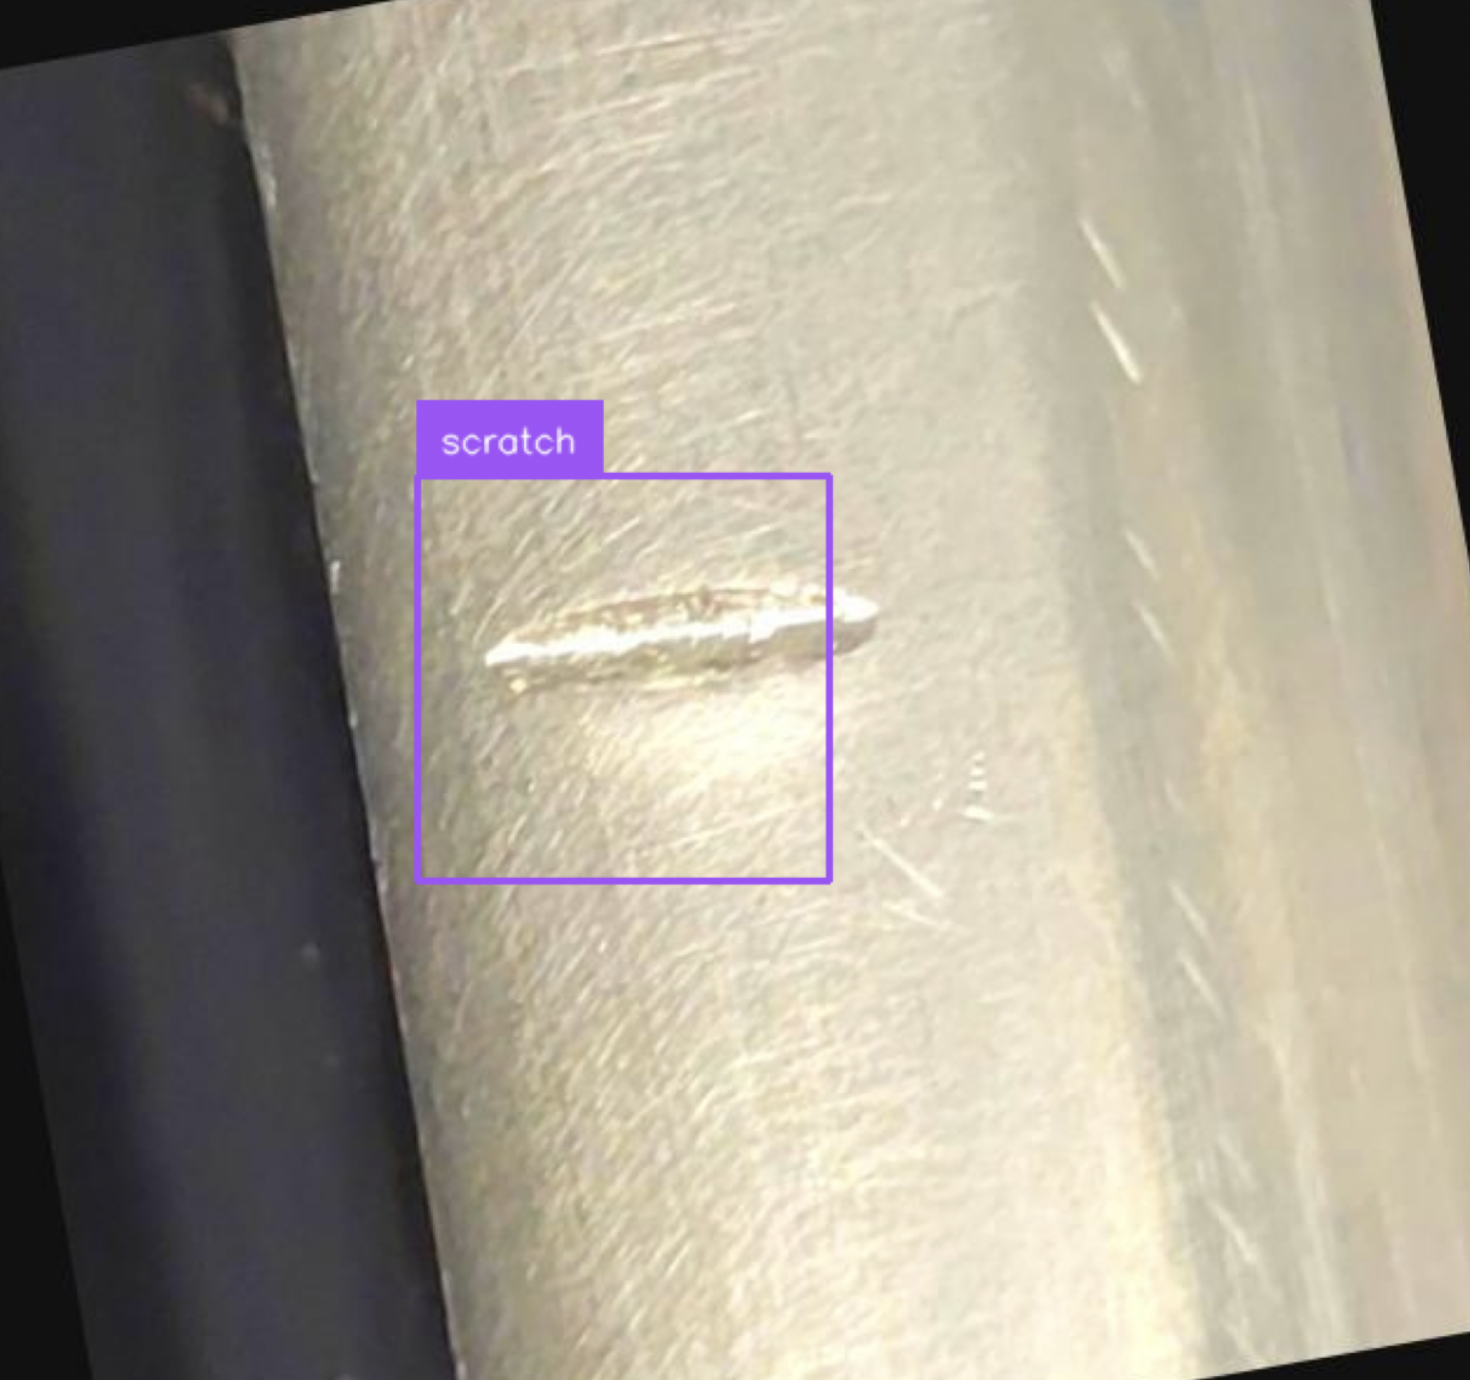
Here is an example showing our Instant model identifying a defect in a piece of metal:

The model successfully identified a scratch.
Evaluate an Instant Model
Roboflow automatically computes model evaluations for Instant models. Model evaluations let you see how your model performs using your validation dataset.
Your Instant evaluation will be available from the “Model Evaluation” section on your Instant model page:

After your model has trained, the evaluation will start computing. The amount of time it will take for your model evaluation to be ready will vary depending on the number of images in your dataset.
When your evaluation is ready, the “View Evaluation” button will show up. Click the button to see your model evaluation.
Model evaluations have two parts: confusion matrices and vector analysis. Confusion matrices let you identify correct and incorrect predictions, whereas vector analysis lets you identify clusters of images that correlate with strong or poor performance.
To learn more about model evaluations, refer to the Roboflow model evaluation documentation.
Here is an example of a confusion matrix from a model evaluation:
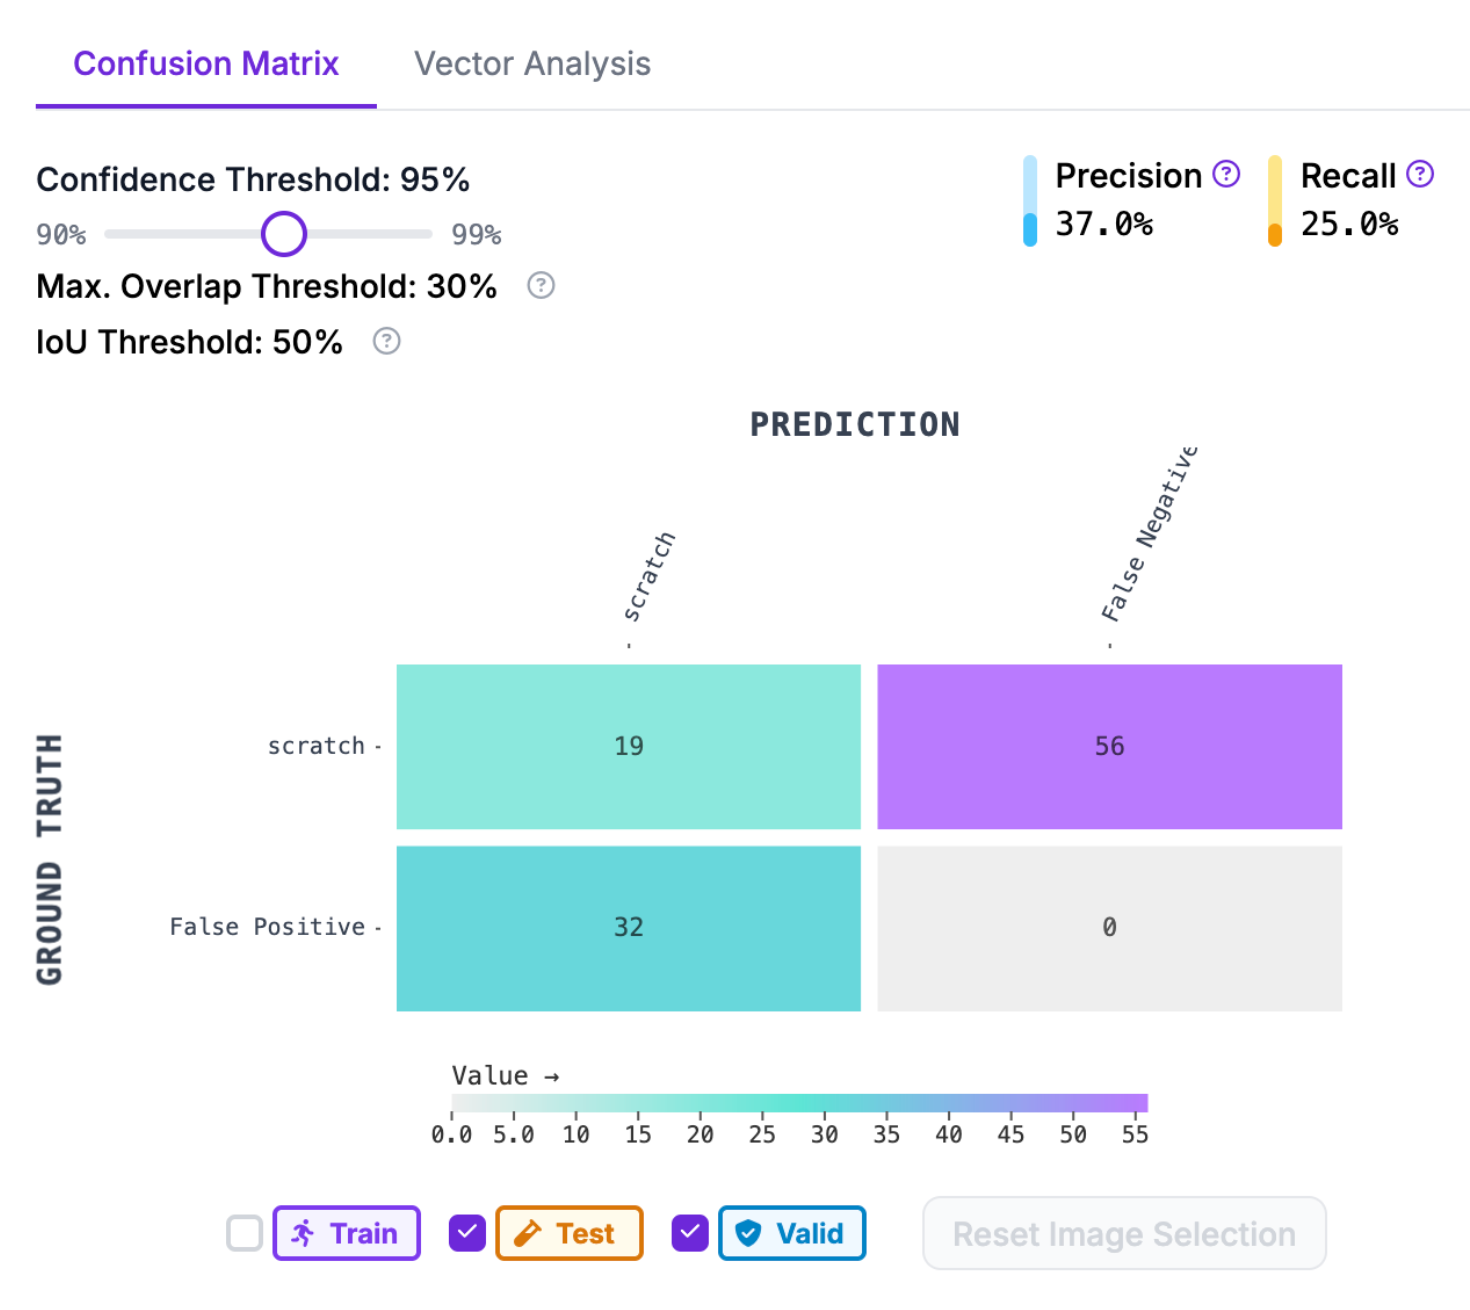
We can see that our model has a 37% precision and 25% recall score. For a model whose training run took only a few minutes, this is good enough for use in testing.
For production use cases, we recommend training a fine-tuned model like RF-DETR or Roboflow 3.0 where you can attain significantly higher accuracy.
Use Instant Models as a Label Assistant
You can use Instant models to label data with Label Assist. This means you can use predictions from an Instant model to automatically label images in your dataset. This can help speed up your labeling process by reducing the number of bounding boxes you need to draw manually.
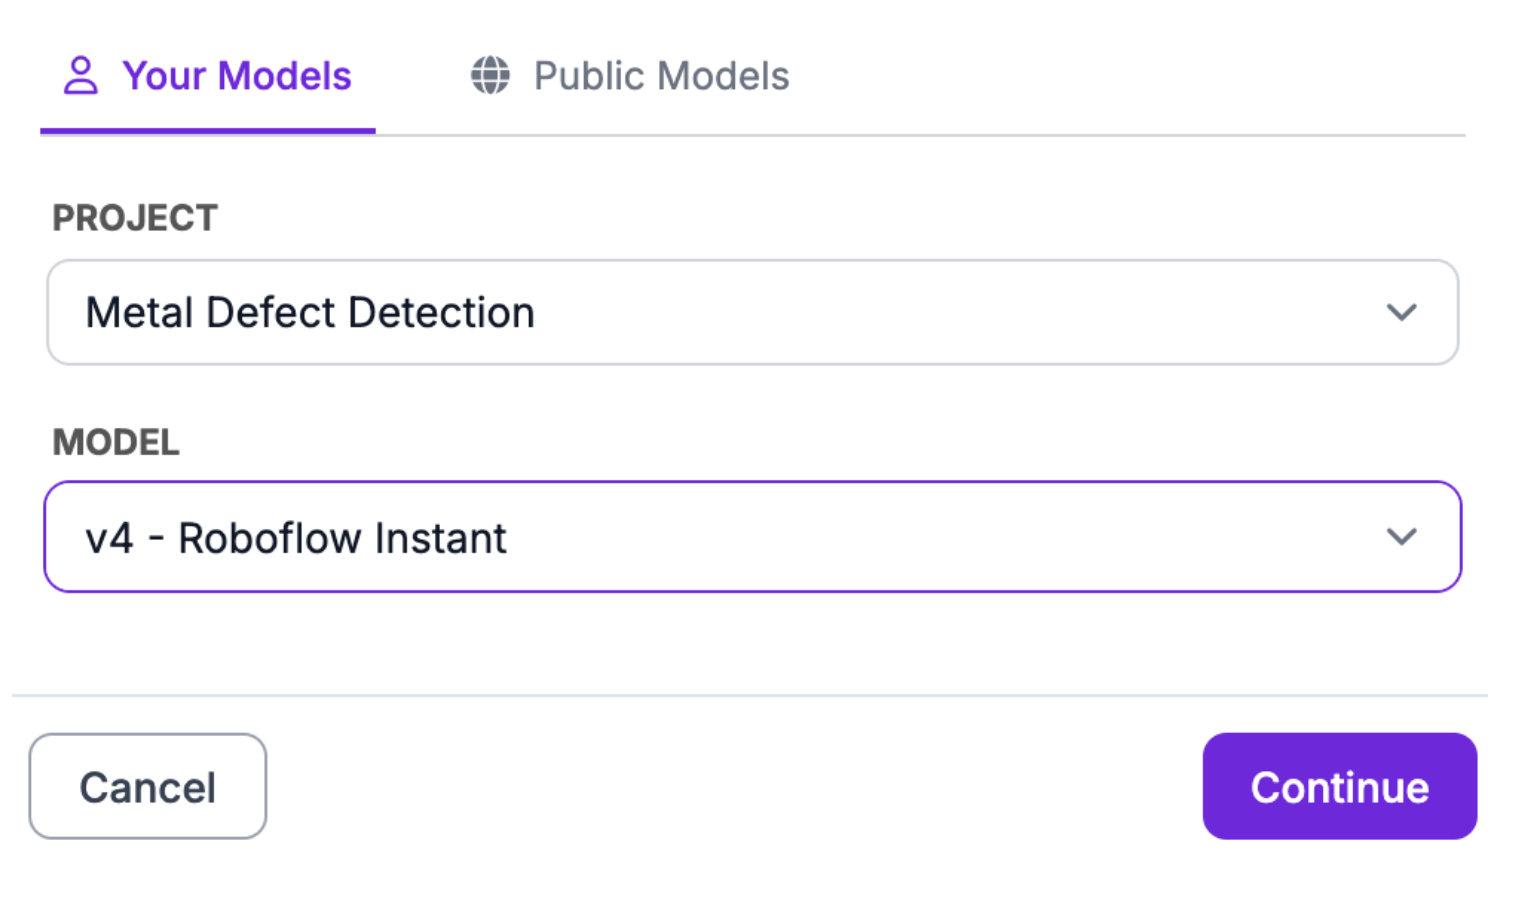
To use an Instant model in Label Assist, open Roboflow Annotate, then click the Label Assist option in the right task tray:
Then, select your Roboflow Instant model:
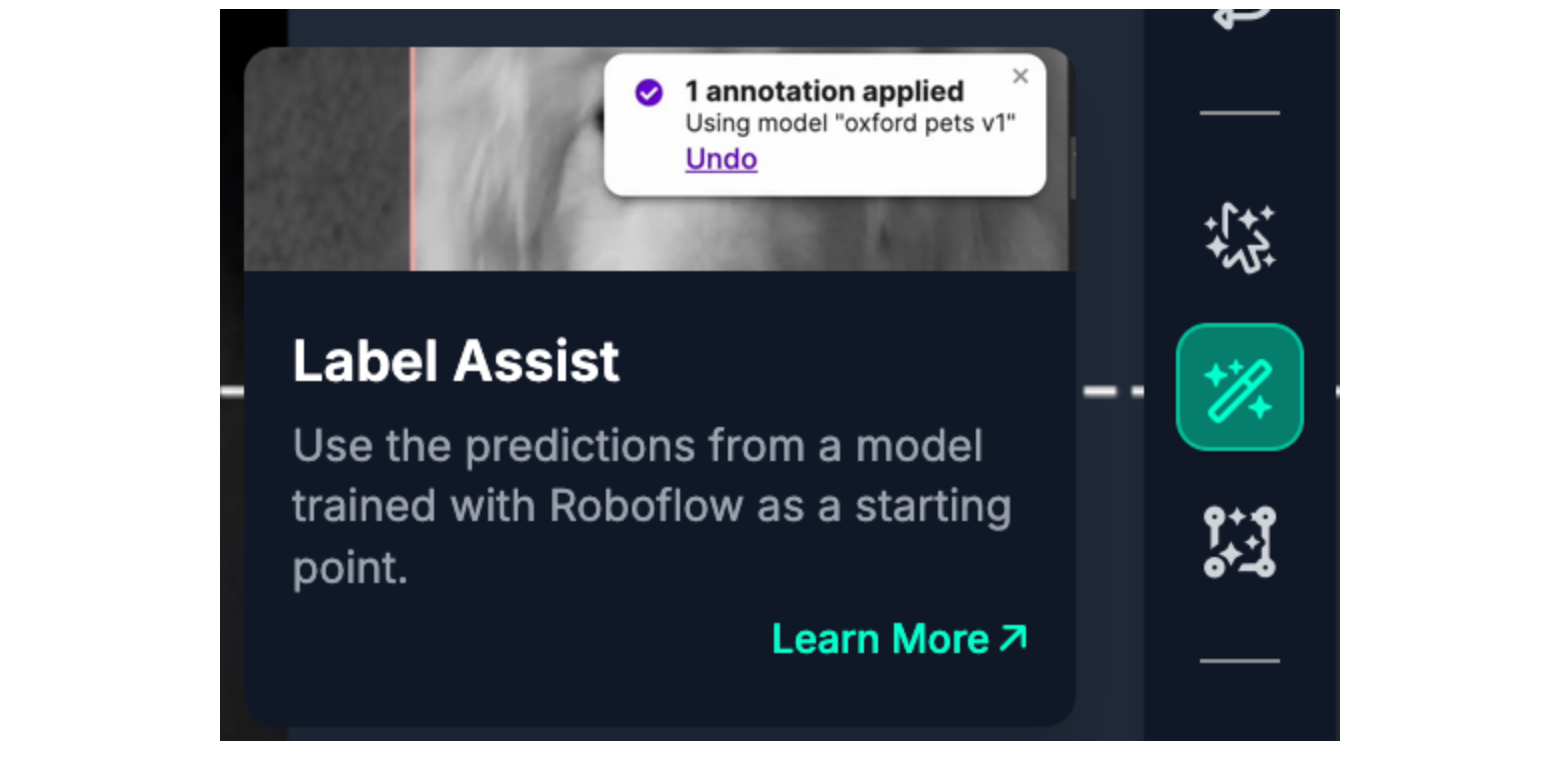
Then, click “Let’s Annotate” to start labeling with Label Assist:
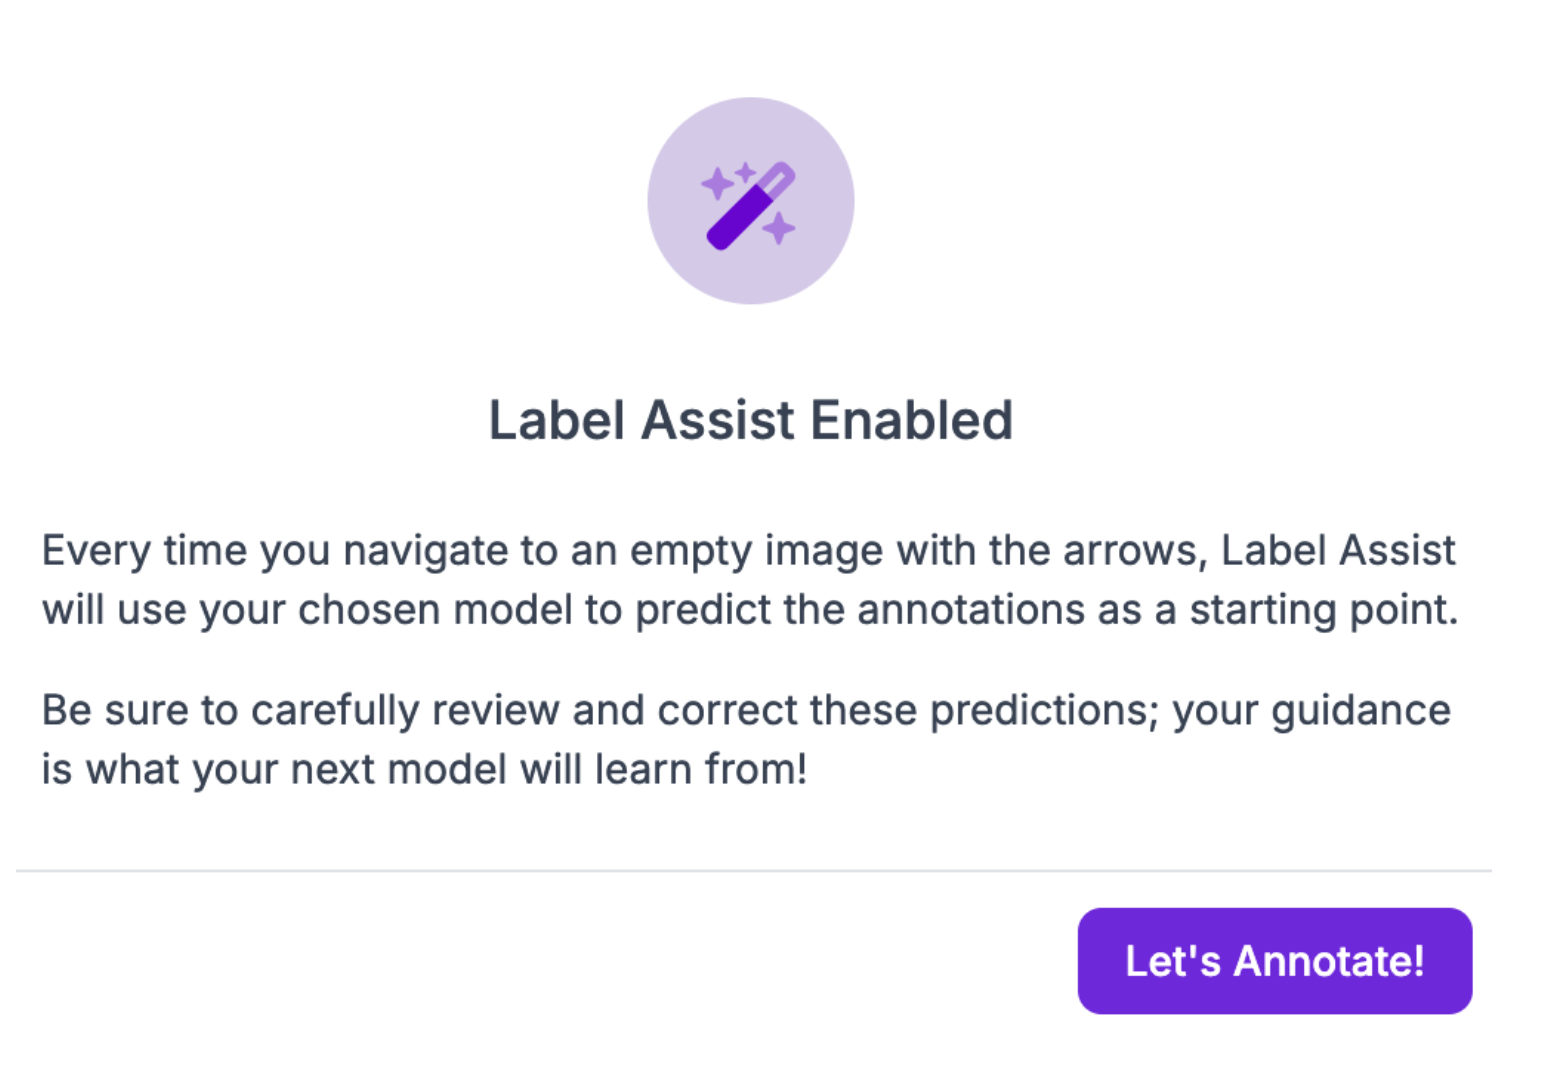
When you click “Let’s Annotate”, Instant will label the image you are viewing. If you see too many predictions, adjust the confidence threshold. We recommend 97% as a starting confidence threshold.
Here is an example of an image labeled with Instant:

You can manually adjust the bounding boxes drawn by Instant if needed to be tight around the object(s) you want to identify. To learn more about annotation best practices, refer to our computer vision labeling tips blog post.
Every time you move to a new image in your annotation session, Instant will run automatically to label the image you are viewing.
Deploy an Instant Model
You can deploy an Instant model with:
- Roboflow Workflows;
- Roboflow Inference, and;
- With a serverless API.
Deploy an Instant Model with Workflows
To use the model in a Workflow, click the “Deploy Model” button at the top of the page:
A window will appear from which you can choose a Workflow template. To start from a Workflow that only has your model set up, choose “Build My Own”.
Here is an example of a Workflow that runs an Instant model and returns the results:
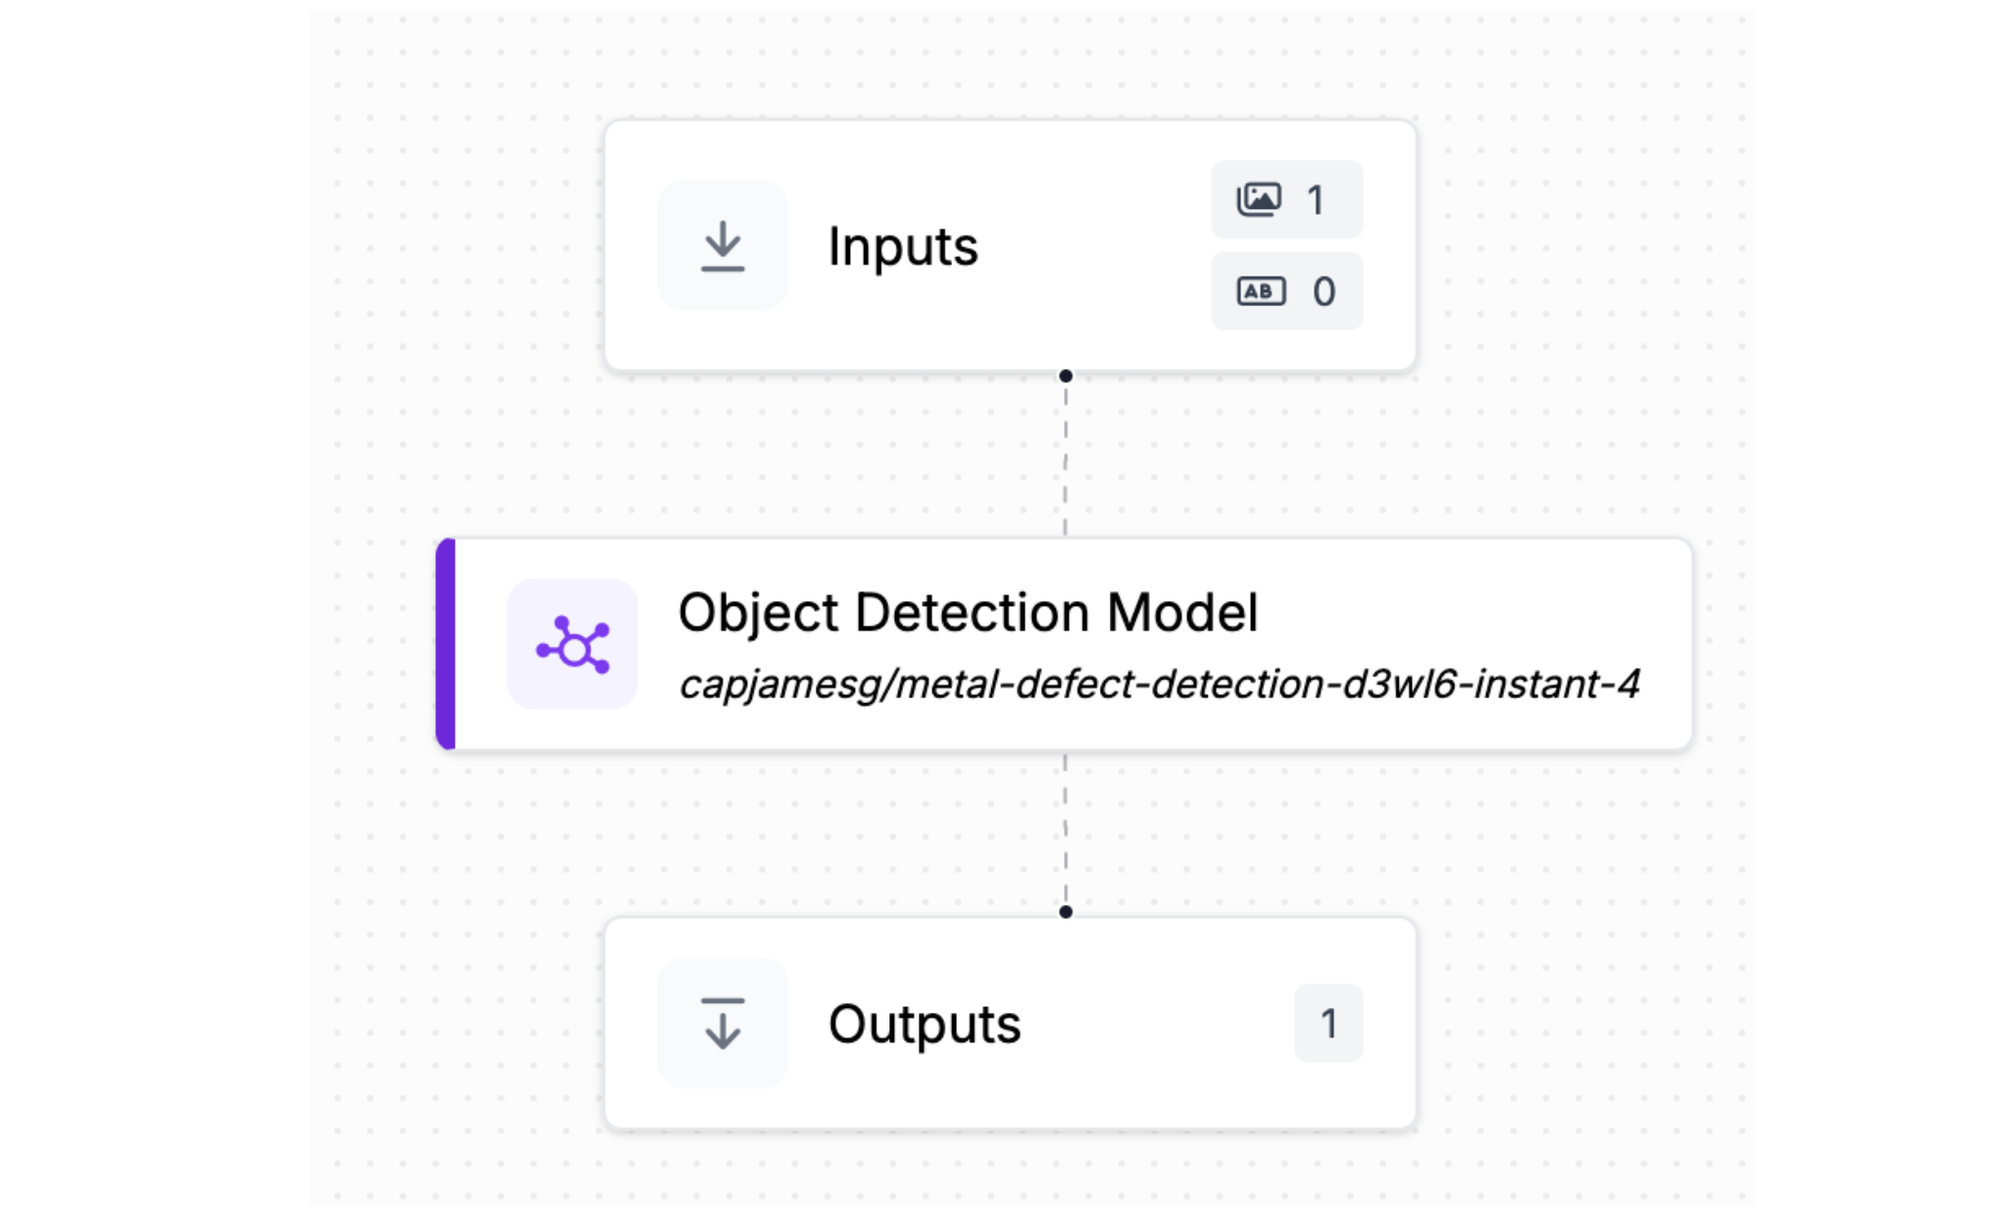
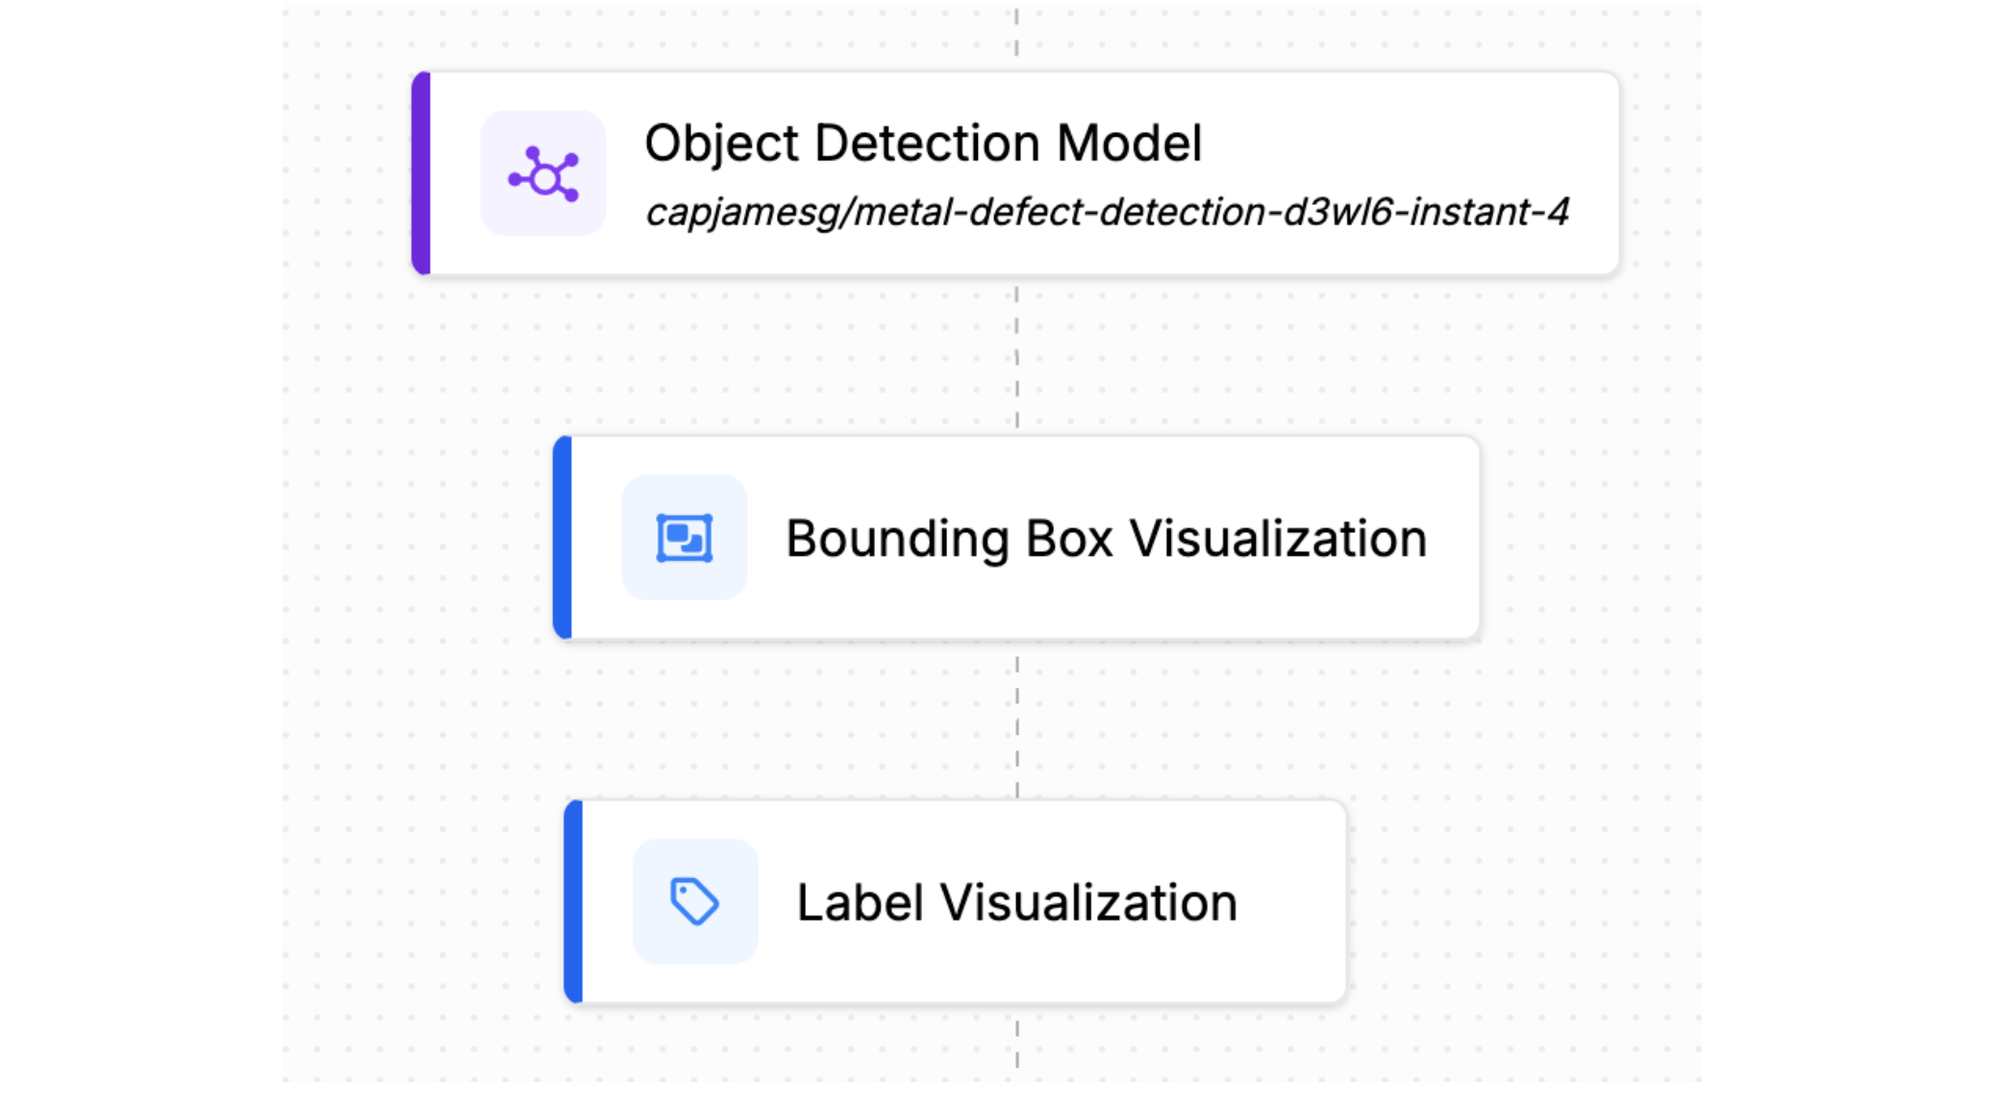
By default, this Workflow will only return prediction coordinates from the model. If you want to visualize the results of your Workflow, add the Bounding Box and Label Visualization blocks to your Workflow, like this:
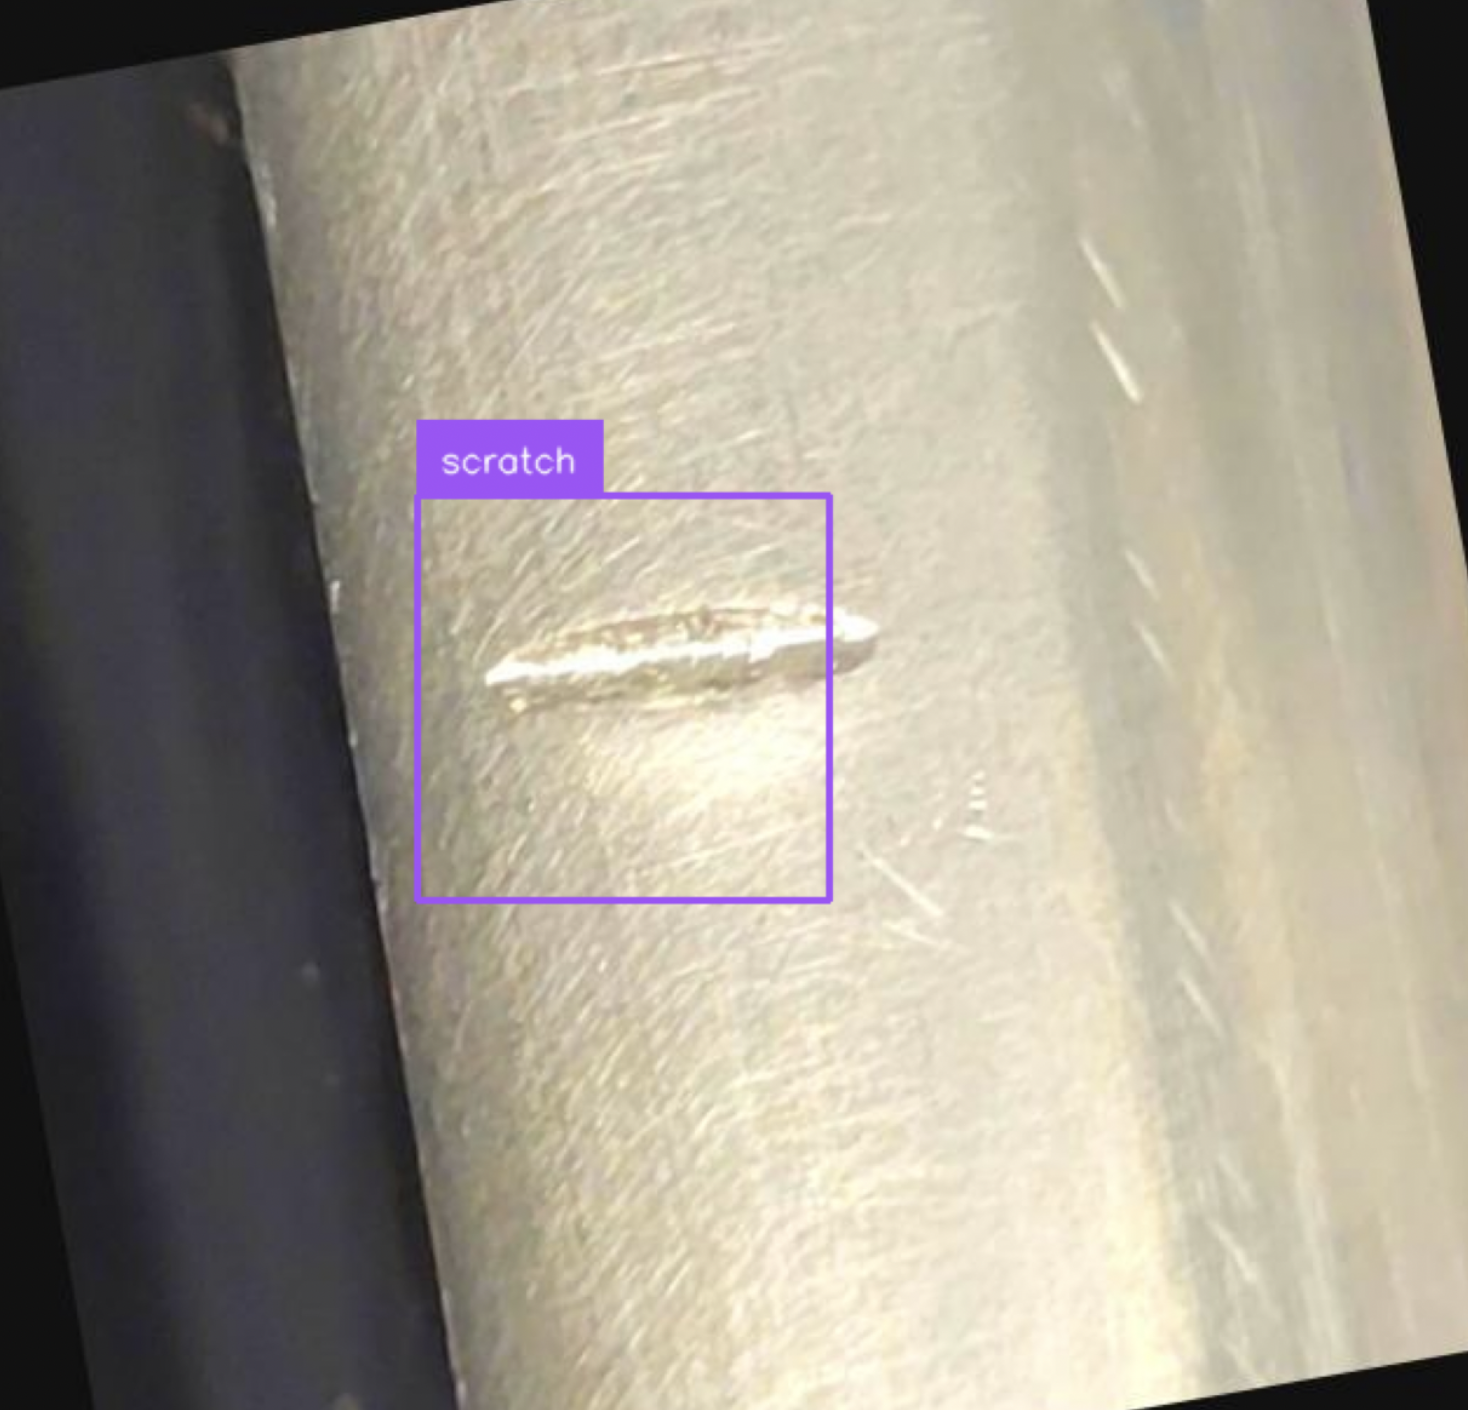
Here is an example of the Workflow running on an image:
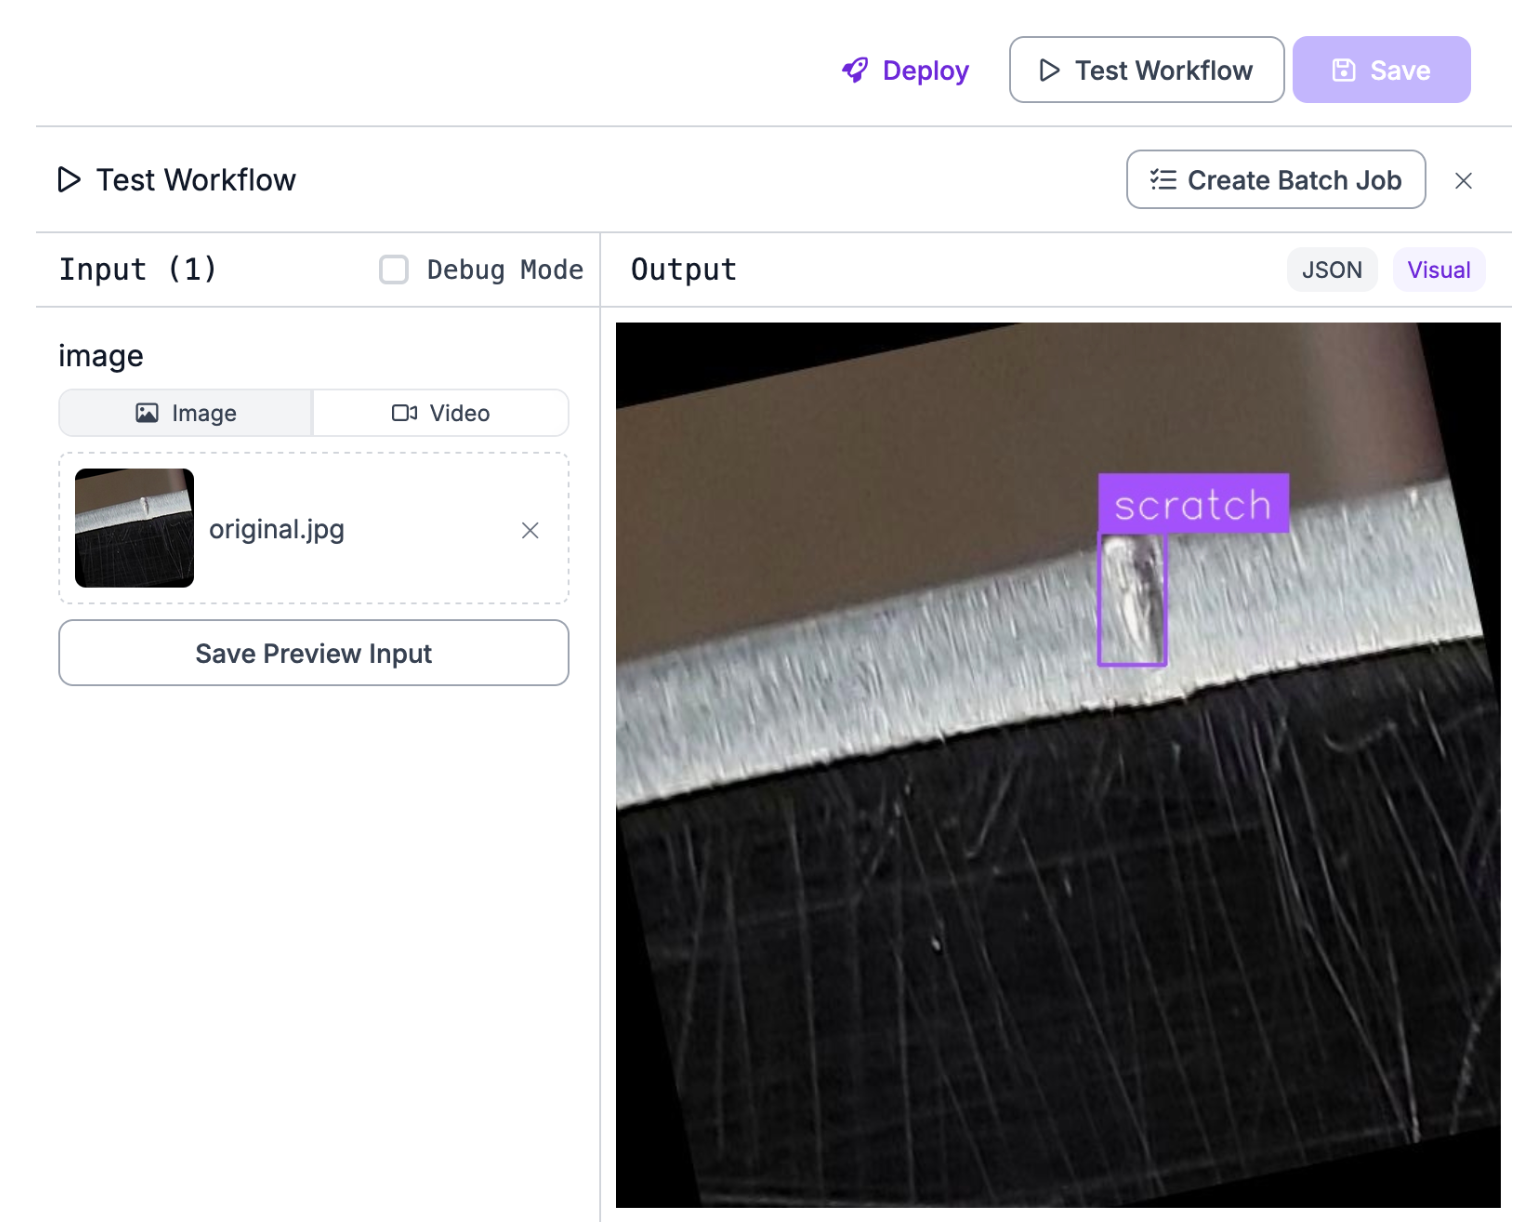
Our model successfully identified the scratch on the metal in the image.
Deploy an Instant Model with Inference
Roboflow Inference is an open source computer vision inference server. You can run Roboflow Instant models on your own hardware with Inference.
To deploy an Instant model with Inference, first install Inference:
pip install “inference[transformers]”Then, create a new Python file and add the following code:
from inference import get_model
import supervision as sv
import cv2

# replace with your Instant model ID
model = get_model(model_id="model-id/version", api_key="YOUR_API_KEY")

# run inference on our chosen image, image can be a url, a numpy array, a PIL image, etc.
image = cv2.imread("image.jpeg")
results = model.infer(image, confidence=0.95)
results = sv.Detections.from_inference(results[0])

box_annotator = sv.BoxAnnotator()
label_annotator = sv.LabelAnnotator()

annotated_image = box_annotator.annotate(
    scene=image, detections=results)
annotated_image = label_annotator.annotate(
    scene=annotated_image, detections=results)

sv.plot_image(annotated_image)
We filter the detections to only include those with a confidence of greater than 0.95. Instant models work at a high confidence. 0.95 is a good baseline, although you may want to increase the number if there are false positive detections.
In the code snippet above, replace model-id/version with your model ID. You can get this ID from the “Model URL” section of your Instant model page:
The code snippet will return a supervision Detections object. This object can then be used with a wide range of features in the supervision Python package, including:
- Detections filtering
- Plotting predictions on an image
- Running NMS
- Calculating the IOU between predictions
- And more
To learn more about what you can do with supervision, refer to the supervision documentation.
Here is the result from the code snippet:
Deploy an Instant Model with an API
You can deploy Roboflow Instant models with the Roboflow Serverless V2 API. This API provides a serverless endpoint to which you can make requests.
To run your model via API, first install the Roboflow Inference SDK:
pip install inference-sdkThen, create a new Python file and add the following code:
# import the inference-sdk
from inference_sdk import InferenceHTTPClient
import supervision as sv

# initialize the client
client = InferenceHTTPClient(
    api_url="https://serverless.roboflow.com",
    api_key="YOUR_API_KEY"
)

# infer on a local image
result = client.infer("image.jpeg", model_id="metal-defect-detection-d3wl6/9")
results = sv.Detections.from_inference(results)
results = results[results.confidence > 0.95]
Above, replace model-id/version with your Instant model ID. See the previous section for instructions on how to find your Instant model ID. Then, set your Roboflow API key.
This code makes a HTTP request to the cloud serverless endpoint, then returns the results. The results are converted into a supervision Detections object so you can process the predictions easily with the supervision Python package.
We filter the detections to only include those with a confidence of greater than 0.95. Instant models work at a high confidence. 0.95 is a good baseline, although you may want to increase the number if there are false positive detections.
Here is an example result:Detections(xyxy=array([[185.78125, 224.375 , 361.40625, 397.8125 ]]), mask=None, confidence=array([0.95857644]), class_id=array([0]), tracker_id=None, data={'class_name': array(['scratch'], dtype='<U7')}, metadata={})
We can plot the results with the following code:
import cv2

image = cv2.imread("image.jpeg")

box_annotator = sv.BoxAnnotator()
label_annotator = sv.LabelAnnotator()

annotated_image = box_annotator.annotate(
    scene=image, detections=results)
annotated_image = label_annotator.annotate(
    scene=annotated_image, detections=results)

sv.plot_image(annotated_image)
Here is the result:
Conclusion
Roboflow Instant is a fast, free training option available in Roboflow. Instant models train automatically when you approve images in your dataset. You can also manually trigger an Instant training job.
When you have an Instant model ready, you can use it as a label assistant, in Workflows, via API, and with Inference. Using an Instant model in a Workflow lets you build your application logic while you label more data and train a larger, fine-tuned model.
To learn more about Instant, refer to the Roboflow Instant documentation.
Cite this Post
Use the following entry to cite this post in your research:
James Gallagher. (Jun 24, 2025). Launch: Roboflow Instant Models. Roboflow Blog: https://blog.roboflow.com/roboflow-instant/