
Surgical instrument counting is an object counting task that involves tracking, verifying, and identifying the number and type of instruments at multiple points across a surgical procedure and beyond. It is not a single event. It is a continuous accountability chain that begins before the patient enters the operating room and ends only when instruments have been cleaned, sterilized, and prepared for the next case.
The counting generally happens at least twice. Once when the sterile tray is laid out before incision, to establish what instruments are present, and once at the closing call, to confirm everything has been returned to the tray. For longer or complex procedures, interim counts are performed whenever a new instrument pack is opened, when the surgical team changes, or when there is any disruption to the count. Each of these checkpoints is a separate object counting event with its own expected baseline and its own potential for error.
Outside the OR, counting continues. After surgery, instruments are collected and transported to the sterile processing department. Staff count what arrives, verify it against the post-operative record, and flag anything that is missing before the next sterilization cycle. At reprocessing, instruments are counted again into their designated trays before being sealed and dispatched for the next case. At each of these handoffs, a computer vision system can automate the count entirely from capturing an image, identifying every instrument by class, and producing a verified count in under a second, giving sterile processing teams the same speed and accuracy at intake and reprocessing that the OR team has at the Mayo stand.
This guide walks through training an RF-DETR based surgical instrument model using Roboflow's auto-training pipeline, building a closing-count Workflow, and deploying a counting assistant for the Mayo stand.
Surgical Instrument Counting with Computer Vision
Today we will build an automated closing-count assistant for a Mayo stand, using a simple but reliable principle: comparing two verified snapshots. A camera mounted directly above the Mayo stand captures two images during each case:
- one before incision
- one at the surgeon’s closing call
Both images are processed using the same computer vision workflow. The difference lies only in how the results are used.
- On the opening image, the system detects every visible surgical instrument, classifies each by type, and computes the count per class. These counts are saved as the baseline for the case. The workflow deployment code
surgical_in.pydoes this. - On the closing image, the system runs the same detection again and computes the counts in exactly the same way. These closing counts are then automatically compared with the saved baseline. The workflow deployment code
surgical_out.pydoes this.
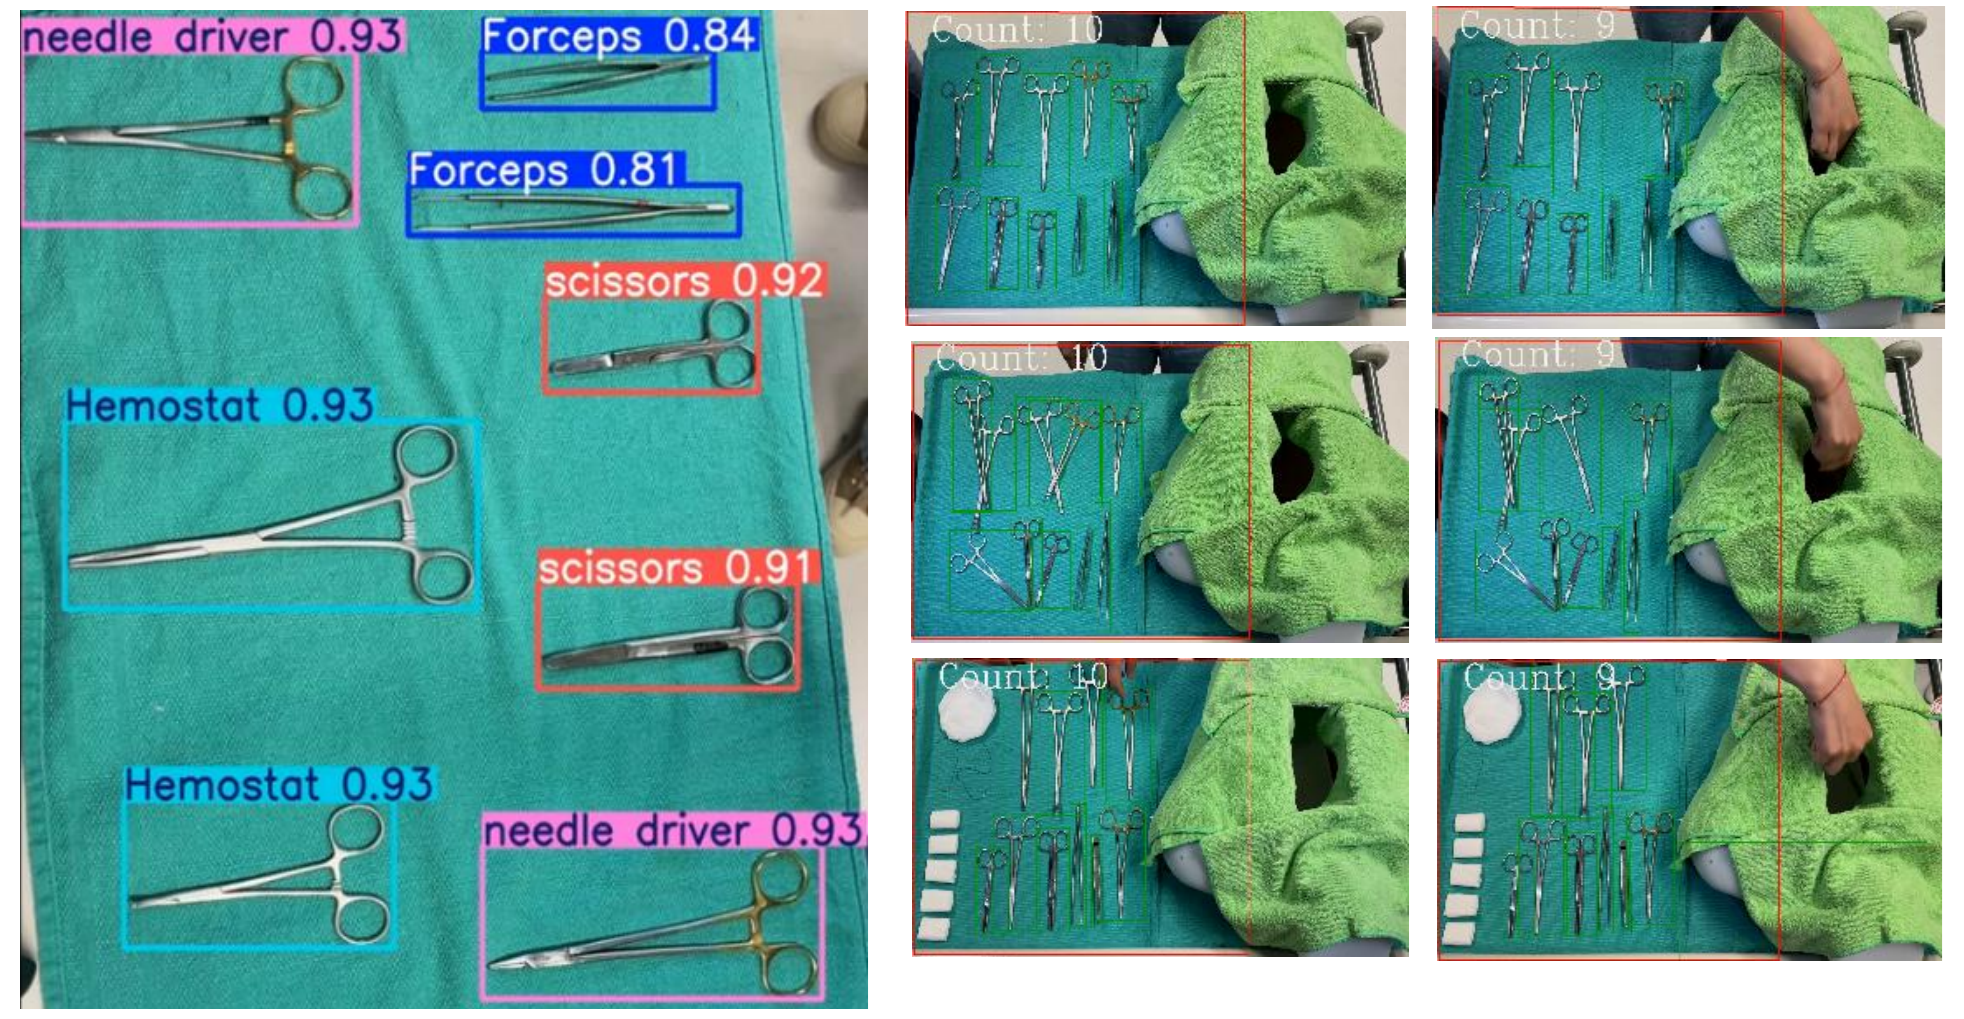
If every instrument class matches the expected count, the case is cleared. If any class is short or over-counted, the system raises an alert and reports exactly which instrument is mismatched and by how many. The system produces a timestamped digital report for every case, providing a reliable verification step before wound closure.
System Design
The system is intentionally designed to be simple and practical to deploy.
- One overhead camera
- One trained detection model
- One reusable workflow
- Two inference calls per case
- One final comparison report
It does not attempt continuous tracking of instruments during surgery. Instruments moving on and off the stand are not tracked in real time. Instead, the system focuses only on two critical checkpoints. This approach avoids complexity such as tracking errors, occlusion issues, and identity switching, while still solving the core problem:
"Does the closing tray match what we started with?"
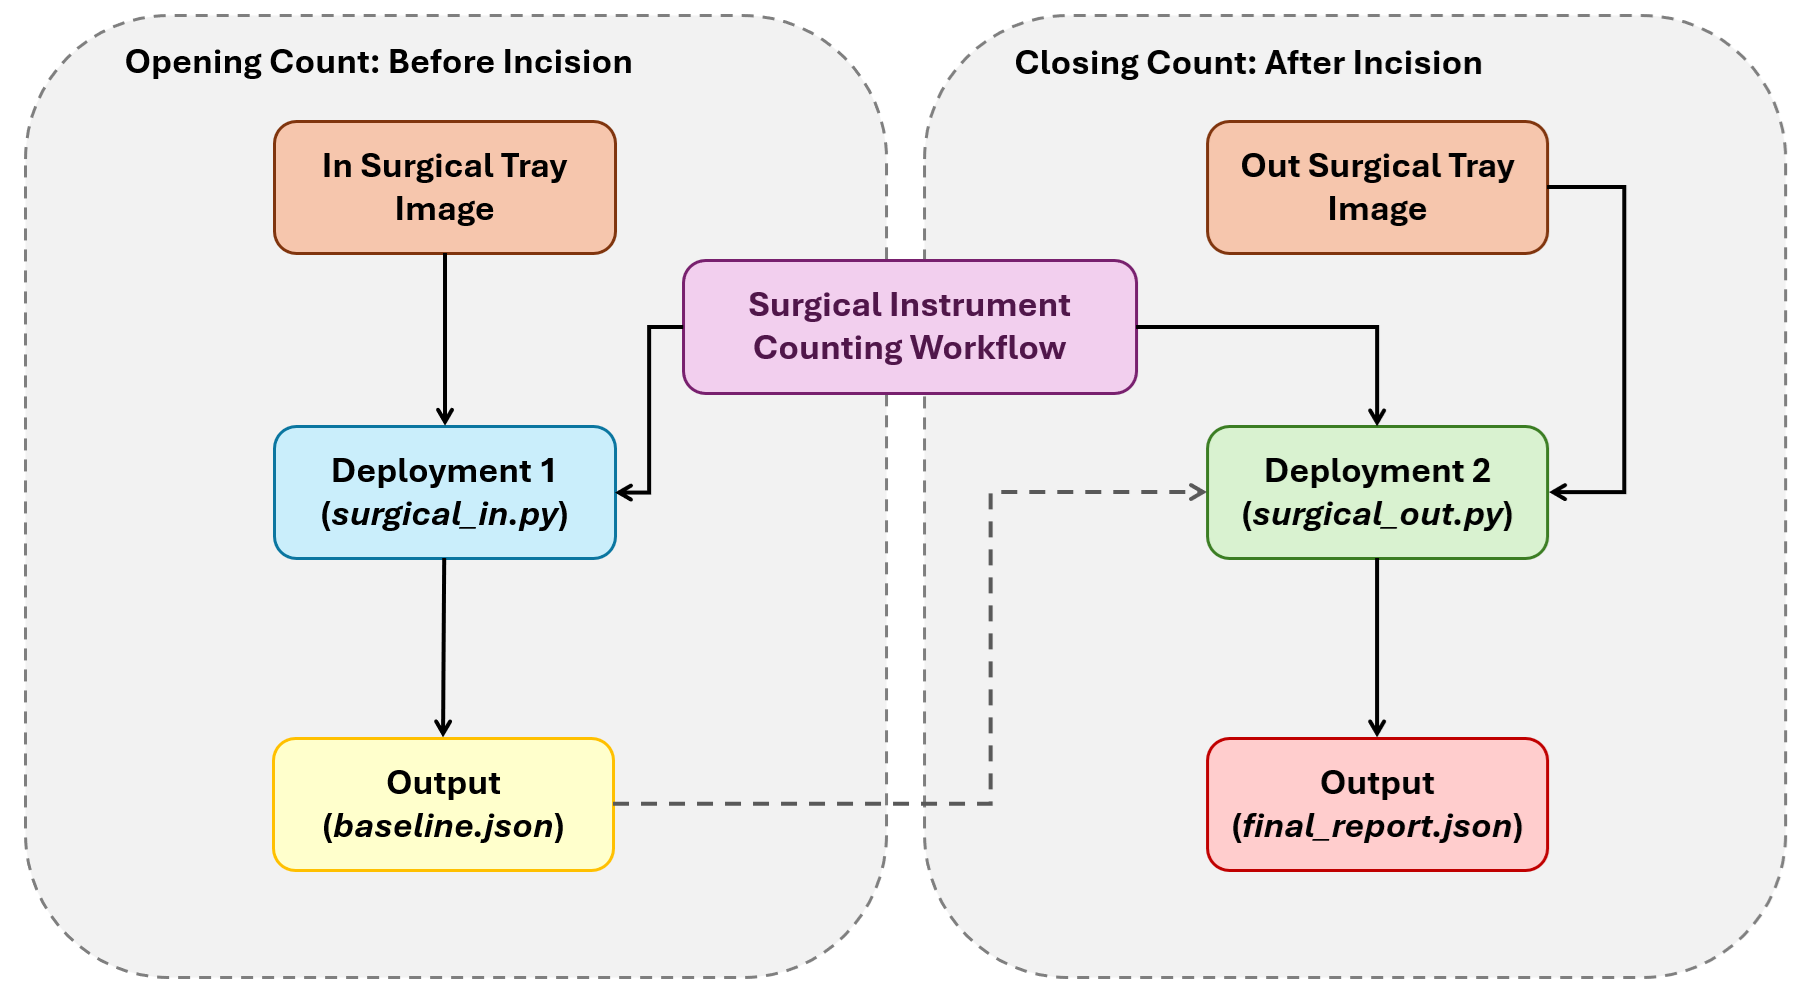
The following diagram illustrates how the system works.
Step 1: Collect and annotate your dataset
Start by creating an Object Detection project in Roboflow. Collect images of the surgical instruments. The model must be trained on the same perspective it will see in production.
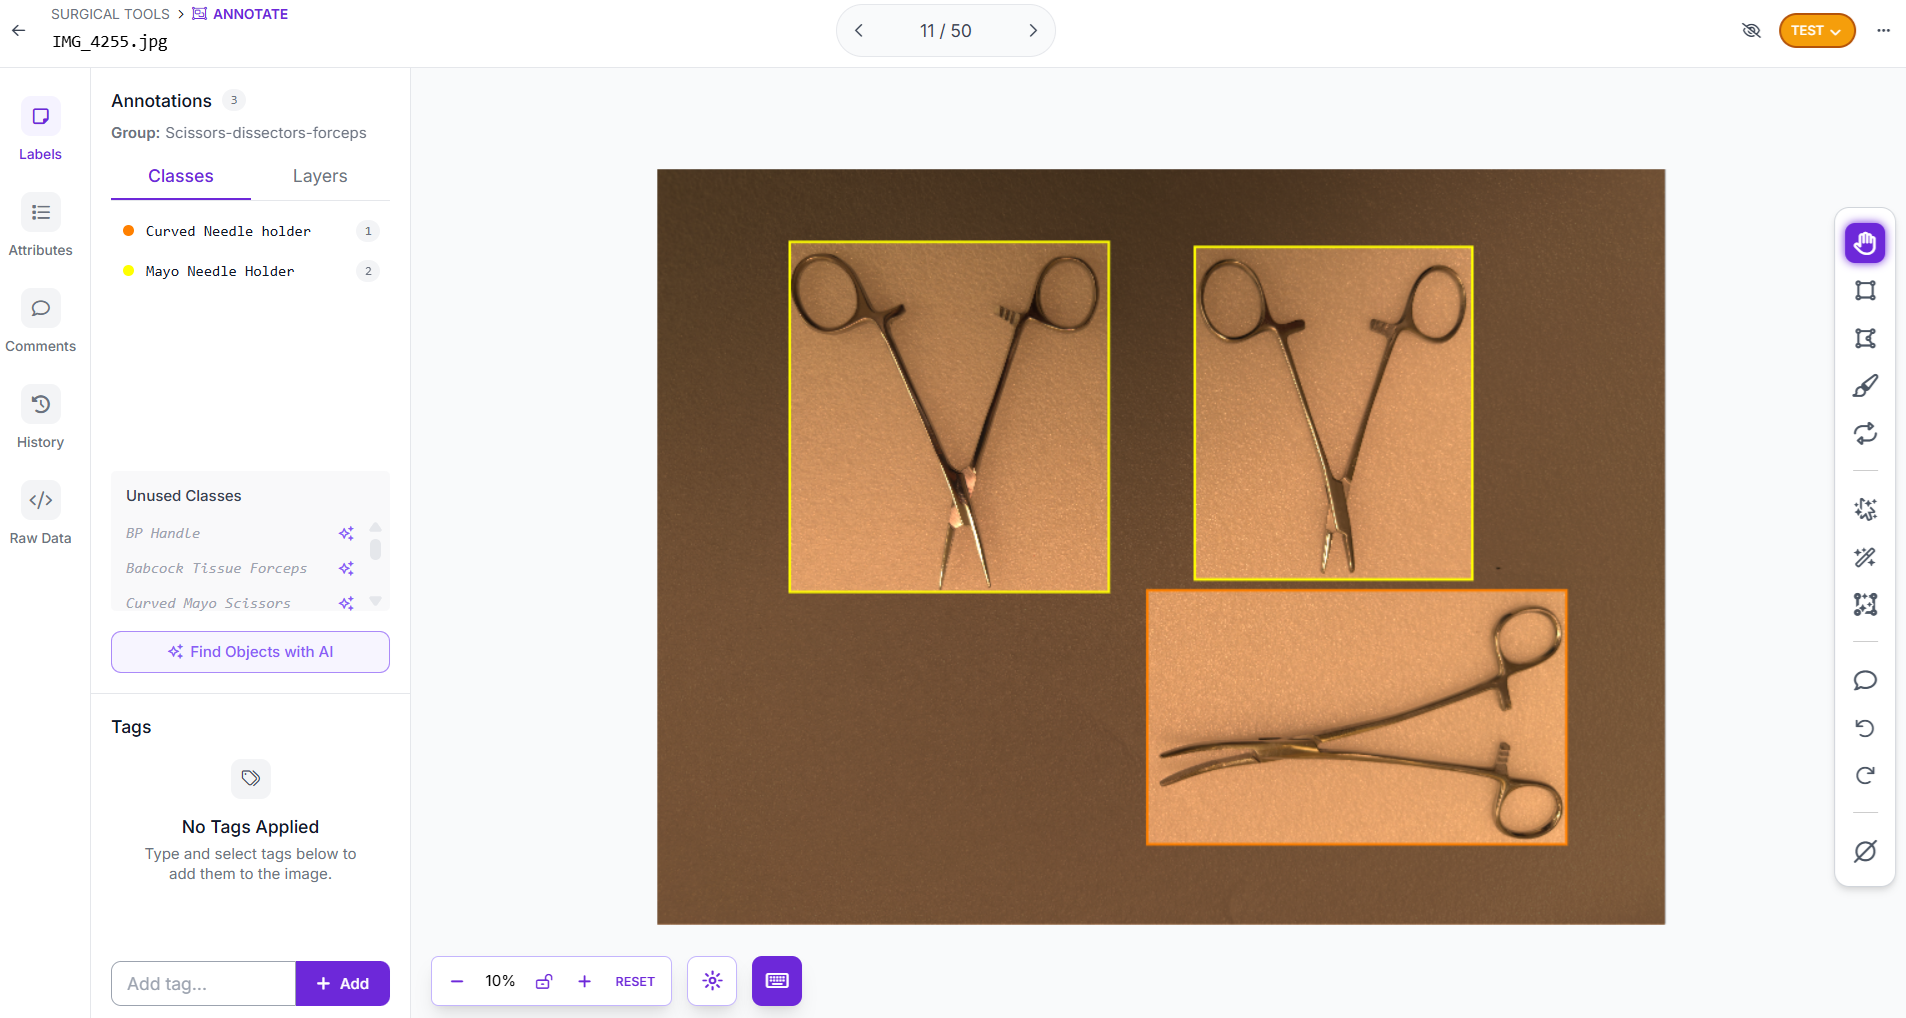
For annotation, draw tight bounding boxes around every visible instrument in each image using Roboflow Annotate. Label every instrument, even when they are partially occluded: if you can identify it, annotate it. Consistent, precise annotations matter more than quantity, a loosely drawn box teaches the model the wrong visual boundary. The model in this guide was trained on ten instrument classes of surgical instruments:
- Babcock Tissue Forceps
- BP Handle
- Curved Mayo Scissors
- Curved Needle Holder
- Dressing Scissors
- Mayo Metzenbum Scissors
- Mayo Needle Holder
- Non-Toothed Dissector
- Right-Angled Needle Holder
Toothed Dissector
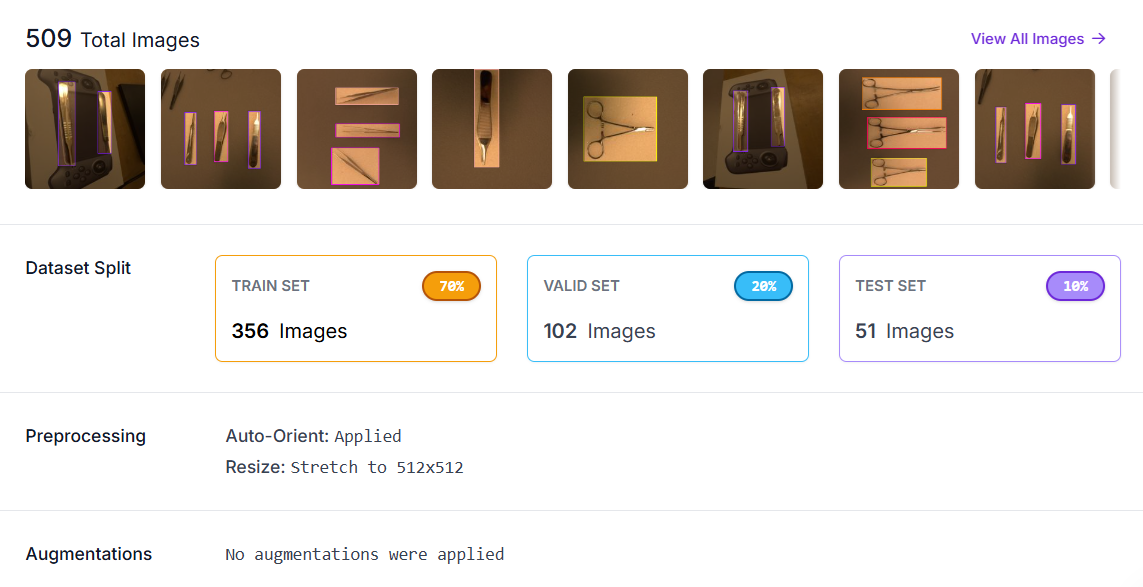
Step 2: Generate a dataset version
Once annotation is complete, generate a dataset version in your Roboflow project. Navigate to your annotated project, and click Versions.
Step 3: Train with Roboflow Train
Train the model using Roboflow Train, a Roboflow's hosted auto-training pipeline. No GPU setup, no training code, no infrastructure management required.
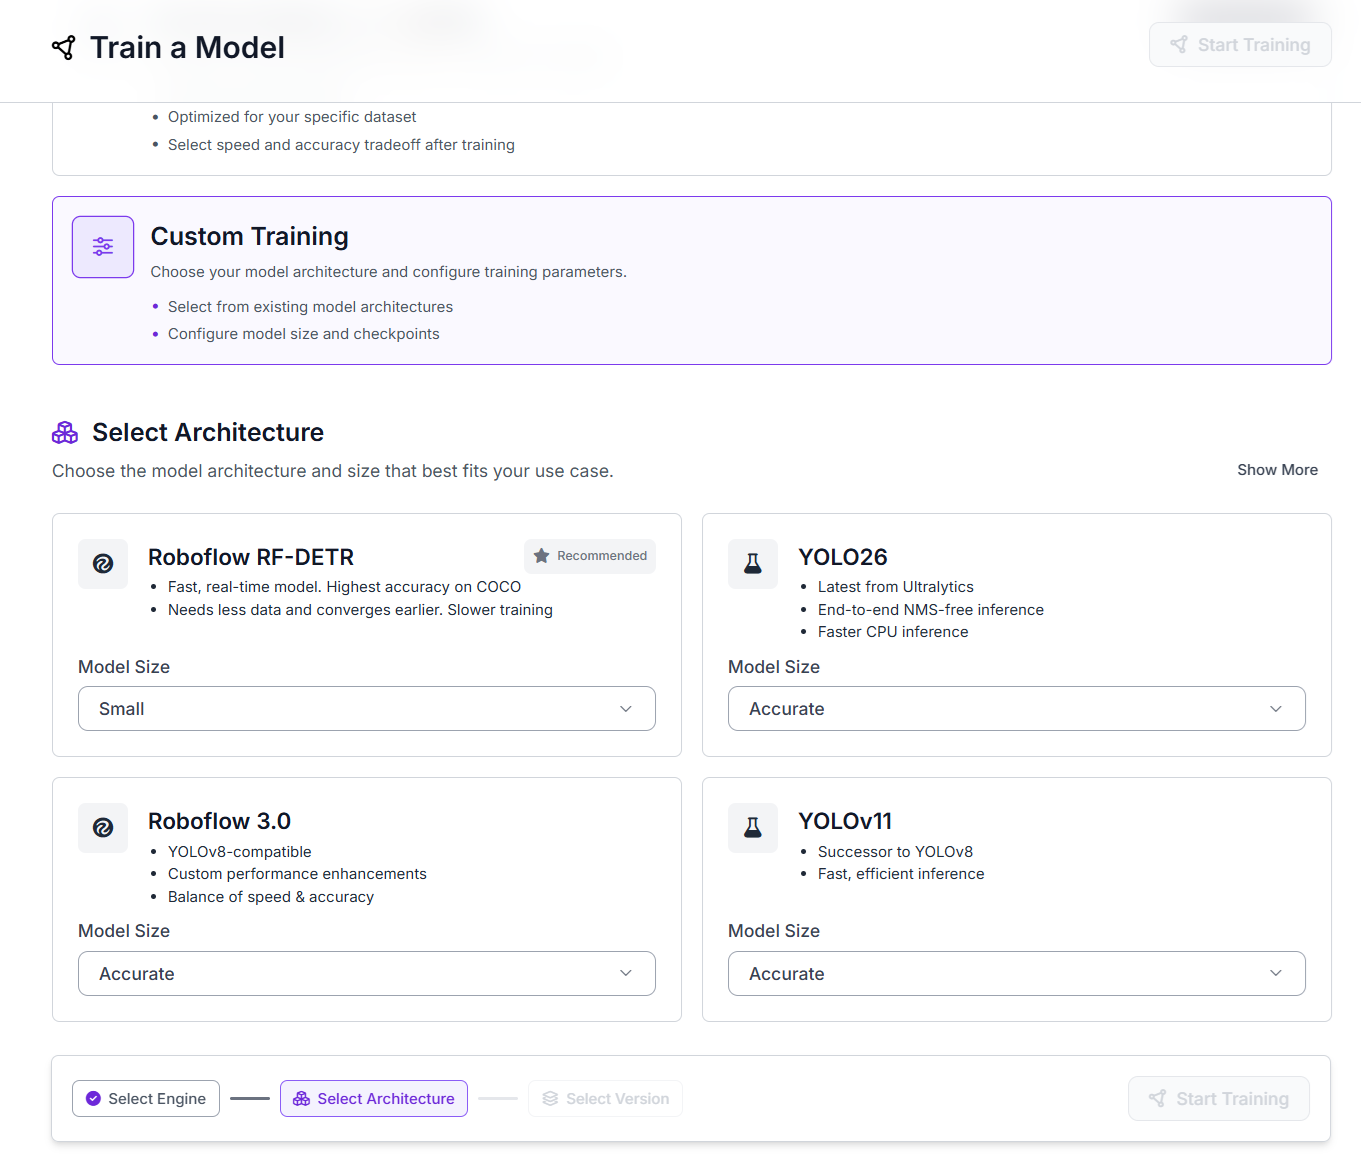
- Navigate to your dataset version and click Train Model.
- Select Custom Training.
- Under Select Architecture, choose RF-DETR. Set the Model Size to Small.
- Click Continue, then Start Training. Training runs on Roboflow's GPU infrastructure and you will receive an email when it's complete.
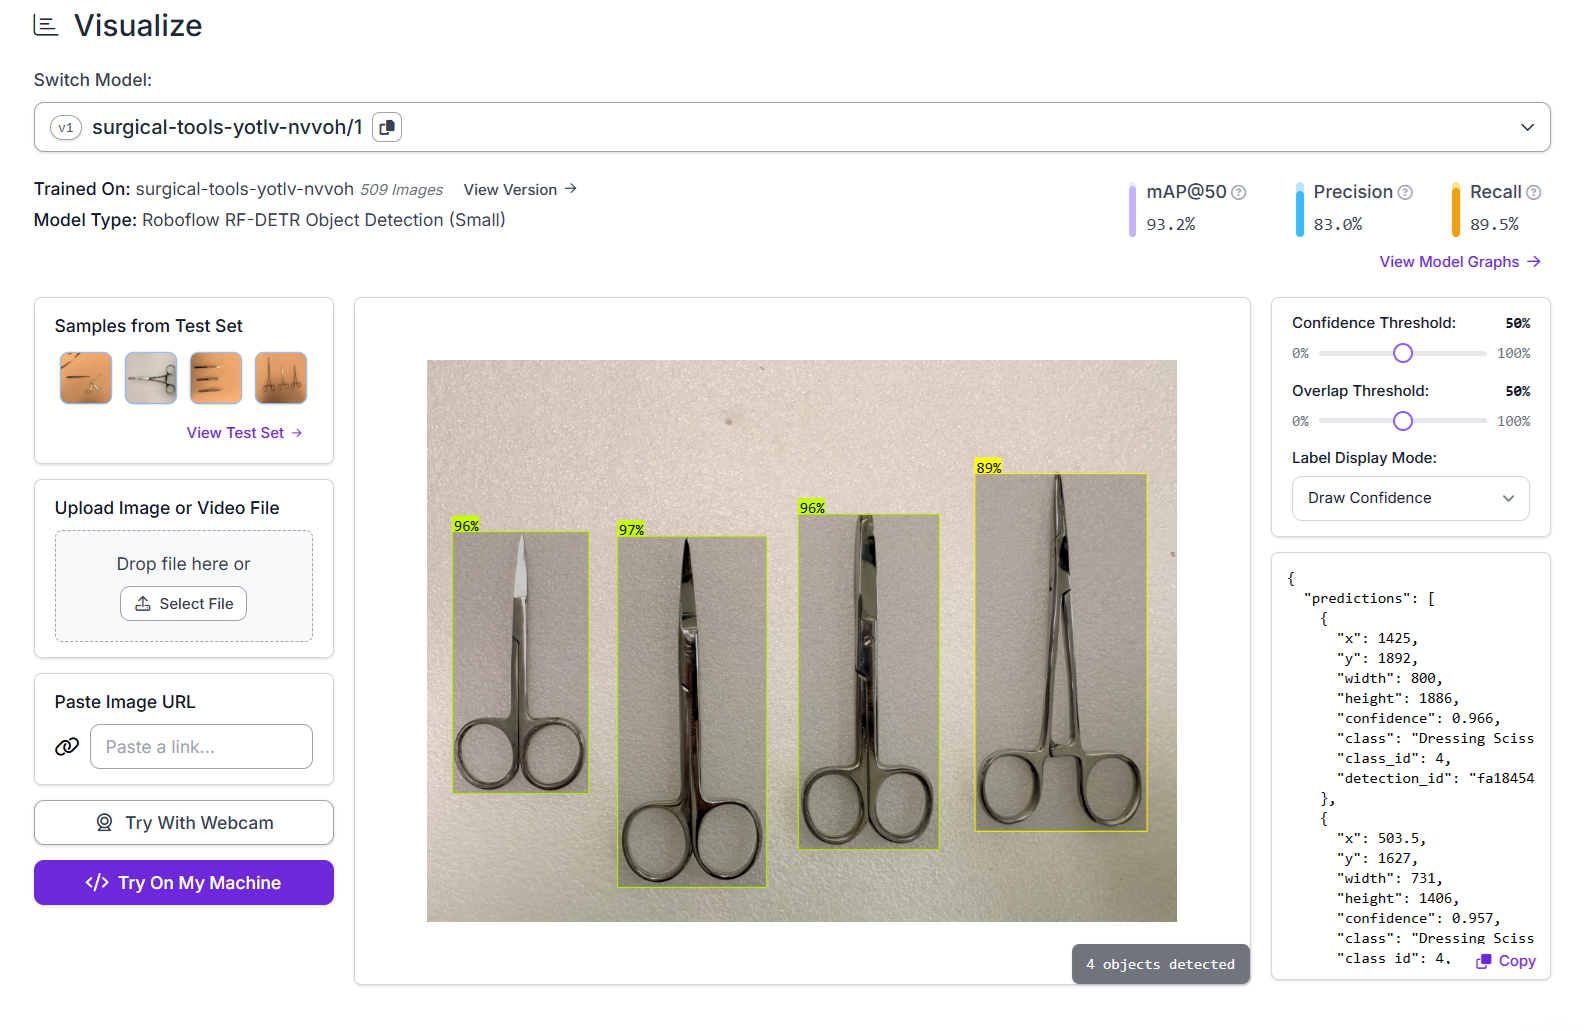
Once the training is done, Roboflow hosts the model and makes it available for inference.
Step 4: Build the counting Workflow in Roboflow
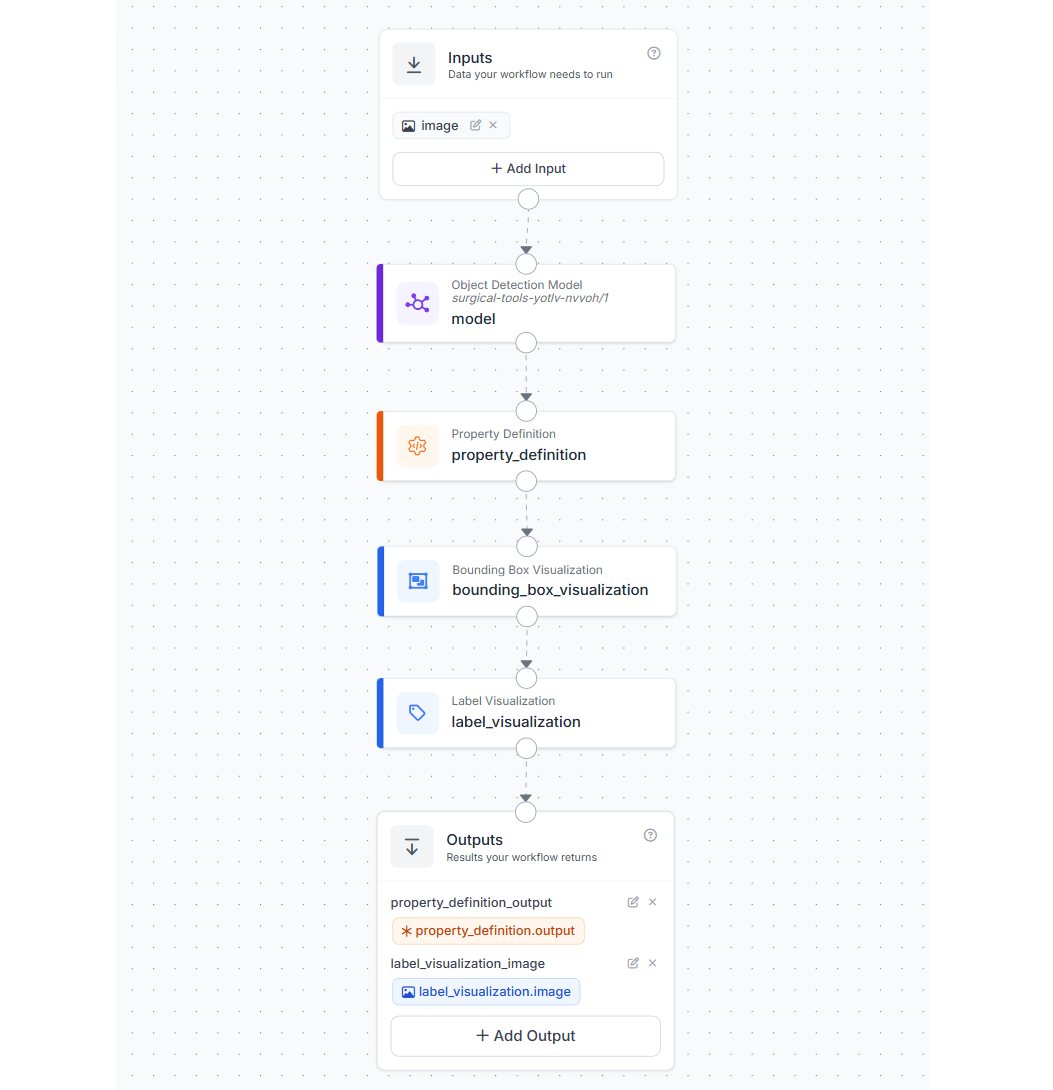
Now, we will build a simple Roboflow Workflow that detects surgical instruments and returns structured prediction data. This workflow is reused for both the opening and the closing stages of the system. The workflow consists of five main blocks:
- Image Input
- Object Detection Model (RF-DETR)
- Property Definition (Convert to Dictionary)
- Bounding Box Visualization
- Label Visualization
- Outputs
In your Roboflow dashboard, click Workflows in the left sidebar. Click Create Workflow, then Build My Own to start from a blank canvas.
When you run this workflow on an input image, you will see output similar to following.

THe workflow generates JSON and image output. This workflow is minimal and flexible.
- It performs only detection and data extraction
- It does not include counting or comparison logic
- It can be reused for both opening and closing stages
We will perform counting and comparison to deployment code of this workflow.
Step 5: Deployment Strategy
Although our system performs two checks, it uses a single Roboflow workflow. This same workflow is reused in both deployment stages of the pipeline.
Deployment 1: Opening Baseline Capture
This step runs before incision.
- Capture one image of the prepared Mayo stand
- Run the workflow on the image
- Convert detections into per-class counts
- Save the counts as a JSON baseline
This baseline represents the ground truth for the case. Here's the surgical_in.py (Opening Baseline) code:
from inference_sdk import InferenceHTTPClient
from collections import Counter
from datetime import datetime
import json

API_KEY = "ROBOFLOW_API_KEY"
WORKSPACE = "tim-4ijf0"
WORKFLOW_ID = "surgical-instrument-counting"

IMAGE_PATH = "in_tray.jpg"
CASE_ID = "OR-3-2026-04-01"

CONF_THRESHOLD = 0.5

CLASSES = [
    "Babcock Tissue Forceps",
    "BP Handle",
    "Curved Mayo Scissors",
    "Curved Needle holder",  # match your model exactly
    "Dressing Scissors",
    "Mayo Metzenbum Scissors",
    "Mayo Needle Holder",
    "Non-Toothed Dissector",
    "Right-Angled Needle Holder",
    "Toothed Dissector",
]

client = InferenceHTTPClient(
    api_url="https://serverless.roboflow.com",
    api_key=API_KEY
)

result = client.run_workflow(
    workspace_name=WORKSPACE,
    workflow_id=WORKFLOW_ID,
    images={"image": IMAGE_PATH}
)

preds = result[0]["property_definition_output"]["predictions"]

counts = Counter()

for p in preds:
    if p["confidence"] >= CONF_THRESHOLD:
        counts[p["class"]] += 1

final_counts = {c: counts.get(c, 0) for c in CLASSES}

baseline = {
    "case_id": CASE_ID,
    "opening_timestamp": datetime.now().isoformat(),
    "counts": final_counts
}

with open("baseline.json", "w") as f:
    json.dump(baseline, f, indent=2)

print("Baseline saved to baseline.json")
print(json.dumps(baseline, indent=2))
When you run the above workflow on the following input image of a surgical tray,
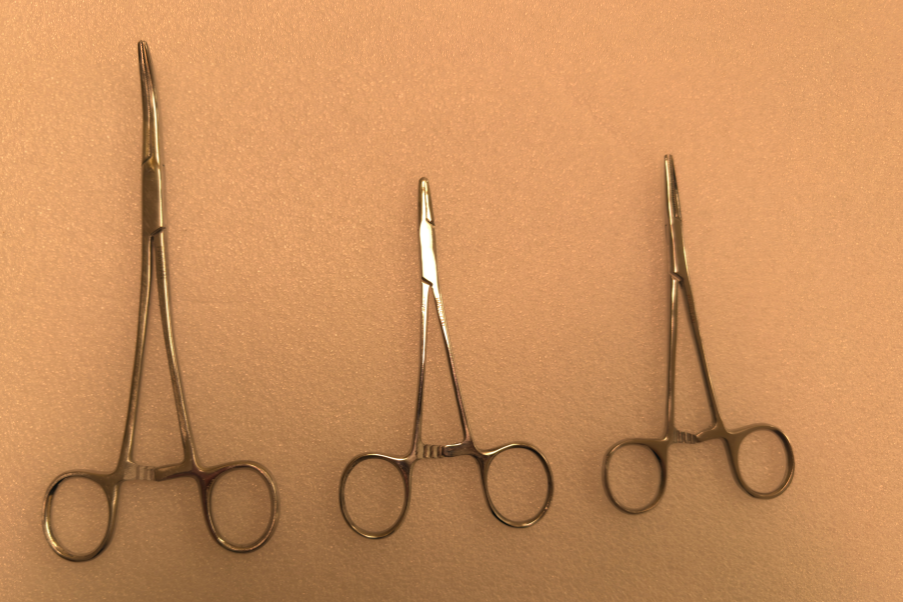
you will get output similar to following. It detects two "Curved Needle holder" and one "Mayo Needle Holder".
{
  "case_id": "OR-3-2026-04-01",
  "opening_timestamp": "2026-04-07T00:03:23.803510",
  "counts": {
    "Babcock Tissue Forceps": 0,
    "BP Handle": 0,
    "Curved Mayo Scissors": 0,
    "Curved Needle holder": 2,
    "Dressing Scissors": 0,
    "Mayo Metzenbum Scissors": 0,
    "Mayo Needle Holder": 1,
    "Non-Toothed Dissector": 0,
    "Right-Angled Needle Holder": 0,
    "Toothed Dissector": 0
  }
}
This result will be saved in baseline.json file which will be used by the second deployment script.
Deployment 2: Closing Verification
This step runs at the surgeon’s closing call.
- Capture a second image of the Mayo stand
- Run the same workflow again
- Convert detections into per-class counts
- Compare these counts with the saved baseline
The system then generates:
- per-class comparison
- mismatch details
- overall case status (
CLEARorALERT)
This acts as the final automated verification before wound closure. Here's the surgical_out.py (Closing + Comparison) code:
- Uses same workflow
- Reads
baseline.json - Writes final report
from inference_sdk import InferenceHTTPClient
from collections import Counter
from datetime import datetime
import json

API_KEY = "ROBOFLOW_API_KEY"
WORKSPACE = "tim-4ijf0"
WORKFLOW_ID = "surgical-instrument-counting"

IMAGE_PATH = "out_tray.jpg"
CONF_THRESHOLD = 0.5

with open("baseline.json", "r") as f:
    baseline = json.load(f)

CASE_ID = baseline["case_id"]
EXPECTED = baseline["counts"]

CLASSES = list(EXPECTED.keys())

client = InferenceHTTPClient(
    api_url="https://serverless.roboflow.com",
    api_key=API_KEY
)

result = client.run_workflow(
    workspace_name=WORKSPACE,
    workflow_id=WORKFLOW_ID,
    images={"image": IMAGE_PATH}
)

preds = result[0]["property_definition_output"]["predictions"]

counts = Counter()

for p in preds:
    if p["confidence"] >= CONF_THRESHOLD:
        counts[p["class"]] += 1

FOUND = {c: counts.get(c, 0) for c in CLASSES}

instrument_counts = {}
mismatches = []

for cls in CLASSES:
    expected = EXPECTED[cls]
    found = FOUND[cls]

    if found == expected:
        status = "OK"
    elif found < expected:
        status = "MISSING"
        mismatches.append({
            "class": cls,
            "expected": expected,
            "found": found,
            "missing": expected - found
        })
    else:
        status = "EXTRA"
        mismatches.append({
            "class": cls,
            "expected": expected,
            "found": found,
            "extra": found - expected
        })

    instrument_counts[cls] = {
        "expected": expected,
        "found": found,
        "status": status
    }

overall_status = "ALERT" if mismatches else "CLEAR"

report = {
    "case_id": CASE_ID,
    "closing_timestamp": datetime.now().isoformat(),
    "status": overall_status,
    "instrument_counts": instrument_counts,
    "mismatches": mismatches
}

with open("final_report.json", "w") as f:
    json.dump(report, f, indent=2)

print("Final report saved to final_report.json")
print(json.dumps(report, indent=2))
When you run the above workflow on the input image "out_tray.jpg" of a surgical tray on the closing end,
you will get output similar to folllowing. This generates an ALERT for one missing "Mayo Needle Holder".
{
  "case_id": "OR-3-2026-04-01",
  "closing_timestamp": "2026-04-07T00:03:52.621992",
  "status": "ALERT",
  "instrument_counts": {
    "Babcock Tissue Forceps": {
      "expected": 0,
      "found": 0,
      "status": "OK"
    },
    "BP Handle": {
      "expected": 0,
      "found": 0,
      "status": "OK"
    },
    "Curved Mayo Scissors": {
      "expected": 0,
      "found": 0,
      "status": "OK"
    },
    "Curved Needle holder": {
      "expected": 2,
      "found": 2,
      "status": "OK"
    },
    "Dressing Scissors": {
      "expected": 0,
      "found": 0,
      "status": "OK"
    },
    "Mayo Metzenbum Scissors": {
      "expected": 0,
      "found": 0,
      "status": "OK"
    },
    "Mayo Needle Holder": {
      "expected": 1,
      "found": 0,
      "status": "MISSING"
    },
    "Non-Toothed Dissector": {
      "expected": 0,
      "found": 0,
      "status": "OK"
    },
    "Right-Angled Needle Holder": {
      "expected": 0,
      "found": 0,
      "status": "OK"
    },
    "Toothed Dissector": {
      "expected": 0,
      "found": 0,
      "status": "OK"
    }
  },
  "mismatches": [
    {
      "class": "Mayo Needle Holder",
      "expected": 1,
      "found": 0,
      "missing": 1
    }
  ]
}
This result will be saved in final_report.json file.
Using one workflow with two deployments is both efficient and robust.
- The detection logic is consistent between opening and closing
- There is no need to pass data between workflows
- The comparison logic remains simple and transparent in code
- The system is easier to test and maintain
Most importantly, it aligns with the real surgical process, which is already based on two manual count checkpoints.
Deployment considerations
Here are some important points considerations for deployment:
- Camera placement: Mount the camera directly overhead the Mayo stand tray, perpendicular to the tray plane. A 60-80 cm distance above the tray surface works well for standard Mayo stand dimensions with a 1080p camera. Perpendicular mounting minimizes perspective distortion and ensures instruments near tray edges are as visible as those in the centre. Avoid angles that generate OR light shadows on reflective instrument surfaces.
- Confidence threshold tuning: Start with the default inference confidence threshold as an initial baseline, then adjust it based on validation results. The right setting depends on the balance between false positives and false negatives in your application. If the system is being used as a safety check, it is often better to tolerate a few extra detections that can be manually verified than to miss a real instrument. For this reason, confidence thresholds should be tuned using class-wise validation performance rather than relying only on one fixed global threshold across all instrument types.
- This system is a second verification layer: Manual counting remains the primary protocol, while the model provides an independent automated cross-check. Any mismatch between the manual count and the system output should trigger review. In addition, the system automatically generates a structured, timestamped report for each case, improving documentation and traceability. Over time, tracking agreement between the two helps build confidence in the system’s reliability.
Extending the System
Once your RF-DETR surgical instrument model is trained and your Workflow is live, the same model supports additional high-value applications. Each uses the same detection model and Workflow API.
- Pre-op tray setup verification: Before incision, the same workflow can be used to verify that the prepared tray contains the correct instrument set. The opening snapshot is compared against the expected configuration for the procedure. Since the scene is well arranged and free from occlusion, this step is highly reliable. Detecting a mismatch at this stage is quick to fix and prevents disruptions later in the procedure.
- Live running count over the Mayo stand: The system can be extended to provide a running count during the procedure by capturing images at intervals instead of only two snapshots. Each capture is processed using the same workflow and compared against the baseline. Any deviation in counts can be surfaced early, giving the team visibility into missing instruments before closure.
- Decontamination intake count: After surgery, the same workflow can be applied at the sterilization intake point. Instruments arriving from the operating room are captured and counted, then compared with the closing report. Any mismatch can be identified before reprocessing begins, improving traceability across the instrument lifecycle.
- Dedicated count for high-risk small instruments: The system can also be specialized for high-risk instruments such as needle holders and fine dissectors. By focusing on a smaller region or using closer images, detection accuracy improves for small objects. Running periodic checks on these critical instruments provides earlier alerts and reduces the risk of missed items.
Surgical Instrument Counting with Computer Vision Conclusion
Surgical instrument counting is a practical computer vision application because of fixed instrument classes, controlled tray views, and known expected counts. An automated visual verification can support faster checks, better consistency, and improved documentation. Beyond count verification, these systems also open the door to broader instrument traceability across preparation, use, and reprocessing, making it valuable for both patient safety and workflow accountability.
Cite this Post
Use the following entry to cite this post in your research:
Timothy M. (Apr 6, 2026). Automate Surgical Instrument Tracking with Computer Vision. Roboflow Blog: https://blog.roboflow.com/surgical-instrument-counting/