
Combining two instance segmentation models, one trained to detect car parts and one to detect damage areas, produces a system that can localize exactly which component (door, hood, bumper) is damaged and to what extent. Both models are sourced from Roboflow Universe, and the tutorial walks through loading them, running staged inference, and overlaying the segmentation masks to highlight the intersection of damage and part boundaries. The approach is applicable to insurance claims processing, used-vehicle valuation, and manufacturer inspection workflows.
This article was contributed to the Roboflow blog by Abirami Vina.
Introduction
Using computer vision, you can identify visual defects with vehicles. This could be used as part of an inspection system at a car manufacturer, for use in helping to calculate the value of second-hand cars based on any visual damage, and more.
Using cameras and AI, computer vision can instantly analyze photos of your car damage, identifying the issue and even estimating the severity.
In this article, we'll use two instance segmentation models to identify car damage, and pinpoint the exact parts affected. We'll guide you step by step through the entire process of building this solution. Let's get started!
Using Instance Segmentation for Car Damage Detection
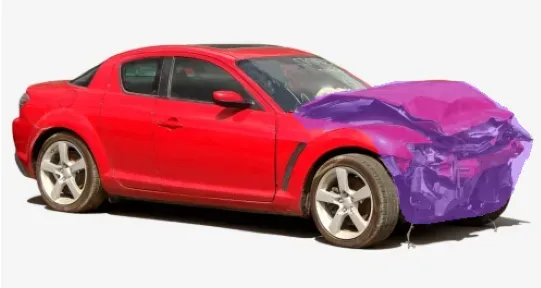
First, let’s talk about the basics of instance segmentation and how it contrasts with other computer vision task types. Image classification involves categorizing an object, whereas object detection involves placing a bounding box around the location of an object in an image. Instance segmentation, on the other hand, recognizes each individual object, and precisely outlines the shape of each object as shown below.

Instance segmentation is useful for applications where you need to know the exact boundaries of objects, such as in defect detection, autonomous vehicle systems, or precision agriculture.
The ability to precisely locate objects – unlike object detection, which draws a box around an object, and may result in other parts being included in a single box because boxes are imprecise – is what makes instance segmentation a great option for assessing car damage.
An image of a damaged car contains many different parts, like wheels, doors, and windows. To understand the image accurately, we need to know not only that these parts exist, but also their exact shapes and locations.
Selecting the Right Computer Vision Models
We'll be using two models from Roboflow Universe. One is trained to detect car parts and the other to detect damaged areas. Roboflow Universe is a computer vision platform that provides a wide range of open-source datasets and models, offering users access to over 200,000 datasets and 50,000 models for their projects. To start, create a Roboflow account and navigate to the model pages shown below.
A Model to Detect Damage
The first model has been trained to detect the damaged area of a car (as shown below). This model has been trained on images with various types of damage such as dents, scratches, or broken parts.
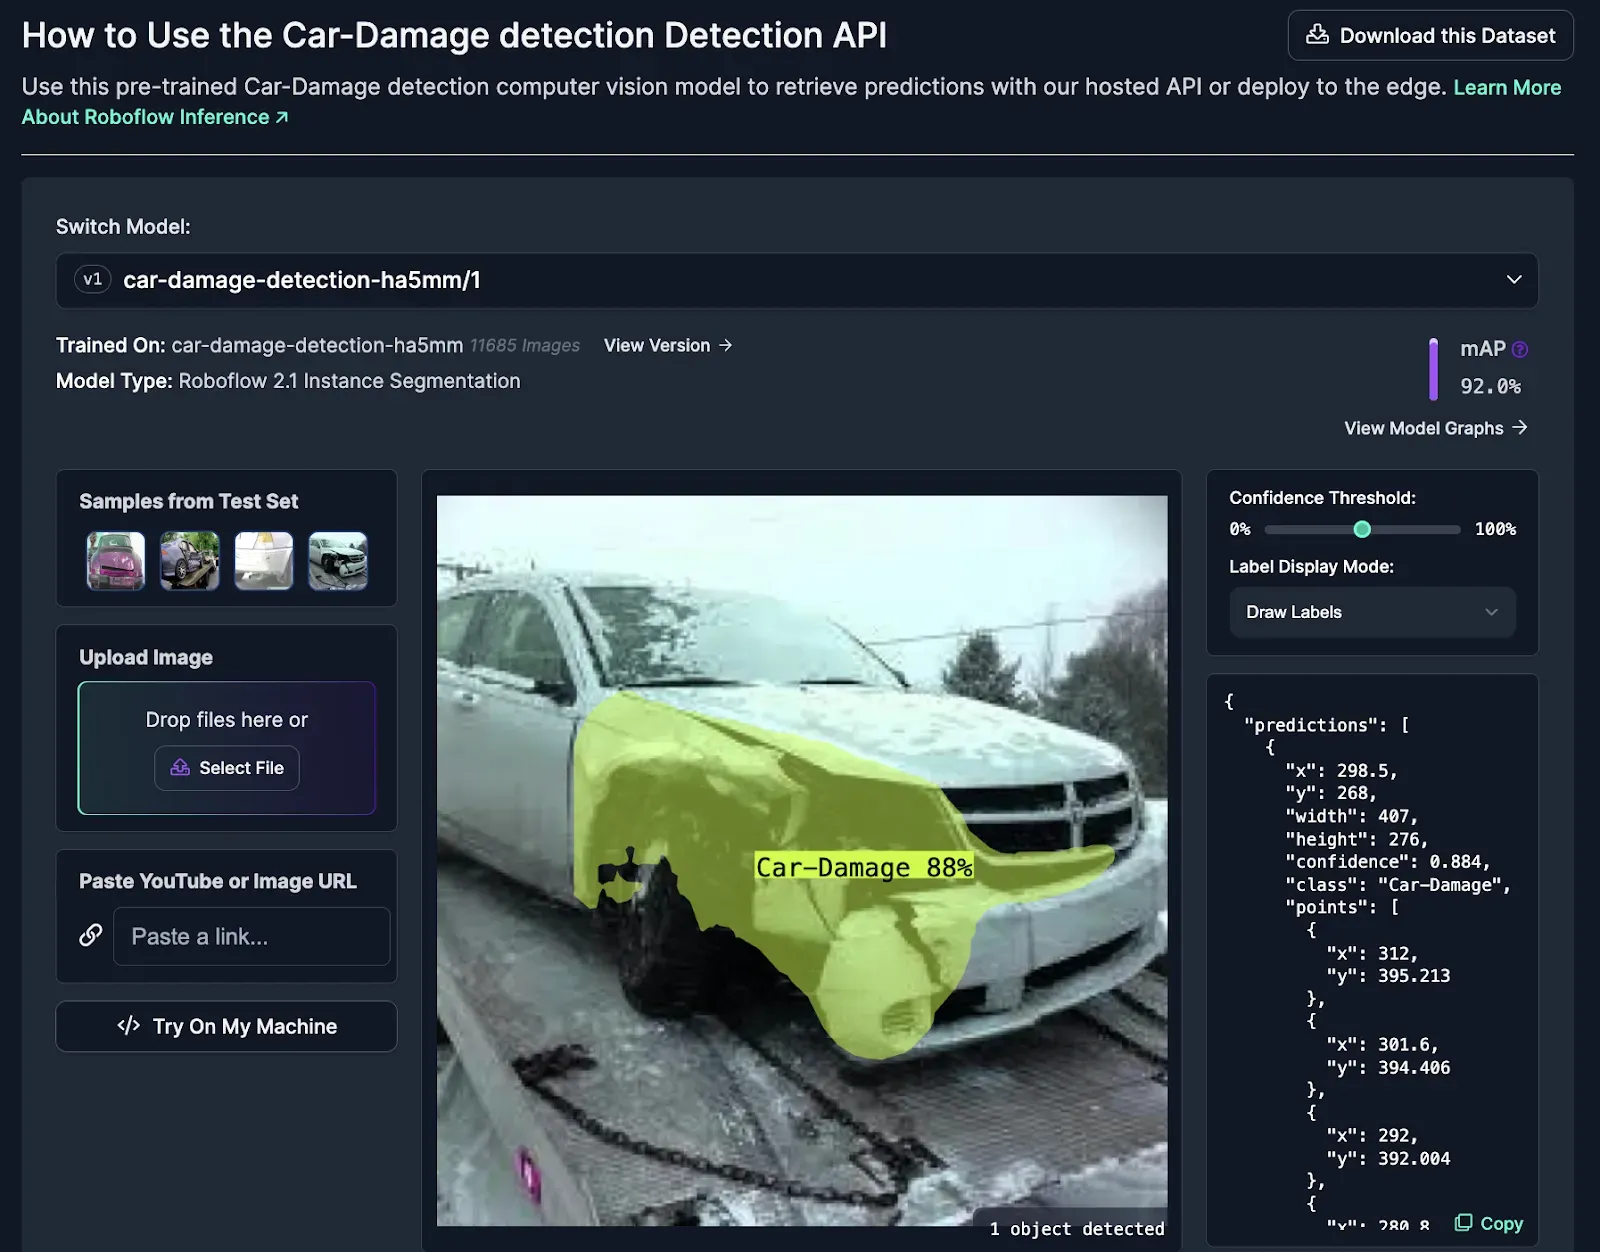
As you scroll through the page, you'll see code snippets demonstrating how to use this model. We will be working with the utilities code snippets as a starting point for our solution.
A Model to Detect Parts of a Car
The second model can detect the parts of a car (as shown below). It's trained to segment individual parts of a car within an image, including key components like bumpers, doors, windows, and lights for both the front and back of the vehicle. Also, it can identify other parts like the hood, mirrors, and tailgate.
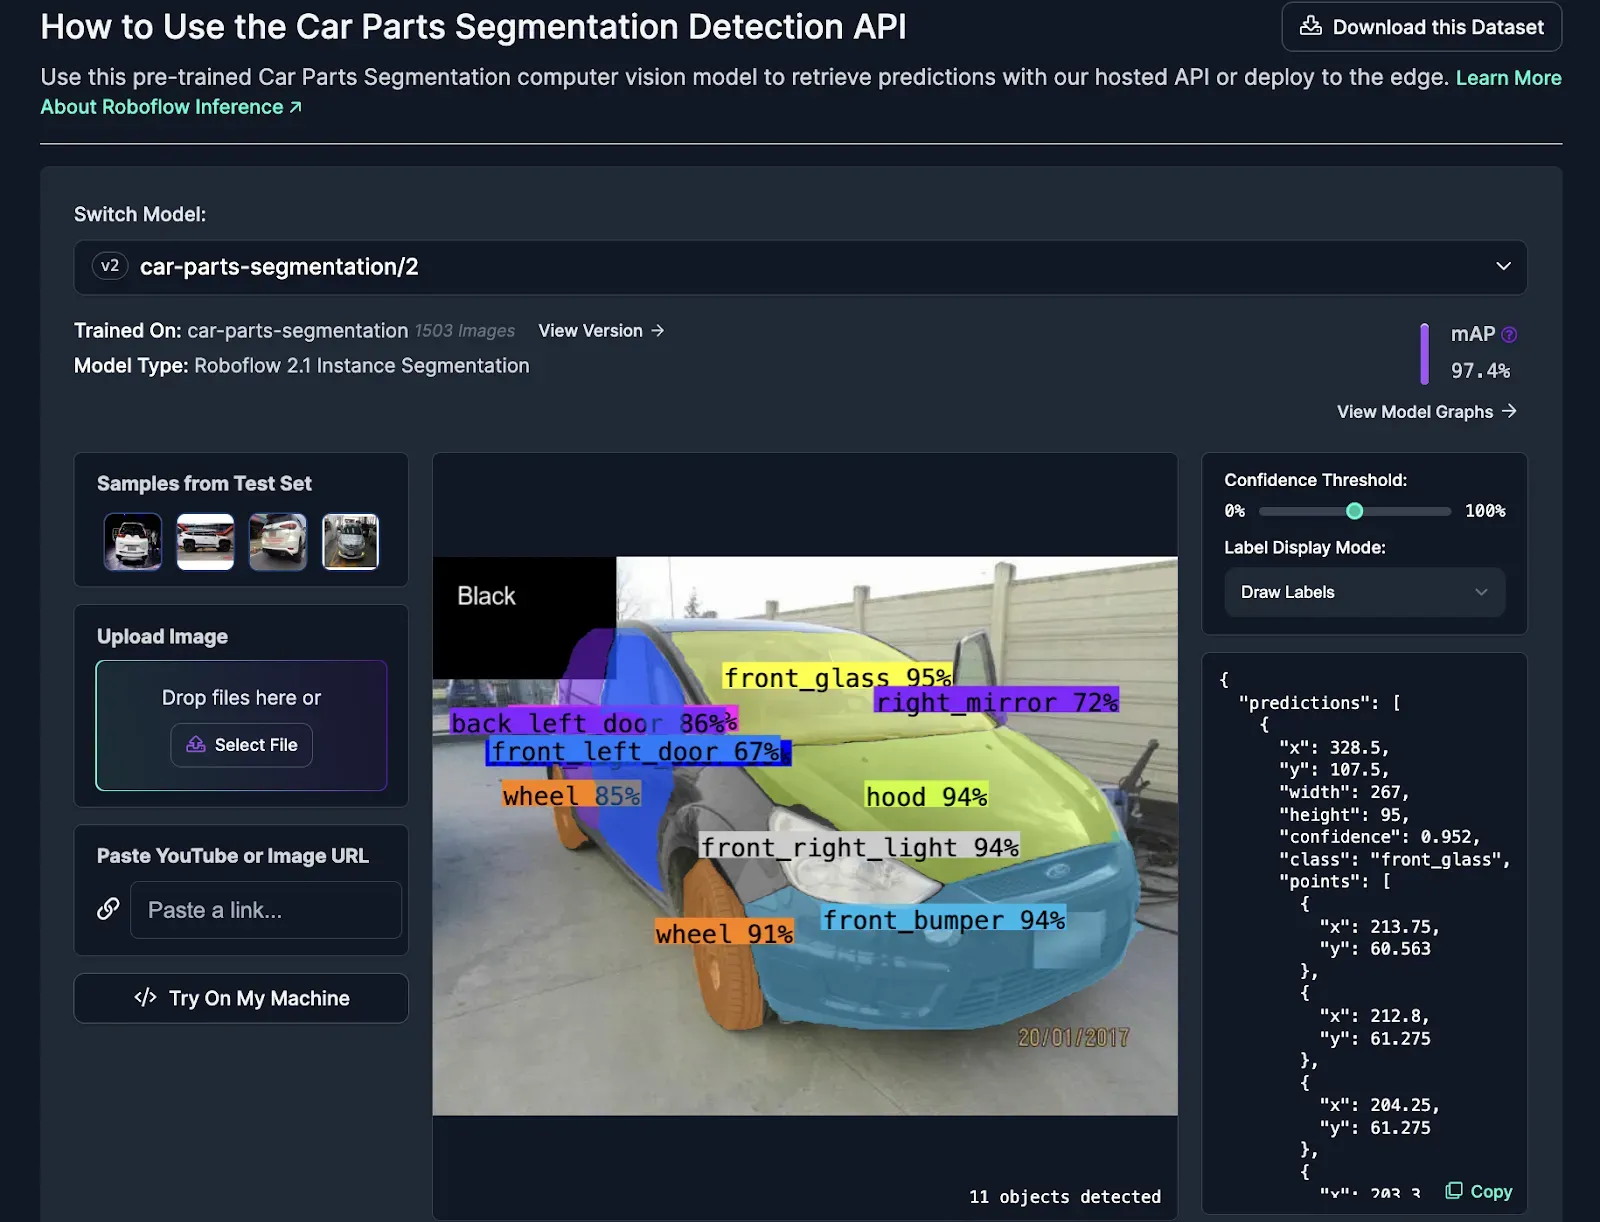
Below, we provide code snippets that walk through how to use the model. Combining the two models mentioned above allows us to analyze the image of a car in more detail. We can identify the presence of damage and precisely which part of the car is affected.
Code Walkthrough
Our aim is to be able to analyze an image of a car and understand which parts of the car may be damaged.
We’ll be using an image downloaded from the internet to showcase this solution. You can do the same or download images from the dataset for the model.
Step 1: Setting Up the Environment
To begin, let's install the necessary dependencies. Run the following command:
pip install roboflow supervision opencv-pythonStep 2: Loading the Models
Next, we’ll import the needed libraries and load the pre-trained models. Below, replace ROBOFLOW_API_KEY with your Roboflow API key. You can refer to the Roboflow documentation for more instructions on how to retrieve your API key.
from roboflow import Roboflow
import supervision as sv
import cv2
import tempfile
import os

# Load the Roboflow API and authenticate with your API key
rf = Roboflow(api_key="ROBOFLOW_API_KEY")

# Load the project for identifying parts of the car
project_parts = rf.workspace().project("car-parts-segmentation")
model_parts = project_parts.version(2).model

# Load the project for detecting damaged areas of the car
project_damage = rf.workspace().project("car-damage-detection-ha5mm")
model_damage = project_damage.version(1).model
Step 3: Run the Damage Detection Model
Then, we can run inferences on the input image using the damage detection model. After getting the prediction results, we will extract the detections and unpack the coordinates of the damaged area of the car.
# Path to the input image
img_path = "path_to_your_image"

# Run the models on the input image
result_damage = model_damage.predict(img_path, confidence=40).json()

# Extract labels and detections from the results
labels_damage = [item["class"] for item in result_damage["predictions"]]
detections_damage = sv.Detections.from_inference(result_damage)

# Extract coordinates of the damaged area
coordinates = []
for List_Coordinates in detections_damage.xyxy:
    for item in List_Coordinates:
        item = int(item)  # Convert to integer
        coordinates.append(item)

# Unpack coordinates
x1, y1, x2, y2 = coordinates
Step 4: Highlighting the Damaged Area in the Output Image
Now, we’ll be using the detections from step 3 to highlight the damaged area of the car on an output image.
# Initialize label and mask annotators
label_annotator = sv.LabelAnnotator(text_scale=0.15)
mask_annotator = sv.MaskAnnotator()
# Read the input image
image = cv2.imread(img_path)
# Annotate damaged areas of the car
annotated_image_damage = mask_annotator.annotate(
scene=image, detections=detections_damage)
# Display the annotated damaged areas image
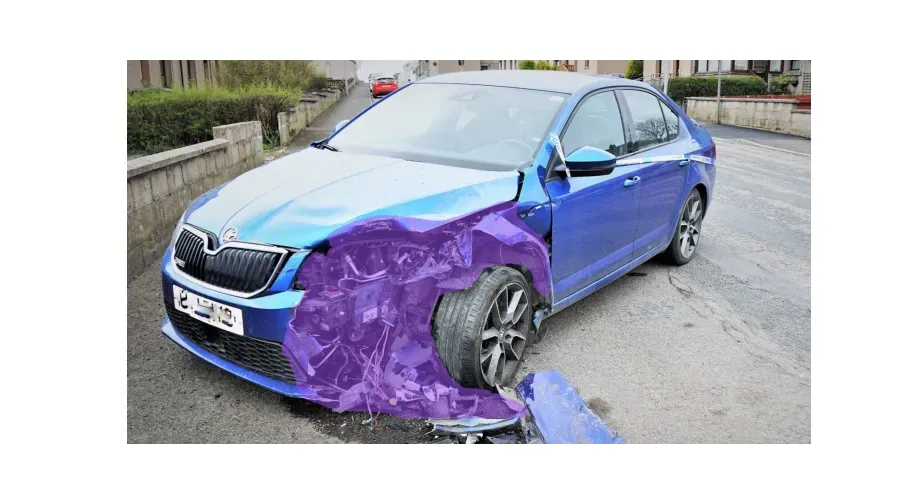
sv.plot_image(image=annotated_image_damage, size=(10, 10))The output image is shown below.
Step 5: Isolating the Damaged Area
We are going to crop the area of damage in the image and store the cropped image in a temporary directory as damage_image.png. We will be working with this image moving forward.
# Crop the damaged area from the original image
annotated_image_damage = annotated_image_damage[y1:y2, x1:x2]

# Create a temporary directory and save the cropped damaged area
temp_dir = tempfile.mkdtemp()
damage_detect_img = os.path.join(temp_dir, "damage_image.png")
cv2.imwrite(damage_detect_img, annotated_image_damage)
Step 6: Running Inferences Using the Car Parts Model
Then, we can run inferences on the cropped image using the model to segment the parts of the car. This allows us to localize our detections to a specific car part. Our first model tells us where damage may be. The second model tells us exactly which part is affected.
Finally, we print the labels of the car parts that have been detected in the cropped image and remove the temporary files we created.
# Run the parts detection model on the cropped damaged area
result_parts = model_parts.predict(damage_detect_img, confidence=15).json()
labels_parts = [item["class"] for item in result_parts["predictions"]]
detections_parts = sv.Detections.from_inference(result_parts)

# Print the parts of the car with probable damages
print("The parts of the car with probable damages are:")
for label in labels_parts:
    print(label)

# Remove the temporary files
os.remove(damage_detect_img)
os.rmdir(temp_dir)
The image below shows the output indicating that the parts of the car likely to be damaged are the wheel and the hood.

Impact and Future Potential
Computer vision is changing how we check our car damages. As this technology advances, insurance companies can use it to spot issues and fix cars faster. For example, right after a car accident, it could be used to check the damage on the spot. This means insurance companies can decide faster what needs to be done next.
It also benefits consumers. On-the-spot damage assessment can lead to a smoother claims process. With car damage detection, you could simply take pictures at the accident scene and submit them to your insurer through their app. The AI can analyze the photos, categorizing the damage and generating a repair cost projection. Streamlining this process, translates to faster repairs and quicker resolution for your claim.
Conclusion
We’ve taken a look at how combining two models that can segment car parts and segment car damage offers an efficient way to assess damaged cars. The solution we created can help provide precise localization of damages and faster evaluations.
With the help of computer vision, we can expect even more automation, leading to faster claims processing, reduced costs, and a smoother experience for everyone involved!
Cite this Post
Use the following entry to cite this post in your research:
Contributing Writer. (Mar 11, 2024). Assess Car Damage with Computer Vision. Roboflow Blog: https://blog.roboflow.com/assess-car-damage-with-computer-vision/