
In today’s content-driven world, media teams, marketers, and content creators manage vast libraries of images, often without structured metadata. This lack of organization makes it challenging to search for specific image qualities, curate content for projects, or analyze trends in visual assets. Manually tagging images with attributes like framing, lighting, or background tidiness is time-consuming and inefficient. SnapGrade solves this problem by automating photo evaluation and metadata tagging, enabling structured organization and smart content recommendations.
SnapGrade is a Python application that uses Roboflow-trained models to analyze images for face visibility, framing, lighting, clutter, and an overall photo score, embedding these tags directly into the image file. This blog walks through how I built SnapGrade, from training models to creating a user-friendly Tkinter GUI, and shows you how to replicate it for your own photo management needs.
Let’s jump into it!
Automated Image Quality Scoring & Metadata Tagging: Build Your App
SnapGrade combines three Roboflow-trained models (person detection, lighting classification, and clutter detection) with a Python application to deliver automated photo quality scoring and metadata tagging. This means that we need to create 3 different projects for 3 different models. Here’s the step-by-step process, covering both the model training and the code implementation:

Part 1: Training Models for Photo Evaluation
To make SnapGrade smart enough to judge photo quality, we require models to analyze three key aspects: framing, lighting, and background clutter. Using Roboflow, we can train models to handle each of these, customizing them for our needs.
1. Person Detection for Framing Assessment
First up, we need to figure out where people are in the photo to tag whether the subject is centred, off-centre, or awkwardly cropped. We can start with the Face Bounding Boxes Dataset from Roboflow Universe, which is great for detecting faces. To use it, I forked the project into my workspace with a single click, super easy, and you can do the same by hitting the “Fork” button on Roboflow and selecting your workspace.
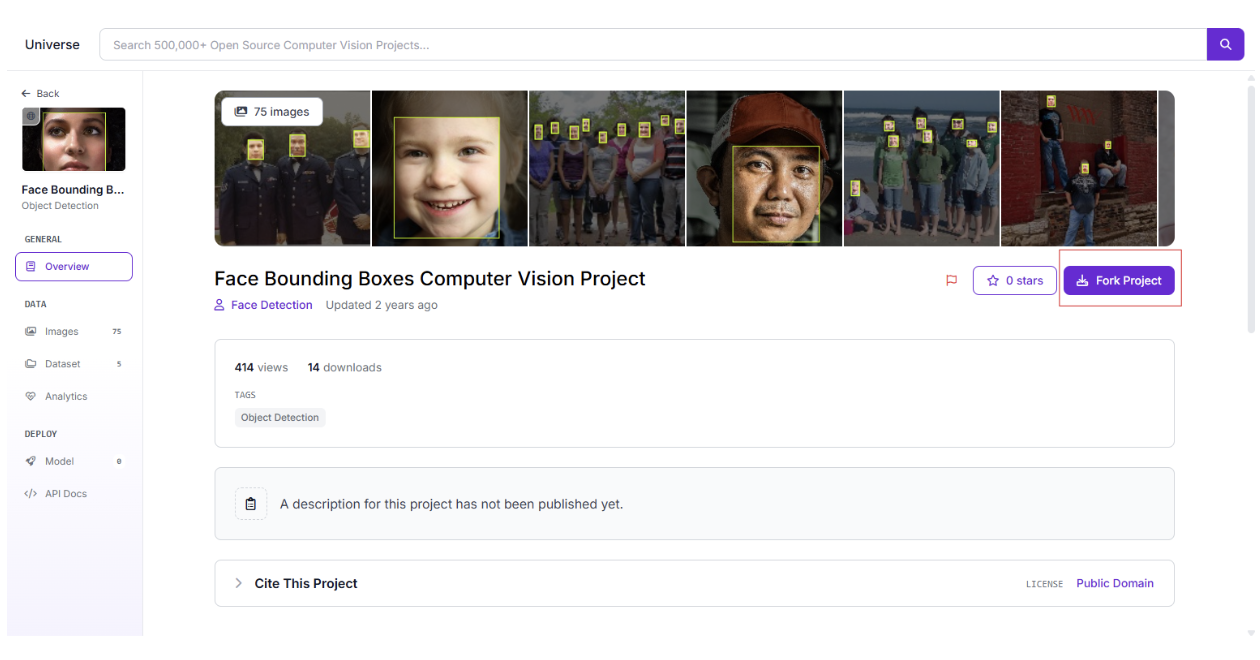
Since I wanted SnapGrade to handle both close-up portraits and full-body shots, I beefed up the dataset with my images of people in various poses and annotated them to mark subject positions. This gave the model a broader view of framing scenarios.
- Preprocessing:
- Resized images to 640x640 pixels to keep things consistent.
- Applied greyscale to cut down on colour noise that could distract the model.
- Tweaked contrast to make subjects pop against the background.
- Skipped augmentations like flips or rotations to keep framing true to real-world setups.
- Training: We can train an RF-DETR object detection model, which is fast and accurate for locating faces. I used a ~50% training, ~30% validation, ~20% test split to balance performance and evaluation, but this can be changed based on the creator. The model now powers tags like “Centred Subject,” “Off-Center Subject,” or “Cropped Subject” in the Python app.
- Dataset: Check out the dataset here: Face Bounding Boxes Dataset
Tip: When forking datasets, add your images to cover your specific use case; it makes a big difference!
2. Lighting Quality Classifier
Next, we can tackle lighting to tag photos as well-lit, underexposed, or overexposed. I found a solid dataset on Kaggle with images labelled for lighting conditions, which we can adapt for SnapGrade with custom labels like “High Dense” and “High Moderate” to describe exposure and brightness. Roboflow’s Batch Annotator was a lifesaver here, letting me label tons of images quickly and consistently. You should check out this feature for your projects as well.
- Preprocessing: We can keep it simple by resizing images to 640x640 pixels. I didn’t mess with colours since the lighting evaluation needs those hues to spot exposure differences.
- Training: We can use a Vision Transformer (ViT) model in Roboflow, which is great for understanding the overall scene. It reliably tags lighting conditions, making it easy to spot photos that are too dark or overly bright.
- Dataset: Grab the dataset here: Lighting Condition Dataset
3. Background Clutter Detection
Finally, we want to check how tidy or messy the background is. We can fork the Clean vs Messy Room Dataset from Roboflow Universe, which classifies spaces as clean or messy. It isn't perfect for our needs (rooms aren’t always the best for photo backgrounds), but it worked well enough after some tweaks.
- Preprocessing: We can resize images to 640x640 pixels and add an auto-orient step to ensure consistent alignment.
- Training: We can train another ViT classification model to distinguish clean from messy backgrounds. This powers the clutter spectrum in the coding section, from “Very Clean Image” to “Very Messy Clutter,” based on the model’s confidence.
- Dataset: See the dataset here: Clean vs Messy Room Dataset
Quick note: If your use case involves specific clutter types (e.g., office supplies or outdoor objects), customize the dataset with your images for better accuracy.
4. Creating the Roboflow Workflow
Now it's time to tie the models together in a Roboflow Workflow:
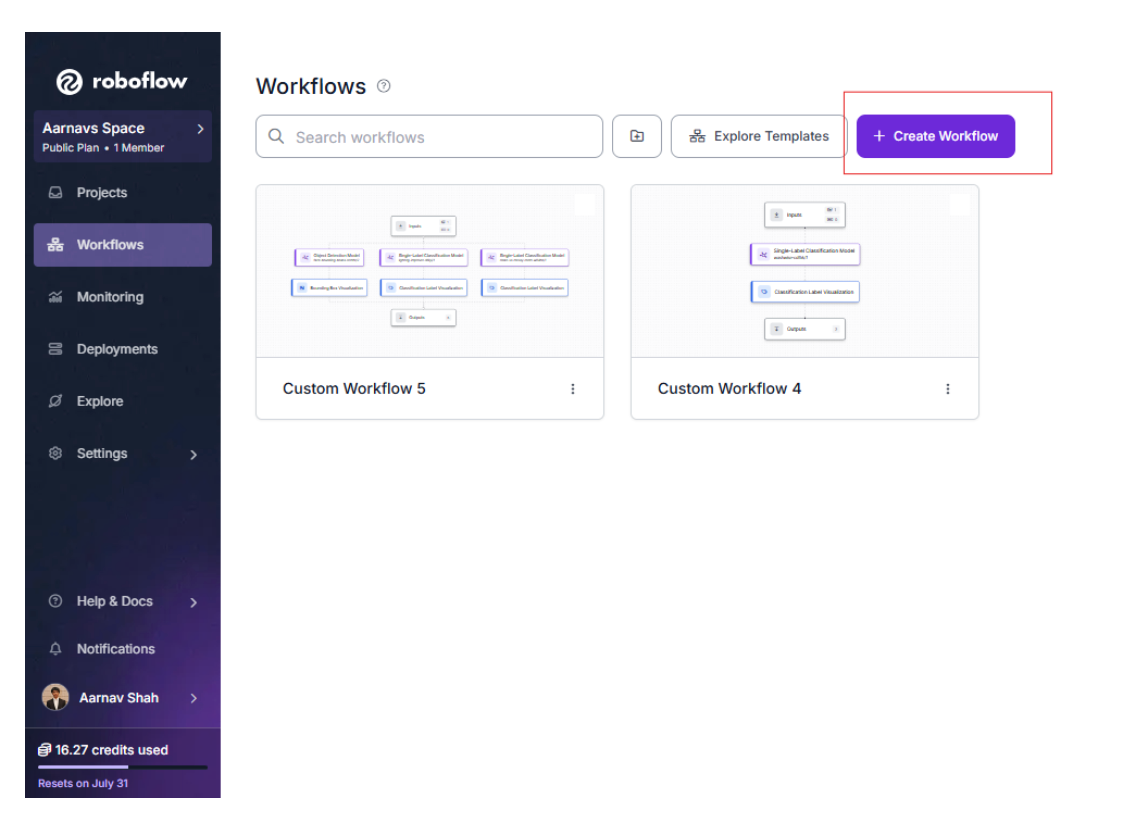
First, we can create our workflow:
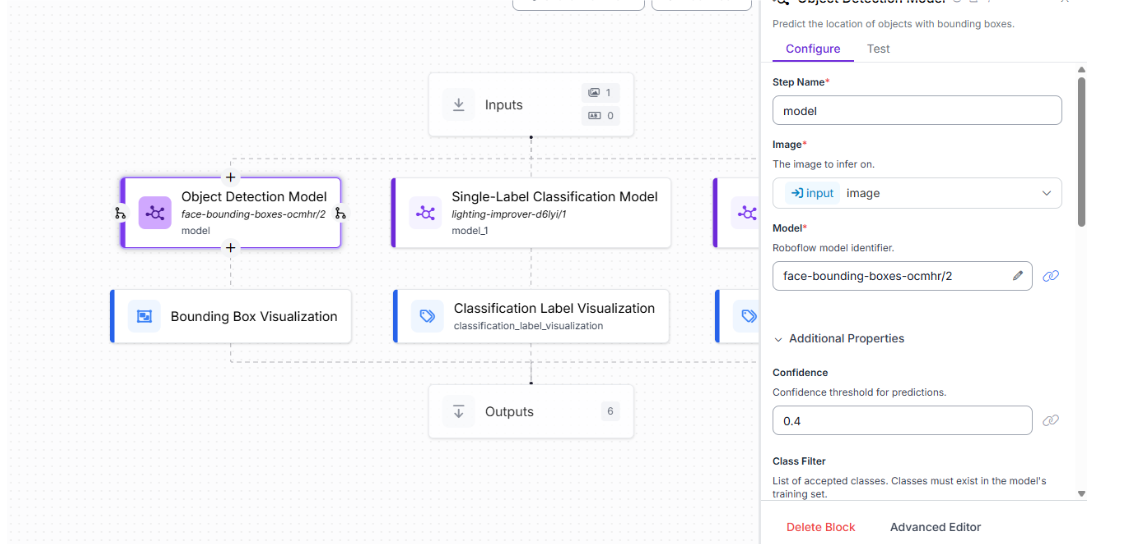
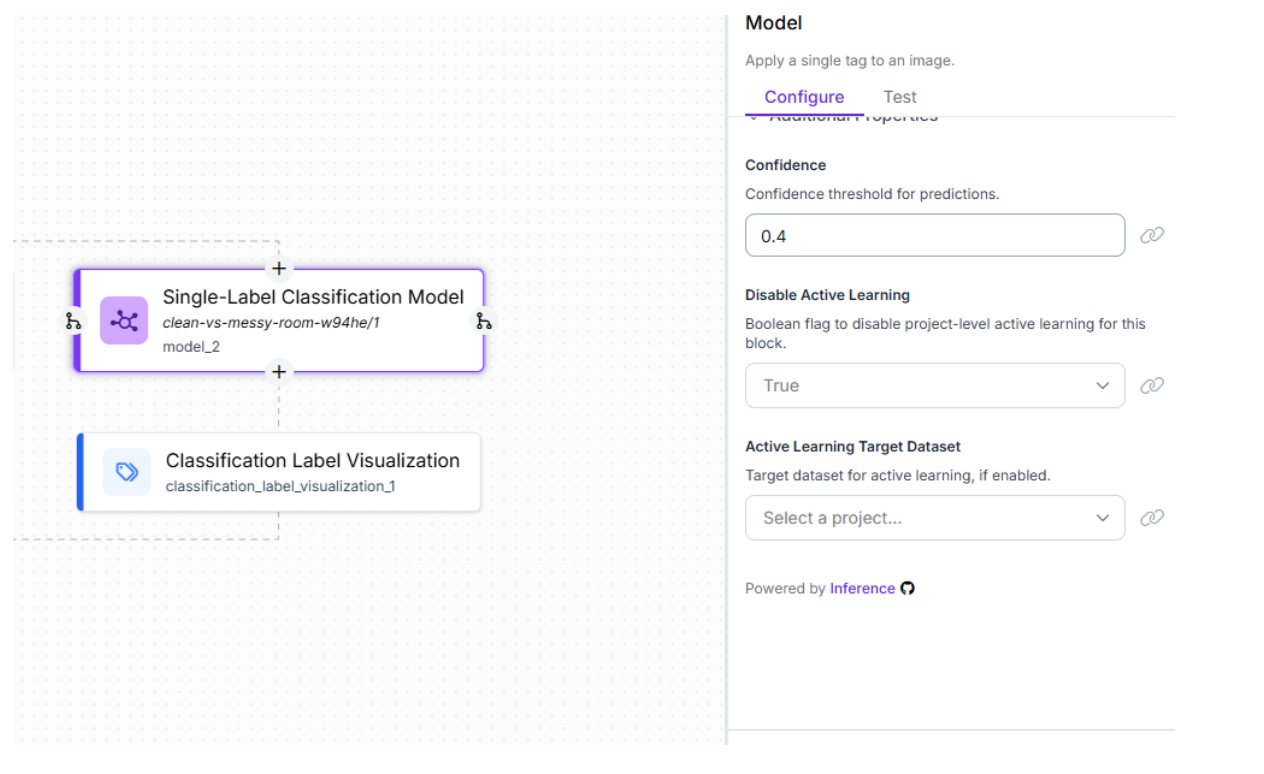
Then we can add all our models one by one as separate blocks. You can add Label Visualization blocks to overlay predictions on images for debugging, as shown, if you want.
For the first face detection model and its corresponding Label Visualization block, we can keep the default settings:
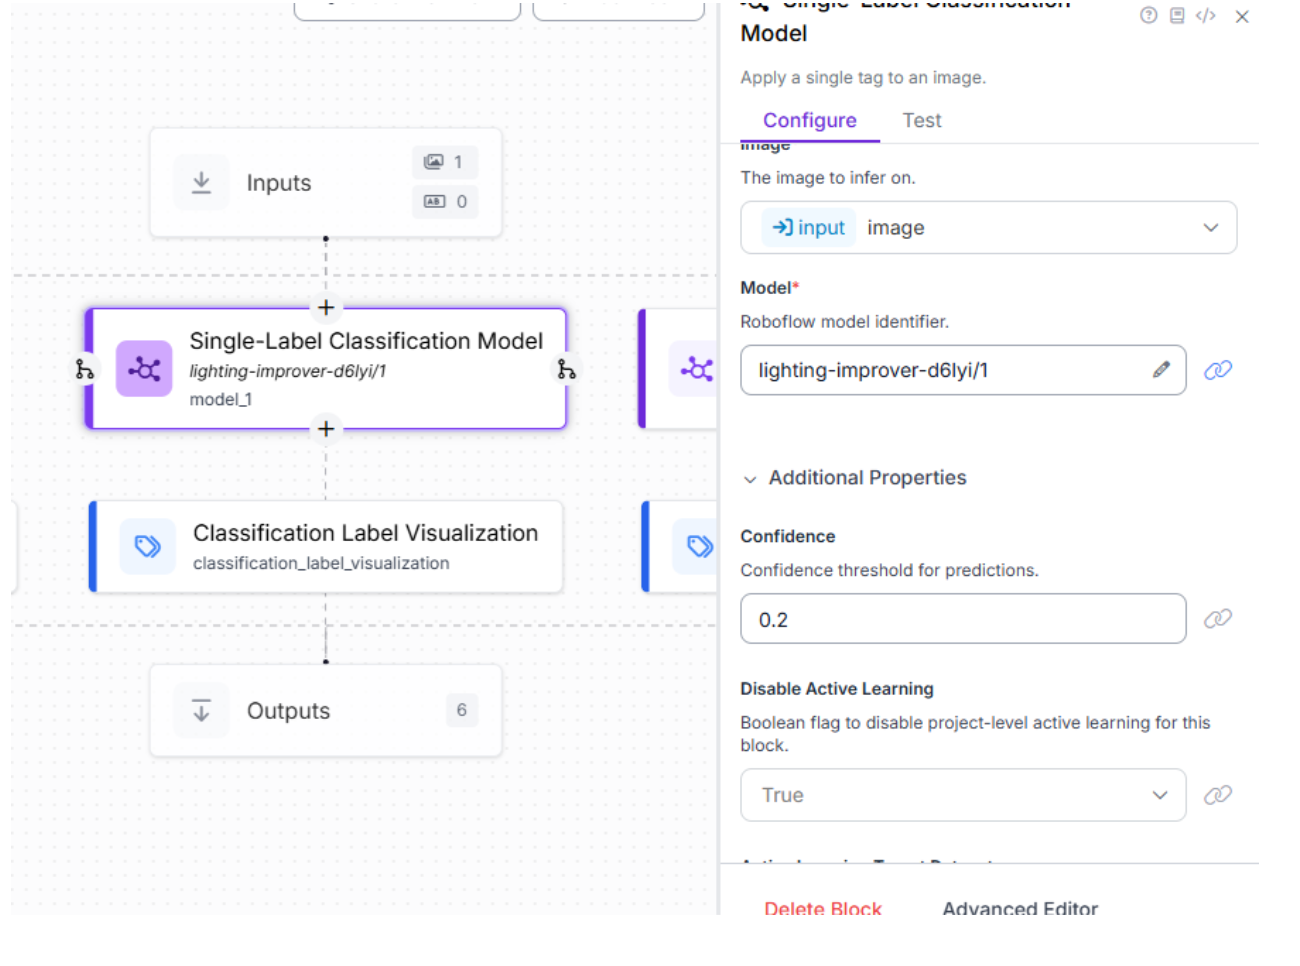
For the lighting classification model, we can bring the confidence threshold down to 0.2 in the Roboflow Workflow to make sure it catches all kinds of images, even those with weird lighting, like dim corners or funky shadows. This lower setting lets the model tag more photos confidently, giving us solid metadata like “High Dense” or “High Moderate” without missing the mark:
For the last model that classified between messy/clean layouts, the default settings are okay to keep:
An important thing to mention is that you should always test your workflow before trying to integrate it so that you can fully understand the quality of your models. If you don’t like their quality, it might be wise to retrain your models and rethink new additions/deletions in training data.
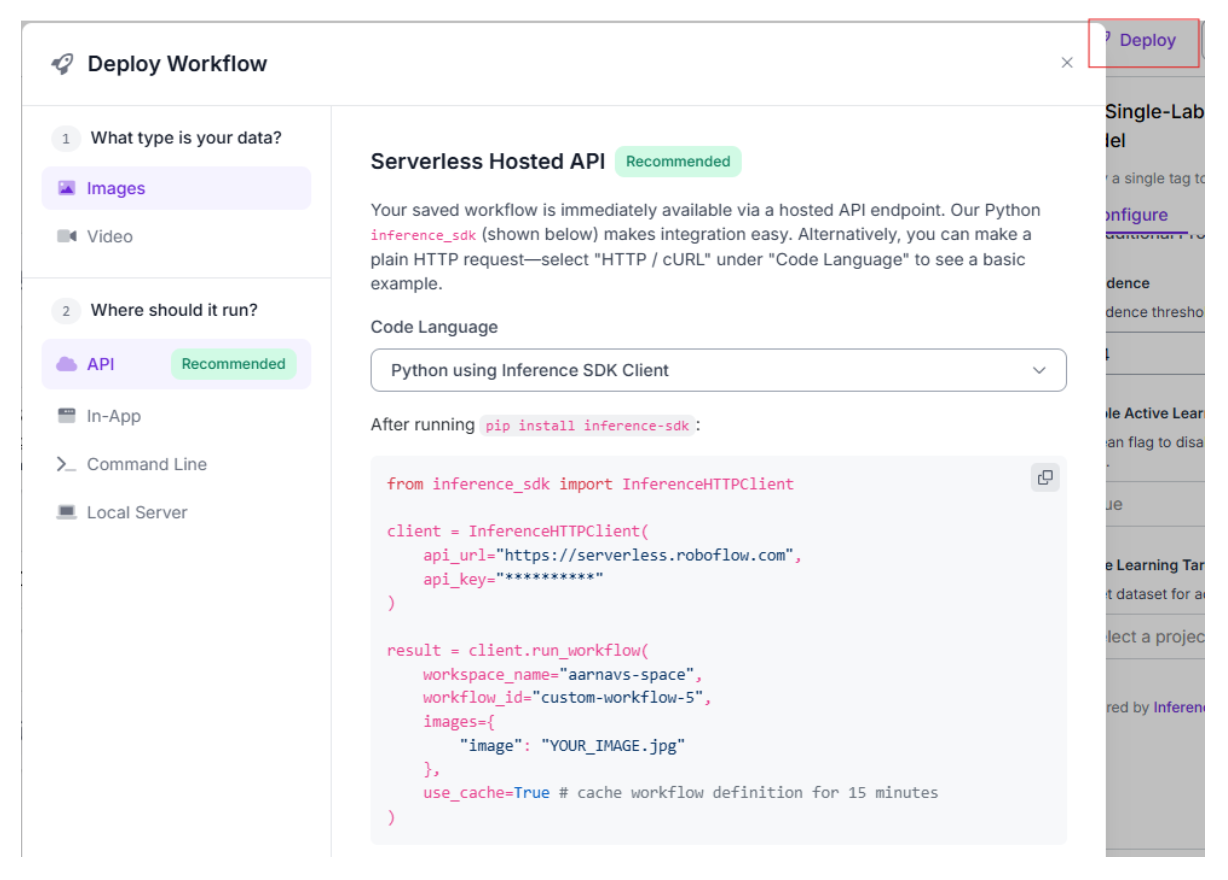
Finally, the workflow is accessible via API, enabling seamless integration with the Python application:
Part 2: Building the SnapGrade Python Application
With the models trained and workflow configured, we can build a Python application using Tkinter for a user-friendly GUI, Pillow for image handling, and inference_sdk for Roboflow API integration. The app will let users upload images, process them through the workflow, embed metadata (face visibility, framing, lighting, clutter, face count, and photo score) into the image file, and view the results. Use this GitHub repository for access to this code. Here’s how it works:
Firstly, we can create a virtual environment and install dependencies (tkinter, Pillow, inference_sdk, python-dotenv). API credentials can be stored in a .env file for security. For help with this, visit this link.
import os
from dotenv import load_dotenv
from inference_sdk import InferenceHTTPClient


# Load environment variables from .env file
load_dotenv()


API_KEY = os.getenv("API_KEY")
WORKSPACE_NAME = os.getenv("WORKSPACE_NAME")
WORKFLOW_ID = os.getenv("WORKFLOW_ID")


# Initialize Roboflow Client
client = InferenceHTTPClient(
    api_url="https://serverless.roboflow.com",
    api_key=API_KEY
)
Next, we can create the GUI. The SnapGradeApp class will build a Tkinter GUI with buttons for selecting images, running the workflow, and viewing embedded metadata. A text widget displays results.
import tkinter as tk
from tkinter import filedialog, messagebox


class SnapGradeApp:
    def __init__(self, master):
        self.master = master
        self.master.title("SnapGrade - Metadata Tagger")
        self.master.geometry("600x500")
        self.image_path = None
        self.tagged_image_path = None


        self.label = tk.Label(master, text="Upload an Image for Metadata Tagging", font=("Arial", 16))
        self.label.pack(pady=20)
        self.upload_btn = tk.Button(master, text="Select Image", command=self.upload_image, width=20)
        self.upload_btn.pack(pady=10)
        self.run_btn = tk.Button(master, text="Run SnapGrade", command=self.run_workflow, state=tk.DISABLED, width=20)
        self.run_btn.pack(pady=10)
        self.view_metadata_btn = tk.Button(master, text="View Embedded Metadata", command=self.view_embedded_metadata, state=tk.DISABLED, width=20)
        self.view_metadata_btn.pack(pady=10)
        self.result_text = tk.Text(master, height=15, width=60)
        self.result_text.pack(pady=20)
The buttons can be disabled until an image is selected, preventing errors.
Next, we’ll create the run_workflow method, which sends the uploaded image (JPEG or PNG) to the Roboflow Workflow API, merges the response into a single dictionary, and processes it to extract metadata.
def run_workflow(self):
    if not self.image_path:
        messagebox.showerror("Error", "No image selected.")
        return
    self.result_text.delete("1.0", tk.END)
    self.result_text.insert(tk.END, "Processing...\n")
    try:
        result = client.run_workflow(
            workspace_name=WORKSPACE_NAME,
            workflow_id=WORKFLOW_ID,
            images={"image": self.image_path},
            use_cache=True
        )
        predictions = {}
        if isinstance(result, list):
            for entry in result:
                if isinstance(entry, dict):
                    predictions.update(entry)
        else:
            raise ValueError("No valid results found in API response.")
        metadata = self.extract_metadata(predictions)
        self.display_metadata(metadata)
        self.save_metadata_to_image(metadata)
    except Exception as e:
        messagebox.showerror("API Error", str(e))
What I always find helpful while writing code is adding debugging logs (e.g., [SnapGrade DEBUG] Full API Response:), which can help clear confusion and, in this case, can help verify the API response.
Next, the extract_metadata method can process the API response to generate tags:
- Face Visibility: “Face Fully Visible” (confidence ≥ 0.7, not cropped, size ≥ 2% of image) or “Partially Obscured.”
- Framing: “Centred Subject” (within 15% of centre), “Off-centre Subject,” or “Cropped Subject.”
- Lighting: From the classifier (e.g., “High Dense”).
- Clutter: Spectrum from “Very Clean Image” (confidence ≥ 0.8) to “Very Messy Clutter.”
- Face Count: Number of detected faces.
- Photo Score: A 0–100 score, with weights:
- Face Visibility: 20 (fully visible), 10 (partially obscured).
- Framing: 20 (centred), 10 (off-centre).
- Lighting: 20 (High Dense), 15 (High Moderate).
- Clutter: 30 (clean), 20 (moderately clean), 10 (slight/moderate clutter), 5 (uncertain).
- Face Count: 10 (one face), 5 (multiple faces).
def extract_metadata(self, result_json):
    metadata = {
        "Face Visibility": "Unknown",
        "Framing": "Unknown",
        "Lighting": "Unknown",
        "Clutter": "Uncertain Clutter",
        "Face Count": 0,
        "Photo Score": 0
    }
    if "model_1_predictions" in result_json:
        metadata["Lighting"] = result_json["model_1_predictions"].get("top", "Unknown")
    if "model_2_predictions" in result_json:
        top_class = result_json["model_2_predictions"].get("top", "Unknown")
        confidence = result_json["model_2_predictions"].get("confidence", 0.0)
        if top_class == "Clean":
            if confidence >= 0.8:
                metadata["Clutter"] = "Very Clean Image"
            elif confidence >= 0.6:
                metadata["Clutter"] = "Clean Image"
            elif confidence >= 0.4:
                metadata["Clutter"] = "Moderately Clean Image"
            else:
                metadata["Clutter"] = "Slightly Clean Image"
    if "model_predictions" in result_json:
        img_info = result_json["model_predictions"].get("image", {})
        img_width = img_info.get("width", 1)
        img_height = img_info.get("height", 1)
        face_detections = [
            pred for pred in result_json["model_predictions"].get("predictions", [])
            if pred["class"].lower().startswith("face")
        ]
        metadata["Face Count"] = len(face_detections)
        if len(face_detections) > 0:
            main_face = max(face_detections, key=lambda f: f["width"] * f["height"])
            rel_size = (main_face["width"] * main_face["height"]) / (img_width * img_height)
            cropped = (
                main_face["x"] - main_face["width"]/2 <= 0.01 * img_width or
                main_face["x"] + main_face["width"]/2 >= 0.99 * img_width or
                main_face["y"] - main_face["height"]/2 <= 0.01 * img_height or
                main_face["y"] + main_face["height"]/2 >= 0.99 * img_height
            )
            metadata["Face Visibility"] = "Face Fully Visible" if main_face.get("confidence", 1.0) >= 0.7 and not cropped and rel_size >= 0.02 else "Partially Obscured"
            dist_x = abs(main_face["x"] - img_width/2) / img_width
            dist_y = abs(main_face["y"] - img_height/2) / img_height
            metadata["Framing"] = "Cropped Subject" if cropped else "Centered Subject" if dist_x < 0.15 and dist_y < 0.15 else "Off-Center Subject"
    score = 0
    if metadata["Face Visibility"] == "Face Fully Visible":
        score += 20
    elif metadata["Face Visibility"] == "Partially Obscured":
        score += 10
    if metadata["Framing"] == "Centered Subject":
        score += 20
    elif metadata["Framing"] == "Off-Center Subject":
        score += 10
    if metadata["Lighting"] == "High Dense":
        score += 20
    elif metadata["Lighting"] == "High Moderate":
        score += 15
    if metadata["Clutter"] in ["Very Clean Image", "Clean Image"]:
        score += 30
    elif metadata["Clutter"] in ["Moderately Clean Image", "Slightly Clean Image"]:
        score += 20
    elif metadata["Clutter"] in ["Slightly Messy Clutter", "Moderately Messy Clutter"]:
        score += 10
    elif metadata["Clutter"] == "Uncertain Clutter":
        score += 5
    if metadata["Face Count"] == 1:
        score += 10
    elif metadata["Face Count"] >= 2:
        score += 5
    metadata["Photo Score"] = score
    return metadata
This will produce a comprehensive set of tags and a quality score for each image.
Furthermore, to ensure metadata stays with the image, we can use Pillow to embed tags into the EXIF Image Description field (JPEG) or tEXt Comment chunk (PNG). The save_metadata_to_image method will save a new image with a _tagged suffix.
from PIL import Image


def save_metadata_to_image(self, metadata):
    try:
        metadata_string = "; ".join(f"{key}: {value}" for key, value in metadata.items())
        img = Image.open(self.image_path)
        img_format = img.format.lower()
        self.tagged_image_path = os.path.splitext(self.image_path)[0] + "_tagged." + ("jpg" if img_format in ["jpeg", "jpg"] else "png")
        if img_format in ["jpeg", "jpg"]:
            exif_data = img.getexif() or Image.Exif()
            exif_data[0x010E] = metadata_string
            img.save(self.tagged_image_path, format="JPEG", exif=exif_data, quality=95)
        elif img_format == "png":
            img.info["Comment"] = metadata_string
            img.save(self.tagged_image_path, format="PNG")
        self.result_text.insert(tk.END, f"\nMetadata embedded in image and saved to {self.tagged_image_path}")
    except Exception as e:
        json_filename = os.path.splitext(self.image_path)[0] + "_metadata.json"
        with open(json_filename, 'w') as f:
            json.dump(metadata, f, indent=4)
        self.result_text.insert(tk.END, f"\nError embedding metadata: {str(e)}\nFallback: Metadata saved to {json_filename}")
A JSON fallback will ensure data is preserved if embedding fails. To view metadata, we can use the GUI’s “View Embedded Metadata” button or ExifTool. For JPG images, we can simply go to the image's properties, and you’ll find the description section there. This is demonstrated in the demo.
Lastly, the view_embedded_metadata method reads the previously saved metadata from the _tagged image and displays it in the GUI, ensuring that we can verify tags without external tools.
def view_embedded_metadata(self):
    image_to_read = self.tagged_image_path if self.tagged_image_path and os.path.exists(self.tagged_image_path) else self.image_path
    try:
        img = Image.open(image_to_read)
        img_format = img.format.lower()
        metadata_string = img.getexif().get(0x010E) if img_format in ["jpeg", "jpg"] else img.info.get("Comment")
        self.result_text.delete("1.0", tk.END)
        if metadata_string:
            self.result_text.insert(tk.END, "Embedded Metadata:\n")
            for pair in metadata_string.split("; "):
                self.result_text.insert(tk.END, f"{pair}\n")
        else:
            self.result_text.insert(tk.END, "No embedded metadata found in the image.\n")
    except Exception as e:
        messagebox.showerror("Error", f"Failed to read embedded metadata: {str(e)}")
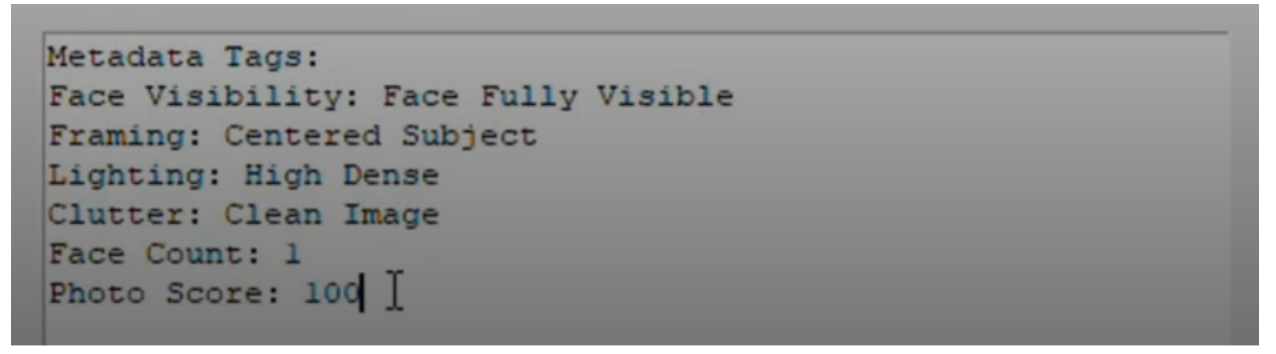
For an image with one face, good lighting, and a clean background, the GUI will show a result like so:
Why Is This Useful?
SnapGrade can transform photo management for media businesses:
- Photographers can filter high-quality images (e.g., Photo Score > 80) for portfolios.
- Marketing Teams can search for images with specific attributes (e.g., “Centred Subject, Clean Image”) for campaigns.
- Content Platforms can leverage metadata for recommendation systems or analytics, boosting engagement.
By embedding metadata directly into images, SnapGrade can ensure tags are portable across systems, eliminating the need for separate metadata files. Plus, it’s scalable. Instead of just rating images, you can create a custom Roboflow Workflow tailored to your business’s needs, like auto-tagging product photos, organizing marketing assets, or streamlining content libraries for lightning-fast searches on your own websites/onlin shops/etc.
Automated Image and Photo Tagging with Computer Vision
Ready to streamline your photo organization? You can train your models on Roboflow, configure the workflow, and use the provided Python code to build your SnapGrade app. The code is available on GitHub.
Have fun!
Written by Aarnav Shah
Cite this Post
Use the following entry to cite this post in your research:
Contributing Writer. (Jul 30, 2025). Automated Image Tagging with Computer Vision. Roboflow Blog: https://blog.roboflow.com/automated-image-tagging/