
In fields like fitness, fashion, and healthcare, accurate body measurements are crucial for tailoring solutions to individual needs. Manual measurements are time-consuming and prone to errors. So I built a real-time body measurement application using computer vision.
Powered by a YOLOv11 Keypoint Detection model from Roboflow Universe, this tool detects 17 body key points and calculates measurements like height, arm span, and shoulder width from a single image. Here’s how I built it, step by step.
How to Build a Body Measurement Application with Computer Vision
Let’s dive in!
Part 1: Create the Body Measurement Model
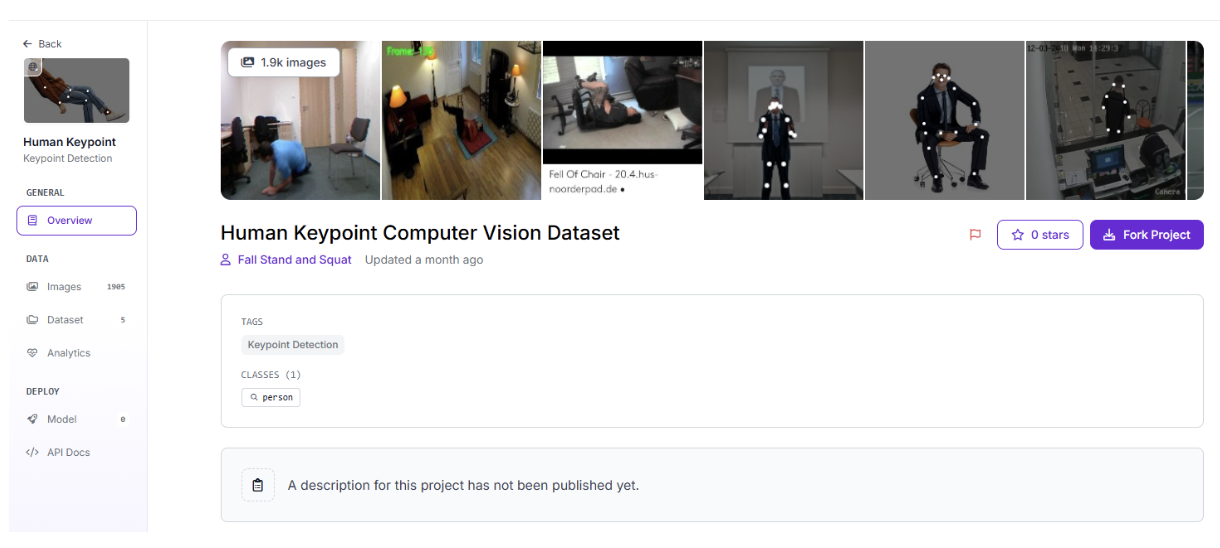
To measure body dimensions accurately, we require a robust key point detection model capable of identifying critical body landmarks (e.g., shoulders, hips, ankles). I sourced a pre-made project from Roboflow Universe, which detects 17 key points across the human body. Below, I outline the data collection, training, and workflow setup process to ensure reliable performance.
Collect Images
High-quality images are the backbone of any computer vision model. For this project, we need images of people in frontal poses, ideally standing straight, to capture keypoints like the nose, eyes, shoulders, elbows, wrists, hips, knees, and ankles. The model from Roboflow Universe comes with a comprehensive dataset of annotated images, which I used as the foundation. These images cover diverse body types and poses, ensuring the model generalizes well.
Tips:
- Ensure images have consistent lighting to minimize noise.
- Use frontal views for optimal key point detection.
- If needed, supplement the dataset with custom images to improve performance in specific scenarios (e.g., varied clothing or backgrounds).
Since the model is pre-trained and forked from Roboflow Universe, annotations for the 17 keypoints (e.g., new-point-0 for Nose, new-point-5 for Right Shoulder) are already provided, allowing us to focus on training and deployment.
Train the Model
The Key point Detection model was trained using Roboflow’s pipeline with the following configurations:
- Preprocessing:
- Auto-Orient: Applied to correct image rotations, ensuring consistent key point alignment.
- Resize: Stretched to 640x640 pixels to standardize input dimensions, critical for accurate key point localization.
- Augmentations (to enhance robustness):
- Outputs per training example: 5, to generate multiple augmented versions.
- Brightness: Varied between -15% and +15% to handle different lighting conditions.
- Exposure: Adjusted between -10% and +10% to improve model resilience.

The project itself was trained on the Yolov11 (accurate) model.
Training took several hours due to the large dataset. The resulting model achieves high accuracy in detecting 17 keypoints, with confidence scores typically around ~0.99 for clear images. I tested it with sample images to confirm it accurately identifies keypoints like Left Shoulder and Right Ankle, even in varied poses.
Tips:
- Monitor Roboflow’s training metrics (e.g., keypoint detection accuracy) to ensure the model isn’t overfitting.
- Test with diverse images (e.g., different body types, clothing) to verify robustness.
- Save the trained model version in Roboflow for reproducibility.
Create a Workflow
For real-time inference, I created a simple Roboflow Workflow by attaching a visualization block to the YOLOv11 model. This block overlays detected keypoints on the input image, producing a visual output with labelled points (e.g., dots on shoulders, hips). The workflow takes an image as input, runs key point detection, and outputs:
- Keypoint data: A list of 17 keypoints with class names (e.g., new-point-0), x/y coordinates, and confidence scores.
- Visualization image: A base64-encoded image or URL showing the input image with keypoints marked.
The workflow’s simplicity ensures fast processing, critical for real-time applications. I set the confidence threshold to the default 0.4 to balance sensitivity and precision, reducing false positives while capturing all relevant keypoints.
Tips:
- Test the workflow in Roboflow’s interface with sample images to verify keypoint accuracy.
- Adjust the confidence threshold (0.3–0.5) based on model performance.
Deploy the Model
With the workflow configured, I deployed it via Roboflow’s API for real-time inference. The workflow outputs:
- keypoint_visualization: A base64-encoded image or URL showing the input image with keypoints overlaid.
- predictions: A list of detected keypoints with details (class, x/y coordinates, confidence).
Next, I built a Python application with a Tkinter GUI to display these outputs and calculate body measurements, which I cover below.
Part 2: Build the Python Application
Now, how can we determine how far the user is from the camera without using extra hardware? One simple method I considered is leveraging the distance between the user’s eyes. By asking the user to input their actual interpupillary distance (the distance between their eyes), we can compare that real-world measurement to the pixel distance between the eye keypoints detected by the model. This gives us a scaling ratio, which can then be used to estimate other body measurements accurately, regardless of how close or far the user is from the camera.

Thus, we design the Python application to process the Roboflow Workflow’s outputs (keypoint data and visualization image) and display body measurements in a user-friendly, dark-themed Tkinter GUI. The application calculates measurements using a user-provided eye distance (in cm) to scale pixel distances to real-world units. Let’s walk through the code, covering setup, keypoint mapping, measurement calculations, GUI layout, and processing logic.
Setup and Dependencies
First, we create a virtual environment and install the required packages:
pip install tkinter ttkbootstrap pillow requests inference-sdk python-dotenvWe store sensitive Roboflow credentials (API key, workspace name, workflow ID) in a .env file for security. For guidance on .env files, see this article.
ROBOFLOW_API_KEY=your_api_key
ROBOFLOW_WORKSPACE=your_workspace
ROBOFLOW_WORKFLOW_ID=your_workflow_id
This ensures secure configuration without hard-coding sensitive data.
Code Section 1: Imports and Environment Setup
We start with the necessary imports and load environment variables.
import tkinter as tk
from tkinter import ttk, filedialog, messagebox
from PIL import Image, ImageTk
import requests
import base64
from io import BytesIO
import math
from typing import List, Dict, Tuple, Optional
from inference_sdk import InferenceHTTPClient
import ttkbootstrap as ttk
from ttkbootstrap.constants import *
from ttkbootstrap.style import Style
from dotenv import load_dotenv
import os


# Load environment variables from .env file
load_dotenv()
Explanation:
- tkinter and ttkbootstrap create the GUI with a modern dark theme (superhero).
- PIL (Pillow) handles image loading and resizing.
- requests downloads visualization images if provided as URLs.
- inference_sdk interfaces with Roboflow’s API.
- python-dotenv loads the .env file, securely accessing ROBOFLOW_API_KEY, ROBOFLOW_WORKSPACE, and ROBOFLOW_WORKFLOW_ID.
- math, base64, BytesIO, and typing support calculations and data handling.
Code Section 2: Keypoint Mapping
The KeypointMapper class maps Roboflow’s keypoint class names (e.g., new-point-0) to human-readable body parts (e.g., Nose) and helps locate specific keypoints.
class KeypointMapper:
    """Maps keypoint class names to body parts"""

    KEYPOINT_MAPPING = {
        'new-point-0': 'Nose',
        'new-point-1': 'Right Eye',
        'new-point-2': 'Left Eye',
        'new-point-3': 'Right Ear',
        'new-point-4': 'Left Ear',
        'new-point-5': 'Right Shoulder',
        'new-point-6': 'Left Shoulder',
        'new-point-7': 'Right Elbow',
        'new-point-8': 'Left Elbow',
        'new-point-9': 'Right Wrist',
        'new-point-10': 'Left Wrist',
        'new-point-11': 'Right Hip',
        'new-point-12': 'Left Hip',
        'new-point-13': 'Right Knee',
        'new-point-14': 'Left Knee',
        'new-point-15': 'Right Ankle',
        'new-point-16': 'Left Ankle'
    }

    @classmethod
    def get_body_part(cls, class_name: str) -> str:
        """Get body part name from class name"""
        return cls.KEYPOINT_MAPPING.get(class_name, class_name)

    @classmethod
    def find_keypoint_by_part(cls, keypoints: List[Dict], body_part: str) -> Optional[Dict]:
        """Find keypoint by body part name"""
        for kp in keypoints:
            if cls.get_body_part(kp['class']) == body_part:
                return kp
        return None
Explanation:
- KEYPOINT_MAPPING defines the 17 key points detected by the YOLOv11 model, mapping Roboflow’s class names to body parts.
- get_body_part retrieves the human-readable name for a key point (e.g., new-point-0 → Nose).
- find_keypoint_by_part locates a key point dictionary (with x, y, confidence) by body part name, used for measurement calculations.
Code Section 3: Measurement Calculations
The MeasurementCalculator class computes body measurements using key point coordinates and a scale ratio derived from the user’s eye distance input.
class MeasurementCalculator:
    """Calculate various body measurements from keypoints"""

    def __init__(self, keypoints: List[Dict], scale_ratio: float):
        self.keypoints = keypoints
        self.scale_ratio = scale_ratio
        self.mapper = KeypointMapper()

    def calculate_distance(self, point1: Dict, point2: Dict) -> float:
        """Calculate Euclidean distance between two points in pixels"""
        return math.sqrt(
            (point1['x'] - point2['x'])**2 +
            (point1['y'] - point2['y'])**2
        )

    def pixels_to_cm(self, pixel_distance: float) -> float:
        """Convert pixel distance to centimeters"""
        return pixel_distance / self.scale_ratio

    def get_eye_distance(self) -> Optional[float]:
        """Calculate eye distance in pixels"""
        left_eye = self.mapper.find_keypoint_by_part(self.keypoints, 'Left Eye')
        right_eye = self.mapper.find_keypoint_by_part(self.keypoints, 'Right Eye')
        if left_eye and right_eye:
            return self.calculate_distance(left_eye, right_eye)
        return None

    def get_shoulder_width(self) -> Optional[float]:
        """Calculate shoulder width in cm"""
        left_shoulder = self.mapper.find_keypoint_by_part(self.keypoints, 'Left Shoulder')
        right_shoulder = self.mapper.find_keypoint_by_part(self.keypoints, 'Right Shoulder')
        if left_shoulder and right_shoulder:
            pixel_distance = self.calculate_distance(left_shoulder, right_shoulder)
            return self.pixels_to_cm(pixel_distance)
        return None

    def get_arm_span(self) -> Optional[float]:
        """Calculate arm span by summing arm segments and shoulder width"""
        left_shoulder = self.mapper.find_keypoint_by_part(self.keypoints, 'Left Shoulder')
        left_elbow = self.mapper.find_keypoint_by_part(self.keypoints, 'Left Elbow')
        left_wrist = self.mapper.find_keypoint_by_part(self.keypoints, 'Left Wrist')
        right_shoulder = self.mapper.find_keypoint_by_part(self.keypoints, 'Right Shoulder')
        right_elbow = self.mapper.find_keypoint_by_part(self.keypoints, 'Right Elbow')
        right_wrist = self.mapper.find_keypoint_by_part(self.keypoints, 'Right Wrist')
        left_upper_arm = 0
        if left_shoulder and left_elbow:
            left_upper_arm = self.calculate_distance(left_shoulder, left_elbow)
        left_forearm = 0
        if left_elbow and left_wrist:
            left_forearm = self.calculate_distance(left_elbow, left_wrist)
        right_upper_arm = 0
        if right_shoulder and right_elbow:
            right_upper_arm = self.calculate_distance(right_shoulder, right_elbow)
        right_forearm = 0
        if right_elbow and right_wrist:
            right_forearm = self.calculate_distance(right_elbow, right_wrist)
        shoulder_width = 0
        if left_shoulder and right_shoulder:
            shoulder_width = self.calculate_distance(left_shoulder, right_shoulder)
        total_pixel_distance = left_upper_arm + left_forearm + right_upper_arm + right_forearm + shoulder_width
        if total_pixel_distance > 0:
            return self.pixels_to_cm(total_pixel_distance)
        return None

    def get_height(self) -> Optional[float]:
        """Calculate approximate height in cm, including estimated head height"""
        left_eye = self.mapper.find_keypoint_by_part(self.keypoints, 'Left Eye')
        right_eye = self.mapper.find_keypoint_by_part(self.keypoints, 'Right Eye')
        left_ankle = self.mapper.find_keypoint_by_part(self.keypoints, 'Left Ankle')
        right_ankle = self.mapper.find_keypoint_by_part(self.keypoints, 'Right Ankle')
        if (left_eye or right_eye) and (left_ankle or right_ankle):
            eye_y = (left_eye['y'] + right_eye['y']) / 2 if left_eye and right_eye else (left_eye or right_eye)['y']
            ankle_y = max(left_ankle['y'], right_ankle['y']) if left_ankle and right_ankle else (left_ankle or right_ankle)['y']
            body_pixel_distance = abs(eye_y - ankle_y)
            head_top_pixel_distance = self.get_head_top_to_eye_length() or 0
            total_pixel_distance = body_pixel_distance + head_top_pixel_distance
            return self.pixels_to_cm(total_pixel_distance)
        return None

    def get_head_top_to_eye_length(self) -> Optional[float]:
        """Estimate vertical distance from top of head to eyes"""
        left_eye = self.mapper.find_keypoint_by_part(self.keypoints, 'Left Eye')
        right_eye = self.mapper.find_keypoint_by_part(self.keypoints, 'Right Eye')
        nose = self.mapper.find_keypoint_by_part(self.keypoints, 'Nose')
        if (left_eye or right_eye) and nose:
            eye_y = (left_eye['y'] + right_eye['y']) / 2 if left_eye and right_eye else (left_eye or right_eye)['y']
            eye_to_nose_vertical_dist = abs(eye_y - nose['y'])
            estimated_dist = eye_to_nose_vertical_dist * 2.0
            return estimated_dist
        return None
Explanation:
- MeasurementCalculator initializes with key points and a scale ratio (pixels/cm).
- calculate_distance computes the Euclidean distance between two key points in pixels.
- pixels_to_cm converts pixel distances to centimetres using the scale ratio.
- get_eye_distance calculates the pixel distance between left and right eye key points, used for scaling.
- get_shoulder_width measures the distance between shoulder key points, converted to cm.
- get_arm_span sums distances for the left upper arm, left forearm, right upper arm, right forearm, and shoulder width.
- get_height estimates height from eyes to ankles, adding an estimated head height (based on eye-to-nose distance).
- Additional methods (not shown for brevity) calculate waist width, arm lengths, leg lengths, thigh lengths, shin lengths, and torso length, all using similar logic.
- get_all_measurements compiles all available measurements into a dictionary, filtering out None values.
The scale ratio (as mentioned before) is derived from the user-provided real-world eye distance (e.g., 6.5 cm) and the pixel eye distance, enabling accurate conversion to centimetres (e.g., scale_ratio = eye_distance_pixels / eye_distance_real).
Code Section 4: Formatting Results
The format_measurement_results function organizes measurements for display in a table.
def format_measurement_results(measurements: Dict[str, float]) -> List[Dict[str, str]]:
    """Format measurement results as a list of dictionaries for table display"""
    categories = {
        'Overall': ['Height', 'Arm Span', 'Shoulder Width', 'Waist Width', 'Torso Length'],
        'Arms': ['Left Arm Length', 'Right Arm Length', 'Left Upper Arm', 'Right Upper Arm', 'Left Forearm', 'Right Forearm'],
        'Legs': ['Left Leg Length', 'Right Leg Length', 'Left Thigh', 'Right Thigh', 'Left Shin', 'Right Shin']
    }

    result = []
    for category, keys in categories.items():
        for key in keys:
            if key in measurements:
                result.append({
                    'Category': category,
                    'Measurement': key,
                    'Value': f"{measurements[key]:.1f} cm"
                })
    return result
Explanation:
- Organizes measurements into categories: Overall (e.g., Height), Arms (e.g., Left Arm Length), and Legs (e.g., Right Thigh).
- Formats each measurement as a dictionary with Category, Measurement, and Value (in cm, rounded to one decimal place).
- Used to populate the GUI’s Treeview table for a clean, categorized display.
Code Section 5: GUI Class Initialization
The BodyMeasurementApp class sets up the Tkinter GUI with a dark theme and initializes key variables.
class BodyMeasurementApp:
    def __init__(self, root):
        self.root = root
        self.root.title("Body Measurement Analyzer")
        self.root.geometry("1400x800")

        # Initialize variables
        self.original_image = None
        self.processed_image = None
        self.eye_distance_pixels = None
        self.eye_distance_real = None
        self.keypoints = []
        self.scale_ratio = None
        self.results_expanded = True
        self.controls_expanded = True
        self.image_panel_size = (600, 500)  # Initial size, updated dynamically

        # Initialize Roboflow client
        self.client = InferenceHTTPClient(
            api_url="https://serverless.roboflow.com",
            api_key=os.getenv("ROBOFLOW_API_KEY")
        )

        # Configure style
        self.style = Style(theme='superhero')
        self.style.configure('TFrame', background='#1a1a1a')  # Deep black background
        self.style.configure('Card.TFrame', background='#1a1a1a', relief='flat', bordercolor='#2c2c2c', borderwidth=1)
        self.style.configure('TLabel', background='#1a1a1a', foreground='#ffffff')
        self.style.configure('primary.TLabel', foreground='#0d6efd', font=('Segoe UI', 14, 'bold'))
        self.style.configure('secondary.TLabel', foreground='#6c757d')
        self.style.configure('primary.TButton', background='#0d6efd', foreground='#ffffff', font=('Segoe UI', 10))
        self.style.configure('success.TButton', background='#28a745', foreground='#ffffff', font=('Segoe UI', 10))
        self.style.configure('primary.Outline.TButton', background='#1a1a1a', foreground='#0d6efd', font=('Segoe UI', 10))
        self.style.configure('info.TEntry', fieldbackground='#2c2c2c', foreground='#ffffff')
        self.style.configure('primary.Treeview', background='#2c2c2c', fieldbackground='#2c2c2c', foreground='#ffffff')
        self.style.configure('primary.Treeview.Heading', background='#0d6efd', foreground='#ffffff', font=('Segoe UI', 10, 'bold'))
        self.style.configure('info.TLabel', background='#1a1a1a', foreground='#17a2b8')
        self.style.configure('info.Horizontal.TProgressbar', troughcolor='#2c2c2c', background='#17a2b8')

        self.setup_ui()
Explanation:
- Initializes a 1400x800 window titled “Body Measurement Analyzer.”
- Tracks variables for images, key points, eye distances, and scale ratio.
- Uses ttkbootstrap’s superhero theme for a dark look (#1a1a1a background, #0d6efd blue accents, #28a745 green buttons).
- Configures styles for frames, labels, buttons, entries, and Treeview for a consistent, modern appearance.
- Initializes the Roboflow client with the API key from the .env file.
Code Section 6: GUI Layout
The setup_ui method creates a two-panel layout: a left panel for controls and results, and a right panel for images.
def setup_ui(self):
    # Main frame
    main_frame = ttk.Frame(self.root, padding=20)
    main_frame.grid(row=0, column=0, sticky=(tk.W, tk.E, tk.N, tk.S))

    # Configure grid weights
    self.root.columnconfigure(0, weight=1)
    self.root.rowconfigure(0, weight=1)
    main_frame.columnconfigure(0, weight=1)
    main_frame.columnconfigure(1, weight=3)
    main_frame.rowconfigure(0, weight=1)

    # Left panel for controls and results
    left_panel = ttk.Frame(main_frame, style='Card.TFrame')
    left_panel.grid(row=0, column=0, sticky=(tk.W, tk.E, tk.N, tk.S), padx=(0, 20))

    # Controls section (collapsible)
    controls_header = ttk.Frame(left_panel)
    controls_header.grid(row=0, column=0, sticky=(tk.W, tk.E), pady=(0, 10))
    ttk.Label(controls_header, text="Controls", style='primary.TLabel').grid(row=0, column=0, sticky=tk.W)
    ttk.Button(controls_header, text="▼", command=self.toggle_controls, style='primary.Outline.TButton', width=3).grid(row=0, column=1, sticky=tk.E)

    self.controls_frame = ttk.Frame(left_panel, padding=10)
    self.controls_frame.grid(row=1, column=0, sticky=(tk.W, tk.E))

    # Image upload
    ttk.Label(self.controls_frame, text="Upload Image", font=('Segoe UI', 10)).grid(row=0, column=0, sticky=tk.W, pady=(0, 5))
    ttk.Button(self.controls_frame, text="Select Image", command=self.select_image, style='primary.TButton', width=15).grid(row=1, column=0, sticky=(tk.W, tk.E), pady=(0, 10))

    # Eye distance input
    ttk.Label(self.controls_frame, text="Eye Distance (cm)", font=('Segoe UI', 10)).grid(row=2, column=0, sticky=tk.W, pady=(0, 5))
    self.eye_distance_var = tk.StringVar()
    ttk.Entry(self.controls_frame, textvariable=self.eye_distance_var, width=10, style='info.TEntry').grid(row=3, column=0, sticky=(tk.W, tk.E), pady=(0, 10))

    # Analyze button
    self.analyze_button = ttk.Button(self.controls_frame, text="Analyze", command=self.process_image, style='success.TButton', width=15)
    self.analyze_button.grid(row=4, column=0, sticky=(tk.W, tk.E), pady=(0, 10))

    # Results section (collapsible)
    results_header = ttk.Frame(left_panel)
    results_header.grid(row=2, column=0, sticky=(tk.W, tk.E), pady=(10, 10))
    ttk.Label(results_header, text="Results", style='primary.TLabel').grid(row=0, column=0, sticky=tk.W)
    ttk.Button(results_header, text="▼", command=self.toggle_results, style='primary.Outline.TButton', width=3).grid(row=0, column=1, sticky=tk.E)

    self.results_frame = ttk.Frame(left_panel, padding=10)
    self.results_frame.grid(row=3, column=0, sticky=(tk.W, tk.E, tk.N, tk.S))

    # Results table
    self.results_tree = ttk.Treeview(self.results_frame, columns=('Category', 'Measurement', 'Value'), show='headings', style='primary.Treeview')
    self.results_tree.heading('Category', text='Category')
    self.results_tree.heading('Measurement', text='Measurement')
    self.results_tree.heading('Value', text='Value (cm)')
    self.results_tree.column('Category', width=100)
    self.results_tree.column('Measurement', width=150)
    self.results_tree.column('Value', width=100)
    self.results_tree.grid(row=0, column=0, sticky=(tk.W, tk.E, tk.N, tk.S))

    scrollbar = ttk.Scrollbar(self.results_frame, orient="vertical", command=self.results_tree.yview, style='primary.Vertical.TScrollbar')
    self.results_tree.configure(yscrollcommand=scrollbar.set)
    scrollbar.grid(row=0, column=1, sticky=(tk.N, tk.S))

    # Keypoints text
    self.keypoints_text = tk.Text(self.results_frame, height=10, width=40, font=('Segoe UI', 9), wrap=tk.WORD, bg='#212529', fg='#ffffff', bd=0)
    self.keypoints_text.grid(row=1, column=0, sticky=(tk.W, tk.E), pady=(10, 0))
    keypoints_scrollbar = ttk.Scrollbar(self.results_frame, orient="vertical", command=self.keypoints_text.yview, style='primary.Vertical.TScrollbar')
    self.keypoints_text.configure(yscrollcommand=keypoints_scrollbar.set)
    keypoints_scrollbar.grid(row=1, column=1, sticky=(tk.N, tk.S))

    # Right panel for images
    self.image_panel = ttk.Frame(main_frame, style='Card.TFrame')
    self.image_panel.grid(row=0, column=1, sticky=(tk.W, tk.E, tk.N, tk.S))
    self.image_panel.rowconfigure(1, weight=1)  # Original image
    self.image_panel.rowconfigure(3, weight=3)  # Processed image (3x area)

    # Original image
    ttk.Label(self.image_panel, text="Original Image", font=('Segoe UI', 12, 'bold')).grid(row=0, column=0, sticky=tk.W, pady=(0, 10))
    self.original_label = ttk.Label(self.image_panel, text="No image selected", style='secondary.TLabel', background='#1a1a1a', anchor='center')
    self.original_label.grid(row=1, column=0, sticky=(tk.W, tk.E, tk.N, tk.S), pady=(0, 20))

    # Processed image
    ttk.Label(self.image_panel, text="Processed Image", font=('Segoe UI', 12, 'bold')).grid(row=2, column=0, sticky=tk.W, pady=(0, 10))
    self.processed_label = ttk.Label(self.image_panel, text="No processed image", style='secondary.TLabel', background='#1a1a1a', anchor='center')
    self.processed_label.grid(row=3, column=0, sticky=(tk.W, tk.E, tk.N, tk.S))

    # Status bar with progress
    status_frame = ttk.Frame(main_frame)
    status_frame.grid(row=1, column=0, columnspan=2, sticky=(tk.W, tk.E), pady=(10, 0))
    self.status_var = tk.StringVar(value="Ready")
    ttk.Label(status_frame, textvariable=self.status_var, style='info.TLabel', padding=5).grid(row=0, column=0, sticky=tk.W)
    self.progress = ttk.Progressbar(status_frame, mode='indeterminate', style='info.Horizontal.TProgressbar')
    self.progress.grid(row=0, column=1, sticky=(tk.E), padx=10)
    status_frame.columnconfigure(0, weight=1)

    # Bind window resize to update image panel size
    self.image_panel.bind('<Configure>', self.update_image_panel_size)
Explanation:
- Layout: A main frame uses a grid layout with two columns: left (weight=1) for controls/results, right (weight=3) for images.
- Left Panel:
- Controls: Collapsible section with a “Select Image” button, eye distance input (Entry), and “Analyze” button. Toggles visibility with toggle_controls.
- Results: Collapsible section with a Treeview table for measurements (Category, Measurement, Value) and a Text widget for keypoint details, both with scrollbars.
- Right Panel:
- Displays original and processed images, with the processed image allocated 3x the area (via rowconfigure(1, weight=1) and rowconfigure(3, weight=3)).
- Labels show “No image selected” or “No processed image” until images are loaded.
- Status Bar: Shows processing status (e.g., “Analyzing image...”) and an indeterminate progress bar.
- Responsive Design: The <Configure> binding on image_panel triggers update_image_panel_size to resize images dynamically.
Code Section 7: Image Resizing and Display
The update_image_panel_size, update_original_image, update_processed_image, and resize_image_for_display methods ensure images fit the panel while maintaining aspect ratios.
def update_image_panel_size(self, event=None):
    """Update the maximum image size based on the image panel's dimensions"""
    panel_width = self.image_panel.winfo_width()
    panel_height = self.image_panel.winfo_height()
    total_height = panel_height - 60  # Subtract padding and label heights
    original_height = total_height // 4
    processed_height = (total_height * 3) // 4
    self.image_panel_size = {
        'original': (max(100, panel_width - 40), max(100, original_height)),
        'processed': (max(100, panel_width - 40), max(100, processed_height))
    }
    if self.original_image:
        self.update_original_image()
    if self.processed_image:
        self.update_processed_image()


def update_original_image(self):
    """Update the original image display to fit the panel"""
    if self.original_image:
        display_img = self.resize_image_for_display(self.original_image, 'original')
        photo = ImageTk.PhotoImage(display_img)
        self.original_label.configure(image=photo, text="")
        self.original_label.image = photo


def update_processed_image(self):
    """Update the processed image display to fit the panel"""
    if self.processed_image:
        display_img = self.resize_image_for_display(self.processed_image, 'processed')
        photo = ImageTk.PhotoImage(display_img)
        self.processed_label.configure(image=photo, text="")
        self.processed_label.image = photo


def resize_image_for_display(self, image, image_type):
    """Resize image to fit within the image panel while maintaining aspect ratio"""
    img_width, img_height = image.size
    max_width, max_height = self.image_panel_size[image_type]
    scale = min(max_width / img_width, max_height / img_height)
    new_width = int(img_width * scale)
    new_height = int(img_height * scale)
return image.resize((new_width, new_height), Image.Resampling.LANCZOS)Explanation:
- update_image_panel_size: Calculates available panel space, allocating 1/4 height to the original image and 3/4 to the processed image (3x area). Ensures minimum dimensions (100x100).
- update_original_image and update_processed_image: Update respective label widgets with resized images.
- resize_image_for_display: Scales images to fit panel dimensions while preserving aspect ratios using LANCZOS resampling for high-quality resizing.
Code Section 8: Image Selection and Processing
The select_image and process_image methods handle user interactions for loading and analyzing images.
def select_image(self):
    file_path = filedialog.askopenfilename(
        title="Select Image",
        filetypes=[("Image files", "*.jpg *.jpeg *.png *.bmp *.gif *.tiff")]
    )
    if file_path:
        try:
            self.original_image = Image.open(file_path)
            self.image_path = file_path
            self.update_original_image()
            self.status_var.set(f"Image loaded: {file_path.split('/')[-1]}")
        except Exception as e:
            messagebox.showerror("Error", f"Failed to load image: {str(e)}", parent=self.root, icon='error')


def process_image(self):
    if not self.original_image:
        messagebox.showerror("Error", "Please select an image first", parent=self.root, icon='error')
        return
    if not self.eye_distance_var.get():
        messagebox.showerror("Error", "Please enter the eye distance", parent=self.root, icon='error')
        return
    try:
        self.eye_distance_real = float(self.eye_distance_var.get())
        if self.eye_distance_real <= 0:
            raise ValueError("Eye distance must be positive")
    except ValueError:
        messagebox.showerror("Error", "Please enter a valid positive number for eye distance", parent=self.root, icon='error')
        return
    self.status_var.set("Analyzing image...")
    self.progress.start(10)
    self.analyze_button.configure(state='disabled')
    self.root.update()
    try:
        result = self.client.run_workflow(
            workspace_name=os.getenv("ROBOFLOW_WORKSPACE"),
            workflow_id=os.getenv("ROBOFLOW_WORKFLOW_ID"),
            images={"image": self.image_path},
            use_cache=True
        )
        self.extract_keypoints(result)
        self.load_visualization(result)
        self.calculate_measurements()
        self.status_var.set("Analysis complete")
    except Exception as e:
        print(f"Debug: Error in process_image: {e}")
        import traceback
        traceback.print_exc()
        messagebox.showerror("Error", f"Failed to process image: {str(e)}", parent=self.root, icon='error')
        self.status_var.set("Analysis failed")
    self.progress.stop()
    self.analyze_button.configure(state='normal')
Explanation:
- select_image: Opens a file dialogue for selecting image files (.jpg, .png, etc.), loads the image with PIL, updates the display, and sets the status bar.
- process_image:
- Validates the image and eye distance input (must be a positive number).
- Starts a progress bar and disables the “Analyze” button.
- Calls the Roboflow Workflow to process the image, then invokes extract_keypoints, load_visualization, and calculate_measurements.
- Handles errors with messagebox popups and debug logging.
Code Section 9: Key point Extraction and Visualization
The extract_keypoints and load_visualization methods process the Roboflow Workflow’s output.
def extract_keypoints(self, result):
    """Extract keypoints from Roboflow result"""
    self.keypoints = []
    try:
        if isinstance(result, list) and result:
            outer_predictions = result[0].get('predictions', {})
            person_detections = outer_predictions.get('predictions', [])
            if person_detections and isinstance(person_detections, list):
                keypoints_list = person_detections[0].get('keypoints', [])
                for keypoint in keypoints_list:
                    if all(key in keypoint for key in ['class_id', 'class', 'x', 'y']):
                        self.keypoints.append({
                            'class_id': keypoint.get('class_id'),
                            'class': keypoint.get('class'),
                            'x': keypoint.get('x'),
                            'y': keypoint.get('y'),
                            'confidence': keypoint.get('confidence')
                        })
        self.keypoints.sort(key=lambda x: x['class_id'] if x.get('class_id') is not None else 999)
    except Exception as e:
        print(f"Error extracting keypoints: {e}")
        import traceback
        traceback.print_exc()


def load_visualization(self, result):
    """Load and display the visualization image"""
    try:
        vis_img = None
        if isinstance(result, list) and result and isinstance(result[0], dict):
            vis_data = result[0].get("keypoint_visualization")
            if vis_data:
                if isinstance(vis_data, str) and vis_data.startswith("data:image"):
                    base64_string = vis_data.split(",")[1] if "," in vis_data else vis_data
                    img_data = base64.b64decode(base64_string)
                    vis_img = Image.open(BytesIO(img_data))
                elif isinstance(vis_data, str) and (vis_data.startswith("/9j/") or vis_data.startswith("iVBOR")):
                    img_data = base64.b64decode(vis_data)
                    vis_img = Image.open(BytesIO(img_data))
                elif isinstance(vis_data, str) and vis_data.startswith("http"):
                    response = requests.get(vis_data, timeout=10)
                    response.raise_for_status()
                    vis_img = Image.open(BytesIO(response.content))
        if vis_img:
            self.processed_image = vis_img
            self.update_processed_image()
            vis_img.save("visualization_output.png")
        else:
            self.processed_label.configure(image=None, text="No processed image available")
            self.processed_label.image = None
    except Exception as e:
        print(f"Error loading visualization: {e}")
        self.processed_label.configure(image=None, text="No processed image available")
        self.processed_label.image = None
Explanation:
- extract_keypoints: Parses the Roboflow Workflow’s output to extract keypoint data (class, x, y, confidence), storing them in self.keypoints sorted by class_id.
- load_visualization: Handles the keypoint_visualization output (base64 or URL), converts it to a PIL image, displays it, and saves it as visualization_output.png. Falls back to a placeholder message if no visualization is available.
Code Section 10: Measurement Calculation and Display
The calculate_measurements and display_results methods compute and display body measurements.
def calculate_measurements(self):
    """Calculate body measurements based on keypoints and eye distance"""
    if len(self.keypoints) < 2:
        self.results_tree.delete(*self.results_tree.get_children())
        self.keypoints_text.delete(1.0, tk.END)
        self.keypoints_text.insert(tk.END, "Insufficient keypoints detected.\nPlease ensure a clear frontal view of a person.", 'error')
        self.keypoints_text.tag_configure('error', foreground='#dc3545')
        return
    calculator = MeasurementCalculator(self.keypoints, 1.0)
    self.eye_distance_pixels = calculator.get_eye_distance()
    if self.eye_distance_pixels:
        self.scale_ratio = self.eye_distance_pixels / self.eye_distance_real
        reference_part = "Eye Distance"
    else:
        left_shoulder = KeypointMapper.find_keypoint_by_part(self.keypoints, 'Left Shoulder')
        right_shoulder = KeypointMapper.find_keypoint_by_part(self.keypoints, 'Right Shoulder')
        if left_shoulder and right_shoulder:
            self.eye_distance_pixels = calculator.calculate_distance(left_shoulder, right_shoulder)
            self.scale_ratio = self.eye_distance_pixels / self.eye_distance_real
            reference_part = "Shoulder Width"
        else:
            self.results_tree.delete(*self.results_tree.get_children())
            self.keypoints_text.delete(1.0, tk.END)
            self.keypoints_text.insert(tk.END, "Unable to calculate scale: no eye or shoulder keypoints detected.\nPlease ensure a clear view of face or shoulders.", 'error')
            self.keypoints_text.tag_configure('error', foreground='#dc3545')
            return
    calculator.scale_ratio = self.scale_ratio
    measurements = calculator.get_all_measurements()
    self.display_results(measurements, reference_part)


def display_results(self, measurements, reference_part):
    """Display measurement results in the table and keypoints in text"""
    self.results_tree.delete(*self.results_tree.get_children())
    self.keypoints_text.delete(1.0, tk.END)
    self.keypoints_text.tag_configure('header', font=('Segoe UI', 10, 'bold'), foreground='#0d6efd')
    self.keypoints_text.tag_configure('item', font=('Segoe UI', 9))
    self.keypoints_text.insert(tk.END, f"Scale: {reference_part} ({self.eye_distance_real:.1f} cm, {self.eye_distance_pixels:.1f} pixels, {self.scale_ratio:.2f} pixels/cm)\n\n", 'header')
    self.keypoints_text.insert(tk.END, "Detected Keypoints:\n", 'header')
    mapper = KeypointMapper()
    for i, kp in enumerate(self.keypoints):
        body_part = mapper.get_body_part(kp['class'])
        self.keypoints_text.insert(tk.END, f"{i+1}. {body_part}: ({kp['x']:.0f}, {kp['y']:.0f}) [Conf: {kp['confidence']:.3f}]\n", 'item')
    formatted_results = format_measurement_results(measurements)
    for item in formatted_results:
        self.results_tree.insert('', tk.END, values=(item['Category'], item['Measurement'], item['Value']))
    if not measurements:
        self.keypoints_text.insert(tk.END, "\nNo measurements calculated.\nPlease ensure clear keypoints in the image.", 'error')
        self.keypoints_text.tag_configure('error', foreground='#dc3545')
Explanation:
- calculate_measurements:
- Checks for sufficient keypoints (≥2); otherwise, displays an error.
- Calculates the pixel eye distance or falls back to shoulder distance if eyes are missing.
- Computes the scale ratio (eye_distance_pixels / eye_distance_real) and uses it to calculate all measurements via get_all_measurements.
- display_results:
- Shows the scale ratio and reference part (e.g., “Eye Distance (6.5 cm, 65.0 pixels, 10.00 pixels/cm)”).
- Lists keypoints with coordinates and confidence scores in the Text widget.
- Populates the Treeview table with categorized measurements (e.g., “Height: 170.2 cm”).
- Displays an error if no measurements are calculated.
Code Section 11: Main Execution
The main function runs the application.
def main():
    root = ttk.Window(themename='superhero')
    app = BodyMeasurementApp(root)
    root.mainloop()


if __name__ == "__main__":
    main()
Explanation:
- Creates a Tkinter root window with the superhero theme.
- Initializes the BodyMeasurementApp class and starts the event loop, enabling user interactions.
Why Is This Useful?
This application automates body measurements for fitness tracking, custom clothing design, and medical assessments. The dark-themed GUI, with collapsible panels and a 3x larger processed image, enhances usability. The eye distance ratio method simplifies scaling, requiring only a single user input (e.g., 6.5 cm) to convert pixel measurements to real-world units. The robust error handling and responsive design ensure a reliable and intuitive experience.
Build Your Automated Body Measurement System
Ready to build it? Use the YOLOv11 Keypoint Detection model from Roboflow Universe, set up the workflow with a visualization block, and implement the provided Python code. Install dependencies and configure your .env file as shown. The code is available on GitHub. Test with clear frontal images for best results, and explore applications in fitness, fashion, or healthcare!
Written by Aarnav Shah
Cite this Post
Use the following entry to cite this post in your research:
Contributing Writer. (Aug 5, 2025). Automated Body Measurement with Computer Vision. Roboflow Blog: https://blog.roboflow.com/body-measurement/