
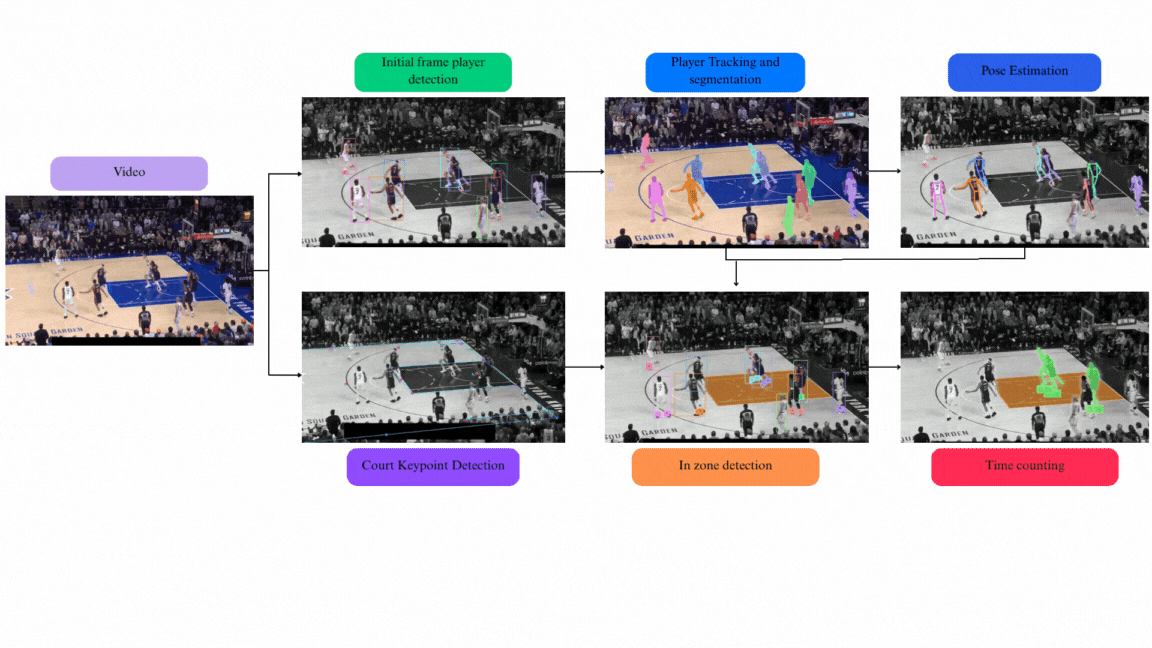
Automatically detecting NBA 3-second paint violations requires solving several distinct sub-problems at once: tracking each player across frames, identifying the painted zone, and counting how long each player stays inside it. This tutorial builds that system by combining player tracking with Meta's SAM2, court keypoint detection and homography to reconstruct the paint polygon, YOLOv11 pose estimation to locate ankle keypoints for precise zone entry detection, and Supervision's PolygonZone and FPSBasedTimer to count occupancy time and fire a violation alert at the three-second threshold.
Introduction
Ever shouted at the screen that a player was camping in the paint? You're not alone. Basketball is a fast paced and dynamic sport, with many rules that apply per player making it difficult for a referee to monitor everything. The 3-second rule in basketball, which prevents players from staying too long in the key, is something that often goes unnoticed.
Thanks to recent advances in computer vision, we can now build models that analyze video footage and automatically detect rule violations, like the 3-second violation.
Video 1: Results showing the time each player spent in the paint.
In this blog post we'll walk through how we built a system that detects and alerts the violation of this rule, tackling several technical challenges like player detection and tracking, the painted zone detection, and checking if the player is inside the zone and for how long.
The Rule and Its Difficulties
Basketball features two distinct 3-second rules, one for offensive players and one for defenders, each designed to maintain game flow and fairness in the paint. For this project we are going to consider the NBA rules.
- The offensive 3-second rule states that an offensive player may not remain in the paint for more than three consecutive seconds while their team has control of the ball.
- The defensive 3-second rule (used in the NBA) prohibits a defensive player from staying in the paint for more than three seconds unless they are actively guarding an opponent.
Both rules aim to prevent players from “camping” near the basket, promoting movement and spacing. However, automatically detecting violations for each rule presents unique challenges that are:
- Tracking all the players
- Detecting if they are inside or outside of the paint.
- Counting the time that they are inside of the paint.
- Detecting the team of each player
- Differentiating defensive from offensive players.
- Detecting active guard from a defender.
For simplification purposes, we are just going to detect if the players are inside the zone, overlooking their team and role.
Solution Components
To detect the violation of this single rule, we need several components that build the solution. In this section we are going to explore these!
Player Tracking
To detect where each player is located at every frame, we are going to handle this with an object tracking solution. To address this, we will use Meta’s Segment Anything Model (SAM) 2 object tracking, in which we indicate the position of the players that we want to track at the initial frame and we get a pretty accurate zero-shot track, without needing to train a model for player’s appearance features for running other tracking methods like DeepSORT.
In order to automate this step, we trained an object detector that will predict the bounding boxes of the players in the initial frame and work as a starting point.
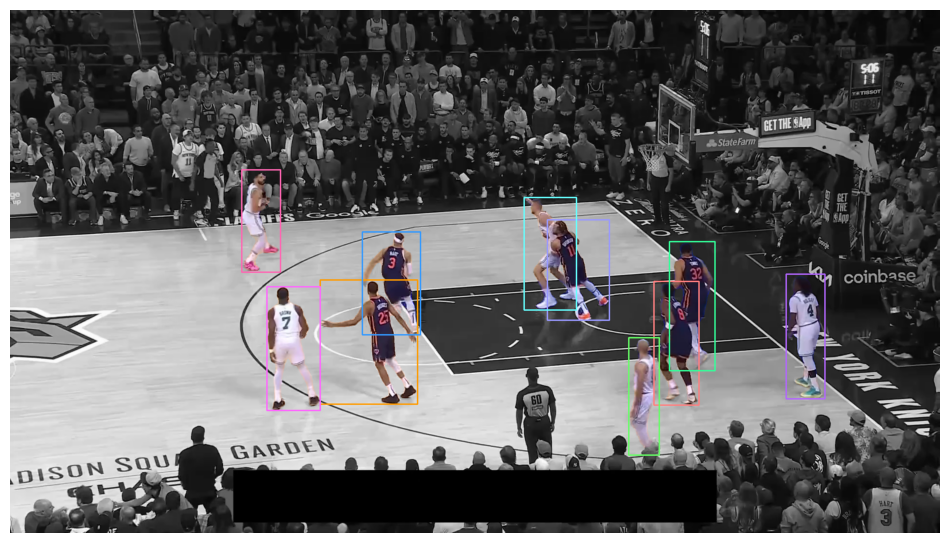
A problem we faced is that SAM2 confuses the ball being held by a player or the background with a player's body part. Our solution for this was developing a function called remove_noisy_segments, which finds the connected components in each mask and removes the ones that do not meet a threshold criteria for the connected component size and distance to the player's centroid, which always is the biggest connected component.
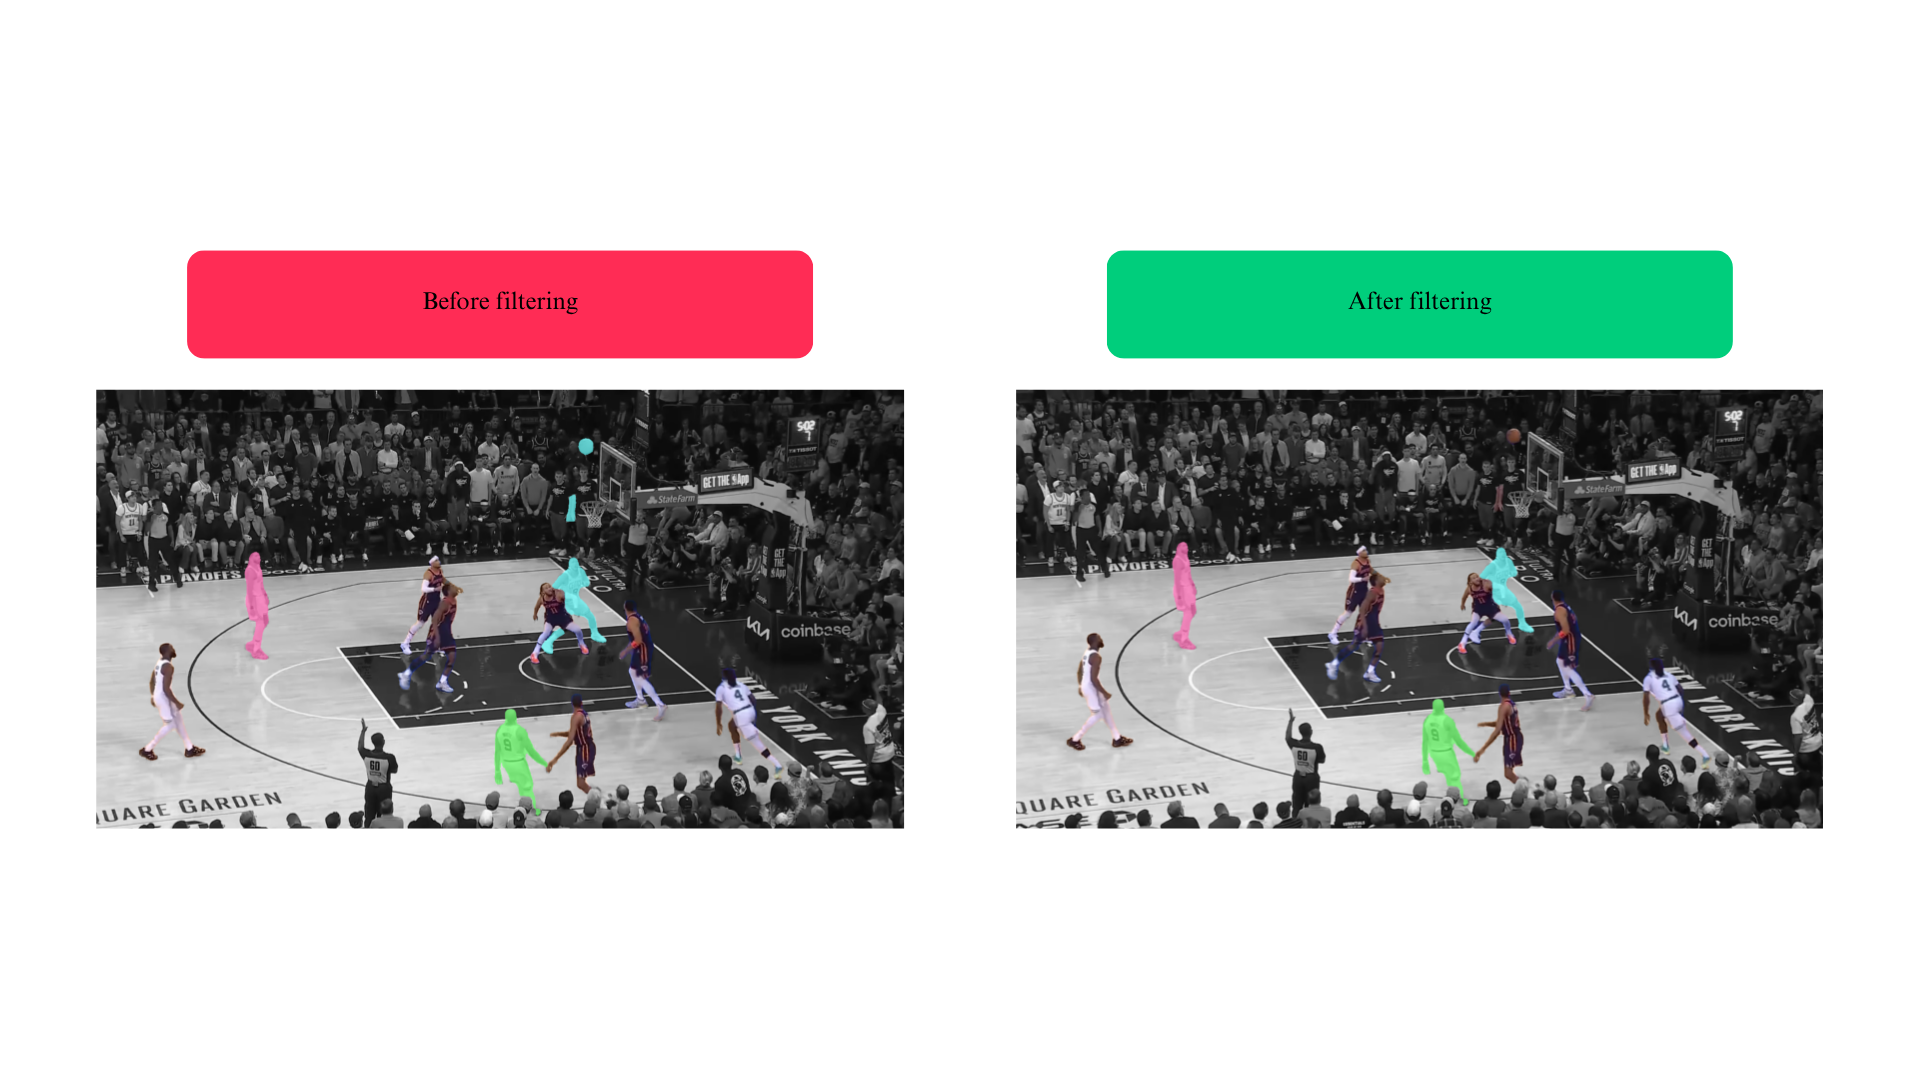
remove_noisy_segments.With this approach and our custom player detector, we obtain:
Video 2: Tracking results of players with SAM2 and filtered masks.
Zone Keypoint Detection
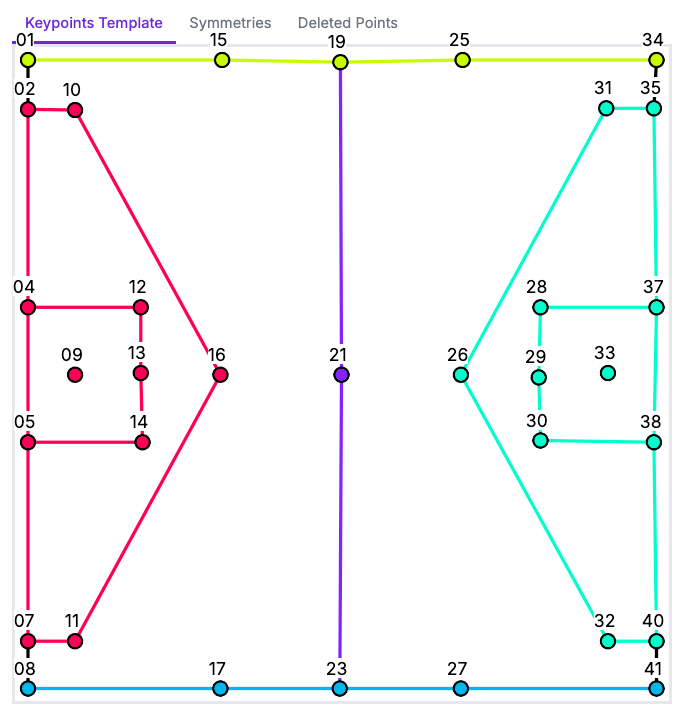
The next step is to find where the painted zones are. To do this, we trained a Keypoint detection model that will detect some selected keypoints in the court, like the 3 point line and the paint.
Both the keypoint detection model and the annotated dataset available on Roboflow Universe, so you can try it out or fine-tune it yourself. It has the following predefined keypoints:
And the detected keypoints following this skeleton, would look like:
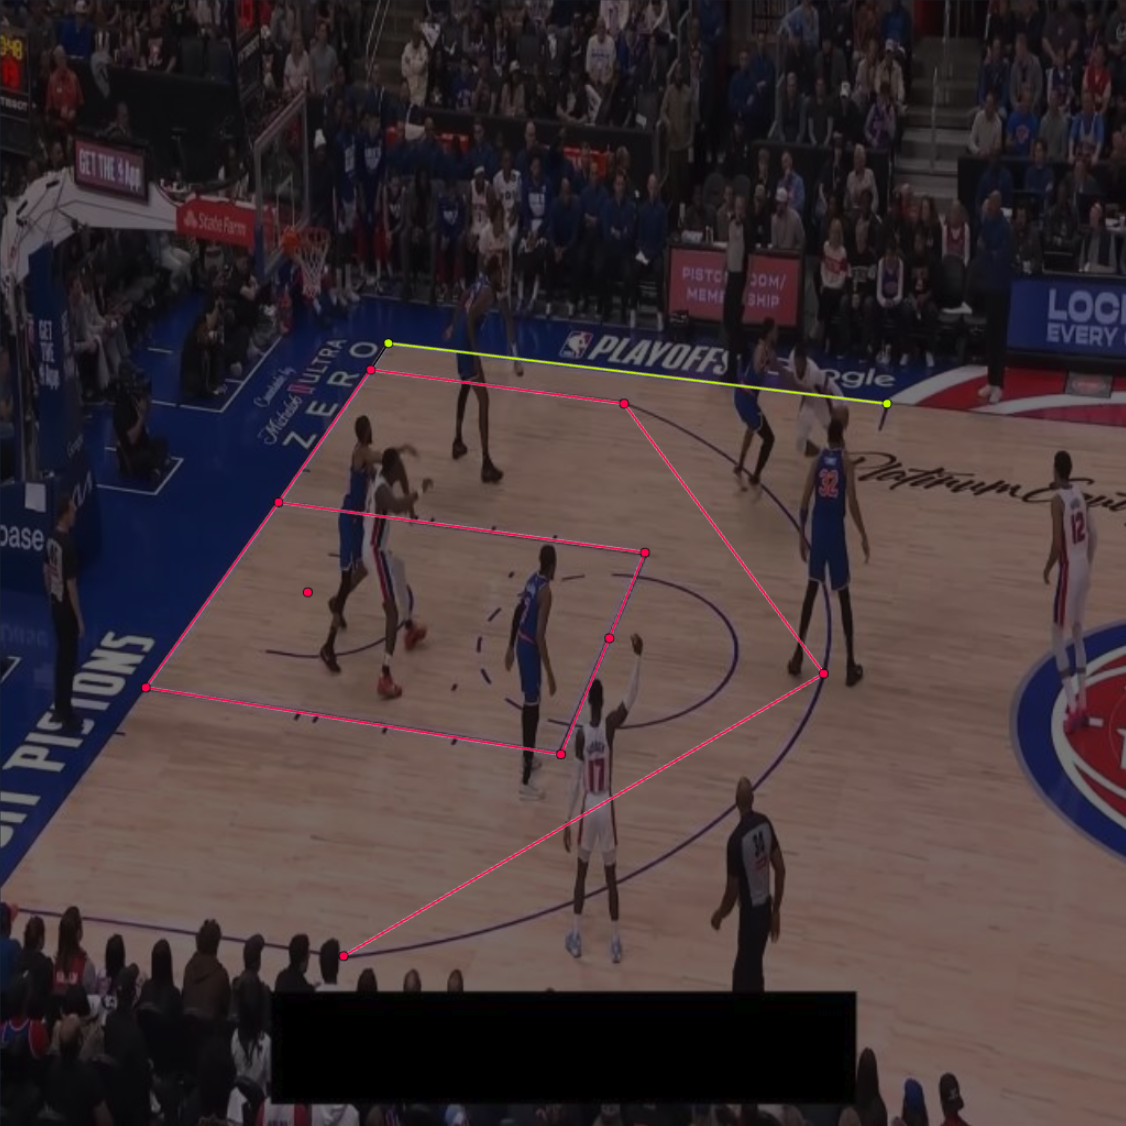
With the detected keypoints, we can find where in the image is the painted zone, but not only that, we can also project any point in the image to the coordinate system of the court, making it possible to create, for example, a radar of the players. This blog post will not be covering the fundamentals on projections and homographies, but you can learn more about it in our Football AI tutorial.
Video 3: Player tracking and trajectory projection visualized in radar view.
In this way, if there is a keypoint not detected by the model (it was occluded, or a model mistake) we can reproject it from the court coordinate system to the image coordinate system, completing the paint rectangle if necessary.
At the end of this step, we get the following results, where in pink we have the detected keypoints and in blue the reconstruction of the expected court based on the homography found associating the detected keypoints with the expected ones.
Video 4: Detected court landmarks (pink) and reconstructed ground truth landmarks (blue).
In Zone Detection
Now that we have the detected zone and players, we can proceed to try and see whether the player is inside the zone or not. According to FIBA and NBA rules:
“A player is considered to be in the restricted area (the paint) if any part of their body is touching the floor inside the paint.”
It is accepted that the count starts when the first foot enters the zone and and reset when both feet leave it, so we will go with that. Given that to the moment we have the mask for each player, we tried using classical image analysis in order to try to find the foot from it, but this wasn’t robust and often failed.
We could also use the bottom part of the bounding box, but in the critical cases where one foot is in and the other out, this would fail. This is why we opted to run a Pose Estimation Model for each tracked player, finding body keypoints and acquiring much more information, and now having the exact position of the player's ankle.
Video 5: Detected ankles and bounding boxes for each player.
With this new information, we used Supervision’s PolygonZone class to find whether any of the detected ankles were inside the zone or not, which can be done with the PolygonZone.trigger method. But if no pose skeleton was detected, we use the bottom center of the bounding box to check if the player is inside.
So once we detect one ankle inside the paint (or the bottom center if no pose detected), we will mark the player as inside the zone and the count will be stopped and resetted only if we detect both ankles outside (or the bottom center if no pose detected).
Basketball Player Pose Estimation
As said before, to find the feet position we opted to run a pose estimation model, YOLOv11 Pose Estimation, that gives us 17 different Pose Keypoints including the face, arms, hips, knees and ankles.
For using this, we cropped each player from the frame and ran the pose estimation to each crop.
Video 6: Detected player poses.
Time Counting
With everything in place, the final step is measuring how long each player remains inside the paint. We calculate this by counting the number of consecutive frames a player is in the zone and then converting this to seconds dividing by the frames per second (FPS).
For this, we used Supervision’s example utility FPSBasedTimer, a tool that we previously demonstrated in our video tutorial on dwell time analysis. This simplifies time tracking by handling frame-to-time conversion reliably and efficiently.
By following all these steps, we obtain the final results:
Video 7, 8: Final results of 3-second rule violation detection; player mask turns red if the player stays in the paint for more than 3 seconds.
Complete Solution
Remember that you can see the full implementation in the notebook that accompanies this guide.
TODO
Let’s bring all the pieces together to summarize how the system works from input to output:
- Video Input: A basketball game clip (e.g., from an NBA broadcast) is fed into the system frame-by-frame.
- Player Detection: We run a YOLOv11 object detector trained on basketball player annotations to detect all players in the initial frame.
- Player Tracking: Using Meta’s SAM2 with zero-shot tracking, we track each player across frames starting from their initial bounding boxes.
- Court Keypoint Detection: A YOLOv11 keypoint model identifies court landmarks (e.g., corners of the paint, 3-point line). These are matched to a canonical court template via homography to reconstruct the painted zone.
- Pose Estimation: For each tracked player, we run YOLOv11 Pose Estimation to locate body keypoints, especially ankles, which help determine zone entry/exit.
- Zone Occupancy Detection: Using Supervision’s
PolygonZone, we check if either ankle lies inside the reconstructed paint polygon. - Time Counting: We count how many consecutive frames each player remains in the zone using
FPSBasedTimer, and convert that into seconds. - Violation Alert: If a player remains in the paint longer than 3 seconds, a violation is flagged.
Conclusion
This blog post provides the building blocks for accurately detecting the NBA 3-second rule violation using AI vision, combining player tracking with Meta's SAM2, court keypoint detection, and precise in-zone detection using pose estimation and Supervision's PolygonZone. Time counting was effectively handled by Supervision's FPSBasedTimer.
While the current implementation simplifies the rule by not differentiating between offensive and defensive players or active guarding, the foundational work sets the stage for future enhancements like team classification and active defense detection.
Cite this Post
Use the following entry to cite this post in your research:
Alexander Dylan Bodner, Piotr Skalski. (Jul 22, 2025). Detect NBA 3 Second Violations with AI. Roboflow Blog: https://blog.roboflow.com/detect-3-second-violation-ai-basketball/