
Florence-2, an MIT-licensed multimodal vision model from Microsoft Research with 1.54 GB weights, can run optical character recognition on a T4 GPU in roughly one second per image. This guide demonstrates two OCR modes using the HuggingFace Transformers implementation: a flat text extraction mode that returns all recognized text as a single string, and a grounded OCR mode that returns bounding boxes alongside each piece of text for applications that need to know where on the image each word appears. Post-processing to normalize encoding artifacts and reconstruct structured text is necessary when using grounded output, especially on dense documents like receipts.
Florence-2, released by Microsoft in June 2024, is a multimodal vision model. With Florence-2, you can generate image captions, detect the location of objects in an image, run Optical Character Recognition (OCR) on an image, and more.
Florence-2 is licensed under an MIT license, which permits commercial use. The model weights are 1.54 GB, which means the model does not take up too much space to use. On a T4 GPU, Florence-2 takes ~1 second to generate an OCR description for an image.
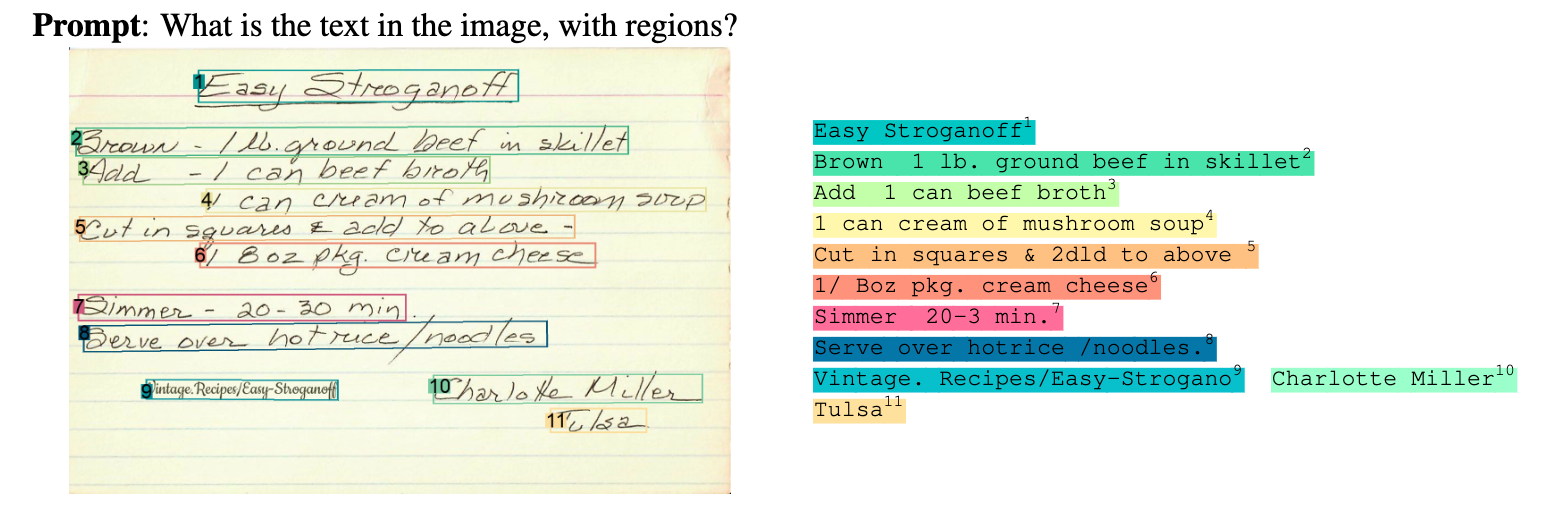
In our testing, and review of the Florence-2 paper, the model shows significant OCR capabilities. The following picture, from the Florence-2 paper, shows the model reading handwriting and transcribing it to text with significant accuracy.
In this guide, we are going to walk through how to use Florence-2 for OCR. We will show how to use the two modes of OCR capabilities: one where you can retrieve all text as a single string, and another where you can retrieve the regions associated with text in an image.
Without further ado, let’s get started!
Step #1: Install Required Dependencies
For this guide, we will use the Hugging Face Transformers implementation of Florence-2.
Run the following command to install the required dependencies:
pip install transformers timm flash_attn einops
With the required dependencies installed, we can write a script to use the model.
Step #2: Retrieve Text in an Image (Without Regions)
Using Florence-2, we can retrieve all text in an image as a single string. This is ideal if you do not need to know the specific area where text is in an image.
Create a new Python file and add the following code:
from transformers import AutoProcessor, AutoModelForCausalLM
from PIL import Image
import requests
import copy
model_id = 'microsoft/Florence-2-large'
model = AutoModelForCausalLM.from_pretrained(model_id, trust_remote_code=True).eval().cuda()
processor = AutoProcessor.from_pretrained(model_id, trust_remote_code=True)

def run_example(task_prompt, text_input=None):
	if text_input is None:
    		prompt = task_prompt
	else:
    		prompt = task_prompt + text_input
	inputs = processor(text=prompt, images=image, return_tensors="pt")
	generated_ids = model.generate(
  	input_ids=inputs["input_ids"].cuda(),
  	pixel_values=inputs["pixel_values"].cuda(),
  	max_new_tokens=1024,
  	early_stopping=False,
  	do_sample=False,
  	num_beams=3,
	)
	generated_text = processor.batch_decode(generated_ids, skip_special_tokens=False)[0]
	parsed_answer = processor.post_process_generation(
    	generated_text,
    	task=task_prompt,
    	image_size=(image.width, image.height)
	)

	return parsed_answer
In this code, we import the required dependencies, load the model in evaluation mode, and define a function that will run inference using our model and return a processed answer. The run_example function is copied from the official Florence-2 notebook.
We can then run inference on an image:
image = Image.open("tire.jpg")
task_prompt = '<OCR>'
print(run_example(task_prompt)["<OCR>"].strip())
Let’s test the model on this image of a car tire:
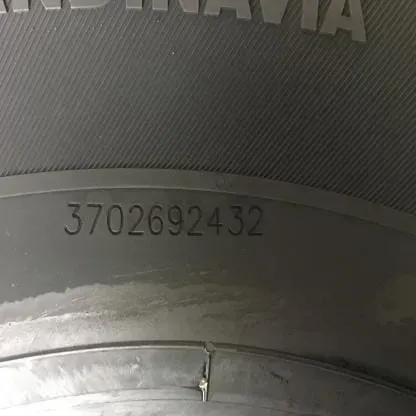
The script returned:
3702692432
The model successfully read the serial number on the car tire, with 100% accuracy.
Step #3: Retrieve Text in an Image (With Regions)
In the last step, we showed how to retrieve all text in an image. This is ideal if there is only one piece of text in an image that you need, or if you are scanning a document where all text is part of a whole (i.e. a screenshot of prose).
With that said, there are use cases where you may want the region associated with text in an image. For example, suppose you are scanning a document. You may want to know where each piece of text appears so that you can programmatically understand the image.
For example, if a specific region contains an address, you can group the information together to process the address as a whole without there being additional information that makes such evaluation harder.
Instead of using <OCR> as the task type as we did in the last step, we will use <OCR_WITH_REGION>. The region task type returns text grouped by region in an image.
The <OCR_WITH_REGION> method of operation returns text with corresponding bounding boxes.
Update the script from the last step and add this function, defined in the official Florence-2 notebook to visualize the bounding boxes returned by the model:
import supervision as sv
from typing import Dict

def run_example(task_prompt: str, text_input: str="", image=image) -> Dict:
    prompt = task_prompt + text_input

    inputs = processor(text=prompt, images=image, return_tensors="pt")
    generated_ids = model.generate(
        input_ids=inputs["input_ids"].cuda(),
        pixel_values=inputs["pixel_values"].cuda(),
        max_new_tokens=1024,
        early_stopping=False,
        do_sample=False,
        num_beams=3,
    )
    generated_text = processor.batch_decode(generated_ids, skip_special_tokens=False)[0]

    print(generated_text)

    parsed_answer = processor.post_process_generation(generated_text, task=task_prompt, image_size=(image.width, image.height))

    return parsed_answer
You can then run the model using the following code:
image = Image.open("image.jpeg").convert("RGB")
task_prompt = "<OCR_WITH_REGION>"
answer = run_example(task_prompt=task_prompt, image=image)

print(answer)

bounding_box_annotator = sv.BoundingBoxAnnotator(color_lookup=sv.ColorLookup.INDEX)
label_annotator = sv.LabelAnnotator(color_lookup=sv.ColorLookup.INDEX)

detections = sv.Detections.from_lmm(sv.LMM.FLORENCE_2, answer, resolution_wh=image.size)
annotated = bounding_box_annotator.annotate(image, detections=detections)
annotated = label_annotator.annotate(annotated, detections=detections)
sv.plot_image(annotated)
When run on an image of a receipt, our model returns:
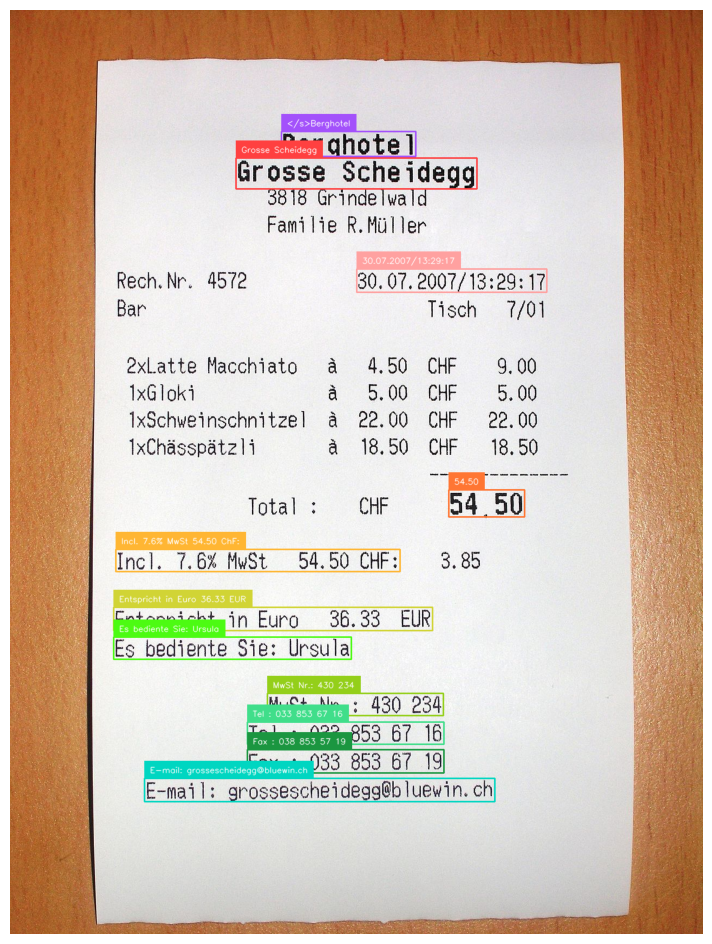
There is a coloured box around regions of text, with the text as understood by the computer visible in a small font. This shows the model has been able to successfully localize text in the image.
With the bounding boxes, you can run calculations like reading information from left-to-right or top-to-bottom in an image, or extract data that is present in a specific region of an image.
Of note, the model did miss some information in the image above. This may be mitigated by splitting up the image into different pieces. For example, here is the result when we pass in only the list of items that make up the total:
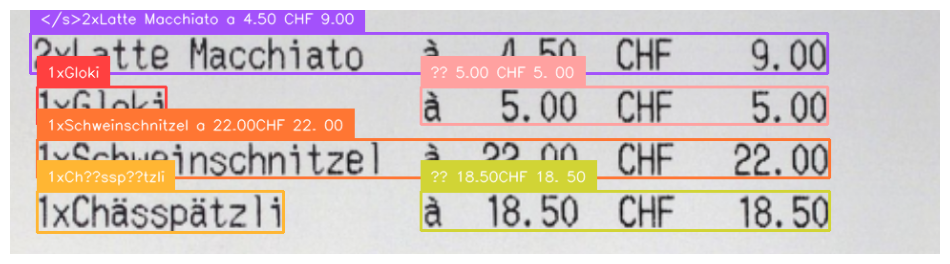
Our model was successfully able to read all of the text.
When you are working with any grounded OCR model like this, there is clean up necessary to read text. The text above would need to be normalized to remove characters that are not properly encoded (i.e. ??), and work to re-build the text as necessary.
Conclusion
Florence-2 is an MIT-licensed computer vision model developed by Microsoft Research. Florence-2 is capable of many tasks, from object detection to image segmentation.
In this guide, we walked through how to use Florence-2 for OCR. We demonstrated how to install the model, then used the model to read all text in an image. We then showed how to retrieve bounding boxes that correspond with text in an image, ideal for OCR applications where you need localization information about each piece of text with which you are working.
Cite this Post
Use the following entry to cite this post in your research:
James Gallagher. (Jul 10, 2024). How to Use Florence-2 for Optical Character Recognition. Roboflow Blog: https://blog.roboflow.com/florence-2-ocr/