
Traditional methods of controlling presentations, such as using a mouse, keyboard, or remote clicker, often restrict a presenter's movement and can disrupt the flow of a presentation. In this blog post we will learn to build a project to control presentation slides with hand gestures, using computer vision.
Our main goal is to allow users to navigate presentation slides using simple hand gestures. By detecting specific gestures, the system can interpret actions to move forward or backward (or any other operation) through slides. Presenters can move freely without being tethered to a keyboard, mouse, or presentation clicker, or worrying about battery on a clicker.
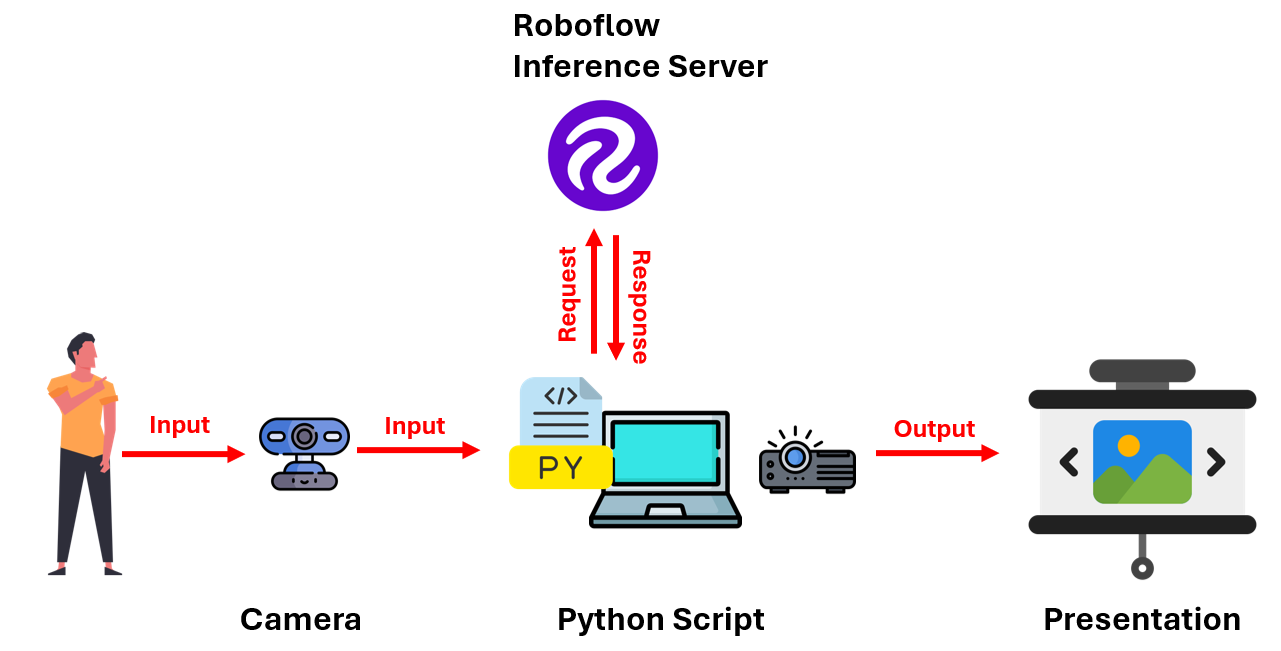
How the system works
The system captures the user's hand gestures using a camera. This visual information is then processed by a computer vision model built using Roboflow. The model recognizes specific hand gestures and translates them into commands. Based on the detected gesture, the system executes the corresponding command to control the presentation slides, such as moving to the next or previous slide.
Build a gesture-based presentation controller
To build this system, we need to train a model that can accurately identify the different hand gestures used for commands to control the slides. In this example, we will train a model to recognize hand gestures for the "next" and "previous" commands to move through slides.
Step #1: Collect and Label Dataset
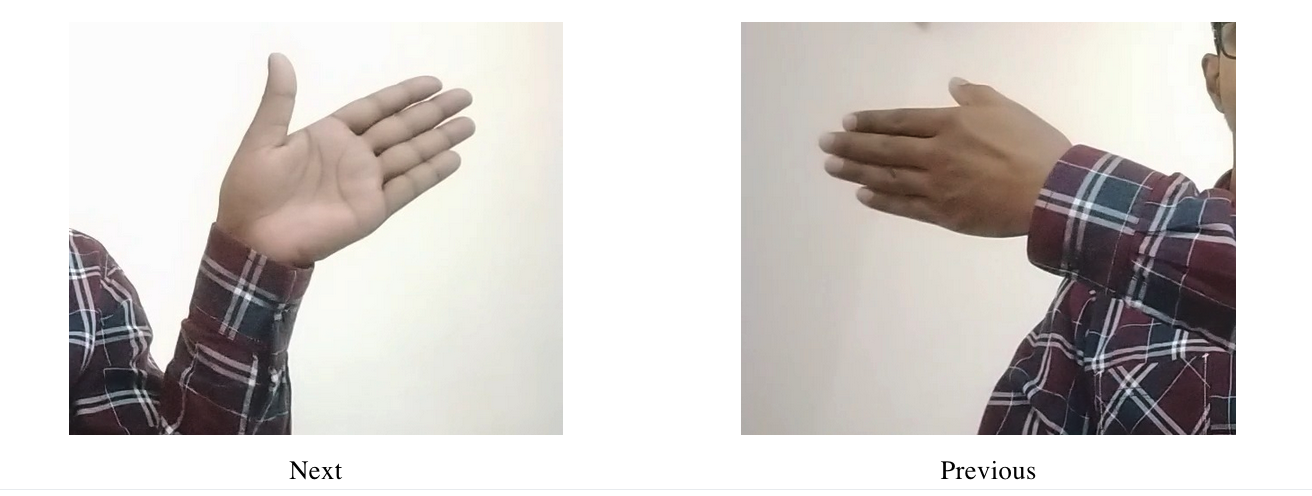
First, collect the images of different hand gestures. We use two gestures here, as illustrated in following figures, for next and previous commands.
After collecting the images, label each gesture using Roboflow Annotate web interface. We need to draw boxes around the hand gesture as shown in following figure.
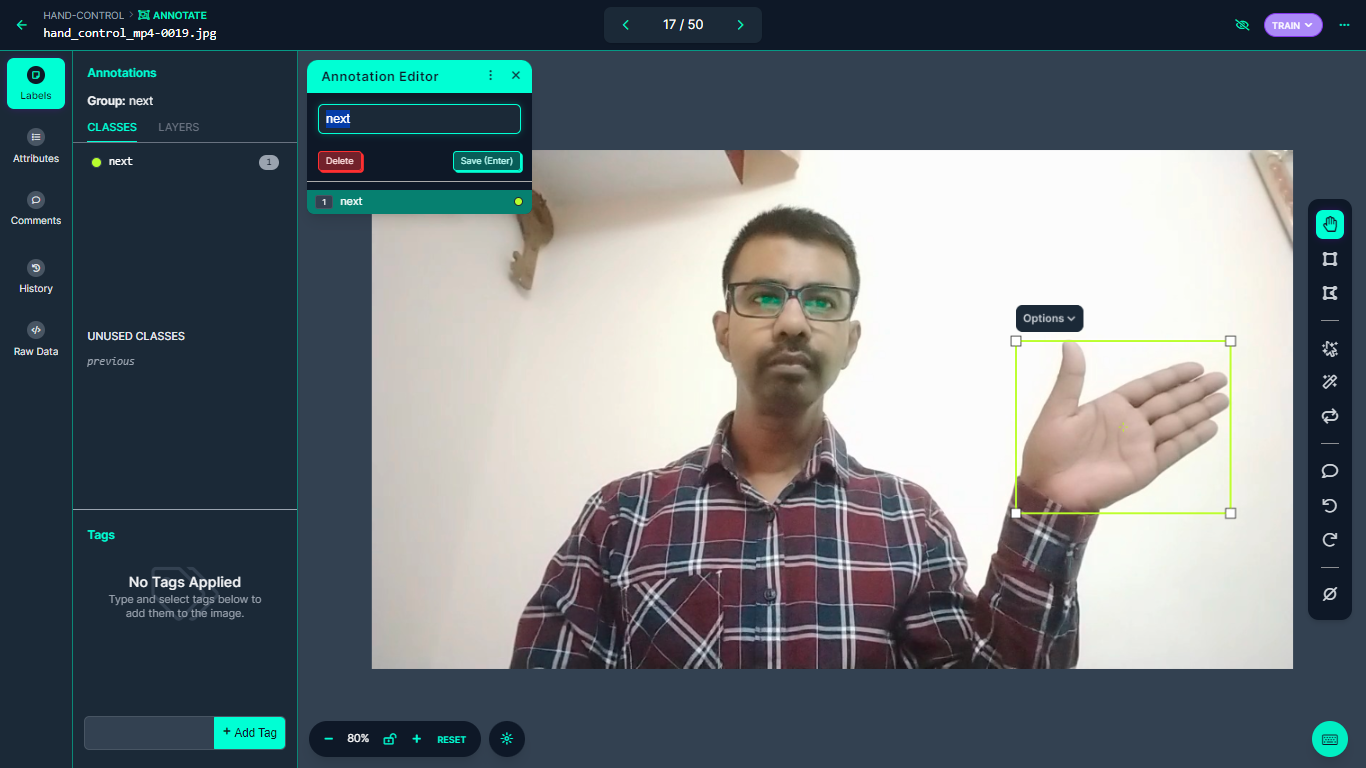
Label all the images in the dataset for the two classes “next” and “previous”.

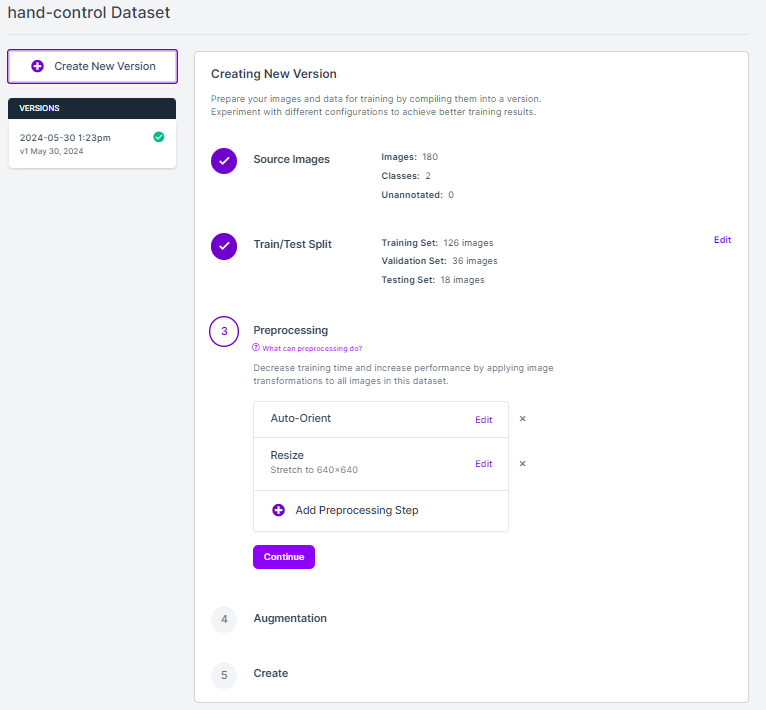
Step #2: Generate a Dataset
Next, we need to generate a dataset. Preprocessing and augmentation steps can be applied to your dataset to enhance the accuracy of your model. For this example, we will use the default preprocessing and augmentation steps. To generate the dataset, click “Generate” in the sidebar. Then, scroll to the bottom of the page and click “Create”. This will generate a version of your dataset. After that, you will be directed to a page where you can train your model.
Step #3: Train a Model
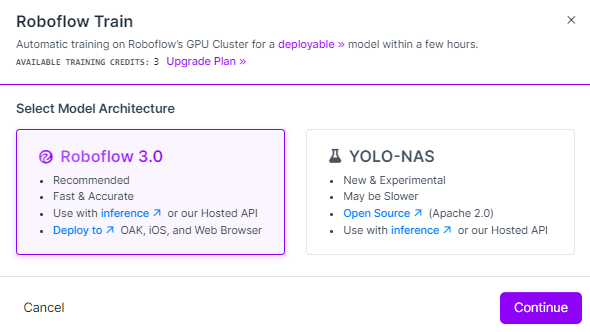
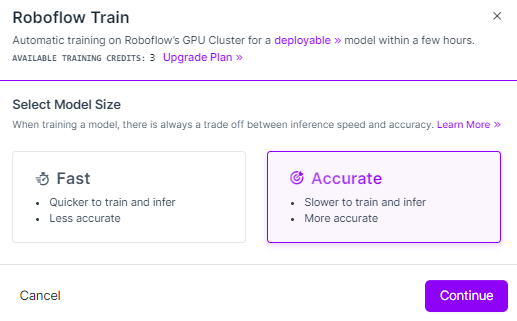
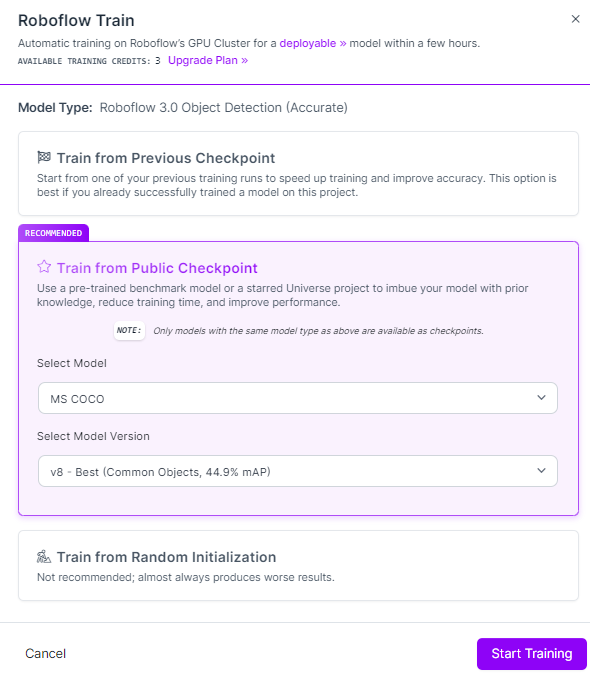
Click the Train with Roboflow button to start training a model. . For training, choose Roboflow 3.0 -> Accurate -> Train from Public Checkpoint option as shown in following images..
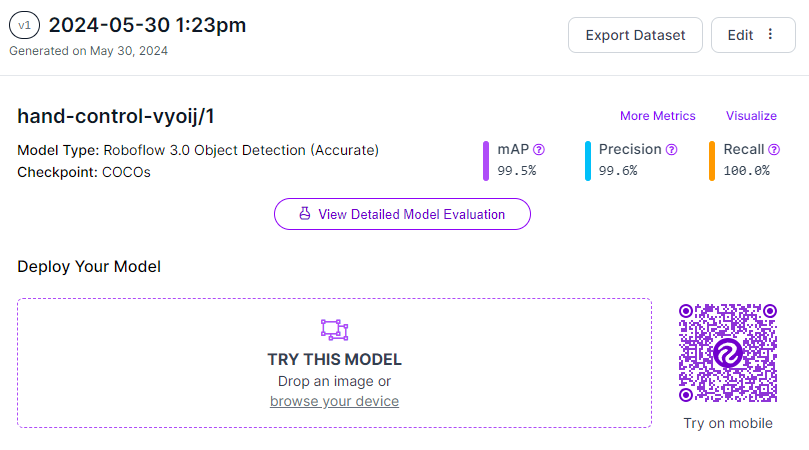
Once you submit a training job, it will be allocated to a server. You will receive an estimate of how long the training process is expected to take. You can monitor your training job in real time, with graphs displaying the performance of your model as it trains. Finally, you will see your model trained with high accuracy.
Step #4: Test the Model
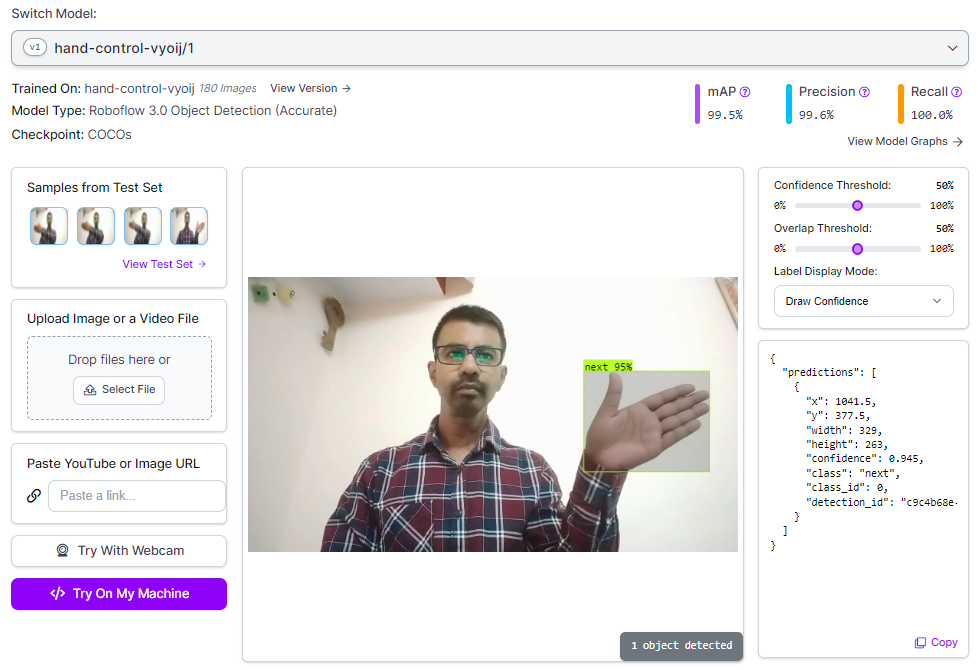
With your model trained, it's important to test its performance in the Roboflow web interface. To do this, click “Visualize” in the Roboflow sidebar. You can either upload a custom image for testing or select an image from your Test set.
Here is an example of a hand gesture detection model running on an image. You can also test the model using input from a webcam to see how it performs in real-time.
Step #5: Build the inference Script
In this step, we will write a Python script that uses the trained model from Roboflow Inference server to detect specific hand gestures in a video feed and control slide presentations accordingly.
To get started, install the Roboflow Python package, the Inference SDK package and pyautogui package, with which we will run inference on our model:
pip install roboflow inference-sdk inference pyautoguiNow, copy and paste following code in a Python .py file.
In the Python script, update your Roboflow API key.
api_key="ROBOFLOW_API_KEY"Following is the full code.
import cv2
import pyautogui
from inference_sdk import InferenceHTTPClient
import time

# Initialize InferenceHTTPClient
CLIENT = InferenceHTTPClient(
    api_url="https://detect.roboflow.com",
    api_key="ROBOFLOW_API_KEY"
)

video = cv2.VideoCapture(0)

while True:
    ret, frame = video.read()
    if not ret:
        break

    # Infer on the frame
    result = CLIENT.infer(frame, model_id="hand-gestures-cjowr/2")
    detections = result['predictions']

    for bounding_box in detections:
        x0 = int(bounding_box['x'] - bounding_box['width'] / 2)
        x1 = int(bounding_box['x'] + bounding_box['width'] / 2)
        y0 = int(bounding_box['y'] - bounding_box['height'] / 2)
        y1 = int(bounding_box['y'] + bounding_box['height'] / 2)
        class_name = bounding_box['class']
        confidence = bounding_box['confidence']

        # Draw bounding box and label on the frame
        cv2.rectangle(frame, (x0, y0), (x1, y1), color=(0, 0, 255), thickness=1)
        cv2.putText(frame, f"{class_name} - {confidence:.2f}", (x0, y0 - 10), cv2.FONT_HERSHEY_SIMPLEX, 0.5,
                    (0, 0, 255), 1)

        # Control slides based on detected class
        if class_name == "low":
            pyautogui.press('right')
            time.sleep(1)  # Pause for a seconds
        elif class_name == "high":
            pyautogui.press('left')
            time.sleep(1)  # Pause for a seconds

    cv2.imshow('frame', frame)

    if cv2.waitKey(1) & 0xFF == ord('q'):
        break

video.release()
cv2.destroyAllWindows()
First, the code continuously captures frames from the webcam. Our code then sends frames to an inference server and receives detection results. We draw bounding boxes and labels on detected objects. We then use pyautogui to control slides based on detected gestures.
To execute, first we run the script in the background. Then open up the presentation and switch to slide mode. Now you can perform hand gestures to move to the next and previous slides.
The following image is an illustration of what’s happening when we execute the code. On the left side of the image, we see the code being executed in background and on the right side of the image we see slide being controlled by hand gestures.

Conclusion
In this blog, we learned how to build a gesture-based presentation slide controller, enabling users to navigate slides using specific hand gestures. Using a custom computer vision model, we detected hand gestures in real-time in a webcam feed and then sent a computer signal to control the slide.
When we make a "next" gesture, it moves to the next slide, and when we make a "previous" gesture, it goes back to the previous slide. Even though we only focused on two gestures, like going to the next or previous slide, we can easily add more gestures, such as moving a hand to draw or highlight on the slides.
Similar approaches could be applied to various applications beyond slide presentations, such as gaming interfaces, virtual reality interactions, or accessibility tools for users with mobility impairments. This project serves as a foundation for exploring the intersection of gesture recognition and human-computer interaction, fostering innovative solutions in diverse domains.
The computer vision project used in this blog post is available at Roboflow Universe.
Cite this Post
Use the following entry to cite this post in your research:
Timothy M. (Jun 5, 2024). Gesture-Based Presentation Controller using Computer Vision. Roboflow Blog: https://blog.roboflow.com/gesture-based-control/