
When a vision model underperforms on a small dataset, your first instinct is often to add augmentation. Flip the images. Rotate them. Jitter the colors. As a result, the dataset gets bigger. But the model usually doesn’t get smarter.
The problem isn’t augmentation - it’s how the data is being expanded. Image-level transforms ignore the objects that actually matter, so they rarely introduce the kind of variation models need to generalize.
In this tutorial, we show a better data strategy, powered by a breakthrough segmentation model, SAM 3. You’ll learn how to use SAM 3 to automatically generate high-quality instance masks, validate them in Roboflow, and apply segmentation-aware augmentation that preserves label quality.
We’ll then train and compare models side by side, showing how this approach improves real performance, taking a model from 83% mAP to 89% mAP without changing architectures or adding new images.
Why Data Augmentation Often Fails
Most image-level augmentations treat the entire image as a single unit. They modify pixels globally, without understanding which parts of the image actually matter. Flipping or cropping an image may technically create a new sample, but it doesn’t introduce new object-level variation. The same solar panel, traffic sign, or rooftop simply reappears with slightly altered pixels.
The goal isn’t more data for the sake of it. It’s better data, expanded in ways that reflect how objects really appear in the world.
Before we grow a dataset, we need reliable object-level labels. This is where Segment Anything Model 3 (SAM 3) becomes useful. Instead of manually drawing masks or starting with noisy bounding boxes, SAM 3 allows us to generate high-quality instance segmentation masks directly from a small set of images.
Growing Vision Datasets with SAM 3
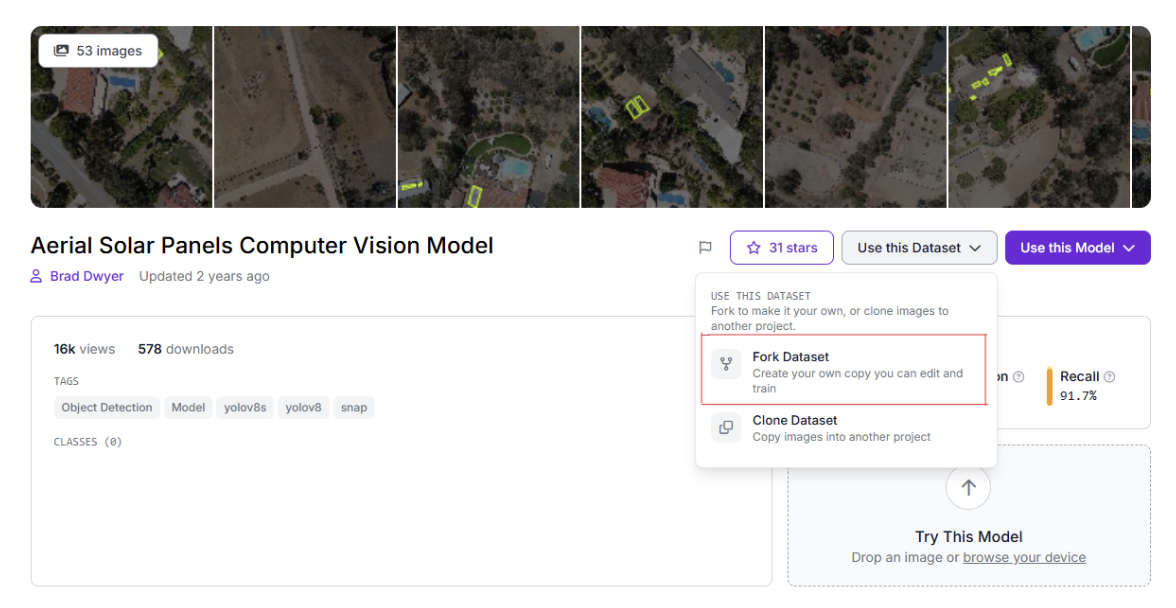
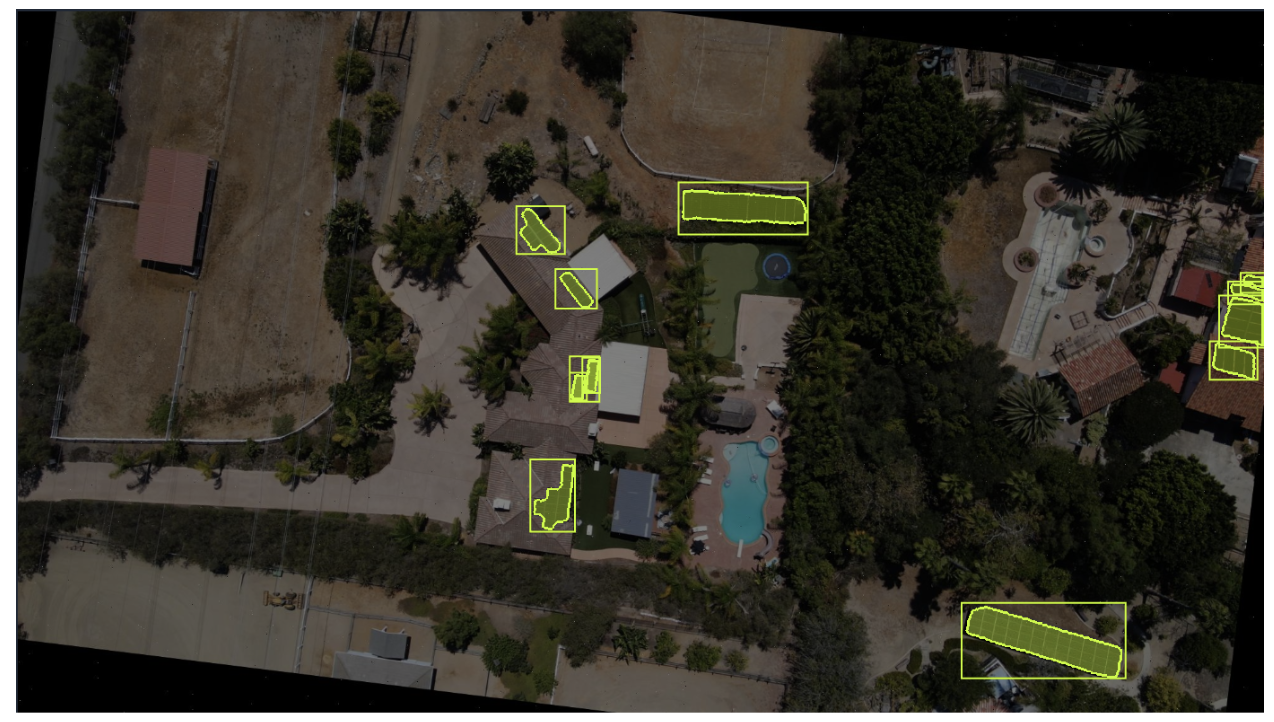
For this tutorial, we’ll use the Aerial Solar Panels dataset from Roboflow Universe. It contains 53 aerial images with object detection annotations identifying rooftop and backyard solar panels.
The dataset is intentionally small and representative of real-world starting points: limited images with coarse labels. This makes it ideal for demonstrating a common upgrade path, converting existing bounding box annotations into high-quality instance segmentation masks before expanding the dataset further.
Now that we’ve selected a dataset, we can use SAM 3 inside Roboflow to automatically generate instance segmentation masks. This process is often referred to as auto-labeling, but what we’re really doing here is upgrading coarse object detection labels into high-quality masks at scale.
Step 1: Fork the Dataset
Start by forking the Aerial Solar Panels dataset from Roboflow Universe into your own workspace. This gives you a clean, editable copy without affecting the original project.
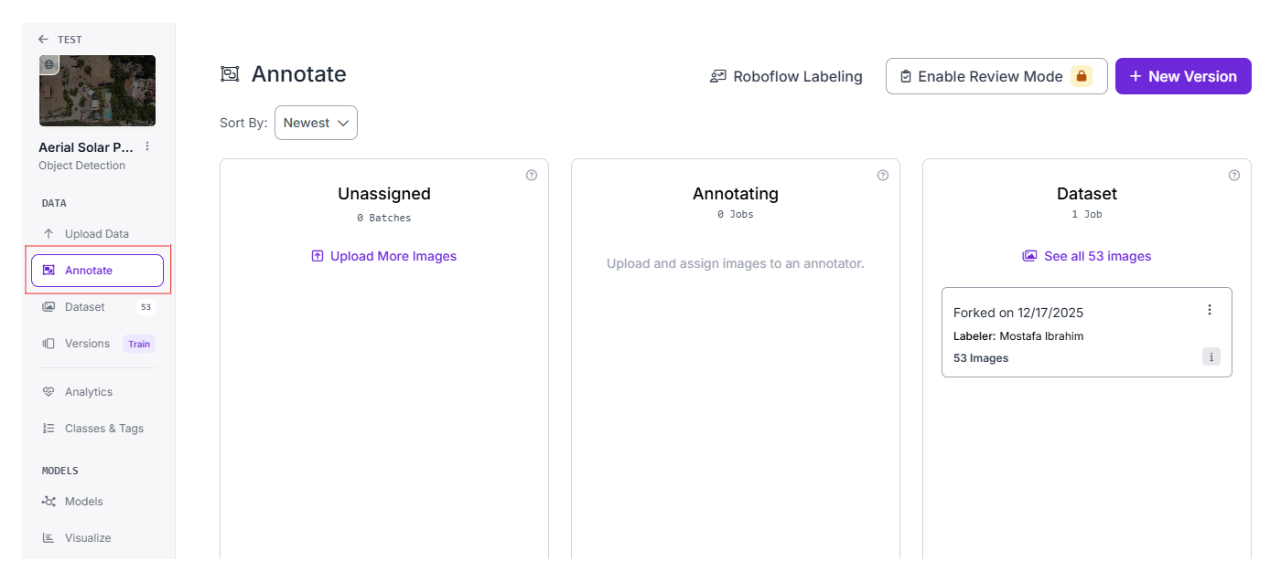
Step 2: Open the Annotate View
From the left sidebar of your project, click Annotate. This opens Roboflow’s annotation board, which is structured as a simple kanban-style flow.
You’ll see datasets represented as cards that move through different stages:
- Unassigned
- Annotating
- Review (appears after labeling is complete)
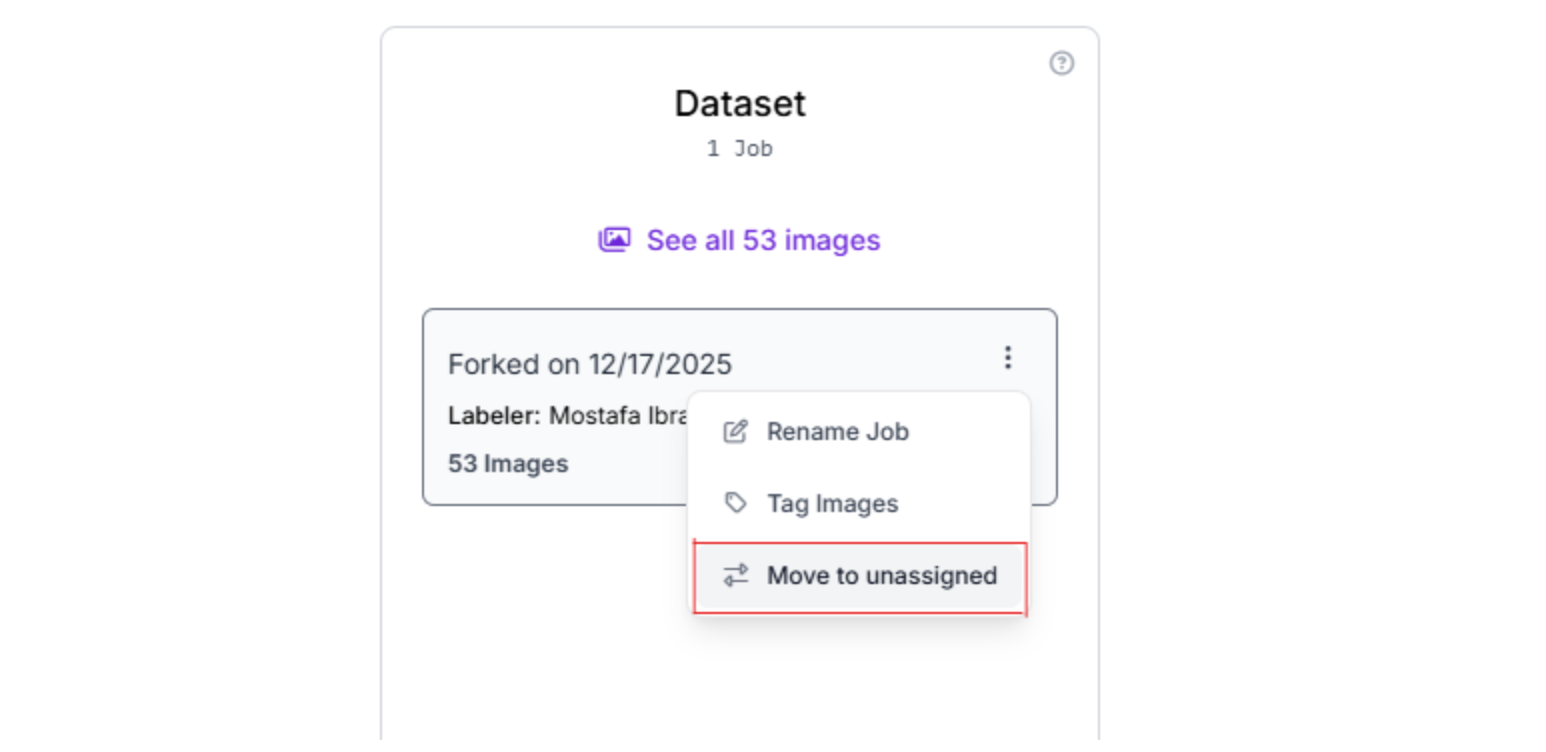
Step 3: Move the Dataset to Unassigned
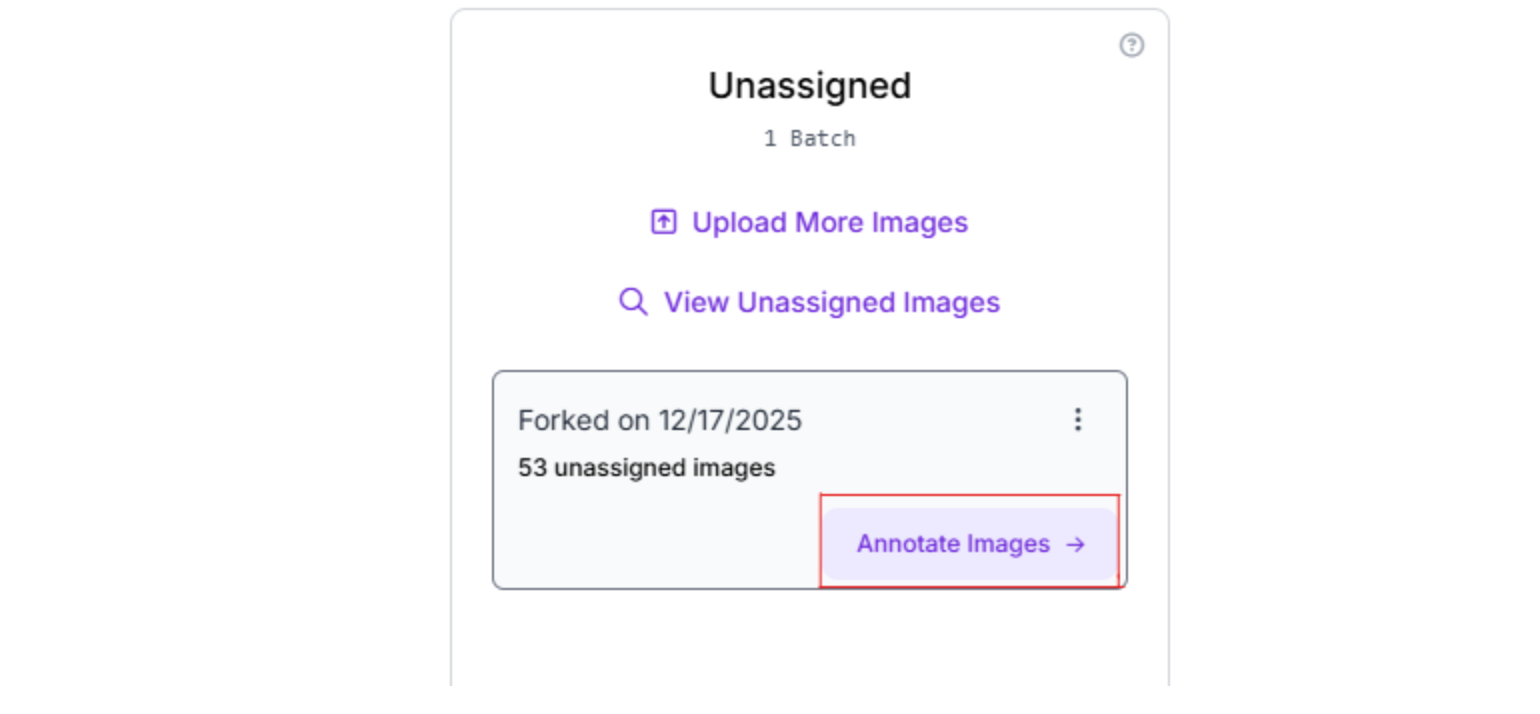
Move your dataset to the unassigned column. Once the dataset card is in this column, an Annotate Images button appears on the card.
Step 4: Start Annotation
Click Annotate Images on the dataset card. This will take you to the annotation setup interface.
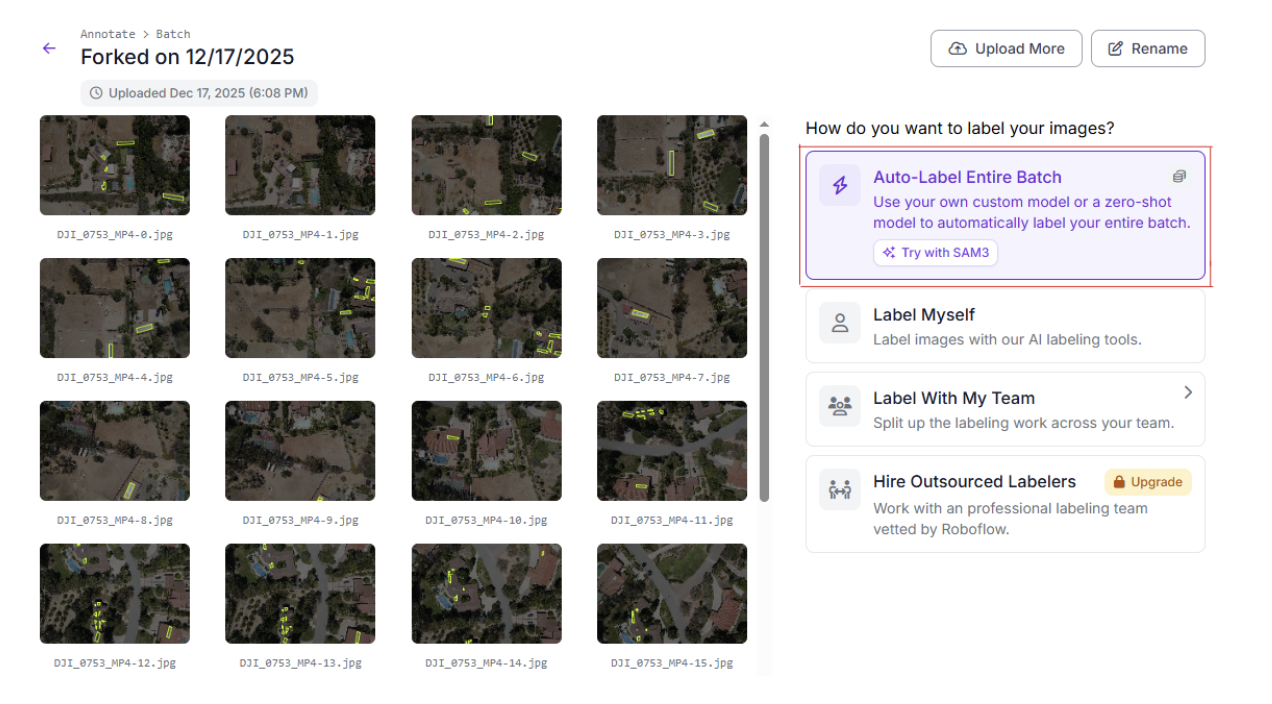
Step 5: Choose Auto-Labeling with SAM 3
On the right-hand sidebar, you’ll see multiple annotation options:
- Auto-Label Entire Batch
- Label Myself
- Label With My Team
- Hire Outsourced Labelers
For this tutorial, we will select Auto-Label Entire Batch. This option uses SAM 3 to generate instance segmentation masks automatically across the entire dataset.
Step 6: Configure Classes and Prompts
Next, you’ll define what SAM 3 should look for. In this dataset, we only need a single class:
- Class name: solar-panels
- Prompt: solar panels
After entering the class and prompt, click Generate Test Results. Roboflow will run SAM 3 on a small sample of images so you can preview the masks before labeling everything.
Step 7: Preview and Adjust Confidence Threshold
Roboflow will display predicted masks on a few sample images. Use this preview to:
- Check if SAM 3 is finding the correct objects
- Adjust the confidence threshold for the class if masks are too aggressive or too conservative
This step is critical. You’re deciding how strict the model should be before it labels the entire dataset.
Step 8: Run Auto-Labeling
Once you’re satisfied with the previews:
- Click Auto Label With This Model
- Click Start Auto Label
Roboflow will now run SAM 3 across the full dataset.
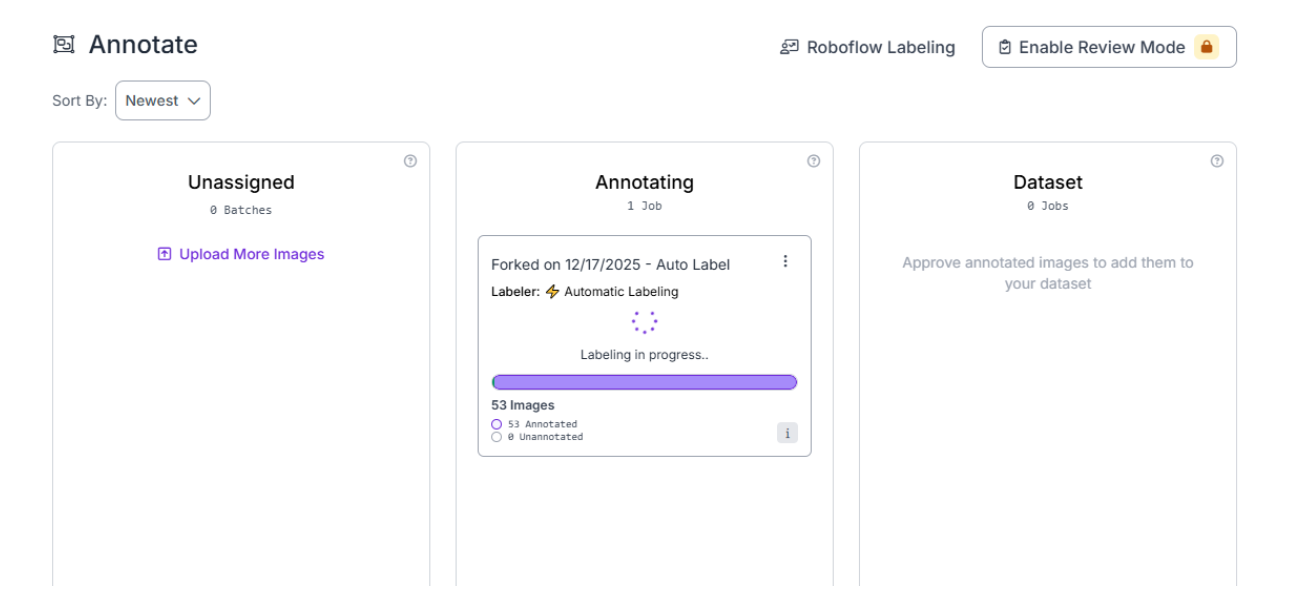
When auto-labeling completes, the card automatically moves to the Review column. This is where we’ll validate and clean the generated masks in the next section.
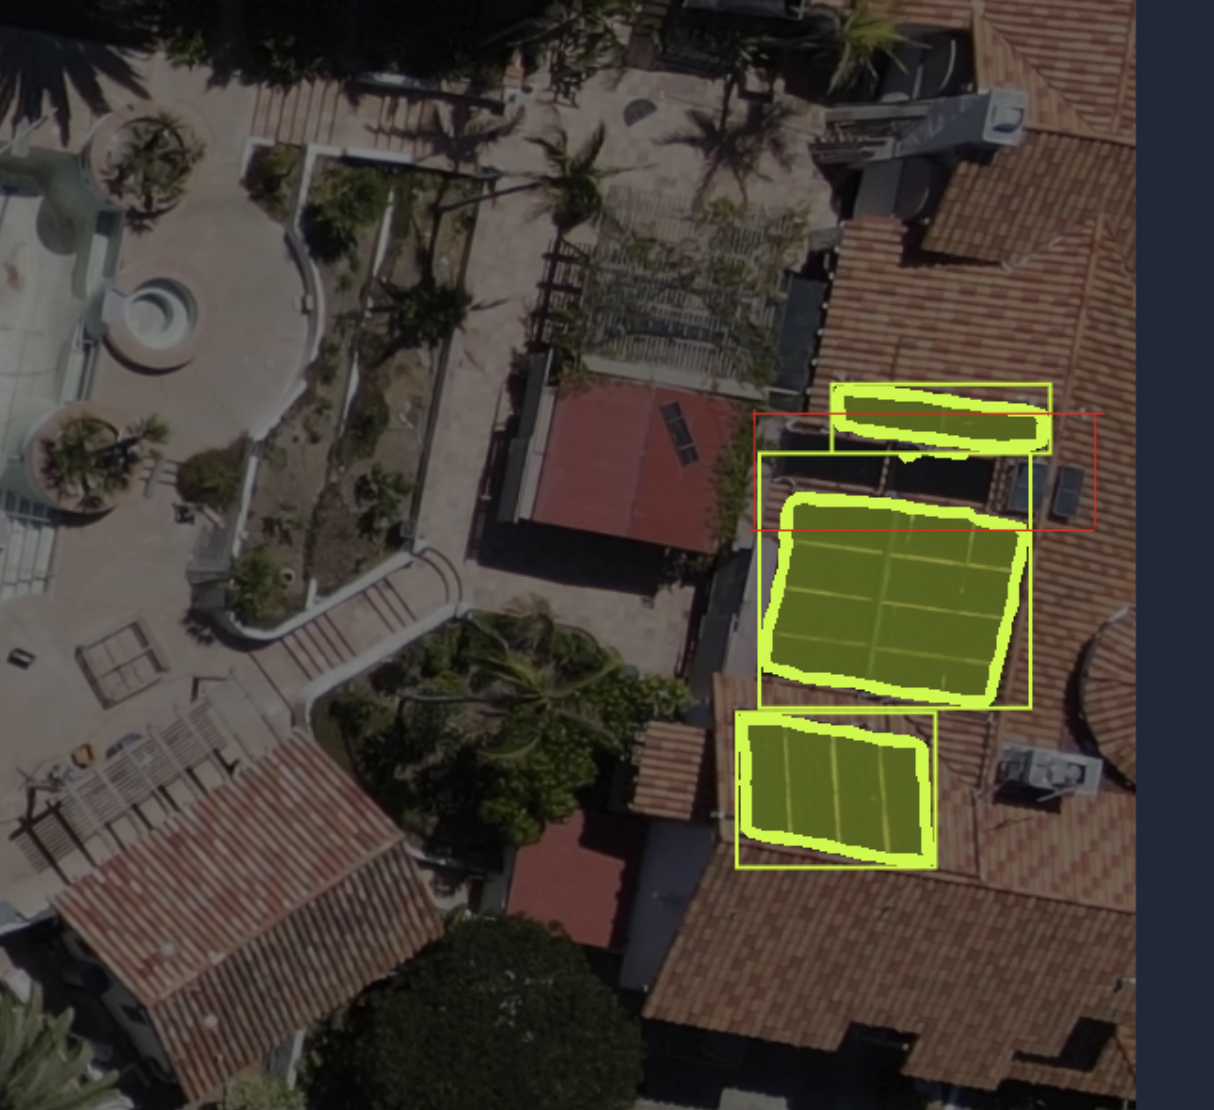
Validate and Clean SAM 3 Masks
SAM 3 does an impressive job out of the box, but auto-generated masks are not the finish line. They’re a starting point. Before using these labels for augmentation or training, you need a quick review pass to make sure the dataset isn’t quietly degrading.
The goal here is light cleanup, not perfection.
Common Issues to Look For
You’re not auditing the dataset exhaustively. You’re scanning for obvious, high-impact problems.
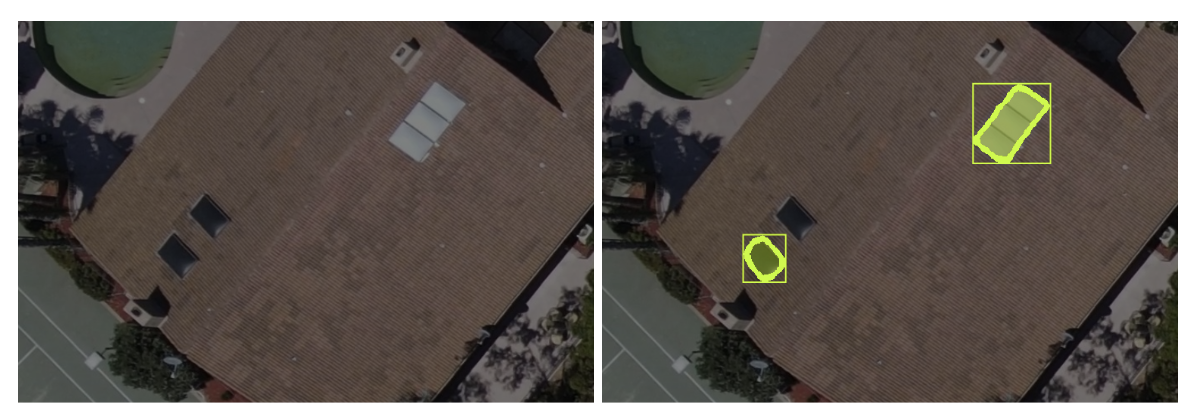
Tiny False Positives
Small, low-confidence masks often appear on:
- Roof textures
- Shadows
- Glare or reflections
These masks add noise and should usually be deleted.
Fragmented Masks
Sometimes a single solar panel is split into multiple masks instead of one clean instance. If the fragments clearly belong to the same object, merge or redraw them into a single mask.
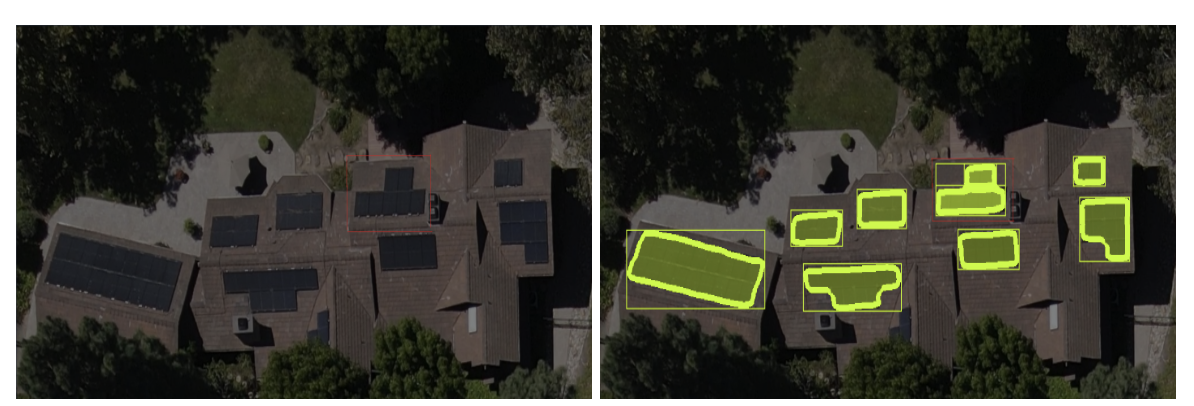
Missed Instances
Occasionally, SAM 3 fails to label an obvious object. In these cases, manually add a mask using the brush tool rather than re-running auto-labeling.
How to Use Segmentation to Expand Datasets Reliably
At this point, we have instance segmentation masks that correctly isolate solar panels from their surroundings. That’s the real unlock. Masks don’t just label objects, they give you control over how those objects appear in new images.
This is what makes segmentation-based augmentation fundamentally different from simple image transforms.
How Masks Enable Segmentation-Aware Augmentation
Instance segmentation masks don’t let you manually move or paste objects around. What they do is ensure that geometric and photometric augmentations are applied correctly at the object level.
1. Spatial Variation Through Geometry-Safe Transforms
When you apply operations like crop, rotation, shear, or mosaic to a dataset with masks:
- The object and its mask are transformed together
- Object boundaries remain aligned
- Relative object position changes naturally within the image
The result is new spatial layouts without corrupting labels, something image-level augmentation alone cannot guarantee.
2. Background Diversity Without Label Drift
Mask-aware augmentation ensures that objects remain intact while the surrounding pixels change due to cropping, rotation, or recomposition.
This introduces background variation by:
- Exposing objects to different surrounding regions
- Changing nearby textures and lighting
- Altering contextual cues without altering object shape
Crucially, the mask stays accurate throughout.
3. Natural Occlusion From Partial Visibility
Augmentations like crop, cutout, and mosaic introduce partial visibility:
- Objects are clipped at image boundaries
- Parts of objects are hidden behind cutout regions
- Objects appear alongside others in mosaic compositions
These effects simulate real-world occlusion without explicitly placing obstacles or drawing synthetic blockers.
Why Masks Matter Here
Without masks, these transformations cause label drift, truncated boxes, or invalid annotations.
With masks, every transformation preserves object integrity, making segmentation-aware augmentation a reliable way to increase dataset diversity without introducing noise.
How to Apply Synthetic Augmentation in Roboflow
With clean instance segmentation masks in place, we can now expand the dataset using segmentation-aware augmentation. This step is where dataset size and diversity increase, but it’s also where mistakes can quietly creep in if changes aren’t controlled.
To keep the process measurable and reversible, we’ll use dataset versioning to separate the baseline from the augmented data and inspect the results carefully before training anything.
Dataset Versioning Strategy
Roboflow versions let you freeze dataset states and experiment without risk. Each version is immutable, meaning once it’s created, its images, labels, and augmentation settings never change. This makes it possible to compare results confidently, knowing exactly what data a model was trained on.
For this tutorial, we’ll create two versions:
- Version 1: SAM 3-labeled baseline This version contains the original images with SAM 3–generated instance segmentation masks and no augmentation.
- Version 2: Augmented dataset This version starts from Version 1 and applies segmentation-aware augmentation to increase data diversity.
This separation is what makes experimentation safe. If augmentation helps, you can move forward with confidence. If it hurts performance, you can immediately fall back to the baseline without re-labeling or data loss. Versioning also allows you to iterate quickly, adjusting augmentation strength, adding or removing transforms, and creating new versions without contaminating earlier results.
In practice, dataset versioning turns augmentation from a one-way bet into a reversible experiment. You’re not guessing whether a change helped. You’re measuring it.
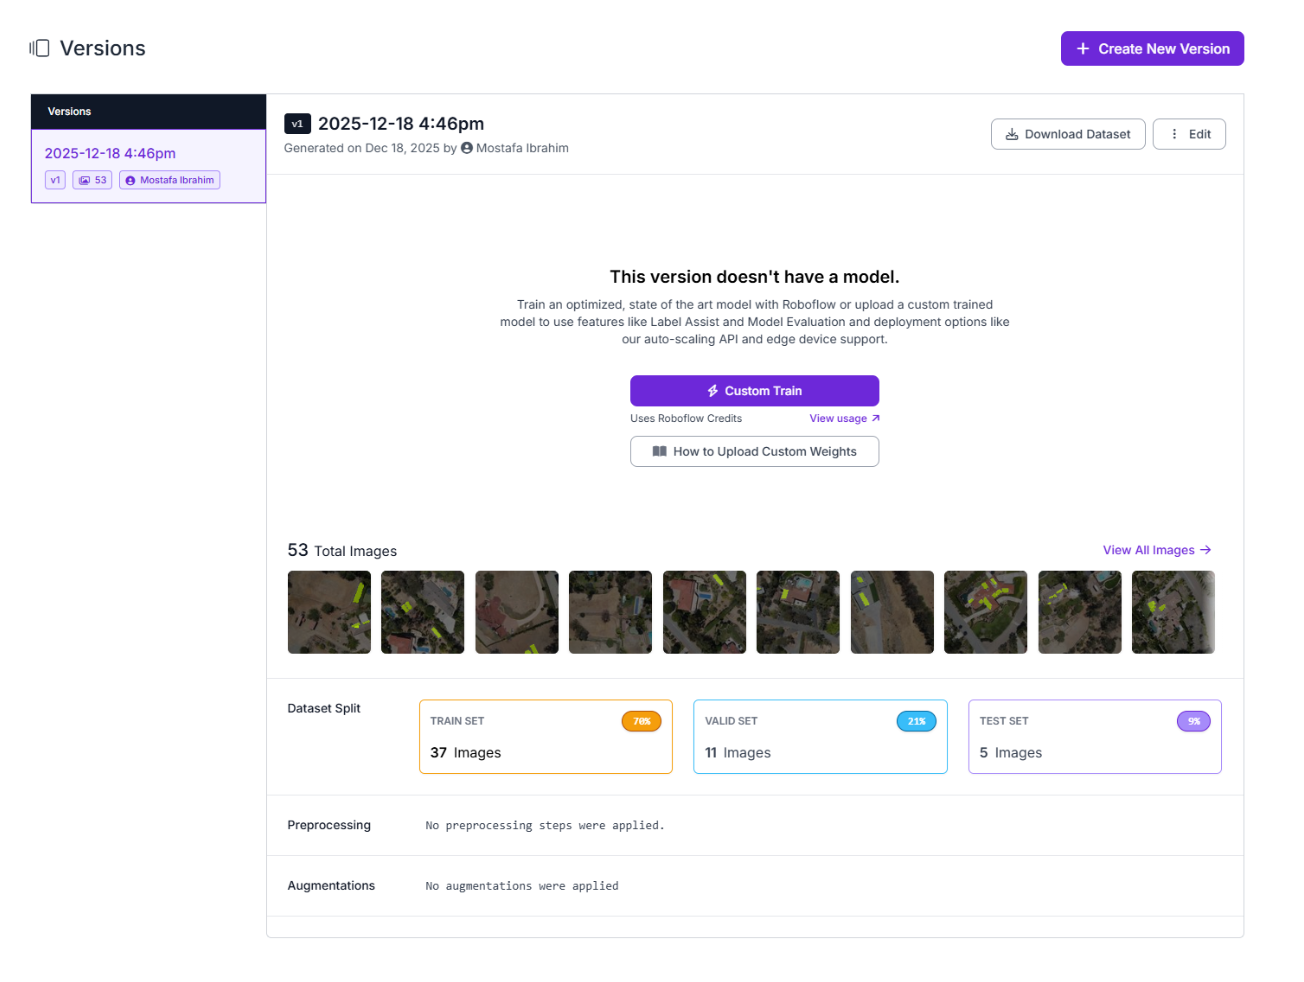
Create Version 1 (Baseline)
From the Versions tab, create a new dataset version:
- Leave preprocessing empty
- Disable all augmentations
- Use the default train/validation/test split
This version serves as the reference point for everything that follows.
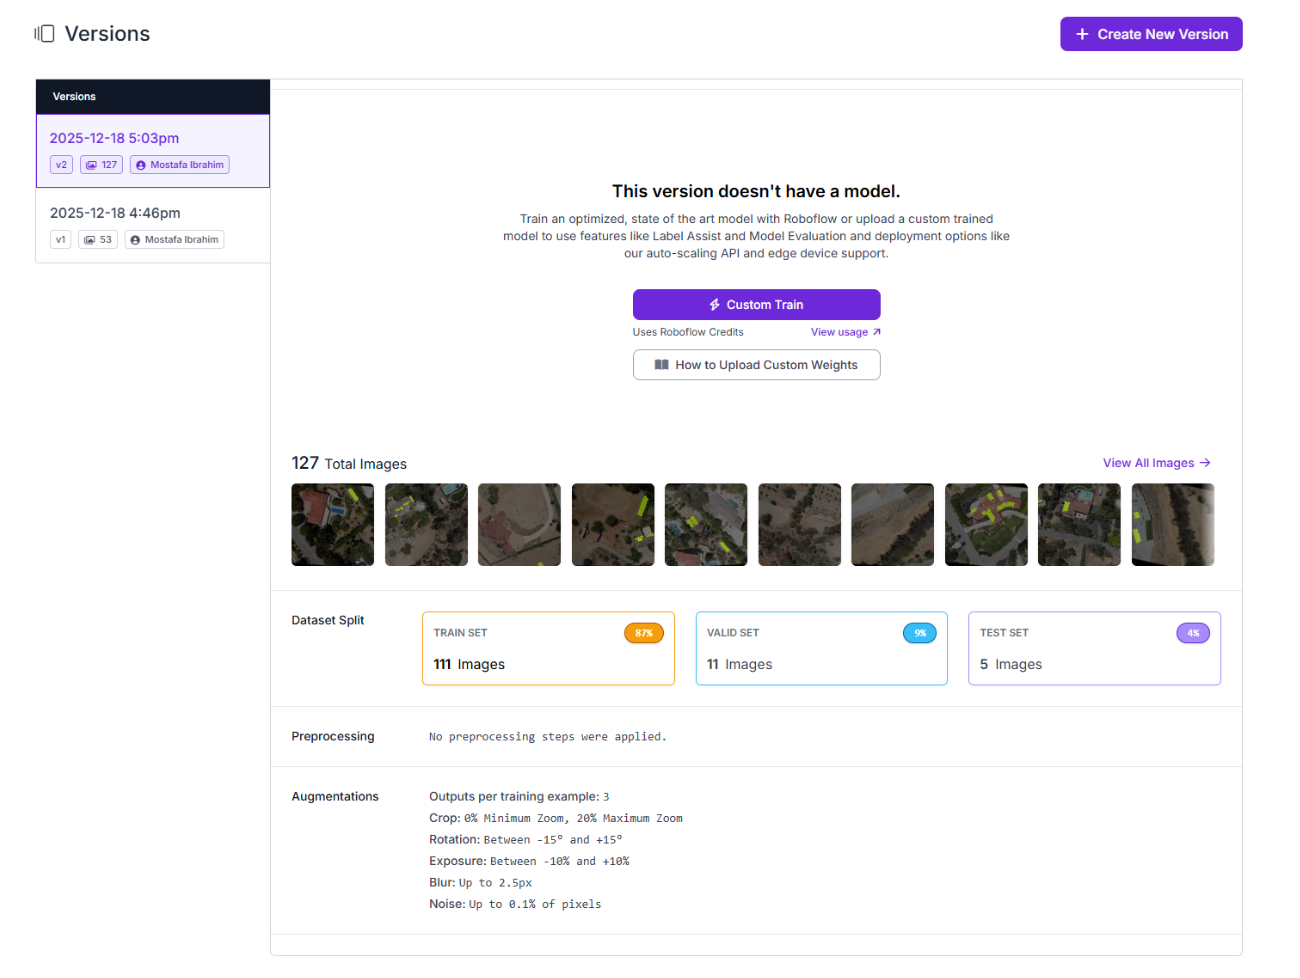
Configure Segmentation-Aware Augmentations
Create Version 2 by starting a new dataset version and enabling augmentation. Because this dataset uses instance segmentation masks, all augmentations preserve mask alignment automatically. The goal is to introduce realistic variation without distorting object shape.
Recommended augmentations include light blur to reflect real capture conditions, mild rotation to account for different drone angles, cropping to introduce local background variation, and small exposure or noise adjustments to simulate lighting changes.
Keep augmentation conservative. Avoid large rotations, aggressive blur, strong color shifts, or extreme cutout settings, as these can introduce unrealistic patterns that harm generalization.
A simple rule applies: if an augmented image looks questionable at first glance, it doesn’t belong in the dataset. Version 2 builds on the SAM 3-labeled baseline, increasing dataset size by 3× through controlled augmentation.
Inspect the Augmented Dataset
Once Version 2 is created, a quick visual inspection is essential. Scroll through a sample of augmented images and confirm that objects remain anchored to surfaces, masks stay aligned with object boundaries, and no floating, clipped, or distorted panels appear. Then compare Version 1 and Version 2 side by side to verify that the augmentation introduced meaningful variation, such as different object positions, backgrounds, and lighting, without making images look synthetic. If the images look realistic and noticeably more diverse, augmentation did its job.
Version 1 (baseline image before augmentation)
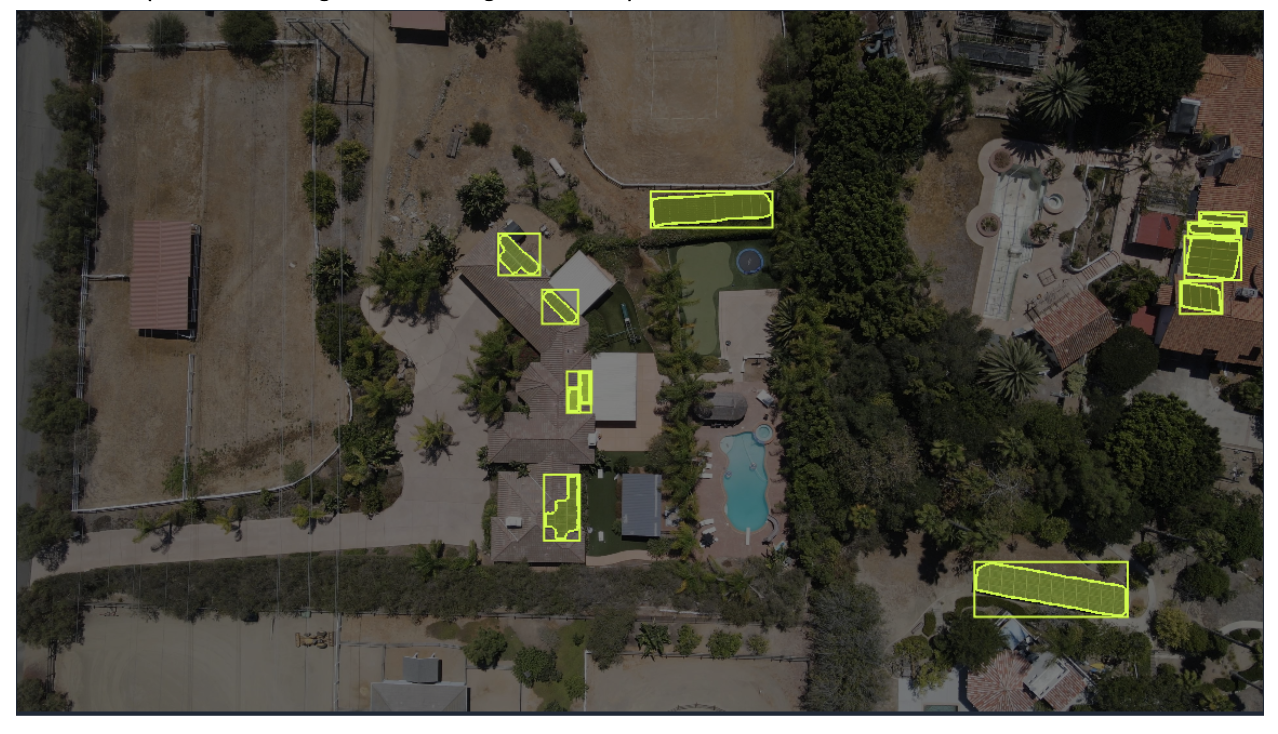
Version 2 (same image after segmentation-aware augmentation)
The Impact of Dataset Changes
Augmentation only matters if it improves downstream model behavior. In this section, we train two comparable models and look at what actually changed. The goal is not to chase perfect metrics, but to determine whether the augmented dataset made the model more robust in meaningful ways.
Training Setup
To make a fair comparison, both models must be trained under identical conditions. The only variable should be the dataset version.
Training configuration for both runs
- Same model architecture
- Same model size
- Same pretrained weights
- Same training settings
- Only the dataset version differs
Hands-on steps
- Open Version 1 (SAM 3–labeled baseline).
- Click Custom Train.
- Select the same:
- Model architecture
- Model size
- Training initialization option
- Start training and note the estimated duration.
Repeat the exact same steps for Version 2 (augmented dataset).
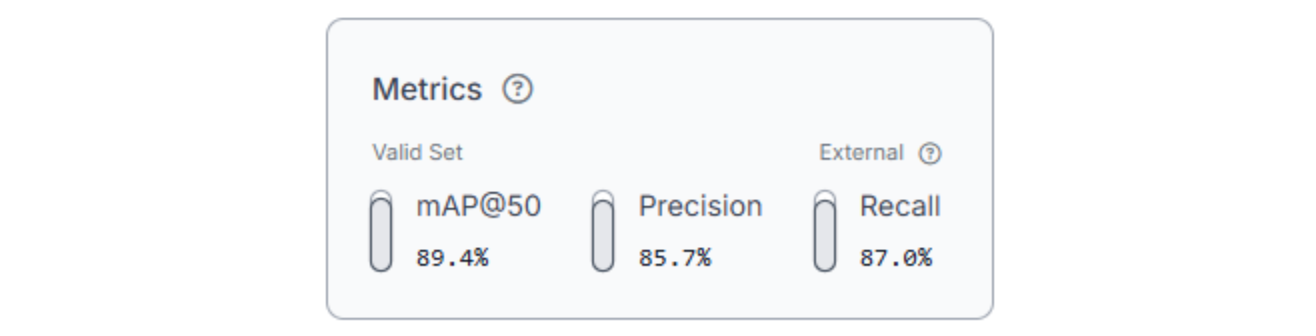
Metrics to Compare
Once training completes, compare the evaluation results side by side.
Key metrics
- mAP: Overall detection quality across thresholds
- Precision: How often predictions are correct
- Recall: How often objects are found
Numbers matter, but they don’t tell the whole story. Pay attention to error patterns, not just metric deltas.
Version 1: SAM 3–labeled baseline (model metrics)

Version 2: Augmented dataset (model metrics)
Interpreting Results
When augmentation helps
- Recall increases significantly without a major precision drop
- Fewer missed objects in difficult contexts
- More stable predictions across lighting or background variation
When augmentation doesn’t help
- Metrics remain flat
- Precision drops noticeably
- New error patterns appear that weren’t present before
What failures usually mean
- Masks were noisy or inconsistent
- Augmentation settings were too aggressive
- Synthetic variation didn’t reflect real-world conditions
Augmentation is not guaranteed to improve performance. When it works, it exposes gaps in the original dataset. When it doesn’t, it often reveals issues in labeling quality or augmentation realism.
In this case, the augmented dataset led to a clear improvement in recall and overall detection quality, with only a moderate tradeoff in precision. The additional variation helped the model generalize to a wider range of solar panel appearances without meaningfully increasing false positives.
When to Use SAM 3 and Synthetic Augmentation
This workflow works best when objects are visually distinct, datasets are small to moderate in size, and collecting new images is costly or slow. SAM 3 is most effective when objects have consistent shapes and textures but appear across varied environments, such as rooftops, roads, or industrial scenes.
It is less effective when objects are ambiguous, heavily occluded, or poorly defined even to humans. In those cases, auto-labeling errors tend to compound during augmentation rather than disappear.
As a rule of thumb, datasets with fewer than 100 images often benefit the most. Below 20 images, results become unpredictable, and manual review dominates any time savings.
Auto-labeling should never be treated as “set and forget.” Re-run SAM 3 when adding new image sources, refining object definitions, or spotting systematic labeling errors. Synthetic data is a force multiplier, not a shortcut, and its value depends entirely on upstream label quality and restraint.
Conclusion
This tutorial demonstrated a practical, data-centric workflow for improving small vision datasets using SAM 3 and Roboflow.
By auto-labeling images with instance segmentation masks, validating results, and applying segmentation-aware augmentation, we expanded dataset coverage without collecting new data.
The key takeaway is simple: better data beats bigger datasets. Clean labels, realistic variation, and deliberate validation matter more than architectural complexity when data is limited. This workflow scales naturally, from early experiments to production-ready datasets, while staying grounded in data quality at every step.
Written by Mostafa Ibrahim
Cite this Post
Use the following entry to cite this post in your research:
Contributing Writer. (Dec 31, 2025). How to Grow Small Vision Datasets with SAM 3 and Synthetic Augmentation. Roboflow Blog: https://blog.roboflow.com/grow-vision-datasets-with-sam-3/