A new state of the art semantic segmentation algorithm emerges from the lineage of transformer models: SegFormer!
In this post, we will walk through how to train SegFormer on a custom dataset using Pytorch Lightning to classify every pixel in an image.
We use the public Balloons dataset for this tutorial but you can use any semantic segmentation dataset you can find on Roboflow Universe or upload and create your own dataset.
Follow along in the How To Train SegFormer notebook.
In this guide, we take the following steps:
- Install SegFormer and Pytorch Lightning dependancies
- Create a dataset class for semantic segmentation
- Define the Pytorch Lightning model class
- Train SegFormer on custom data
- View training plots in Tensorboard
- Evaluate model on test dataset
- Visualize results
What's Cool About SegFormer?
Like other computer vision tasks, transformers have proven very useful for semantic segmentation. Since semantic segmentation is so closely related to image classification (but on a pixel level) it seemed a natural evolution for ViT to be adopted and adapted for the task.
With ViT as a backbone showing great promise, various papers began to build on the idea and innovate to address issues of low resolution and high computational cost. And, while performance continued to improve with each new method, these papers seemed to focus solely on the design of the transformer encoder and neglected the decoder. Enter SegFormer. SegFormer sets itself apart with (Credit: Xie):
- a new "positional-encoding-free and hierarchical Transformer encoder"
- "a lightweight All-MLP decoder design"
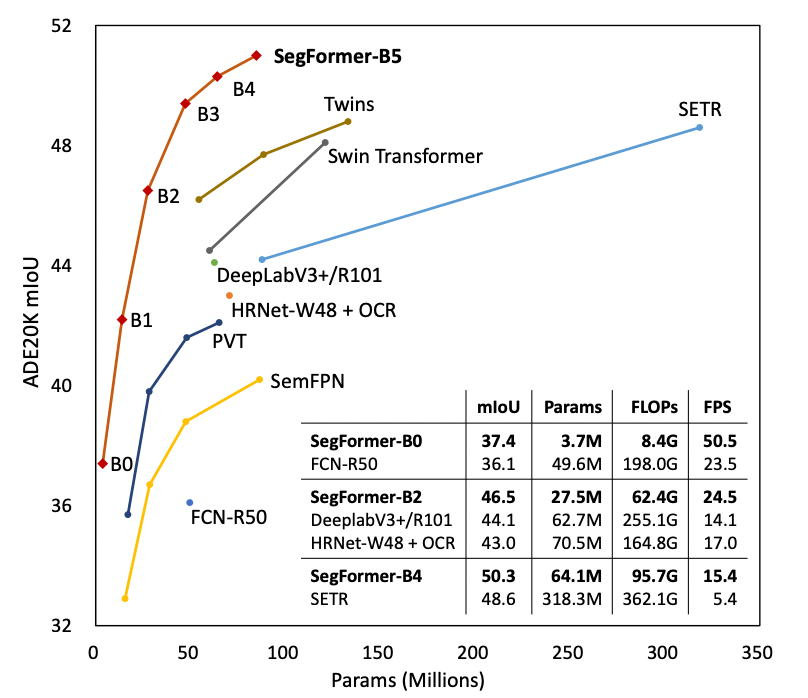
The novel encoder is able operate at arbitrary resolutions without impacting performance. Additionally, the encoder is able to generate both high resolution and low resolution features in contrast to ViT. The decoder design is able to combine both local and global attention to produce high quality representations at low cost.
With these novel improvements, SegFormer sets a new SOTA on ADE20K, Cityscapes, and COCO-Stuff semantic segmentation datasets.
Install SegFormer and Pytorch Lightning Dependancies
First we install the dependencies necessary for training SegFormer including pytorch-lightning , transformers , and roboflow. We will import the SegFormer model architecture implementation from transformers and we will use pytorch-lightning for our training routine.
pip install pytorch-lightning transformers datasets roboflow==0.2.7Create A Dataset
The most important aspect of any machine learning model is the data. Your model is only as good as your data, so let's start off on the right foot!
To train SegFormer we will need a semantic segmentation dataset. This means we need image label pairs where the label assigns a class to every pixel in the image. A common way to do this is to assign a pixel value to every class in the dataset. Then, for each image, we can create a mask using those pixel values. Convention reserves a pixel value of 0 for background and a pixel value of 255 for areas of the image to ignore when evaluating performance.

To create a dataset like this we recommend that you:
- Upload raw images and annotate them in Roboflow with Roboflow Annotate, then choose the "Semantic Segmentation Masks" format when exporting.
You can also:
- Browse and download open source semantic segmentation projects to start from on Roboflow Universe
- Use the same public Balloons dataset we use in this tutorial
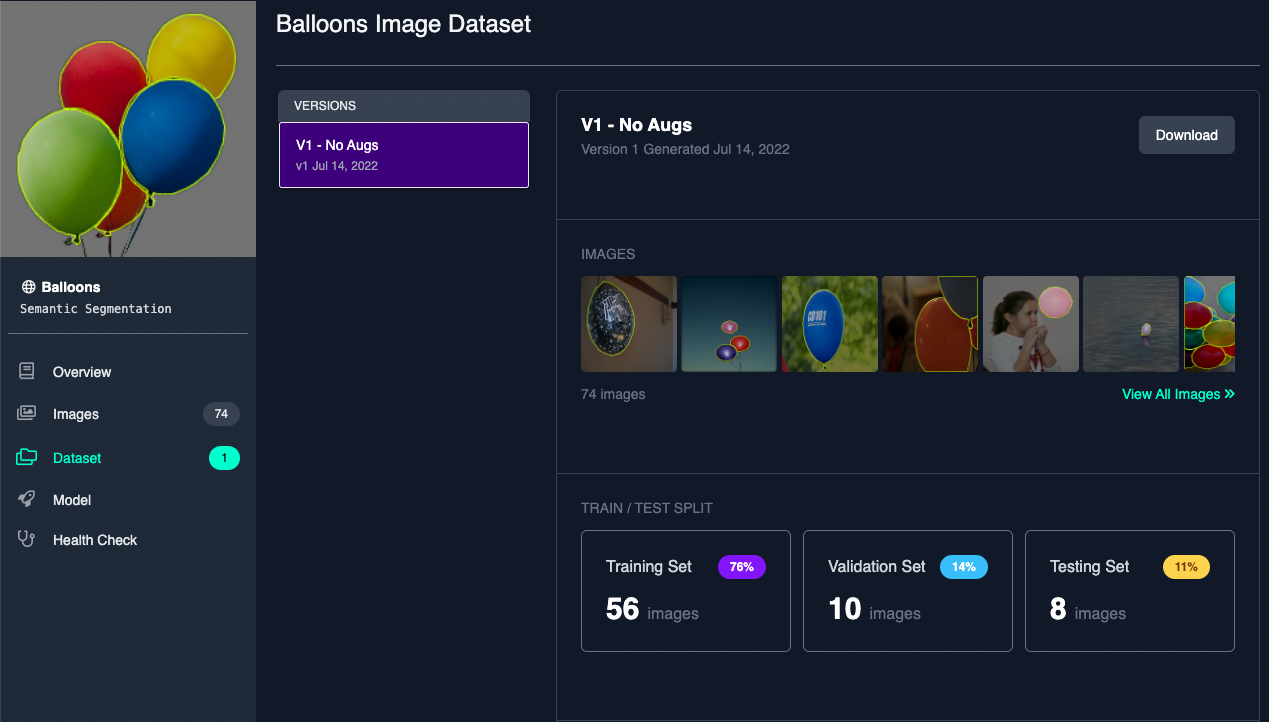
On the dataset version page of your Roboflow project hit Export, then select the Semantic Segmentation Masks format. A Python snippet will be generated to download your dataset into your Colab notebook.
from roboflow import Roboflow
rf = Roboflow(api_key="YOUR API KEY")
project = rf.workspace("YOUR WORKSPACE").project("YOUR DATASET")
dataset = project.version(<DATASET VERSION NUMBER>).download("png-mask-semantic")
Now we must define our SemanticSegmentationDataset class:
from torch.utils.data import Dataset, Dataloader

class SemanticSegmentationDataset(Dataset):
    """Image (semantic) segmentation dataset."""

    def __init__(self, root_dir, feature_extractor):
        self.root_dir = root_dir
        self.feature_extractor = feature_extractor
        self.classes_csv_file = os.path.join(self.root_dir, "_classes.csv")
        with open(self.classes_csv_file, 'r') as fid:
            data = [l.split(',') for i,l in enumerate(fid) if i !=0]
        self.id2label = {x[0]:x[1] for x in data}

        image_file_names = [f for f in os.listdir(self.root_dir) if '.jpg' in f]
        mask_file_names = [f for f in os.listdir(self.root_dir) if '.png' in f]

        self.images = sorted(image_file_names)
        self.masks = sorted(mask_file_names)

    def __len__(self):
        return len(self.images)

    def __getitem__(self, idx):

        image = Image.open(os.path.join(self.root_dir, self.images[idx]))
        segmentation_map = Image.open(os.path.join(self.root_dir, self.masks[idx]))

        encoded_inputs = self.feature_extractor(image, segmentation_map, return_tensors="pt")

        for k,v in encoded_inputs.items():
          encoded_inputs[k].squeeze_()

        return encoded_inputs
Next, let's instantiate our new class. Note, here we will set the size of our feature extractor to 128. This will be the size of images that SegFormer receives as training input. The larger the size, the longer training will take. For this tutorial, we will choose small inputs so that training won't take so long.
Also notice, we are initializing the feature extractor by passing in the name of the pre-trained model we are fine tuning. This helps the feature extractor know what preprocessing steps it should take when yielding examples from the dataset during training.
After instantiating our datasets, we can create our data loaders. Depending on the hardware you are using, you may need to change the parameters in the data loader constructors ( batch_size, num_workers, prefetch_factor).
from transformers import SegformerFeatureExtractor

feature_extractor = SegformerFeatureExtractor.from_pretrained("nvidia/segformer-b0-finetuned-ade-512-512")
feature_extractor.reduce_labels = False
feature_extractor.size = 128

train_dataset = SemanticSegmentationDataset("./roboflow/train/", feature_extractor)
val_dataset = SemanticSegmentationDataset("./roboflow/valid/", feature_extractor)
test_dataset = SemanticSegmentationDataset("./roboflow/test/", feature_extractor)

batch_size = 8
train_dataloader = DataLoader(train_dataset, batch_size=batch_size, shuffle=True, num_workers=3, prefetch_factor=8)
val_dataloader = DataLoader(val_dataset, batch_size=batch_size, num_workers=3, prefetch_factor=8)
test_dataloader = DataLoader(test_dataset, batch_size=batch_size, num_workers=3, prefetch_factor=8)
Define the Pytorch Lightning Model Class
Now we will define the SegformerFinetuner class. This class will contain all of the methods that Pytorch Lightning needs to train our model.
import pytorch_lightning as pl
from transformers import SegformerForSemanticSegmentation
from datasets import load_metric

import torch
from torch import nn

import numpy as np

class SegformerFinetuner(pl.LightningModule):

    def __init__(self, id2label, train_dataloader=None, val_dataloader=None, test_dataloader=None, metrics_interval=100):
        super(SegformerFinetuner, self).__init__()
        self.id2label = id2label
        self.metrics_interval = metrics_interval
        self.train_dl = train_dataloader
        self.val_dl = val_dataloader
        self.test_dl = test_dataloader

        self.num_classes = len(id2label.keys())
        self.label2id = {v:k for k,v in self.id2label.items()}

        self.model = SegformerForSemanticSegmentation.from_pretrained(
            "nvidia/segformer-b0-finetuned-ade-512-512",
            return_dict=False,
            num_labels=self.num_classes,
            id2label=self.id2label,
            label2id=self.label2id,
            ignore_mismatched_sizes=True,
        )

        self.train_mean_iou = load_metric("mean_iou")
        self.val_mean_iou = load_metric("mean_iou")
        self.test_mean_iou = load_metric("mean_iou")

    def forward(self, images, masks):
        outputs = self.model(pixel_values=images, labels=masks)
        return(outputs)

    def training_step(self, batch, batch_nb):

        images, masks = batch['pixel_values'], batch['labels']

        outputs = self(images, masks)

        loss, logits = outputs[0], outputs[1]

        upsampled_logits = nn.functional.interpolate(
            logits,
            size=masks.shape[-2:],
            mode="bilinear",
            align_corners=False
        )

        predicted = upsampled_logits.argmax(dim=1)

        self.train_mean_iou.add_batch(
            predictions=predicted.detach().cpu().numpy(),
            references=masks.detach().cpu().numpy()
        )
        if batch_nb % self.metrics_interval == 0:

            metrics = self.train_mean_iou.compute(
                num_labels=self.num_classes,
                ignore_index=255,
                reduce_labels=False,
            )

            metrics = {'loss': loss, "mean_iou": metrics["mean_iou"], "mean_accuracy": metrics["mean_accuracy"]}

            for k,v in metrics.items():
                self.log(k,v)

            return(metrics)
        else:
            return({'loss': loss})

    def validation_step(self, batch, batch_nb):

        images, masks = batch['pixel_values'], batch['labels']

        outputs = self(images, masks)

        loss, logits = outputs[0], outputs[1]

        upsampled_logits = nn.functional.interpolate(
            logits,
            size=masks.shape[-2:],
            mode="bilinear",
            align_corners=False
        )

        predicted = upsampled_logits.argmax(dim=1)

        self.val_mean_iou.add_batch(
            predictions=predicted.detach().cpu().numpy(),
            references=masks.detach().cpu().numpy()
        )

        return({'val_loss': loss})

    def validation_epoch_end(self, outputs):
        metrics = self.val_mean_iou.compute(
              num_labels=self.num_classes,
              ignore_index=255,
              reduce_labels=False,
          )

        avg_val_loss = torch.stack([x["val_loss"] for x in outputs]).mean()
        val_mean_iou = metrics["mean_iou"]
        val_mean_accuracy = metrics["mean_accuracy"]

        metrics = {"val_loss": avg_val_loss, "val_mean_iou":val_mean_iou, "val_mean_accuracy":val_mean_accuracy}
        for k,v in metrics.items():
            self.log(k,v)

        return metrics

    def test_step(self, batch, batch_nb):

        images, masks = batch['pixel_values'], batch['labels']

        outputs = self(images, masks)

        loss, logits = outputs[0], outputs[1]

        upsampled_logits = nn.functional.interpolate(
            logits,
            size=masks.shape[-2:],
            mode="bilinear",
            align_corners=False
        )

        predicted = upsampled_logits.argmax(dim=1)

        self.test_mean_iou.add_batch(
            predictions=predicted.detach().cpu().numpy(),
            references=masks.detach().cpu().numpy()
        )

        return({'test_loss': loss})

    def test_epoch_end(self, outputs):
        metrics = self.test_mean_iou.compute(
              num_labels=self.num_classes,
              ignore_index=255,
              reduce_labels=False,
          )

        avg_test_loss = torch.stack([x["test_loss"] for x in outputs]).mean()
        test_mean_iou = metrics["mean_iou"]
        test_mean_accuracy = metrics["mean_accuracy"]

         metrics = {"test_loss": avg_test_loss, "test_mean_iou":test_mean_iou, "test_mean_accuracy":test_mean_accuracy}

        for k,v in metrics.items():
            self.log(k,v)

        return metrics

    def configure_optimizers(self):
        return torch.optim.Adam([p for p in self.parameters() if p.requires_grad], lr=2e-05, eps=1e-08)

    def train_dataloader(self):
        return self.train_dl

    def val_dataloader(self):
        return self.val_dl

    def test_dataloader(self):
        return self.test_dl
With that defined, lets instantiate it:
segformer_finetuner = SegformerFinetuner(
    train_dataset.id2label,
    train_dataloader=train_dataloader,
    val_dataloader=val_dataloader,
    test_dataloader=test_dataloader,
    metrics_interval=10,
)
Train SegFormer on Custom Data
Up to this point we have downloaded our data from Roboflow, we defined a class to access that data, and we created a class to tell Pytorch Lightning how to use that data to train our network. Now we are ready to train!
Luckily, Pytorch Lightning makes that pretty easy. First, we'll setup early stopping based on validation loss so we don't overfit out model. Then we can create the Pytorch Lightning trainer and hit the launch button!
from pytorch_lightning.callbacks.early_stopping import EarlyStopping
from pytorch_lightning.callbacks.model_checkpoint import ModelCheckpoint

early_stop_callback = EarlyStopping(
    monitor="val_loss",
    min_delta=0.00,
    patience=3,
    verbose=False,
    mode="min",
)

checkpoint_callback = ModelCheckpoint(save_top_k=1, monitor="val_loss")

trainer = pl.Trainer(
    gpus=1,
    callbacks=[early_stop_callback, checkpoint_callback],
    max_epochs=500,
    val_check_interval=len(train_dataloader),
)

trainer.fit(segformer_finetuner)
After running trainer.fit your output should look something like this:

View Training Plots in Tensorboard
One of the niceties of Pytorch Lightning is that it defaults to using a TensorBoard logger. That means anytime we used the self.logger attribute in our SegformerFinetuner class, we saved metrics that can be read by TensorBoard. To view the TensorBoard plots we run the following (assuming we are in a Jupyter notebook):
%load_ext tensorboard
%tensorboard --logdir lightning_logs/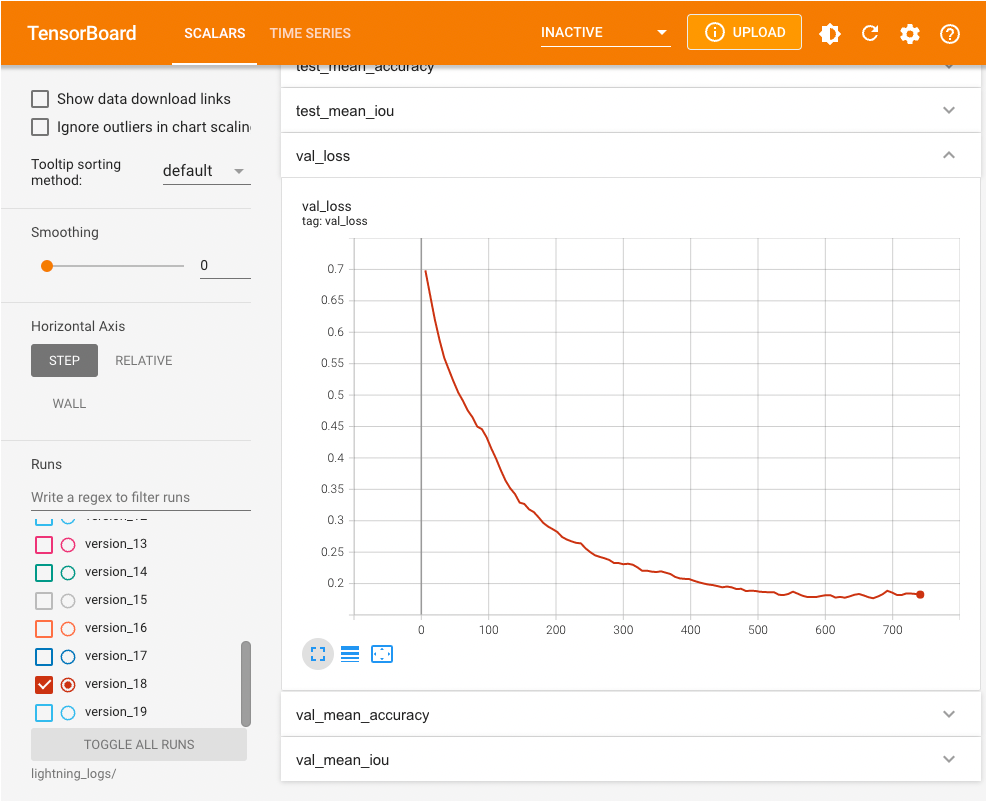
Evaluate Model on Test Dataset
In true Pytorch Lightning style, testing our model is a one liner:
res = trainer.test(ckpt_path="best")
Visualize Results
Metrics are nice, but let's see what they really mean by visualizing our model outputs next to our labels (the ideal model output). Note the color map only has two entries since the balloon dataset only has two classes. If your dataset has more classes, add index-to-rgb entires in the color map dictionary.
color_map = {
    0:(0,0,0),
    1:(255,0,0),
}

def prediction_to_vis(prediction):
    vis_shape = prediction.shape + (3,)
    vis = np.zeros(vis_shape)
    for i,c in color_map.items():
        vis[prediction == i] = color_map[i]
    return Image.fromarray(vis.astype(np.uint8))

for batch in test_dataloader:
    images, masks = batch['pixel_values'], batch['labels']
    outputs = segformer_finetuner.model(images, masks)

    loss, logits = outputs[0], outputs[1]

    upsampled_logits = nn.functional.interpolate(
        logits,
        size=masks.shape[-2:],
        mode="bilinear",
        align_corners=False
    )

    predicted = upsampled_logits.argmax(dim=1).cpu().numpy()
    masks = masks.cpu().numpy()

from matplotlib import pyplot as plt
f, axarr = plt.subplots(predicted.shape[0],2)
for i in range(predicted.shape[0]):
    axarr[i,0].imshow(prediction_to_vis(predicted[i,:,:]))
    axarr[i,1].imshow(prediction_to_vis(masks[i,:,:]))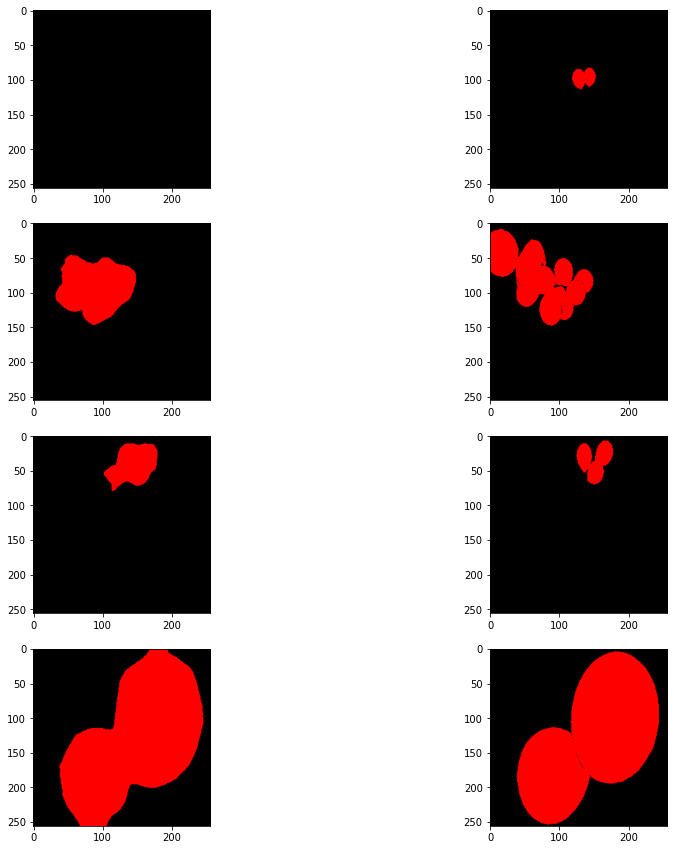
Conclusion
Huzzah! You just trained SegFormer on a custom dataset using Pytorch Lightning and Roboflow. For our example, we detected balloons but the possibilities are limitless. Semantic segmentation is used in self driving cars, robotics, aerial imagery analysis, and more. In this blog post we:
- Downloaded data from Roboflow
- Used Pytorch Lightning to describe how our model should be trained
- Trained and tested our model using convenient Pytorch Lightning APIs
- Visualized our results
Don't forget to checkout the How to Train Segformer notebook!
Happy segmenting!
Citations
Xie, Enze, et al. "SegFormer: Simple and efficient design for semantic segmentation with transformers." Advances in Neural Information Processing Systems 34 (2021): 12077-12090. | |
| APA |
|---|
Cite this Post
Use the following entry to cite this post in your research:
Paul Guerrie. (Jul 22, 2022). How To Train SegFormer on a Custom Dataset. Roboflow Blog: https://blog.roboflow.com/how-to-train-segformer-on-a-custom-dataset-with-pytorch-lightning/
