
This tutorial walks through every step of training a YOLOv8 object detection model on a custom dataset, from installing the Ultralytics pip package and preparing labeled data in Roboflow to running training via the yolo CLI, validating results, and deploying to edge devices. Benchmarked against YOLOv5 on the RF100 dataset, YOLOv8 scores higher on 64% of tasks, with negligible difference when it falls short. The post includes code for running inference via the Roboflow API once your model is trained and deployed.
YOLOv8 is the latest installment in the highly influential family of models that use the YOLO (You Only Look Once) architecture. YOLOv8 was developed by Ultralytics, a team known for its work on YOLOv3 and YOLOv5.
Following the trend set by YOLOv6 and YOLOv7, we have at our disposal object detection, but also instance segmentation, and image classification. The model itself is created in PyTorch and runs on both the CPU and GPU. As with YOLOv5, we also have a number of various exports such as TF.js or CoreML.
For a deep dive into the YOLOv8 architecture, see our What's New in YOLOv8 post.
We are still waiting for the Papers with Code benchmark comparing YOLOv8 with the other SOTA real-time models. In the meantime, we matched v8 against YOLOv5 using the RF100 dataset. YOLOv8 scores higher 64% of the time, and when it performs worse, the difference is negligible.
In this tutorial, we will take you through each step of training the YOLOv8 object detection model on a custom dataset. You will learn how to use the new API, how to prepare the dataset, and most importantly how to train and validate the model.
The steps to train a YOLOv8 object detection model on custom data are:
- Install YOLOv8 from pip
- Create a custom dataset with labelled images
- Export your dataset for use with YOLOv8
- Use the yolo command line utility to run train a model
- Run inference with the YOLO command line application
You can try a YOLOv8 model with the following Workflow:
In the Workflow above, you can drag and drop an image and the system will detect the objects in it using a YOLOv8 model. You can also see how the model compares to YOLO-World, a zero-shot model.
Let's begin!
Check out our Autodistill guide for more information, and our Autodistill YOLOv8 documentation.
How to Install YOLOv8
YOLOv8 can be installed in two ways : from the source and via pip. This is because it is the first iteration of YOLO to have an official package.
From pip (recommended)
To install YOLOv8 from pip, use the following command:
pip install "ultralytics<=8.3.40"From source
You can install the model from the source on GitHub using these commands:
git clone https://github.com/ultralytics/ultralytics
cd ultralytics
pip install -e ultralytics
The New YOLOv8 API
The developers of YOLOv8 decided to break away from the standard YOLO project design : separate train.py, detect.py, val.py, and export.py scripts. In the short term it will probably cause some confusion while in the long term, it is a fantastic decision!
This pattern has been around since YOLOv3, and every YOLO iteration has replicated it. It was relatively simple to understand but notoriously challenging to deploy especially in real-time processing and tracking scenarios.
The new approach is much more flexible because it allows YOLOv8 to be used independently through the terminal, as well as being part of a complex computer vision application.
The YOLOv8 CLI
YOLOv8 comes with a command line interface that lets you train, validate or infer models on various tasks and versions. The CLI requires no customization or code. You can run all tasks from the terminal. Usage is fairly similar to the scripts we are familiar with. The example below shows how to leverage the CLI to detect objects in a given image.
yolo task=detect \
mode=predict \
model=yolov8n.pt \
conf=0.25 \
source='https://media.roboflow.com/notebooks/examples/dog.jpeg'
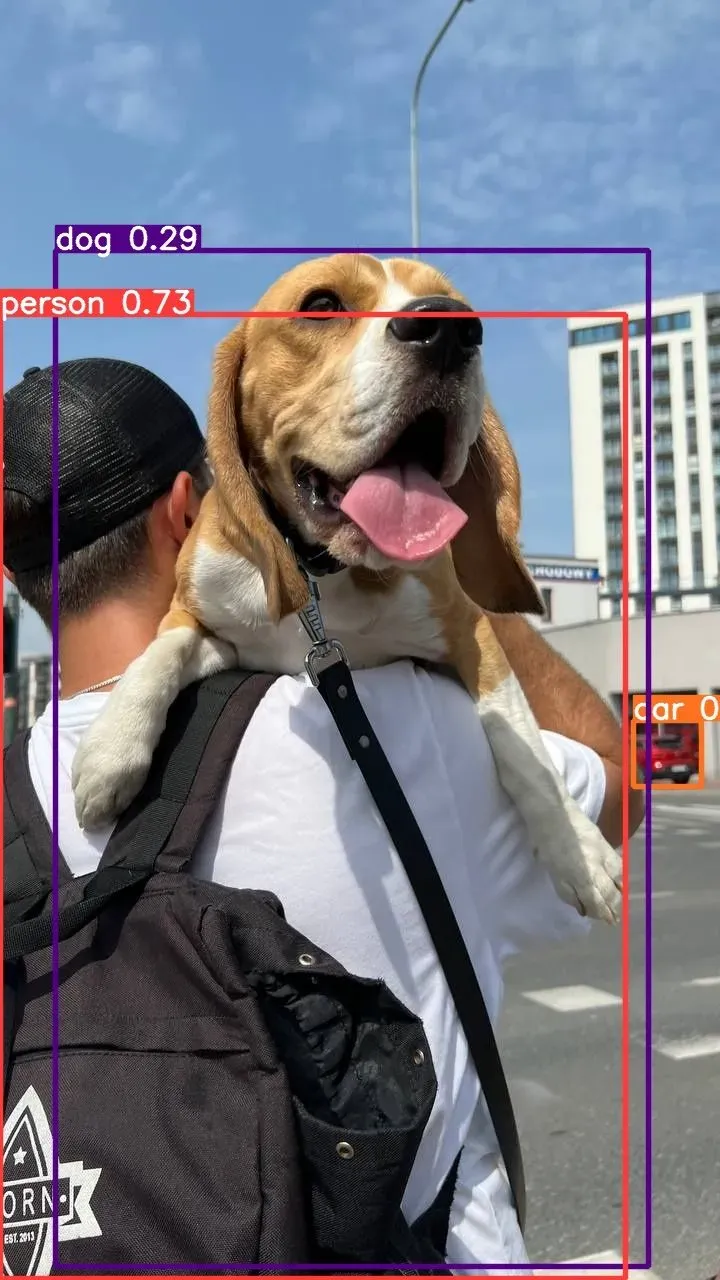
The YOLOv8 Python SDK
Ultralytics YOLO comes with a pythonic Model and Trainer interface. This finally allows us to use the YOLO model inside a custom Python script in only a few lines of code. Something like this has been impossible until now without doing a repository fork and making your own changes to the code.
from ultralytics import YOLO

model = YOLO('yolov8n.pt')
model.predict(
   source='https://media.roboflow.com/notebooks/examples/dog.jpeg',
   conf=0.25
)
Preparing a custom dataset for YOLOv8
Building a custom dataset can be a painful process. It might take dozens or even hundreds of hours to collect images, label them, and export them in the proper format. Fortunately, Roboflow makes this process straightforward. Let me show you how!
Create a project
Before you start, you need to create a Roboflow account. Once you do that, you can create a new project in the Roboflow dashboard. Keep in mind to choose the right project type. In this case choose, "Object Detection".
Upload your images
Next, add data to your newly created project. You can do it via API or through our web interface. If you don’t have a dataset, you can grab one from Roboflow Universe or use the football-players-detection dataset which we will be showing later in this tutorial.
If you drag and drop a directory with a dataset in a supported format, the Roboflow dashboard will automatically read the images and annotations together.
Label your images
If you only have images, you can label them in Roboflow Annotate. When starting from scratch, consider annotating large batches of images via API or use the model-assisted labeling tool to speed things up.
Generate a new version of your dataset
Now that we have our images and annotations added, we can Generate a Dataset Version. When Generating a Version, you may elect to add preprocessing and augmentations. This step is entirely optional, however, it can allow you to improve the robustness of your model significantly.
Export your dataset
Once the dataset version is generated, we have a hosted dataset we can load directly into our notebook for easy training.
One way to download a dataset from Roboflow Universe is to use our pip package. You can generate the appropriate code snippet directly in our UI. On a dataset’s Universe home page, click the Download this Dataset button and select YOLO v5 PyTorch export format.
After a few seconds, you will see a code similar to the one below, except with all the necessary parameters filled in. You can copy and paste it into your Jupyter Notebook or a similar environment. When you execute it, the dataset will be downloaded to your machine in the appropriate format. Magic!
from roboflow import Roboflow

rf = Roboflow(api_key='YOUR_API_KEY')
project = rf.workspace('WORKSPACE').project('PROJECT')
dataset = project.version(1).download('yolov8')
Train YOLOv8 on a custom dataset
After pasting the dataset download snippet into your YOLOv8 Colab notebook, you are ready to begin the training process. You can do so using this command:
yolo task=detect \
mode=train \
model=yolov8s.pt \
data={dataset.location}/data.yaml \
epochs=100 \
imgsz=640
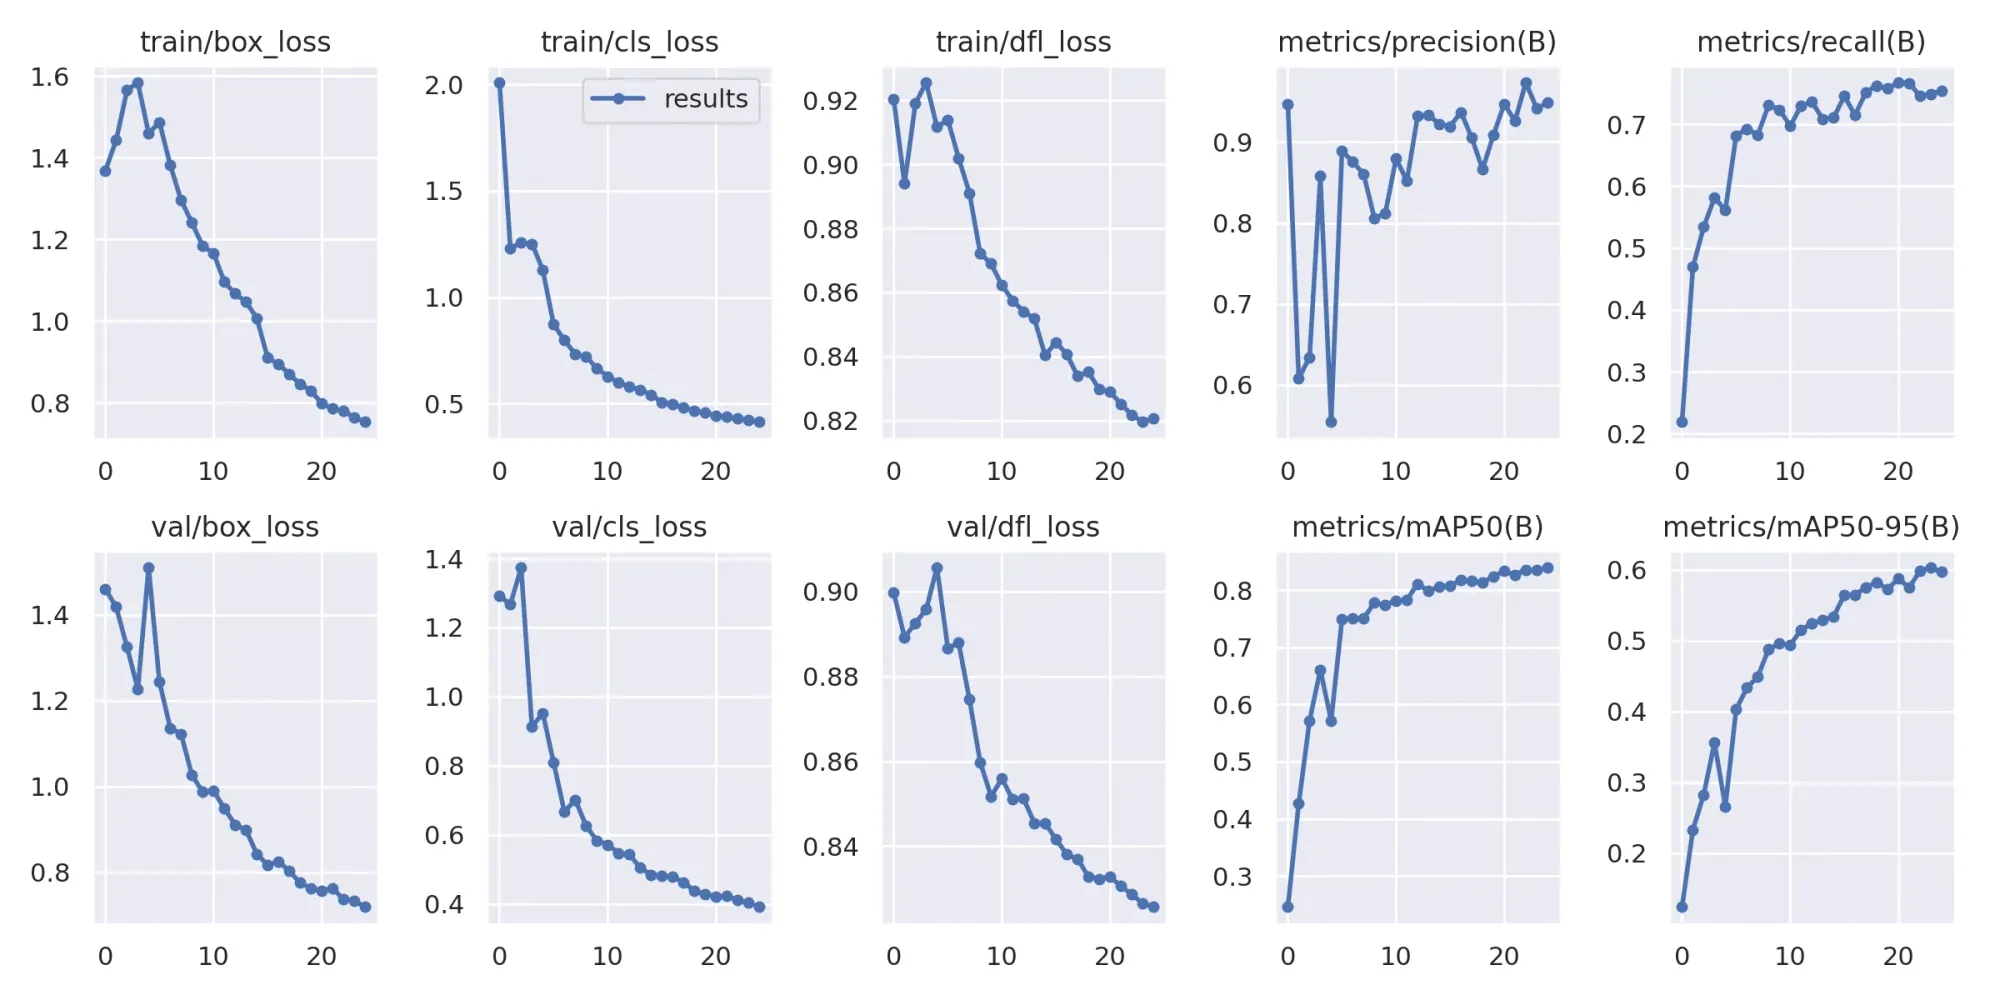
Your model will begin training and run for several minutes, or hours, depending on how big the dataset is and which training options you chose.
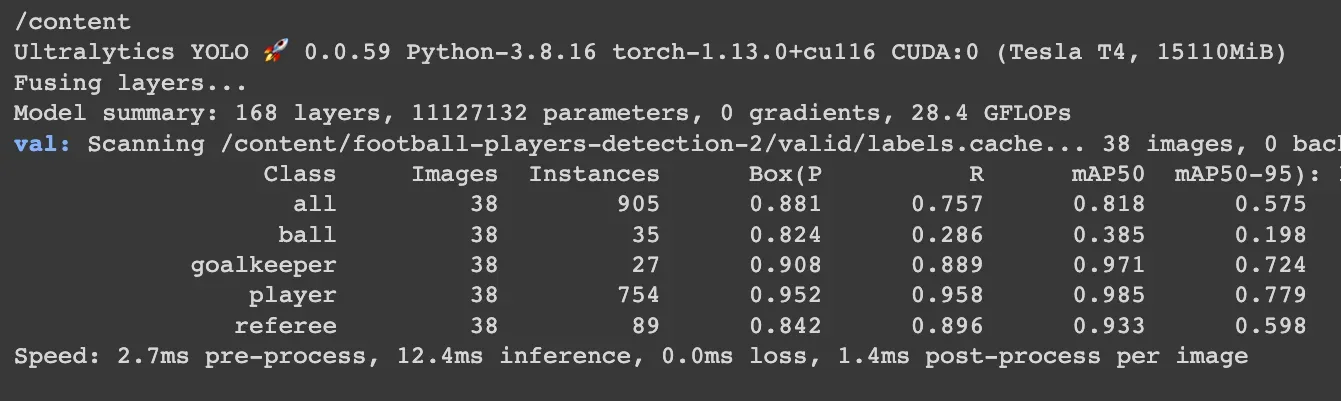
Here are the results of training a player detection model with YOLOv8:
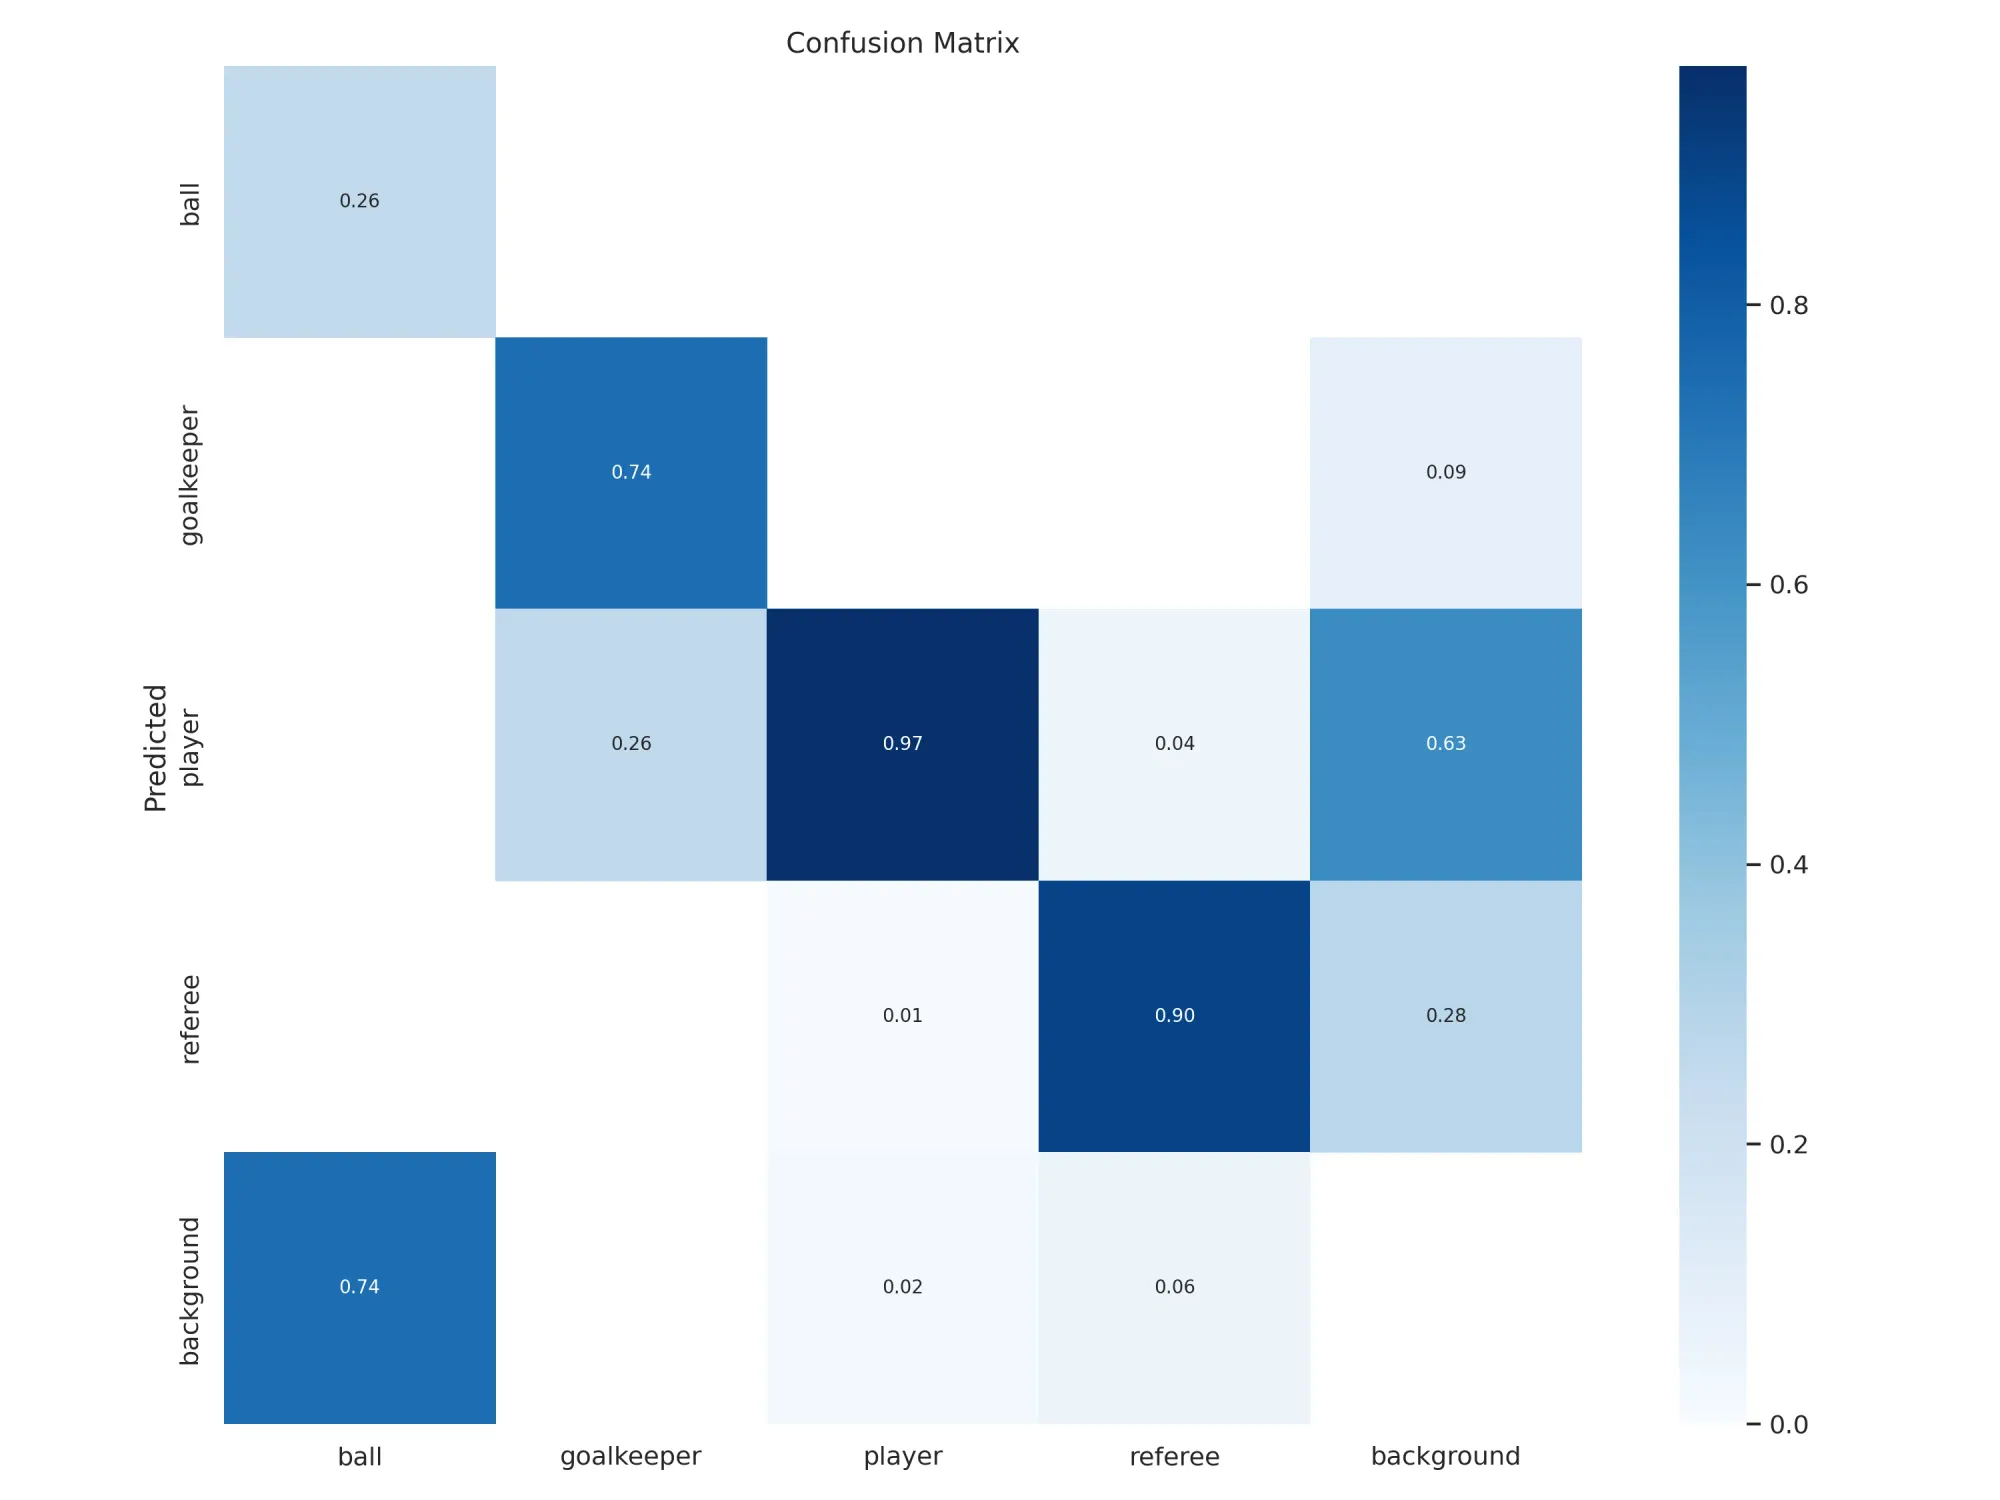
Validate with a new model
When the training is over, it is good practice to validate the new model on images it has not seen before. Therefore, when creating a dataset, we divide it into three parts, and one of them that we will use now as a test dataset.
yolo task=detect \
mode=val \
model={HOME}/runs/detect/train/weights/best.pt \
data={dataset.location}/data.yaml
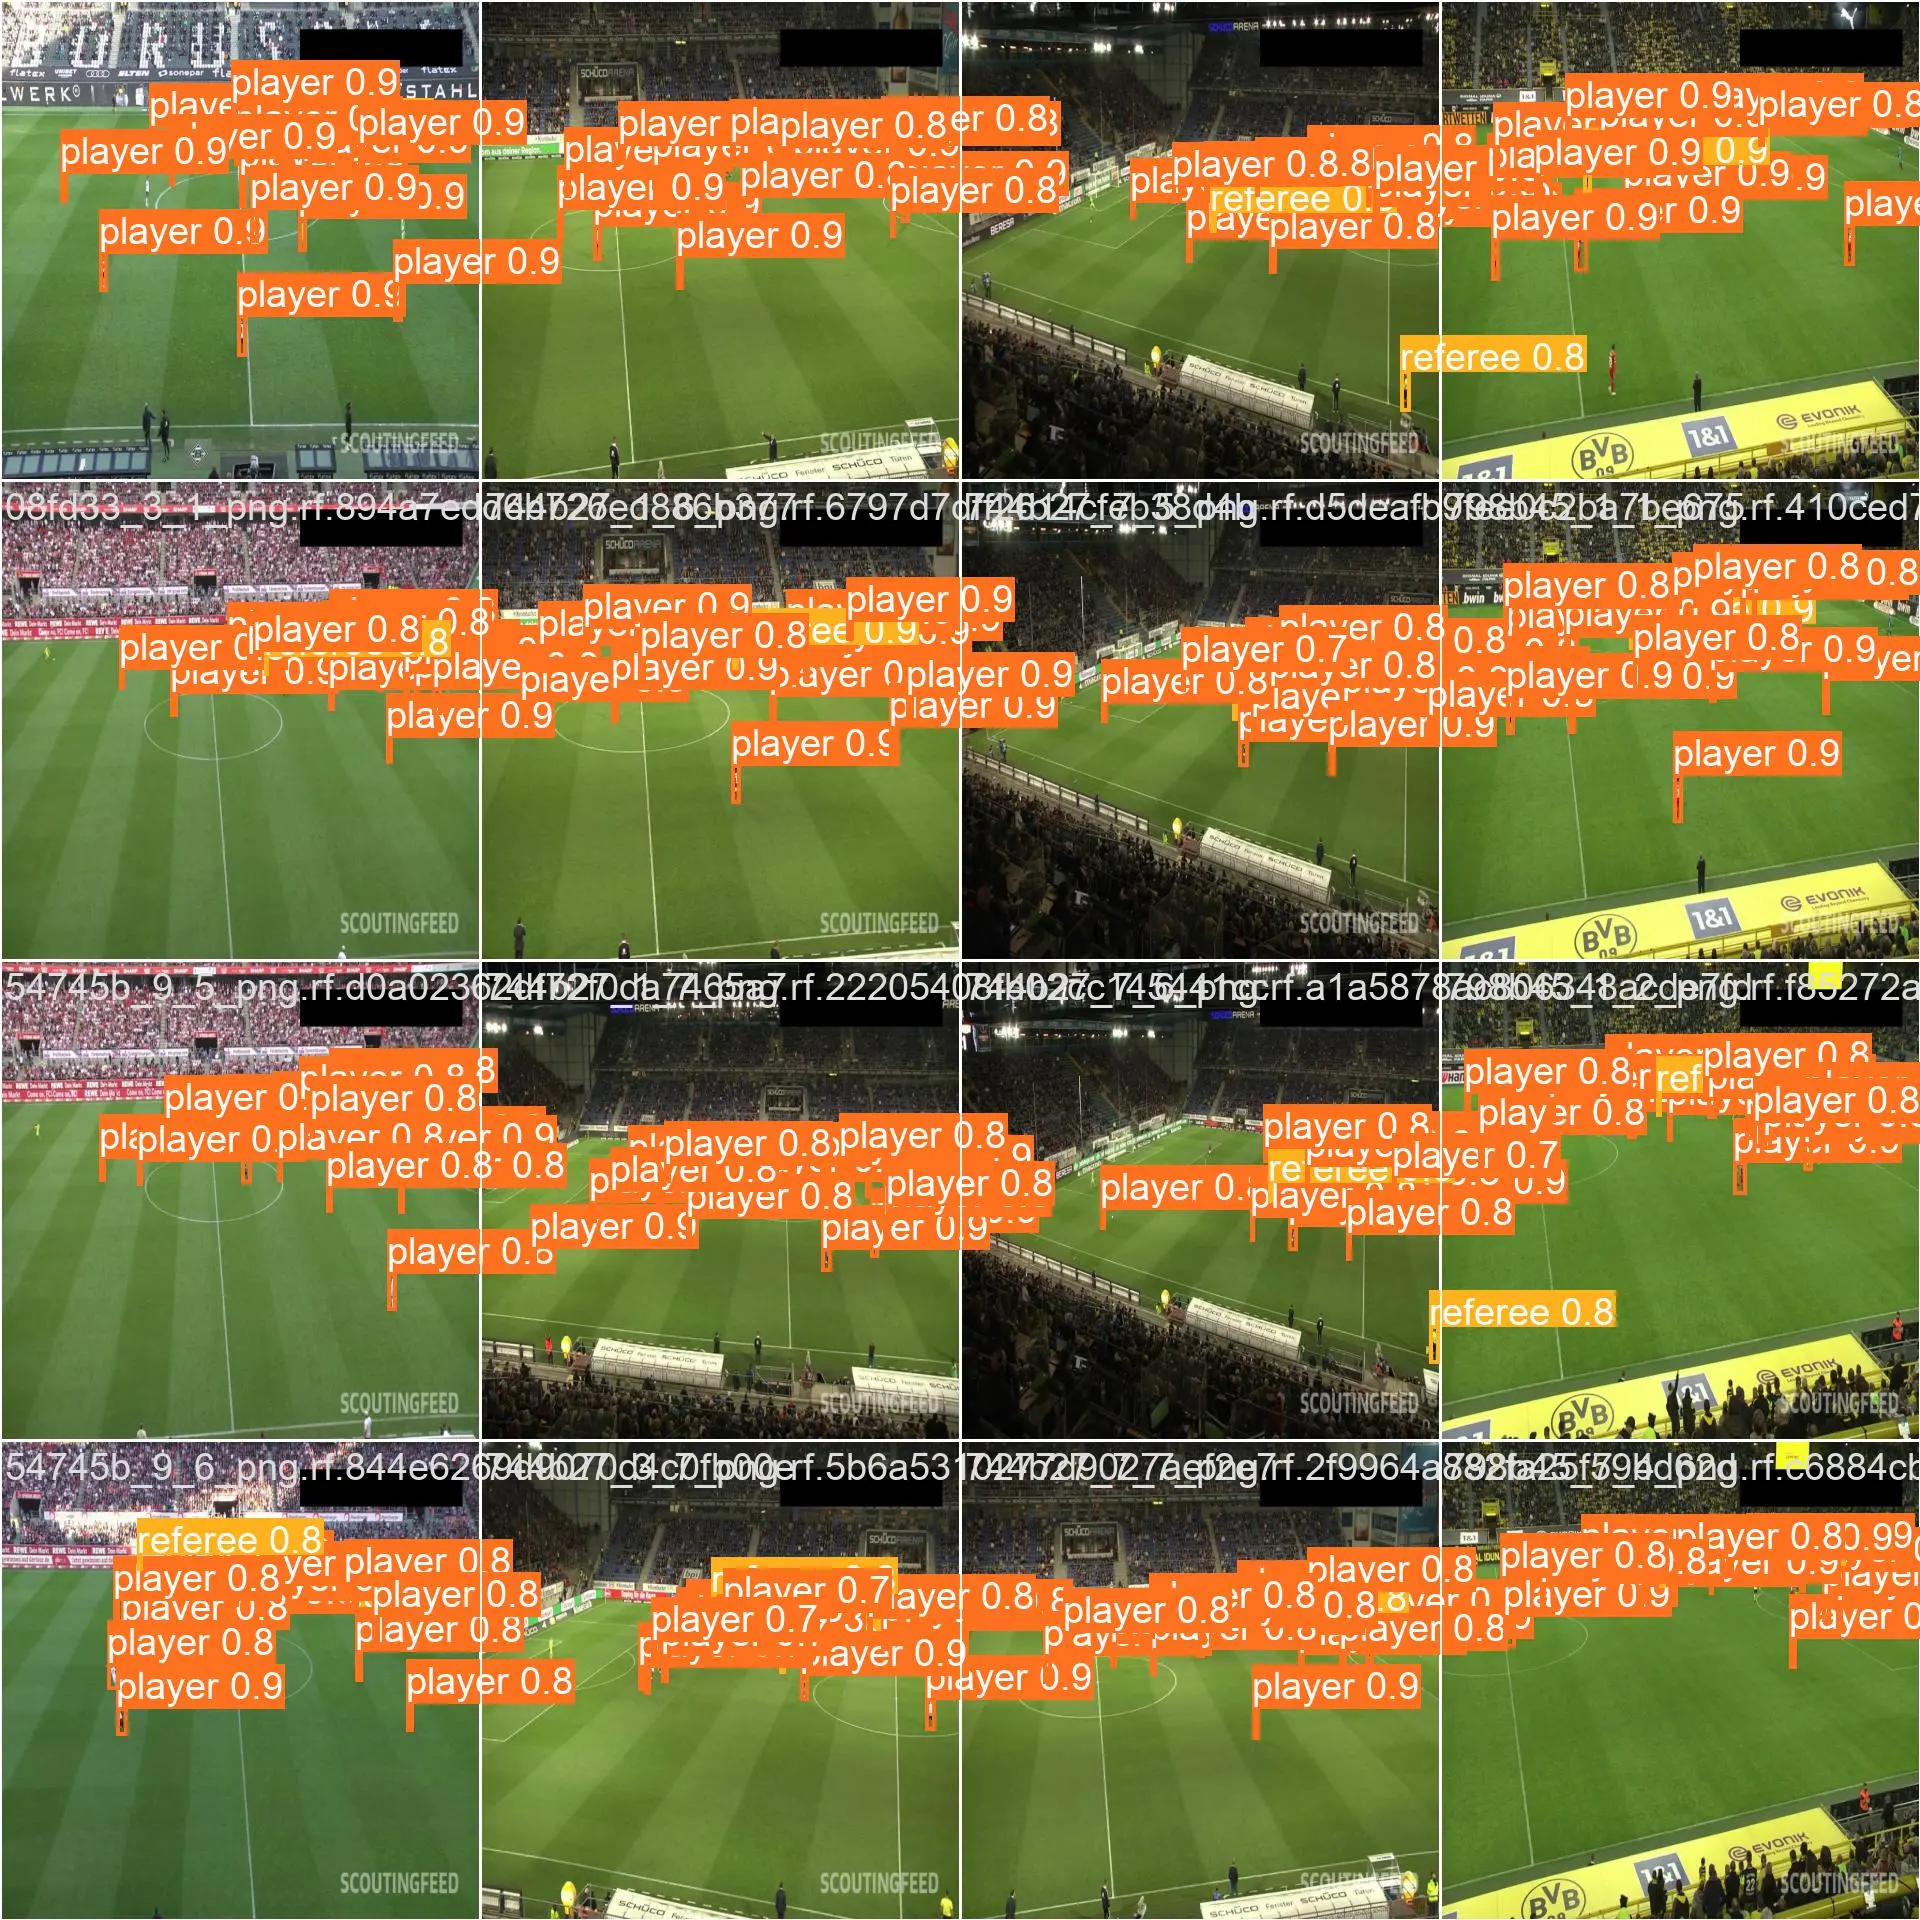
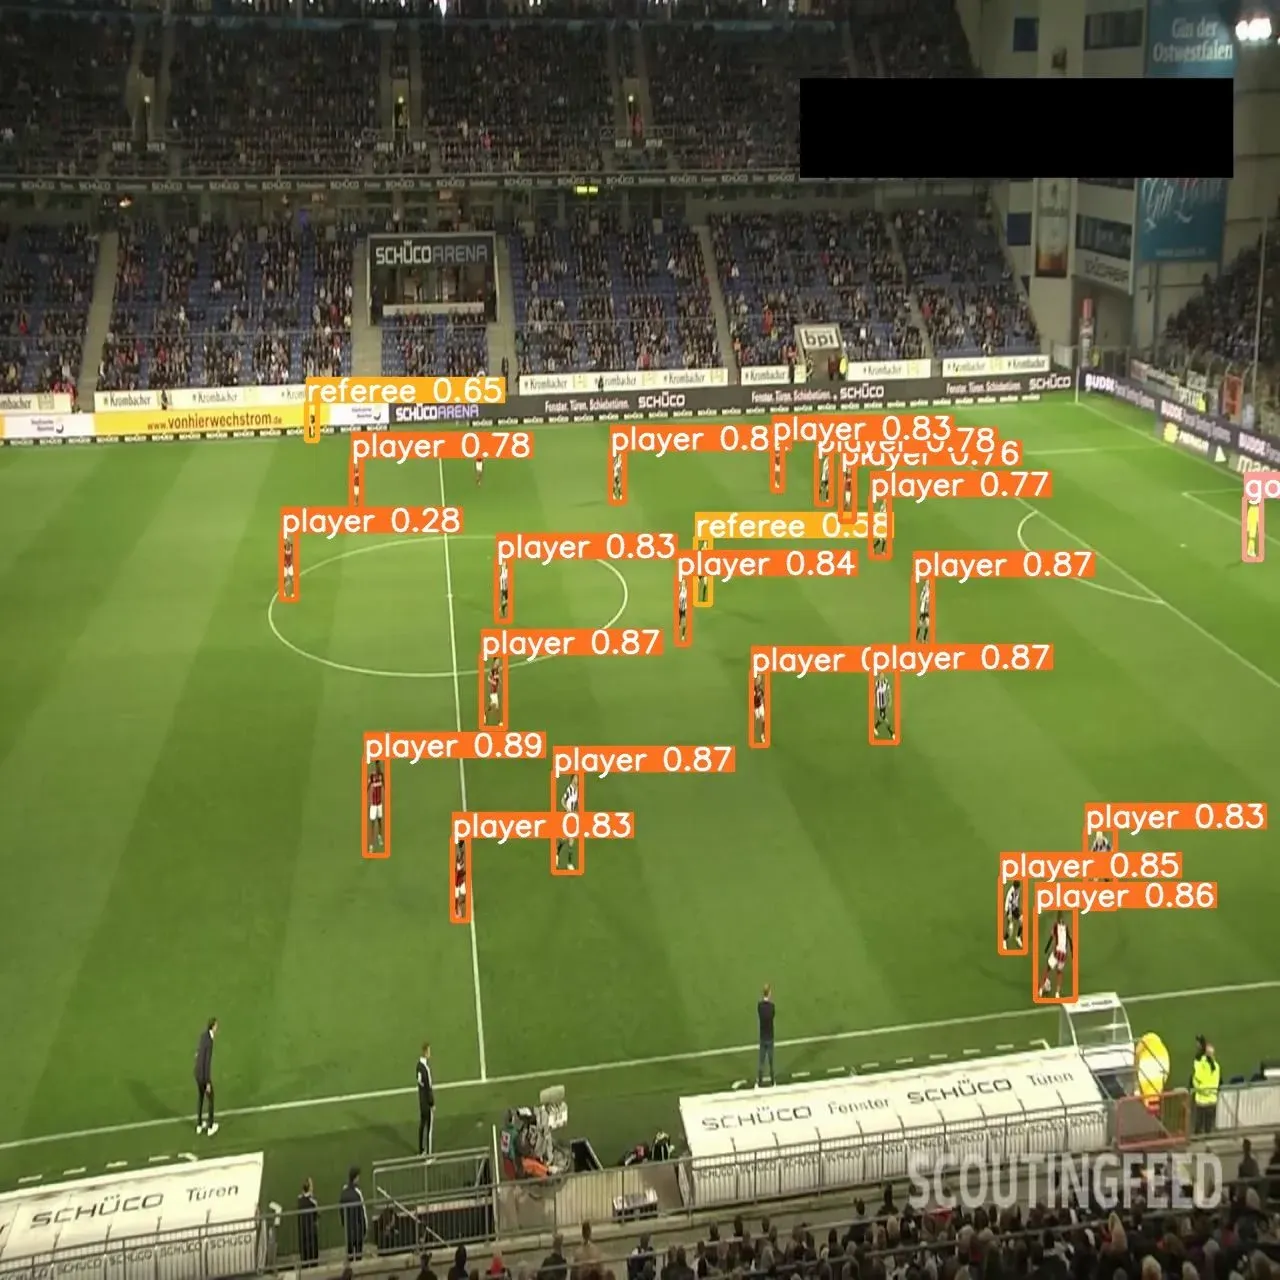
Predict with a custom model
To predict data using a custom model, use the following command:
yolo task=detect \
mode=predict \
model={HOME}/runs/detect/train/weights/best.pt \
conf=0.25 \
source={dataset.location}/test/images
Export and Upload Weights
Once you have finished training your YOLOv8 model, you’ll have a set of trained weights ready for use with a hosted API endpoint. These weights will be in the “/runs/detect/train/weights/best.pt” folder of your project. You can upload your model weights to Roboflow Deploy with the deploy() function in the Roboflow pip package to use your trained weights.
To upload model weights, add the following code to the “Inference with Custom Model” section in the notebook:
project.version(DATASET_VERSION).deploy(model_type=”yolov8”, model_path=f”{HOME}/runs/detect/train/”)
Replace the DATASET_VERSION value with the version number associated with your project. If you downloaded your weights from Roboflow using the code snippet provided earlier, the “DATASET_VERSION” number is stored in the “dataset.version” value.
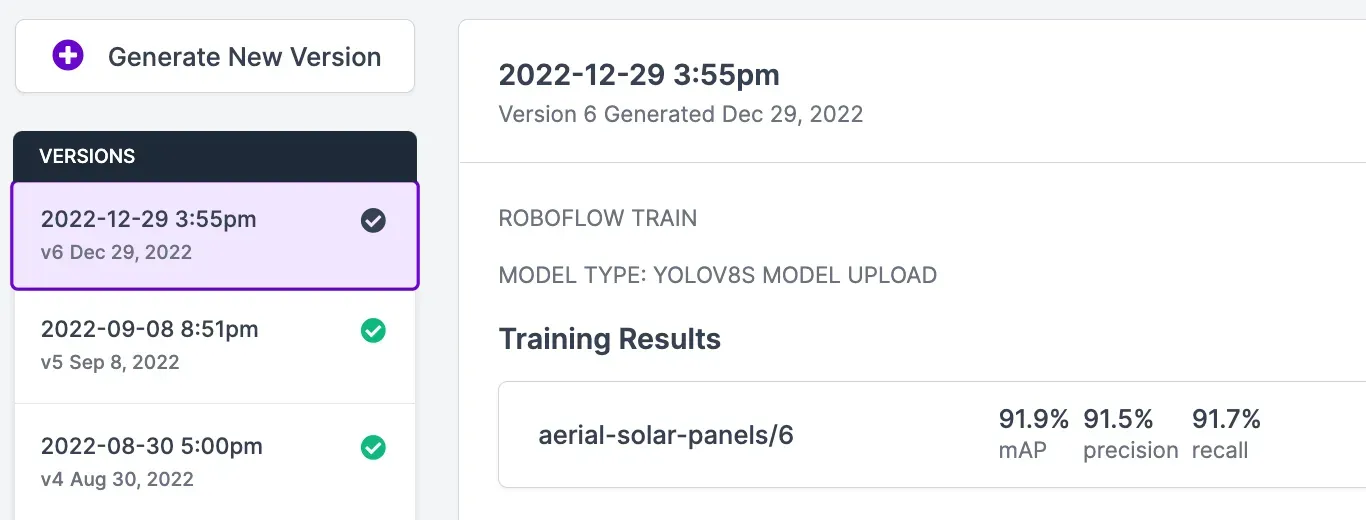
When you run the code above, you’ll see a green checkmark appear next to the version for which you have uploaded weights. You will also see a label that says you uploaded your weights using the YOLOv8 weight upload feature:
Click on "Deploy" in the sidebar of the Roboflow dashboard to see the deployment options available to you. Directly in the browser, you can test your model and share the model with others by sending them the URL.
You'll be able to test and show model performance by uploading an image or video:
and by using your webcam, or by pasting in a YouTube link to a video on which you want to run inference.
Once you've uploaded the model weights, your custom trained YOLOv8 model can be built into production applications or shared externally for others to see and use. Explore pre-trained YOLOv8 models on Roboflow Universe.
Deploy Your Model to the Edge
In addition to using the Roboflow hosted API for deployment, you can use Roboflow Inference, an open source inference solution that has powered millions of API calls in production environments. Inference works with CPU and GPU, giving you immediate access to a range of devices, from the NVIDIA Jetson to TRT-compatible devices to ARM CPU devices.
With Roboflow Inference, you can self-host and deploy your model, on-device and at the edge.
You can deploy applications using the Inference Docker containers or the pip package. In this guide, we are going to use the Inference Docker deployment solution. First, install Docker on your device. Then, review the Inference documentation to find the Docker container for your device.
For this guide, we'll use the GPU Docker container:
docker pull roboflow/roboflow-inference-server-gpuThis command will download the Docker container and start the inference server. This server is available at http://localhost:9001. To run inference, we can use the following Python code:
import requests

workspace_id = ""
model_id = ""
image_url = ""
confidence = 0.75
api_key = ""

infer_payload = {
    "image": {
        "type": "url",
        "value": image_url,
    },
    "confidence": confidence,
    "iou_threshold": iou_thresh,
    "api_key": api_key,
}
res = requests.post(
    f"http://localhost:9001/{workspace_id}/{model_id}",
    json=infer_object_detection_payload,
)

predictions = res.json()
Above, set your Roboflow workspace ID, model ID, and API key.
Also, set the URL of an image on which you want to run inference. This can be a local file.
To use your YOLOv8 model commercially with Inference, you will need a Roboflow Enterprise license, through which you gain a pass-through license for using YOLOv8. An enterprise license also grants you access to features like advanced device management, multi-model containers, auto-batch inference, and more.
To learn more about deploying commercial applications with Roboflow Inference, contact the Roboflow sales team.
Conclusion
YOLOv8 is the latest release in the family of YOLO models, defining a new state-of-the-art in object detection. When benchmarked on Roboflow 100, we saw a significant performance boost between v8 and v5.
The YOLOv8 software is designed to be as intuitive as possible for developers to use. With a new Ultralytics YOLOv8 pip package, using the model in your code has never been easier. There is also a new command line interface that makes training more intuitive, too.
Now you have all you need to start training YOLOv8 models. Happy building!
Cite this Post
Use the following entry to cite this post in your research:
Piotr Skalski. (Jan 10, 2023). How to Train YOLOv8 Object Detection on a Custom Dataset. Roboflow Blog: https://blog.roboflow.com/how-to-train-yolov8-on-a-custom-dataset/