
Video-first applications are rapidly becoming the standard across industries such as surveillance, retail analytics, sports, and robotics. Instead of working with isolated images, these systems rely on continuous streams of visual data, where every frame contributes to a larger context. This shift introduces new levels of complexity, as understanding motion, tracking objects over time, and responding in real time become essential.
Unlike image-based workflows, video pipelines must handle temporal consistency and sustained throughput. Processing a single image is relatively straightforward, but processing thousands of frames per minute requires careful consideration of performance, latency, infrastructure, and cost.
These challenges create a gap between building a working model and deploying a reliable video system in production. Roboflow helps bridge this gap by simplifying model deployment, workflow orchestration, temporal dependency handling, and stream processing, enabling faster and more reliable scaling of video pipelines.
This blog explores how Roboflow supports building video AI pipelines and provides a practical demonstration of creating a workflow to detect suitcases on a conveyor belt and measure how long they stay within a defined zone. It highlights how Roboflow enables efficient, no-code development and deployment of video-heavy pipelines.
What Makes Video Pipelines Complex?
Video pipelines are more complex than image-based systems because they handle continuous data, time-based relationships, and strict performance requirements. Here are the key factors:
- Continuous Stream Processing: Video is a constant stream of frames that must be processed sequentially, making it harder to manage than standalone images.
- Temporal Dependencies: Understanding video requires context across multiple frames, such as tracking objects or identifying events over time.
- High Data Volume: Video produces a large number of frames, creating challenges in storage, bandwidth, and processing.
- Real-Time Constraints: Many applications need immediate responses, requiring low-latency processing and efficient pipelines.
- Infrastructure Complexity: Video systems involve multiple components like ingestion, inference, tracking, and storage working together.
- Edge vs Cloud Limitations: Deployment choices introduce tradeoffs between latency, scalability, and resource availability.
- Dynamic Real-World Conditions: Changes in lighting, motion, and environment can affect model performance over time.
Simplifying the Challenges of Video Pipelines with Roboflow
Roboflow simplifies video-heavy AI pipelines by tackling complex challenges through features such as:
Video Input, Streaming, and Frame Management
Roboflow provides a Serverless Video Streaming API that connects live sources such as webcams, RTSP cameras, or uploaded files directly to your workflows.
Using WebRTC, it streams frames and returns structured inference results in real time. The system automatically handles frame delivery, buffering, scaling, and bandwidth management, so you do not need to build custom ingestion or decoding logic.
Real-Time Sequential Processing and Rate Control
Processing video requires handling frames in sequence under strict latency constraints. Roboflow’s Inference Pipeline manages streaming, batching, frame prioritization, and skipping, dropping outdated frames when necessary.
It also supports automatic reconnection and consistent handling across multiple source types, ensuring smooth real-time performance.
Temporal Analysis, Tracking, and Event Logic
Handling time-based behavior across frames is one of the most challenging aspects of video systems.
Roboflow Workflows simplify this by combining tracking, zone logic, and event detection into modular, reusable blocks.
- Time in Zone: Calculates how long tracked objects remain within one or more defined polygon zones, enabling precise measurement of dwell time in specific areas.
- ByteTrack: Tracks objects across frames using the ByteTrack algorithm, maintaining consistent identities even through occlusions or brief disappearances.
With these components, you can track objects, measure dwell time, count crossings, and trigger events without writing custom temporal logic or integrating separate tracking systems.
The video below demonstrates the use of Time in Zone and ByteTrack concepts to calculate dwell time within a zone, using skiers on a slope as an example:
Scalable Multi-Stream Processing
Video systems often need to process many streams at once using its Inference Pipeline and Stream Management API.
Roboflow enables parallel inference across multiple feeds from a single pipeline instance, allowing you to scale to higher throughput without building custom orchestration or stream management infrastructure.
Flexible Deployment from Cloud to Edge
Different applications require different latency and compute trade-offs. Roboflow supports deployment across serverless cloud APIs, dedicated servers, and edge devices like NVIDIA Jetson.
This flexibility allows you to place inference close to the data source or users, optimizing for performance and cost.
Infrastructure Simplification with Unified SDKs and APIs
Roboflow provides a single, consistent interface across ingestion, inference, and output handling, removing the need to combine multiple tools and custom glue code.
The same API and SDK patterns work across models and languages, with standardized request formats and JSON outputs, so switching models does not require changes to integration logic.
Built-in utilities handle frame ingestion, streaming, and multi-stage pipelines, while abstracting data flow and post-processing, reducing boilerplate and simplifying development.
Visual Workflow Builder and Modular Pipeline Design
Roboflow offers a visual workflow builder that lets you create pipelines by dragging and dropping blocks for segmentation, detection, tracking, filtering, and logic through Roboflow Workflows.
Workflows include ready-to-use model blocks, visualization blocks for inspecting predictions, pre- and post-processing blocks, active learning blocks, etc., to quickly refine models from live feedback. Together, these components make it fast and intuitive to build the logic layer of a video AI pipeline.
This modular setup simplifies the design, debugging, and modification of complex systems, reducing dependence on extensive coding.
Streamlined Video Model Training and AI-Assisted Labeling
Roboflow streamlines video model training by automatically extracting frames, versioning datasets, and applying video-specific augmentations without any coding.
It also accelerates large-scale data annotation for model training through AI-assisted labeling, reducing both time and cost.
AI-assisted labeling includes:
- Label Assist uses pre-existing or public models to pre-label large batches of images, allowing humans to quickly verify or correct predictions.
- Model-assisted labeling further leverages tools like SAM 3 and vision-language models to automatically generate segmentation masks or detect common objects, enabling faster dataset creation even before custom models are trained.
Once trained, these models can be directly imported into Roboflow Workflows as reusable blocks for Video AI pipelines.
Model Monitoring
Roboflow Monitoring provides built-in dashboards to track throughput, latency, and errors, enabling continuous performance improvements and reliable operations without extra infrastructure. This allows developers to focus on refining models instead of building or integrating monitoring tools.
Roboflow also supports real-time alerting and historical trend analysis, helping teams quickly identify anomalies or performance degradation.
By tracking key metrics across multiple models and deployments, it provides actionable insights into which models may need retraining or optimization.
This reduces downtime and ensures AI systems remain robust and accurate even as input data or operational conditions change.
The video below demonstrates the Roboflow Model Monitoring dashboard:
Flexible Outputs, Security, and Production Readiness
Roboflow supports customizable output formats such as structured JSON or annotated frames, making integration with downstream systems easier.
It also includes built-in authentication using API keys for your workflows and access controls to secure your datasets and models, ensuring that production deployments meet security requirements.
Creating a Time-in-Zone Tracker for Airport Luggage Using Roboflow Workflows
Roboflow Workflows let you visually design video AI pipelines by connecting blocks for detection, tracking, zone analysis, and visualization, simplifying complex logic, reducing coding, and enabling rapid, scalable, production-ready workflows.
In the example video below, we used Roboflow Workflows to detect suitcases on a conveyor belt and measure how long they remain within a defined zone.
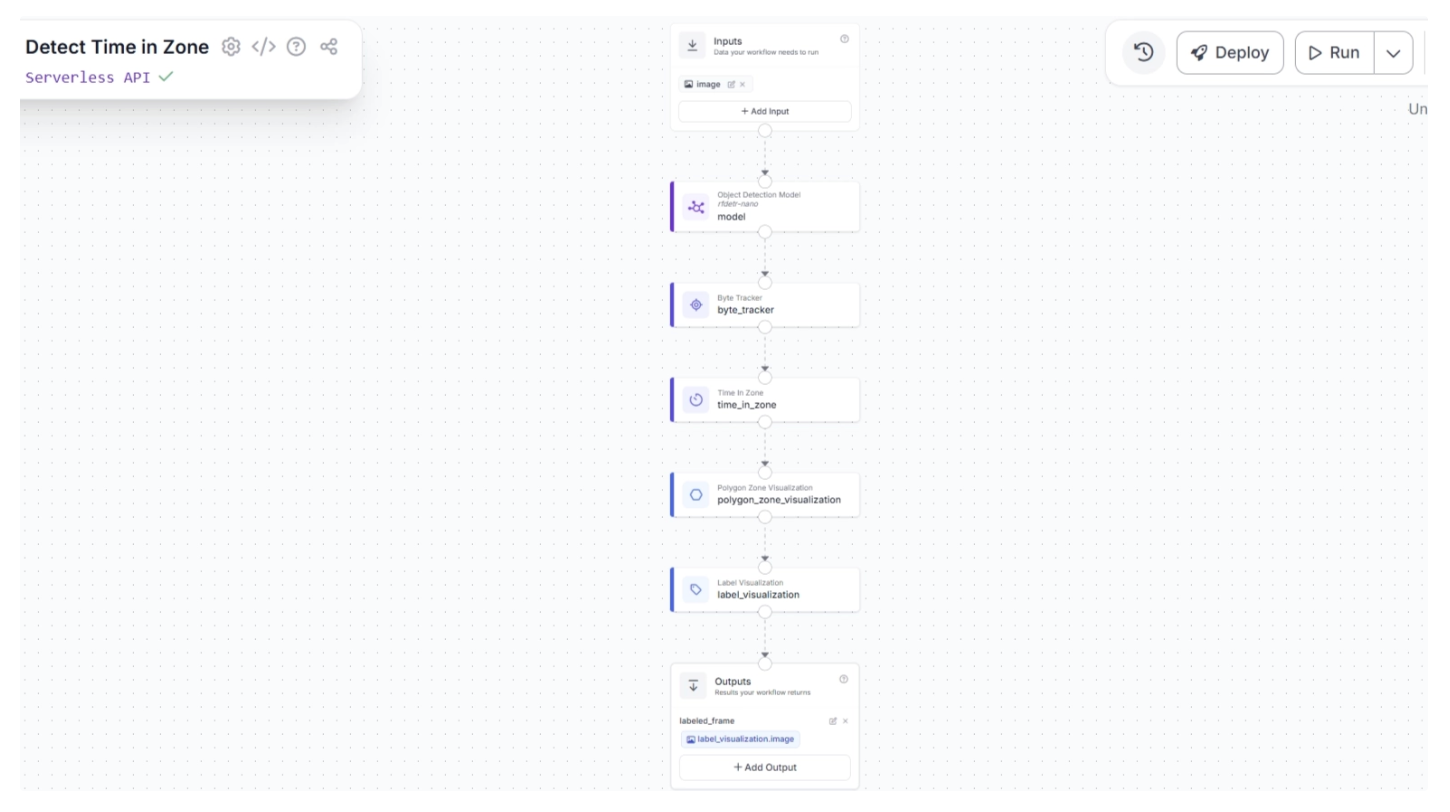
The entire workflow was built with no code, using only Roboflow workflow blocks for detection, visualization, and time-in-zone calculations. This is the workflow we will build.
This suitcase detection workflow can be applied to real-world scenarios such as:
- Airport baggage handling: tracking luggage and detecting delays
- Logistics and warehouses: monitoring packages on conveyors
- Manufacturing: checking products on assembly lines
- Retail inventory: ensuring smooth item movement
- Loss prevention: spotting misplaced or stalled items
In a Video AI Pipeline Roboflow Workflows acts as the Logic Layer.
Step 1: Set Up Your Roboflow Workflow
To get started, create a free account on Roboflow and log in. Then create a workspace, select “Workflows” from the left sidebar, and click the “Create Workflow” button.
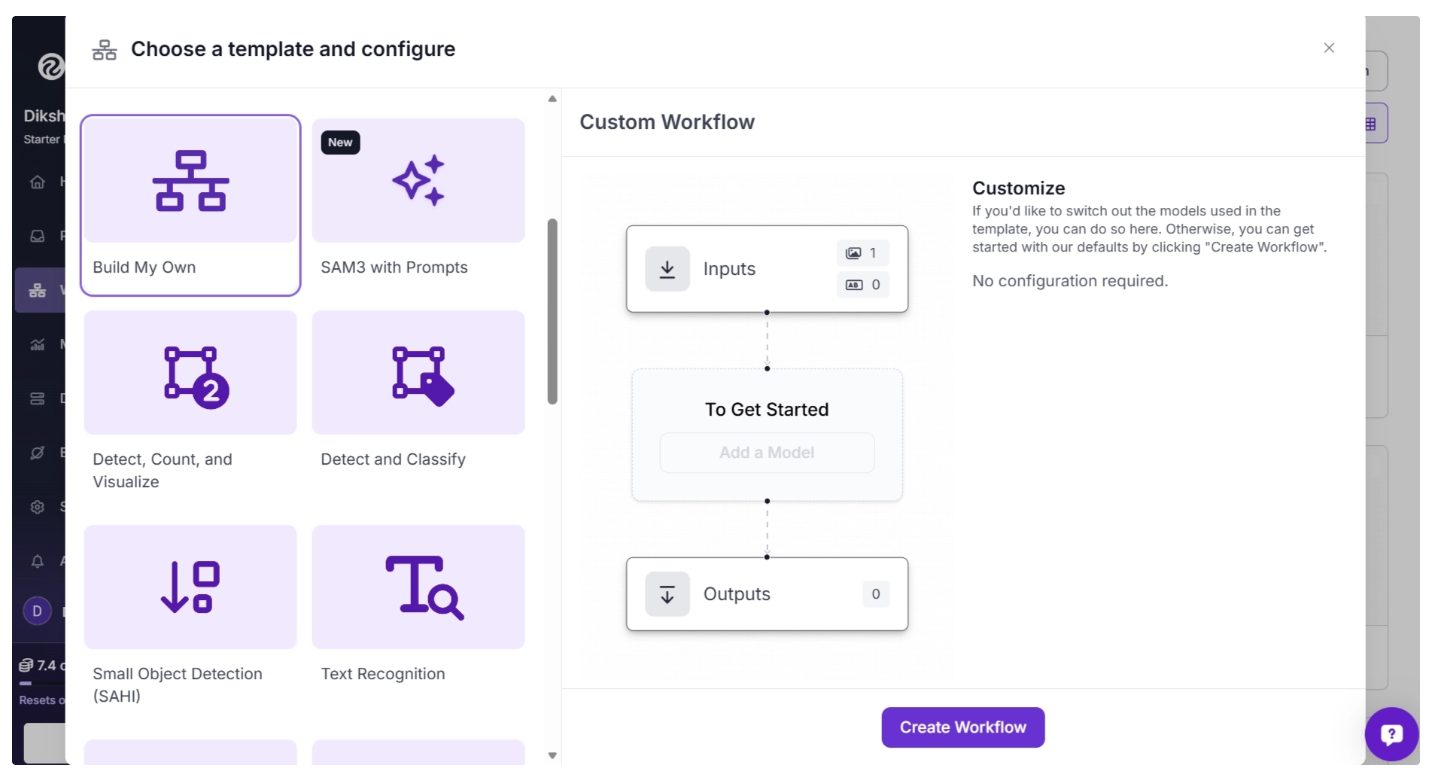
This will open a modal like the one shown below, where you can choose from various templates for segmentation, OCR, small object detection, and more.
In our case, we select “Build My Own,” as shown below:
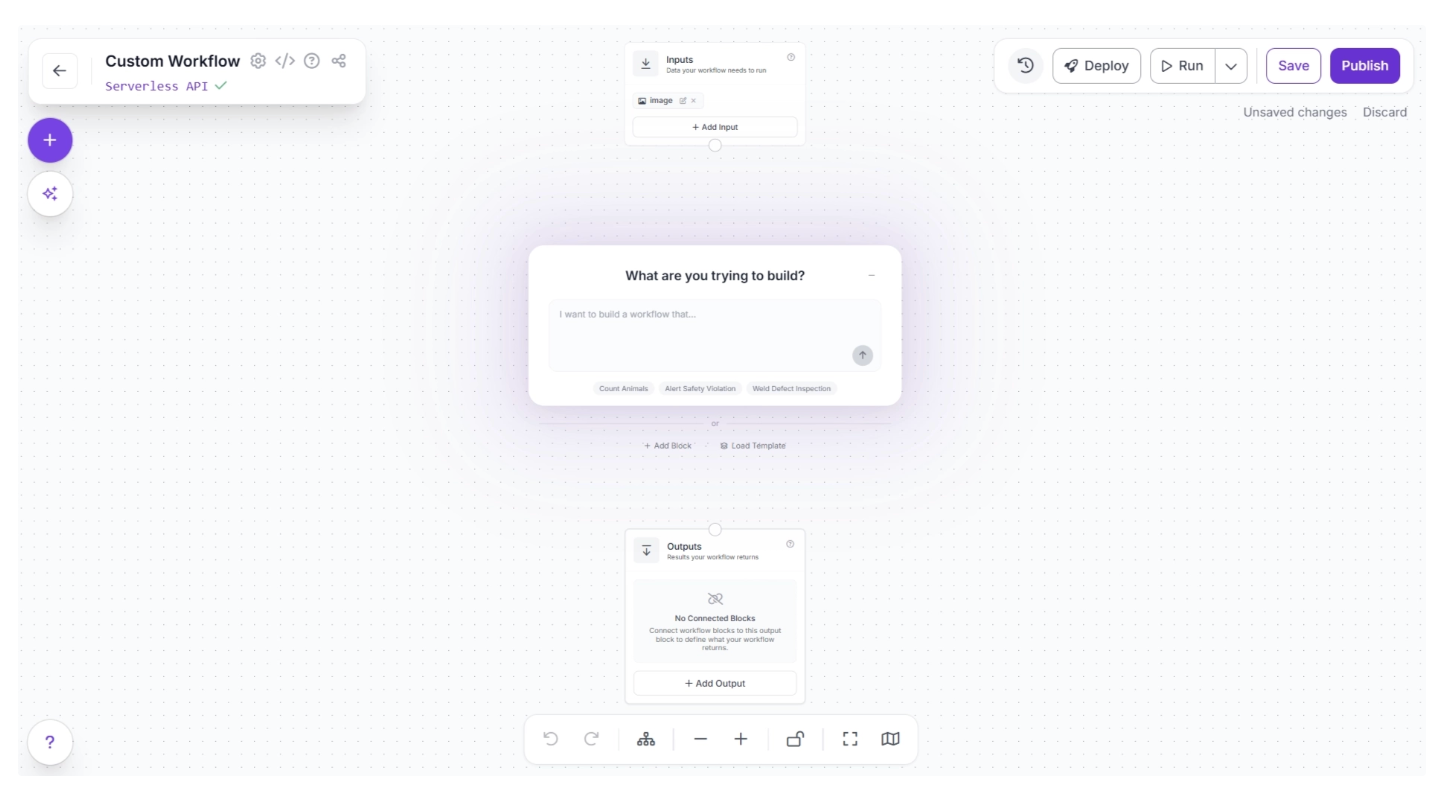
Then you’ll be taken to a blank workflow editor, as shown below, ready to build your AI-powered workflow.
You will see two workflow blocks, Inputs and Outputs, along with an AI Assistant pop-up, which you can use to create workflows for your use case by simply entering prompts. For now, you can minimize it.
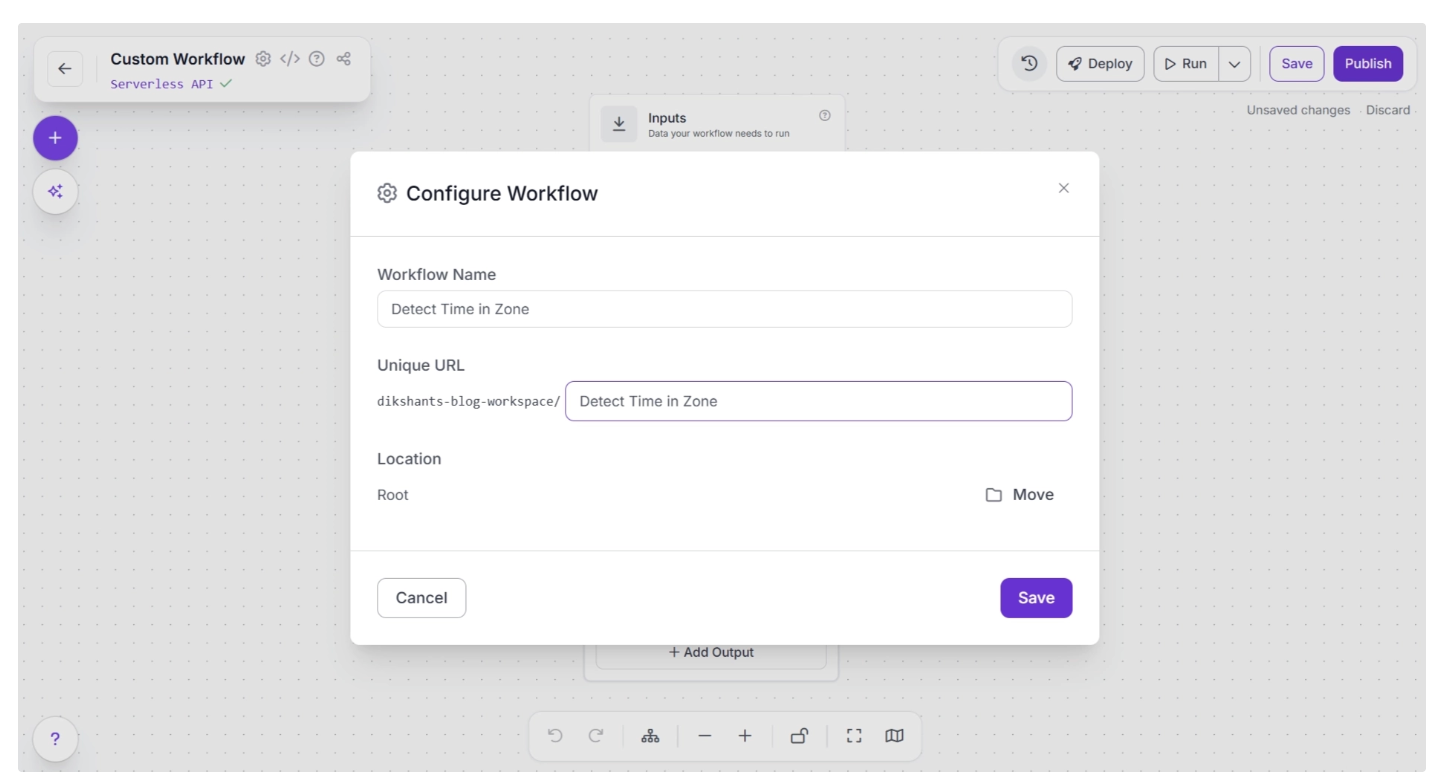
You can also configure the workflow name by clicking the ⚙️ icon in the top-left corner. This opens the workflow configuration modal, as shown below:
You can then return to the home page and, in the left sidebar under “Workflows,” open the renamed workflow to continue building.
Make sure you publish the workflow after adding a few blocks to save your changes.
Step 2: Add an Object Detection Model
Next, we’ll add object detection capabilities to our workflow using the Object Detection Model block. This Roboflow workflow block lets us use RF-DETR, among other models, to detect suitcases on a conveyor belt at an airport.
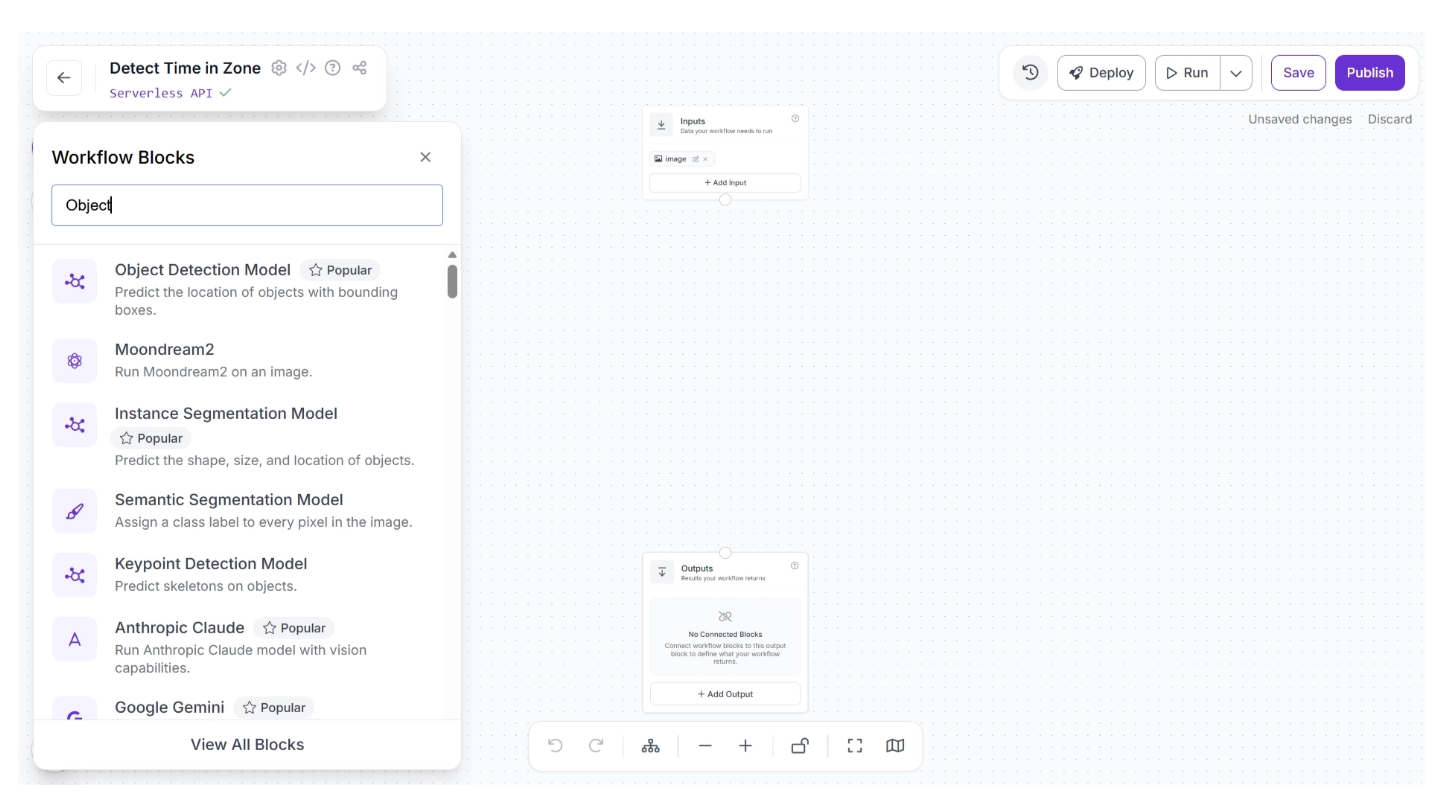
To add this block, click the “+” button in the top-left corner of the workflow canvas. A pop-up menu with workflow blocks will appear, as shown below. From there, search for “Object Detection Model” and select it to insert it into your workflow.
Once added, create a connection from the Inputs block to the Object Detection Model block. This ensures that the workflow inputs are available to the Object Detection Model block.
Then click the Auto Layout button, located to the left of the Zoom In and Zoom Out controls in the bottom menu, to automatically organize the workflow layout.
The canvas should then appear as shown below.
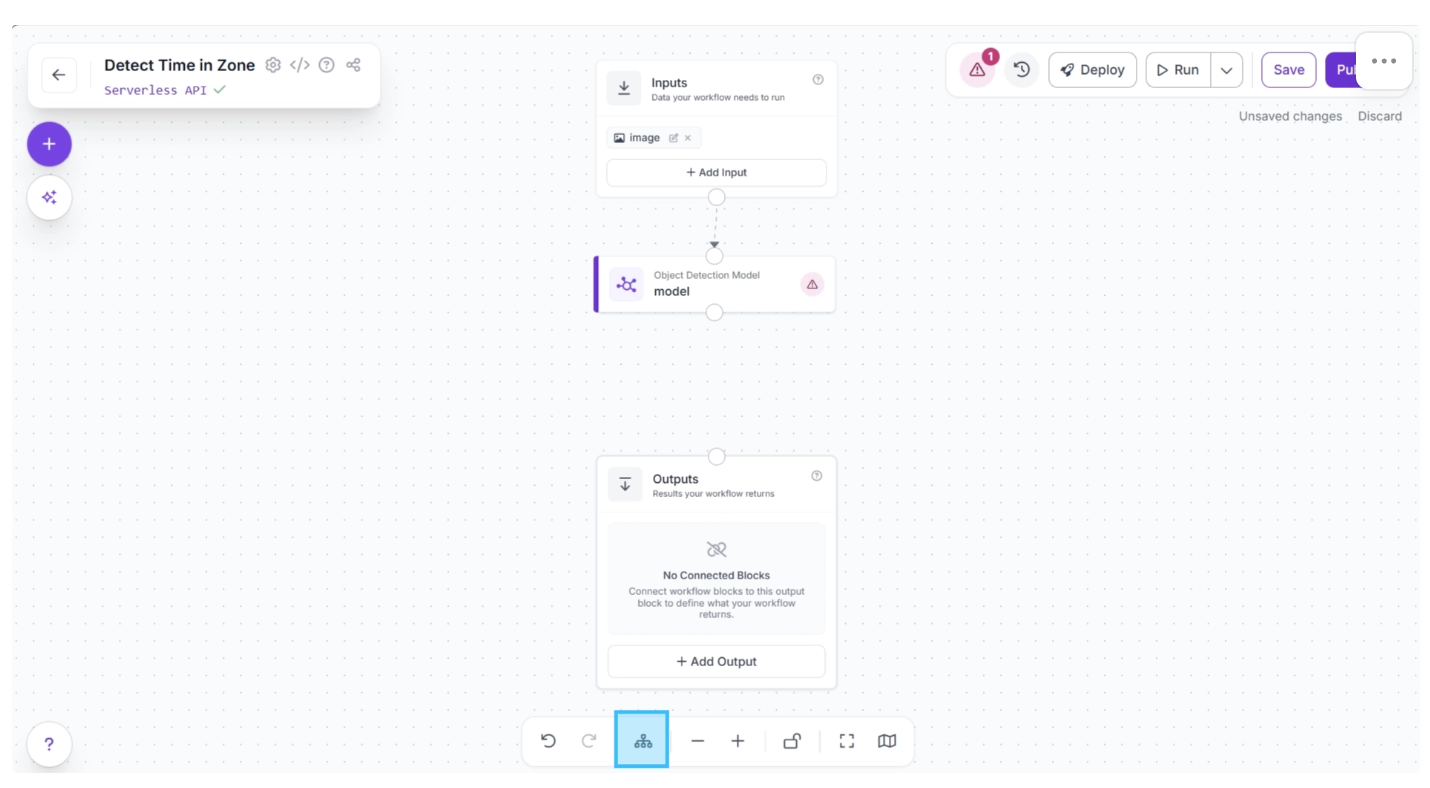
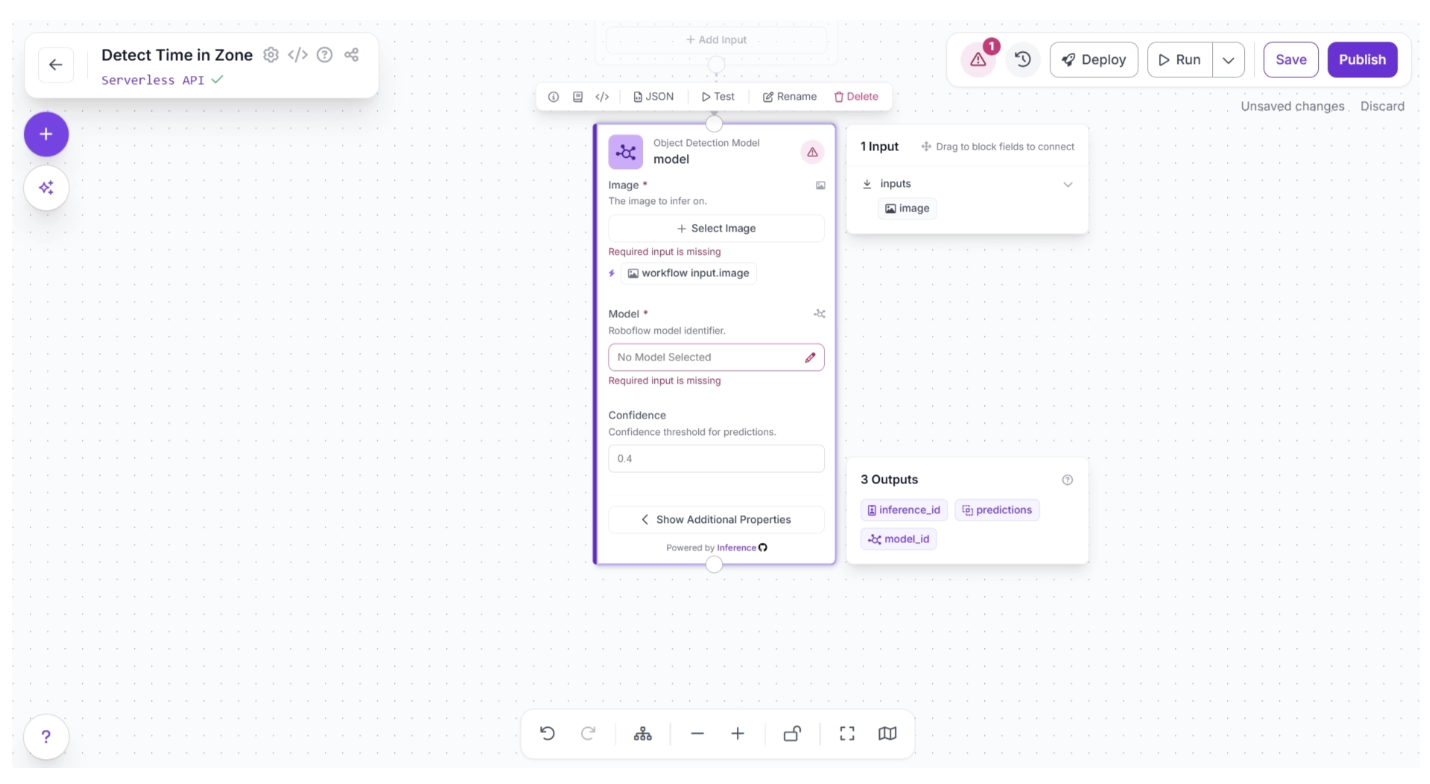
Now, you can choose the detection model to identify suitcases. To do this, select the Object Detection Model block. This will expand the block, as shown below, and display its configurable parameters. Among these, click the pencil icon (✏️) under the Model Parameter section.
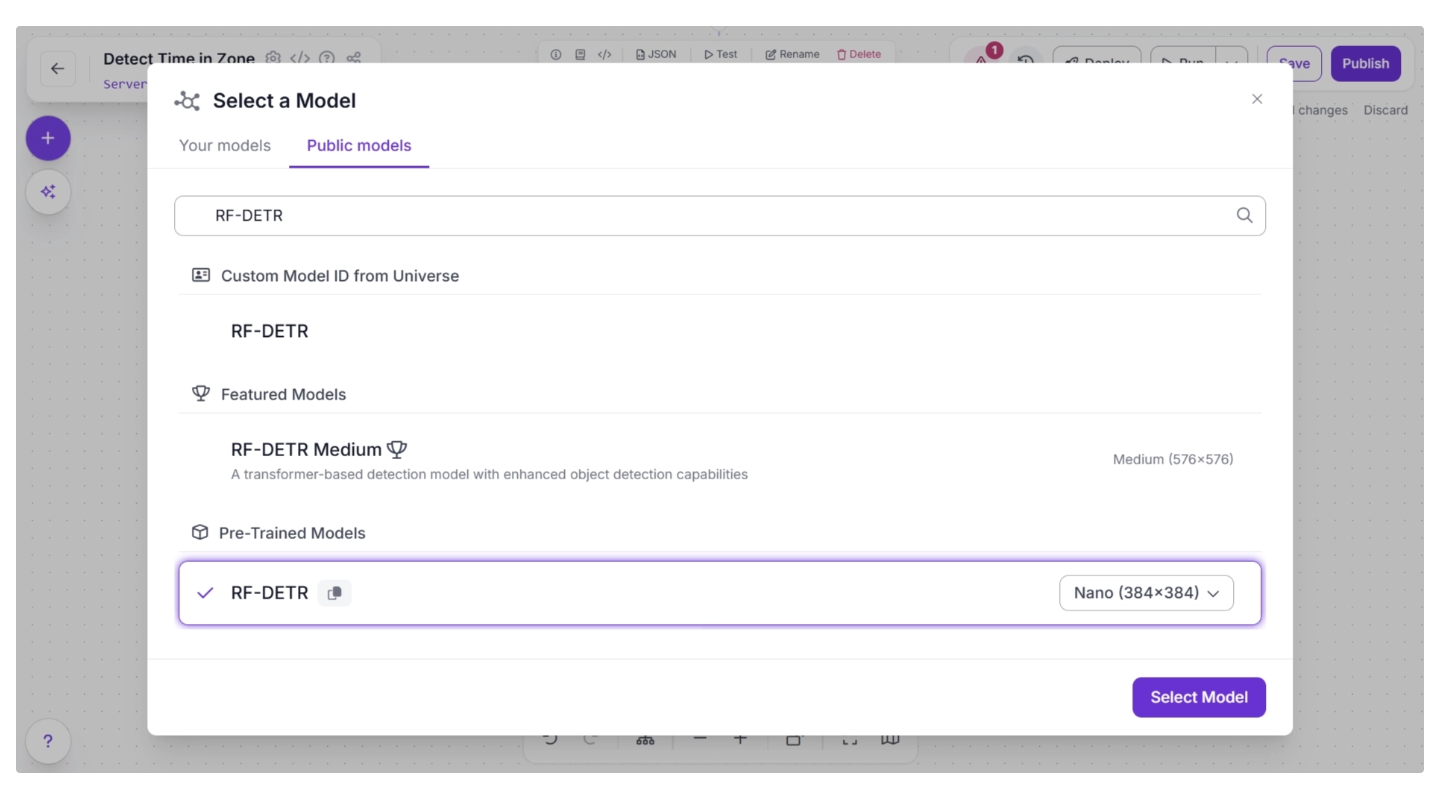
Once the pencil icon is clicked, a pop-up will appear. In it, select the “Public Models” option. This will display all the available object detection models on Roboflow. Search for “RF-DETR” and choose the Nano model, as shown below.
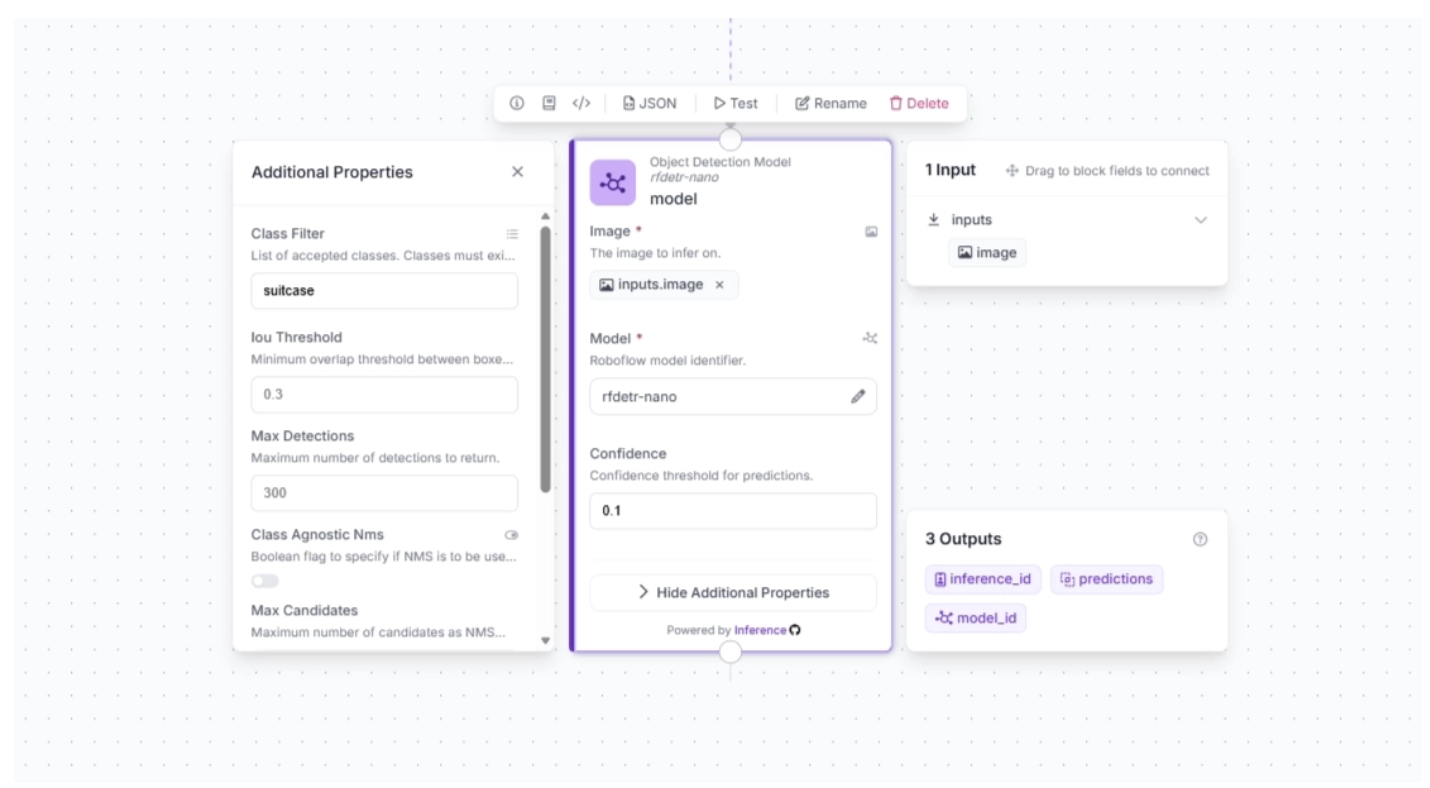
Once the model is selected, you can also configure the confidence score. For this use case, set the confidence to 0.1, then click the lightning icon (⚡) under the Image Parameter in the block.
When you connect one block to another, the downstream block receives the output from the upstream block, which can be used as input for its parameters. The lightning icon automatically assigns these input values from the upstream block to the most likely parameters.
Next, click “Show Additional Properties.” This will reveal additional parameters for the Object Detection Model block. One such parameter is ‘Class Filter,’ which filters out all detection classes except the one provided. We will use this to make the model detect only suitcases. To do this, add “suitcase” as the value for the ‘Class Filter.’
The block should then be configured as shown below:
Step 3: Integrate a Byte Tracker for Object Tracking
To enable tracking of objects across video frames using predictions from the object detection model, add a Byte Tracker block to your workflow.
This block takes detections and their corresponding video frames as input, initializing trackers for each detection based on configurable parameters such as track activation threshold, lost track buffer, minimum matching threshold, and frame rate.
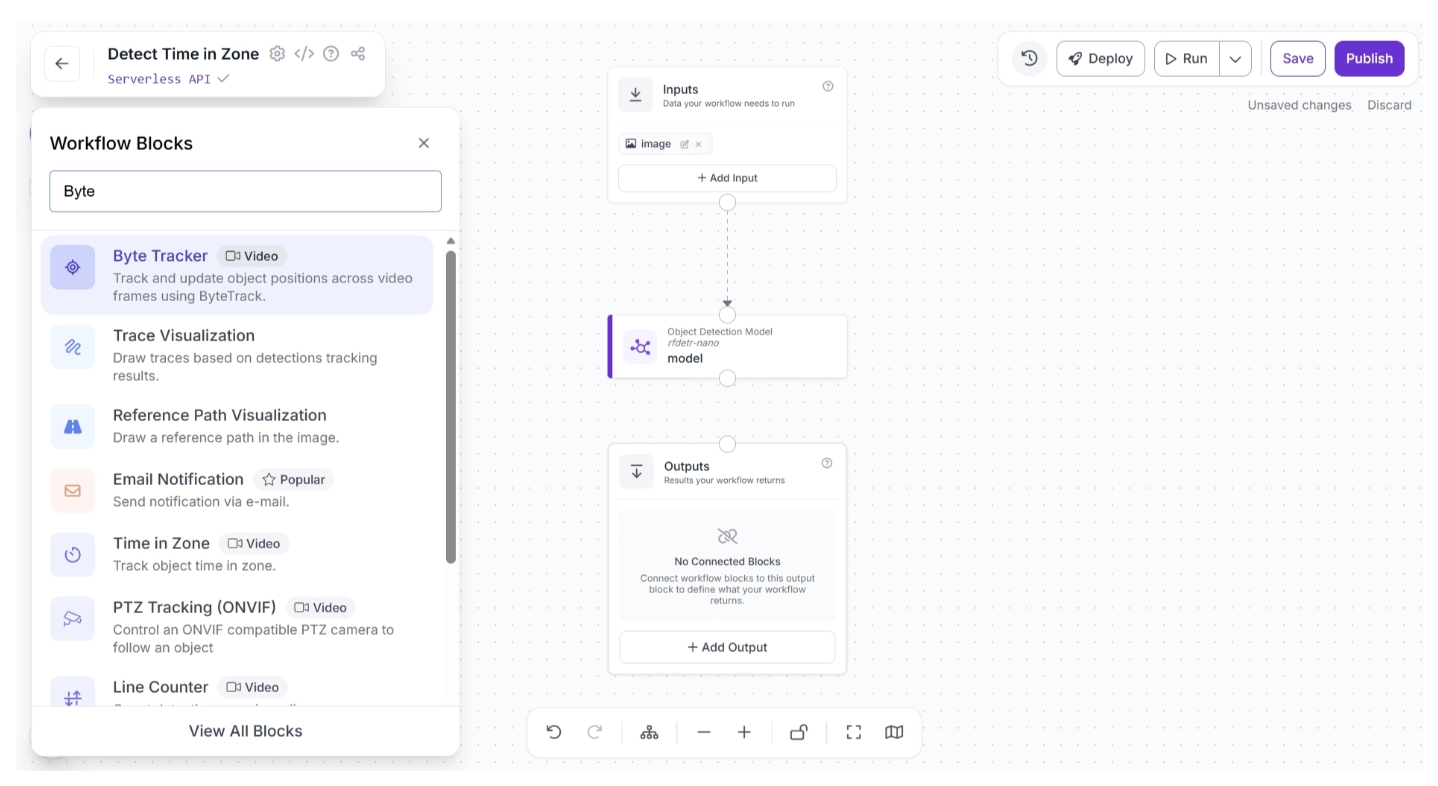
To add this block, click the “+” button in the top-left corner of the workflow canvas. A pop-up menu with workflow blocks will appear, as shown below. From there, search for “Byte Tracker” and select it to insert it into your workflow.
Once added, create a connection from the Object Detection Model block to the Byte Tracker block. This ensures that the Object Detection Model block outputs are available to the Byte Tracker block.
The canvas should then appear as shown below:
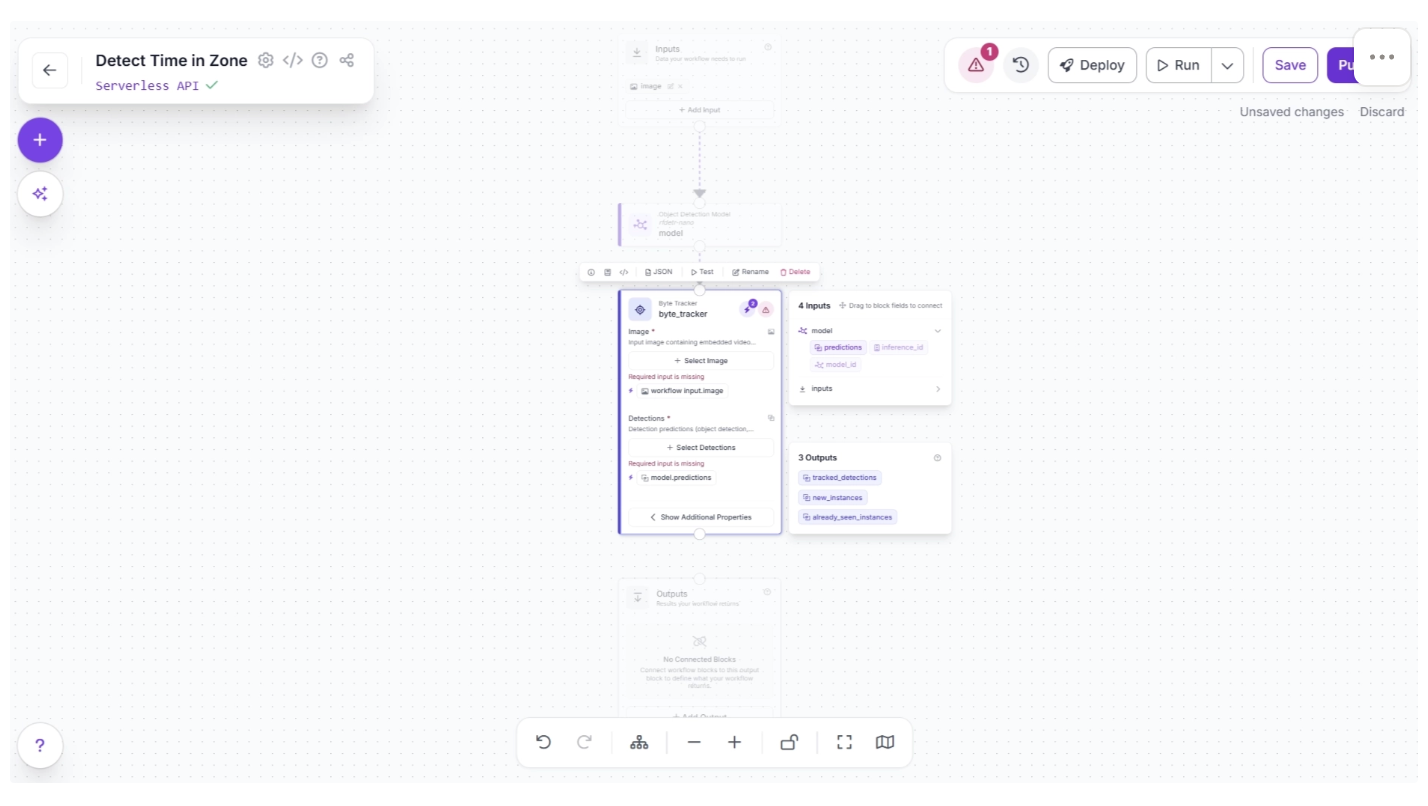
Click the lightning icon (⚡) in the top-right corner of the Byte Tracker block to accept “input suggestions,” as shown below.

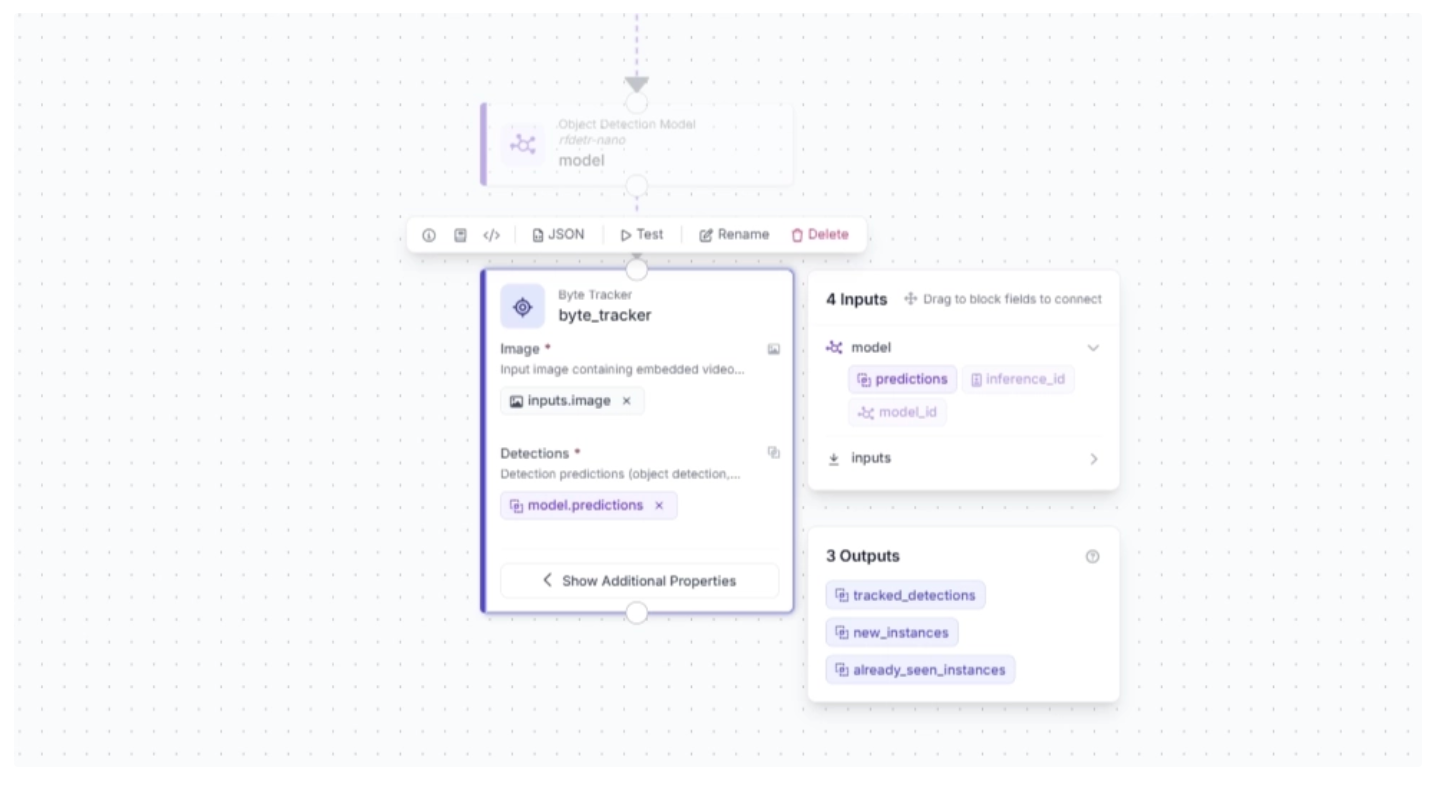
Then, the Byte Tracker block parameters should be configured as shown below:
Step 4: Track Time Inside a Zone
To track how long a detected object stays inside a defined area (zone) within a video stream, we use a Time in Zone block.
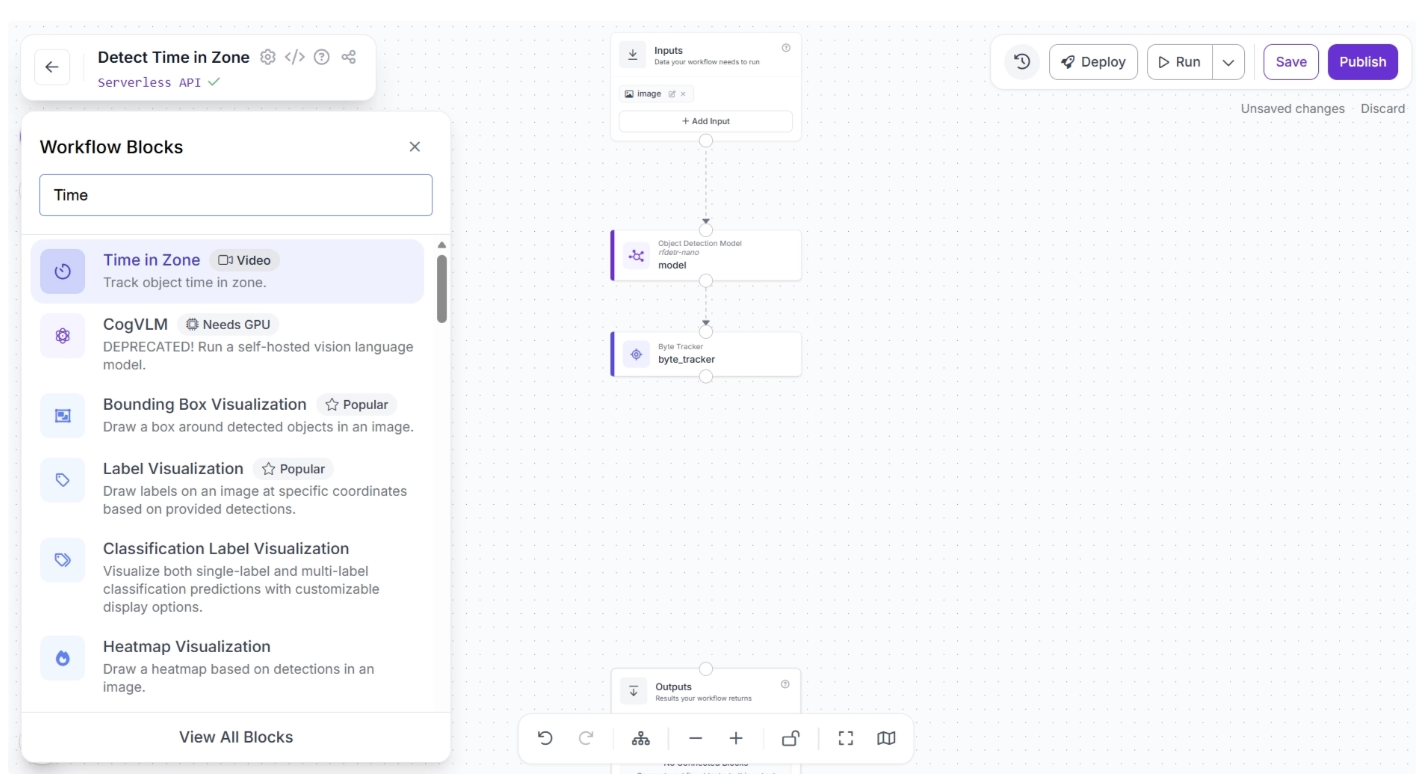
To add this block, click the “+” button in the top-left corner of the workflow canvas. A pop-up menu with workflow blocks will appear, as shown below. From there, search for “Time in Zone” and select it to insert it into your workflow.
Once added, create a connection from the Byte Tracker block to the Time in Zone block. This ensures that the Byte Tracker block outputs are available to the Time in Zone block.
The canvas should then appear as shown below:
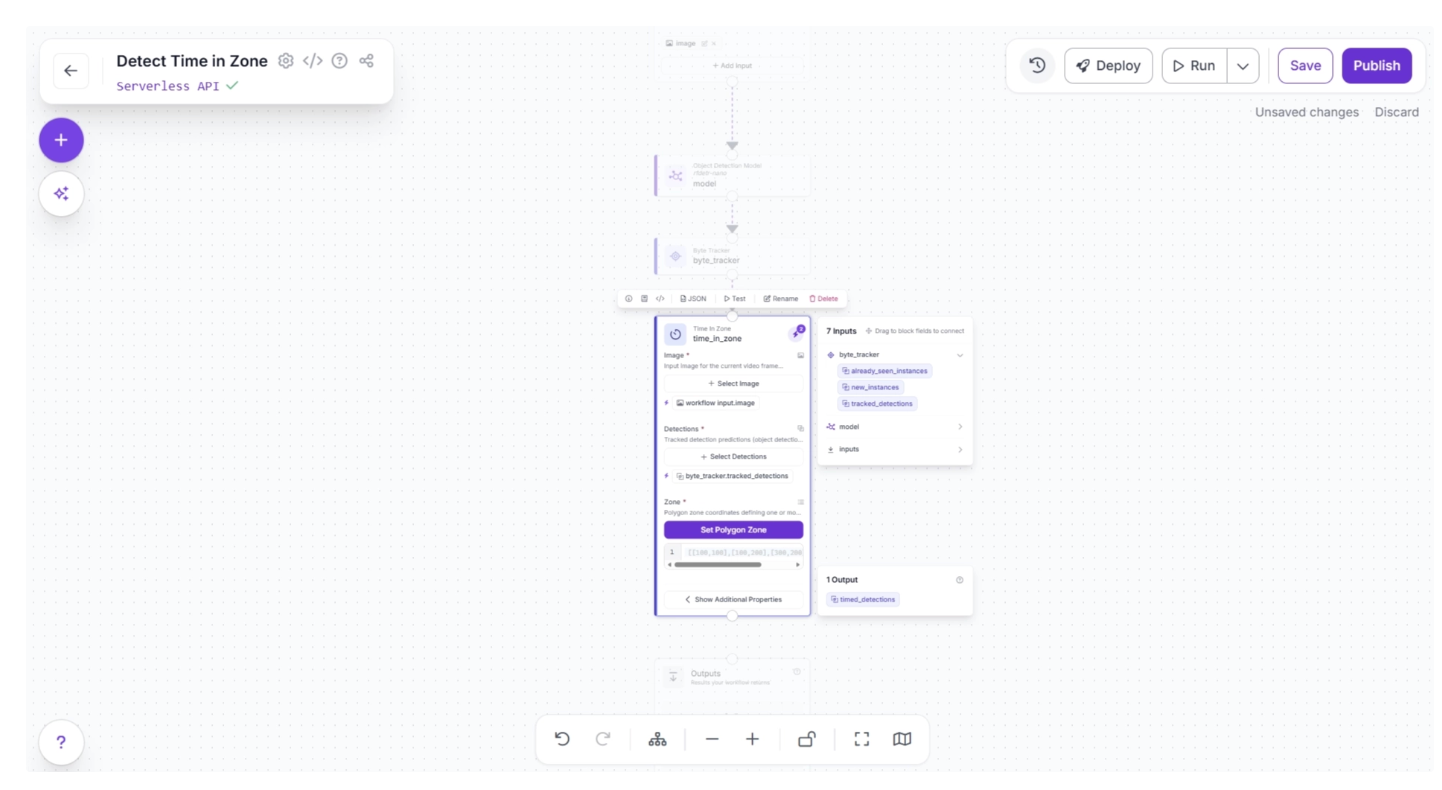
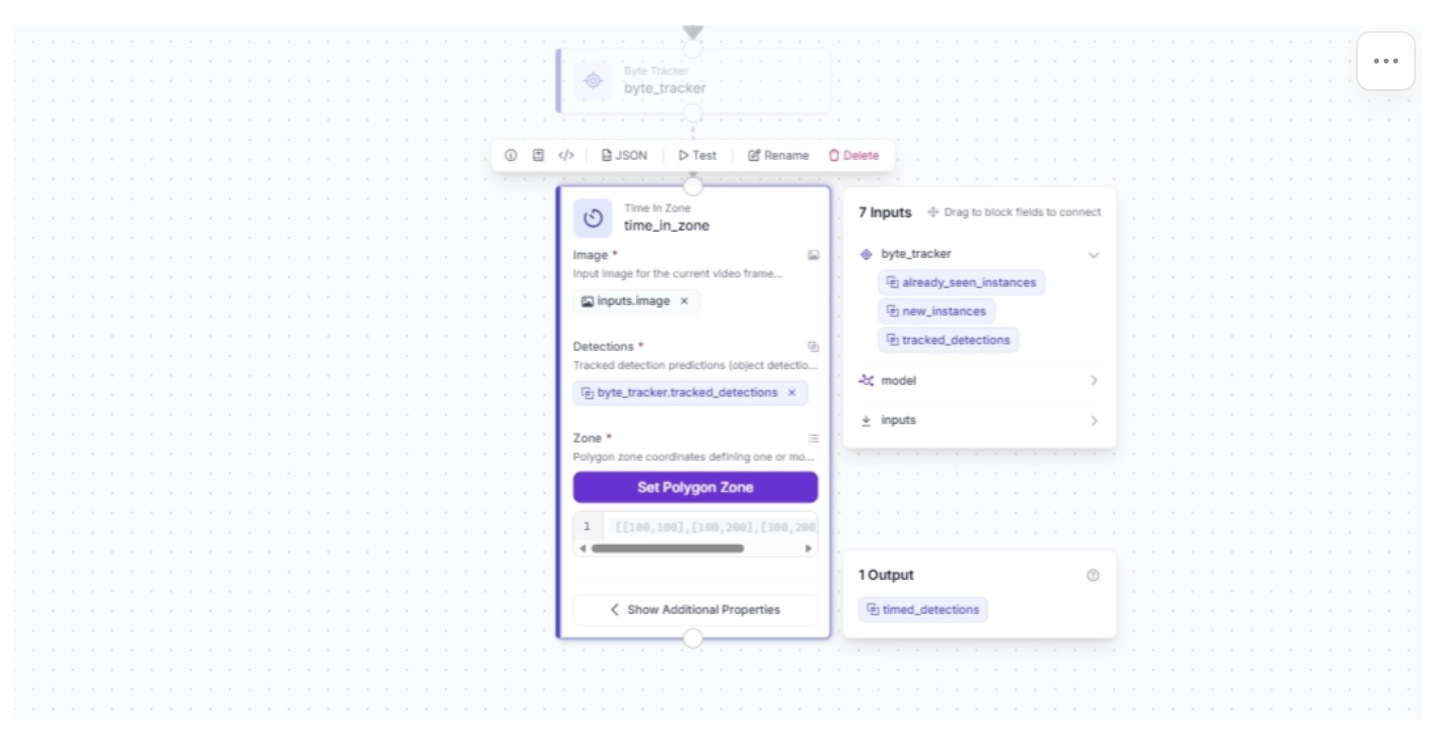
Click the lightning icon (⚡) in the top-right corner of the Time in Zone block to accept “input suggestions,” as shown below.
Now define the area, or zone, within the video stream to track how long an object stays in it. To do this, click “Set Polygon Zone” and upload a frame from the video stream or a video that the workflow will process. Then draw a polygon to define the area, as shown below.
For this example you can try uploading this video.
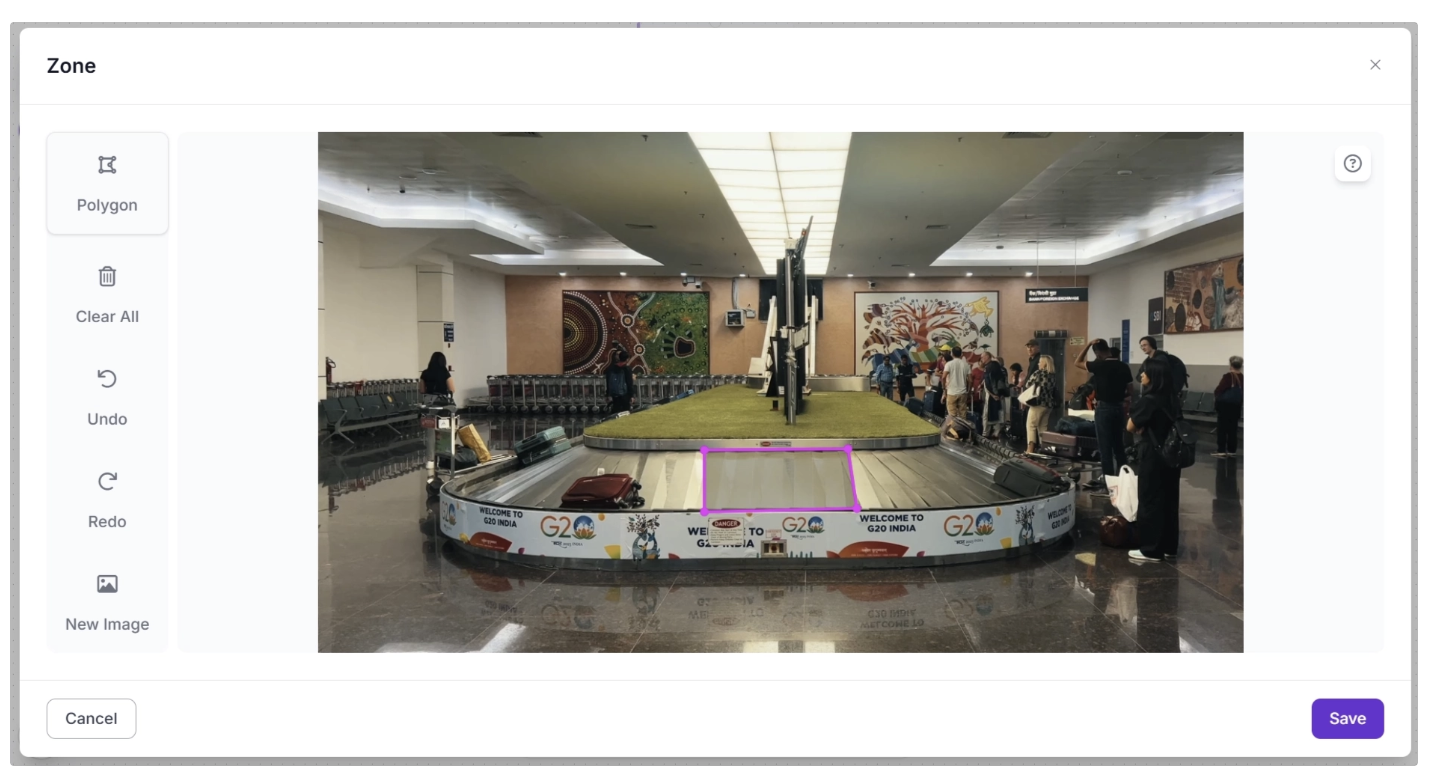
Note: The video stream resolution used to run this workflow must be the same as the resolution of the frame on which the polygon zone was drawn.
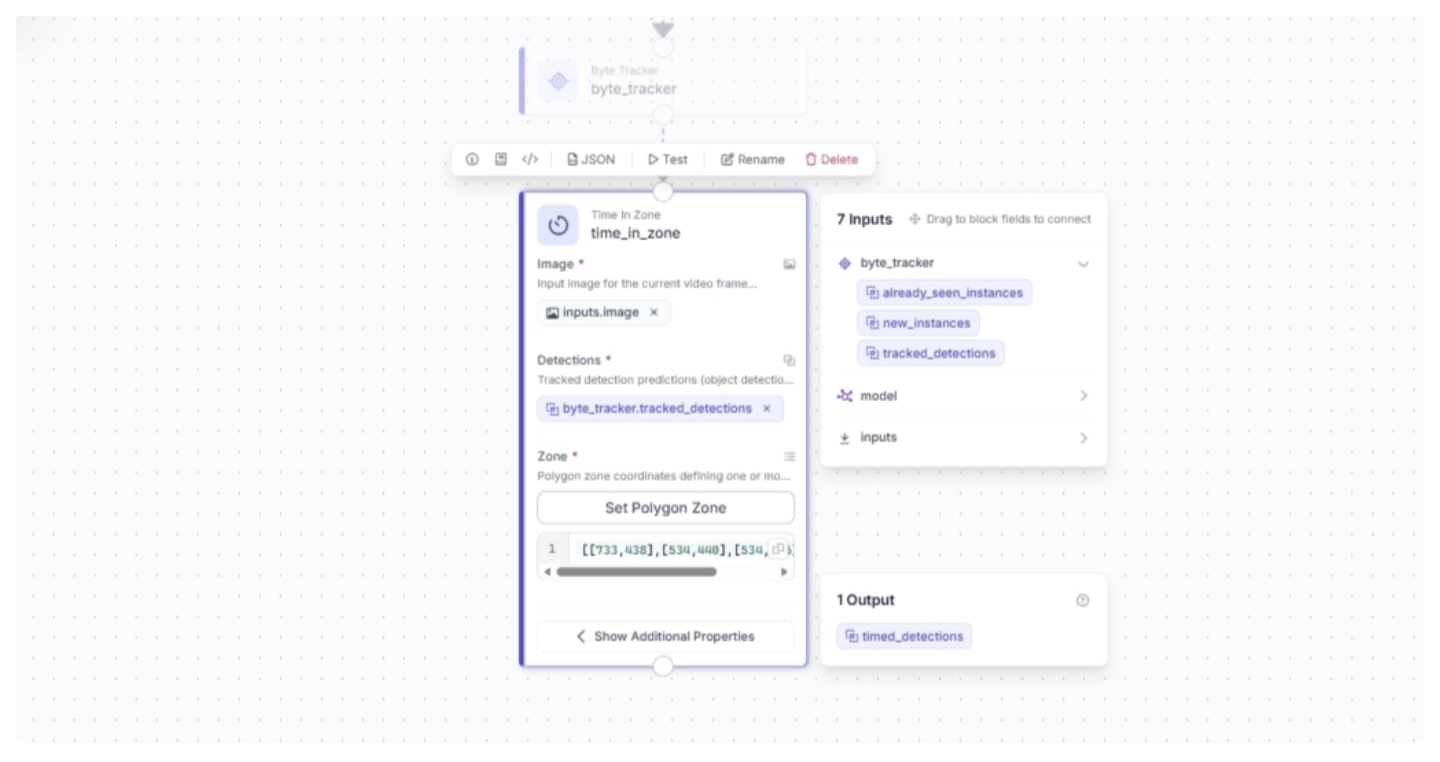
Next, configure the Time in Zone block parameters as shown below. The Zone value is automatically set to the polygon region you just drew, and the Detections value should be set to the Byte-tracked detections from the previous block.
Step 5: Visualize Zones and Time in Zone
Now, in the final output, the time a suitcase spends in the defined zone must be visualized. This is done using Label Visualization. Additionally, the zone itself can be visualized using Polygon Zone Visualization.
First, to visualize the zone, add a Polygon Zone Visualization block. To do this, click the “+” button in the top-left corner of the workflow canvas. A pop-up menu with workflow blocks will appear, as shown below. From there, search for “Polygon Zone Visualization” and select it to insert it into your workflow.
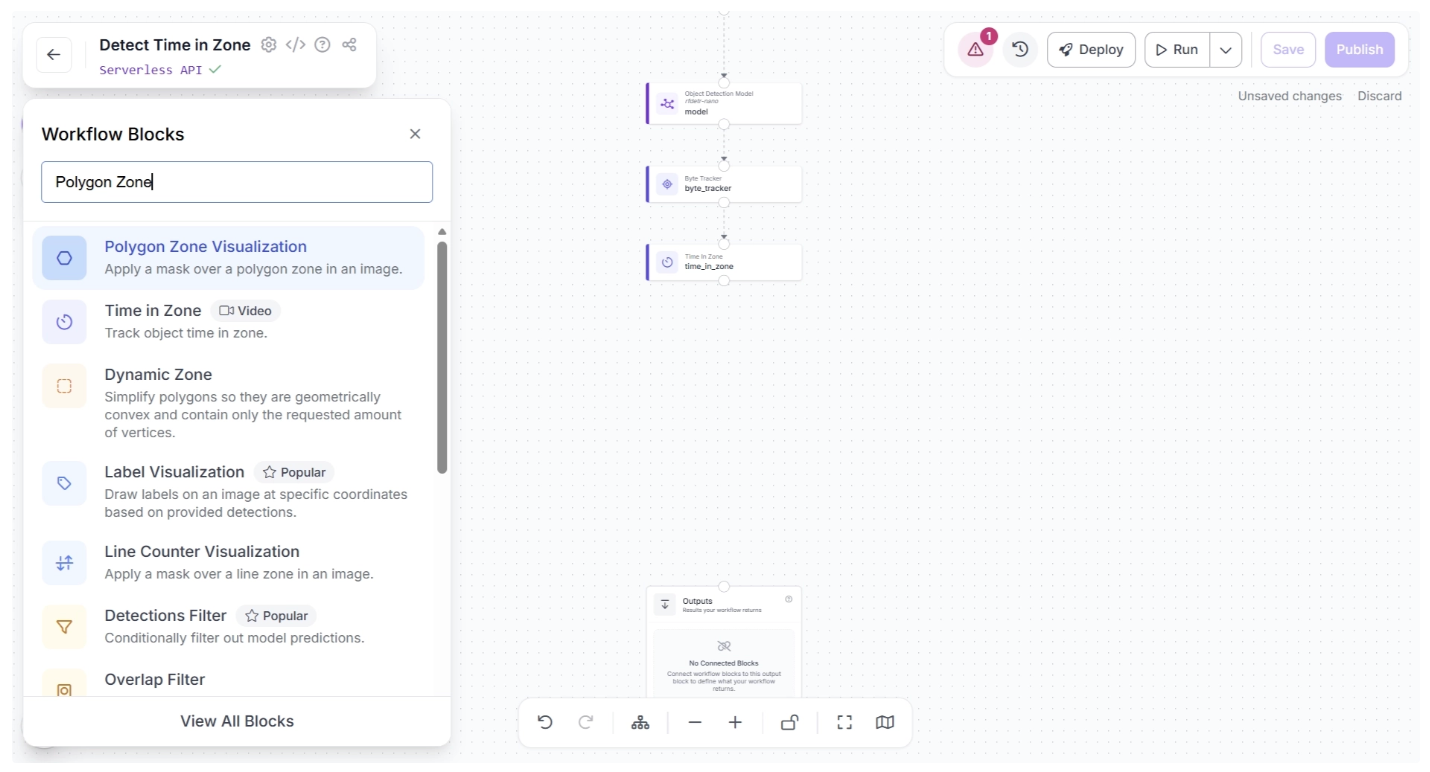
Now connect the Time in Zone block to the Polygon Zone Visualization block. To visualize the zone defined earlier, copy the polygon zone coordinates from the Time in Zone block and paste them into the “Zone” field of the Polygon Zone Visualization block.
The coordinates should look something like this: [[733,438],[534,440],[534,525],[745,520]], as shown below:
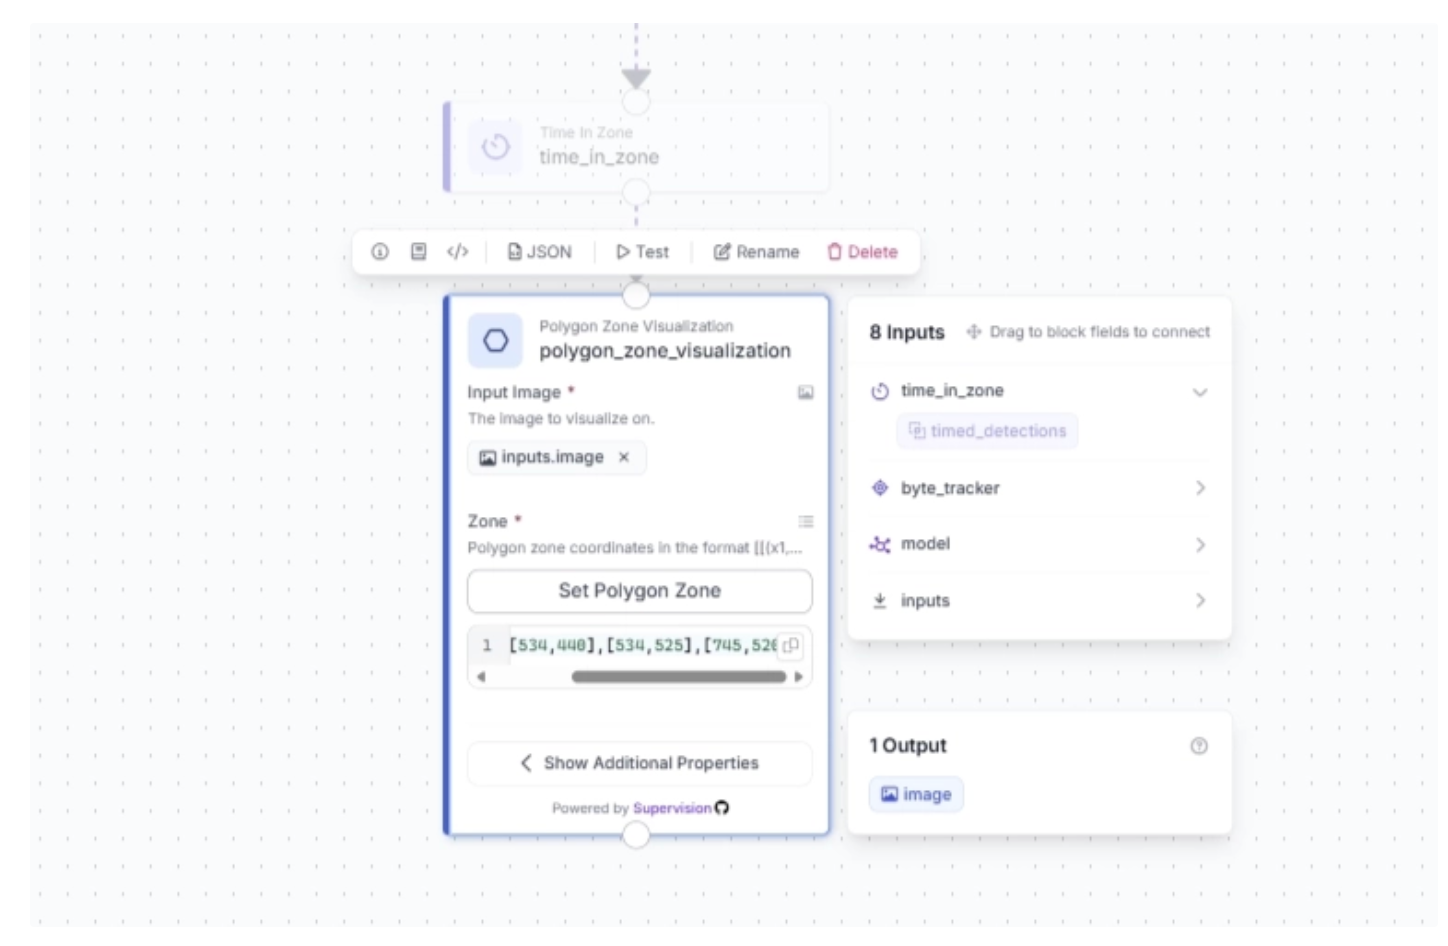
Under the Polygon Zone Visualization block’s additional properties, you can configure the color of the polygon zone that will be overlaid on top of the video stream, along with its transparency. For this example, we set the color to “#1BF533” and the opacity to 0.4.

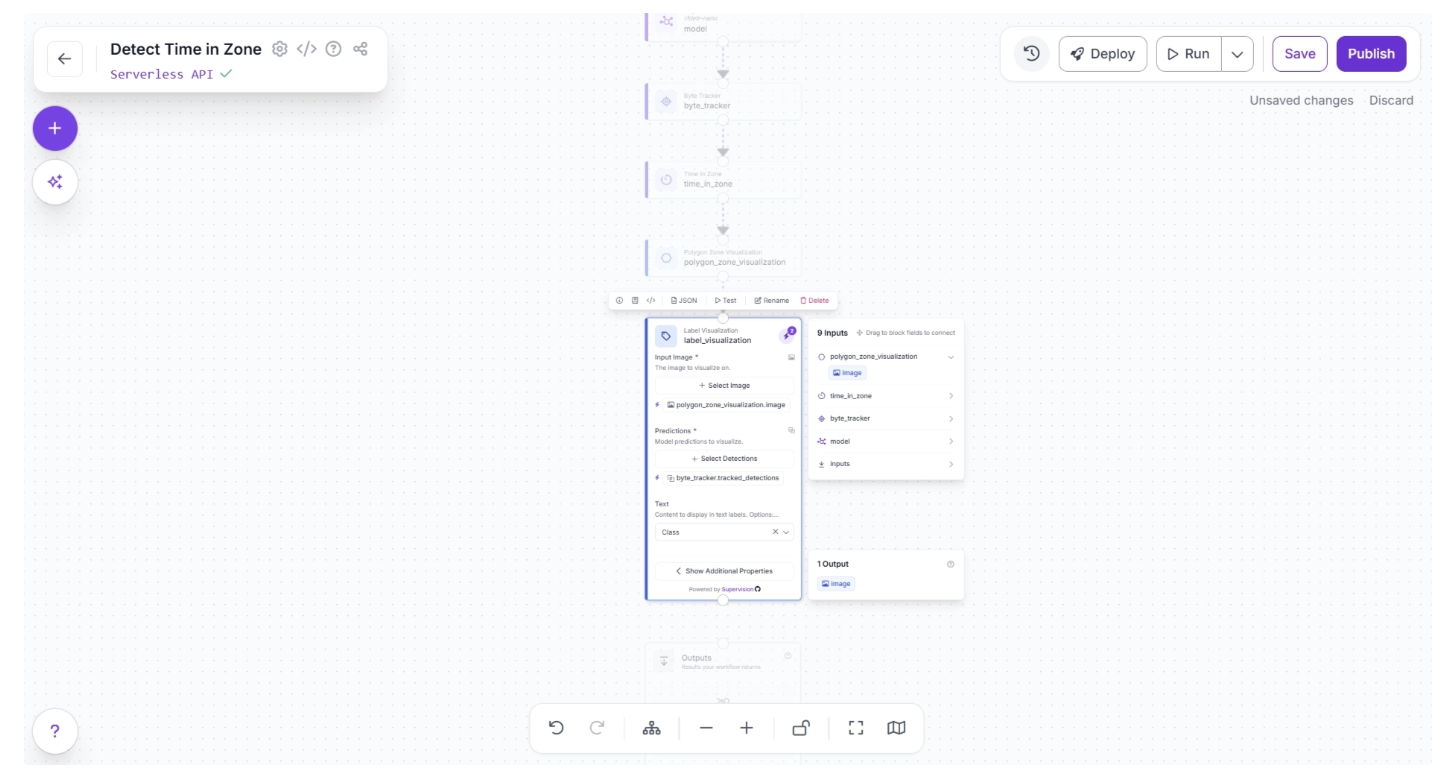
Now, to visualize the time a suitcase spends in the zone, we use the Label Visualization block. The actual time in zone is determined by the Time in Zone block, and its output is what gets visualized by the Label Visualization block.
To add this block, click the “+” button in the top-left corner of the workflow canvas. A pop-up menu with workflow blocks will appear, as shown below. From there, search for “Label Visualization” and select it to insert it into your workflow.

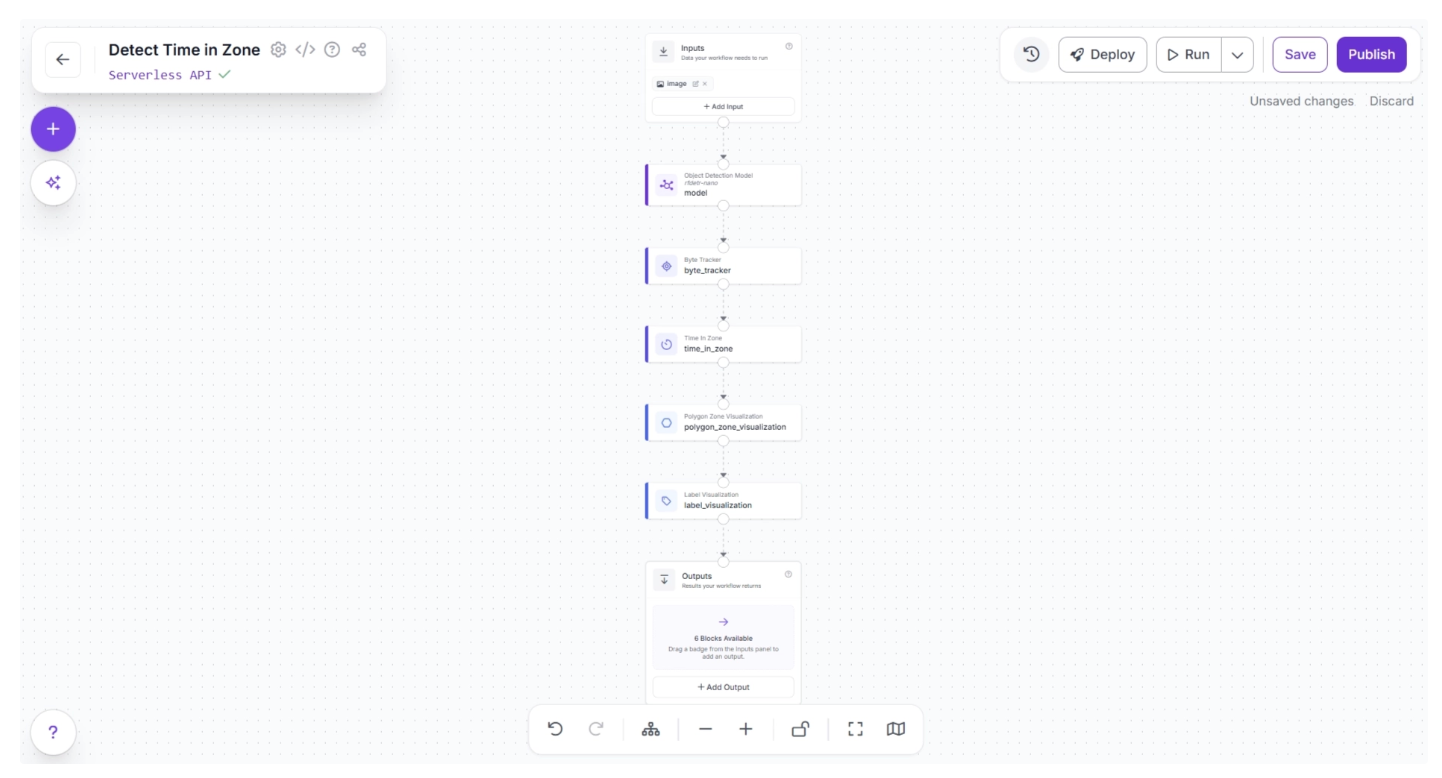
Then connect the Polygon Zone Visualization block to the Label Visualization block, after which the canvas should appear as shown below.
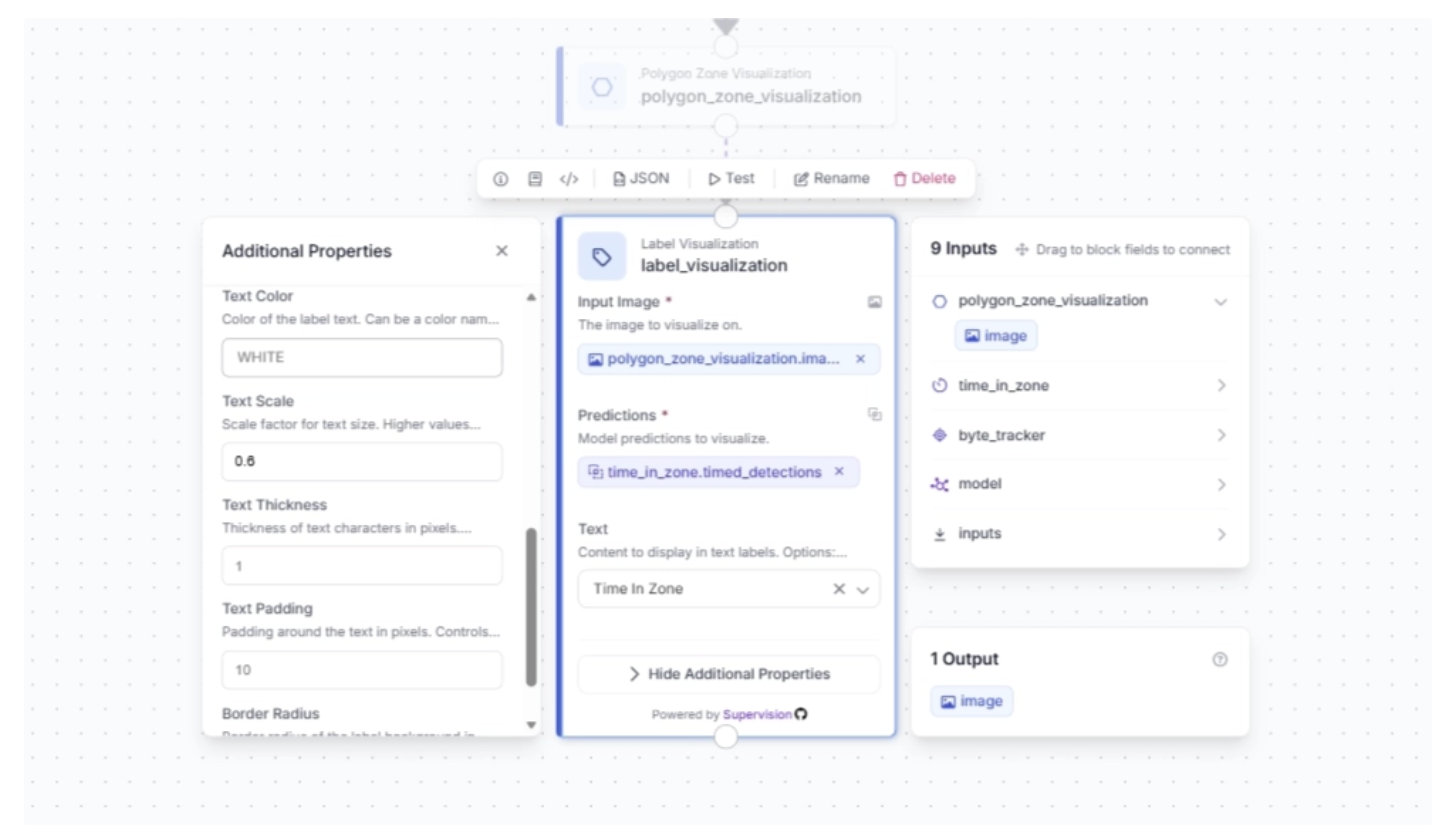
Then, in the pop-up that appears when configuring the Label Visualization block, drag and drop the image under ‘polygon_zone_visualization’ into the ‘Input image’ field of the Label Visualization block.
Similarly, drag and drop ‘timed_detections’ under ‘time_in_zone’ into the ‘Predictions’ field of the Label Visualization block, as shown below:
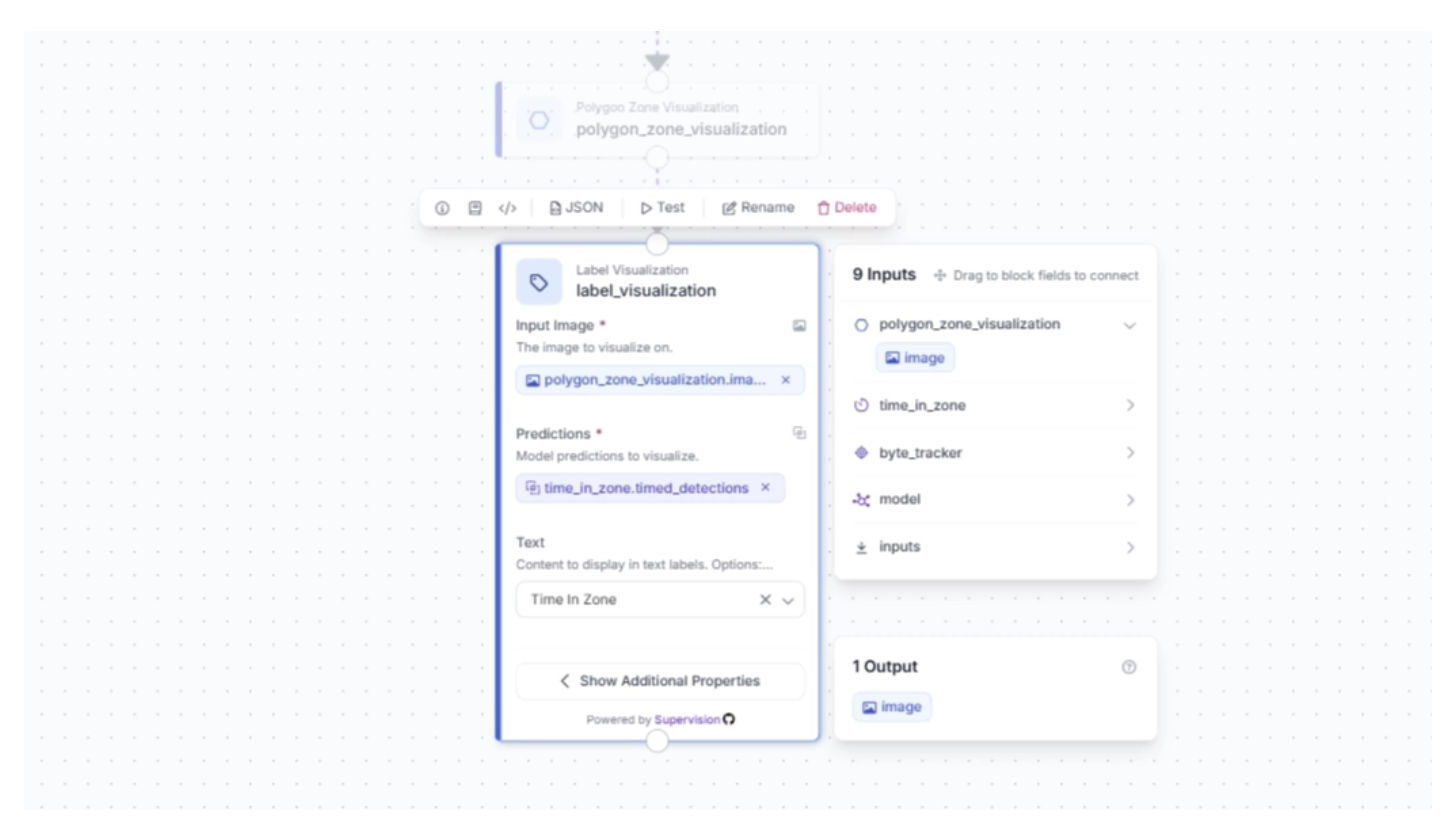
Under the Label Visualization block’s additional properties, you can configure various label visualization settings. For this example, we set the text scale to 0.6:
Step 6: Configure Workflow Outputs
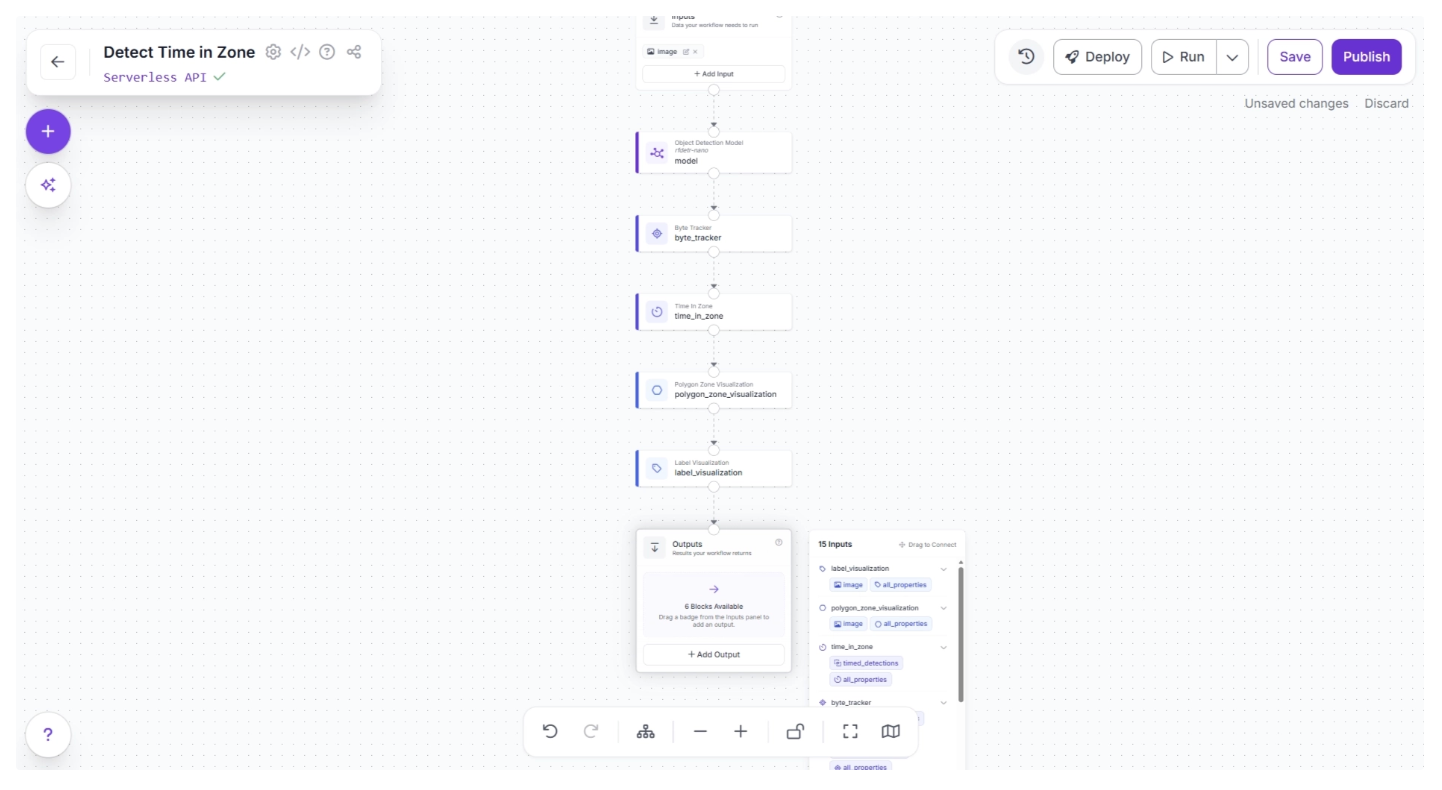
To output the time-in-zone visualized video stream, create a connection from the Label Visualization block to the Outputs block, as shown below. This ensures that the outputs from the Label Visualization block are available to the Outputs block.
Clicking the Outputs block reveals all the possible outputs from the workflow, as shown below:
Now, drag and drop the image under ‘label_visualization’ into the Outputs block and enter a parameter name for this output. In our example, we chose the name ‘labeled_frame,’ as shown below:
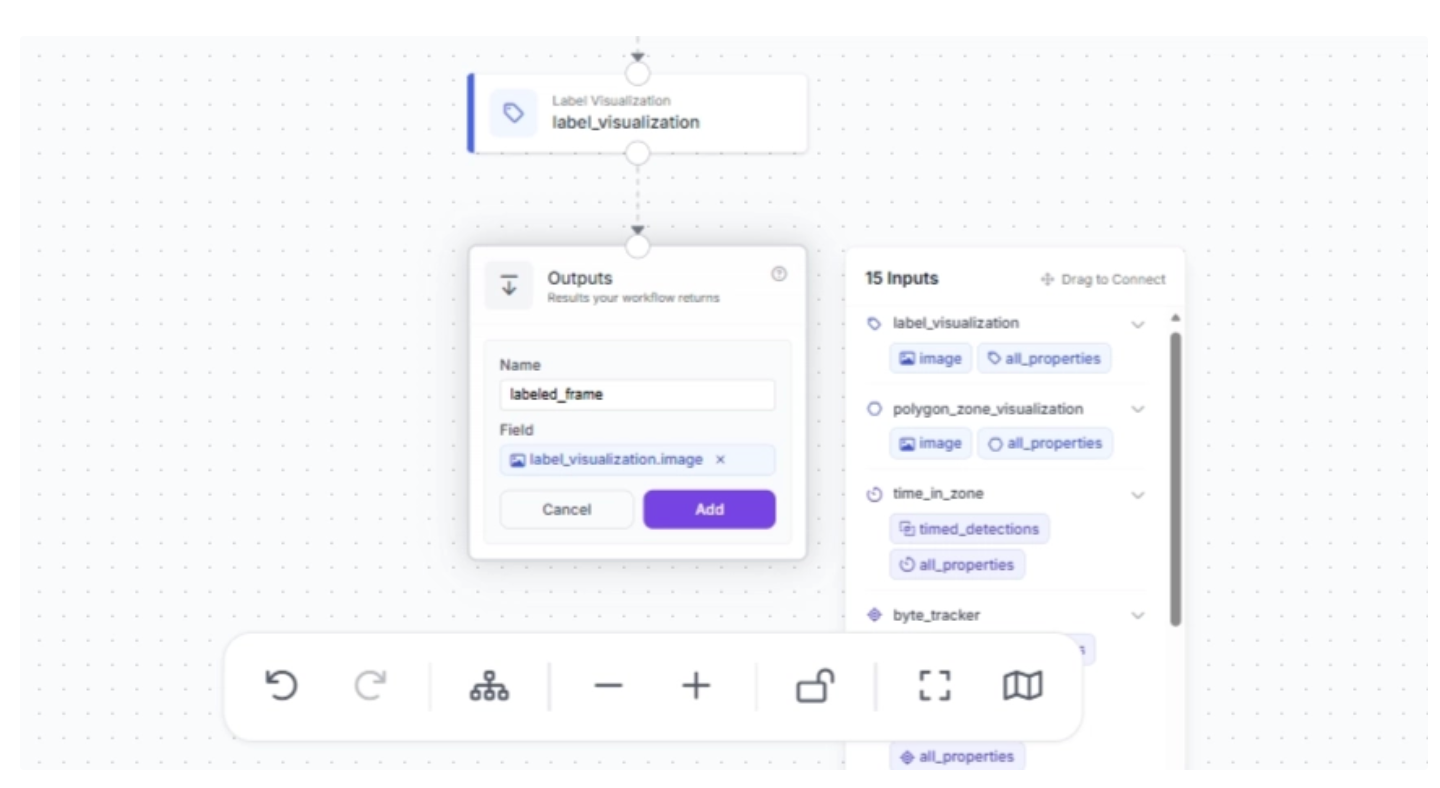
Once that is done, click “Add.” This completes your workflow, which takes in a video stream and outputs a video stream where suitcases that enter a zone, along with how long they remain there, are visualized.
Step 7: Run the Workflow
With your workflow complete, you can now run it. Click the “Run” button in the top-right corner of the editor. This opens a sidebar where you can upload an and video execute the workflow:

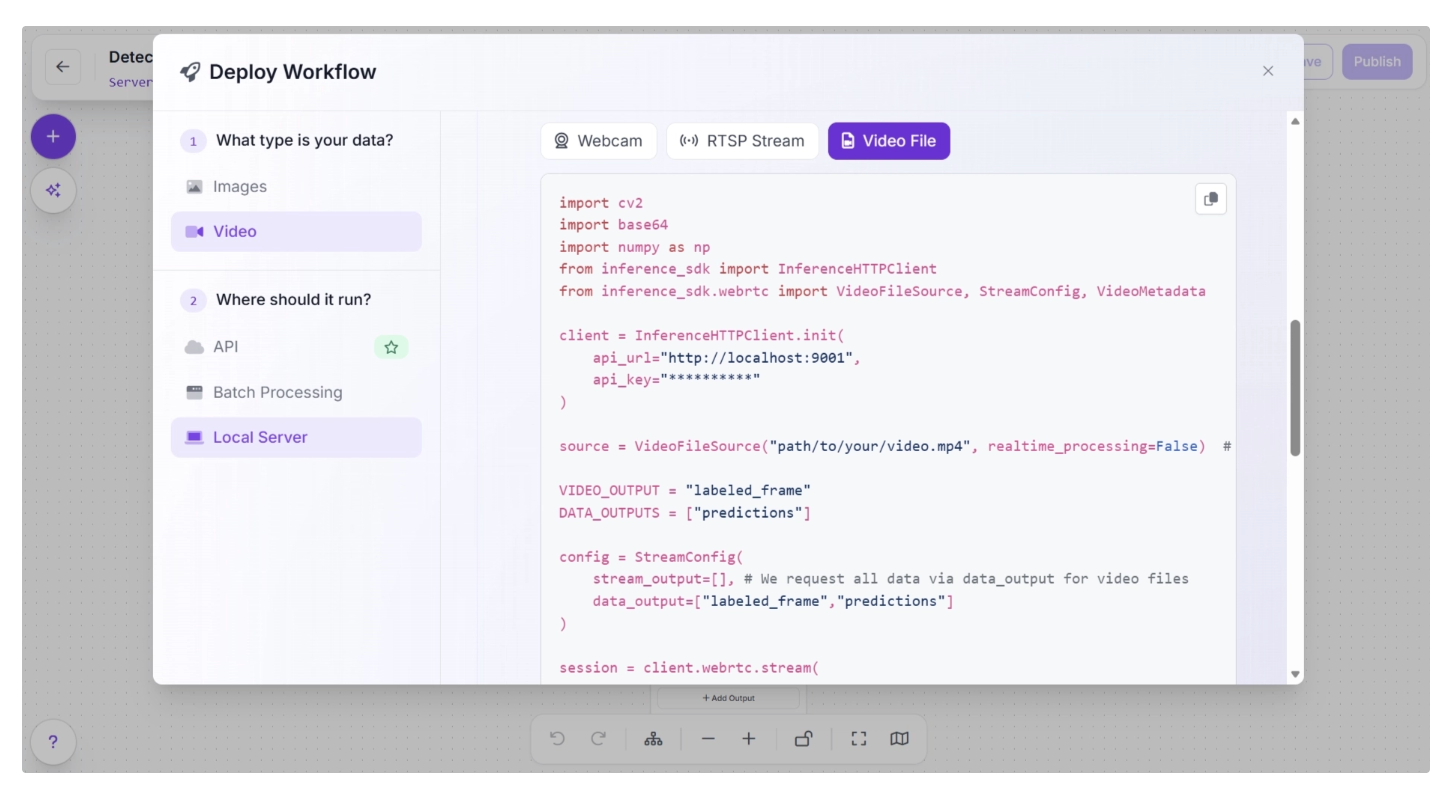
The workflow may fail when run on high-resolution videos directly from the UI due to WebRTC connection issues. In such cases, use an inference server (Docker recommended) to run the workflow locally.
First, set up the inference server and ensure it is running at http://localhost:9001, then install the inference-sdk package:
pip install -U inference-sdk
And then execute the script below:
import cv2
import base64
import numpy as np
from inference_sdk import InferenceHTTPClient
from inference_sdk.webrtc import VideoFileSource, StreamConfig, VideoMetadata

client = InferenceHTTPClient.init(
    api_url="<http://localhost:9001>",
    api_key="YOUR_API_KEY"
)

source = VideoFileSource("TEST_VIDEO.mp4", realtime_processing=False)  # Buffer and process all frames

VIDEO_OUTPUT = "labeled_frame"
DATA_OUTPUTS = ["predictions"]

config = StreamConfig(
    stream_output=[], # We request all data via data_output for video files
    data_output=["labeled_frame","predictions"]
)

session = client.webrtc.stream(
    source=source,
    workflow="detect-time-in-zone",
    workspace="your-workspace",
    image_input="image",
    config=config
)

frames = []

@session.on_data()
def on_data(data: dict, metadata: VideoMetadata):
    # print(f"Frame {metadata.frame_id} predictions: {data}")

    if VIDEO_OUTPUT and VIDEO_OUTPUT in data:
        timestamp_ms = metadata.pts * metadata.time_base * 1000
        img = cv2.imdecode(np.frombuffer(base64.b64decode(data[VIDEO_OUTPUT]["value"]), np.uint8), cv2.IMREAD_COLOR)
        frames.append((timestamp_ms, metadata.frame_id, img))
        print(f"Processed frame {metadata.frame_id}")
    else:
        print(f"Processed frame {metadata.frame_id} (data only)")

session.run()

if VIDEO_OUTPUT and len(frames) > 0:
    # Stitch frames into output video
    frames.sort(key=lambda x: x[1])
    fps = (len(frames) - 1) / ((frames[-1][0] - frames[0][0]) / 1000) if len(frames) > 1 else 30.0
    h, w = frames[0][2].shape[:2]
    out = cv2.VideoWriter("output.mp4", cv2.VideoWriter_fourcc(*"mp4v"), fps, (w, h))
    for _, _, frame in frames:
        out.write(frame)
    out.release()
    print(f"Done! {len(frames)} frames at {fps:.1f} FPS -> output.mp4")
elif VIDEO_OUTPUT:
    print("No video frames collected.")
The above Python script is taken from the “Deploy” menu, where you can also find your API key. Once run, it produces a video with the Time in Zone visualized output.
Step 8: Deploy Your Workflow
Roboflow provides several deployment options for workflows. You can access them by clicking the “Deploy” button to the left of the “Run” button in the top-right corner of the canvas, which opens a pop-up as shown below:
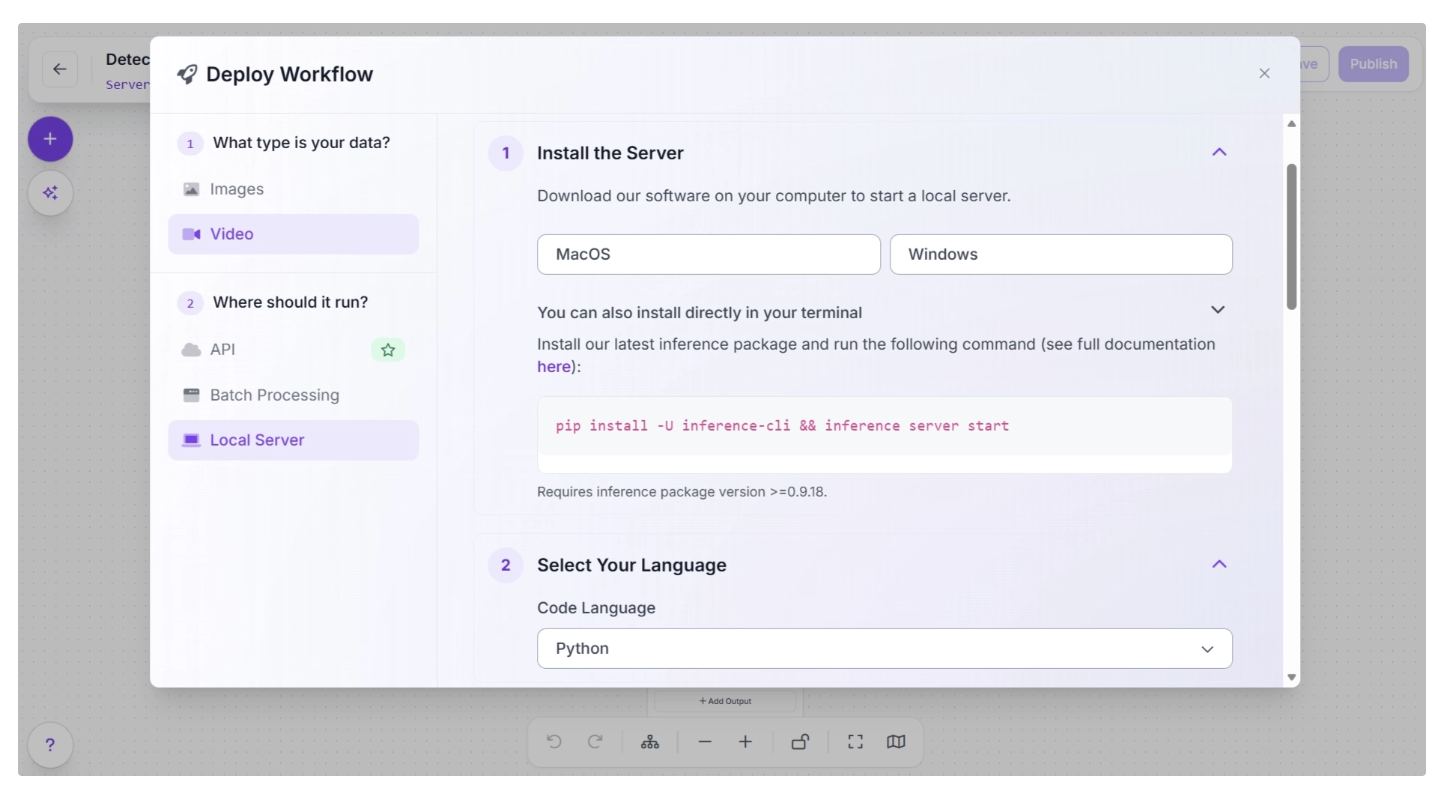
Various deployment options exist for running inference on the workflow. Cloud deployment options include API and Batch Processing, while Local Server is an edge deployment option.
Edge (on-device) deployment involves setting up an inference server on the edge device by installing the required packages and running the inference script as shown below:
Comparing Edge and Cloud Deployment for Video AI Pipelines
When designing video AI pipelines, the choice between running model inference between edge and cloud is best made by looking at the specific use case.
Different applications have very different requirements for latency, scale, and reliability, which directly determine where the pipeline should run.
Edge Deployment: Best for Real-Time, On-Site Decisions
Edge deployment is ideal for time-sensitive scenarios where video must be processed instantly, enabling immediate local decisions and actions without waiting for cloud communication.
Typical use cases include:
- Industrial automation and safety systems: Detecting hazards, monitoring machinery, or triggering emergency stops requires immediate response without relying on network connectivity.
- Autonomous systems: Drones, robots, and self-driving systems depend on real-time perception to navigate and react to their environment.
- Retail loss prevention: Identifying suspicious activity or shoplifting in real time to alert staff instantly.
- Smart traffic systems: Traffic signal control, violation detection, and pedestrian safety require millisecond-level decisions.
In these scenarios, sending video to the cloud would introduce latency that prevents immediate actions, making the system unreliable or unsafe.
Cloud Deployment: Best for Scale, Aggregation, and Heavy Processing
Cloud deployment is better suited for use cases where real-time response is less critical, but scale and compute power are essential.
Typical use cases include:
- City-wide surveillance analytics: Aggregating feeds from hundreds or thousands of cameras for trend analysis and incident review.
- Content moderation and video analysis platforms: Processing uploaded videos for policy enforcement or metadata extraction.
- Sports analytics and broadcasting: Analyzing recorded footage for player tracking, highlights, and performance insights.
- Training and improving models: Using large datasets of recorded video to retrain or fine-tune models.
- Retail and business intelligence: Analyzing customer behavior patterns over time rather than instant decisions.
These applications benefit from centralized infrastructure, where powerful GPUs and storage enable more complex processing.
Hybrid Deployment: Best for End-to-End Intelligent Systems
Many real-world systems combine both approaches to match different parts of the pipeline to the right environment.
Common hybrid use cases include:
- Smart surveillance systems: Edge detects motion or anomalies and sends only relevant clips to the cloud for deeper analysis and storage.
- Autonomous robots with fleet learning: Edge handles navigation and obstacle avoidance, while the cloud aggregates data from multiple robots to improve models.
- Retail analytics systems: Edge counts people and detects events in real time, while the cloud analyzes long-term trends across multiple stores.
- Industrial inspection pipelines: Edge performs quick defect detection, while the cloud runs more detailed analysis and maintains historical records.
Learn more about Cloud versus Edge inference here.
Common Mistakes in Video AI Pipelines
Video AI projects are complex, and small oversights can affect reliability. The common errors below highlight key pitfalls to avoid:
Ignoring temporal consistency
Video is sequential, and predictions should account for object motion and behavior over multiple frames.
Without this, simple detection can fail for occluded or fast-moving objects. Using trackers such as ByteTrack inside Roboflow workflows ensures consistent IDs and smooth tracking.
Overloading infrastructure with unnecessary frames
High-resolution video at 30–60 FPS produces huge volumes of data. Feeding every frame to a model can overwhelm the inference server and storage.
Frame skipping, adaptive sampling, and batching in Roboflow help reduce computational load while preserving key information.
Incorrect zone or ROI setup
When defining regions of interest (polygons, zones) for event detection, shaky/moving cameras or incorrect frame selection can make zones unreliable.
Roboflow lets you set polygon zones carefully and supports HD video input to improve accuracy. A still camera and correct video input selection are essential.
Relying solely on one model type
Relying solely on detection without tracking or segmentation can lead to missed events. Combining multiple model types improves robustness, allowing consensus decisions when one model’s confidence is low.
No monitoring or performance tracking
Deploying without monitoring can let errors propagate unnoticed. Roboflow supports logging and metrics tracking for deployed video workflows, helping you catch anomalies and retrain models when needed.
Conclusion: Leveraging Roboflow for Video-Intensive Pipelines
Building reliable video AI pipelines requires more than a strong model. It demands careful coordination of frame ingestion, temporal tracking, zone logic, deployment, monitoring, and other components, all working together under strict performance constraints.
Roboflow addresses each of these challenges through a unified platform that covers the full pipeline lifecycle. From the visual workflow builder with modular blocks to flexible deployment across cloud, edge, and hybrid environments, Roboflow removes the complexities that typically slow down video AI development.
As video is rapidly becoming the dominant data type across industries, from airports and warehouses to retail floors and factory lines, the volume and complexity of video data grows, so does the need for AI systems that can process it reliably, accurately, and at scale.
Roboflow equips teams to meet this demand, enabling them to build, deploy, and continuously improve video AI pipelines without getting bogged down in infrastructure. Try Roboflow.
Written by Dikshant Shah
Cite this Post
Use the following entry to cite this post in your research:
Contributing Writer. (Mar 26, 2026). How to Use Roboflow for Video-Heavy Pipelines. Roboflow Blog: https://blog.roboflow.com/how-to-use-roboflow-for-video-heavy-pipelines/