

Optical Character Recognition (OCR) enables computers to extract and understand text from images and documents, making it possible to automate document processing and reduce manual data entry. Learn how to build, customize, and deploy complete OCR pipelines using Roboflow Workflows.
Every day, businesses process thousands of documents, from invoices and receipts to contracts, forms, and medical records. While people can read these documents with ease, computers need specialized techniques to extract and understand the text they contain.
Optical Character Recognition (OCR) bridges this gap by enabling computers to read and extract text from images, scanned documents, and photos of documents. It converts real-world documents into searchable, copyable, and machine-readable text, making it possible to automate data entry, streamline document processing, integrate data from documents into digital workflows, and reduce manual work.
In this guide, you'll learn:
- What OCR is and how it works
- Real-world applications of OCR
- Challenges and limitations of OCR
- Popular OCR models and frameworks
- How to build and deploy OCR workflows using Roboflow
What Is OCR?
OCR (Optical Character Recognition) is a computer vision task that detects and extracts text from images, scanned documents, PDFs, and photographs, converting it into machine-readable text that can be searched, copied, analyzed, and processed by software.
Instead of manually typing information from paper documents or images, OCR automatically recognizes the characters and returns digital text.
For example, OCR can convert:
- A scanned invoice into editable text
- A photo of a receipt into structured expense data
- A PDF contract into searchable text
- A picture of a street sign into translated text
- A handwritten document into digital text
Without OCR, computers treat an image containing text exactly the same as any other image. OCR gives computers the ability to read text from these images.
Real-World OCR Applications
OCR is used across a wide range of industries to automate tasks that involve reading and processing text from images and documents. Some of the most common real-world applications include:
- Document Digitization: Convert scanned documents, books, PDFs, and paper records into searchable and editable digital text so that information can be easily stored, searched, and shared, helping reduce paper-based workflows. Read this guide on Document Digitization.
- Invoice and Receipt Processing: Extract invoice numbers, dates, totals, and vendor information so that accounting tasks can be automated, helping reduce manual data entry and processing time. Read this guide on Invoice Processing.
- Identity Document Verification: Read information from passports, driver's licenses, and national IDs to automatically and instantly verify customer identities, helping streamline KYC and onboarding processes.
- Automatic License Plate Recognition (ALPR): Read vehicle license plates so that vehicles can be identified automatically, helping enable parking management, toll collection, and traffic monitoring. Read this guide on ALPR.
- Healthcare Document Processing: Digitize patient records, prescriptions, laboratory reports, and medical forms so that healthcare information is easier to access and manage, helping reduce administrative workload. Read this guide on Medical Bill OCR.
- Mail and Logistics Automation: Read addresses, shipping labels, and tracking numbers so that mail and packages can be sorted automatically, helping improve delivery speed and accuracy.
- Retail and Inventory Management: Extract information from product labels, serial numbers, shelf tags, and expiration dates so that inventory can be tracked automatically, helping improve warehouse efficiency and stock accuracy. Read this guide on AI-Powered Shelf Price Verification.
- Financial Document Processing: Extract information from checks, bank statements, loan documents, and financial reports so that financial workflows can be automated, helping reduce errors and speed up document processing.
- Translation and Accessibility: Recognize text from signs, menus, books, and other printed materials so that it can be translated or converted into speech, helping make information more accessible across languages and for visually impaired users.
Challenges of OCR
OCR accuracy depends heavily on the quality and characteristics of the input. Some of the most common challenges include:
- Poor Image Quality: Blurry, low-resolution, noisy, or compressed images can make text difficult to detect and recognize accurately.
- Skewed or Rotated Documents: Documents captured at an angle or with perspective distortion can reduce OCR accuracy unless they are corrected beforehand.
- Low Contrast and Background Noise: Faded text, shadows, reflections, or cluttered backgrounds can make it difficult to distinguish text from its surroundings.
- Handwritten Text: Variations in handwriting style, spacing, and legibility make handwritten text significantly harder to recognize than printed text.
- Unusual Fonts: Decorative, stylized, or uncommon fonts may not match the patterns learned by OCR models, leading to recognition errors.
- Complex Document Layouts: Multi-column pages, tables, forms, and mixed text-image layouts can make it difficult to determine the correct reading order and structure.
- Multilingual Documents: Documents containing multiple languages or scripts often require language-specific models or accurate language detection.
- Curved or Rotated Text: Text on bottles, signs, logos, or other curved and arbitrarily oriented surfaces is more difficult to detect and recognize than horizontally aligned text.
Although these challenges can affect OCR accuracy, many can be mitigated to some extent through preprocessing techniques such as image denoising, contrast enhancement, deskewing, perspective correction, etc.
Post-processing techniques such as spell correction, text normalization, and contextual error correction can further improve the accuracy of extracted text.
How Does OCR Work?
Modern OCR systems combine computer vision techniques and deep learning models to convert text in images into machine-readable text. While the underlying models have evolved significantly, most OCR pipelines still follow the same five-step process.
1. Image Acquisition
The OCR pipeline begins with an image containing text. This may be a scanned document, PDF, smartphone photo, screenshot, receipt, invoice, or a frame extracted from a video.
The quality of the input image plays a critical role in OCR performance. High-resolution images with good lighting and minimal distortion generally produce much more accurate results than blurry, noisy, or low-resolution images.
2. Image Preprocessing
Before extracting text, the image is preprocessed to improve its quality and make characters easier to identify. Common preprocessing techniques include:
- Contrast Enhancement: Increases the difference between text and background, making characters clearer, especially in low-quality images.
- Noise Reduction: Removes unwanted artifacts, such as grain, compression noise, and background patterns, that can interfere with text recognition. Common noise reduction techniques include:
- Gaussian Blur: Smooths small variations and reduces random image noise.
- Median Filtering: Removes salt-and-pepper noise while preserving text edges.
- Morphological Operations: Techniques such as erosion and dilation to remove small artifacts, fill gaps, and improve the structure of text regions.
- Grayscale Conversion: Converts color images into grayscale by removing color information while preserving intensity differences needed for OCR.
- Binarization: Converts grayscale images into black-and-white images by separating text from the background, creating clearer text regions.
- Perspective Correction: Removes distortions caused by angled camera captures, transforming images into a more readable format.
- Resizing and Normalization: Adjusts image dimensions and pixel values to match the expected input format of the OCR model.
These preprocessing steps help reduce recognition errors and improve OCR accuracy.
3. Text Detection
Text Detection is the process of identifying where text appears within an image. Instead of analyzing the entire image as text, an OCR system first locates text regions and separates them from non-text elements, such as tables, graphics, and photographs.
Text detection identifies regions in an image that contain text, such as paragraphs, text blocks, individual lines, words, and, in some cases, individual characters.
Traditional text detection relied on techniques such as page segmentation and document layout analysis to locate text regions within an image.
Modern OCR systems, however, use deep learning-based text detection models, such as CRAFT and DBNet++, to accurately identify the location of text within an image.
The output of this stage is a set of bounding boxes or polygons that represent the position and shape of each detected text region.
These regions are then cropped or passed to the text recognition stage, where the actual text content is extracted.
4. Text Recognition
Text Recognition is the process of converting detected text regions into machine-readable characters and words. This step analyzes each detected text region and predicts the corresponding text sequence.
Traditional OCR systems relied on handcrafted features combined with pattern-matching or statistical classification techniques to recognize individual characters.
Modern OCR systems use deep learning architectures such as Convolutional Neural Networks (CNNs), Vision Transformers (ViTs), and Transformer-based encoder-decoder models to recognize entire text sequences end to end. Popular models include TrOCR and GLM-OCR.
These models are significantly more robust than traditional approaches and can accurately recognize text across a wide range of real-world scenarios, including varying fonts, handwriting, curved or rotated text, low-resolution images, challenging lighting conditions, and multilingual documents.
The output of this stage is the recognized text, often paired with the location of the corresponding text region in the image.
5. Post-processing
The recognized text is then refined to improve accuracy and usability. OCR systems often apply domain-specific rules and language models and to correct recognition errors and produce cleaner output.
Typical post-processing operations include:
- Spell checking and grammar correction
- Formatting dates, currencies, phone numbers, and addresses
- Removing duplicate or invalid characters
- Preserving document reading order and layout
The final output is structured, machine-readable text that can be searched, copied, indexed, analyzed, translated, or integrated into downstream applications such as document management systems, databases, and business automation workflows.
Popular OCR Models and Frameworks
OCR models and frameworks serve as the core processing stage of an OCR system, responsible for detecting and recognizing text from preprocessed images.
Depending on the model or framework, they may use traditional computer vision and pattern recognition techniques, deep learning-based text detection and recognition models, or multimodal vision language models capable of performing end-to-end OCR within a single architecture.
Some of the most popular OCR models and frameworks include:
1. Tesseract OCR
Tesseract OCR is one of the most widely used open-source OCR engines. Originally developed using traditional computer vision and pattern recognition techniques, modern versions use a Long Short-Term Memory (LSTM) neural network-based text recognition engine to improve recognition accuracy.
Tesseract performs both text detection and text recognition within a single OCR pipeline. However, while its text recognition is LSTM-based, its text detection relies on traditional page segmentation and layout analysis rather than modern deep learning-based text detection models.
It works best on clean documents with structured layouts but may struggle with complex images, curved text, or highly variable backgrounds.
Key features:
- Supports more than 100 languages
- Uses LSTM-based text recognition
- Works well for scanned documents and printed text
- Can be combined with external text detection models for complete OCR pipelines
2. EasyOCR
EasyOCR is an open-source deep learning OCR framework designed to perform both text detection and text recognition within a single pipeline.
It uses the CRAFT (Character Region Awareness for Text Detection) model to locate text regions and a Convolutional Recurrent Neural Network (CRNN) for text recognition, making it suitable for both document OCR and text in natural scene images.
EasyOCR is supports GPU acceleration, and performs well on multilingual text, signs, receipts, screenshots, and other real-world images.
Key features:
- Performs both text detection and text recognition using deep learning
- Supports more than 80 languages, including multilingual recognition
- Works well on both scanned documents and natural scene text
- Simple Python API with GPU acceleration support
3. PaddleOCR
PaddleOCR is an open-source OCR framework that provides a complete pipeline for both text detection and text recognition.
It combines state-of-the-art deep learning models into an end-to-end OCR pipeline, using the DB (Differentiable Binarization) model for text detection and the SVTR (Scene Text Recognition) model for text recognition in recent PP-OCR (PaddlePaddle-OCR) versions. This enables accurate and efficient OCR on both scanned documents and natural scene images.
In addition to OCR, PaddleOCR includes document parsing capabilities that convert PDFs and images into LLM-ready structured outputs, such as Markdown and JSON, making it suitable for retrieval-augmented generation (RAG) and AI agents.
It also includes additional components for text orientation classification, document layout analysis, and table structure recognition.
PaddleOCR is optimized for high accuracy and efficient deployment, with support for multiple inference backends and hardware platforms, including GPUs, CPUs, and edge devices.
Key features:
- Performs both text detection and text recognition using deep learning
- Supports OCR in more than 100 languages
- Includes document layout analysis, table recognition, and LLM-ready document parsing with Markdown and JSON output
- Optimized for fast inference and deployment on cloud, mobile, and edge devices
- Supports multiple inference backends, including ONNX Runtime, TensorRT, and OpenVINO
4. GLM-OCR
GLM-OCR is an open-source Vision Language Model (VLM) developed for optical character recognition and document understanding.
Unlike traditional OCR frameworks that use separate text detection and recognition models, GLM-OCR performs OCR end-to-end within a single multimodal model.
Rather than explicitly detecting text regions with models such as CRAFT or DBNet, it processes the entire document image and directly generates the extracted text and document structure (in form of HTML table).
It is designed for complex documents, including forms, tables, receipts, invoices, academic papers, mathematical formulas, and handwritten text.
In addition to plain text extraction, GLM-OCR can generate structured outputs such as Markdown, making it well suited for document AI, retrieval-augmented generation (RAG), and AI agents.
As a VLM, it can also answer questions about document content and perform higher-level document understanding tasks.
However, specialized OCR frameworks such as PaddleOCR are generally faster and more efficient for large-scale OCR workloads. Try GLM-OCR on Roboflow Playground.
Key features:
- End-to-end OCR using a single vision language model
- No explicit text detection stage with bounding box prediction
- Extracts text while preserving document structure and layout
- Supports complex documents, tables, forms, formulas, and handwriting
- Generates structured outputs such as Markdown
- Supports document question answering and other multimodal tasks
5. General-Purpose Vision Language Models (VLMs)
General-purpose Vision Language Models (VLMs) are multimodal AI models that understand both images and text. Although not designed specifically for OCR, they can perform text extraction, document understanding, and question answering by directly interpreting document images.
Unlike traditional OCR frameworks, VLMs process the entire image end-to-end without separate text detection and recognition models. They can extract text, preserve document structure, answer questions about document content, and generate configurable outputs such as plain text, Markdown, HTML, JSON, or user-defined formats through prompting.
Some VLMs can also generate text bounding boxes, although the accuracy and reliability of these predictions vary depending on the model and are generally less consistent than specialized OCR text detection models.
While VLMs are highly flexible, they are generally slower and more computationally expensive than specialized OCR frameworks such as PaddleOCR, making them less suitable for high-throughput OCR workloads.
Examples include GPT-5.6, Gemini 3.6 Flash, Claude Sonnet 5, Qwen3-VL, and Llama 4. Try them on Roboflow Playground.
Key features:
- Perform OCR, document understanding, and visual reasoning within a single multimodal model
- Extract text from documents, forms, receipts, tables, and natural scene images using prompts
- Perform reasoning-based information extraction (for example, extracting only an ID card's expiration date or identifying the invoice due date)
- Generate structured outputs such as Markdown, HTML, or JSON
- Support document question answering, summarization, and information extraction
- Can understand non-text visual elements such as charts, diagrams, and figures
- More flexible than traditional OCR models
This guide compares a wide range of OCR models, including TrOCR, EasyOCR, Florence-2, Mistral OCR, and vision language models from OpenAI, Google, and Anthropic, based on their accuracy, speed, and cost. If you're having trouble choosing the right OCR model for your use case, check it out.
How to Build an Optical Character Recognition (OCR) Pipeline in Roboflow Workflows
Roboflow Workflows is a visual, low-code platform for building computer vision pipelines by connecting AI models, image processing operations, and custom logic through a drag-and-drop interface.
Instead of building complex computer vision pipelines from scratch, you can assemble them visually and deploy them with just a few clicks.
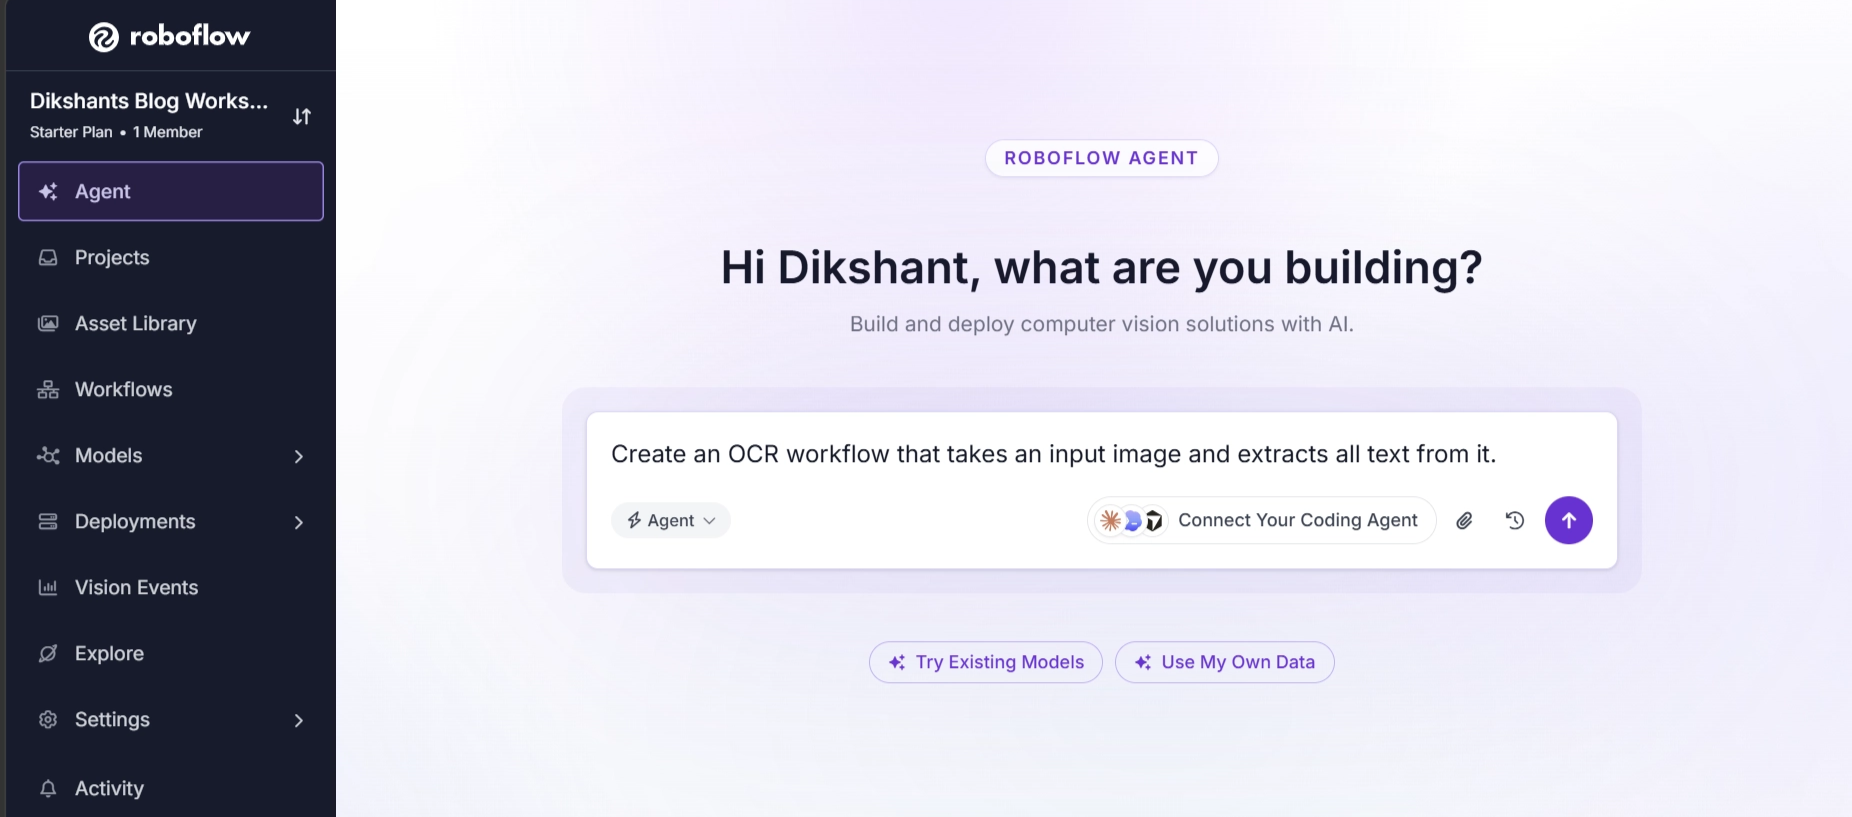
You can also use Roboflow Agent, available in your workspace after you log in, to automatically generate workflows from natural language prompts.
Roboflow Agent acts as a conversational interface for Roboflow tools such as Workflows. Instead of manually building a workflow block by block, you simply describe the workflow you want to create. Roboflow Agent then generates the workflow, which you can review, edit, and customize in the Workflow Editor.
This provides a fast starting point while still giving you full control over the generated workflow.
For example, you can ask Roboflow Agent to create a workflow that performs OCR:
Roboflow Agent generates a workflow capable of performing OCR:
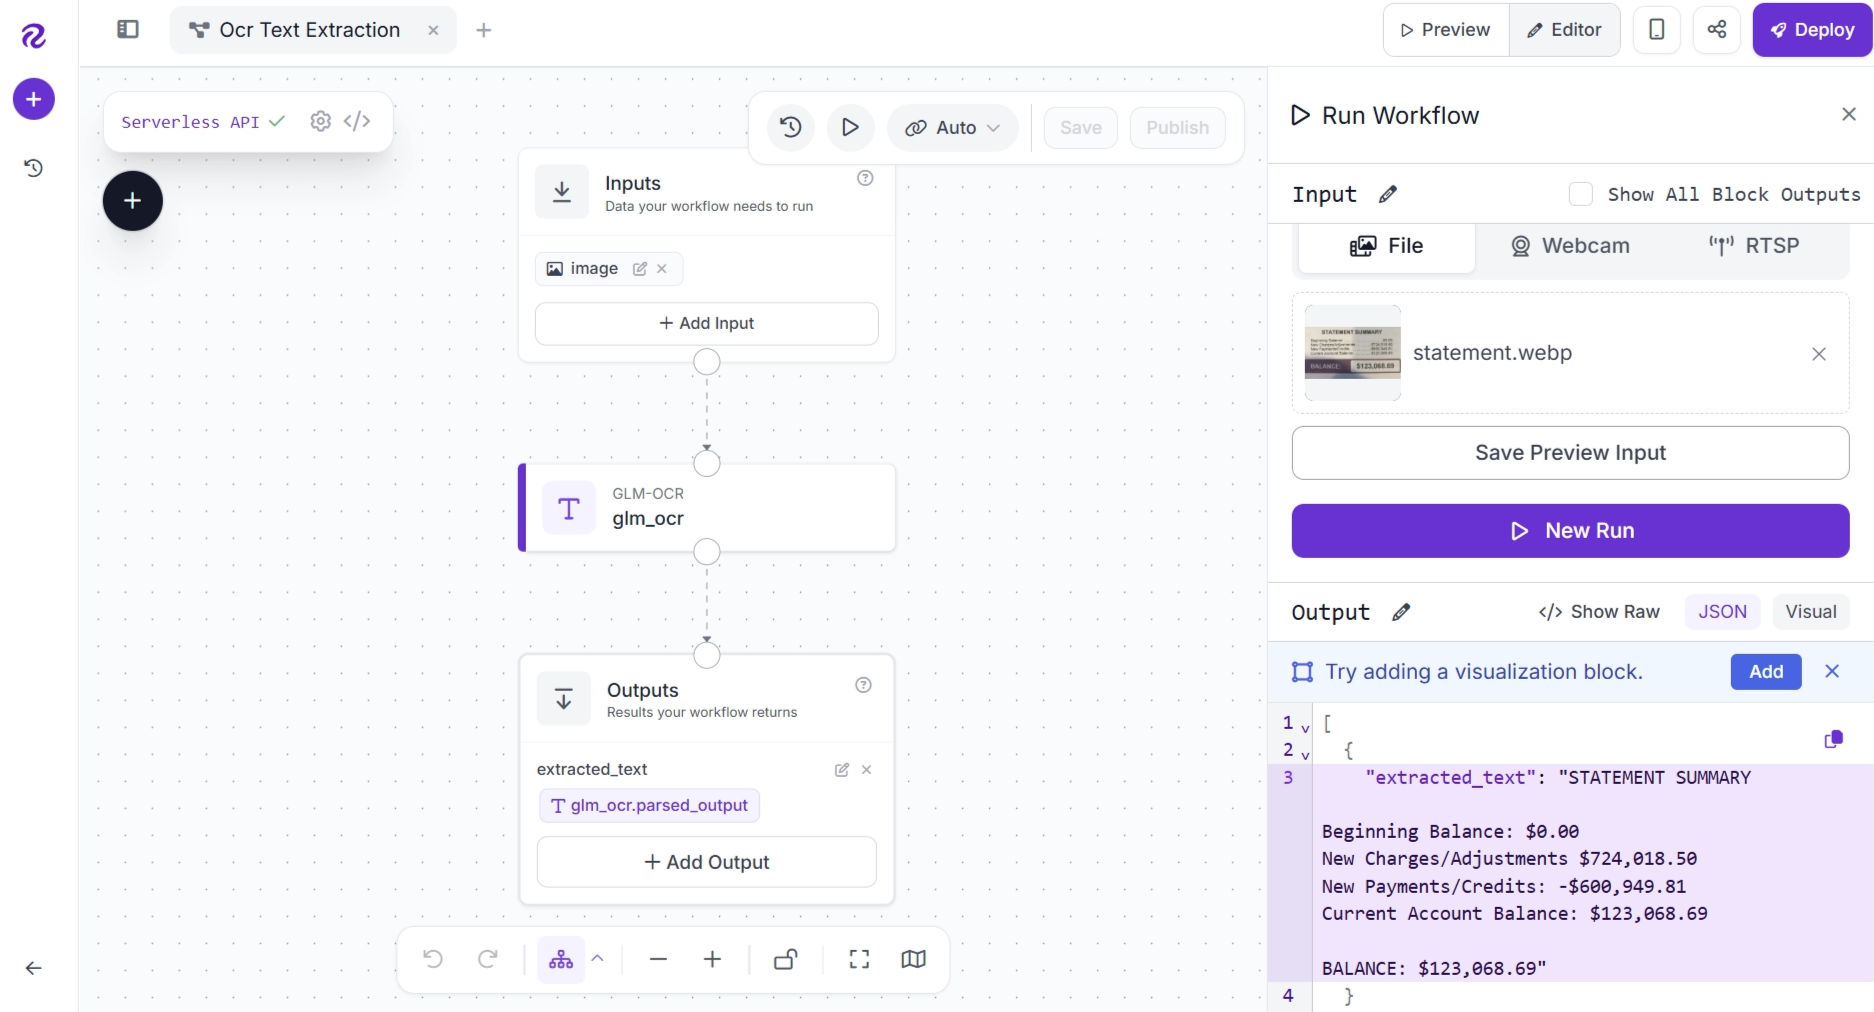
You can continue refining the workflow using natural language. For example, you can ask Roboflow Agent to add image preprocessing and postprocessing steps, replace OCR models, incorporate visualization blocks, or make other modifications without manually editing the pipeline.
In this guide, however, we will build a complete OCR workflow manually, including image preprocessing and post-processing steps. This approach will help you understand how each component works, how different blocks connect, and how to customize OCR pipelines for your own use cases.
The video below demonstrates the workflow we will build:
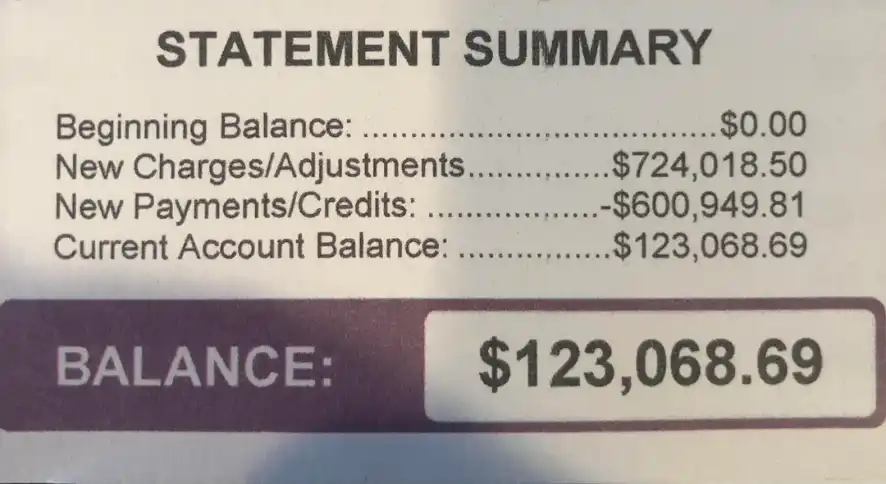
You can try the workflow here. The workflow is built to perform correct OCR on the below scanned billing statement:
Step 1: Create a Workflow
To get started, create a free Roboflow account and sign in. Next, create a workspace, then navigate to Workflows from the left sidebar and click Create Workflow.
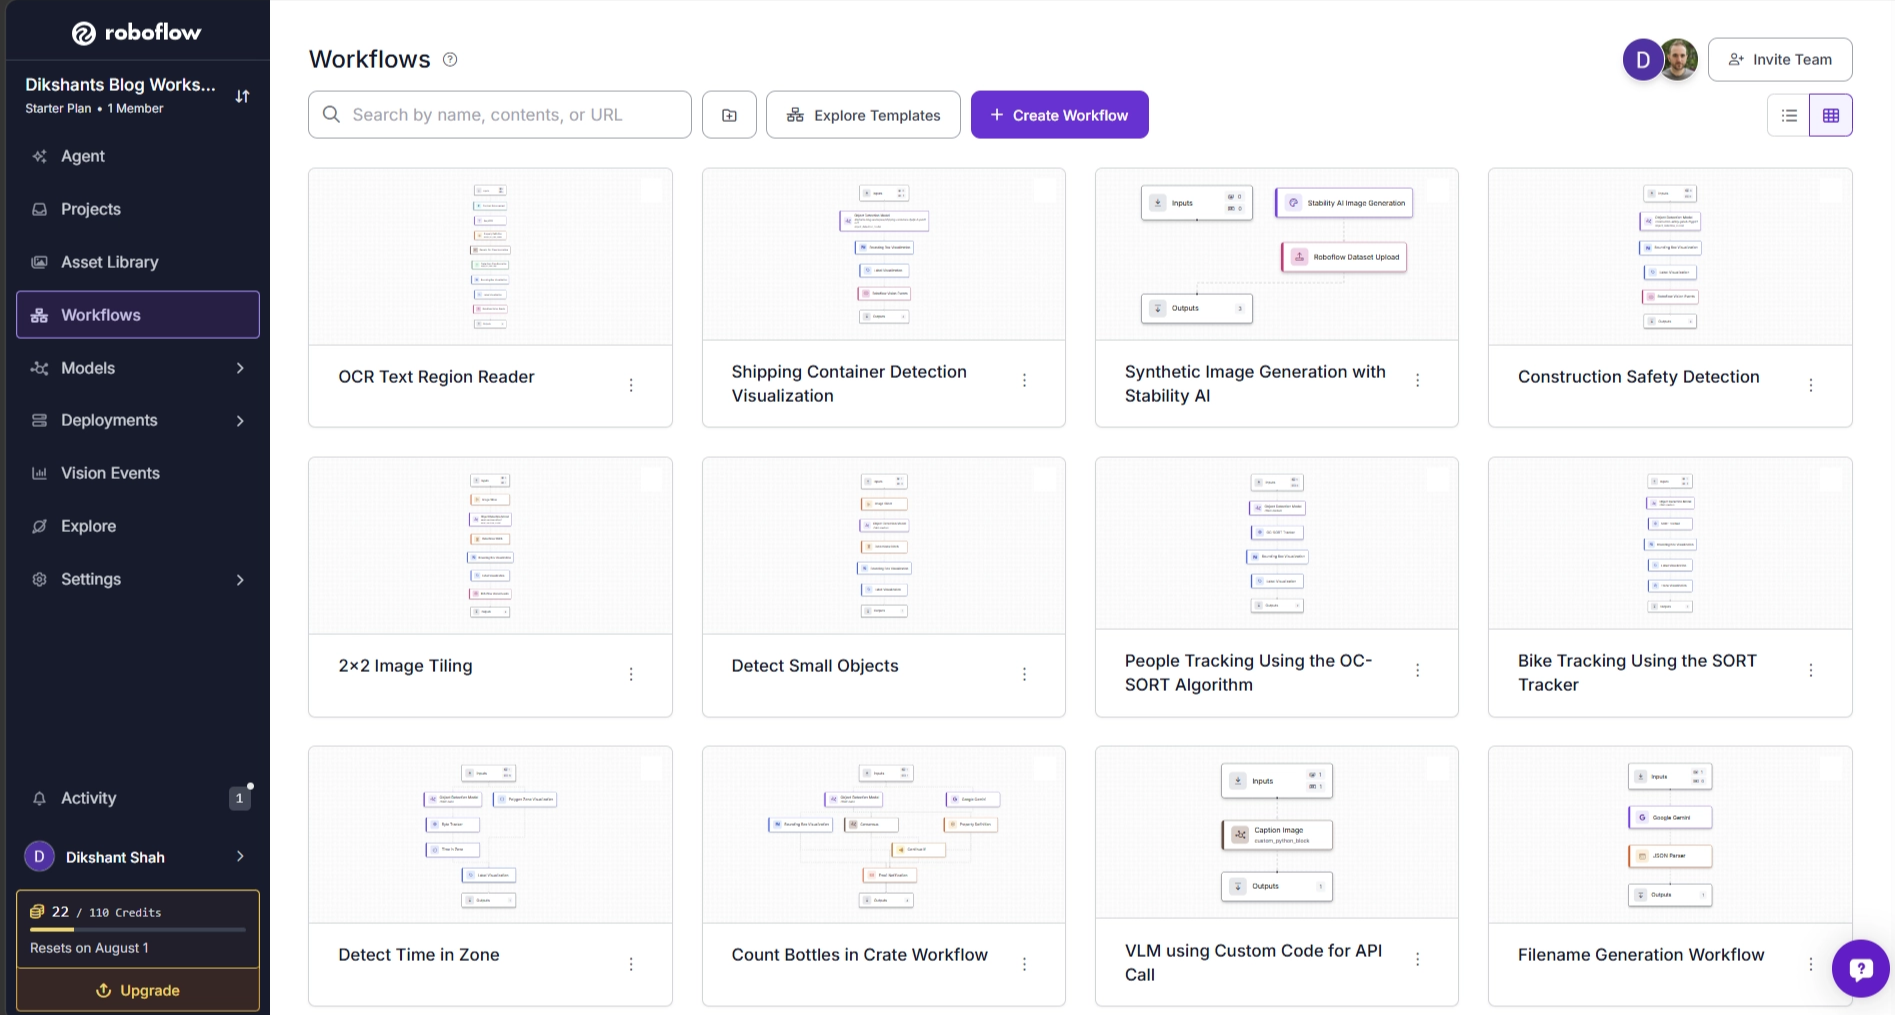
You will be taken to the Workflows editor, where you can build and configure your workflow.
By default, the editor contains three key elements:
- An Inputs block that accepts an image as input
- An Outputs block with no configured outputs
- An Agent chat panel that lets you modify your workflow using natural language prompts
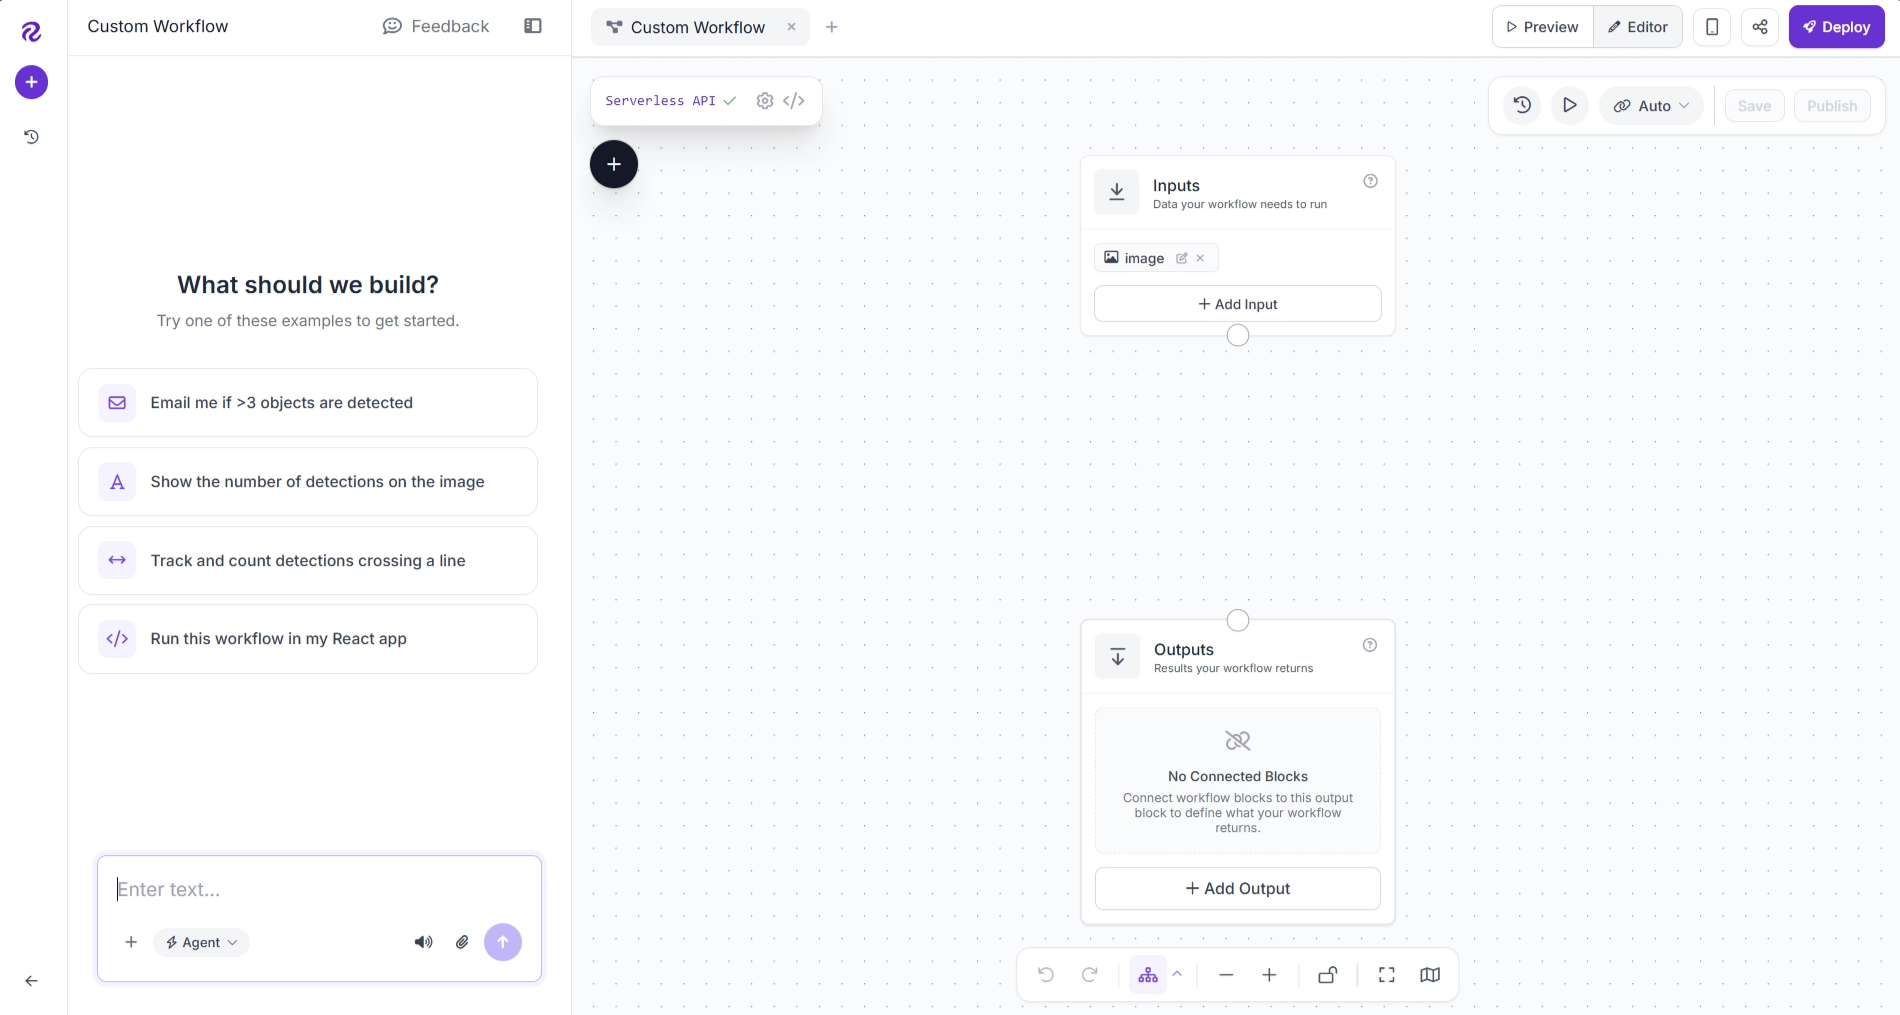
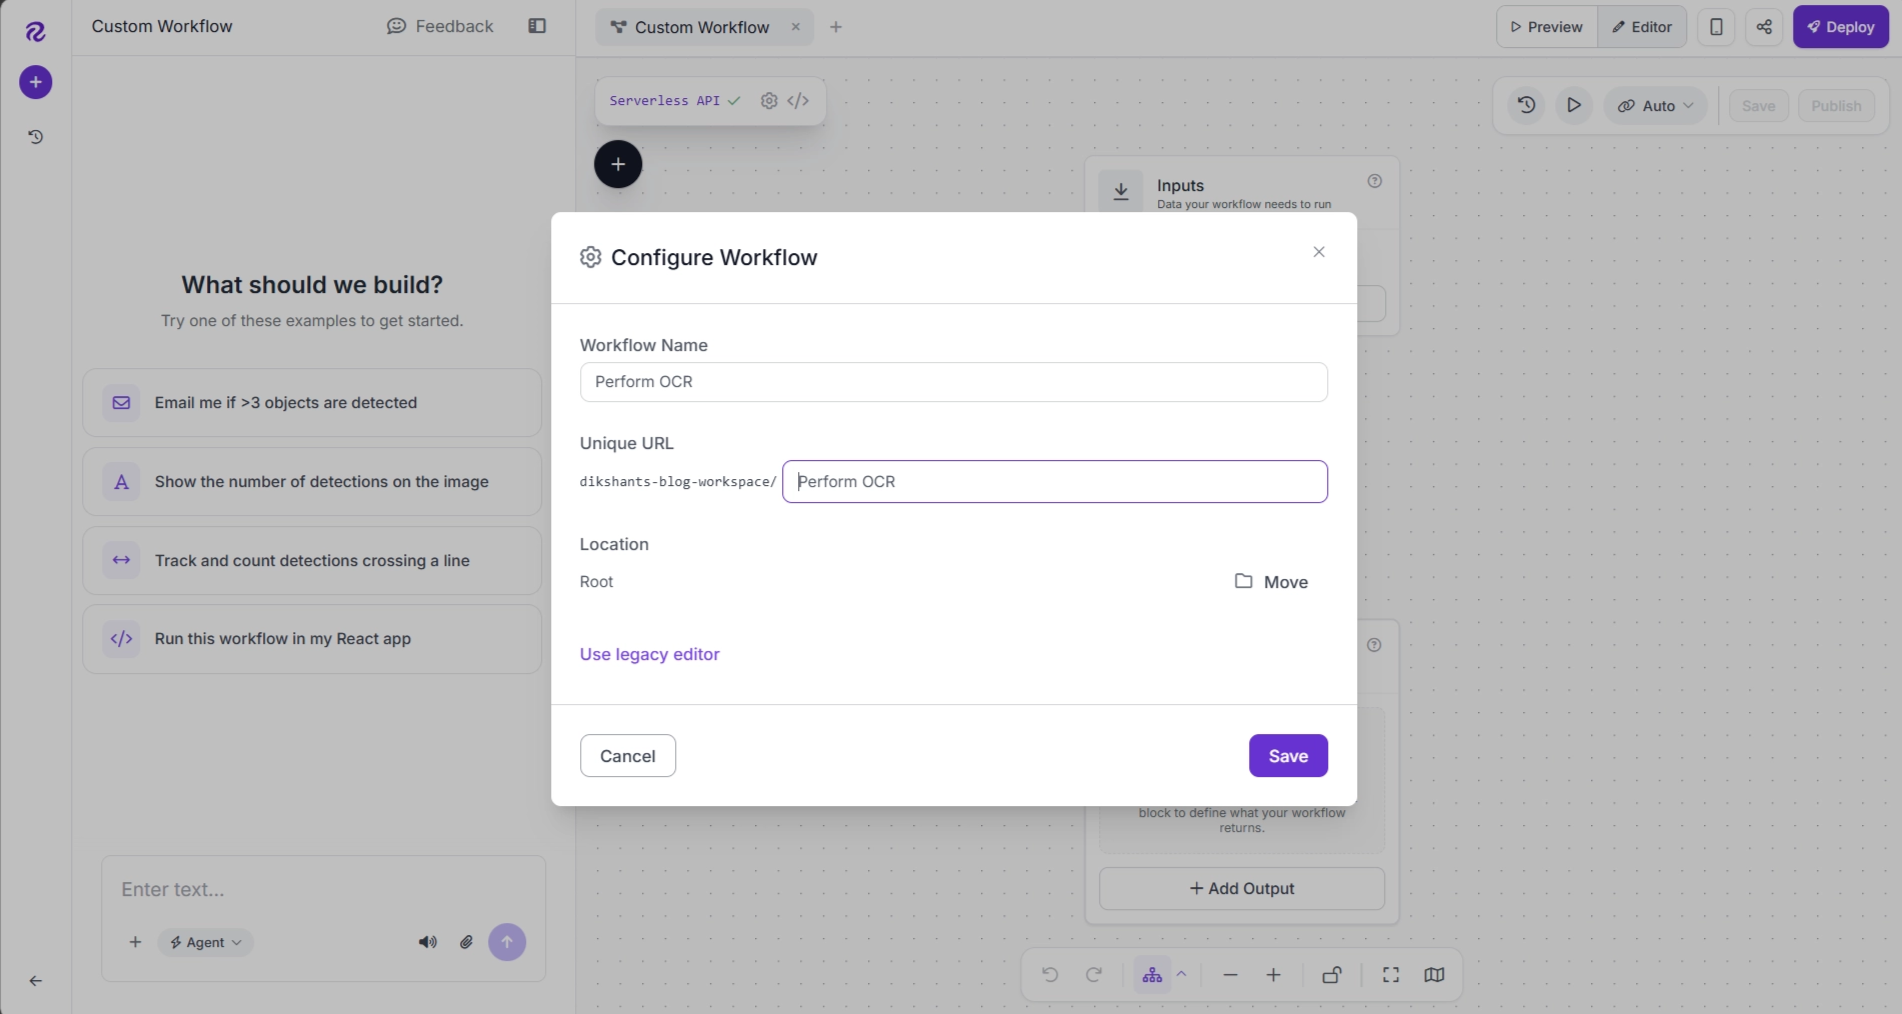
For this tutorial, we'll build the workflow manually, so you can hide the Roboflow Agent panel. You can also rename your workflow by clicking the ⚙️ icon.
Step 2: Enhance Image Contrast
OCR models generally perform better on images with higher contrast because text is easier to distinguish from the background.
To add this capability to our workflow, add a Contrast Enhancement block. Click the + button in the upper left corner of the workflow editor, search for Contrast Enhancement, and insert the block into your workflow.
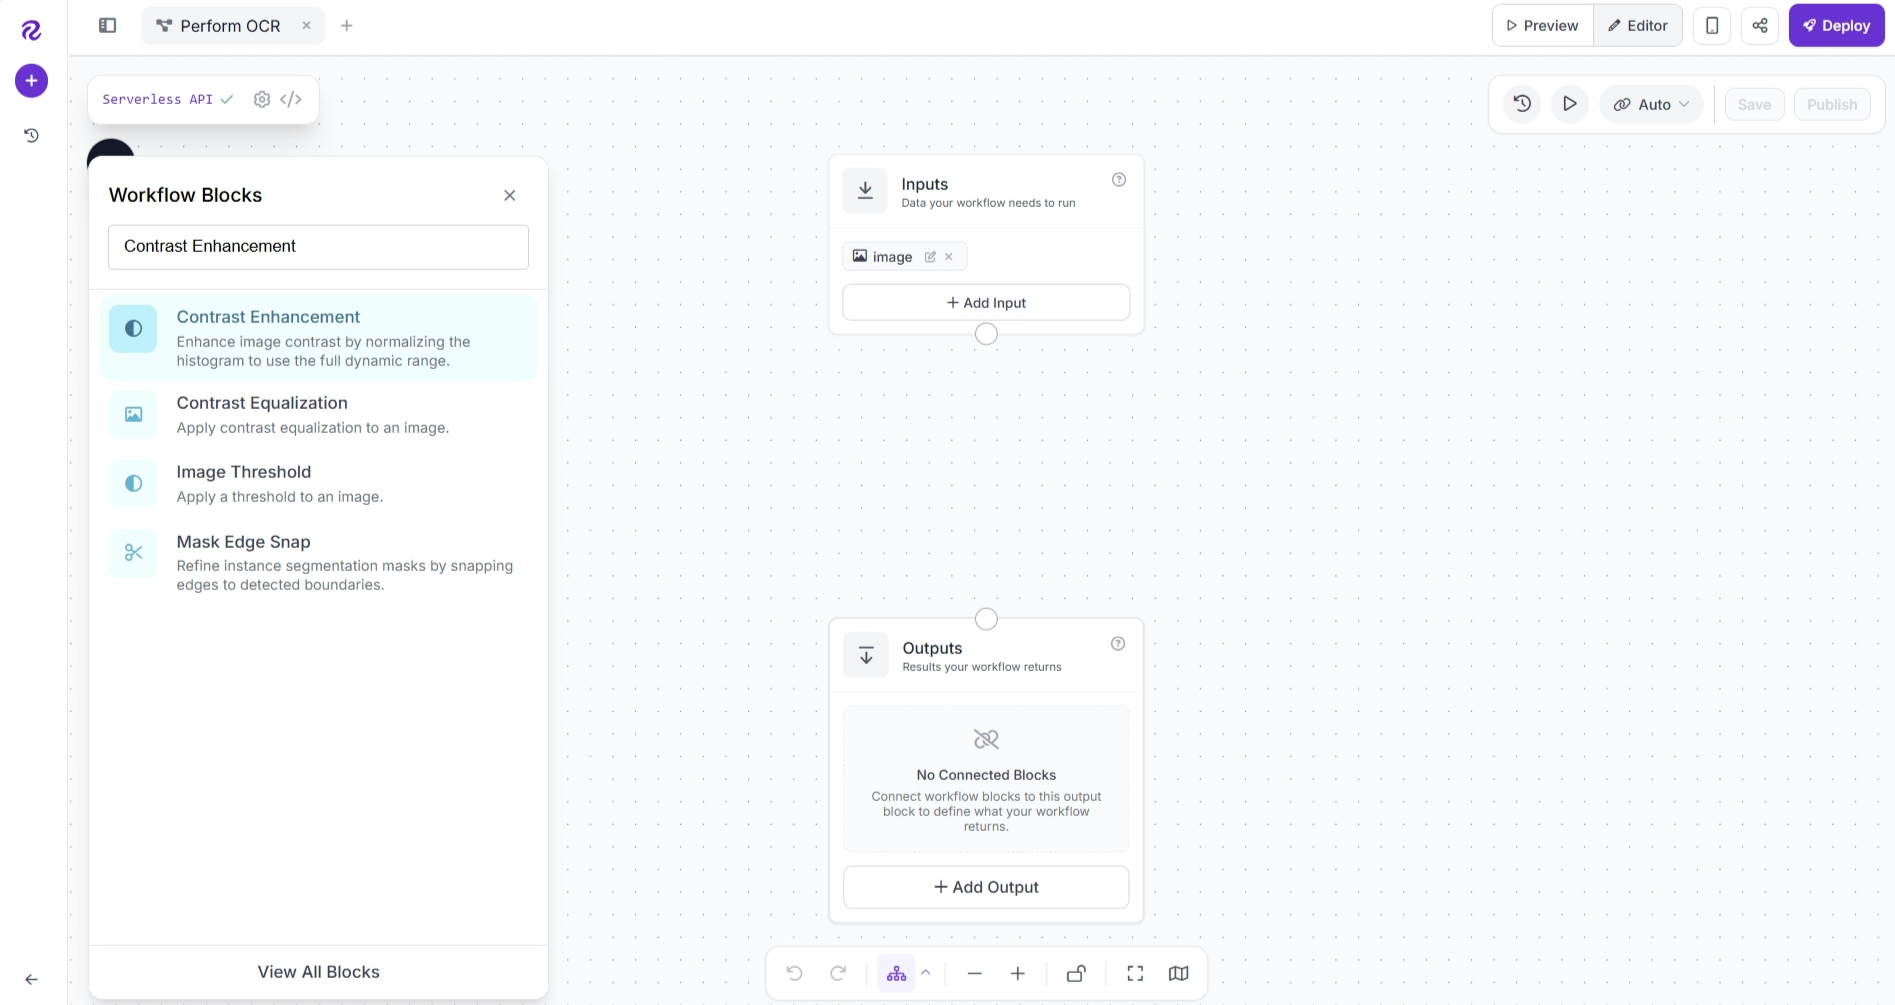
After adding the block, the workflow editor should automatically connect the blocks in the following order: Inputs → Contrast Enhancement → Outputs.
If these connections are not created automatically, connect the blocks manually, as shown below.
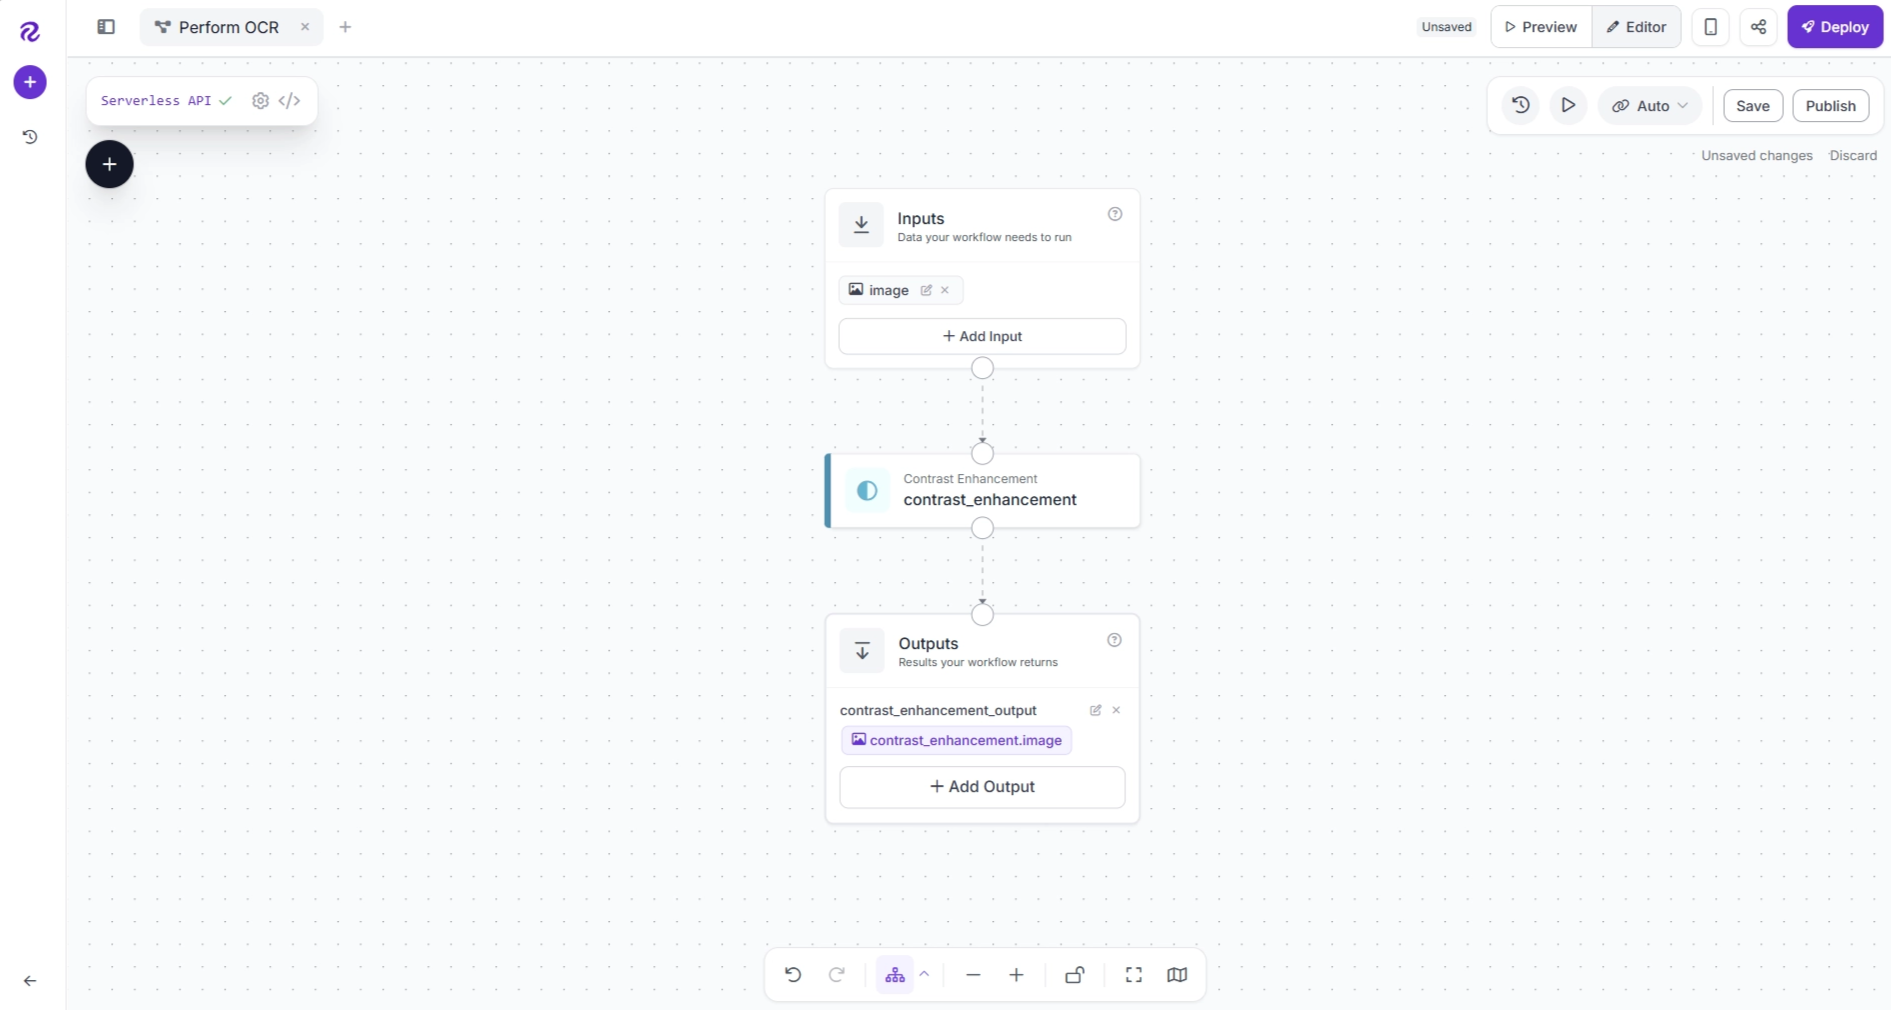
Connections pass outputs from one block to another, allowing downstream blocks to use the results produced by upstream blocks.
If the connections make your workflow cluttered, click Auto Layout (located beside the zoom controls) to automatically arrange the blocks into a cleaner layout.
Next, configure the Contrast Enhancement block as shown below.
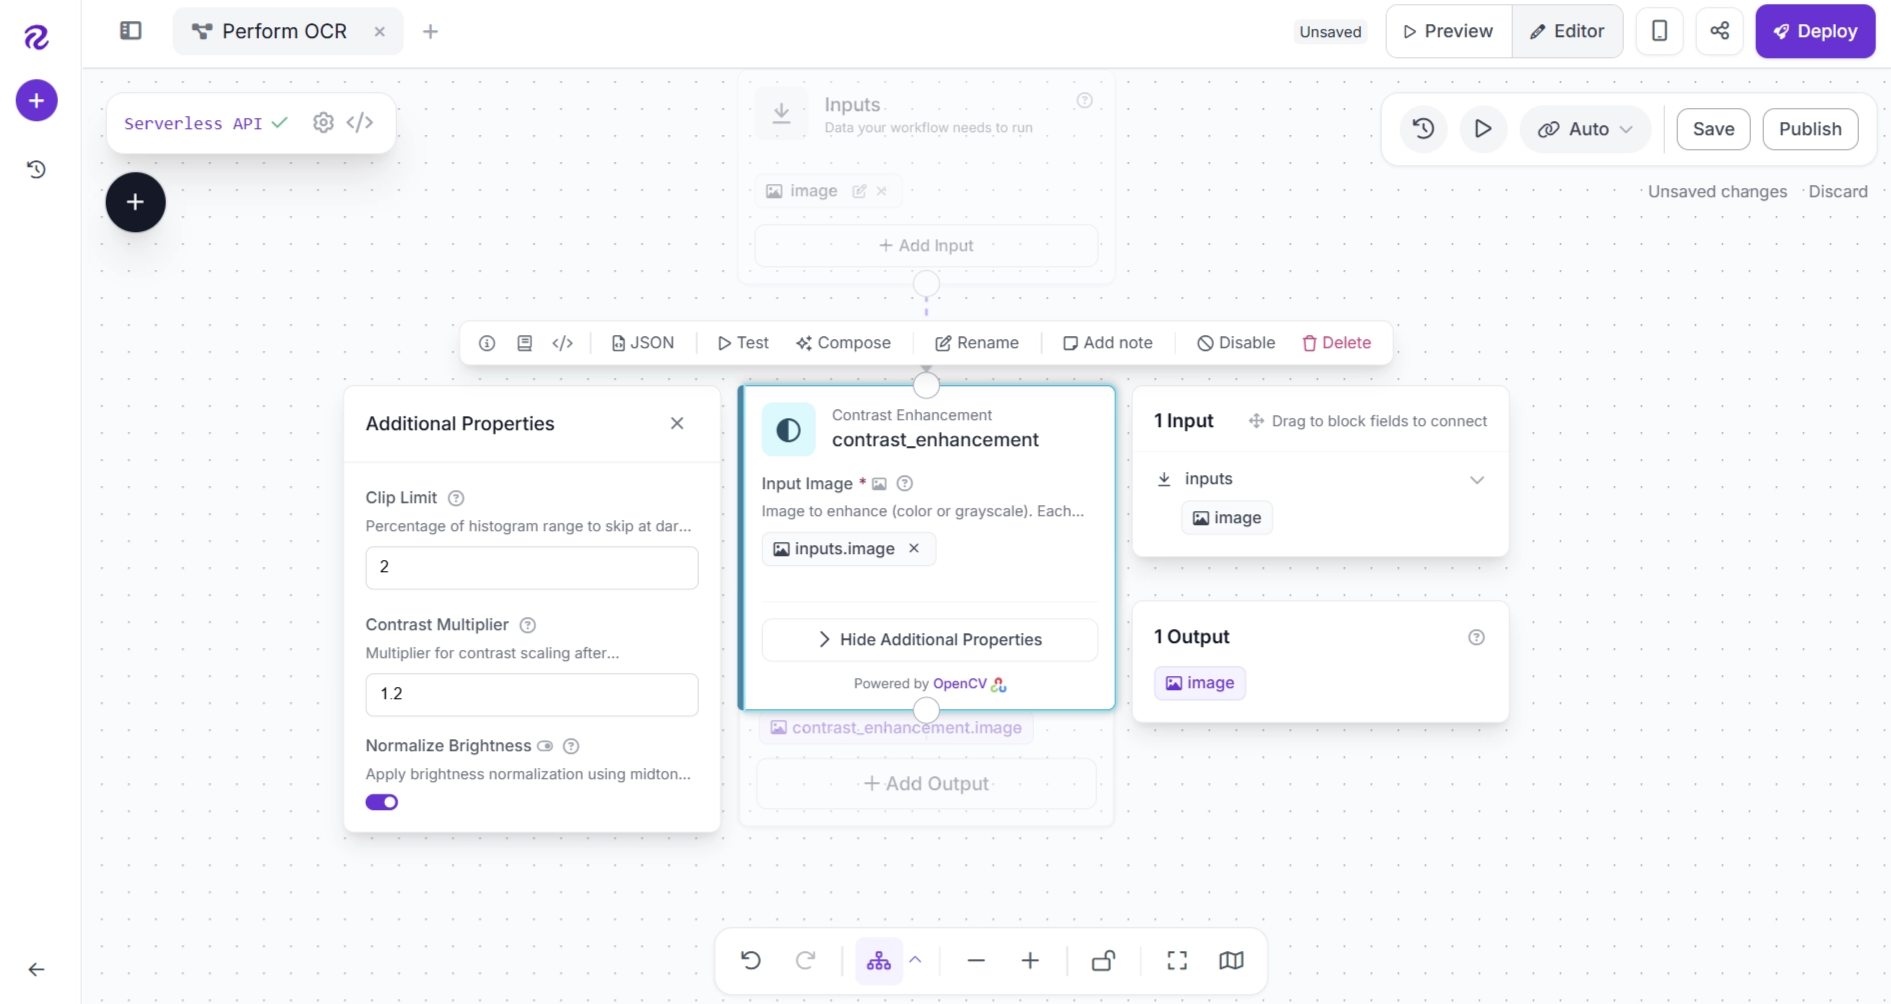
One advantage of Roboflow Workflows is that you can run your workflow after adding each block. This lets you inspect intermediate outputs and verify that each step is working as expected before moving on.
The video above demonstrates how contrast enhancement improves the readability of a scanned billing statement by making the text clearer and easier for the OCR model to recognize.
Contrast Enhancement serves as the preprocessing step in this workflow. You can also add additional preprocessing blocks, such as Perspective Correction, Morphological Operations, Resizing, and Normalization, among others.
These blocks can be chained together to progressively improve the input image before it is passed to the OCR model.
Step 3: Add an OCR Model
Next, add the OCR model that will extract text from the enhanced image. In this guide, we'll use EasyOCR. Click the + button, search for EasyOCR, and add the block to your workflow.
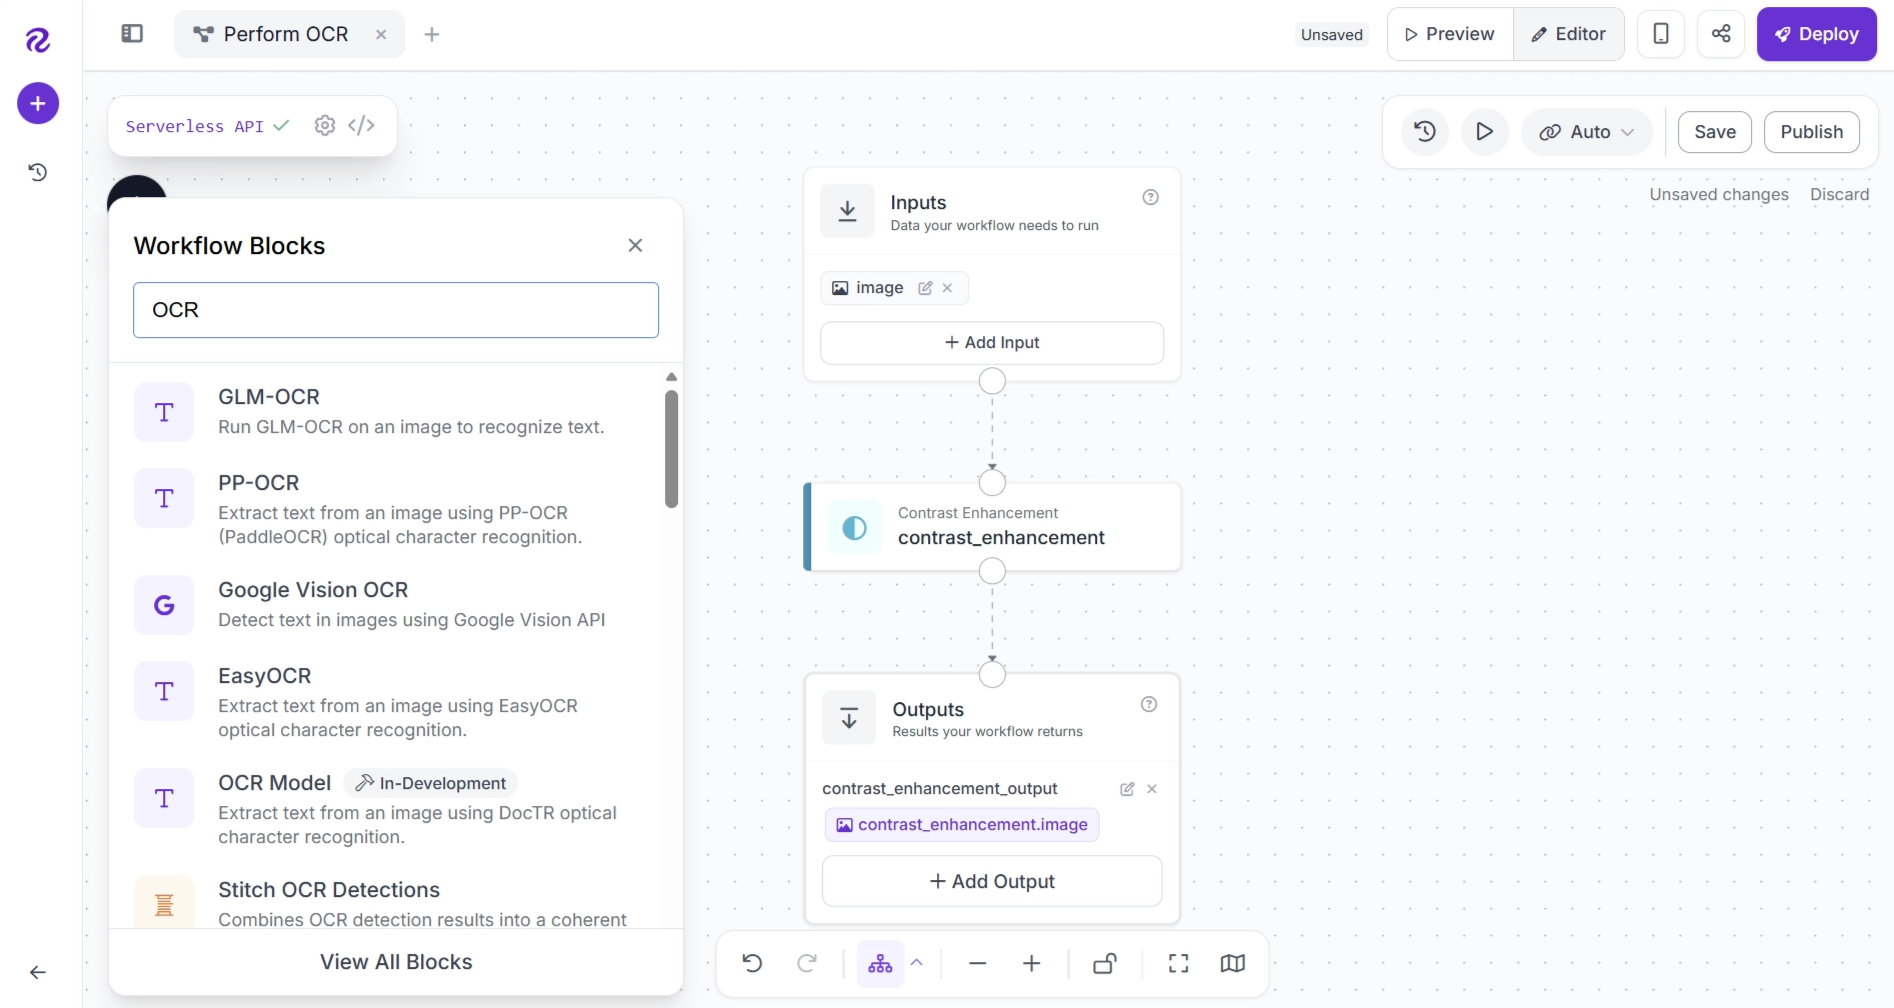
After adding the block, make sure your workflow is connected as follows: Contrast Enhancement → EasyOCR → Outputs. This ensures that the contrast-enhanced image is passed to the EasyOCR block for text recognition. Remove any unnecessary connections.
Connecting the EasyOCR block to the Outputs block automatically exposes all of its outputs, allowing you to inspect the OCR results each time you run the workflow.
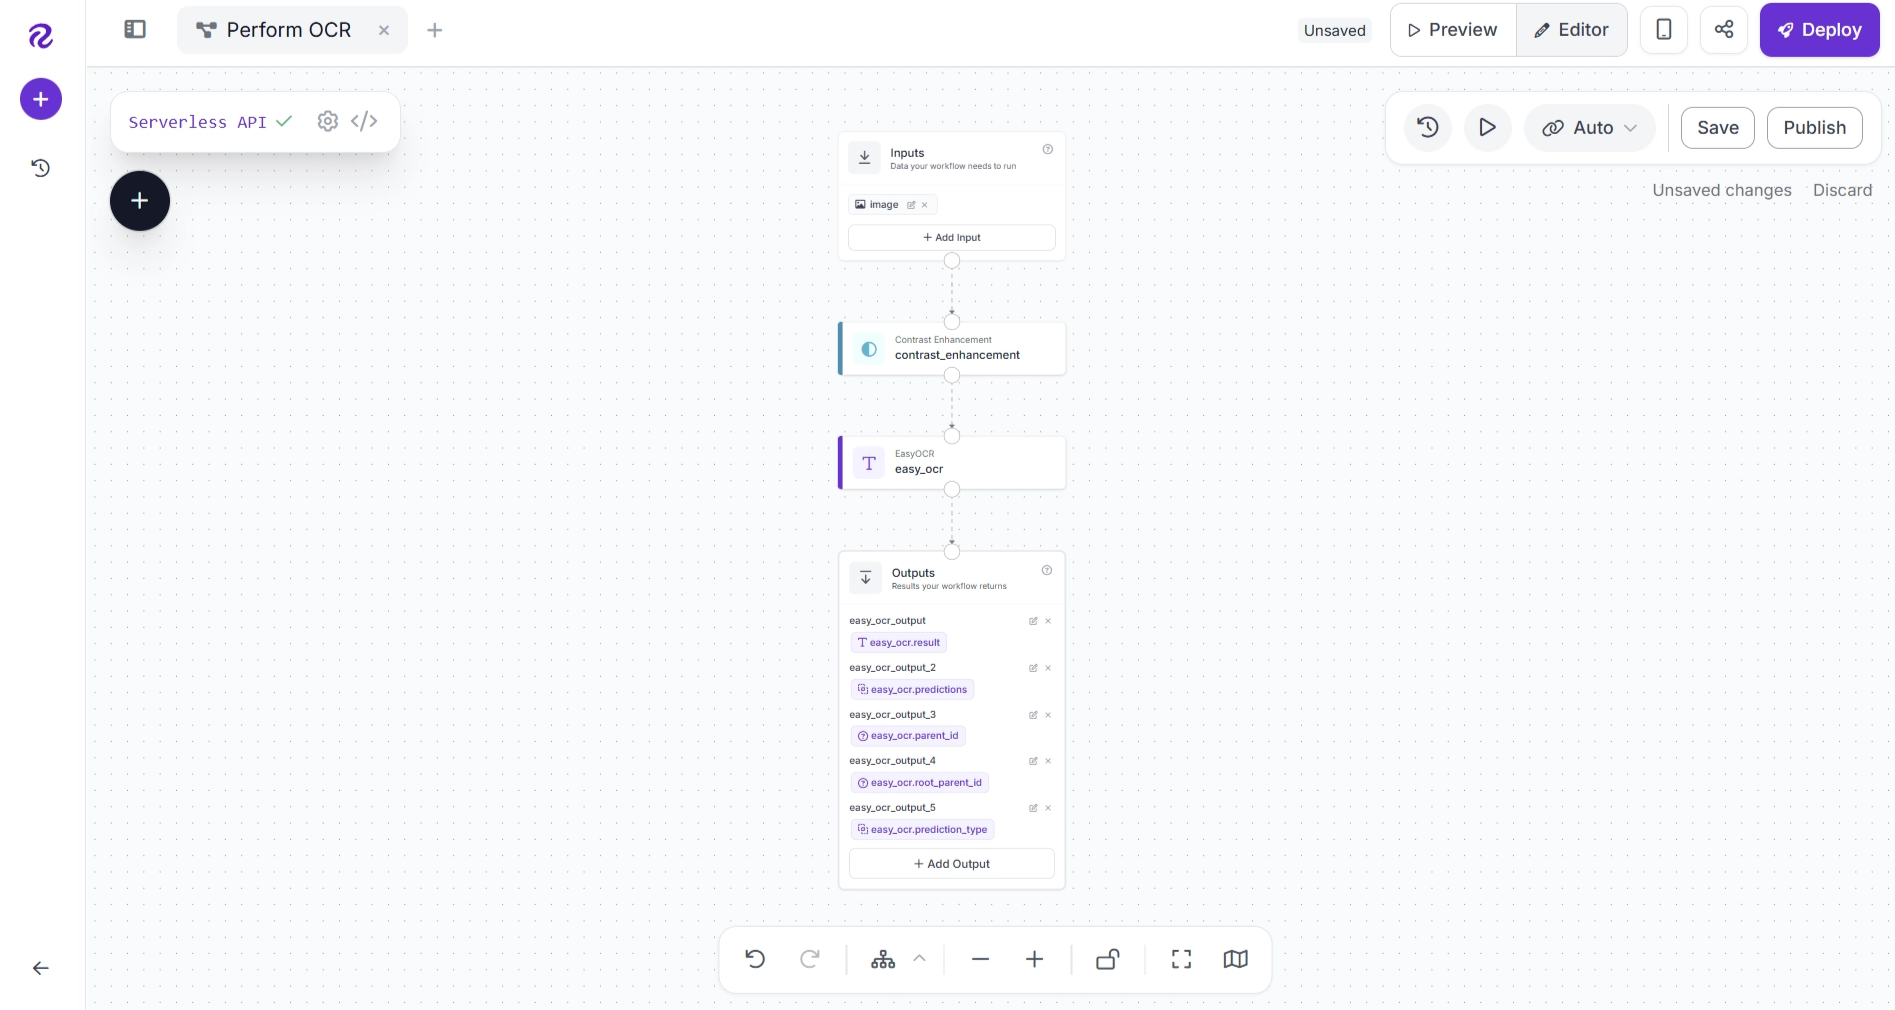
Next, configure the EasyOCR block as shown below.
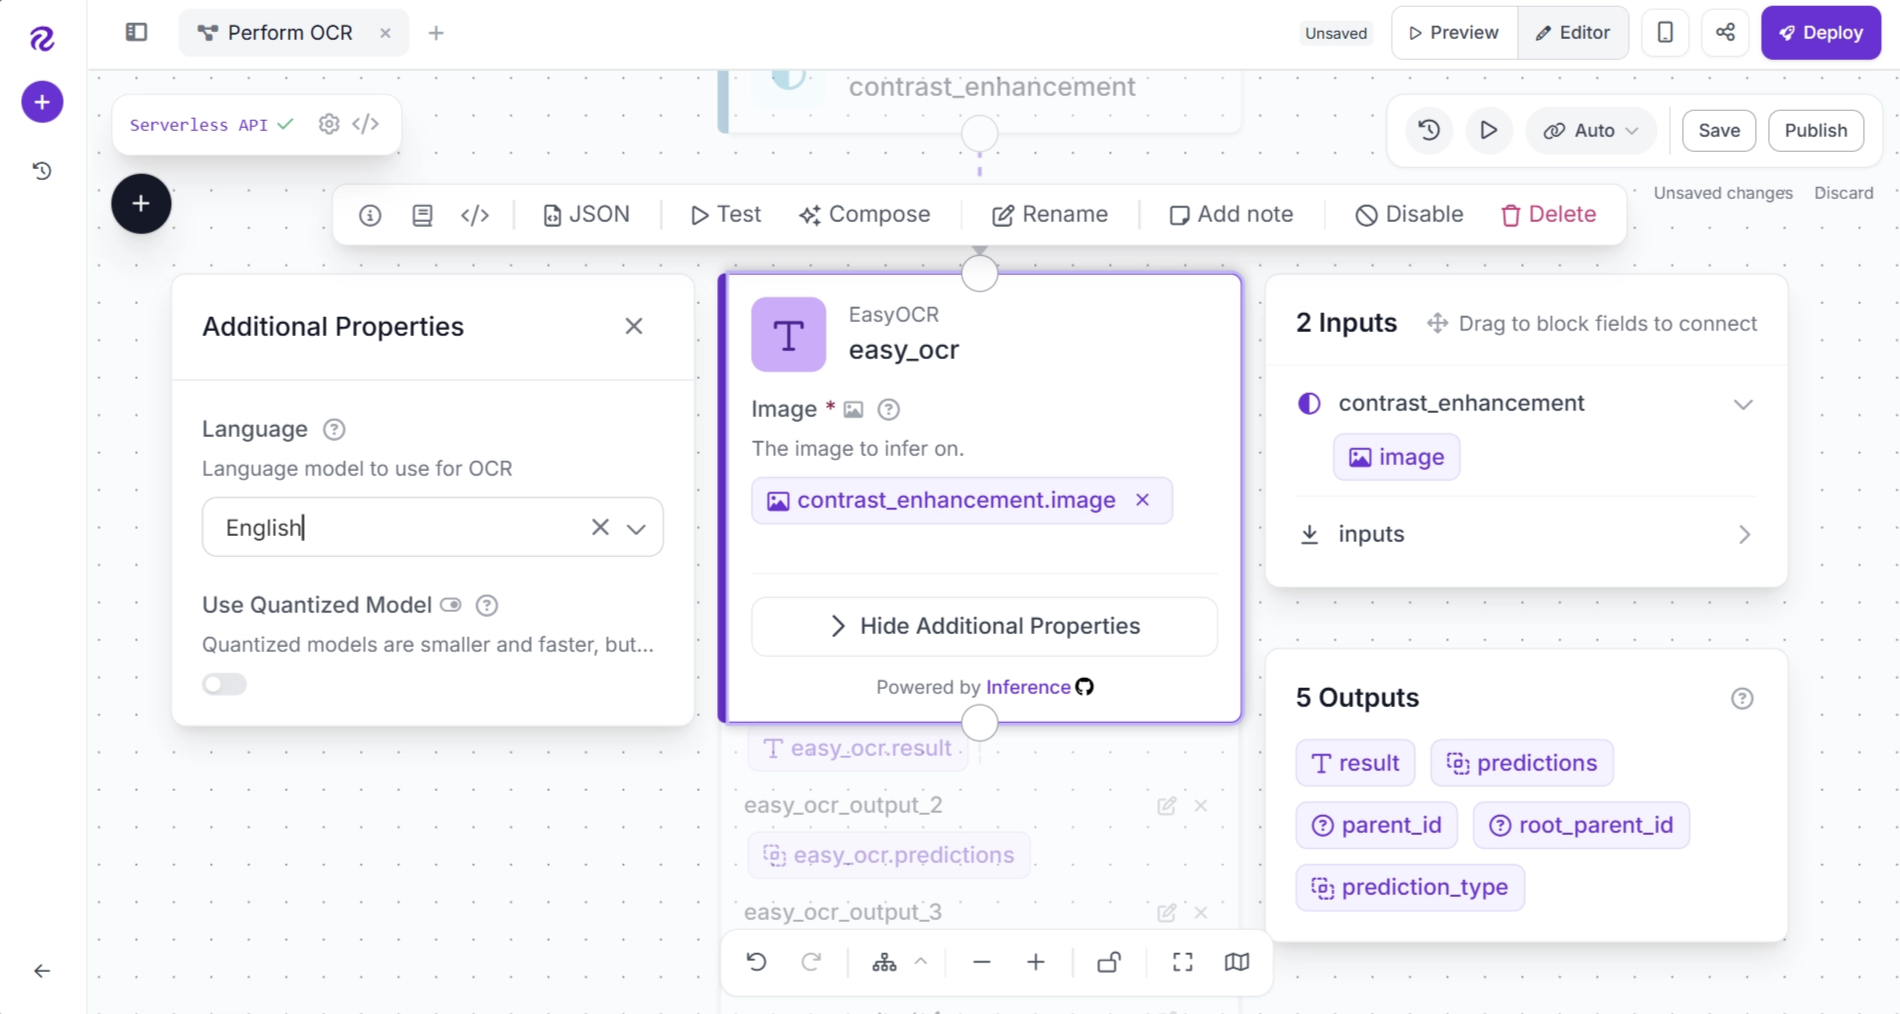
You can now run the workflow on the billing statement to verify that the OCR model is correctly detecting and extracting text from the enhanced image.
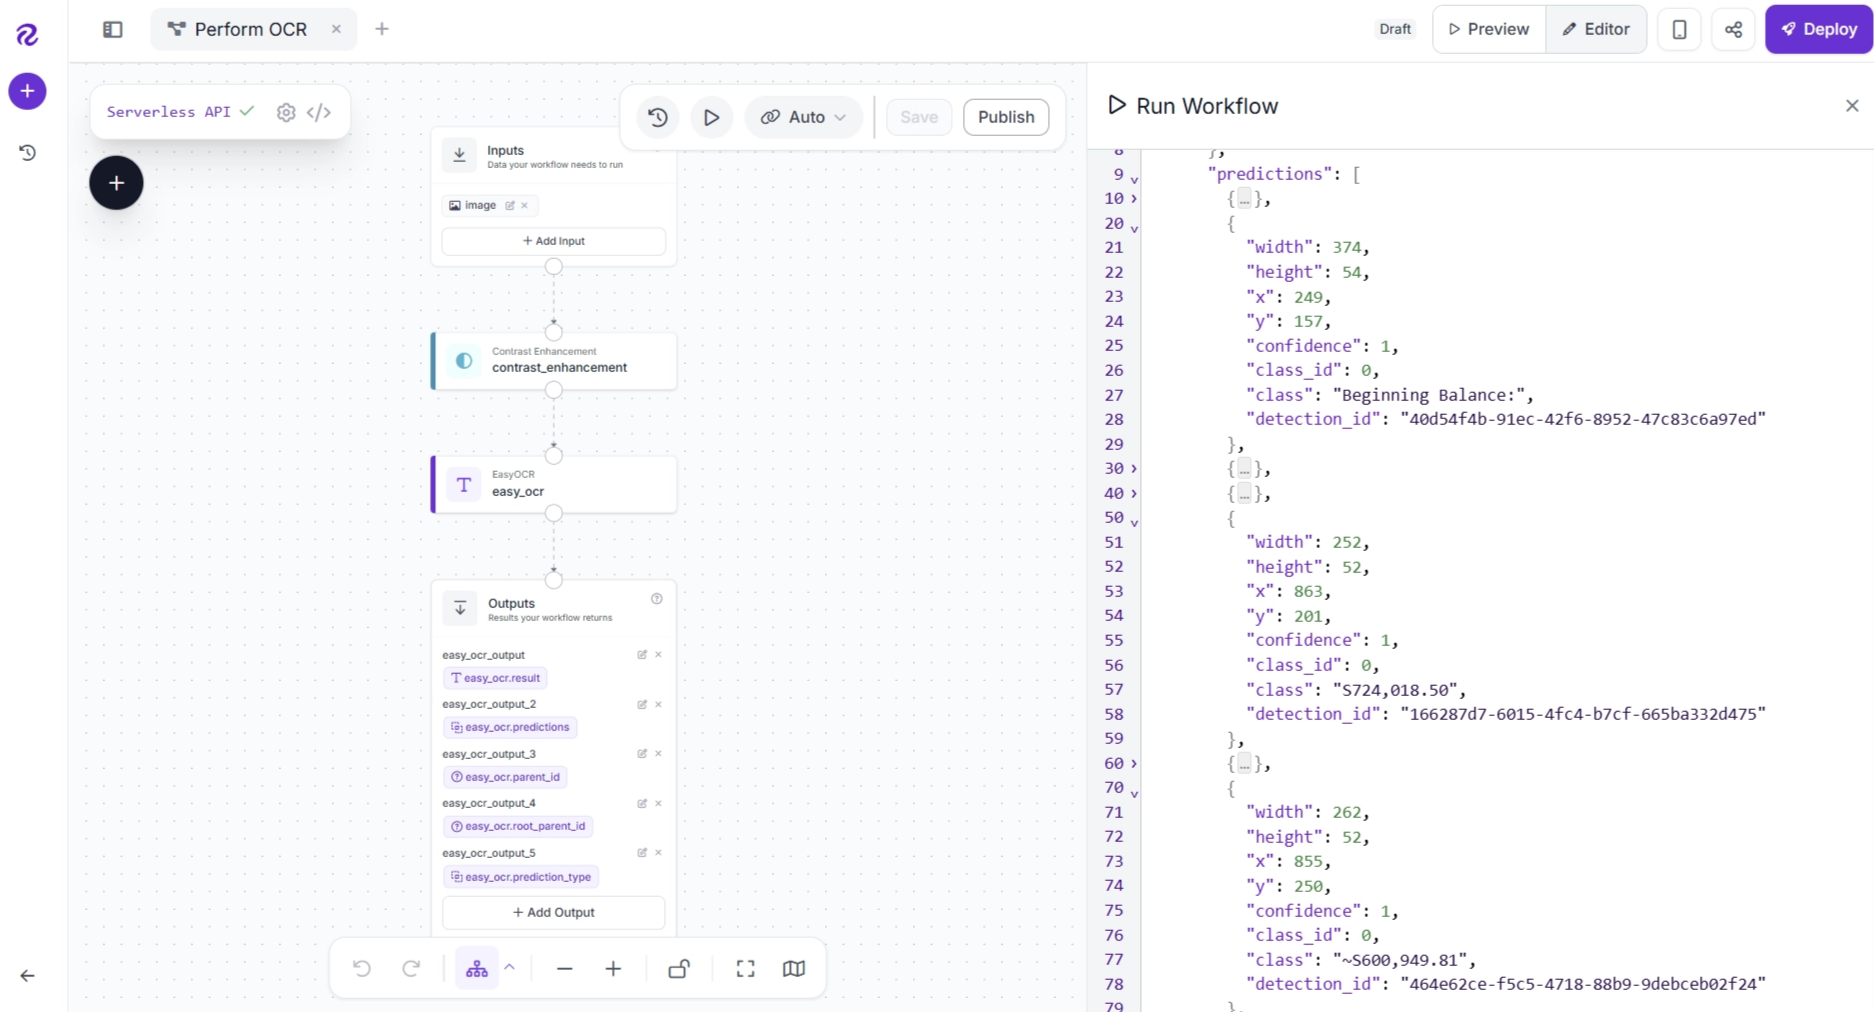
EasyOCR first detects text regions in the image and then extracts the text from each detected region within a single pipeline.
Step 4: Extract OCR Predictions for Postprocessing
The EasyOCR block outputs a list of extracted text along with the corresponding bounding boxes for each text region, as well as a single string containing all text detected in the image.
Although EasyOCR accurately recognizes most of the text in the example billing statement, some recognition errors remain. For example:
- ‘$’ is recognized as ‘S’
- ‘-’ negation is recognized as ‘~’
Rather than replacing the OCR model, we can correct these errors using postprocessing. To begin the correction process, we first need to extract the predicted text from the list of predictions generated by the EasyOCR output.
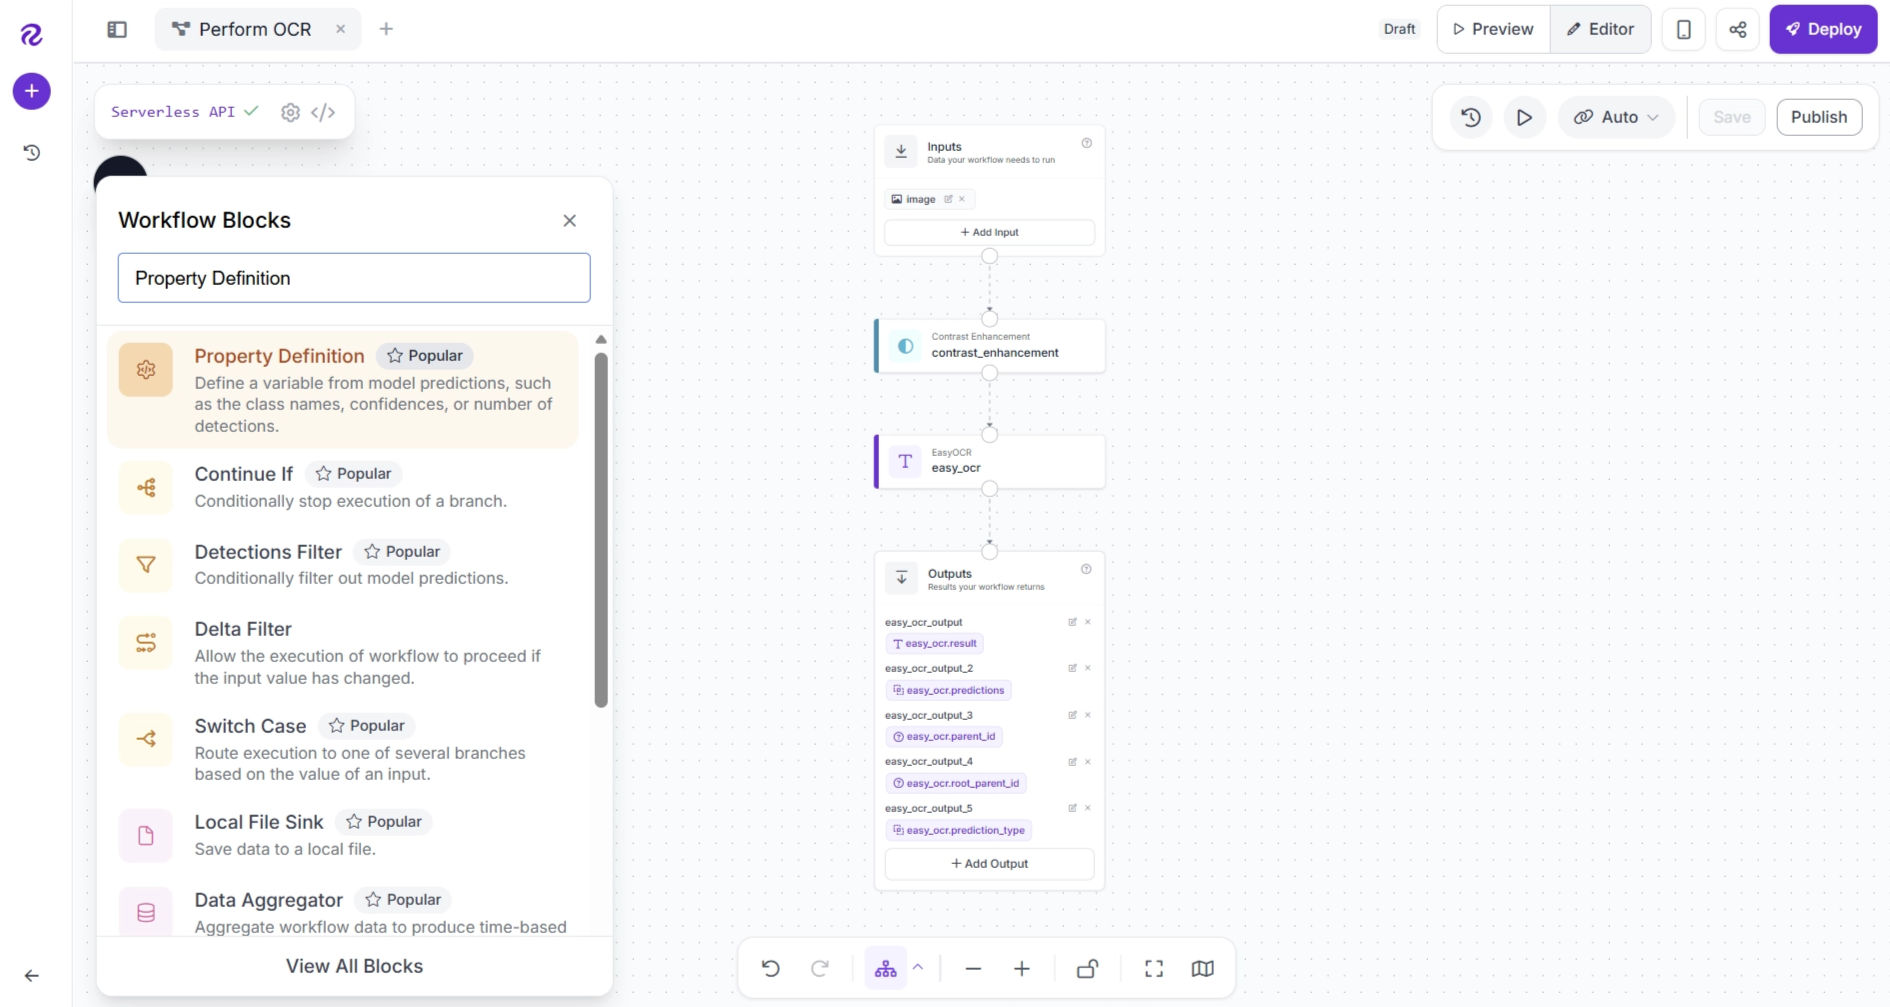
To do this, we use the Property Definition block. This block extracts specific properties or fields from workflow step outputs.
It can be used to extract class names, confidence scores, counts, coordinates, OCR text, metadata, and other properties from model predictions or workflow data for data transformation, property extraction, metadata access, and value extraction tasks.
Click the + button, search for Property Definition, and add the block to your workflow.
After adding the block, make sure your workflow is connected as follows: EasyOCR → Property Definition → Outputs. Remove any unnecessary connections.
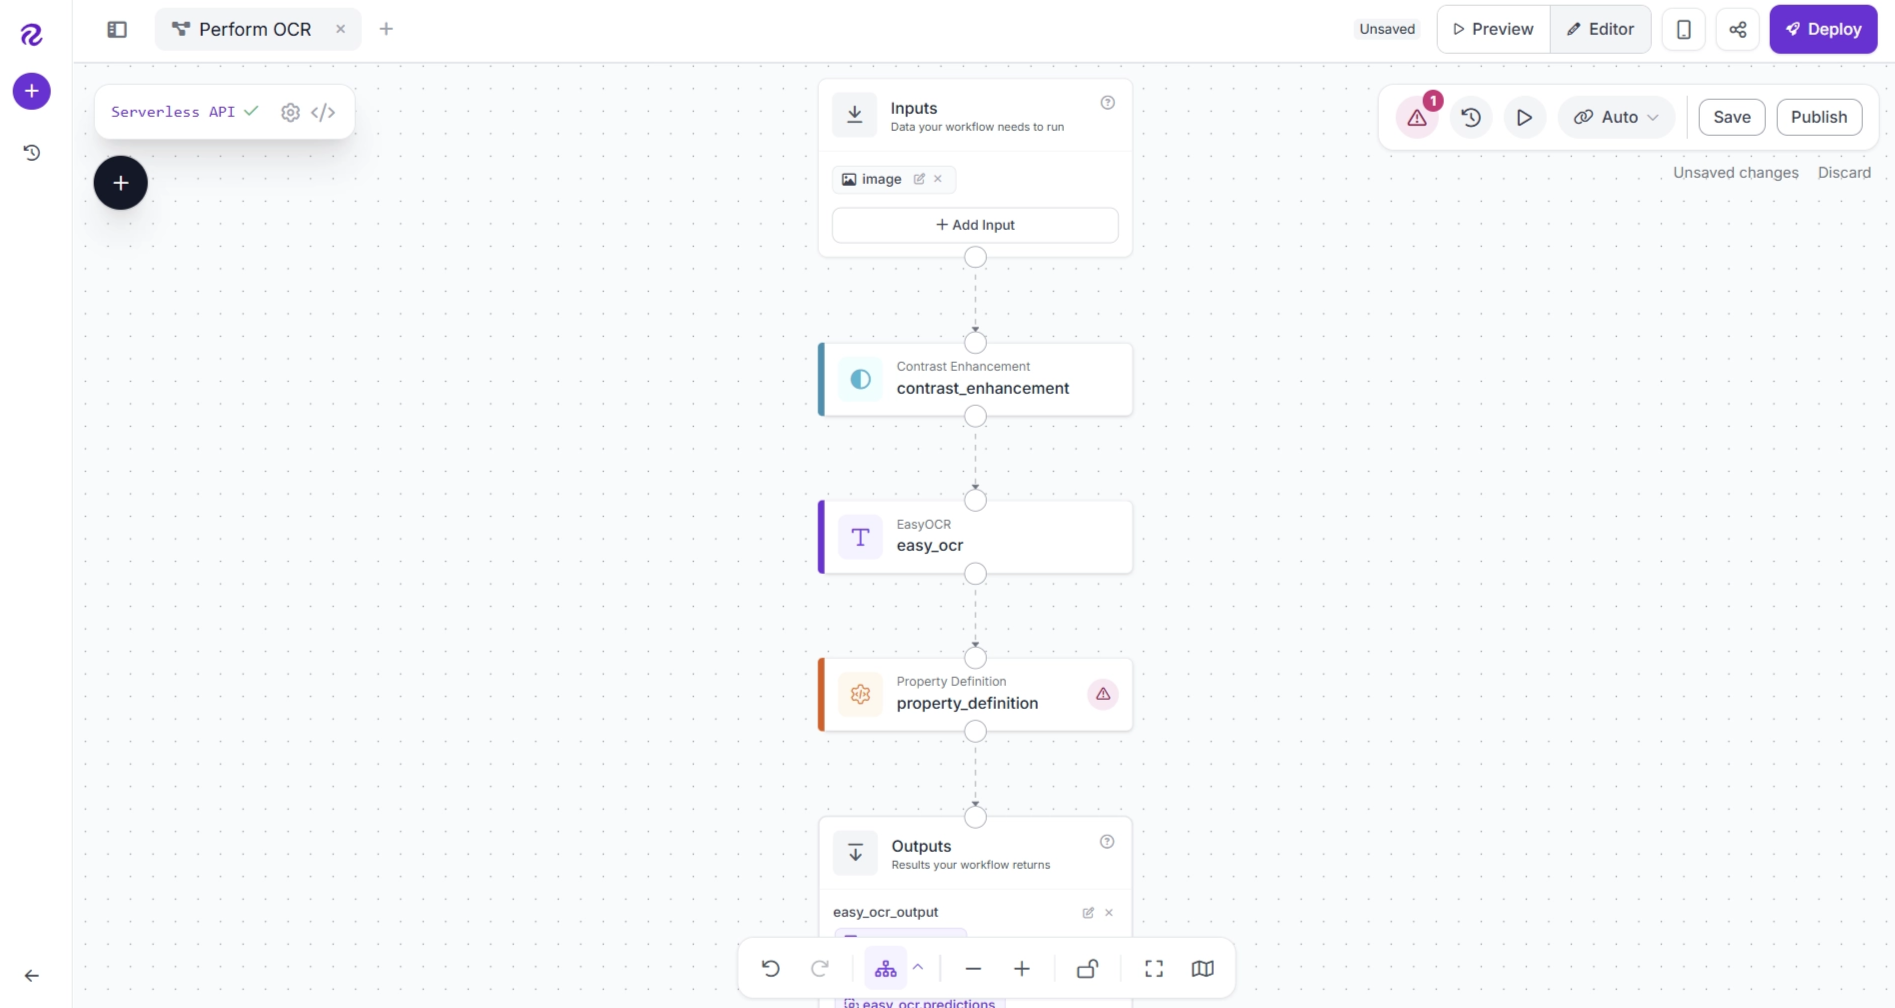
Next, configure the Property Definition block as shown below. For clarity, you can also rename the block to extract_ocr_class_names.
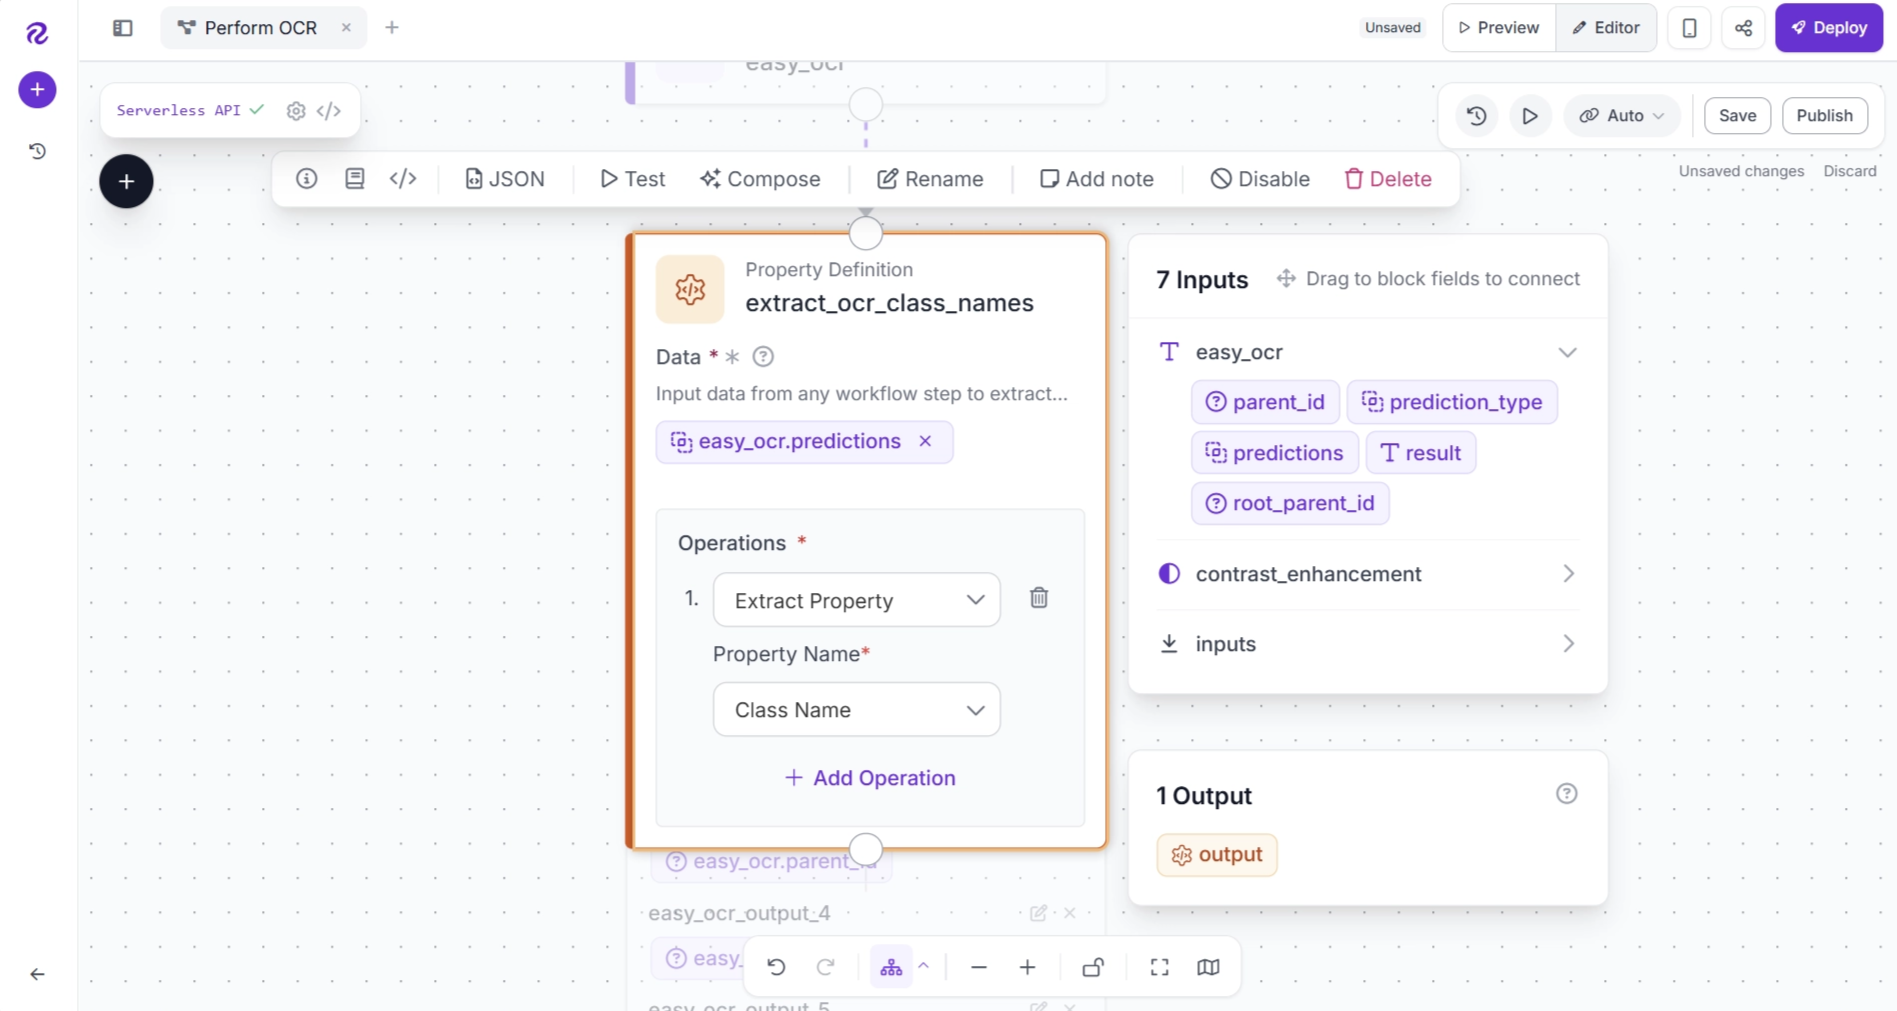
The configuration above extracts the class property from the OCR predictions, as this property contains the text recognized from each detected text region.
Step 5: Apply Postprocessing to Correct OCR Error
Next, we'll normalize the extracted OCR text predictions using a Custom Python Block. The Custom Python Block lets you execute Python code within a workflow. It accepts user-defined inputs and produces outputs that can be consumed by downstream blocks.
Click the + button, search for Custom Python Block, and add it to your workflow.
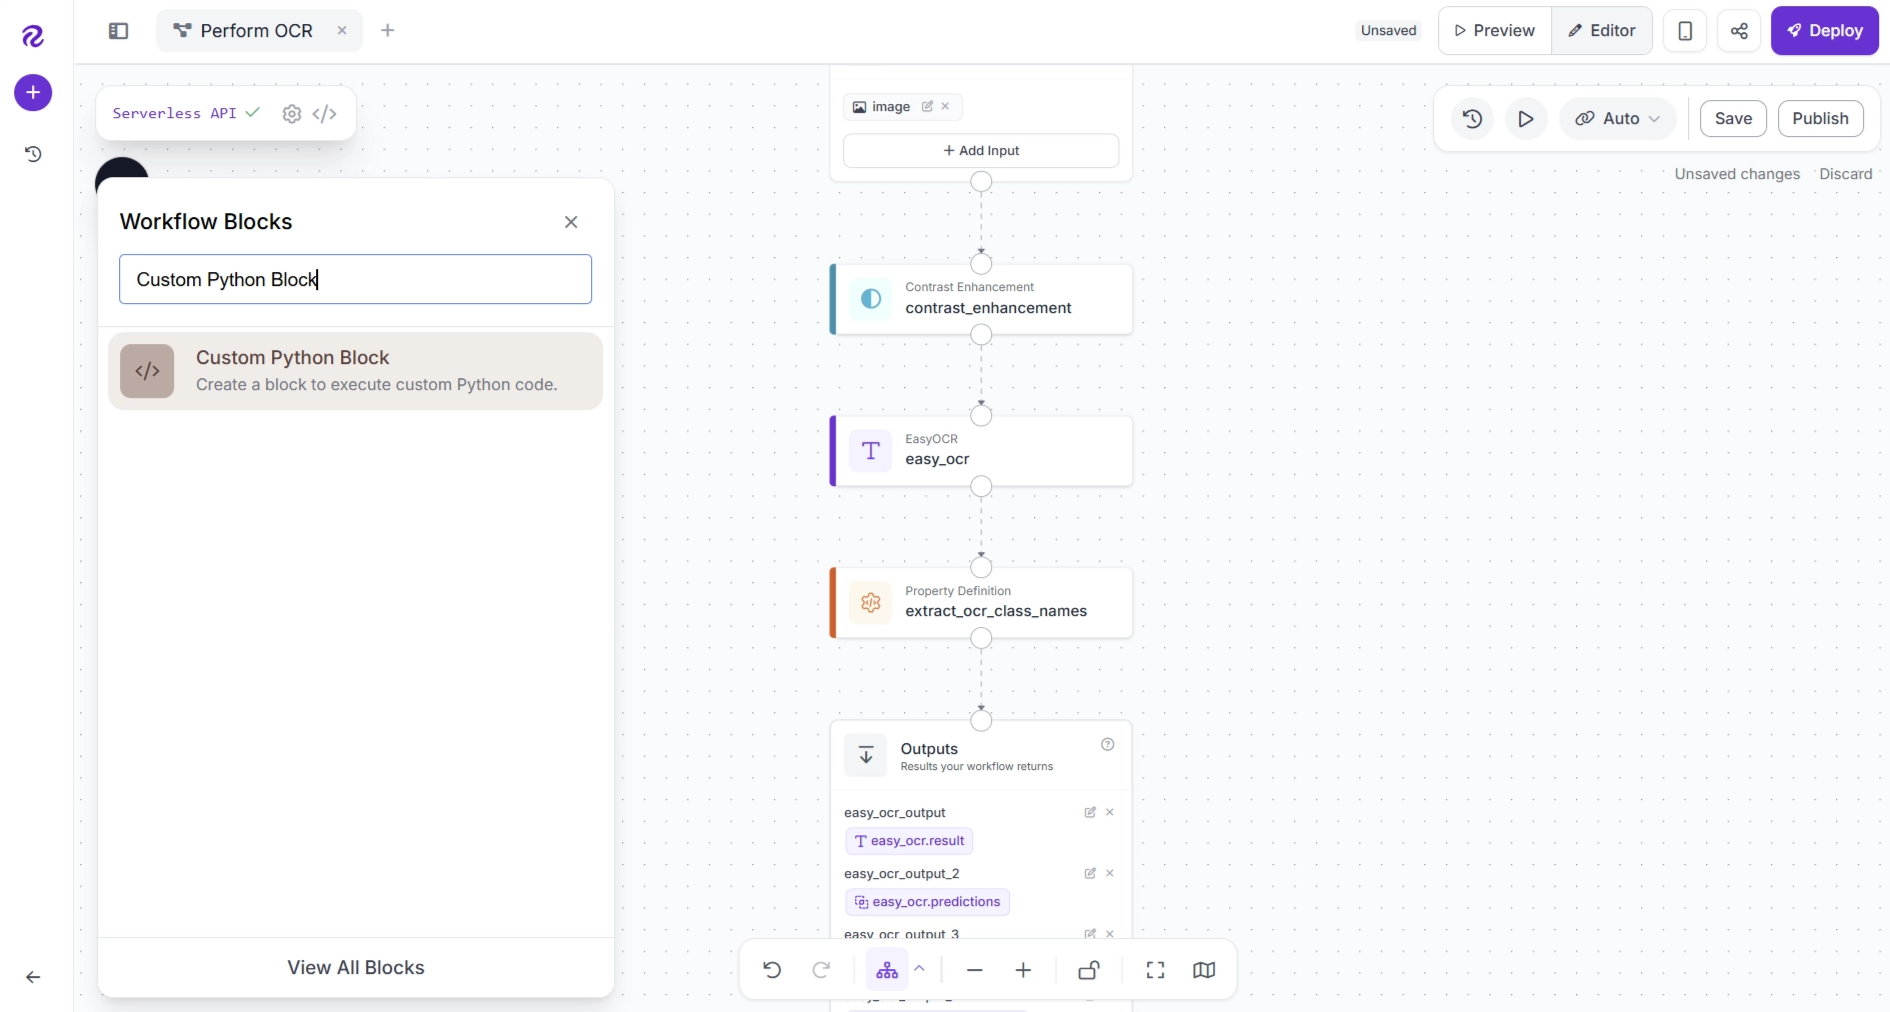
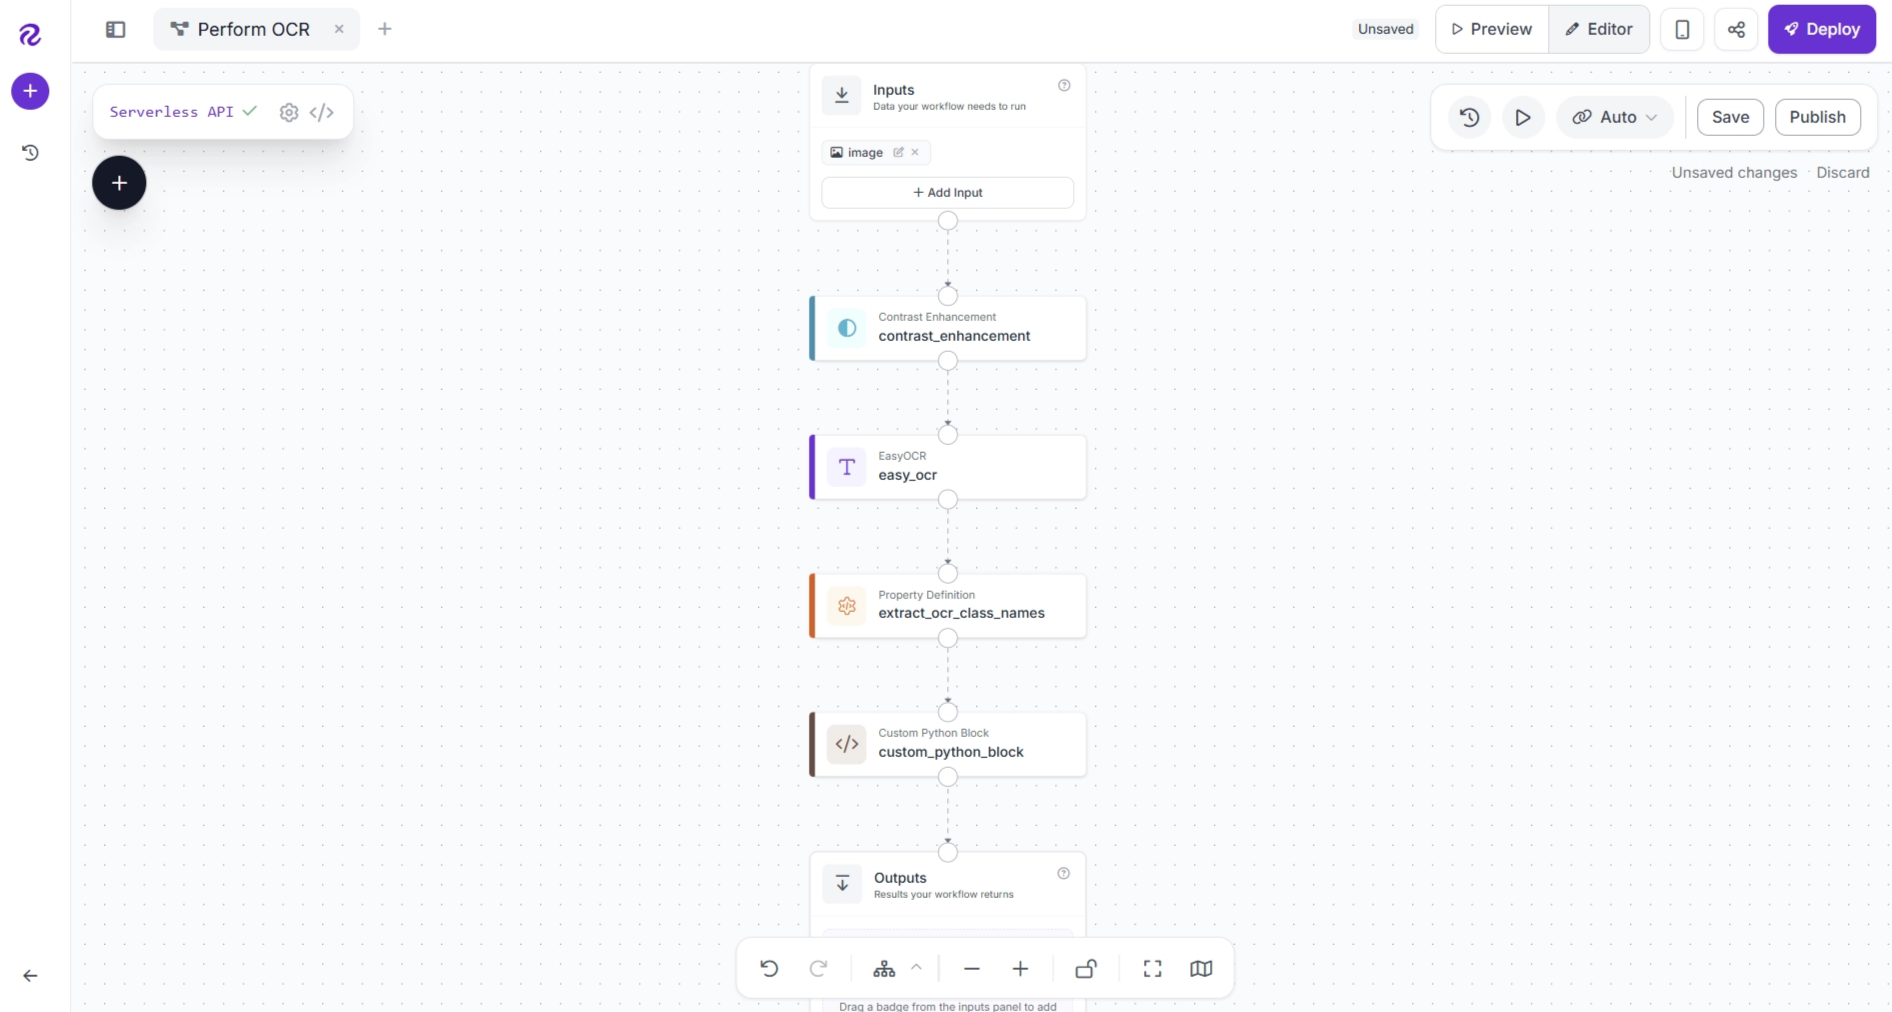
After adding the block, make sure the workflow is connected as follows: Property Definition (extract_ocr_class_names) → Custom Python Block → Outputs. Remove any unnecessary connections.
Now, select the block and click Edit Code.
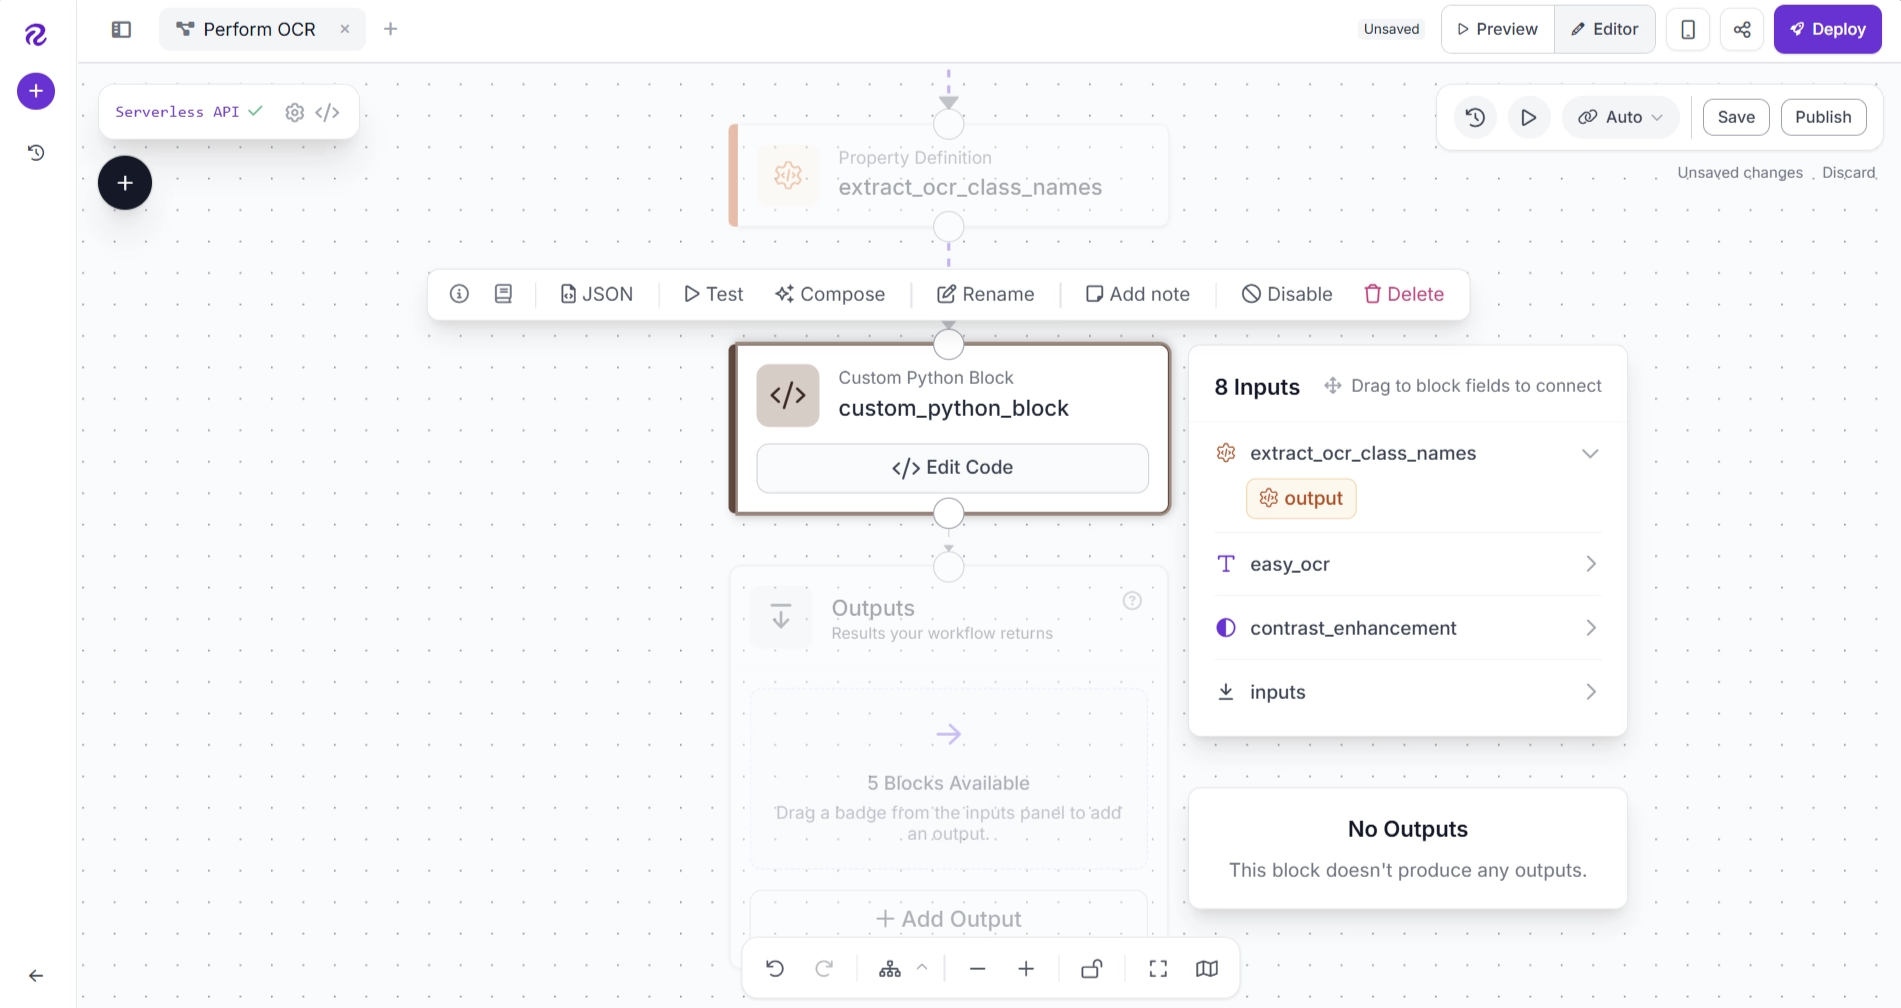
The configuration dialog shown below will appear. From here, you can define the block's name, description, input and output fields, and add the Python code that will process the incoming OCR predictions.
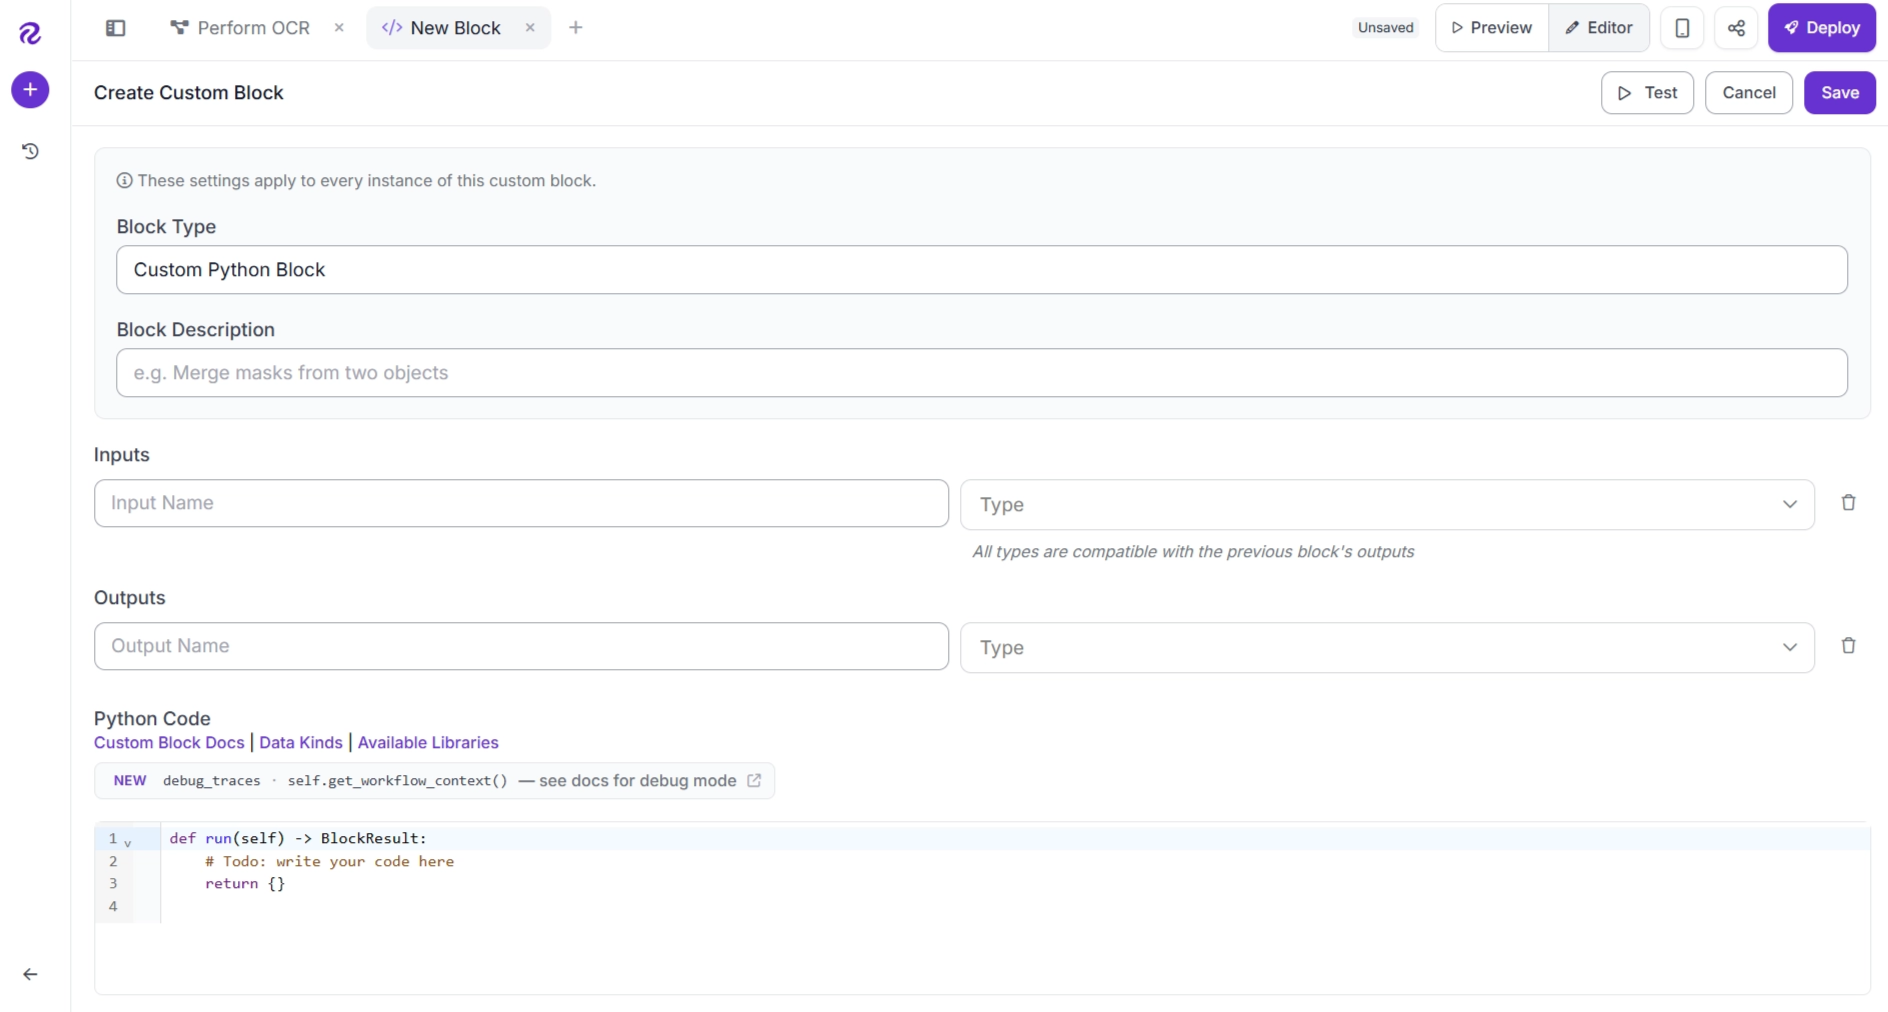
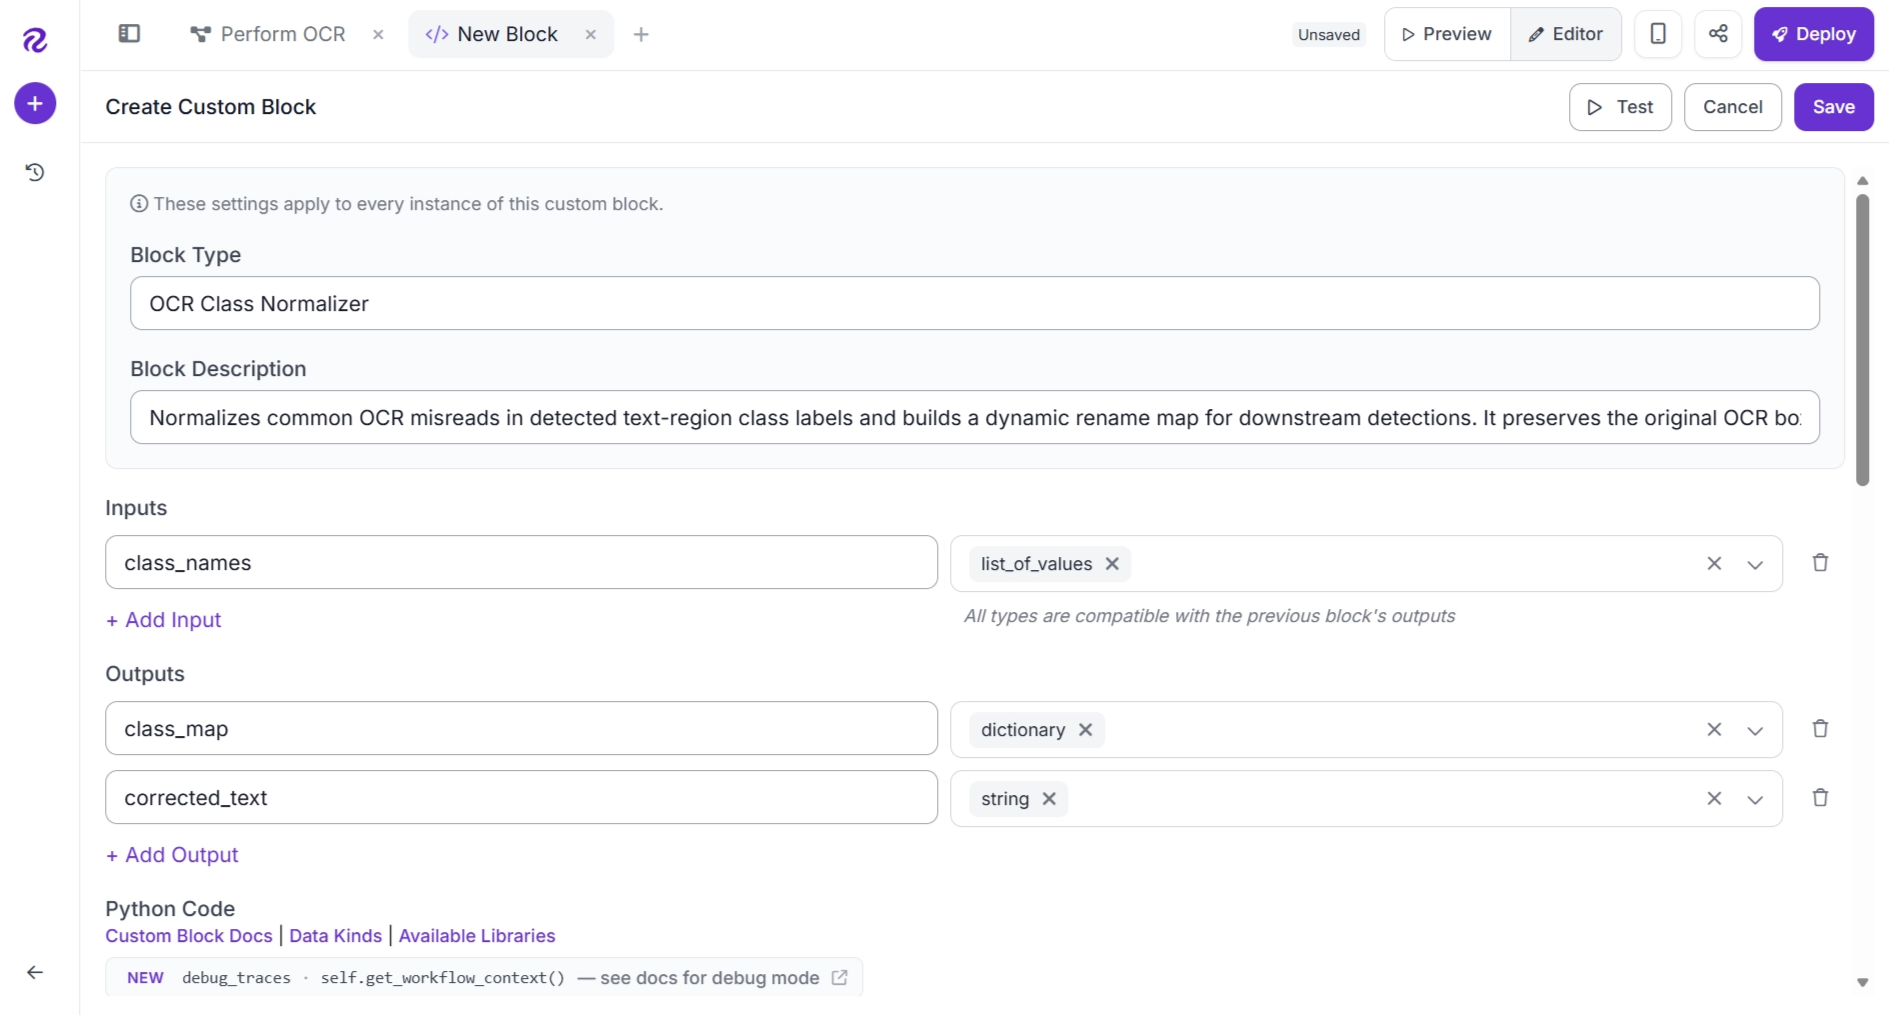
Configure the block using the settings shown below. Set Block Type to "OCR Class Normalizer" and Description to "Normalizes common OCR recognition errors."
Create one input named class_names with the type list_of_values. Then create two outputs:
- class_map with the type dictionary
- corrected_text with the type string
Paste the following Python code into the Python Code editor. The script applies a series of rule-based corrections to the OCR predictions. Specifically, it
- converts ‘~’ at the beginning of a number into ‘-’
- converts ‘o’ and ‘O’ into ‘0’ for numeric values
- replaces ‘S’ with ‘$’ when it appears before a number
- creates a dictionary (class_map) that maps each OCR-predicted text element to its corrected version
- combines the corrected text elements into a single corrected OCR string (corrected_text)
def run(self, class_names):
    def looks_numeric_or_currency(s):
        if s is None:
            return False
        value = str(s).strip()
        if not value:
            return False
        allowed = set("0123456789oO.,:$S-~() ")
        return any(ch.isdigit() for ch in value) and all(ch in allowed for ch in value)

    def fix_token(token):
        if token is None:
            return ""
        s = str(token)
        if not s:
            return s

        # Rule 1: a leading ~ means negative.
        if s.startswith("~"):
            s = "-" + s[1:]

        # Rule 2: o or O inside a numeric/currency-looking token means 0.
        # This runs before S -> $ so values like So.00 become S0.00, then $0.00.
        if looks_numeric_or_currency(s):
            s = "".join("0" if ch in ["o", "O"] else ch for ch in s)

        # Rule 3: S before a number means currency symbol.
        # Handles both S600 -> $600 and -S600 -> -$600.
        if len(s) >= 2 and s[0] == "S" and s[1].isdigit():
            s = "$" + s[1:]
        elif len(s) >= 3 and s[0] == "-" and s[1] == "S" and s[2].isdigit():
            s = "-$" + s[2:]
        return s

    def fix_text(text):
        if text is None:
            return ""
        return " ".join(fix_token(part) for part in str(text).split(" "))

    try:
        originals = list(class_names)
    except Exception:
        originals = []

    mapping = {}
    corrected = []
    for item in originals:
        original = "" if item is None else str(item)
        fixed = fix_text(original)
        mapping[original] = fixed
        corrected.append(fixed)

    return {"class_map": mapping, "corrected_text": "\n".join(corrected)}
Finally, configure the block so that the class_names input receives the list of classes (predicted OCR texts) output from the Property Definition (extract_ocr_class_names) block, as shown below.
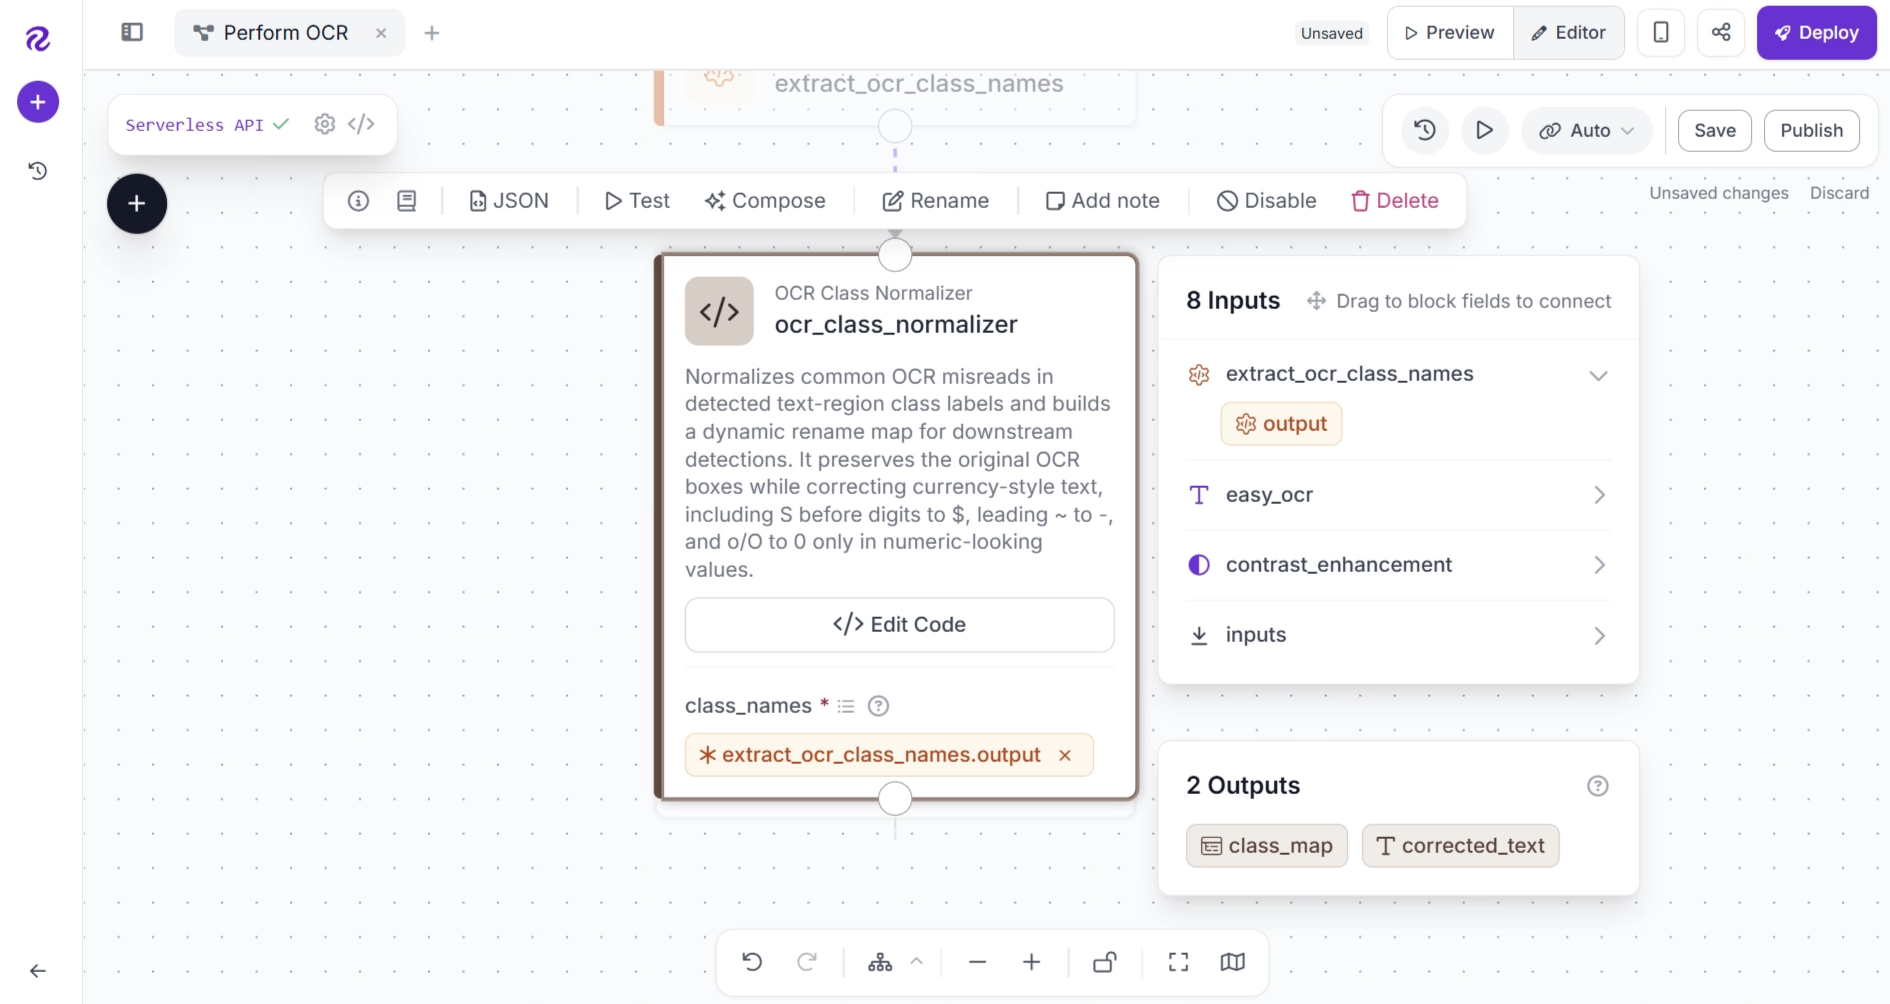
When the block runs, the class_map output from the block contains a dictionary that maps each OCR text prediction to its corrected version. Specifically:
- each key represents the original OCR prediction text
- each value represents the corrected OCR prediction text
While the corrected_text output is a string created by combining the list of corrected OCR text predictions.
Step 6: Update OCR Predictions with Corrected Text
The previous step generated a class_map dictionary that maps each original OCR prediction to its corrected version. In this step, we will apply this mapping to the original EasyOCR predictions so that the detected text regions contain the corrected text values.
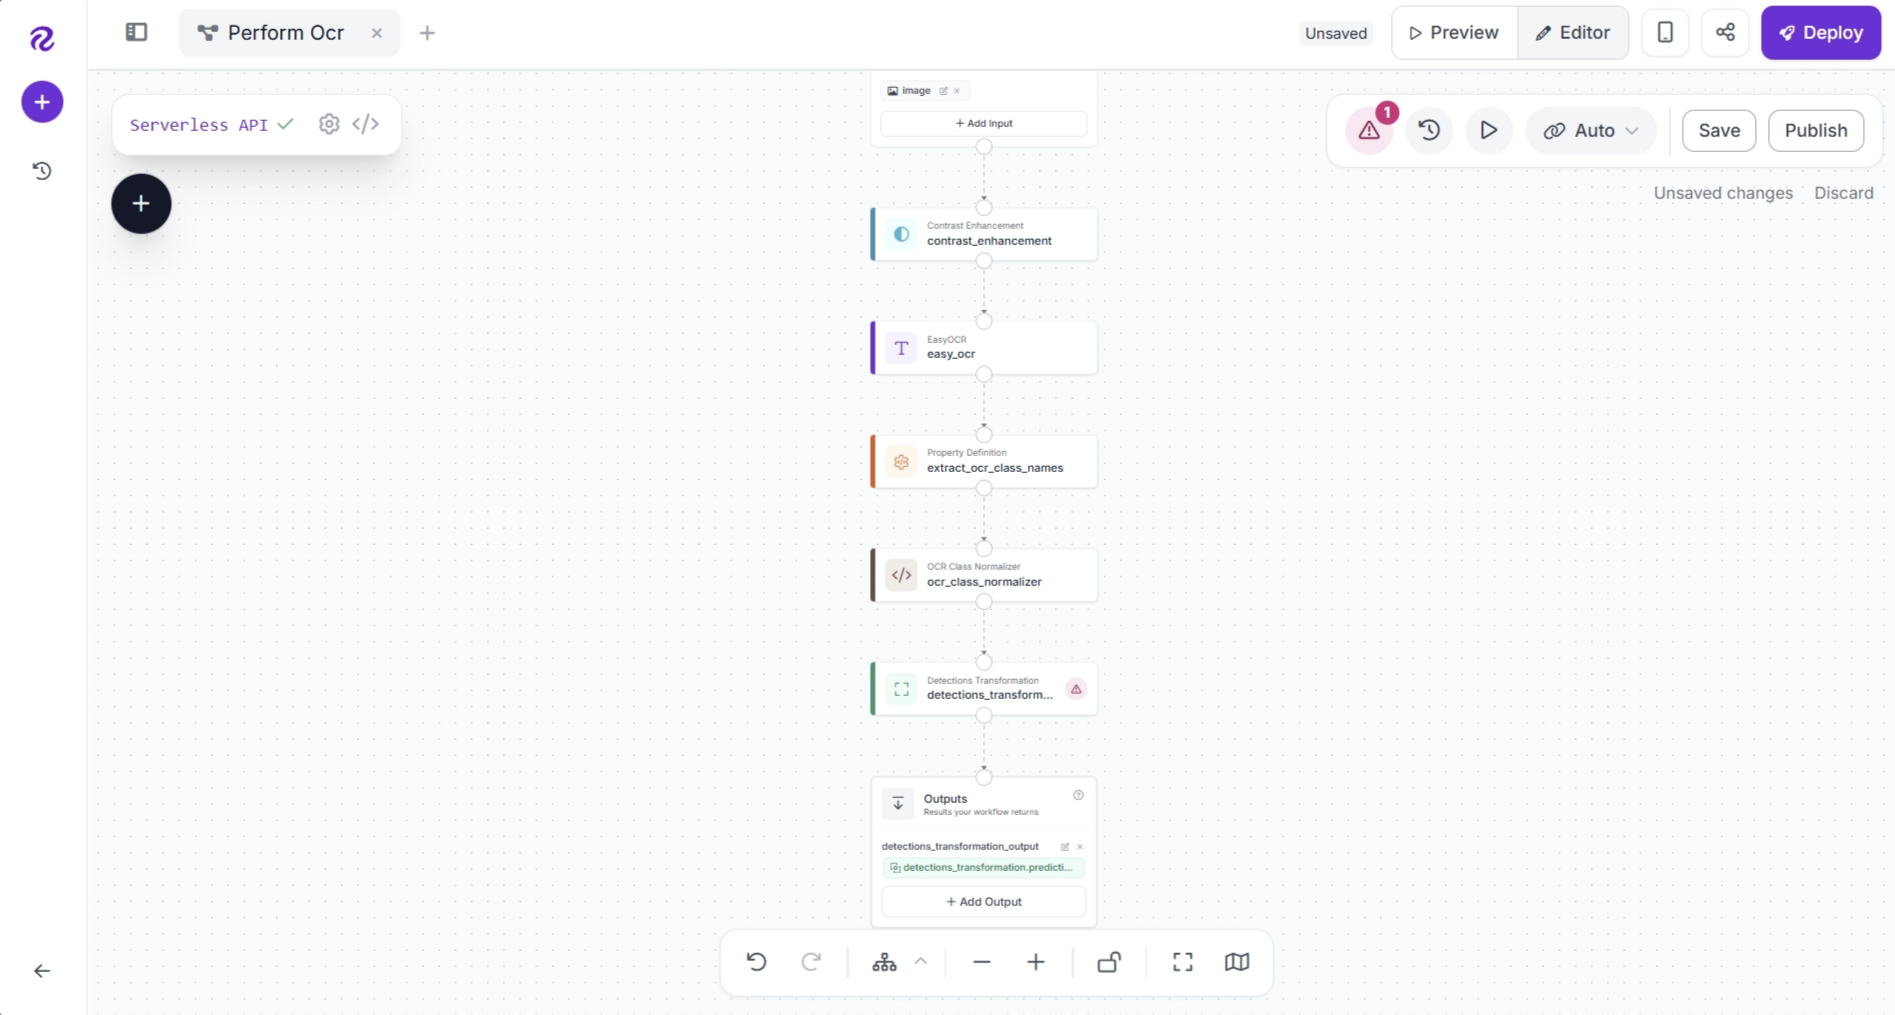
To apply these corrections, add a Detections Transformation block to your workflow. Click the + button, search for Detections Transformation, and add the block to your workflow.
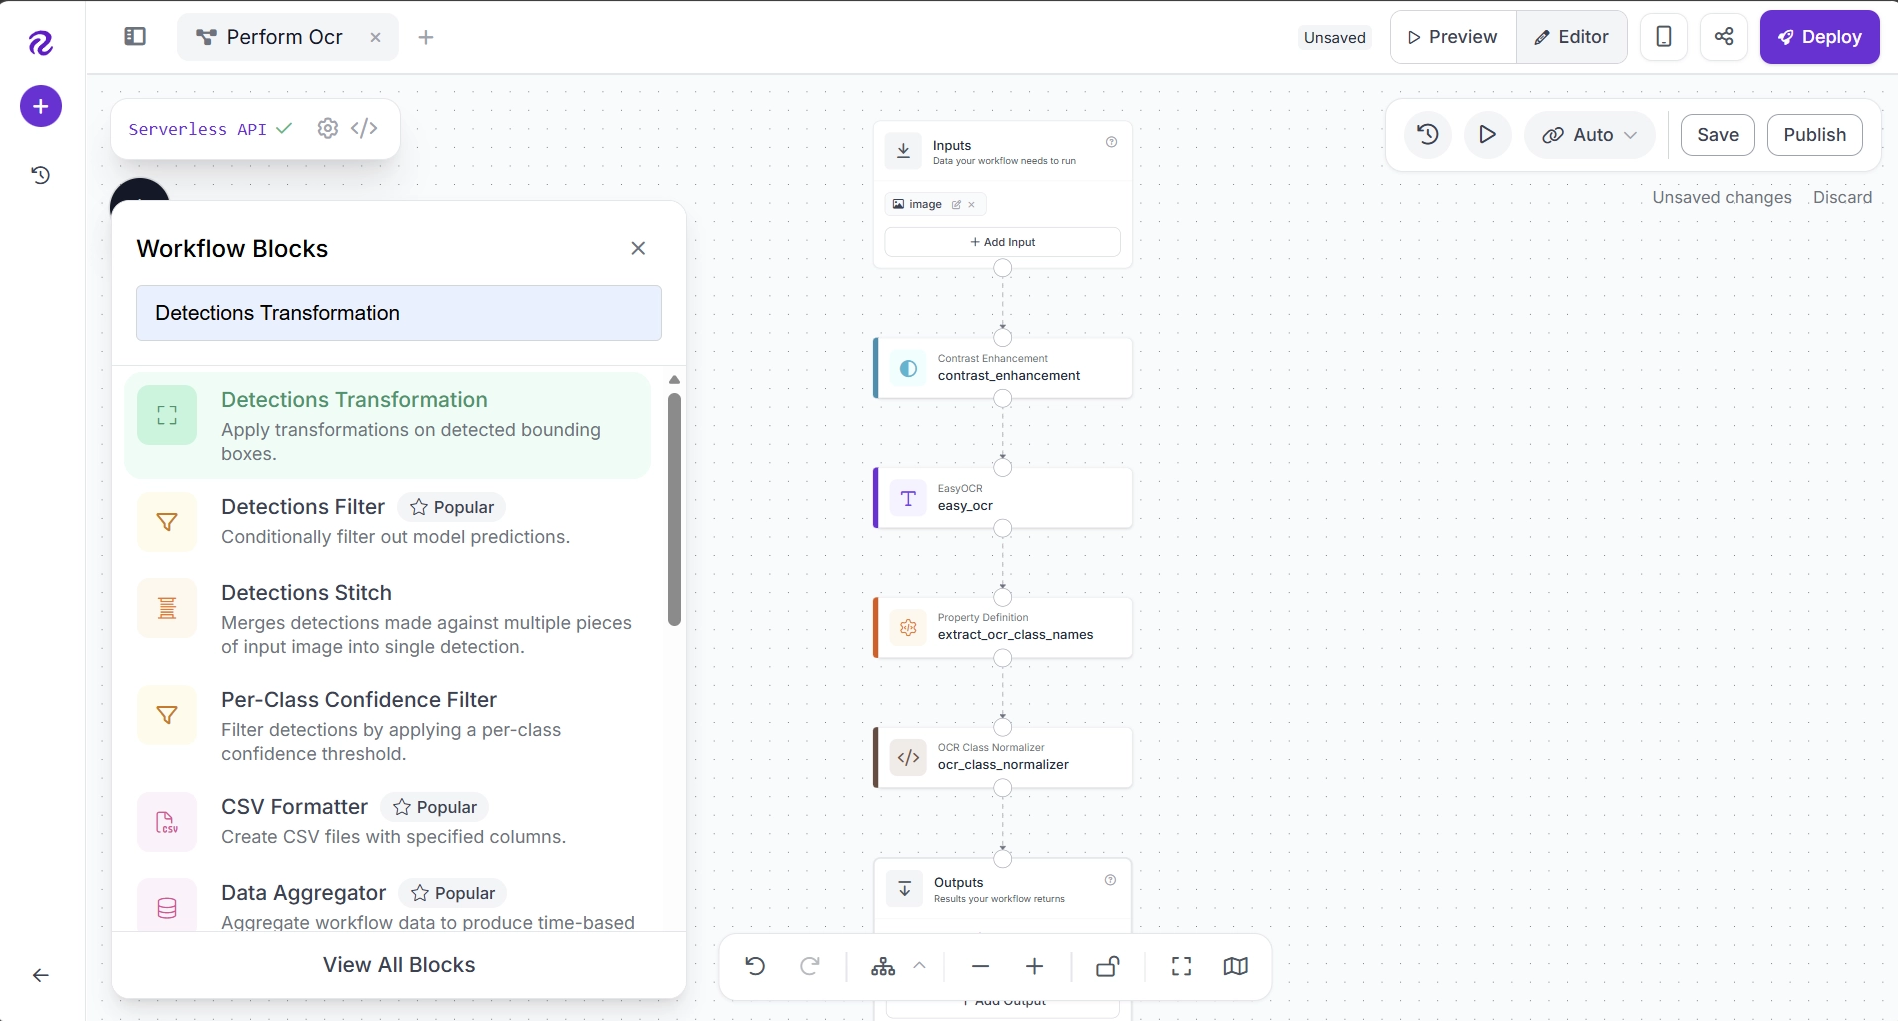
After adding the block, connect the workflow as follows: Custom Python Block (ocr_class_normalizer) → Detections Transformation → Outputs. Remove any unnecessary connections.
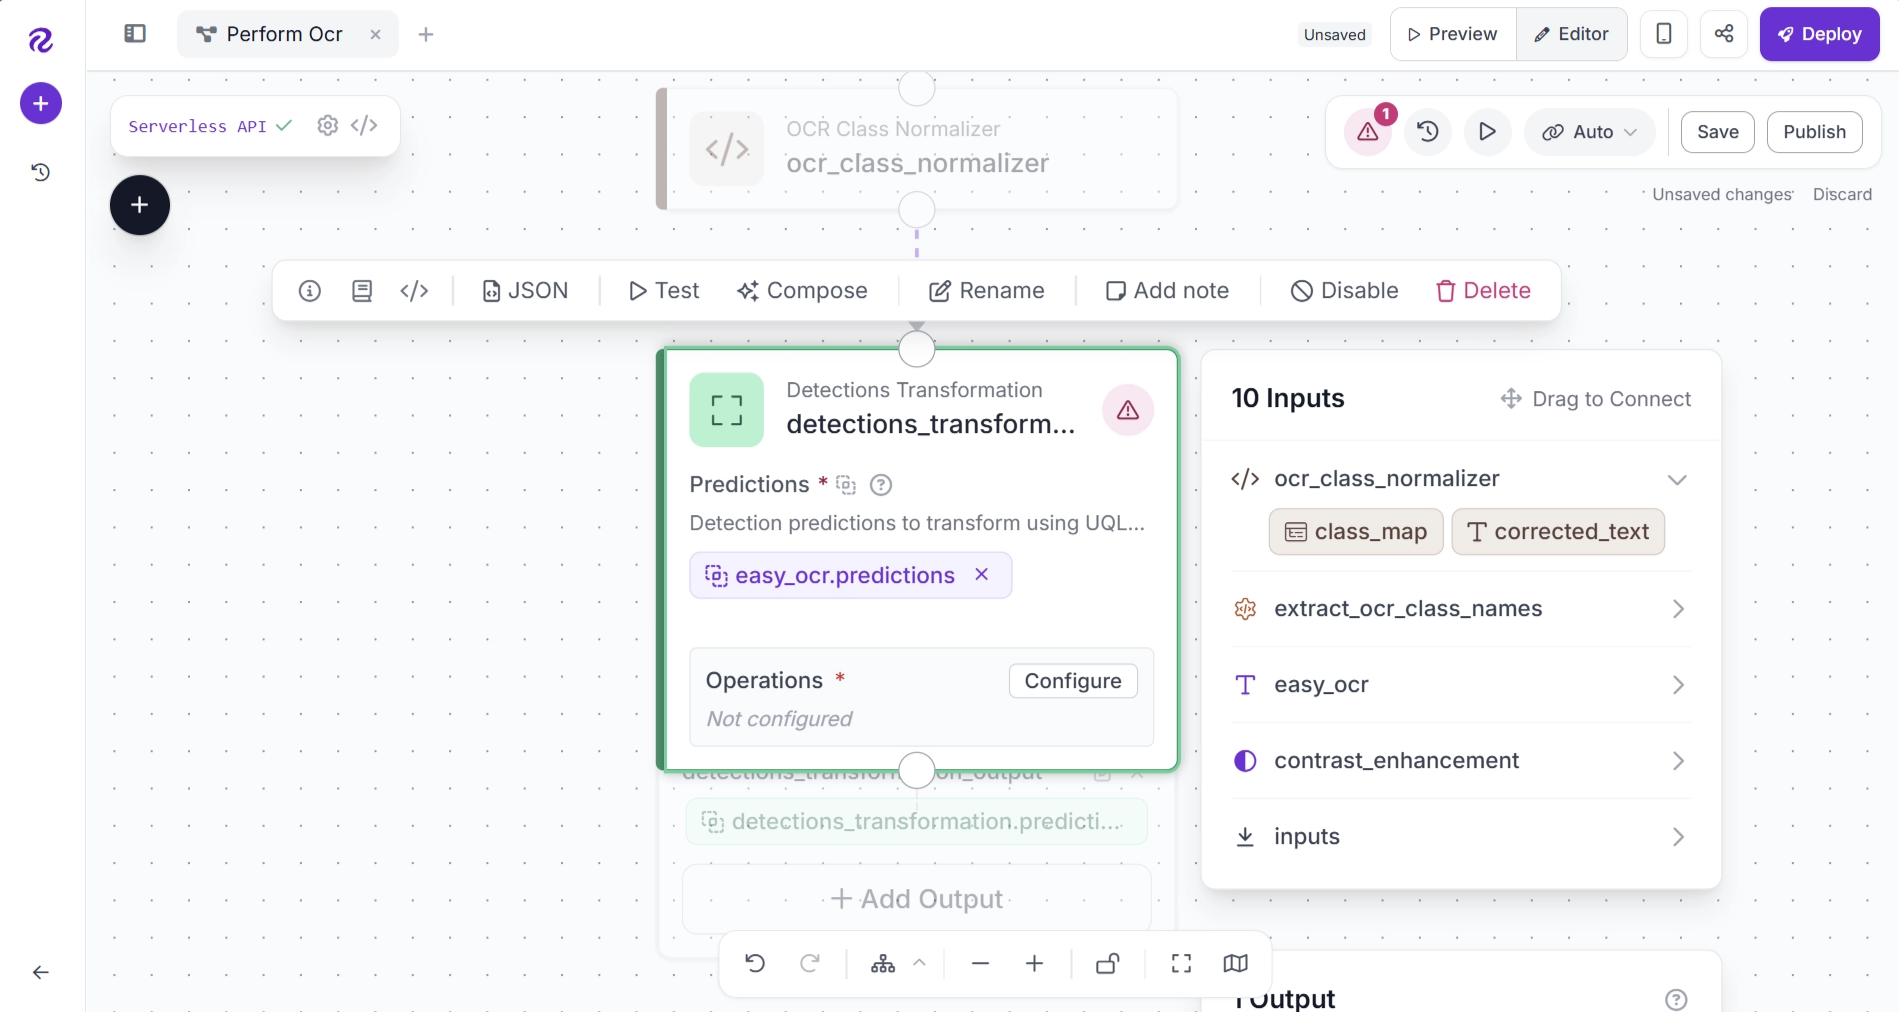
Configure the Detections Transformation block so that the Predictions parameter receives the original predictions generated by the EasyOCR block.
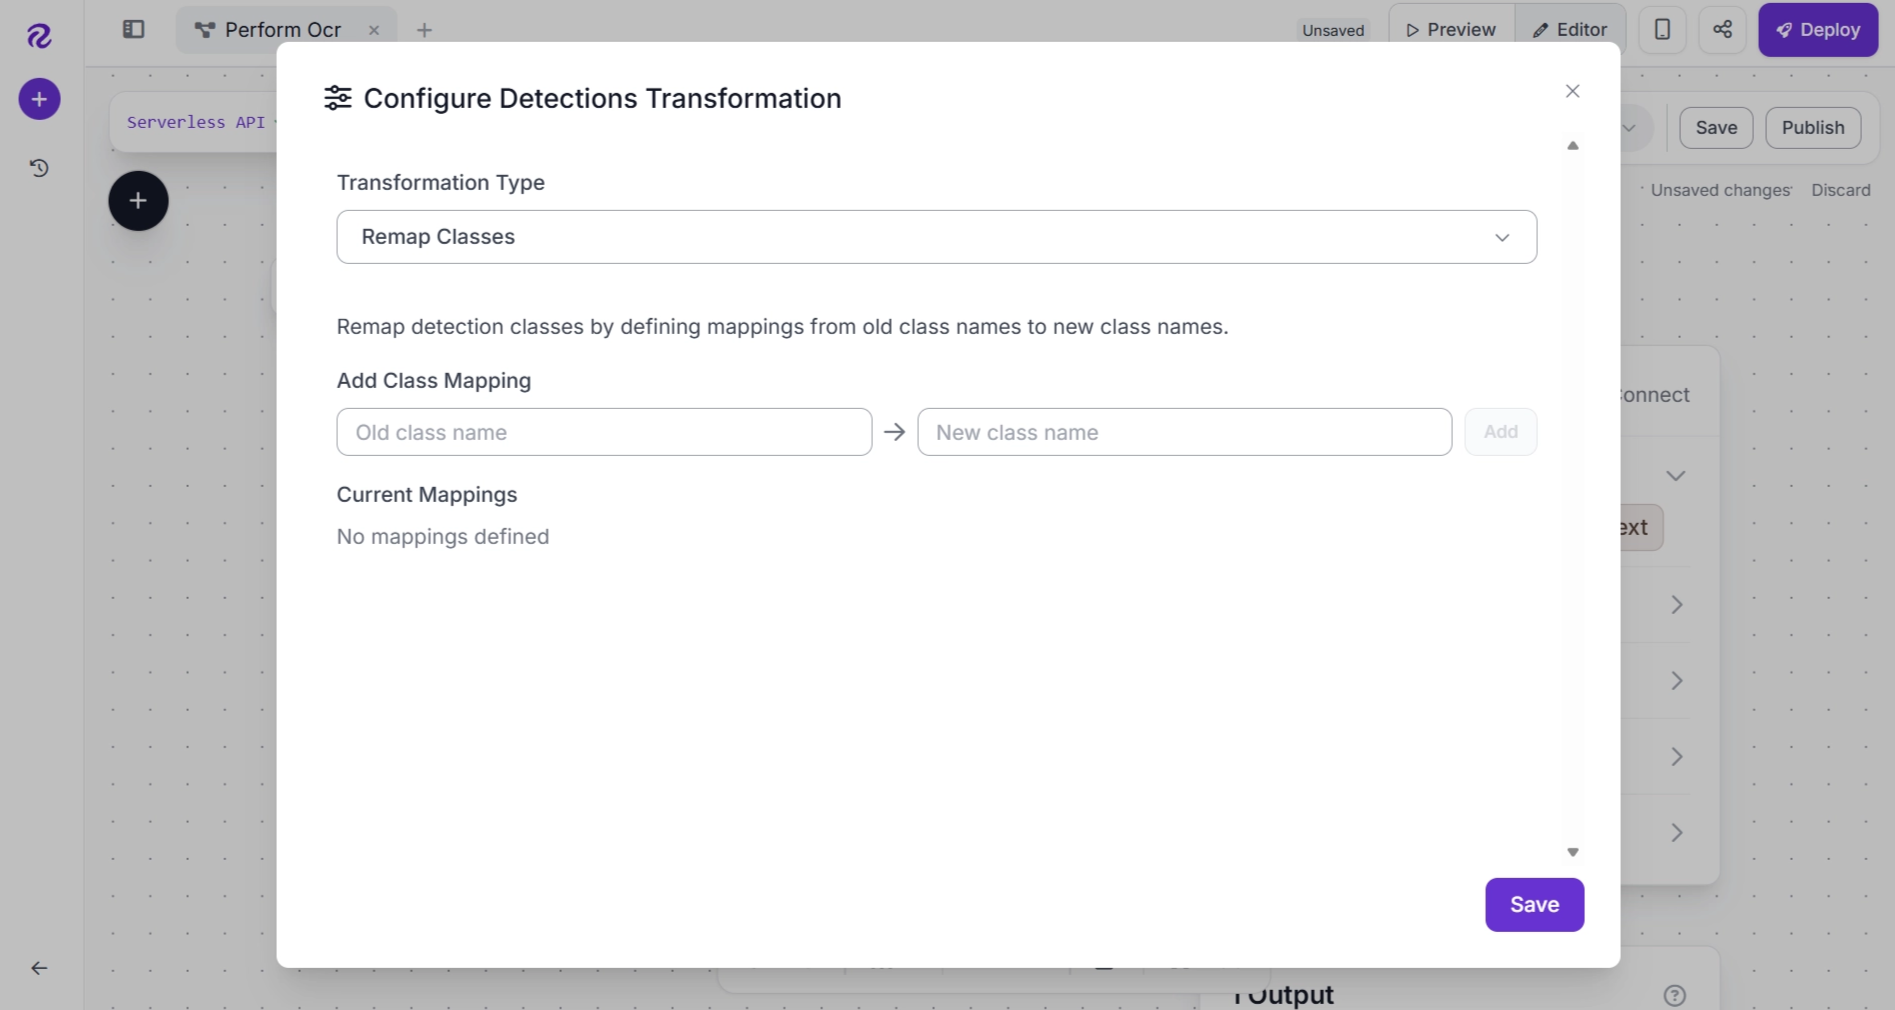
By default, the Detections Transformation block allows you to manually define a class mapping. This works well when the classes are known in advance and do not change. You can configure this mapping by clicking Configure within the block.
However, in this workflow, the correction mapping is generated dynamically by the Custom Python Block (ocr_class_normalizer). Therefore, instead of manually entering the mapping, we will generate it dynamically.
To do this, close the configuration dialog and open the Workflow JSON panel.
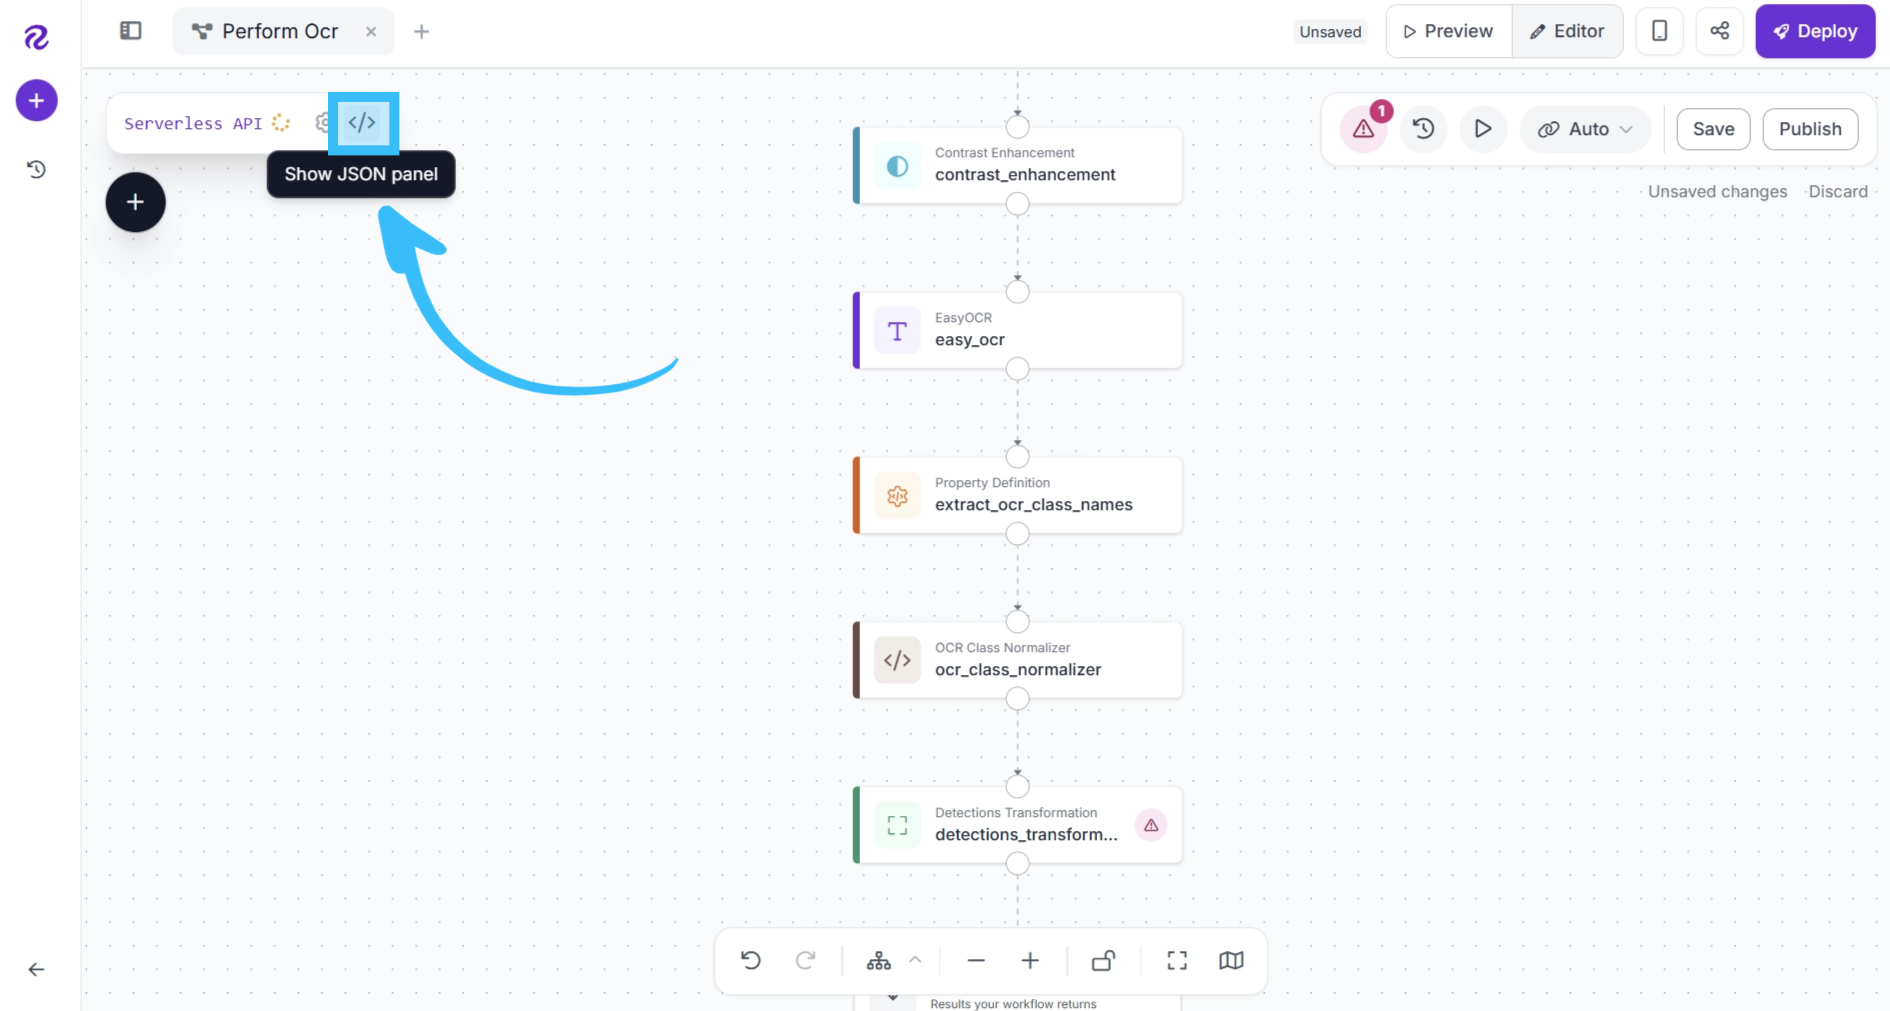
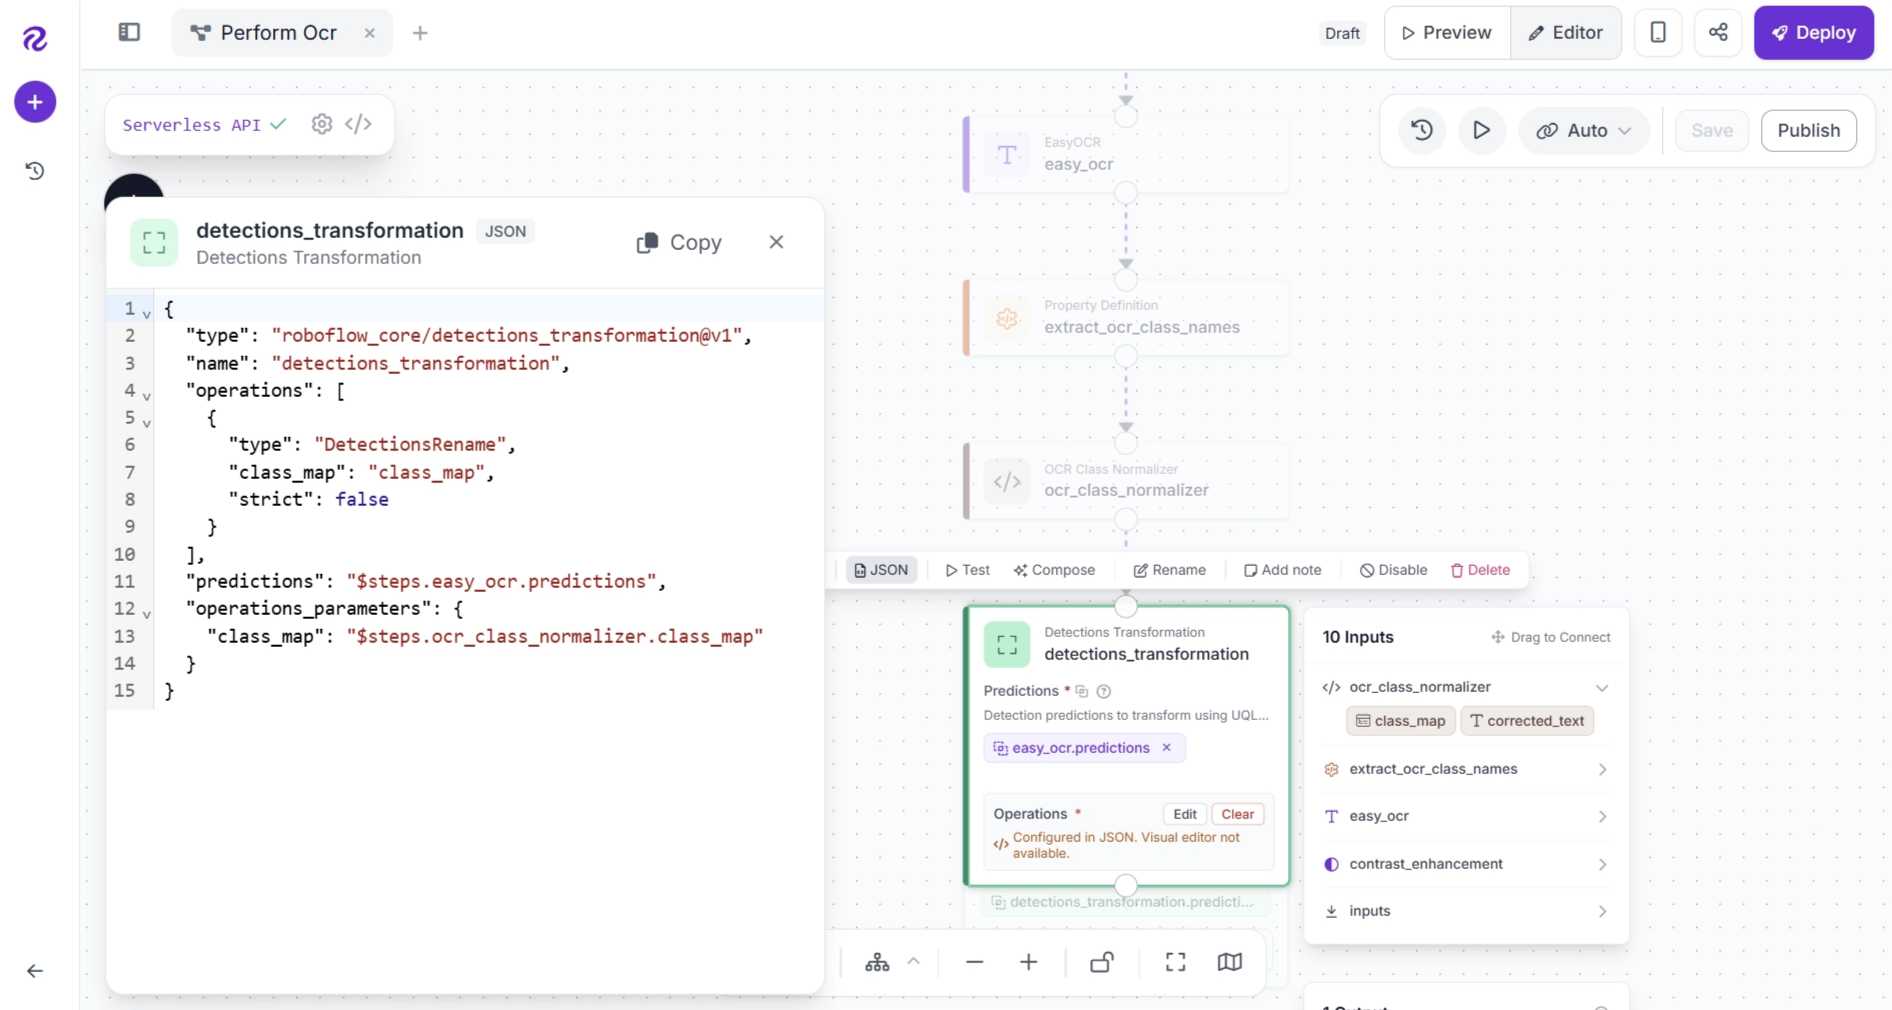
The Workflow JSON panel displays the configuration for every block in the workflow in JSON format. Locate the JSON definition for the Detections Transformation block.
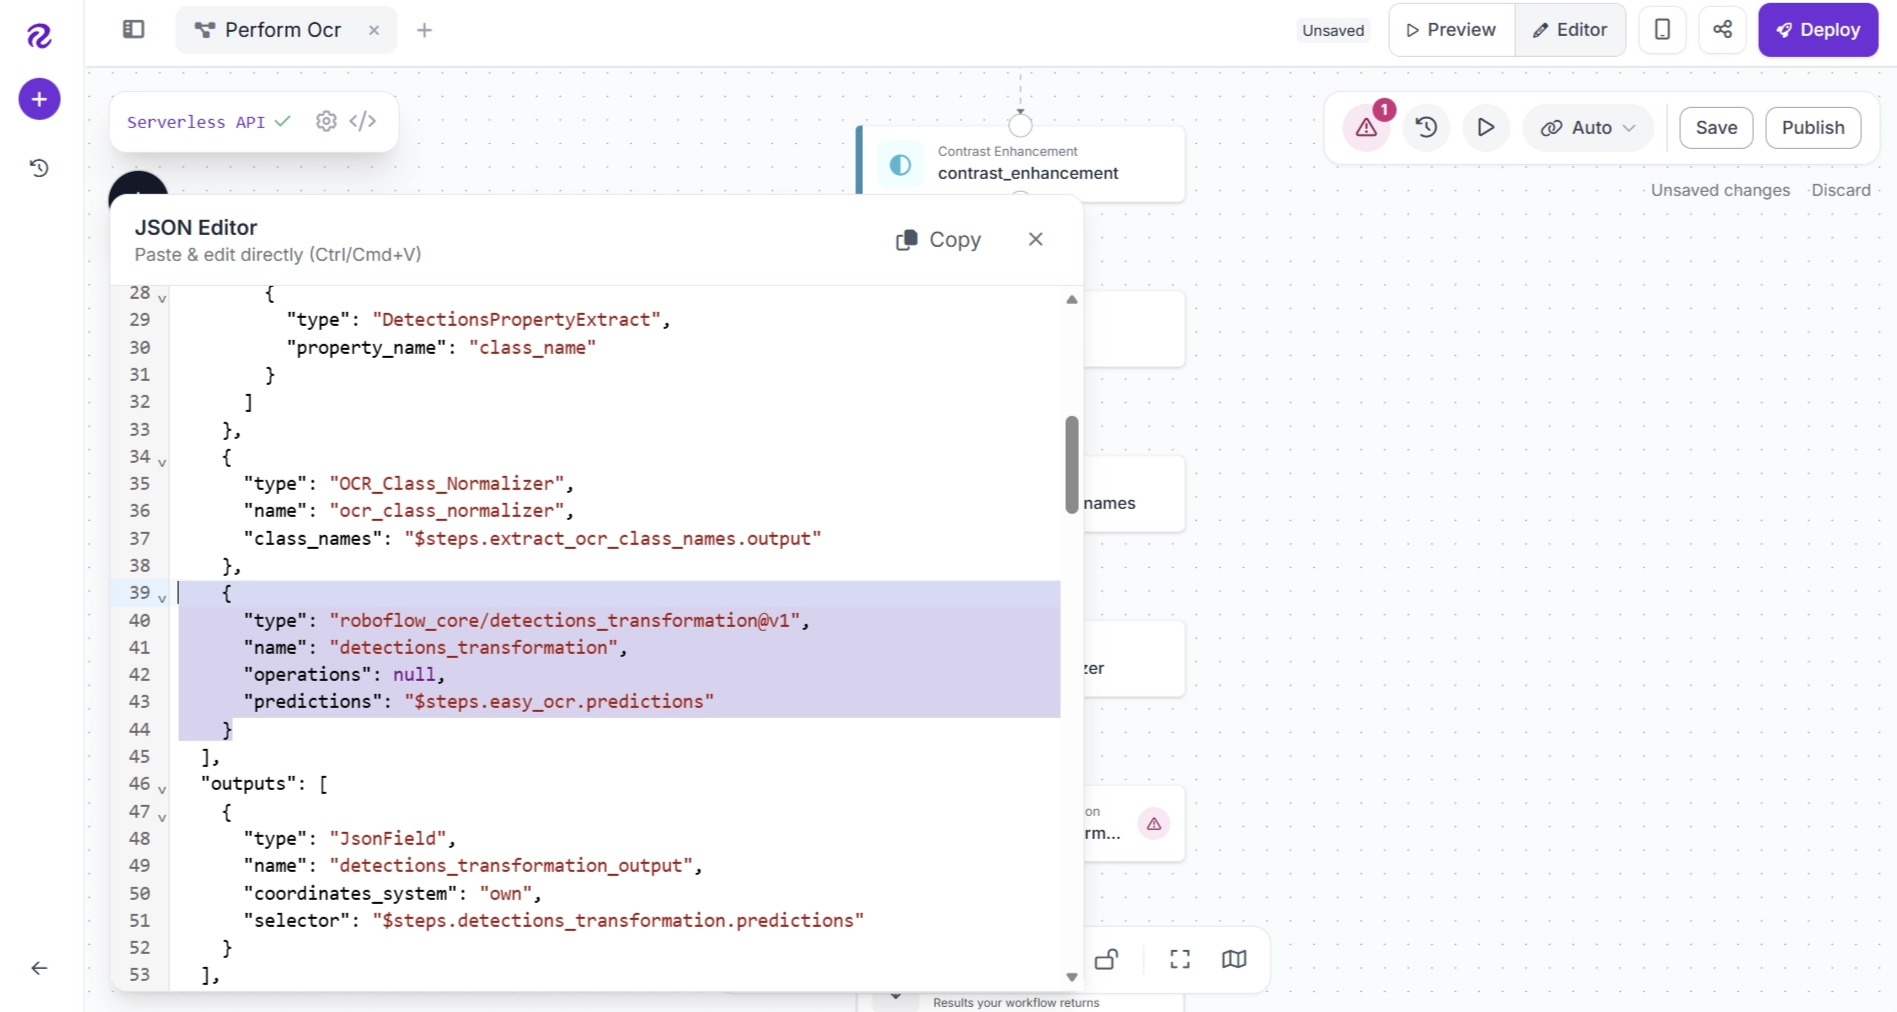
Replace it with the following configuration:
{
  "type": "roboflow_core/detections_transformation@v1",
  "name": "detections_transformation",
  "operations": [
    {
      "type": "DetectionsRename",
      "class_map": "class_map",
      "strict": false
    }
  ],
  "predictions": "$steps.easy_ocr.predictions",
  "operations_parameters": {
    "class_map": "$steps.ocr_class_normalizer.class_map"
  }
}
The updated JSON should look like this:
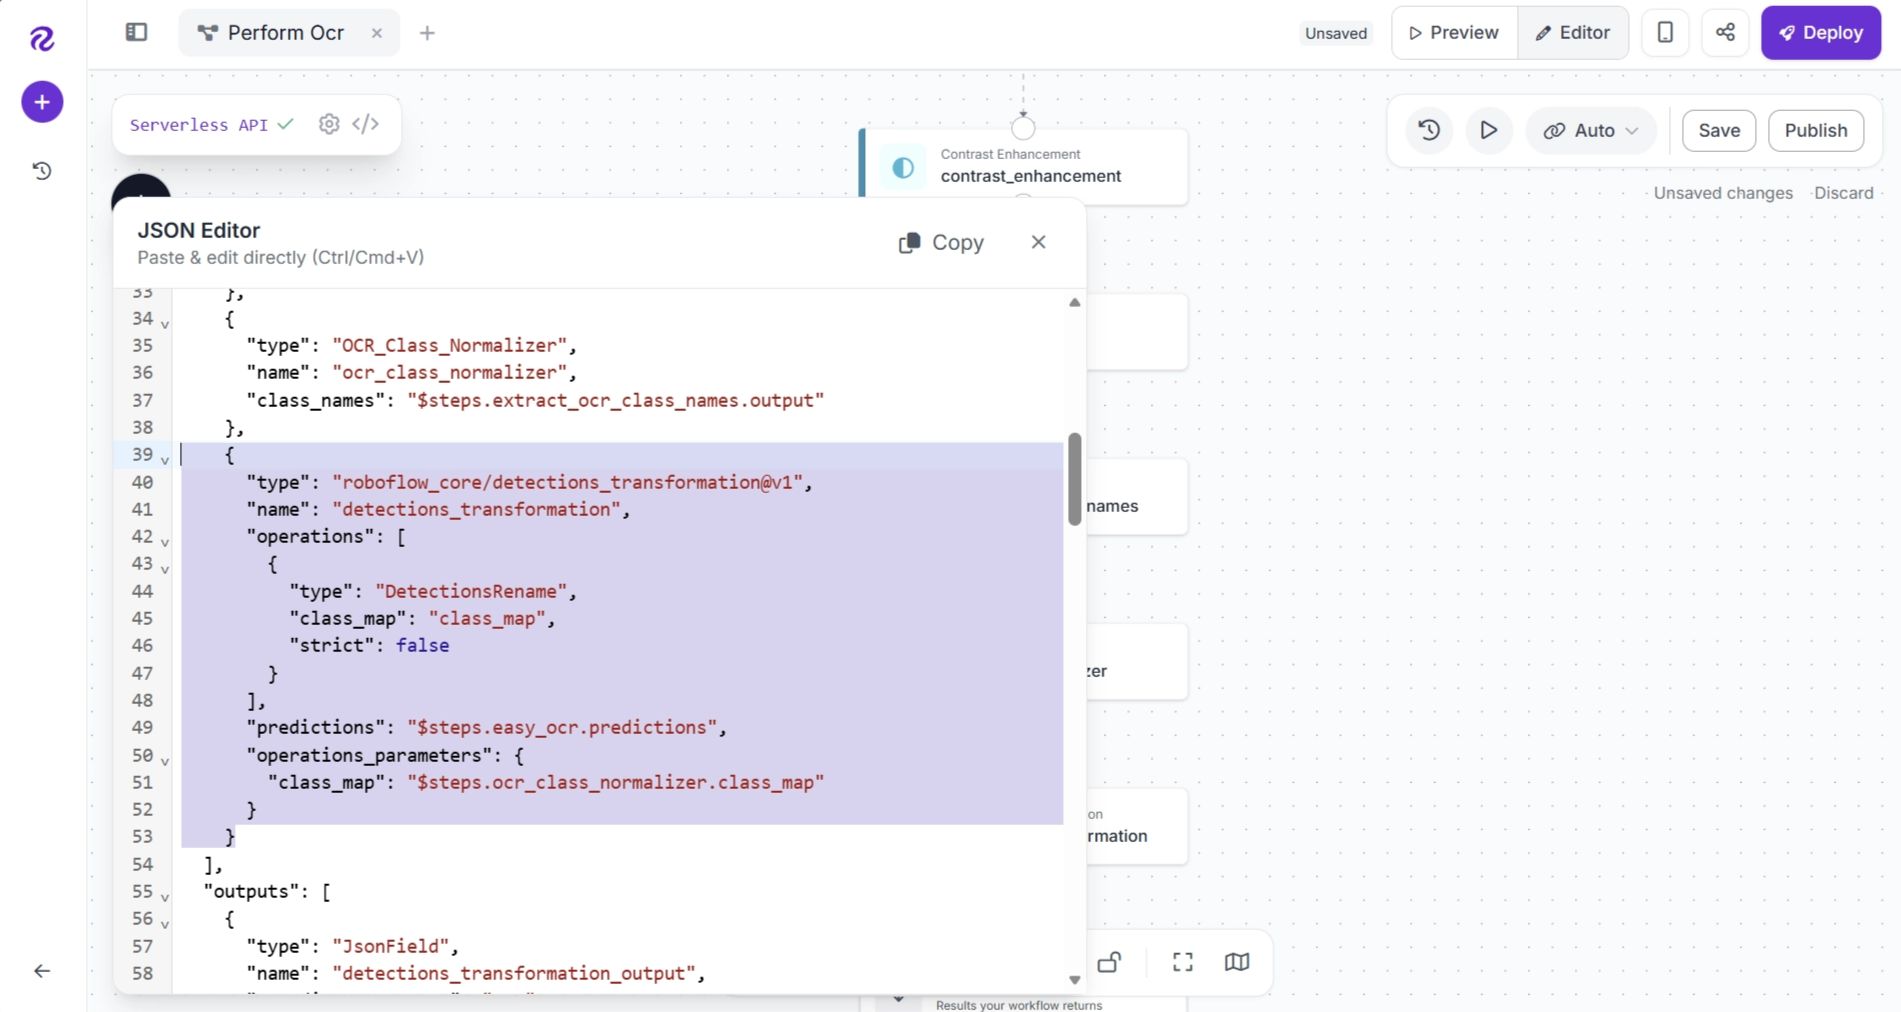
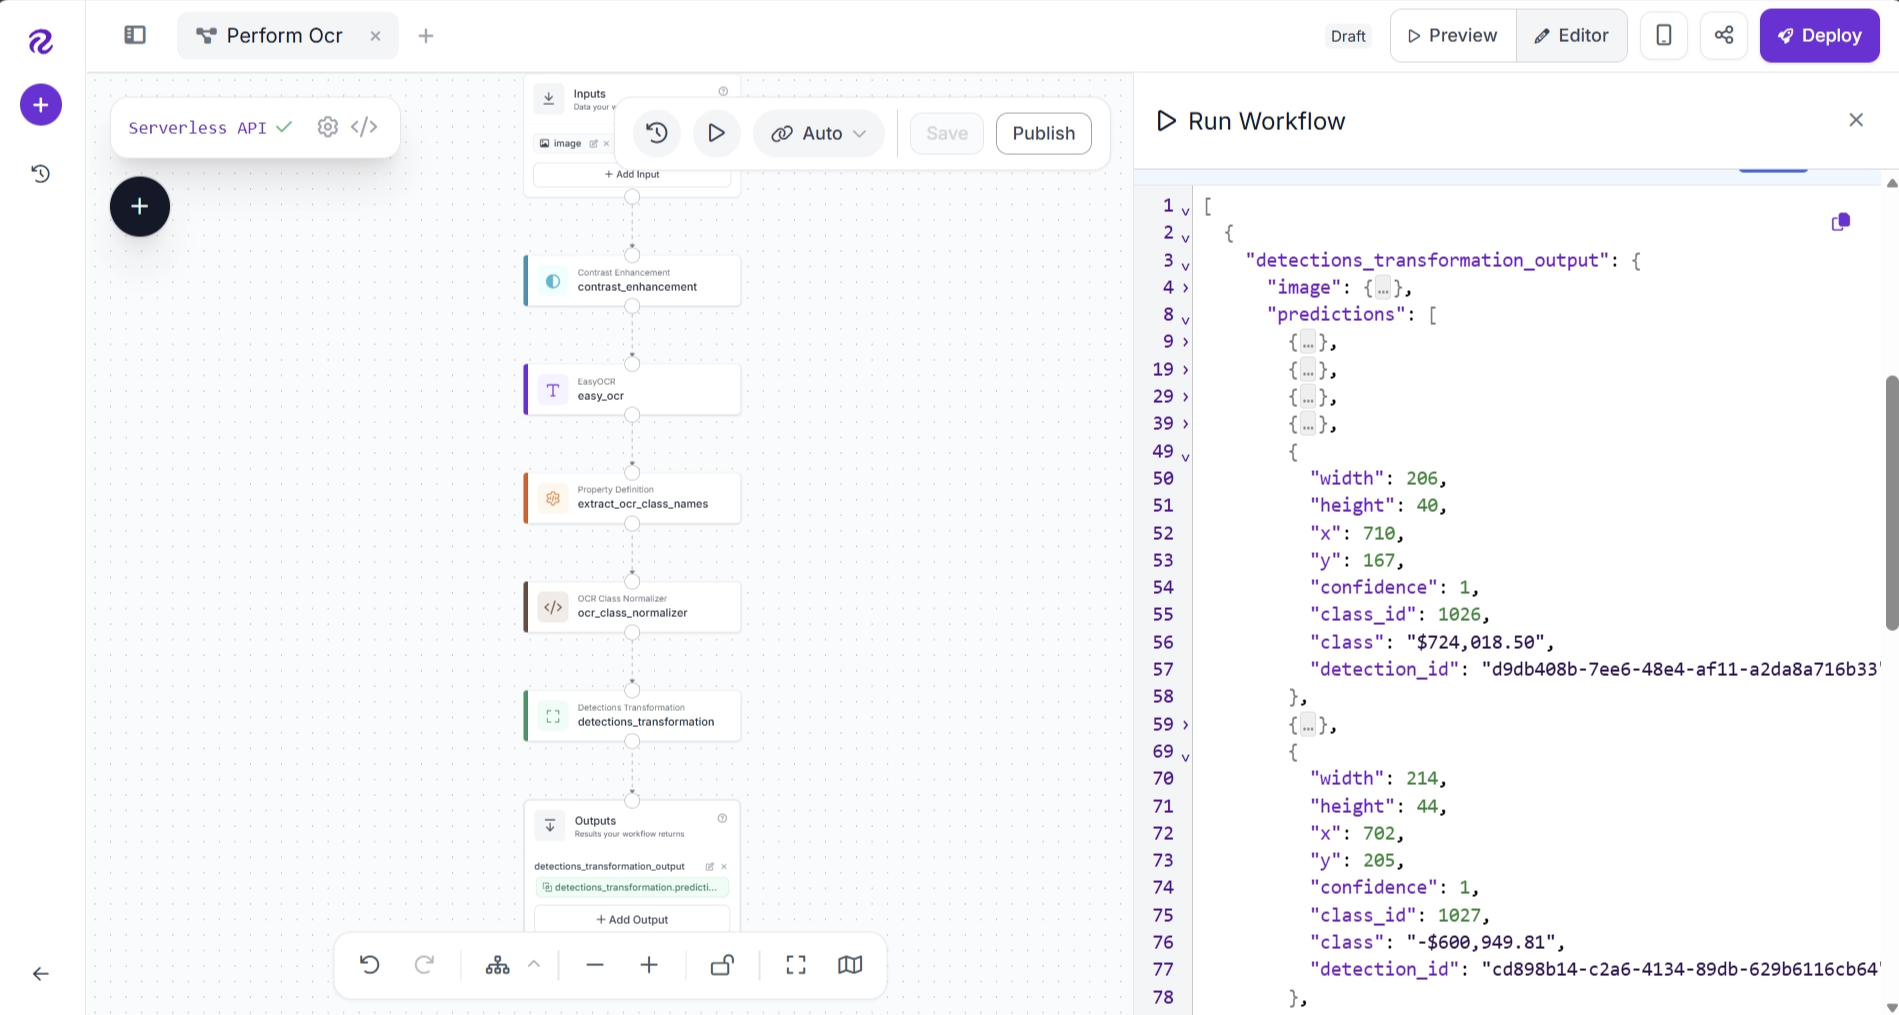
Run the workflow again. The OCR predictions should now contain the corrected text generated by the OCR Class Normalizer Block.
Instead of editing the JSON manually, you can also ask Roboflow Agent to make the change. For example, use the following prompt:
"Use Detections Transformation to apply the class_map output from the ocr_class_normalizer block to the model predictions.”
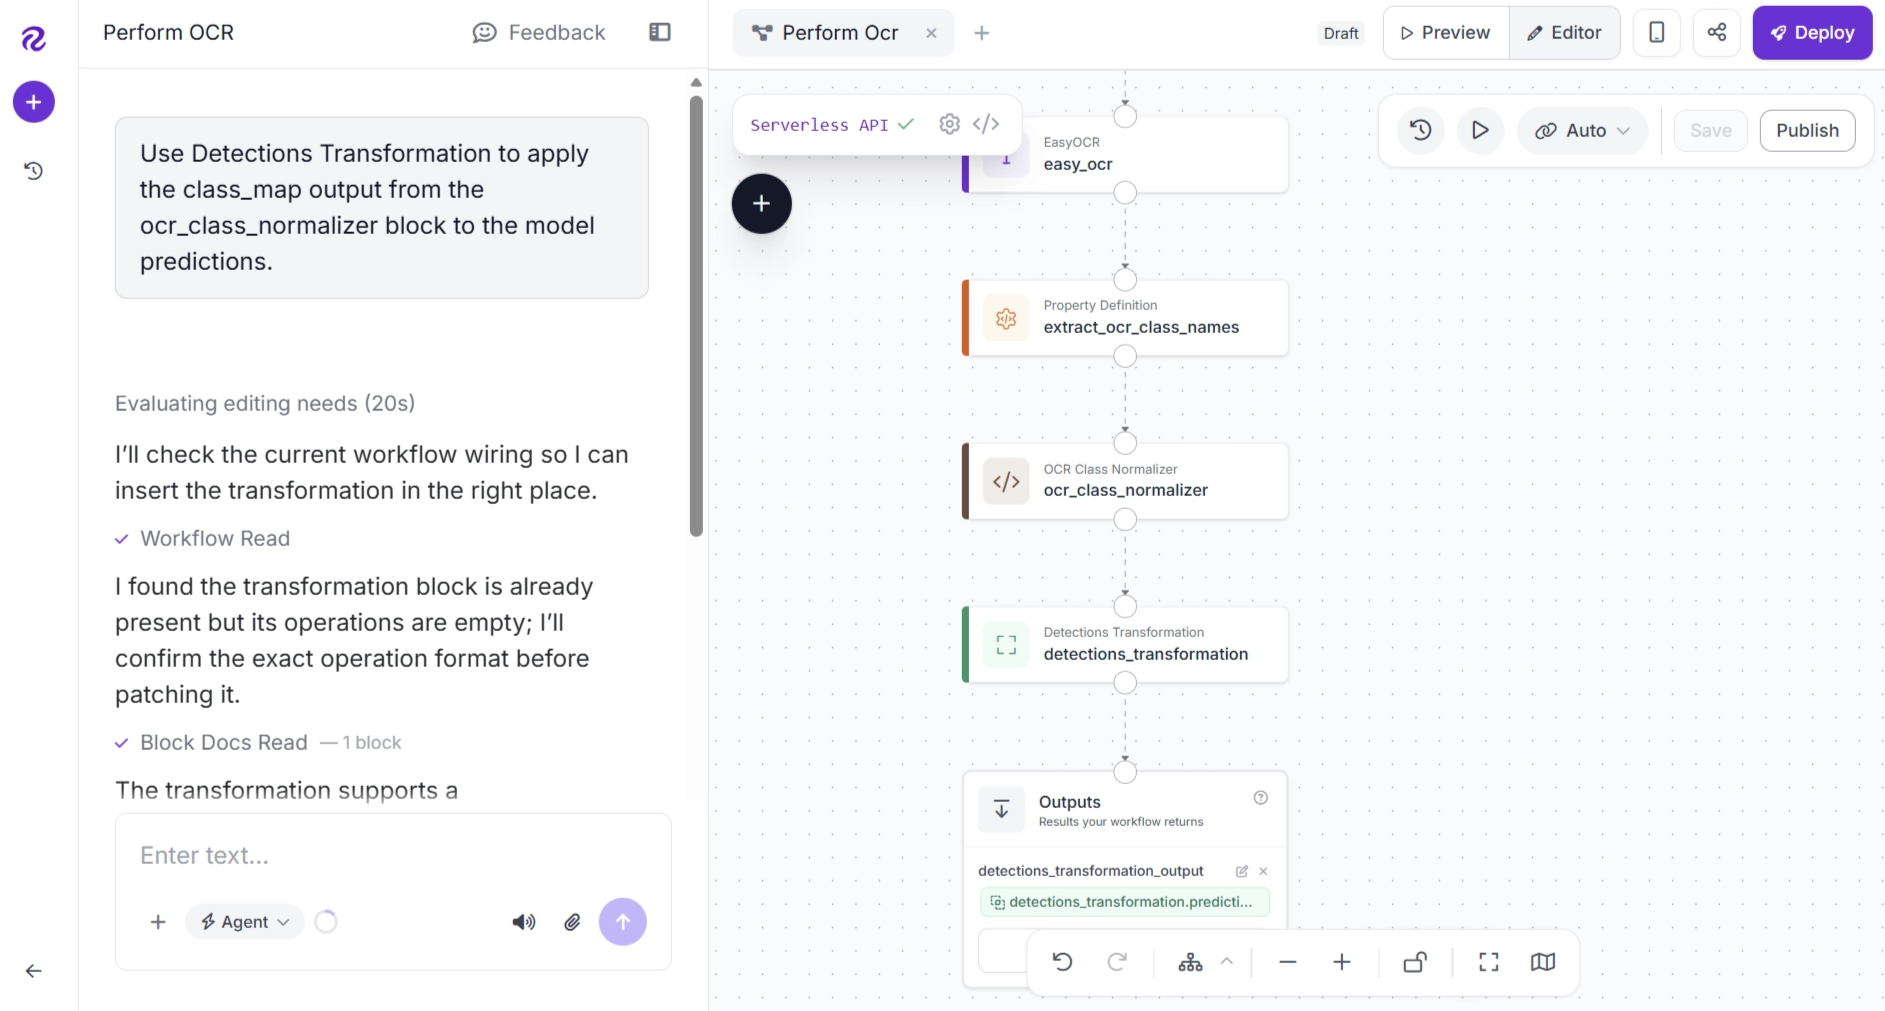
After the agent finishes, verify the generated configuration by selecting the Detections Transformation block, clicking the newly available Edit button, and then clicking Edit JSON.
Step 7: Visualize Detected Text Regions
Since EasyOCR detects the location of each text region, you can visualize these detections by adding a Bounding Box Visualization block to your workflow. This allows you to see where each OCR prediction was detected in the image.
Click the + button, search for Bounding Box Visualization, and add the block to your workflow.
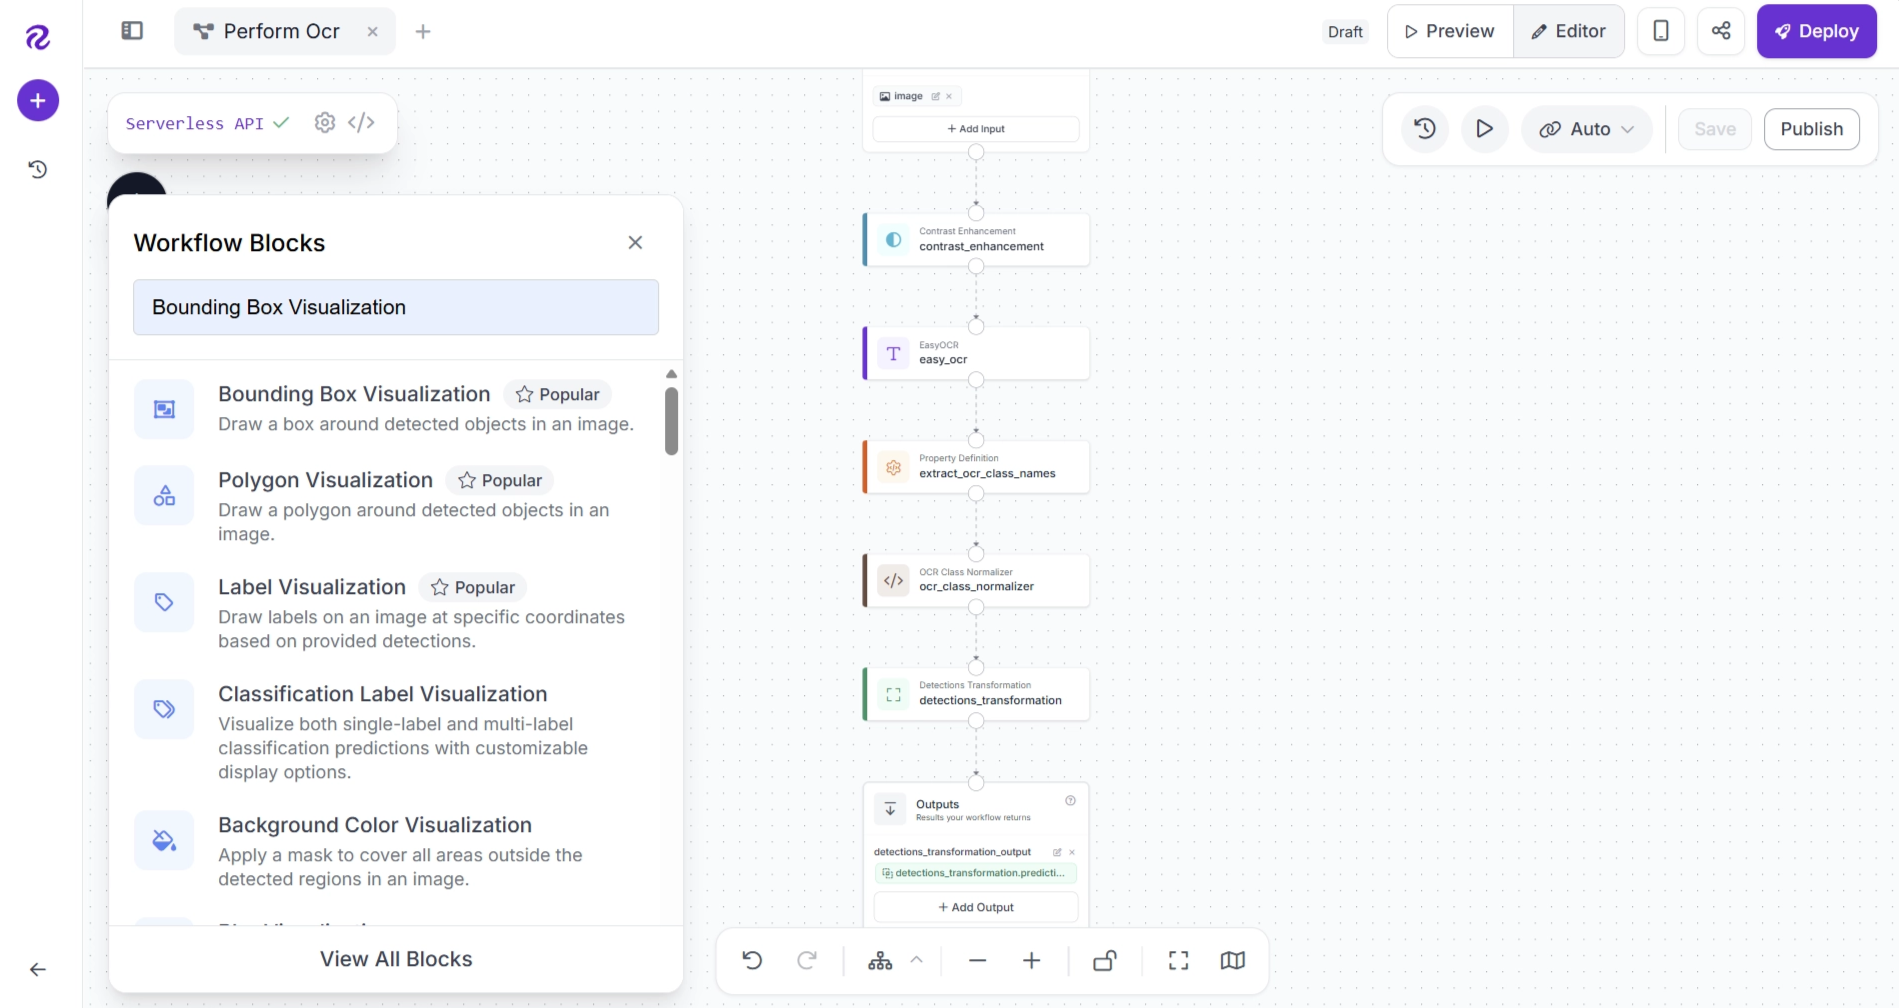
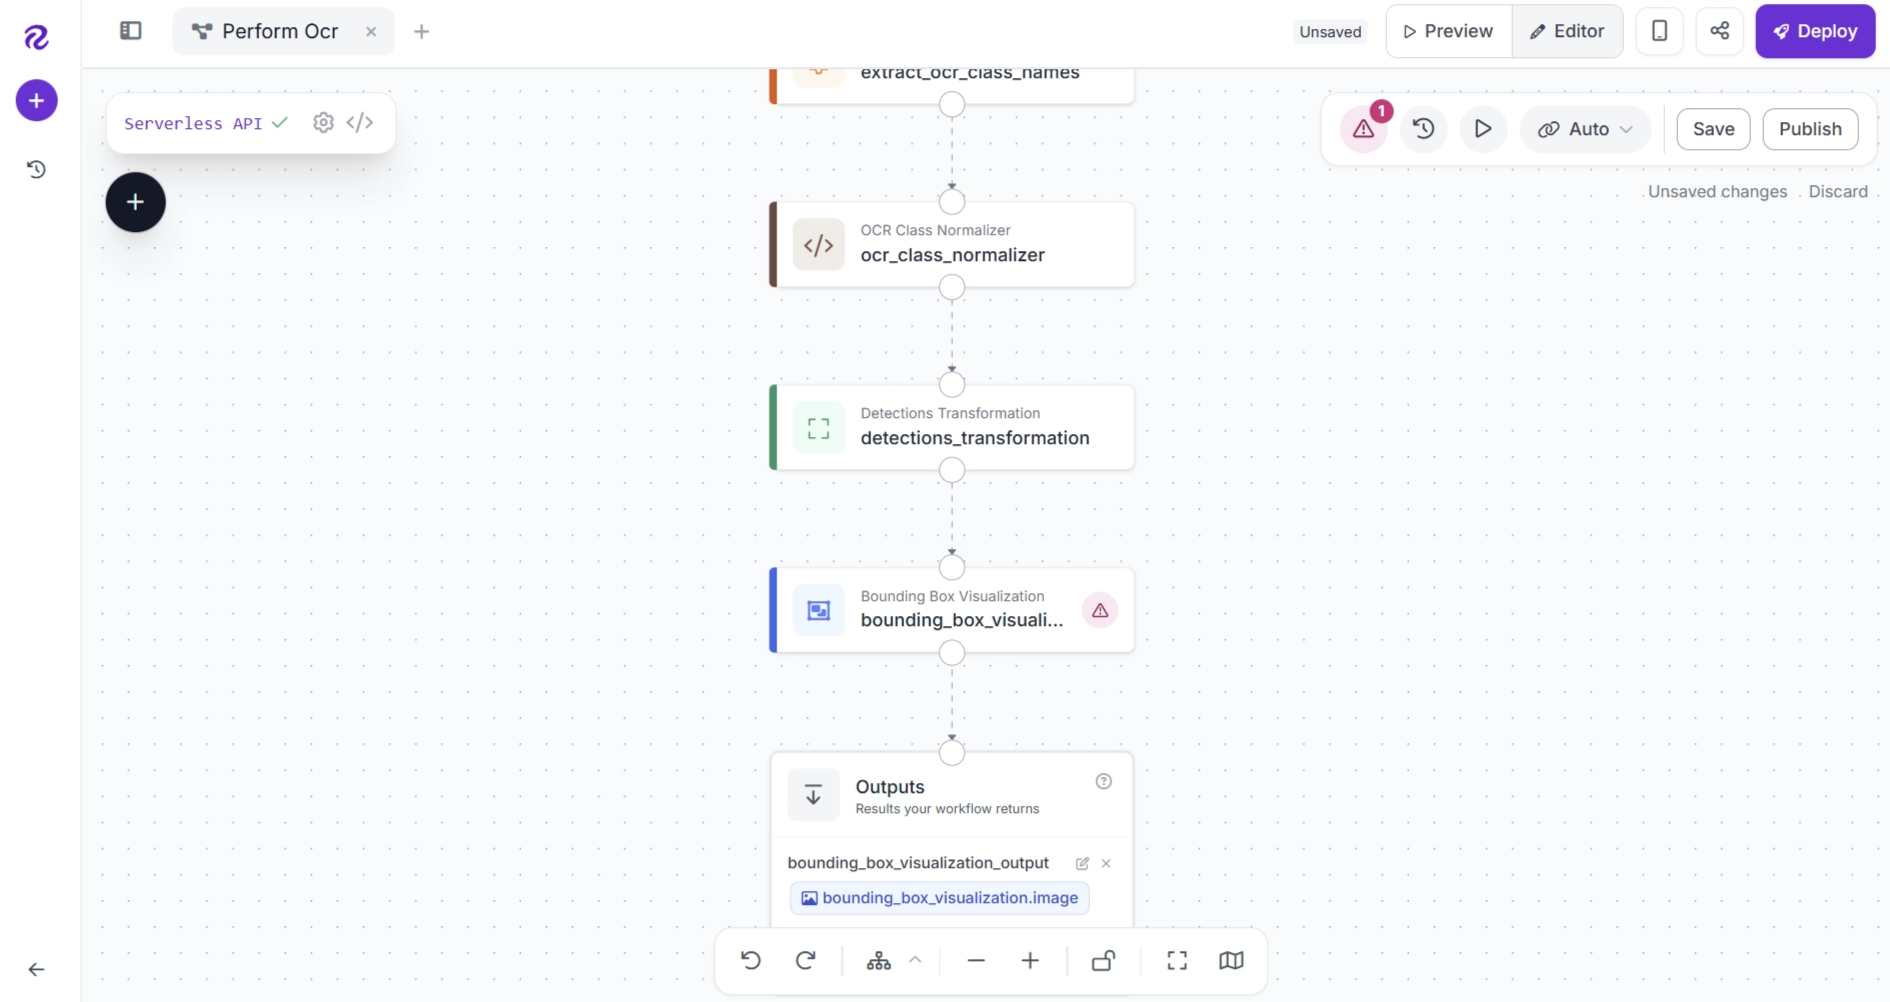
After adding the block, connect the workflow as follows: Detections Transformation → Bounding Box Visualization → Outputs. Remove any unnecessary connections.
Next, configure the Bounding Box Visualization block as shown below.
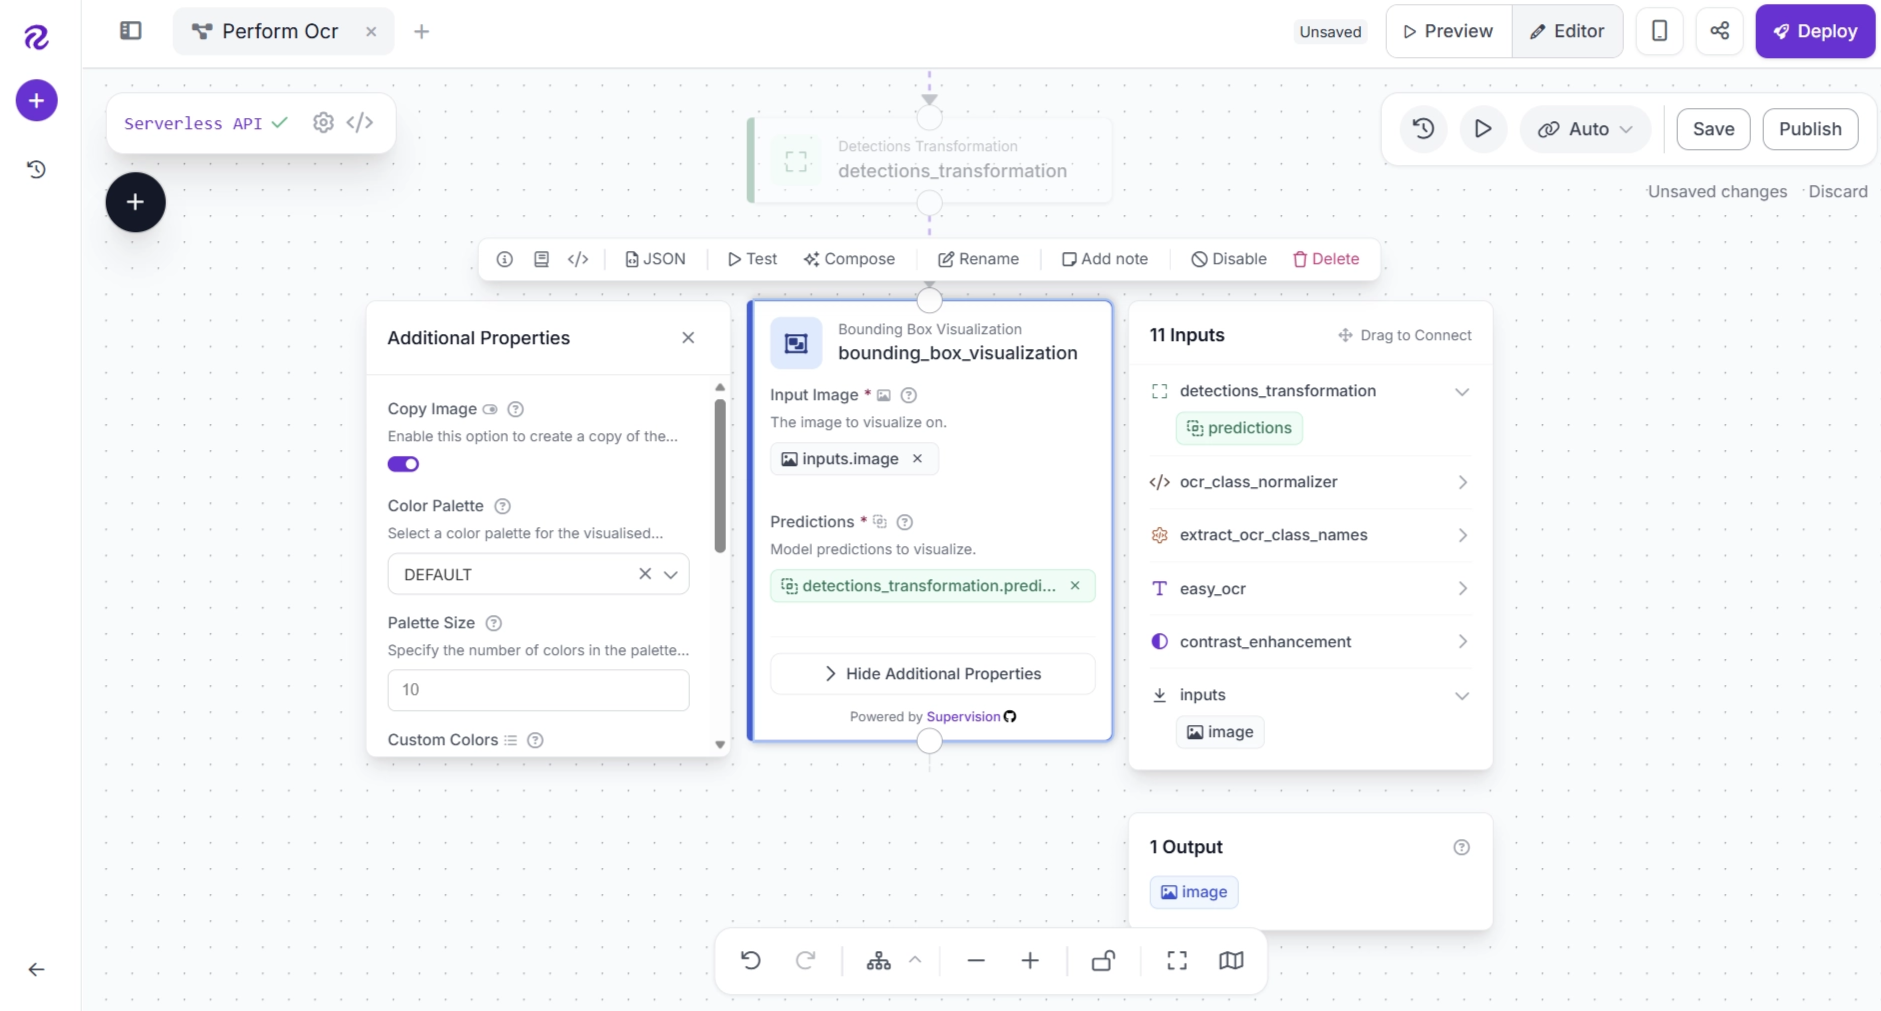
The Bounding Box Visualization block uses the detection coordinates from the Detections Transformation output to draw bounding boxes around each detected text region.
Step 8: Visualize the Recognized Text
The Detections Transformation block updates the OCR predictions with corrected text while preserving the bounding box coordinates generated by EasyOCR. To display these corrected text values on the image, add a Label Visualization block.
Click the + button, search for Label Visualization, and add the block to your workflow.
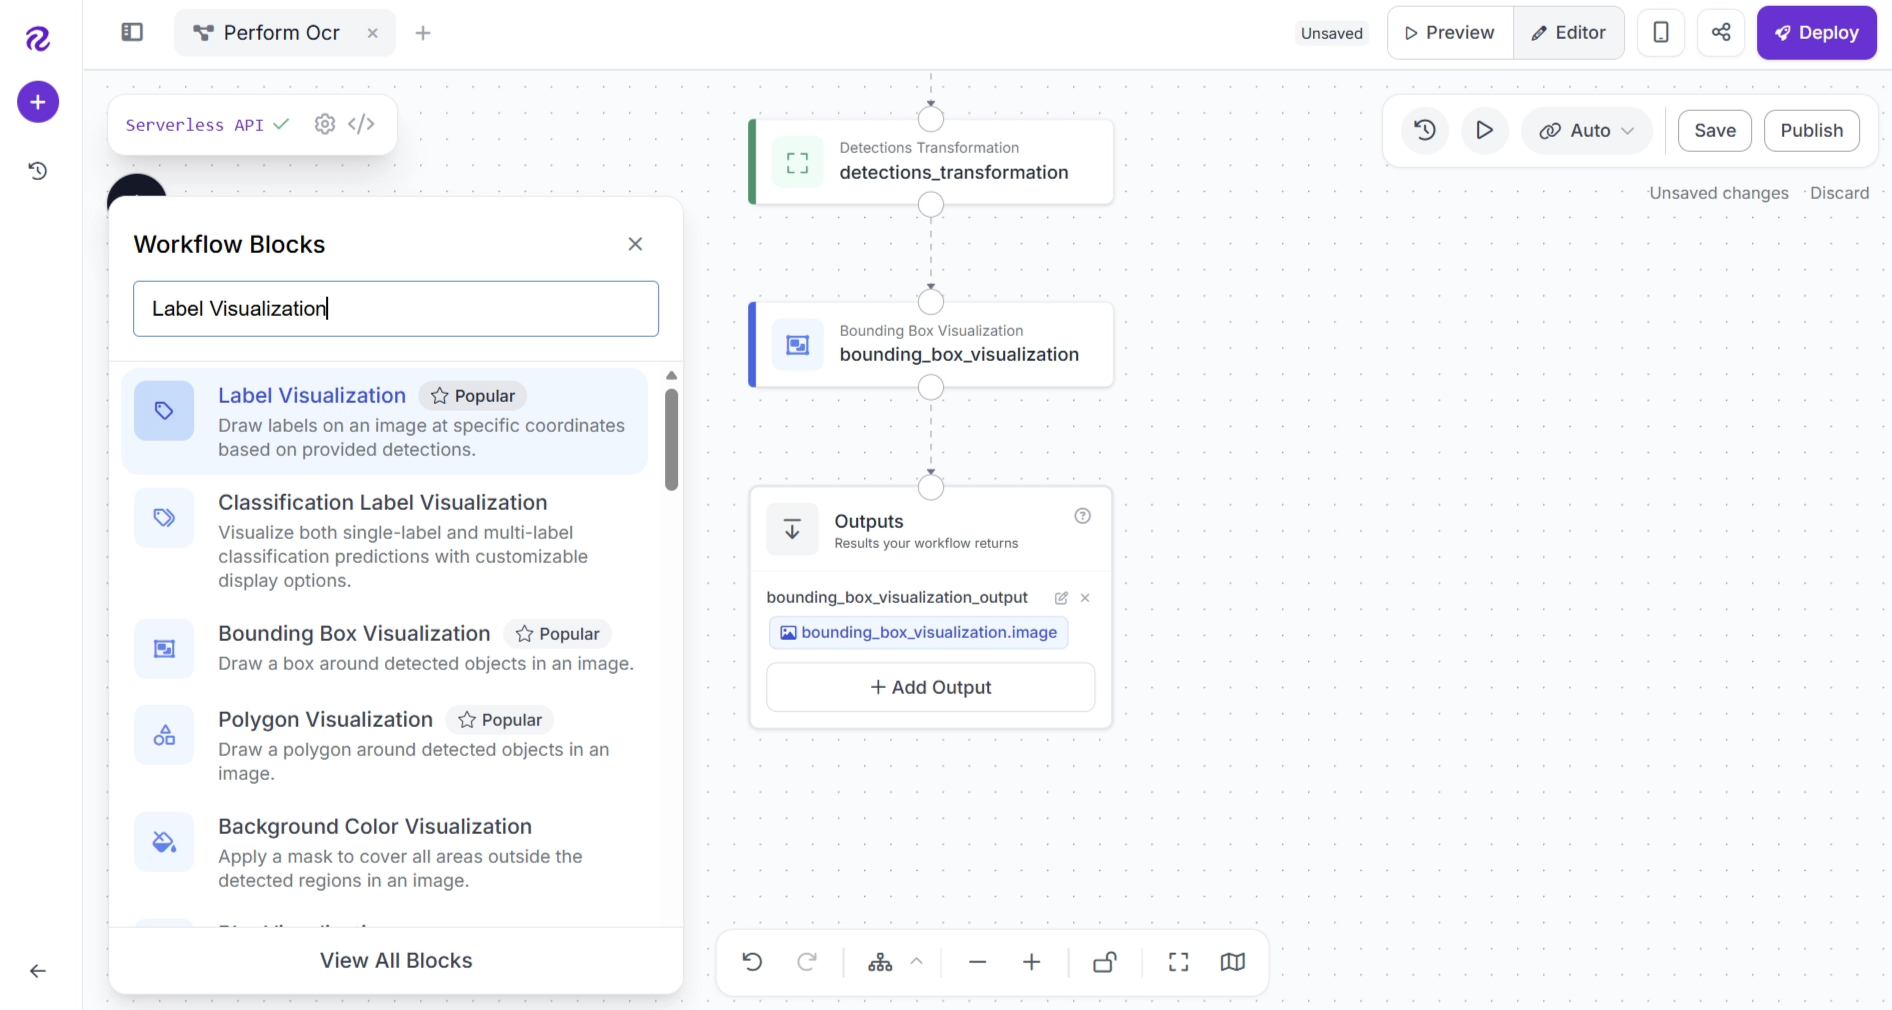
After adding the block, connect the workflow as follows: Bounding Box Visualization → Label Visualization → Outputs. Remove any unnecessary connections.
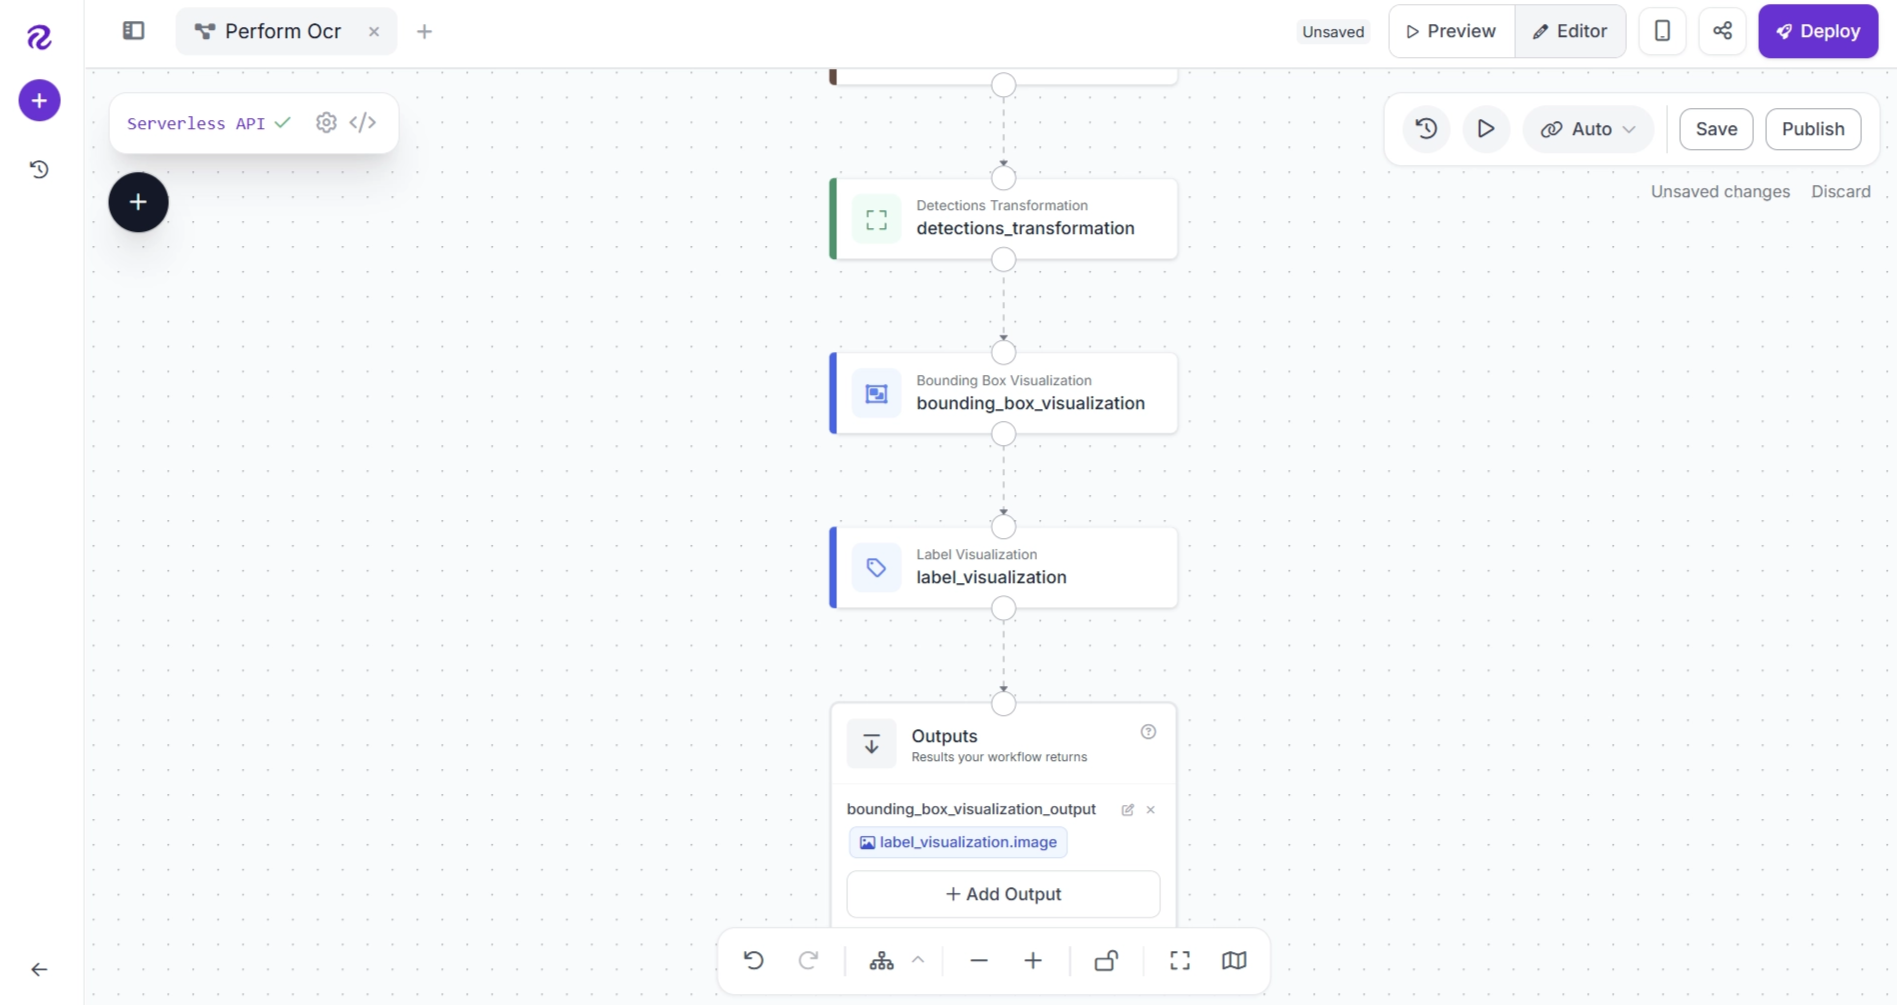
Configure the Label Visualization block as shown below. Set the Image input within the block to receive the output from the Bounding Box Visualization block. This ensures that the corrected OCR labels are rendered on top of the image that already contains the bounding boxes.
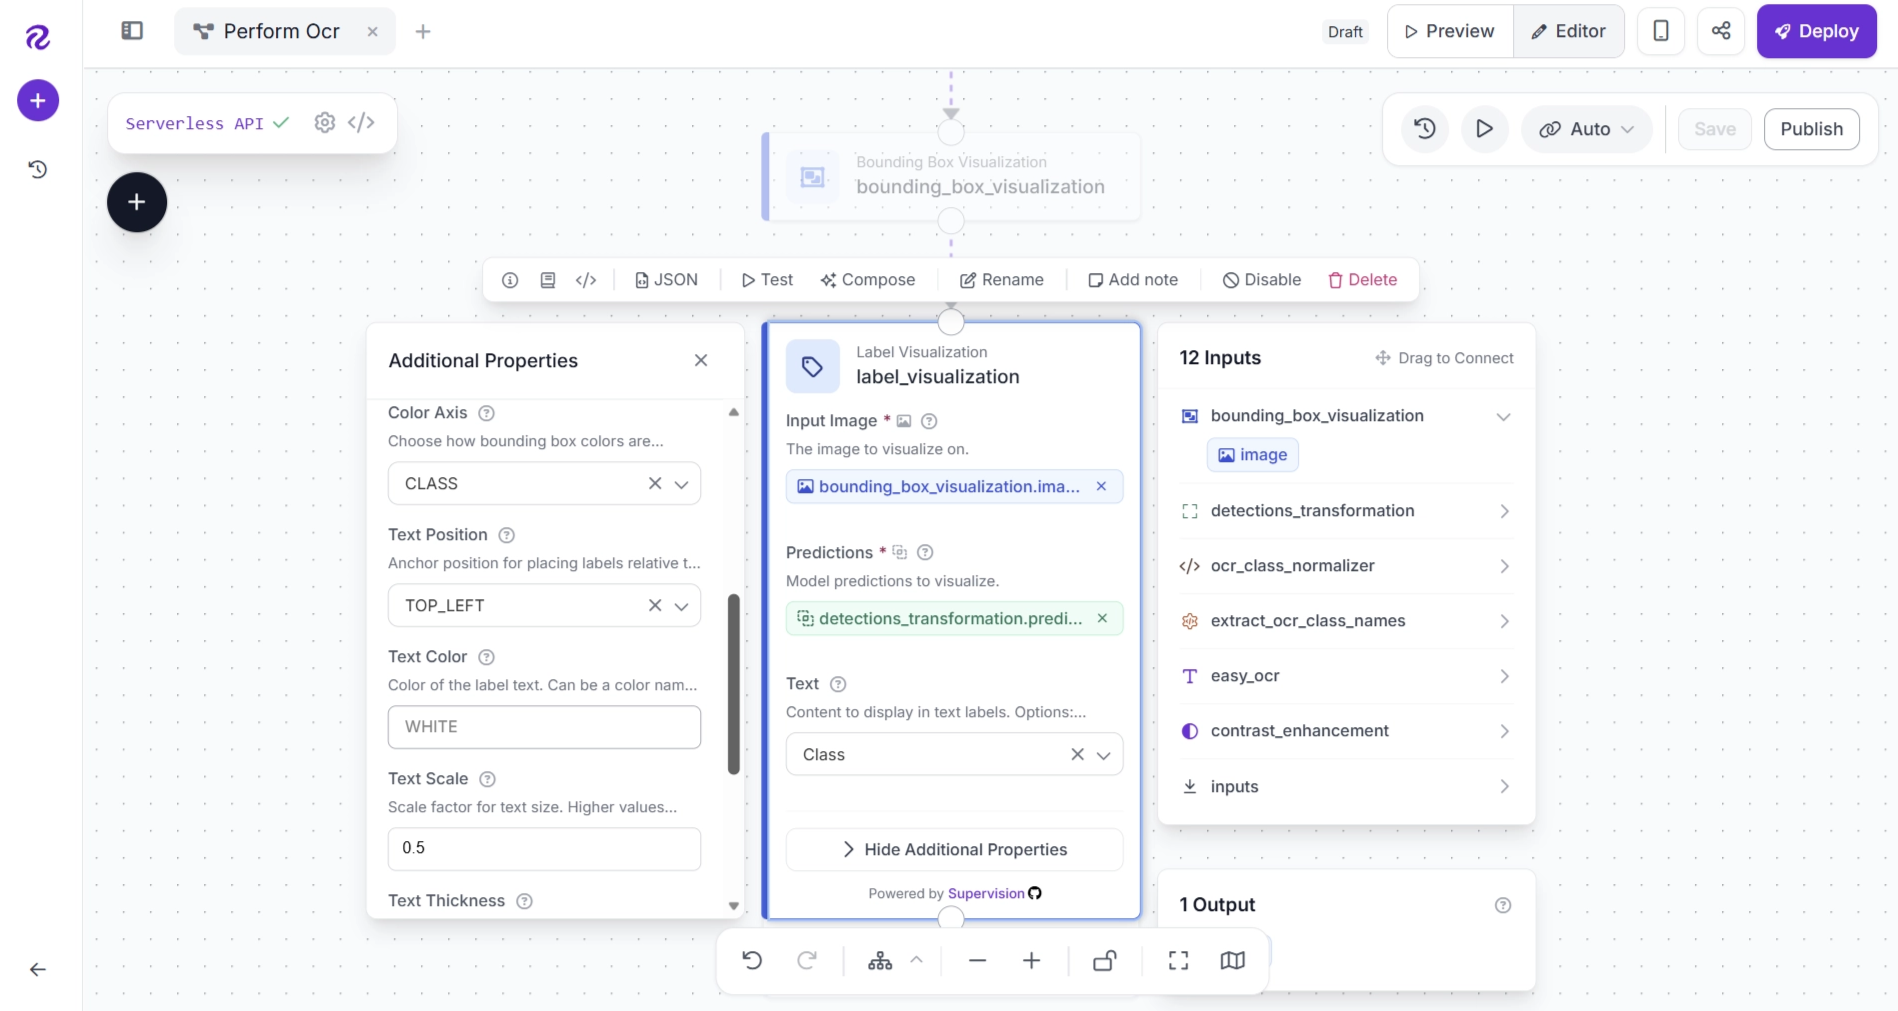
Next, configure the remaining of the Label Visualization block as shown below.
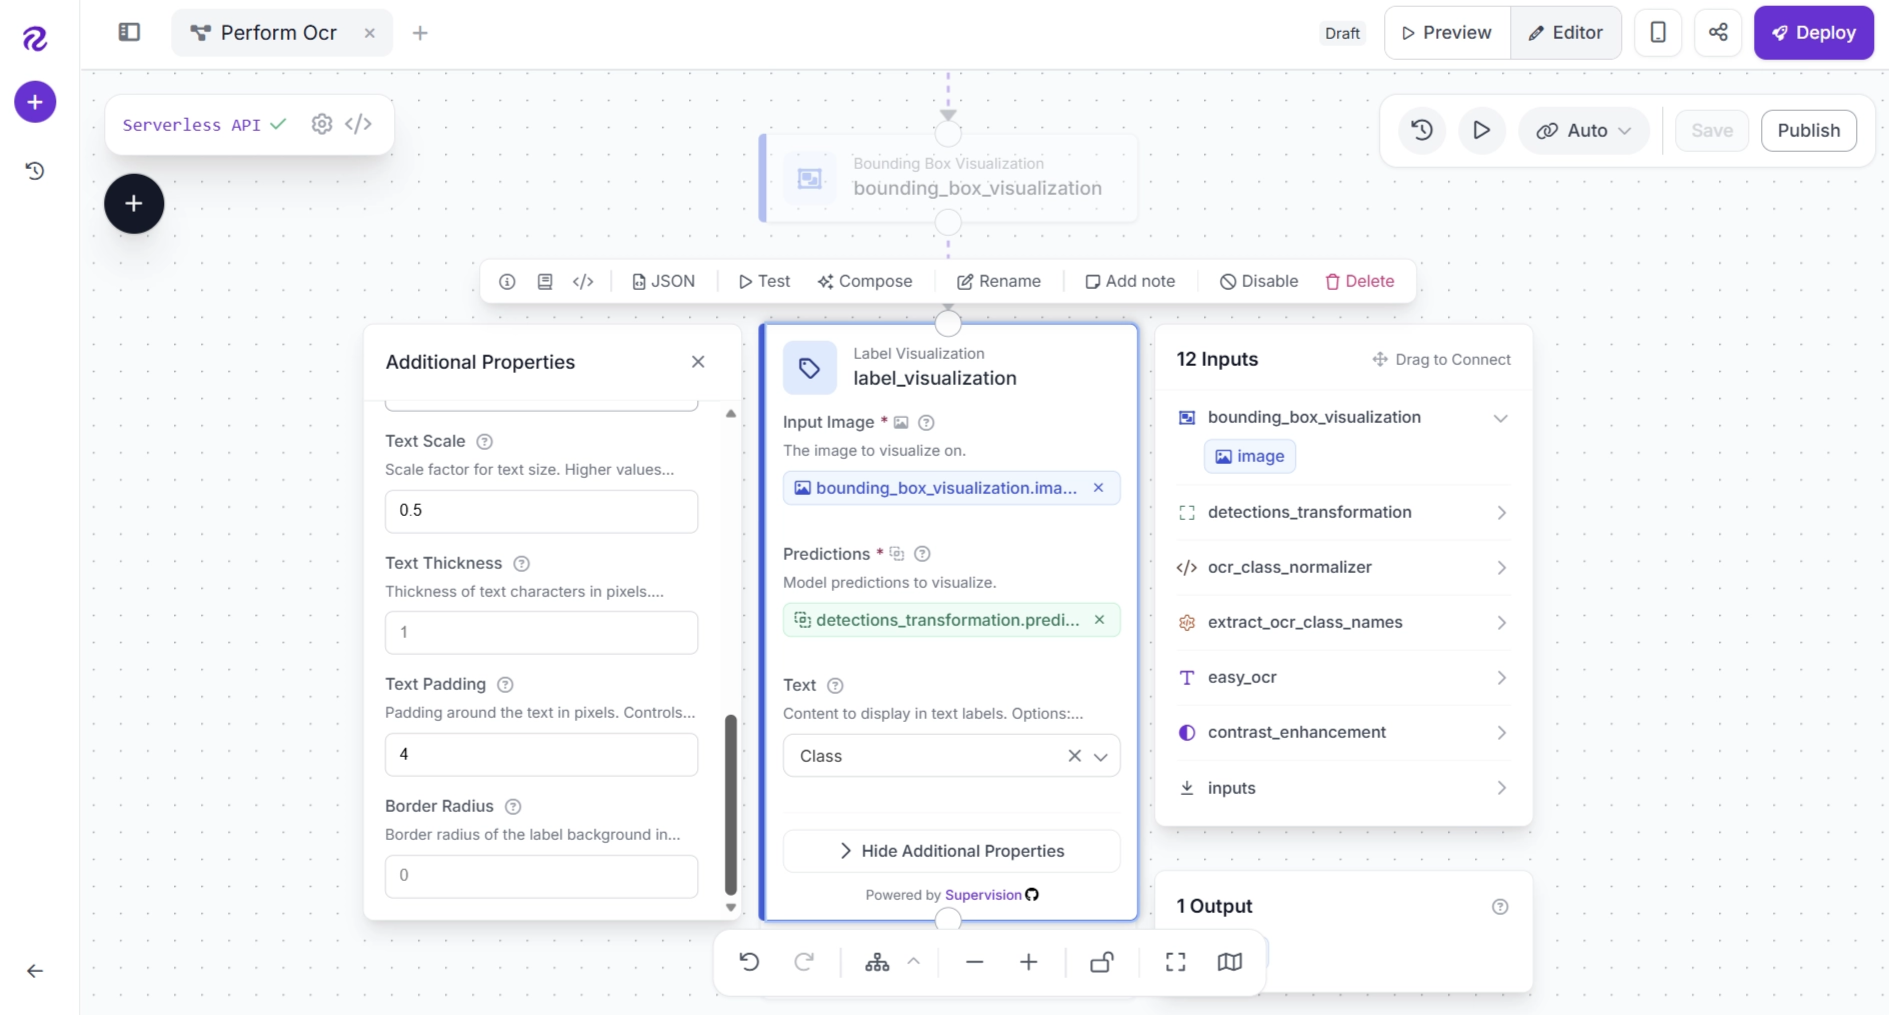
Step 9: Configure the Workflow Outputs
With all processing and visualization blocks added, the final step is to configure the outputs returned by the workflow.
First, remove any unnecessary outputs from the Outputs block.
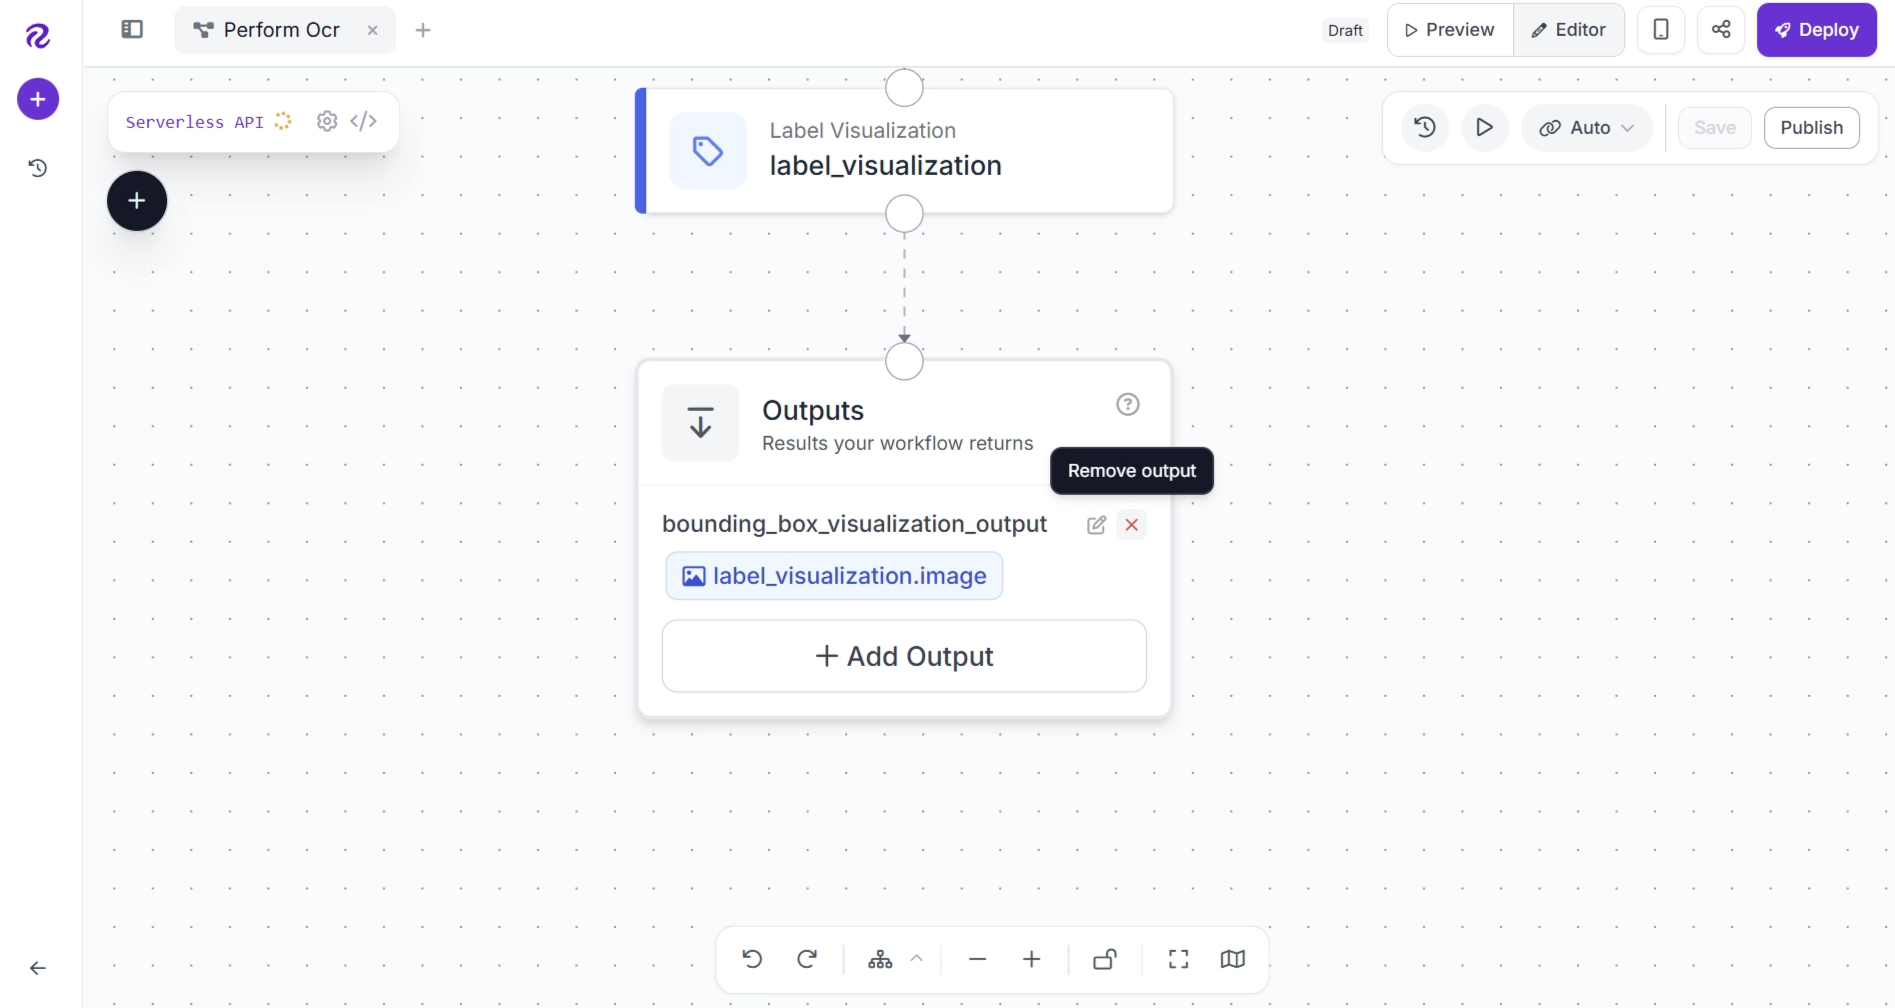
The Outputs block should look as shown below.
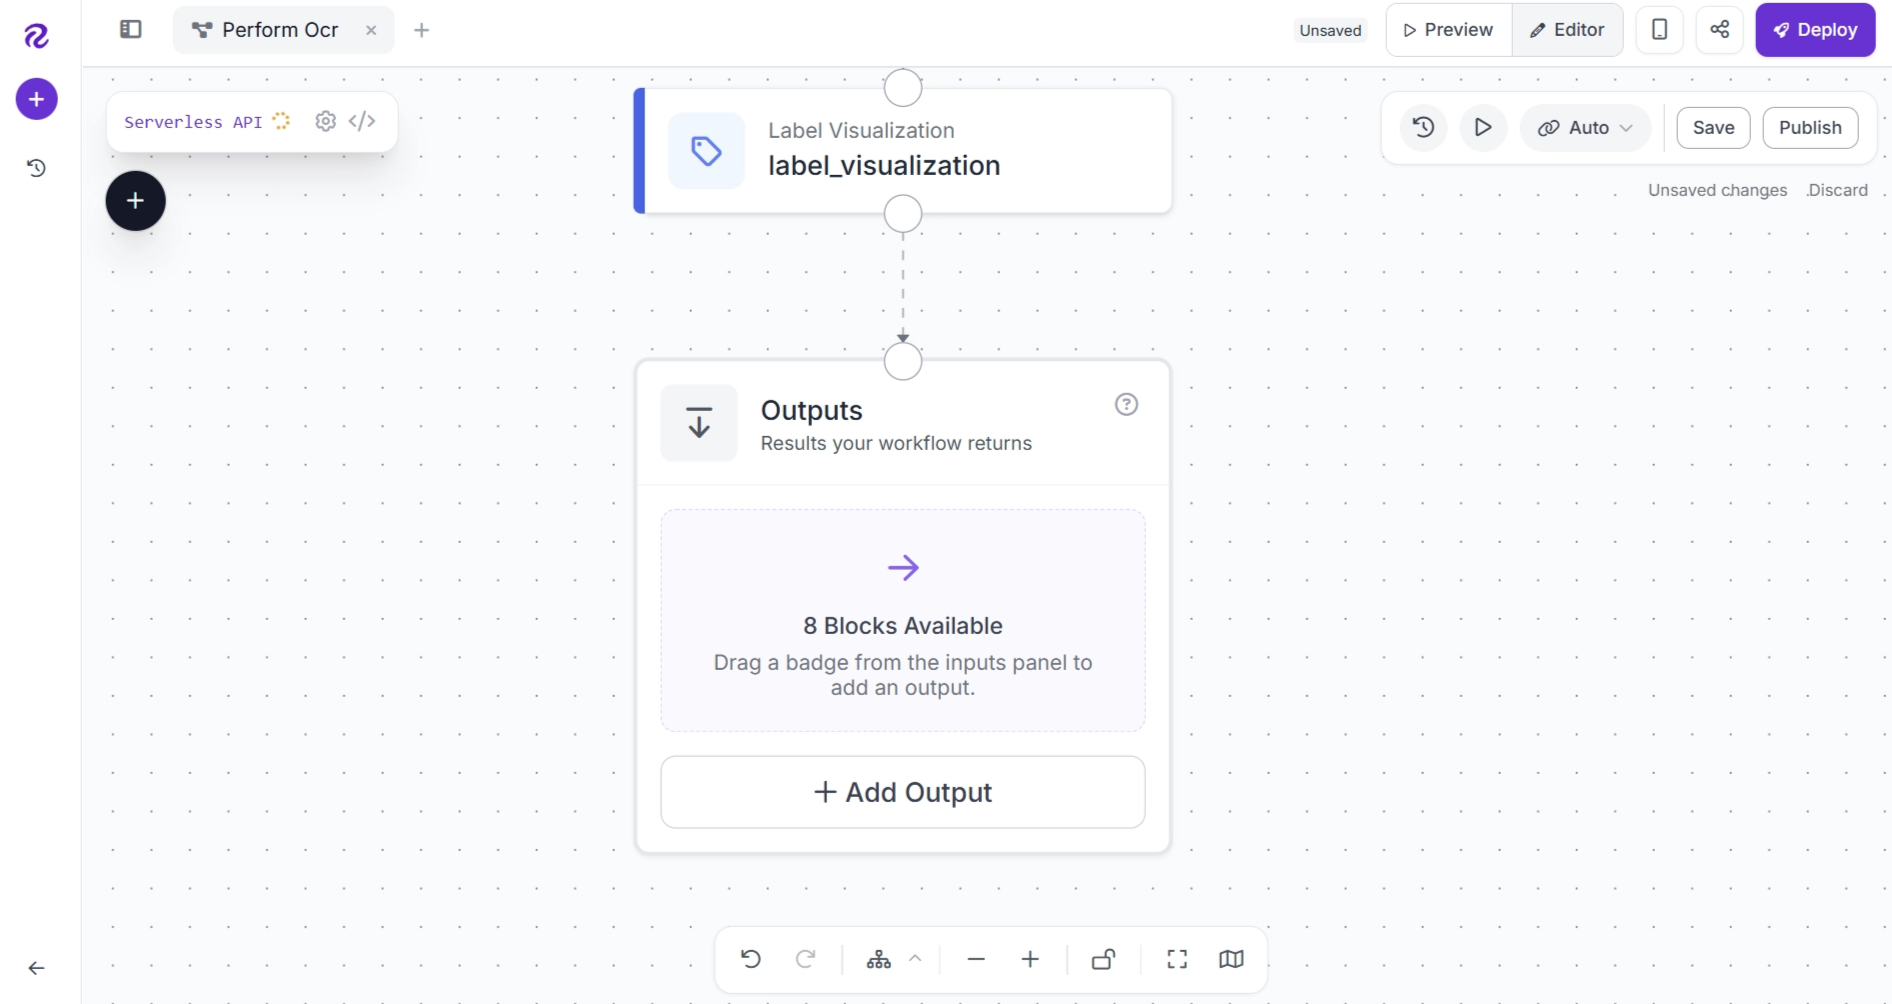
Click + Add Output to expose the values you want the workflow to return.
For this tutorial, add the following outputs:
- Image with bounding boxes and labels
- Original EasyOCR predictions
- Corrected OCR predictions
- OCR correction map (class_map)
These outputs make it easy to evaluate the performance of EasyOCR, compare it with other OCR models, and assess how different preprocessing or post-processing techniques affect the accuracy of your OCR workflow.
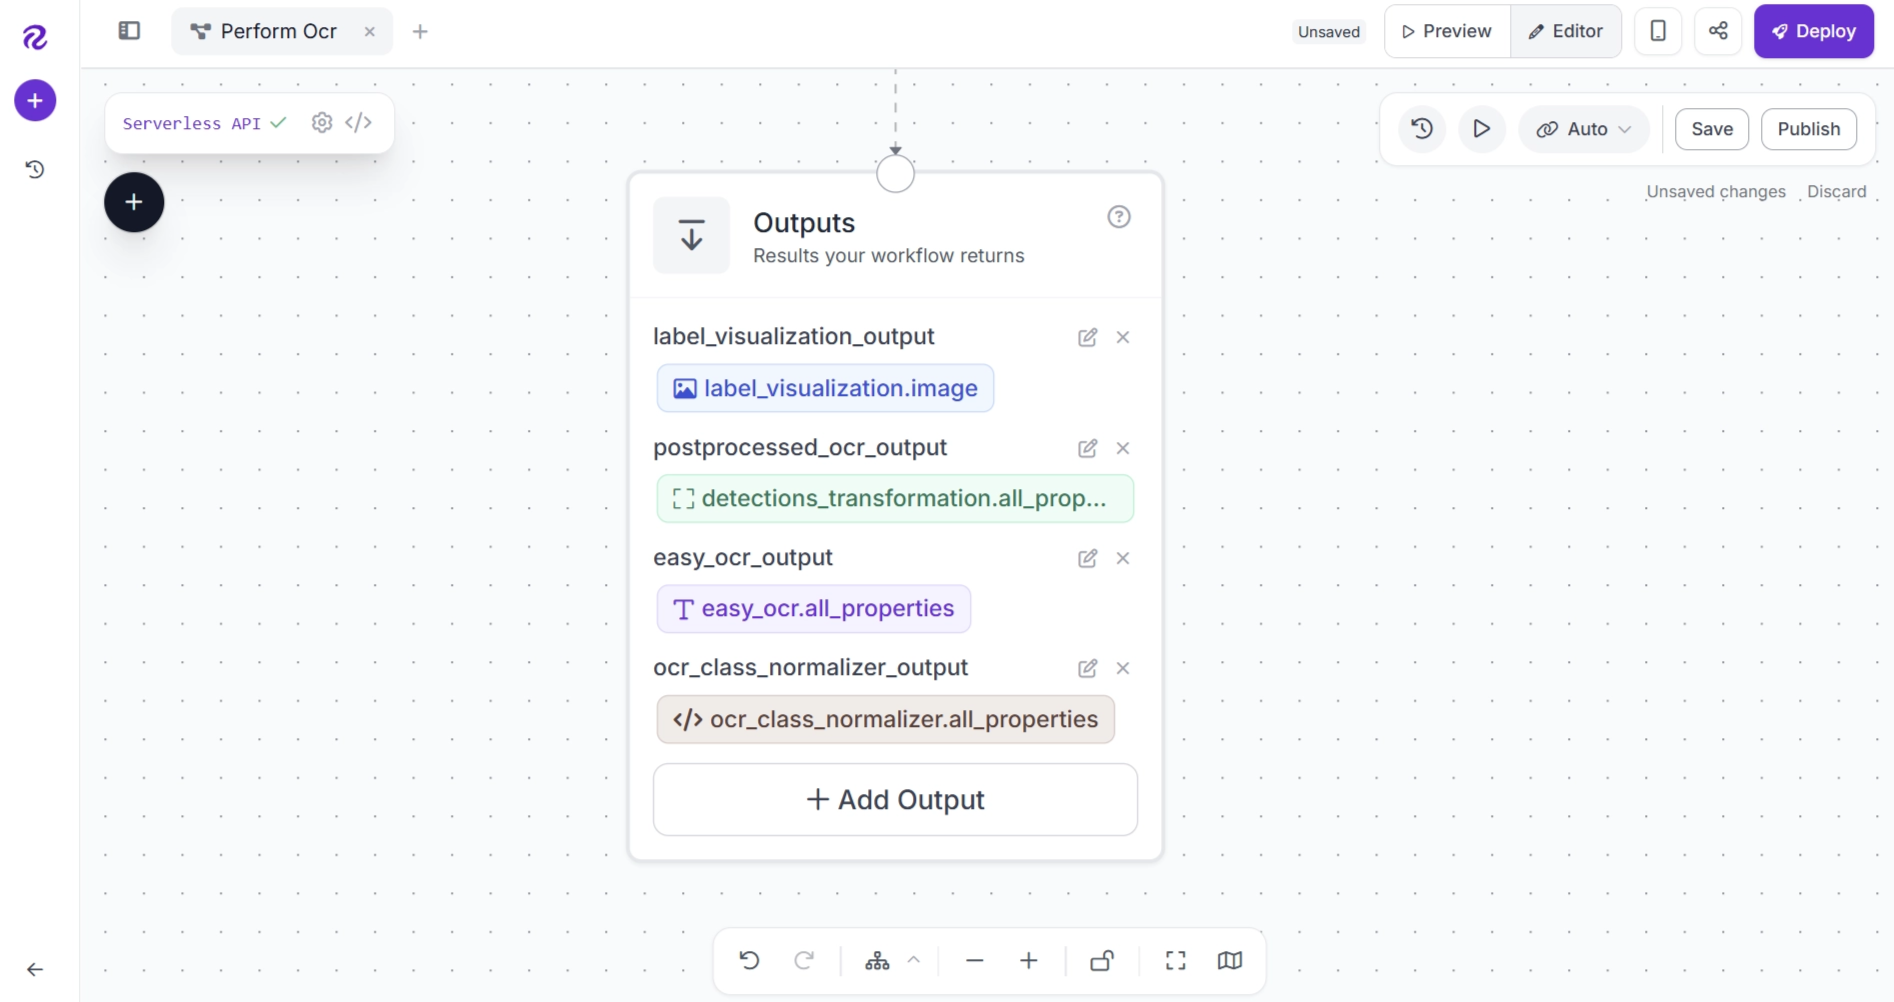
Step 10: Run the OCR Workflow
Your OCR workflow is now complete. Click Run in the Workflows editor to run it.
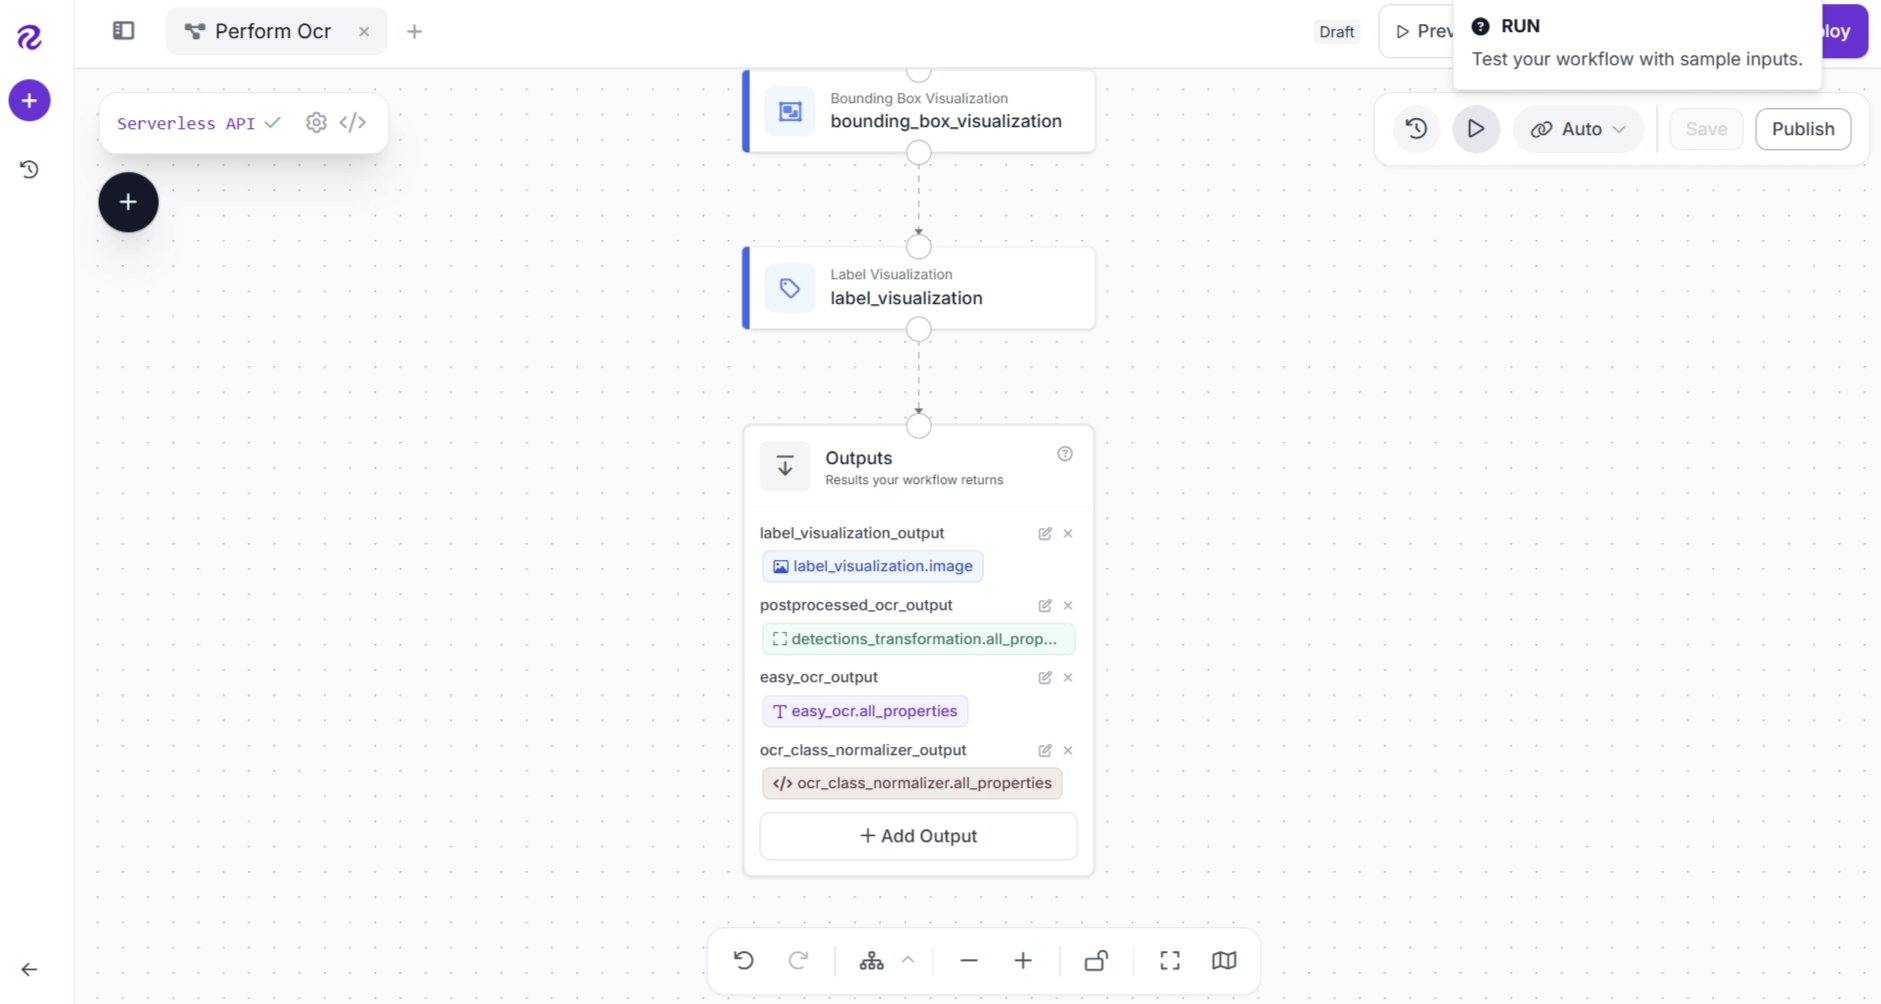
Upload an image to use as the input for inference.
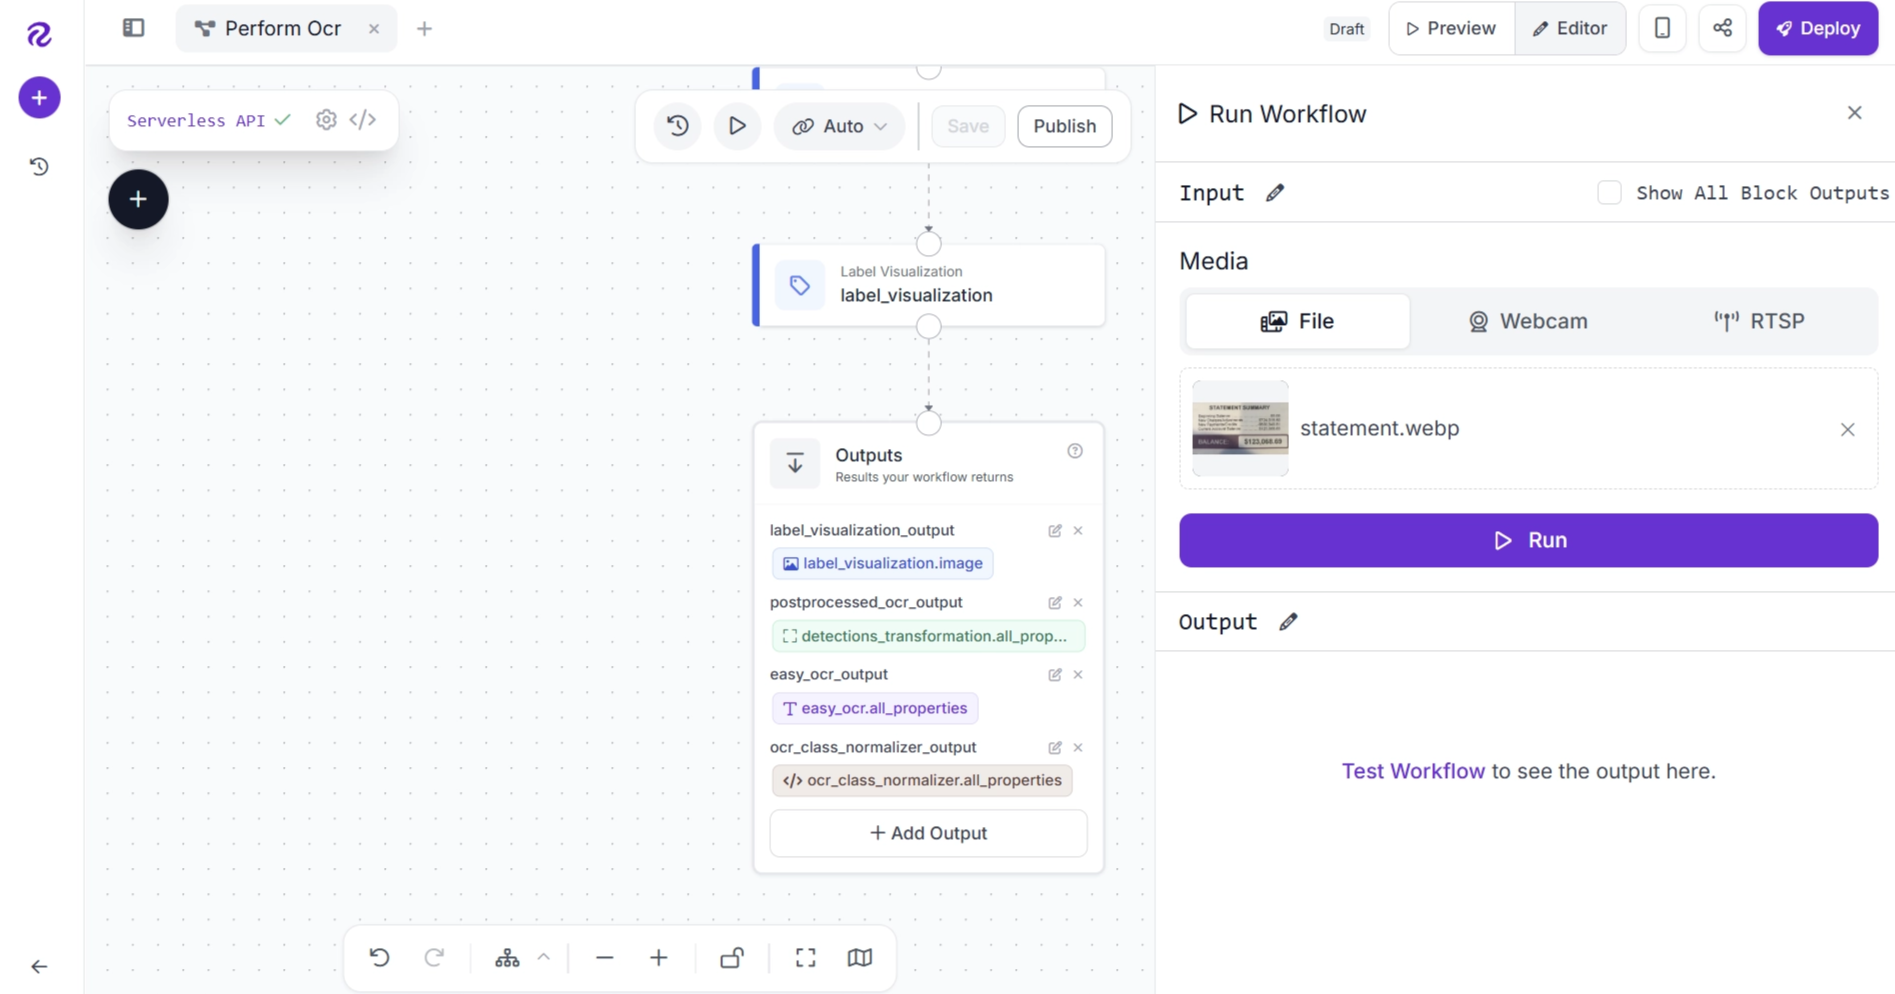
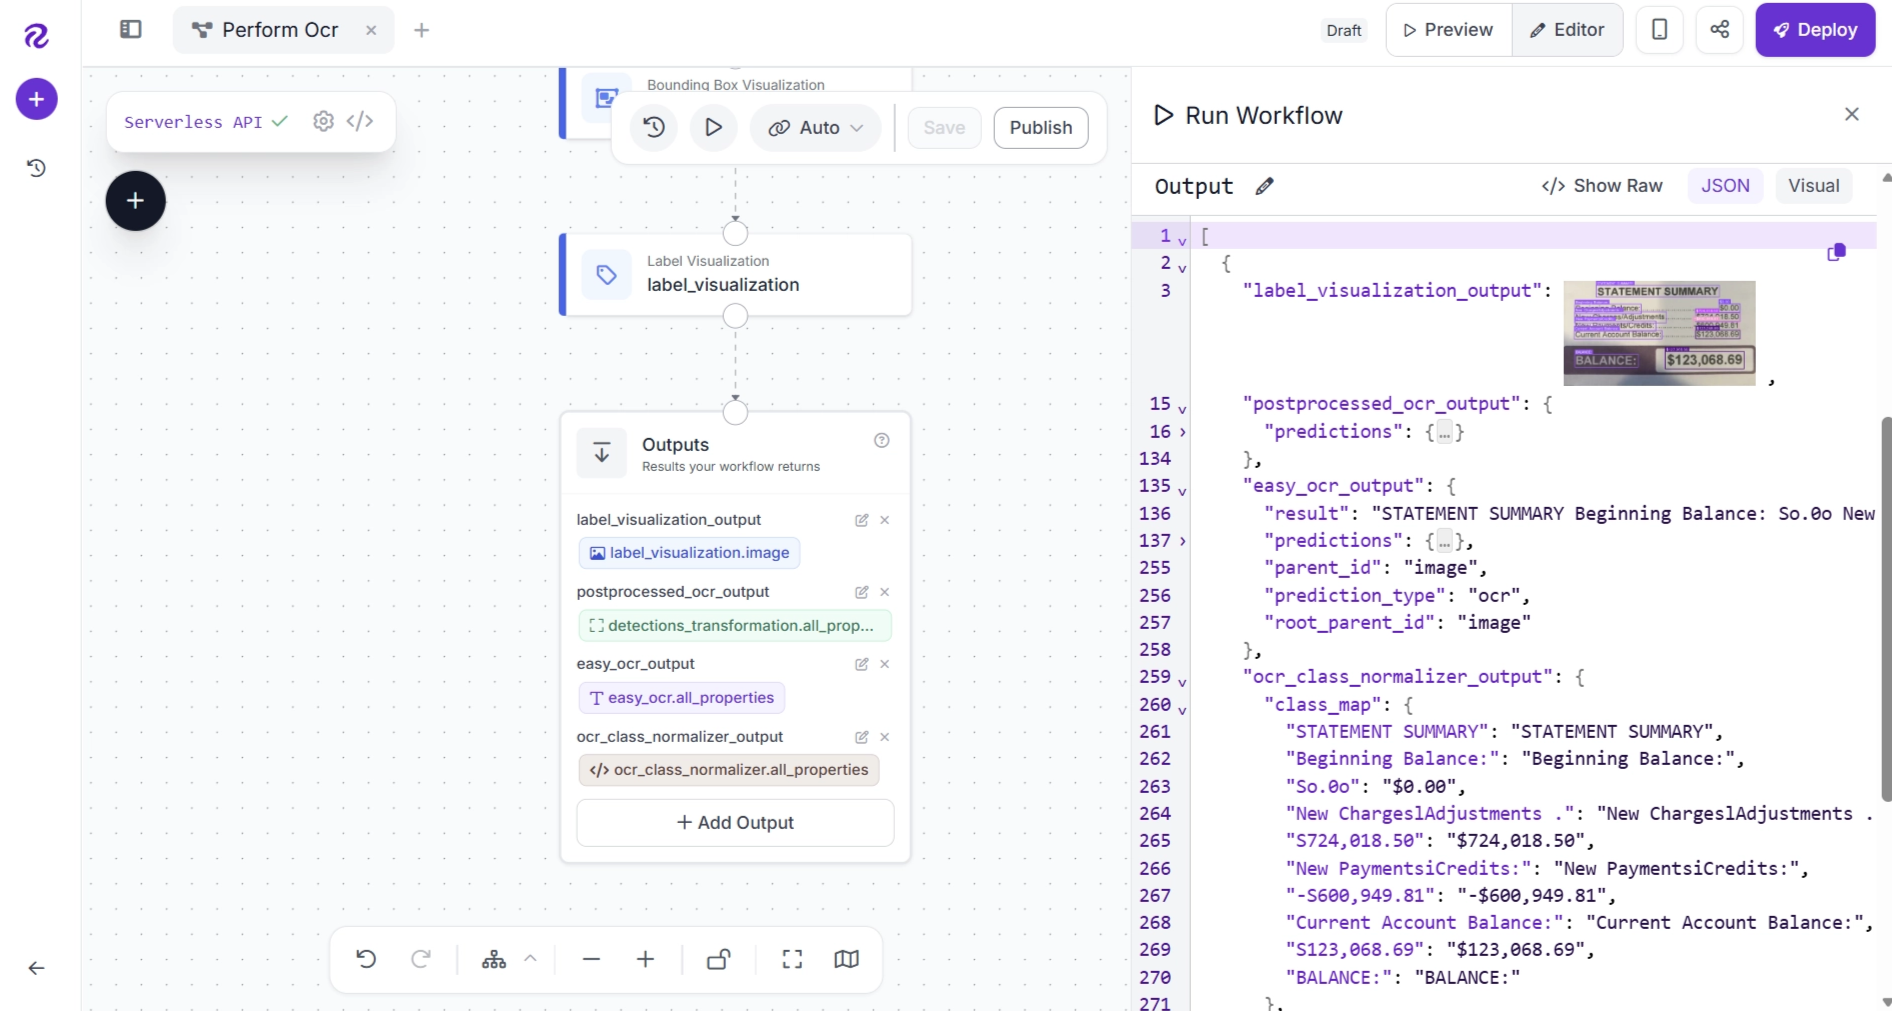
After the workflow finishes running, open the Outputs tab to review the generated results.
The workflow returns the following outputs:
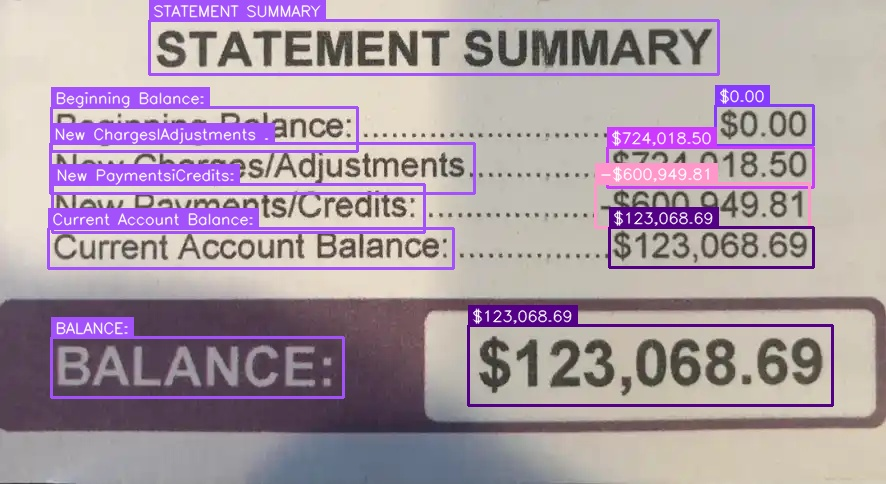
- The final visualization image with bounding boxes and corrected OCR labels
- The original OCR predictions generated by EasyOCR
- The corrected OCR predictions after applying postprocessing rules
- The OCR correction mapping (class_map) showing how each prediction was transformed
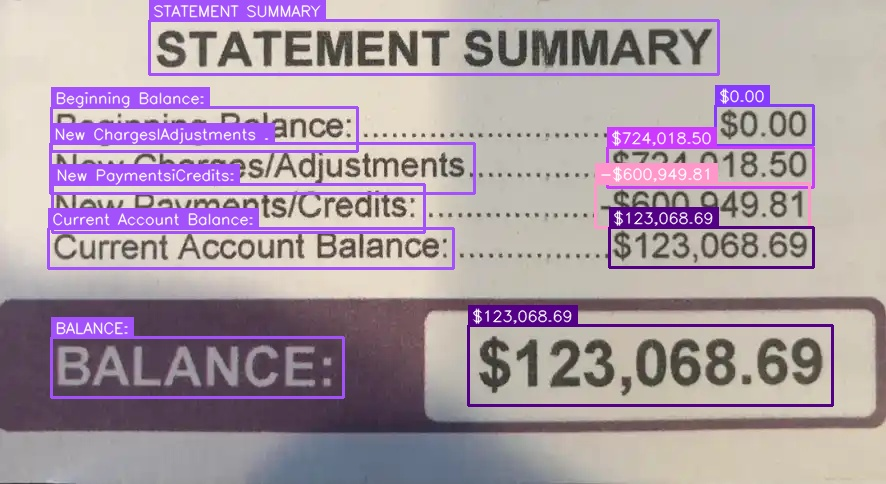
The image below shows the final visualized output generated by the complete OCR pipeline, including the detected text regions and the corrected OCR labels.
The workflow we built demonstrates how preprocessing, OCR inference, and postprocessing can be combined in Roboflow Workflows to create a customizable OCR pipeline.
By modifying individual blocks, you can adapt the workflow to support different document types, OCR models, and correction rules.
How to Deploy the OCR Workflow Using Roboflow Deploy?
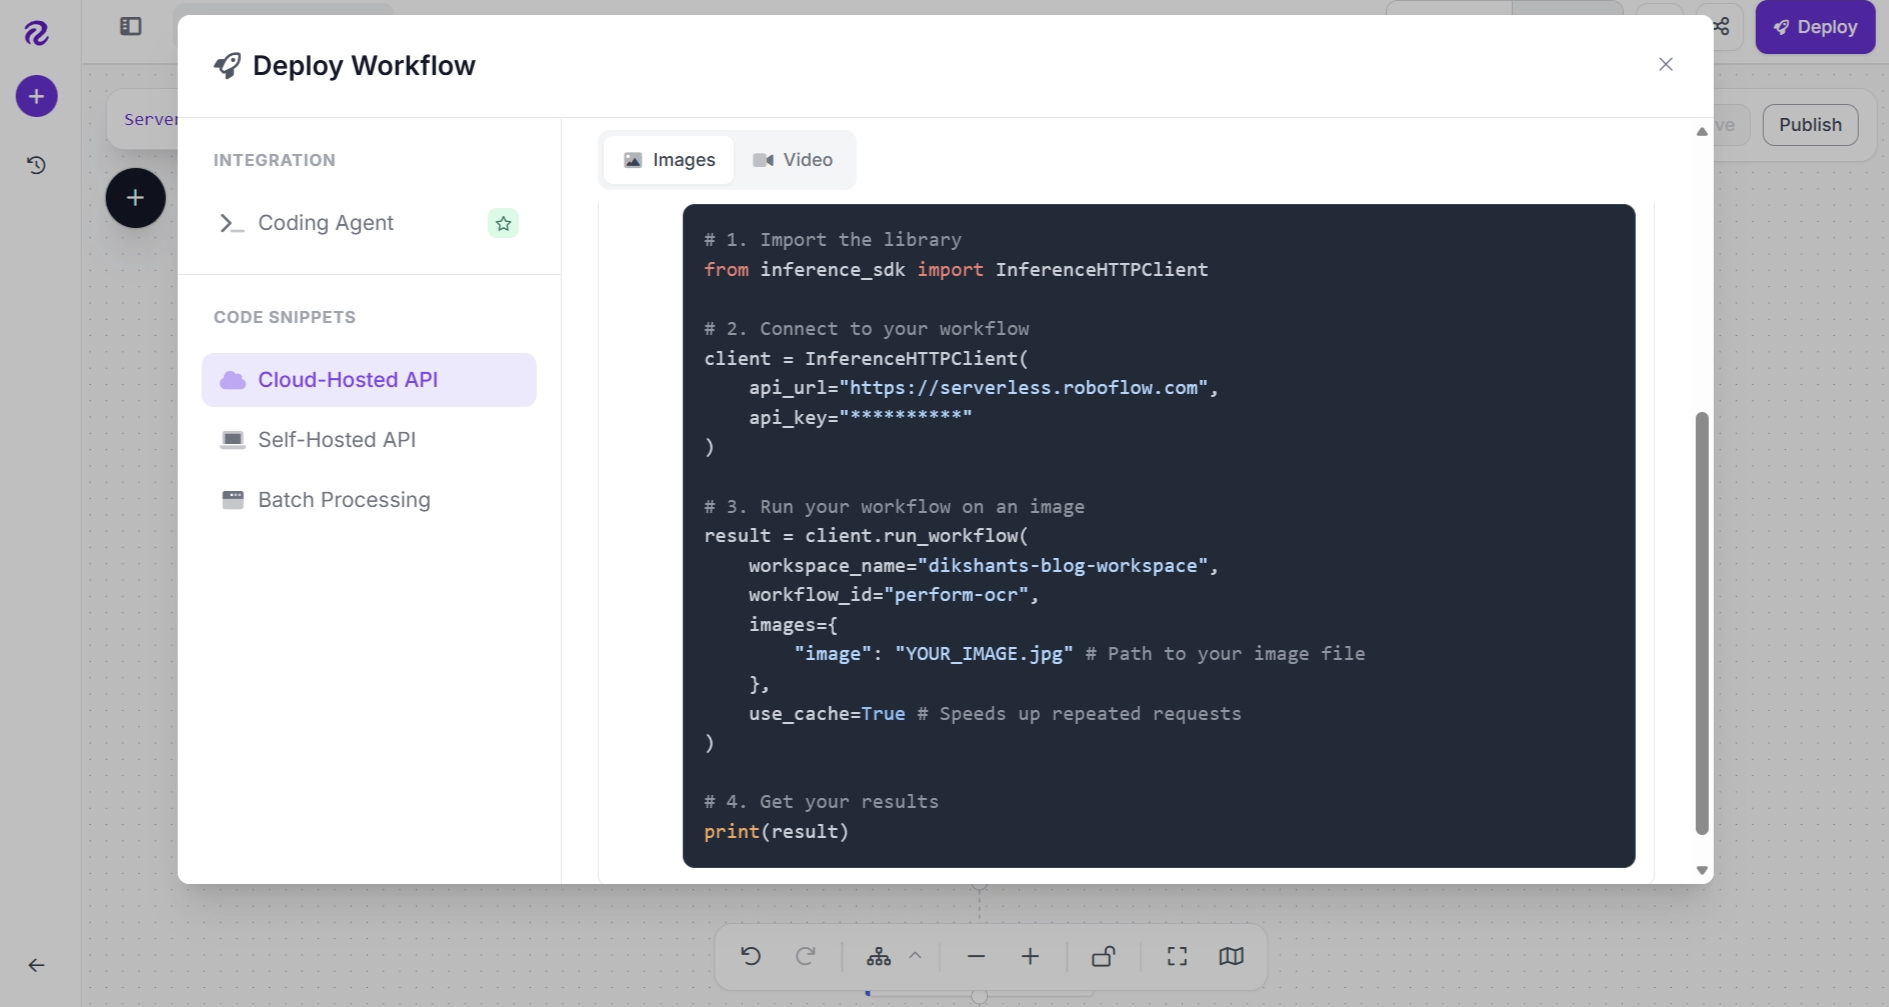
Once your OCR workflow is complete, click Deploy in the Workflows editor to open the deployment panel. From here, you can choose a deployment option and access everything you need to run your workflow in production.
Roboflow Deploy automatically generates production-ready code snippets that can be copied directly into your application. These generated snippets can also be used with AI coding assistants such as Codex, Claude, Cursor, and ChatGPT to accelerate workflow integration and application development.
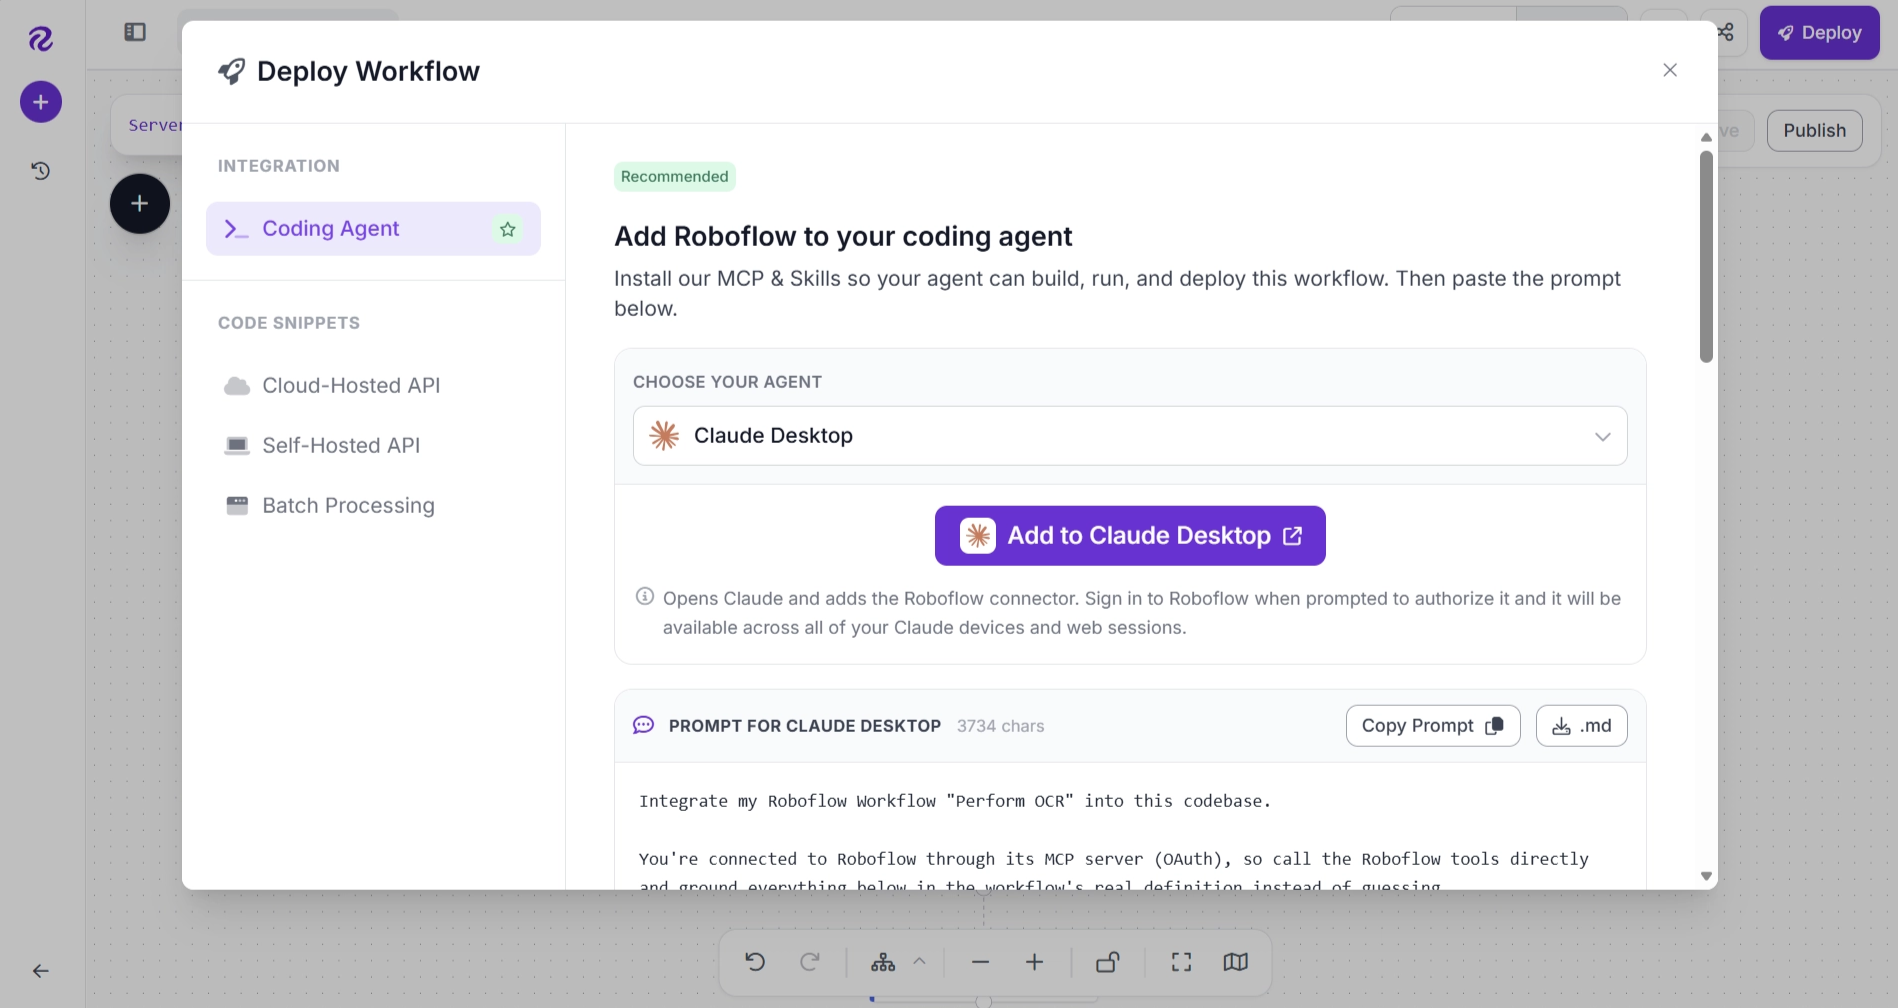
Roboflow Deploy supports both local and cloud-based deployment options. The Deployment panel provides ready-to-use code for running your workflow with different input sources, including images, video files, live webcam streams, and RTSP camera streams.
You can run your OCR workflow locally using Roboflow Inference for on-device processing or deploy it to the cloud using the Roboflow Hosted API, where inference usage is billed based on your available credits.
OCR Conclusion
OCR enables computers to extract and understand text from images, documents, and real-world environments, making it possible to automate tasks that traditionally require manual data entry.
However, building a reliable OCR pipeline involves more than selecting an OCR model. Real-world applications often require multiple components, including image preprocessing, OCR models, post-processing logic, visualization, and deployment.
With Roboflow Workflows, you can build complete OCR pipelines using a visual, low-code interface without manually integrating each component from scratch. By combining prebuilt blocks for image enhancement, OCR models and frameworks, custom processing logic, and visualization, you can quickly experiment with different pipeline configurations, compare OCR models, and identify the best solution for your specific use case.
For applications such as document extraction, receipt processing, form analysis, and custom document AI solutions, Roboflow Workflows provides the tools to prototype, test, refine, and deploy OCR pipelines faster.
Start building OCR workflows with Roboflow Workflows for free.


Cite this Post
Use the following entry to cite this post in your research:
Dikshant Shah. (Jun 25, 2026). Optical Character Recognition (OCR): How It Works. Roboflow Blog: https://blog.roboflow.com/what-is-optical-character-recognition-ocr/