Morphological operations are a set of techniques used in image processing to analyze and modify the shape and structure of objects within an image. The morphological operations are based on the mathematical theory of morphology, which studies the properties of shapes and patterns.
Morphological operations are typically applied to binary images, although some operations can also be applied to grayscale images. These operations are used to remove noise, separate or extract specific shapes, and perform various other tasks in image analysis. Here are some of the most common morphological operations:
- Erosion
- Dilation
- Opening
- Closing
- Top-hat Transform
- Skeletonization
- Thinning
In this guide, we are going to discuss morphological operations in image processing. We will walk through several techniques and how to apply them using the scikit-image (skimage) Python package.
Before we learn about each of the above operations, let's first understand an important concept used in all morphological operations: structuring elements.
Structuring Elements
A structuring element is a matrix used in morphological operations to define the neighborhood or pattern of pixels that are processed together. The shape and size of the structuring element determine how the morphological operation interacts with the pixels in the image.
Below are the common types of structuring elements that are typically used.
Square/Rectangle
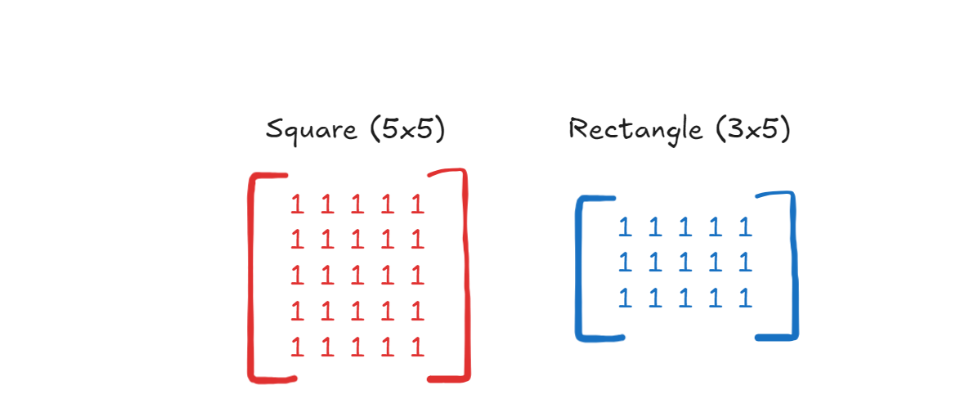
In this element, there is is a matrix of ones in a square or rectangular pattern. Uniformly affects all pixels in the neighborhood. Often used for basic operations due to its simplicity.
Disk or Circle
A disk or circle structural element is a circular pattern where the center pixel is surrounded by a neighborhood of pixels that form a circle. It provides isotropic effects, meaning uniform changes in all directions. Ideal for processing circular objects or when a uniform impact in all directions is needed.

Cross
A cross structural element pattern is shaped like a cross, typically derived from a square by retaining only the central row and column. Emphasizes changes along the horizontal and vertical directions. Useful for operations that require preservation of linear features or lines.

Ellipse
An elliptical structural element pattern, which is like the disk but elongated in one direction. It has anisotropic effects, meaning more influence in one direction. Useful for processing elongated structures or features that are stretched in one direction.

Diamond
A diamond-shaped structural element pattern, often a variation of a cross, but with diagonal influence. Combines the properties of a cross and a square, affecting pixels diagonally as well. Useful for operations that require a balanced influence between diagonal and orthogonal directions.

Custom Shapes
You can also use custom-defined shapes, tailored to specific needs. Provides flexibility for unique image processing tasks where standard shapes are not sufficient.

Morphological Operations
In this section we will understand each morphological operation listed above. We will use Scikit-Image library to implement the morphological operations. Please follow example notebook for code implementation alongside this blog.
For our example we are using the following source images.

The source images are converted to binary and grayscale images respectively before applying the morphological operations as shown below.

Erosion
Erosion shrinks or reduces the boundaries of the foreground objects by a certain amount based on a structuring element (also called a kernel).
Erosion has two components:
- Structuring Element: The erosion operation involves a structuring element (also called a kernel), which is a small matrix used to probe the input image.
- Binary Image: Erosion is typically applied to a binary image where pixels are either 1 (white) or 0 (black).
This process results in the following:
- Foreground Objects Shrink: Small details in the foreground are removed.
- Object Boundaries: The edges of the objects are eroded (retracted) inward by the size of the structuring element.
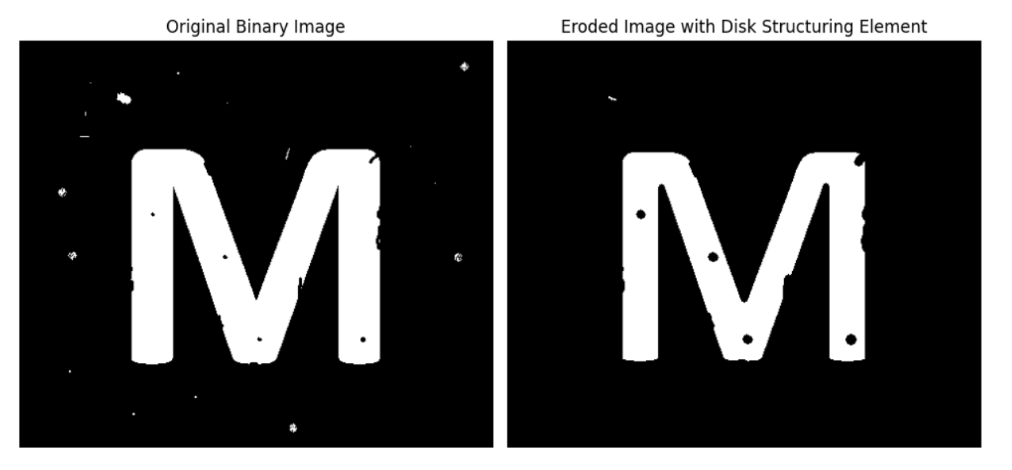
Imagine you have a binary image with a large letter "M". Erosion with a disk-shaped structuring element will cause the boundaries of the "M" to shrink inward. Small details or noise around the letter will be removed. Following code shows how to perform erosion:
# Define a disk-shaped 7x7 structuring element
selem = disk(3)

# Apply erosion
eroded_image = erosion(binary_image, selem)
Following is the output.
Dilation
Dilation is another fundamental morphological operation that complements erosion. While erosion shrinks objects in a binary image, dilation expands them. The basic idea behind dilation is to grow or increase the boundaries of foreground objects based on a structuring element.
Dilation has two components:
- Structuring Element: Dilation involves a structuring element, which is a small matrix used to probe the input image.
- Binary Image: Dilation is typically applied to a binary image where pixels are either 1 (white) or 0 (black).
This process results in the following:
- Foreground Objects Expand: The objects in the foreground (white regions) grow outward.
- Bridging Gaps: Small gaps or holes in the foreground objects can be filled.
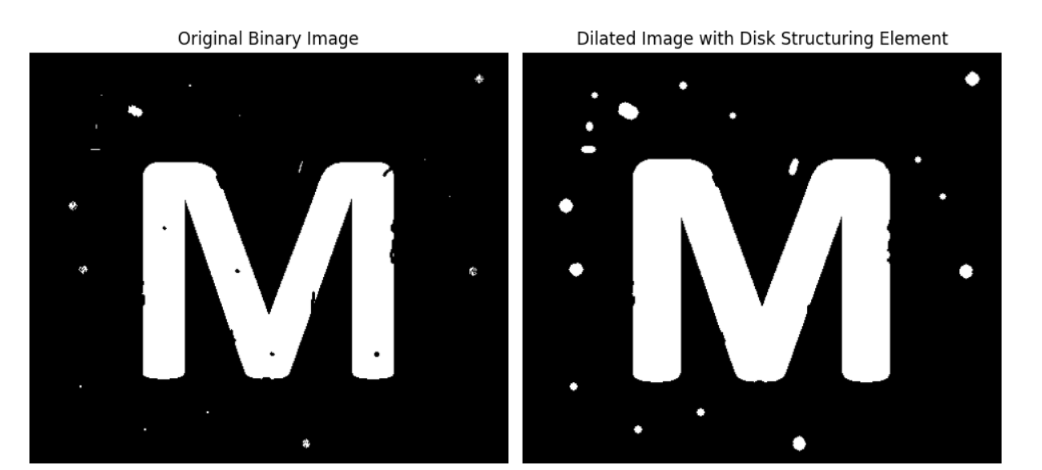
Imagine you have a binary image with a large letter "M". Dilation with a disk-shaped structuring element will cause the boundaries of the "M" to expand outward. Small gaps or noise in the letter can be filled. Code below shows how to apply dilation:
# Define a disk-shaped 7x7 structuring element
selem = disk(3)

# Apply dilation
dilated_image = dilation(binary_image, selem)
Following is the output generated by code.
Opening
Opening is a morphological operation that combines erosion followed by dilation. It is primarily used to remove small objects or noise from an image while preserving the shape and size of the larger objects.
Here are the two parts of opening:
- Erosion: The first step in opening is erosion, which removes small objects or details from the foreground (white regions) by shrinking the boundaries of the objects.
- Dilation: After erosion, dilation is applied, which restores the size of the remaining objects. However, since the smaller objects were completely eroded away in the first step, they are not restored, effectively removing them from the image.
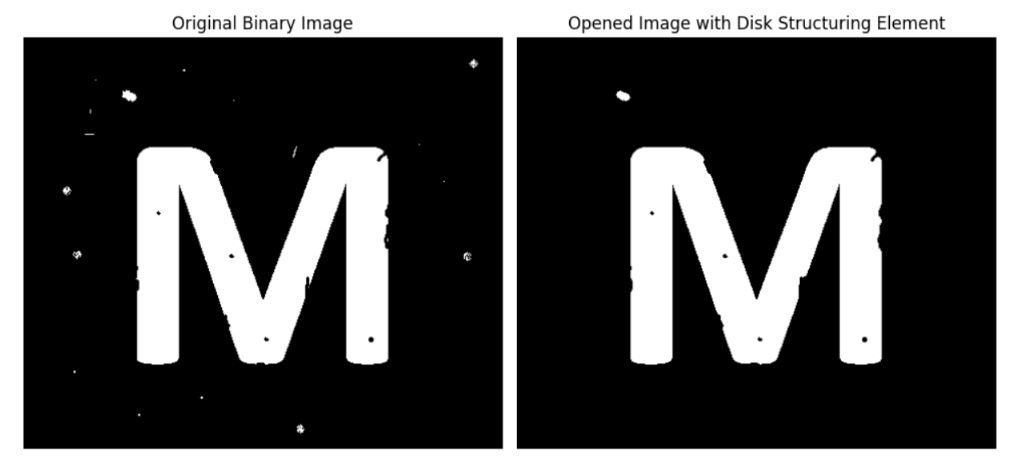
The key effect of opening is that it smooths the contour of objects, breaks narrow isthmuses, and eliminates thin protrusions. It is particularly useful for removing noise or small objects that are not connected to the main objects in the image.
Consider an image with small noise or specks around a large object, such as the letter "M". Applying the opening operation will remove the small noise while preserving the shape of the letter. Following is the code to apply opening operation:
# Define a disk-shaped structuring element
selem = disk(3)

# Apply opening (erosion followed by dilation)
opened_image = opening(binary_image, selem)
The code will generate the following output:
Closing
Closing combines dilation followed by erosion. It is essentially the reverse of the opening operation and is used to close small holes, gaps, or spaces within the foreground objects while preserving their overall shape.
Here are the two components in Closing:
- Dilation: The first step in closing is dilation, which expands the boundaries of the foreground objects (white regions) in the binary image. This step helps in filling small holes or gaps within the objects.
- Erosion: After dilation, erosion is applied. The erosion step shrinks the boundaries back, restoring the original size of the objects. However, any small holes or gaps that were filled during the dilation step will remain filled, effectively "closing" them.
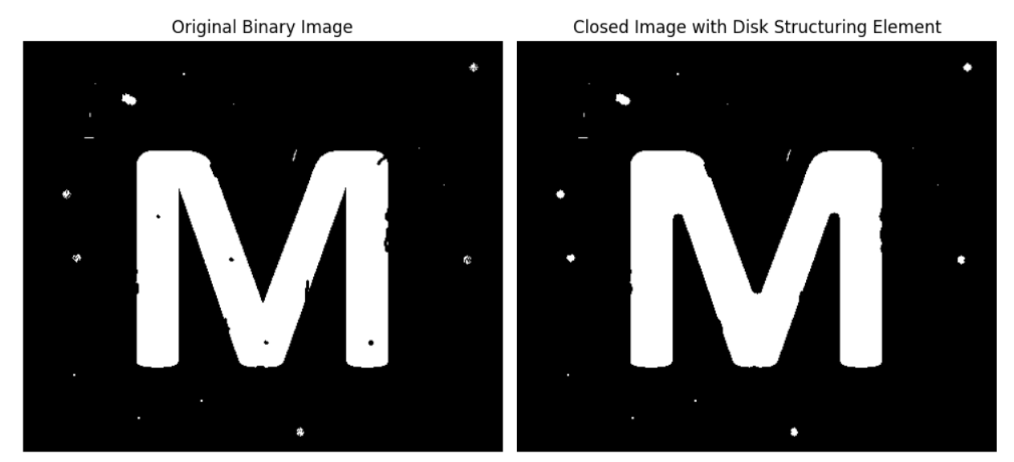
The key effect of closing is that it smooths the contours of objects, fuses narrow breaks and long thin gulfs, eliminates small holes, and fills gaps in the contours of objects.
Consider an image with small gaps or holes within a large object, such as the letter "M" with small holes or gaps. Applying the closing operation will fill these holes or gaps while preserving the overall shape of the letter. Code below shows how to apply a closing operation:
# Define a disk-shaped structuring element
selem = disk(5)

# Apply closing (dilation followed by erosion)
closed_image = closing(binary_image, selem)
The code generates the following output.
Top-Hat Transform
The Top-Hat Transform is a morphological operation used to enhance features in an image, such as small objects or bright details on a darker background. It is particularly useful in applications like image enhancement, background equalization, and feature extraction.
There are two types of top-hat transforms:
White Top-Hat Transform:
This transform extracts small, bright objects or regions from an image. It is defined as the difference between the original image and its opening.
White Top-Hat=Original Image−Opening
How the White Top-Hat Transform Works
- Opening: The opening operation is performed first, which consists of an erosion followed by a dilation. This operation removes small bright structures and noise from the image.
- Subtraction: The result of the opening is then subtracted from the original image, highlighting the small bright structures that were removed during the opening process.
Black Top-Hat Transform:
This transformation extracts small, dark objects or regions from an image. It is defined as the difference between the closing of the image and the original image.
Black Top-Hat=Closing−Original Image
Here is how black top-hat transforms work:
- Closing: The closing operation consists of a dilation followed by an erosion. It fills small dark regions and gaps within an image, effectively smoothing out the background and brightening dark features.
- Subtraction: The original image is subtracted from the closed image. This operation highlights the dark features that were filled in during the closing process, making them more prominent against the lighter background.
Consider a grayscale image where small bright objects or features are present on a darker background (e.g. a number plate on a car). The white top-hat transform will enhance these bright features by removing the background and keeping only the small bright objects.
The Black Top-Hat Transform (often just called the Black-Hat Transform) emphasizes small dark features or details that are darker than their surrounding background. When applied to an image, the black top-hat transform highlights these dark areas by subtracting the original image from the result of the closing operation.
Following is the code to implement both operations:
# Define a disk-shaped structuring element
selem = disk(12)

# Apply white top-hat transform to enhance small bright features
white_tophat_image = white_tophat(gray_image, selem)

# Apply black top-hat transform to enhance small dark features
black_tophat_image = black_tophat(gray_image, selem)
Following the output of the code.

Skeletonization
Skeletonization is a morphological operation that reduces binary objects in an image to their skeletons, or thin structures, while preserving the topological and geometric properties of the original shapes. This process transforms a shape into a single-pixel-width line, which makes it easier to analyze the shape's structure and connectivity.
Here is how skeletonization works:
- Thinning: The skeletonization process typically involves iterative thinning. The image is progressively thinned from the edges inward until only the skeleton remains.
- Preservation of Connectivity: The algorithm ensures that the connectivity of the objects is preserved throughout the thinning process. This means that the resulting skeleton retains the same topological features as the original object.
- Edge Conditions: Special care is taken to handle edge conditions and ensure that the thinning process does not break the connectivity or shape of the objects.
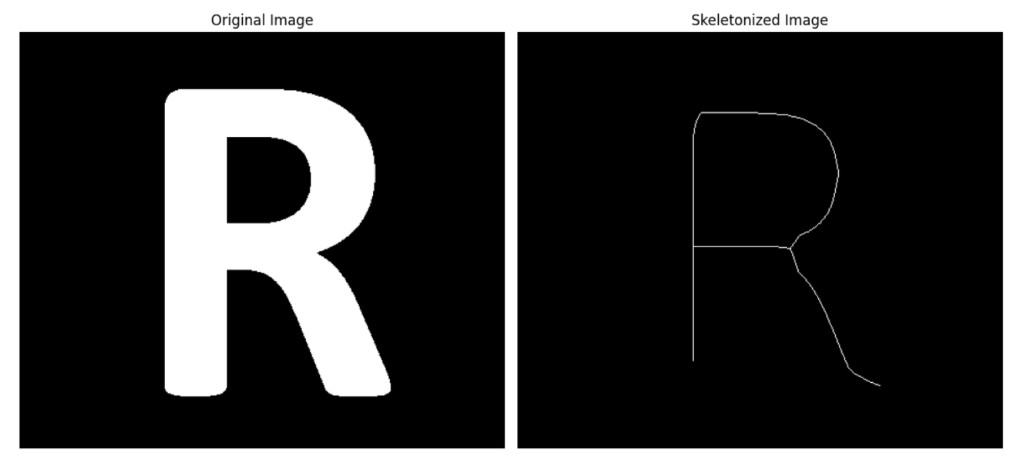
Consider a binary image of the letter "R". This example shows that objects are reduced to thin lines representing their skeletons. Belo is the code for Skeletonization
# Perform skeletonization
skeleton = skeletonize(binary_image)
You will see output like following.
Thinning
Thinning is used to reduce the thickness of objects in a binary image to a single-pixel-wide representation. It is similar to skeletonization but focuses on reducing object thickness without necessarily preserving the exact medial axis of the shape. The goal of thinning is to reduce the foreground objects to their skeletal forms, which are one pixel wide, while preserving the object's shape and connectivity.
Here are the stages of thinning:
- Pixel Removal: During each iteration, a pixel is removed if it meets certain criteria related to its neighbors. For example, a pixel might be removed if it has a certain number of white neighbors or if removing it does not disconnect the object.
- Multiple Passes: Thinning often requires multiple passes over the image, with different criteria for each pass, to ensure that the object is reduced to a one-pixel-wide line.
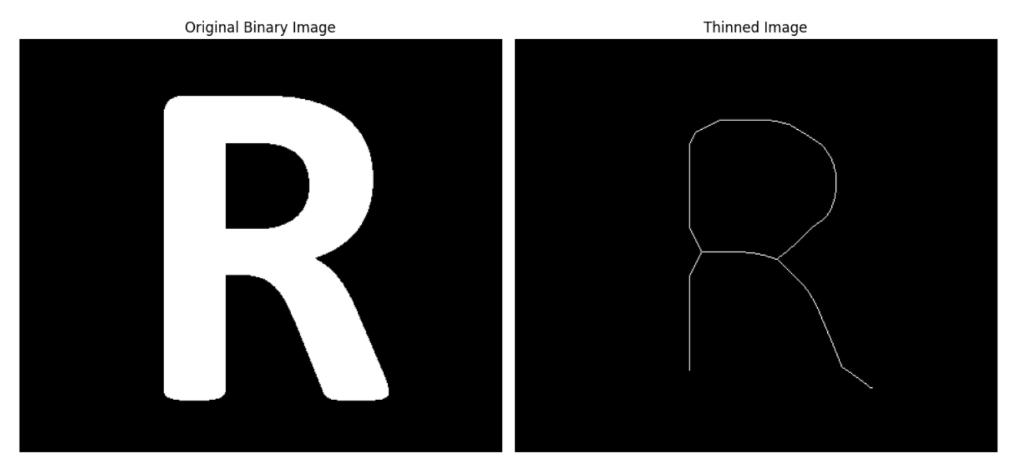
Let's apply thinning to a simple binary image, such as a letter "R". This example will demonstrate how thinning reduces the thickness of the letter to a single-pixel-wide line. Below is the code example for thinning:
# Perform thinning
thinned_image = thin(binary_image)
The output image looks like the following.
Conclusion
In this blog, we explored various morphological operations in image processing, including erosion, dilation, opening, closing, top-hat and black-hat transforms, skeletonization, thinning etc.
We learned how these operations modify images based on the shapes of structuring elements, which serve as probes to analyze the spatial structure of images.
Morphological operations can be used for various purposes such as Noise Removal, Shape Analysis and Feature Extraction, Image Enhancement, Preprocessing for Computer Vision.
Morphological operations are powerful tools in image processing, providing a foundation for more advanced techniques and practical applications in various fields.
You can download code for this blog here.
Cite this Post
Use the following entry to cite this post in your research:
Timothy M. (Sep 3, 2024). Morphological Operations in Image Processing. Roboflow Blog: https://blog.roboflow.com/morphological-operations/
