
Tracking football players across video frames requires both detection and multi-object tracking. This tutorial walks through building a player tracking system using a custom-trained detection model and ByteTRACK, starting from a failed attempt with a COCO-pretrained model and progressing to a dataset built from Bundesliga footage. The resulting pipeline assigns each player a persistent ID across frames, enabling downstream analysis such as measuring distance traveled, mapping field zones visited, and reconstructing how the ball moved between players.
I have long been fascinated by the use of Computer Vision (CV) in sports. After all, it is a combination of two things I love. Almost three years ago, I wrote a post on my personal blog in which I tried — at that time, still using YOLOv3 — to detect and classify basketball players on the court.
The ongoing FIFA World Cup has motivated me to revisit this idea. This time I used a combination of YOLOv5 and ByteTRACK to track football players on the field. This blog post accompanies the Roboflow video where I talk through how to track players on a football field.
Without further ado, let's begin to walk through the steps taken to build a player tracking project with computer vision.
Step 1: Leveraging a pre-trained detector
Initially, I hoped to skip the custom model training. I wanted this to be a quick project that would take me a few hours from start to finish. The popular COCO dataset, which was used to train YOLOv5 and YOLOv7 models, contains two classes I was most interested in — person and sports ball. This made me very optimistic that I could train from a COCO checkpoint.
I quickly downloaded several dozen short football game videos from the Bundesliga Data Shootout Kaggle competition and put the pre-trained model to the test. I tried various configurations of iou_threshold, confidence_threshold and input_resolution but the result I was able to get was disappointing.
On this model, the ball was detected on barely a couple of video frames, far too few to track such a small and fast-moving object reliably. On the other hand, the model detected many redundant objects outside the field — coaches, fans, maintenance staff, camera crews, and even reserve balls. All this would force me to write additional detection filtering logic, and I didn't want to do that.
Even though the dataset contains the classes I needed, the videos used for inferences must have been significantly different from the images used for training. In this situation, I had no choice but to create my own dataset and train a custom model.
Step 2: Building a custom detector
Training a custom model is a lot of effort. Mainly because of the immense amount of manual work that has to be done to annotate the images. As I was in a hurry, I decided to streamline the process as much as possible. I selected a few dozen videos from the previously mentioned Kaggle dataset and used FFmpeg to extract 10 frames from each of them — one every 3 seconds.
Next, I leveraged the pre-trained YOLOv5 model by performing automatic preliminary annotation of the images and saving the detected objects to txt files. I was now ready for stage 2 : refining the data.
Although the computer already did 90% of the work, the manual corrections took me almost 5 hours. At the same time, I introduced two additional object classes — referee and goalkeeper. You can see the results of my work in Roboflow Universe. The dataset is open source and available for anyone to use for free.
pre-trained COCO model on the left vs custom model on the right
The result of custom training made me much more confident. It was possible to solve the two aforementioned problems.
Unfortunately, most likely due to class imbalance, the model still has problems detecting the goalkeeper class. In the rest of the project, I treated each goalkeeper as a regular football player. If I had more time, I would apply dataset augmentation, trying to introduce a bit more images containing this class.
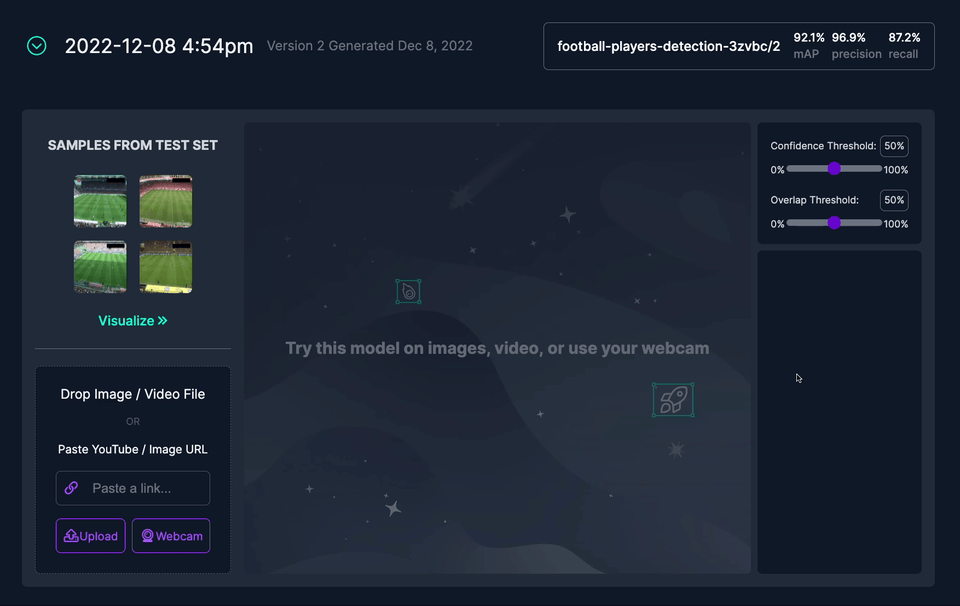
Try it yourself
If you feel like having a little fun, you can test my model. It is available on Roboflow Universe along with my dataset. Just drag and drop your test image. Note that the version available online is slightly different than the one I used in my demo.
Step 3: Tracking objects
I decided to use ByteTRACK , one of the SOTA multi-object trackers, for tracking objects in the video. Internally, ByteTRACK does not use any neural networks. The power of the model comes purely from simple math calculations : comparing bounding box position on individual frames.
Importantly, ByteTRACK is not responsible for detection but only tracking. As a result, it does not require separate training like some other trackers. ByteTRACK allows you to easily swap out detectors without redesigning the entire code architecture.
Take a peek at the simplified code snippet below which illustrates the starter code you would need to leverage ByteTRACK in your own projects. In the ByteTRACK project, each object on the frame gets a unique ID.
import torch

model = torch.hub.load(
    'ultralytics/yolov5',
    'custom',
    WEIGHTS_PATH, device=0)
byte_tracker = BYTETracker(BYTETrackerArgs())
for frame in frames:
    ...
    results = model(frame, size=1280)
    detections = Detection.from_results(
        pred=results.pred[0].cpu().numpy(),
        names=model.names)
    ...
    tracks = byte_tracker.update(
        output_results=detections2boxes(detections=detections),
        img_info=frame.shape,
        img_size=frame.shape)
    detections = match_detections_with_tracks(
        detections=detections,
        tracks=tracks)
Here is the result of the model:
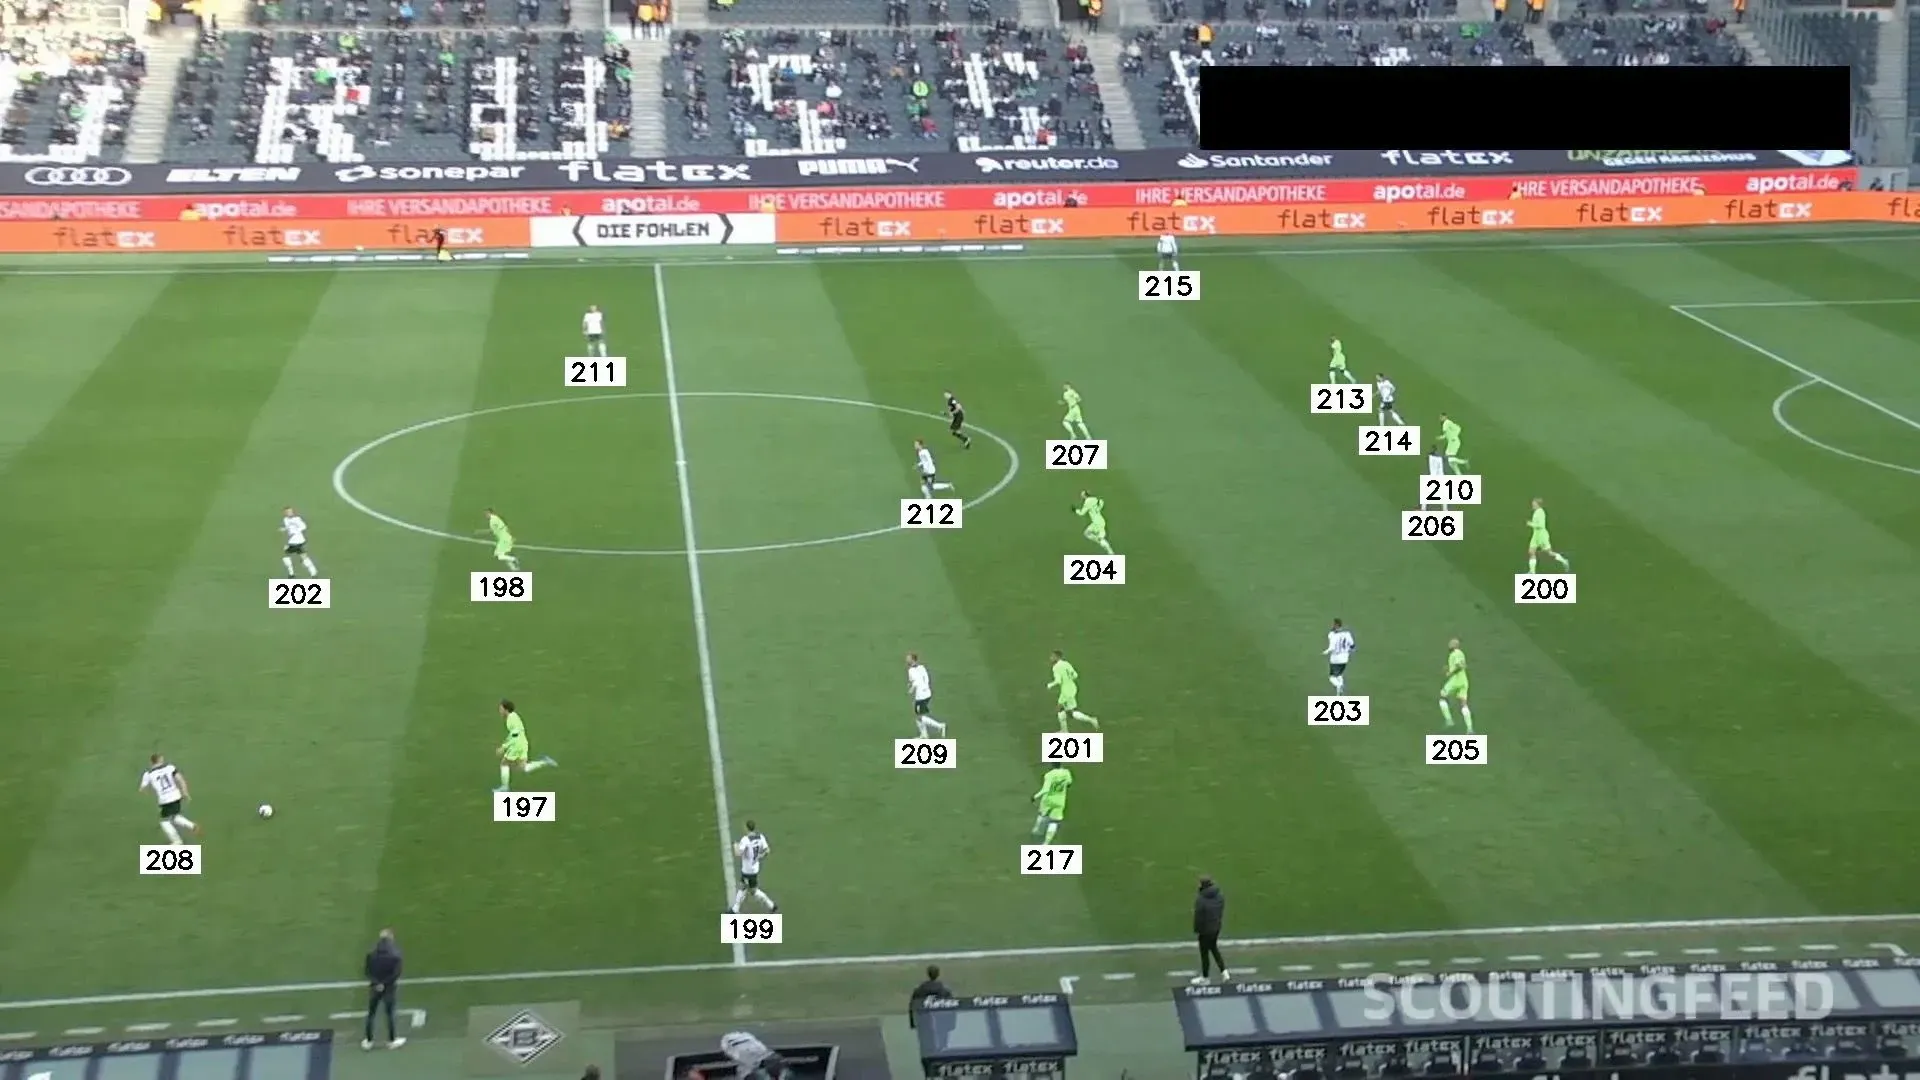
Every player is assigned a unique number and is tracked between frames.
Conclusion
Detection and tracking is just the beginning. Now we can really take it to the next level! We can now quickly analyze the course of the action, knowing how the ball traveled between players, count the distance the players traveled, or locate the field zones where they appeared most often.
Use the code in our Notebook to bootstrap your project and unleash your creativity. And most importantly, let us know what you've been able to build.
Stay up to date with the projects I am working on at Roboflow and on my GitHub page! ⭐
Cite this Post
Use the following entry to cite this post in your research:
Piotr Skalski. (Dec 9, 2022). Track Football Players with Computer Vision. Roboflow Blog: https://blog.roboflow.com/track-football-players/