
This tutorial shows how to run a computer vision model in a web browser using Roboflow.js and route its output through the OBS Websocket to control OBS Studio scene transitions and source positions in real time based on detected hand gestures. The setup connects a Roboflow-hosted model to OBS via a local WebSocket connection, replacing physical stream decks with gesture-triggered commands, which opens practical paths for accessibility use cases and multi-camera security or sports broadcast workflows. The post walks through all configuration steps, from OBS scene creation and WebSocket setup to embedding the Roboflow API key and writing the JavaScript calls for scene and source control.
Learning outcomes 💫
By the end of this blog post, you will be able to...
- Understand how to set up the OBS Websocket and roboflow.js.
- Run a computer vision model in your web browser that controls OBS Studio.
- Know what commands are useful for controlling OBS Studio.
Introducing OBS and OBS Websockets
Open Broadcaster Software (OBS) is free and open source software for video recording and live streaming. Stream to Twitch, YouTube and many other providers all in one platform. OBS is powerful and has been built on for over a decade. It has tons of features that make streaming not only possible, but cutting edge.
One of those features we will be highlighting today is called the “OBS Websocket” which allows you to control OBS via websocket communication.
The OBS websocket allows for external applications to securely connect with OBS and control various features of the platform. This is especially exciting when you combine that level of control with a machine learning model.
Video walkthrough of using computer vision to control OBS Studio
Why Use Computer Vision to Control OBS?
Sometimes controlling OBS can be difficult, and there are various stream decks and gadgets you can buy to solve the headache of managing your OBS environment. While this solution works for a lot of the top streamers, it doesn’t fulfill the needs of everyone. Specifically those who are streaming in open environments or those who are physically impaired.
So instead of buying a stream deck or powerpoint remote, what if you could train an AI to help you control OBS? Well, good news, by using Roboflow.js and the OBS Websocket, we can use gestures to control the scenes and sources of OBS.
While inherently this won’t make you into a successful streamer, it might empower you to build something you otherwise thought impossible. Below are some examples of where computer vision and OBS can be combined to make some interesting applications.
- Security: If you need to manage multiple cameras for security purposes, you can load video inputs into OBS and use Roboflow.js to transition between scenes. If a scene includes an object or person of interest we can have Roboflow.js prioritize that screen and trigger events like recording automatically.
- Sports: For a use case like baseball, you might want to run multiple OBS virtual cameras and have Roboflow.js watch all of them. This way we can monitor when key events occur in the game. When an event occurs we can transition the main camera to any camera on the field in real-time. This would be particularly useful in transitioning from player to player when a ball is hit, without the need for an operator.
- Entertainment: For streamers running a live event, having the ability to do transitions by yourself might open the door for new content opportunities. Some creators have enough budget to hire camera crews to make sure an event goes flawlessly, but for those without resources, computer vision can be trained to act as your AI producer, capable of transitioning scenes, tracking objects, and bringing sources to your scenes.
Setting up the Roboflow OBS Controller
To set up the OBS controller you will need to download a folder from GitHub, edit a couple lines of code, and configure your OBS environment.
This sounds like a daunting task if you haven’t interacted with code or GitHub before, but we will try and make the process as pain free as possible with this tutorial.
Step 1: Download the Roboflow OBS Controller
Download Roboflow OBS Controller Zip from GitHub: Download OBS Controller
Step 2: Unzip and Open roboflow.js
After unzipping the file, open the "OBS-Controller-main" folder and open the file called roboflow.js in notepad or your favorite IDE like Visual Studio Code. You'll need to change a few variables before running the OBS Controller.
After opening roboflow.js, focus on LINES 5 - 21.
Step 3: Open OBS to Retrieve IP Address:Port
With roboflow.js still open, open up OBS to get the first line of information you need from OBS which is the websocket IP and Port.
The most recent versions of OBS come with the OBS Websocket Settings installed.
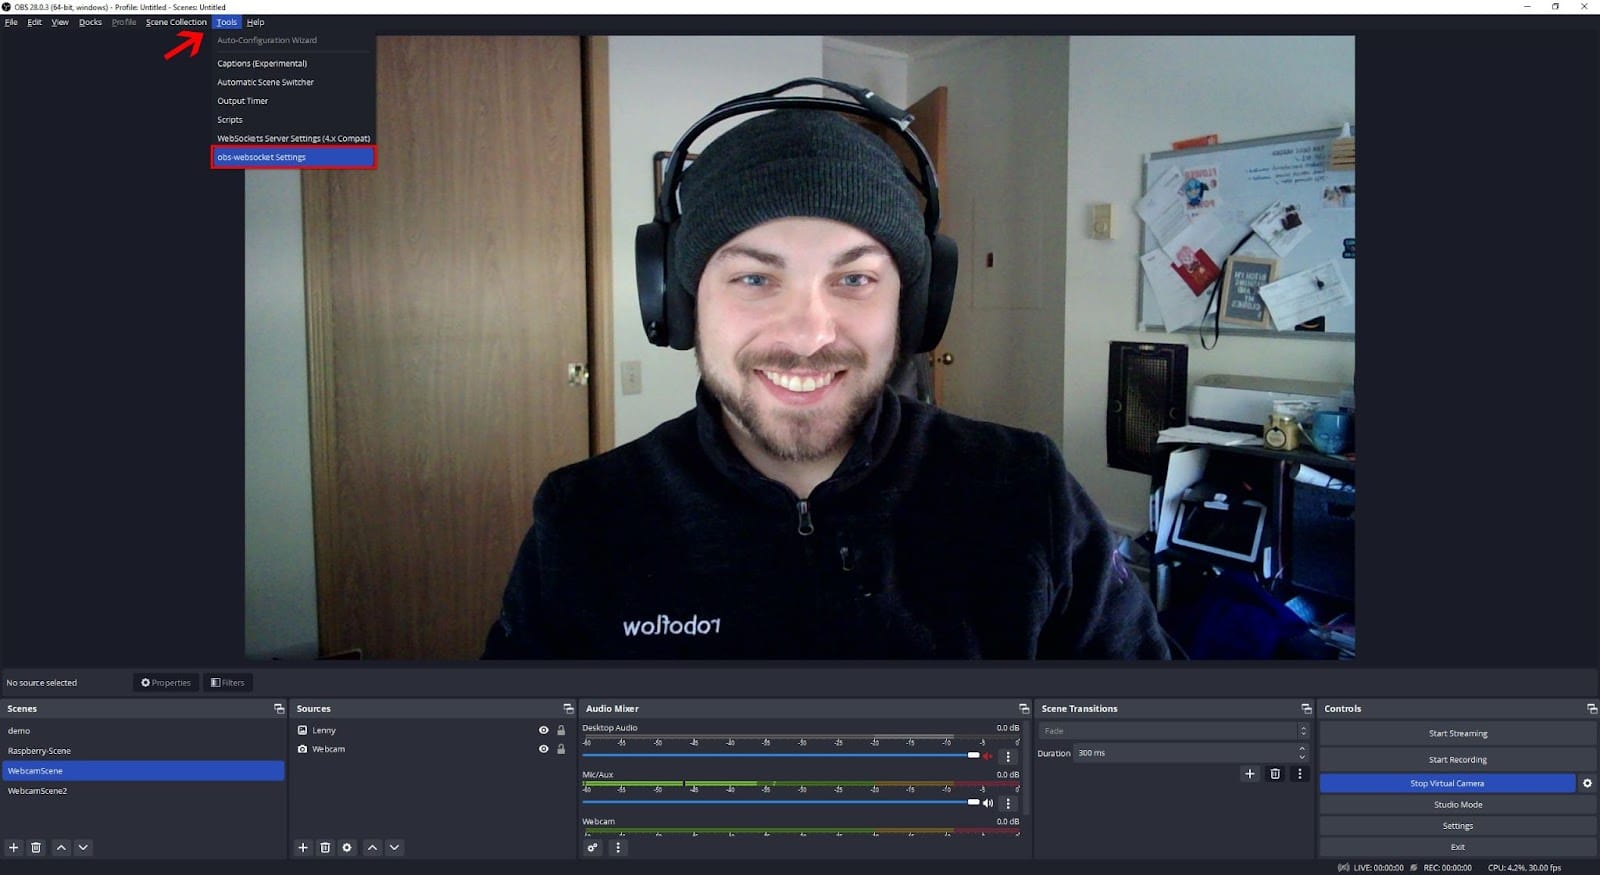
After opening the OBS Websocket Settings, you are going to be presented with a panel (see below). Click “Enable WebSocket server” if it isn’t already enabled. This will allow you to use the websocket of OBS.
This panel also has a button called “Show Connection Info” which after clicking you can see the Server IP, Port Number and Password which is required for logging into this OBS instance.
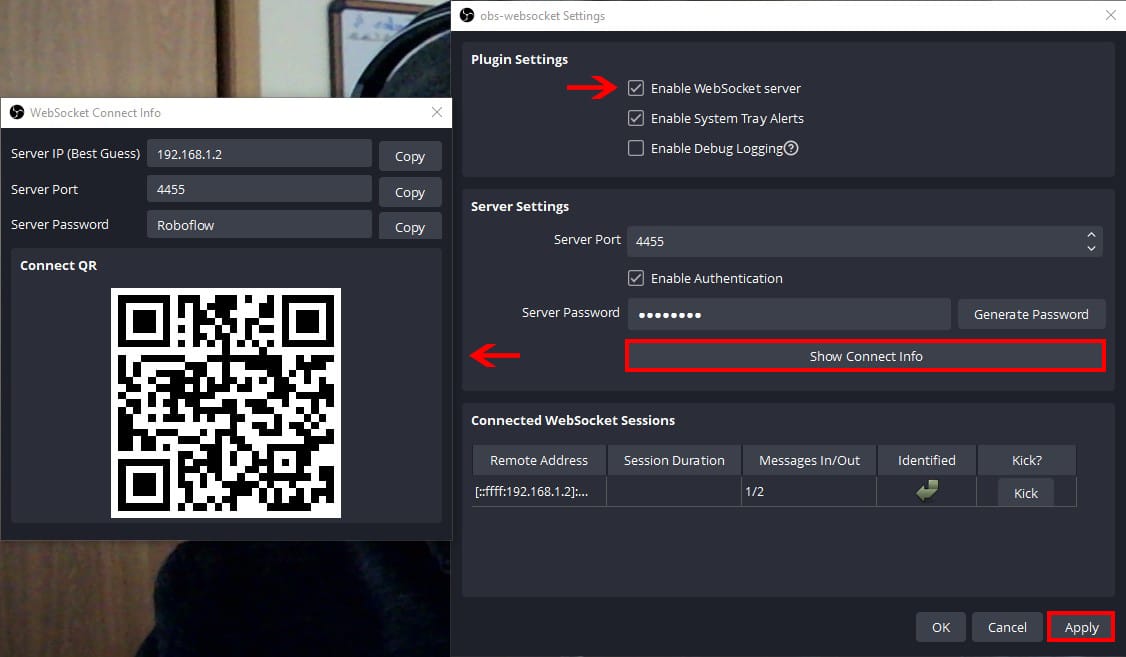
Set a password if you don’t already have one and copy those three variables to a notepad. We will be using them in the next step.
Step 4: Put IP Address, Port and Password into main.js
After successfully navigating the settings and enabling OBS websockets, you should have something like this:
IP: 192.168.1.2
PORT: 4455
PASSWORD: Roboflow
You are now going to construct the websocket address which will be used in roboflow.js on LINE 5.
Required config: "ws://IP:PORT"
Example config: "ws://192.168.1.2:4455”
LINE 5 -> Replace your IP and PORT number in the required config above to make something similar to the example config.
LINE 6 -> Replace the PASSWORD with the password you set in the OBS-Websocket Settings.
Step 5: Creating OBS Scenes and Sources
To run the current version of the Roboflow OBS Controller you will need to create two scenes inside of OBS.
One named “WebcamScene” and another named “WebcamScene2” which you will use to switch between. You will also need to set up a source object called “Lenny” which will be controlled by the “Up”, “Down”, “Stop” and “Grab” gesture.
It is important to know that the scene names in the roboflow.js, need to match the scene and source names that you create in OBS. Matching the scene and source names is how we are going to get roboflow.js controlling your OBS environment.
Step 6: Create “WebcamScene” and Add Sources
Here is the first scene you need to set up in OBS, you will notice that the scene is named “WebcamScene” and we have two sources. One running our webcam called "Webcam" and the other is called “Lenny” which is holding an image. The image file is called “lenny.png” which is included in the "OBS-Controller-main" folder.
Step 7: Create “WebcamScene2” and Add Sources
The second and last scene we need to set up is "WebcamScene2", which is primarily set up to demo the scene transitioning feature. If you have another webcam, you can set it as a source in “WebcamScene2”.
I used another USB webcam I had and added it as a source called "Webcam2". The secondary webcam is not required to demo scene transitions, but will help in transitioning back to the first scene.
Step 8: Get Publishable API Key from Roboflow Workspace Settings
Login to your Roboflow account, if you don't have one, you can make one for free. Once you have logged in, navigate to the top right hand corner and click the settings button.
After you are in the settings menu, click one of your workspaces to access the Roboflow API section. Once in the Roboflow API section, copy your Publishable API Key.
Step 9: Configure Roboflow.js Authentication Variables
With your copied API Key, navigate back to roboflow.js and add it inside the double quotes on LINE 14. If you want to try the gesture controller model that was used in this tutorial you can find it here on Roboflow Universe. The model ID is "obs-3" which goes on LINE 15 and version number is "14" which goes on LINE 16.

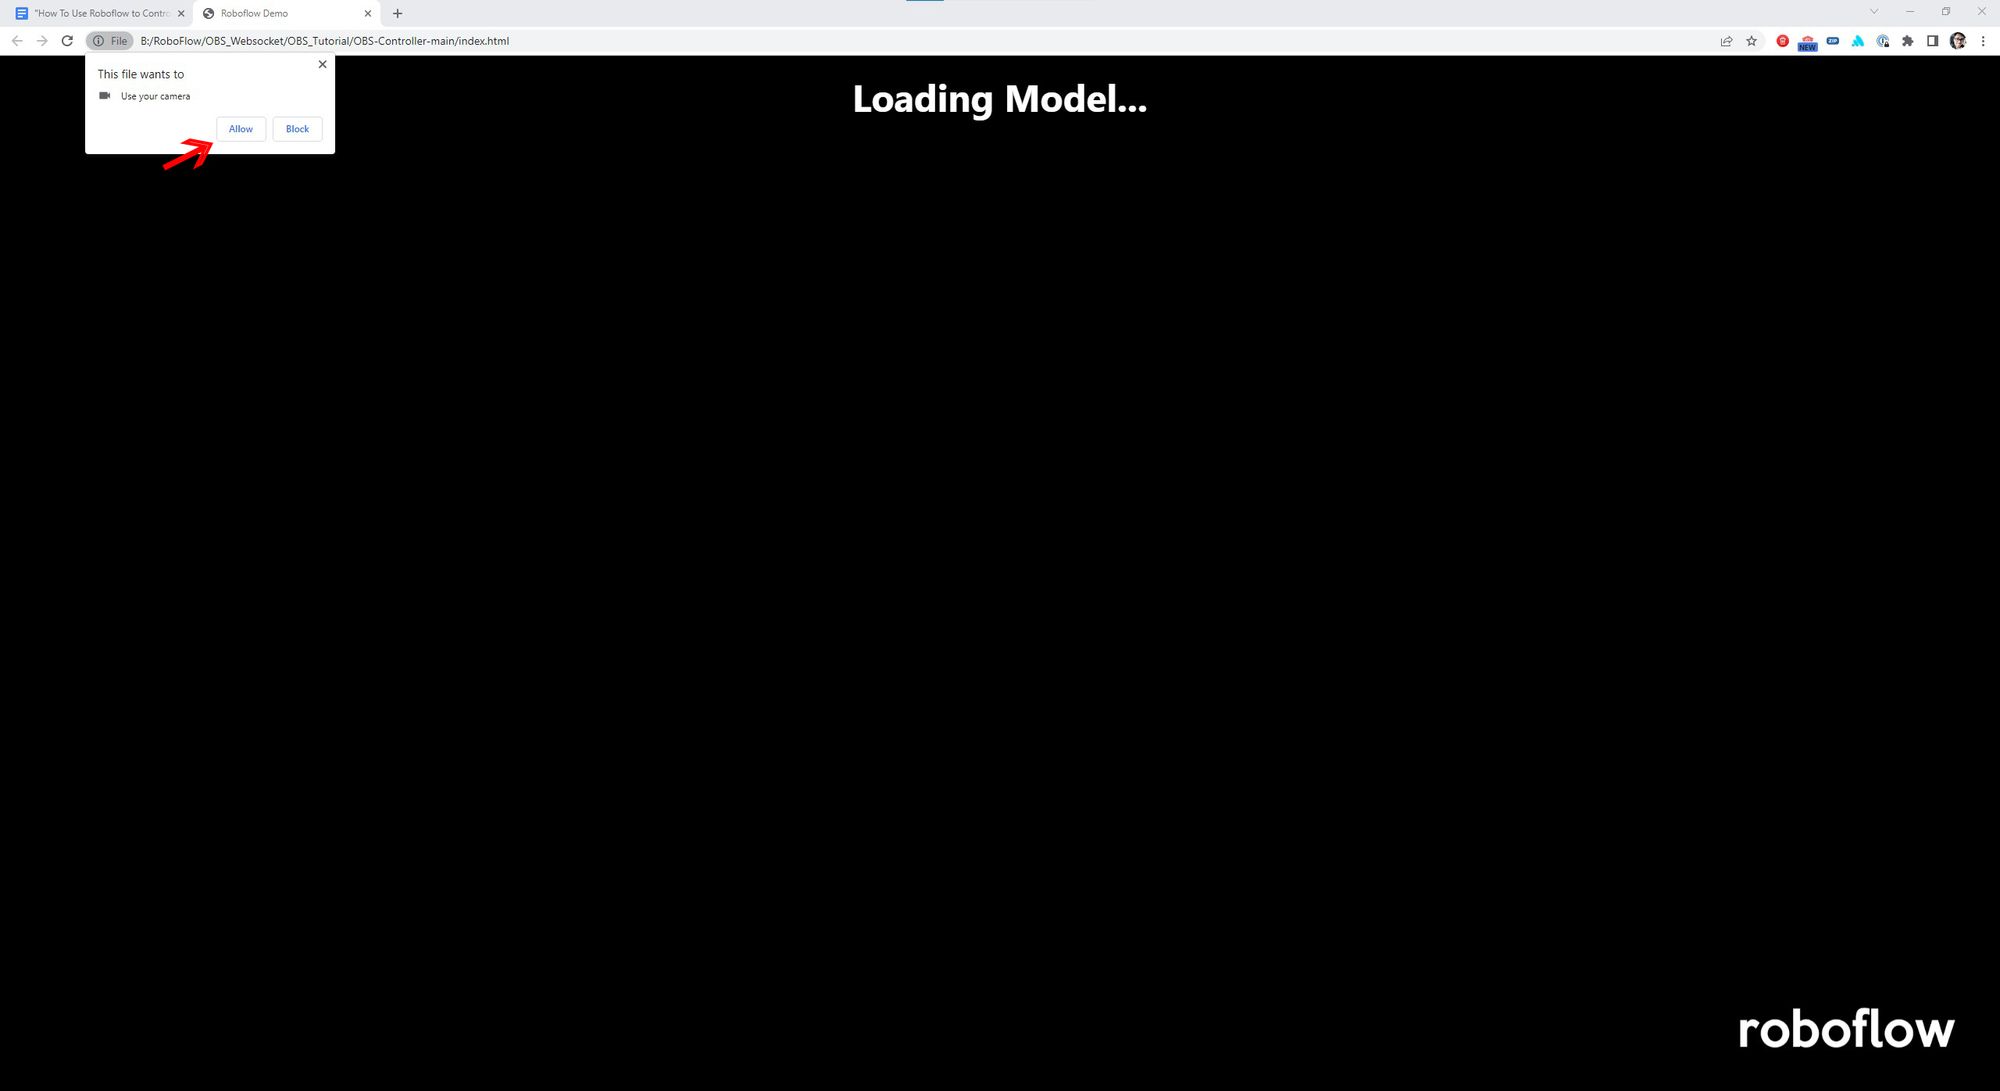
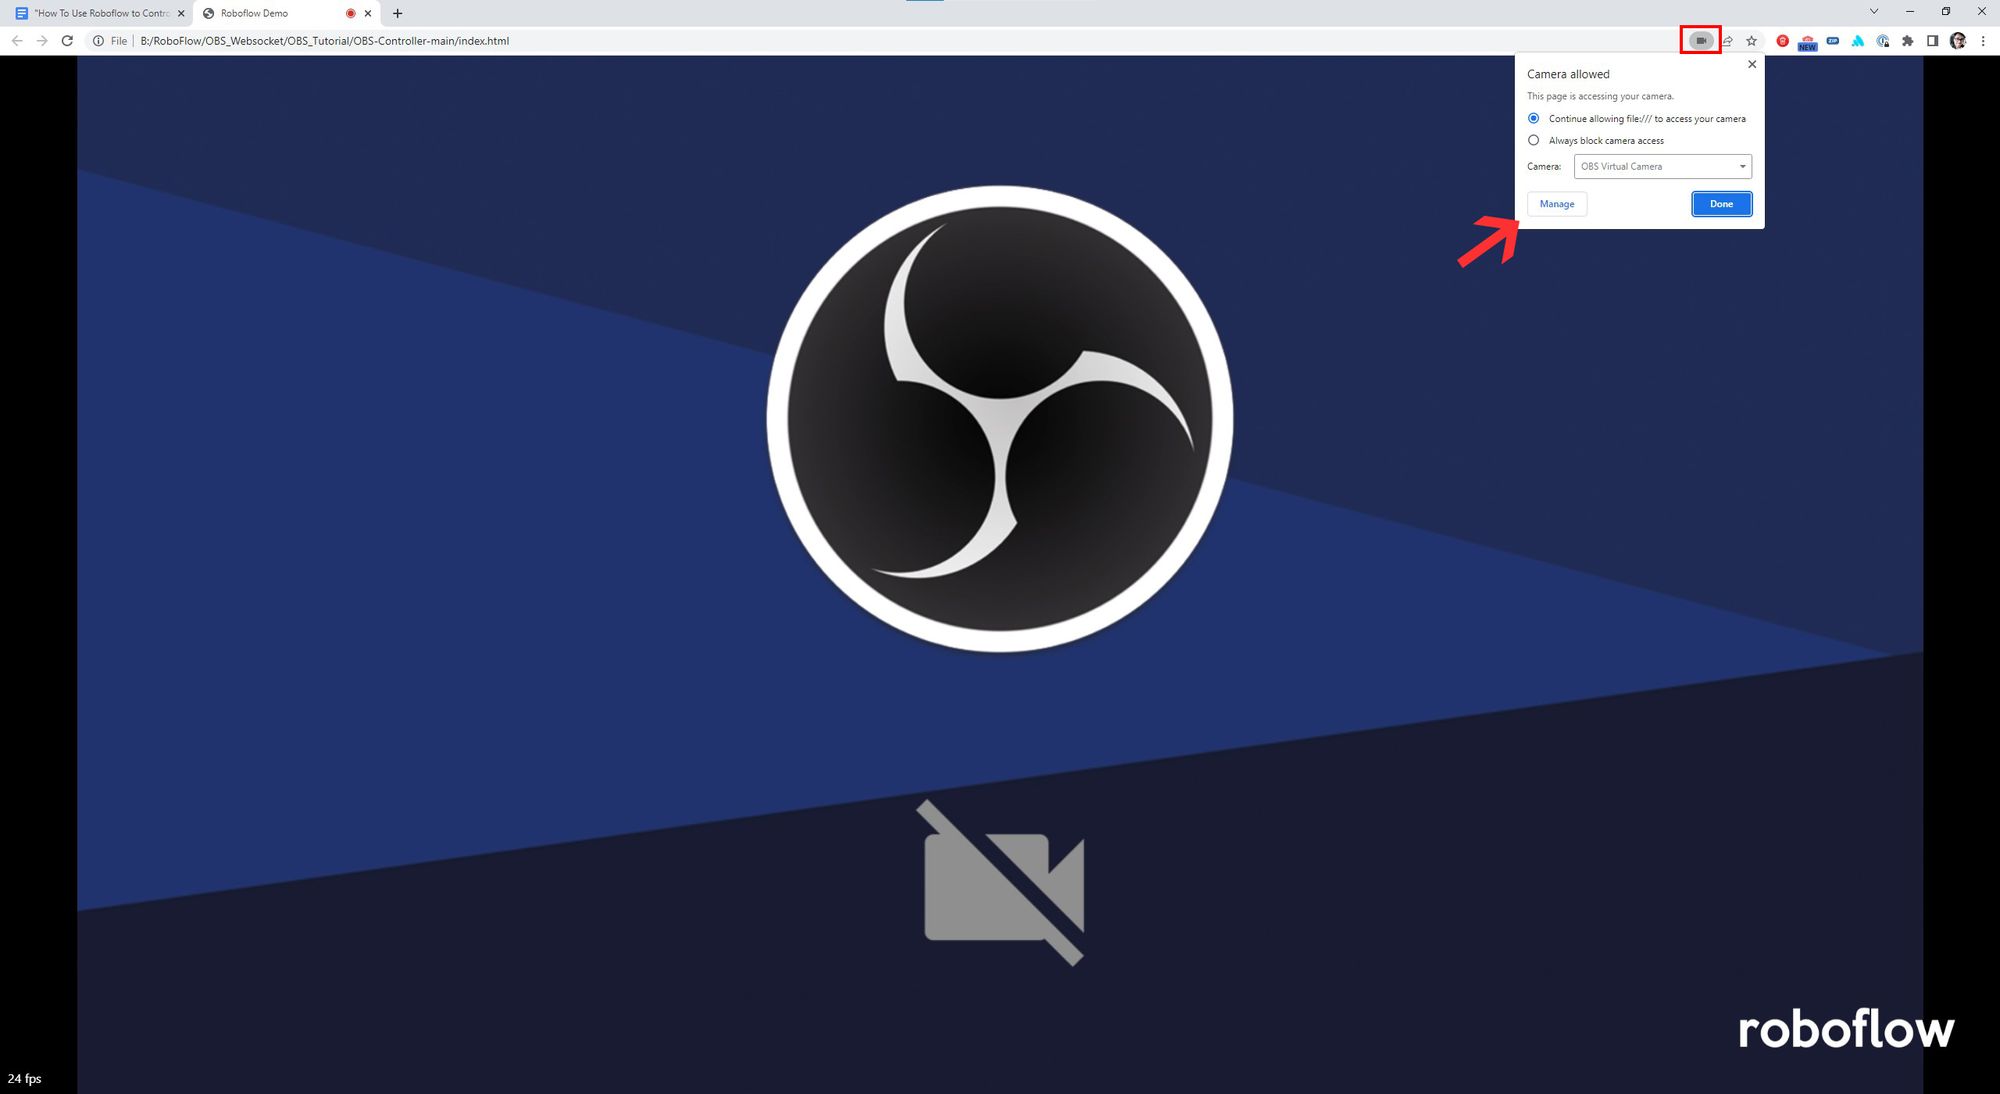
Step 10: Open index.html and Allow Use of Camera
Navigate back to your "OBS-Controller-main" folder and double click index.html. This will open roboflow.js in your favorite web browser. For this tutorial we are using Google Chrome. Allow Google Chrome to access your cameras by clicking the "Allow" button.
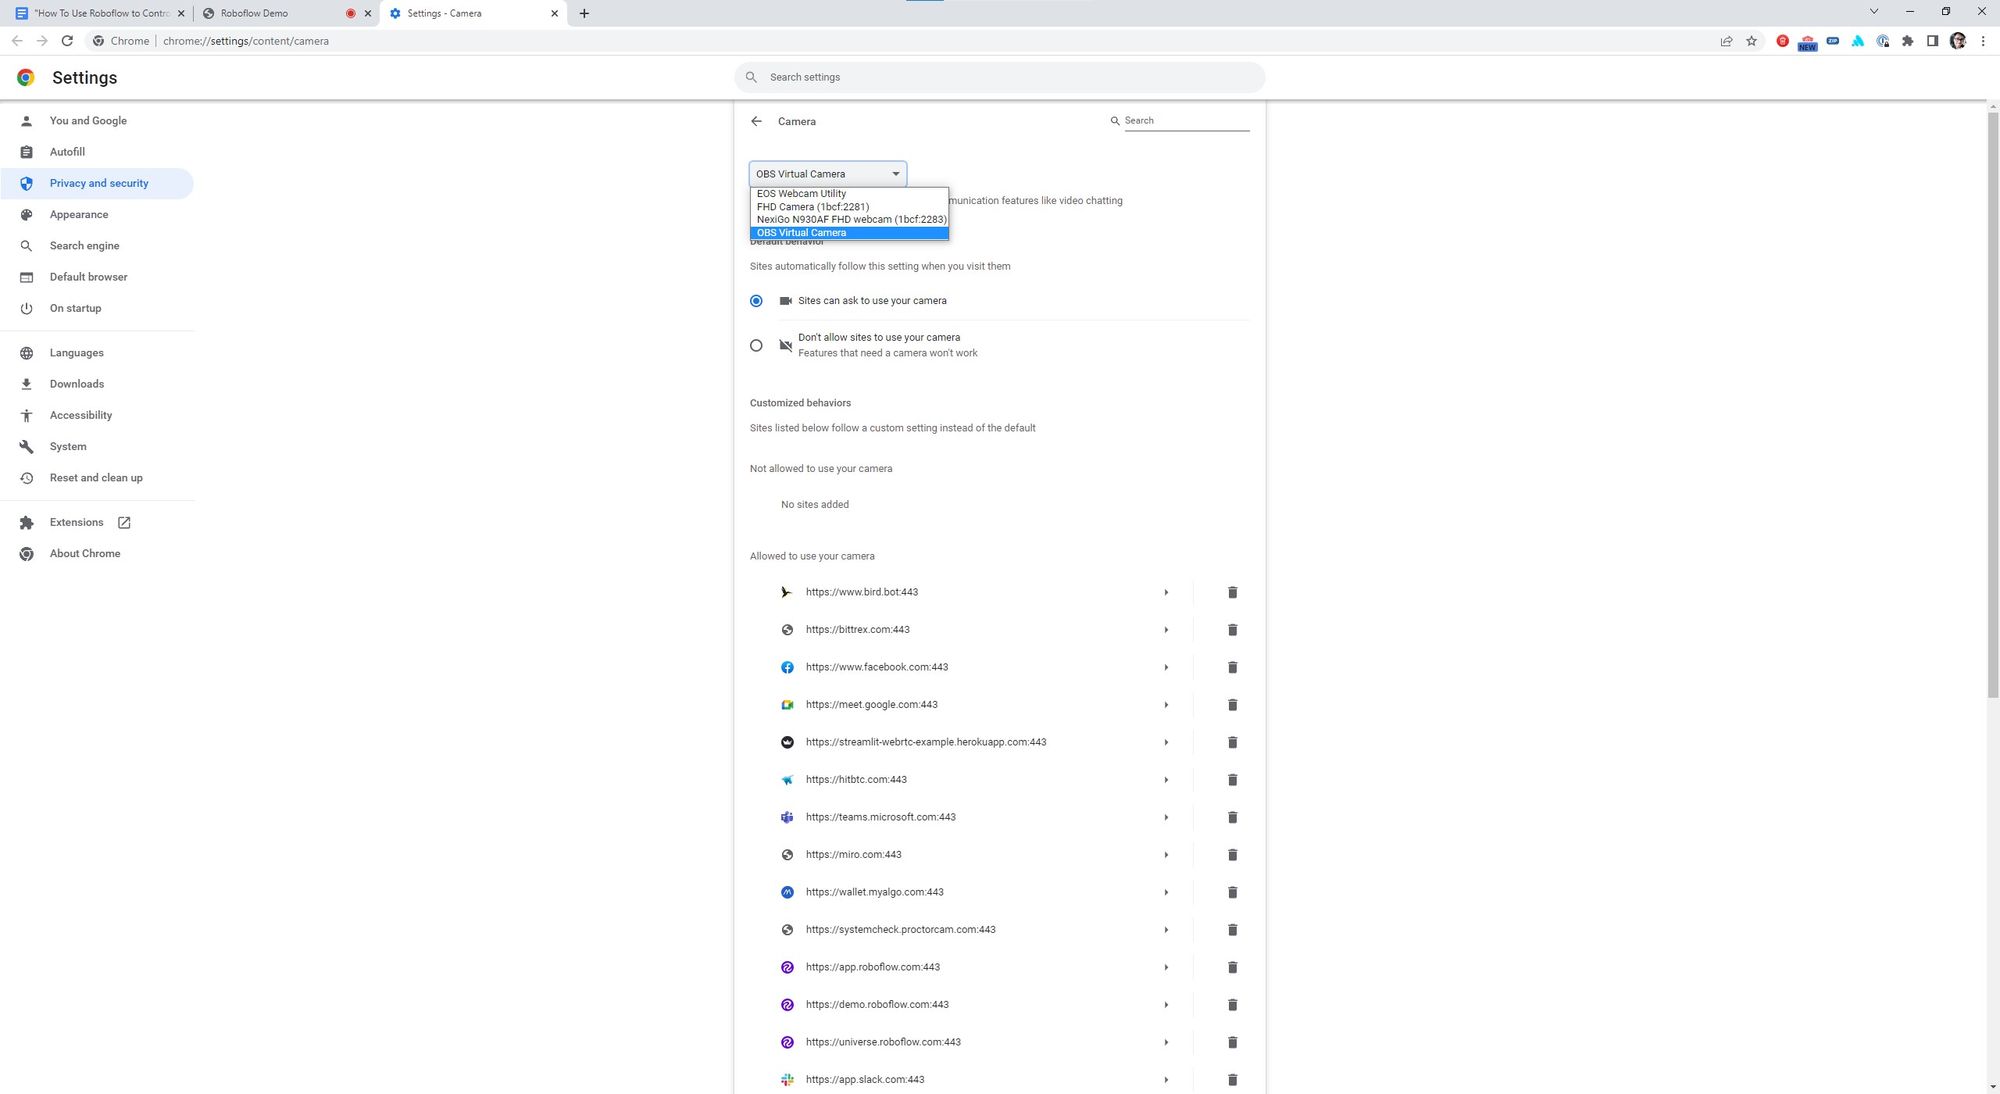
Step 11: Set Camera Input in Browser to OBS Virtual Camera
Click the camera button on the right hand side of the URL. This will bring up the camera input settings of Chrome where we need to navigate to the "Manage" section.
Once inside the camera section of Chrome we can establish a primary input. For the OBS controller to work, we need this set to "OBS Virtual Camera" which will let roboflow.js access the virtual camera.
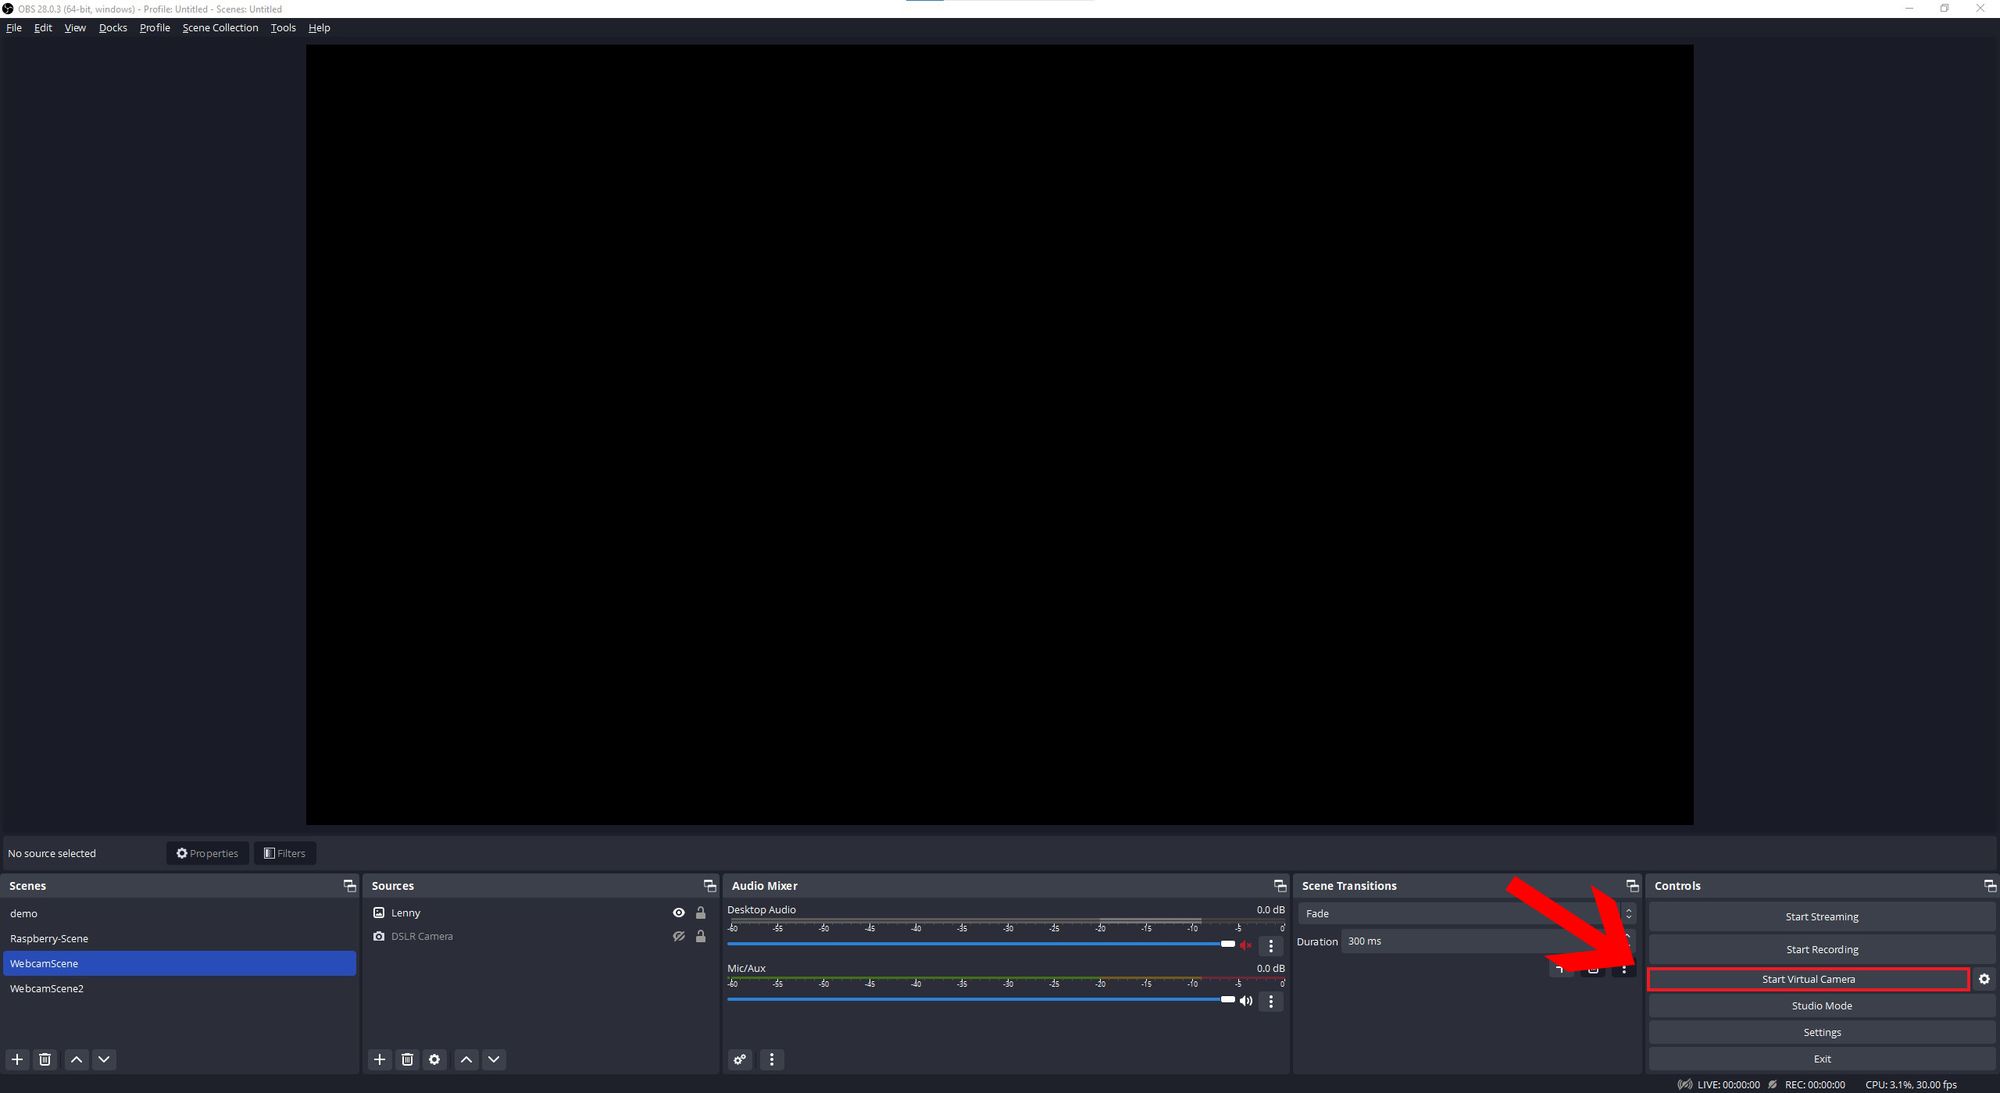
Step 12: Start OBS Virtual Camera and Refresh Index.html
After configuring the Google Chrome camera input, you can start the OBS virtual camera by clicking "Start Virtual Camera" in the bottom right corner of OBS.
Refresh your index.html tab and you should have successfully installed the controller.
Congratulations! You loaded a computer vision model into your web browser and it is controlling OBS!
Extra: Learn How the Javascript Functions Work
In order for someone to use the OBS websocket, a programming language must first be chosen. We have decided for control the websocket using Javascript because it works universally in web browsers.
The OBS community has developed a .js package which we have pulled into our index.html. This will allow us to control OBS by building upon the community package.
<script src="https://unpkg.com/obs-websocket-js@5.0.2/dist/obs-ws.min.js"></script>
Inside of roboflow.js we initialize the OBS web socket package by calling the command
var obs = new OBSWebSocket();
To connect to OBS we need the address and password which we collected during the tutorial. That gets passed with this code.
obs.connect(address, password);
Now that our code is connected we can pass a scene transition with this command.
obs.call('SetCurrentProgramScene', {'sceneName': Scene_1});
To control a source like we did during the tutorial, we will have to find the Source ID and feed that into a transition command. That looks like this.
let ret = await obs.call('GetSceneItemId', {'sceneName': Scene_1, 'sourceName': Source_1})
Source_1_ID = ret.sceneItemId;
obs.call('SetSceneItemTransform', {'sceneName': Scene_1, 'sceneItemId': Source_1_ID, 'sceneItemTransform': {'positionX': x, 'positionY': y}});
It is seen in the last obs.call command that we are transitioning the source ID from scene name to the position x and y. This is the main way we can move sources from various objects.
There is a lot more we can do with the OBS JavaScript package, but these are the few commands you will need to move sources and transition scenes. We hope you enjoyed learning about computer vision and OBS.
Cite this Post
Use the following entry to cite this post in your research:
Tyler Odenthal. (Oct 18, 2022). How to Use Computer Vision to Control OBS Studio. Roboflow Blog: https://blog.roboflow.com/use-computer-vision-to-control-obs/