
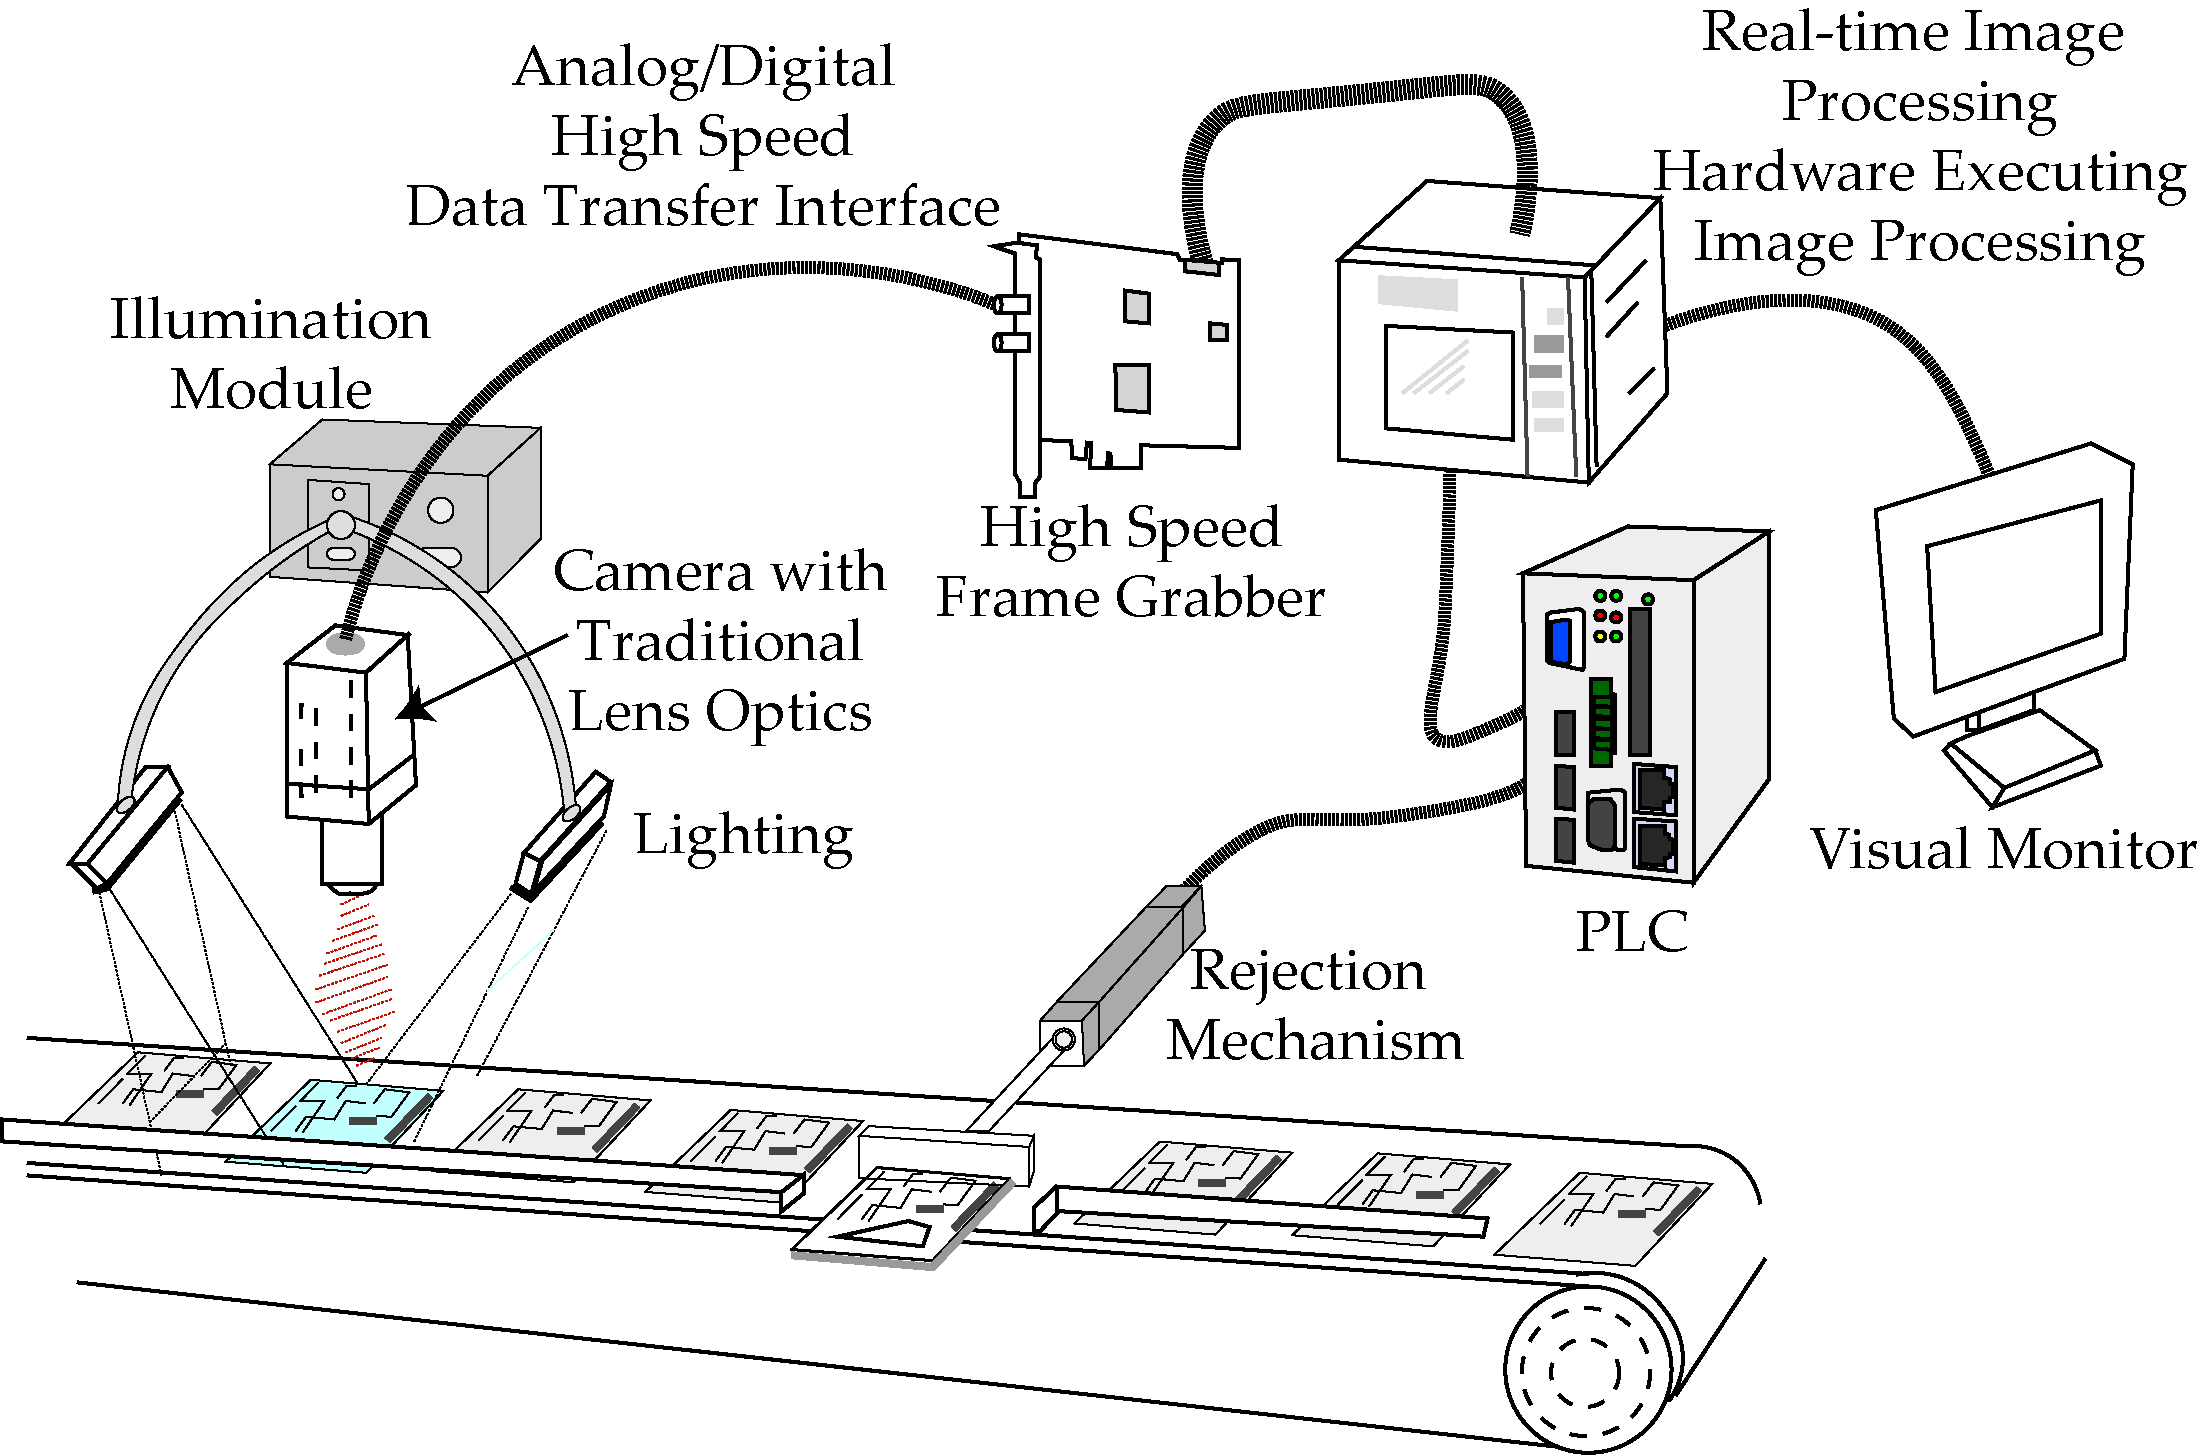
A Vision Inspection System (VIS), also called an Automated Visual Inspection (AVI) or Machine Vision System, is a computer-based setup that uses cameras and image processing software to automatically inspect products, materials, or processes for defects, errors, or quality compliance.
The key components of VIS include:
- Camera/s: Cameras to capture images and controlled lighting to highlight relevant features of the object to be inspected.
- Processing Unit: Industrial PC, GPU workstation, or embedded device (e.g., Jetson, FPGA) that runs computer vision algorithms.
- Software: Software is the brain of VIS. It can be a classical vision algorithm (i.e. edge detection, template matching, morphological filters), deep learning models (i.e. CNN for classification, YOLO, Faster R-CNN, RF-DETR for object detection, U-Net for segmentation) or anomaly detection algorithms (i.e. autoencoders, one-class models).
- Hardware: The hardware systems connected to the production line, PLCs, or robots for pass/fail decisions, sorting, or further action.
What Do Visual Inspection Systems Do?
VIS can perform variety of inspection tasks including:
Defect Detection
One of the most common uses of vision inspection is the identification of defects such as scratches, cracks, dents, missing parts, or deformations on a product. For example, in automotive manufacturing, VIS detects tiny cracks in engine components, while in electronics, it identifies missing solder joints or misplaced chips on printed circuit boards (PCBs).
Measurement and Gauging
Vision systems are widely used for dimensional measurements such as checking lengths, widths, diameters, angles, and even surface roughness. For example, in the aerospace industry, VIS ensures turbine blades or gears meet strict dimensional tolerances, and in metal machining, it measures thread pitch and hole alignment.
Pattern and Label Verification
Vision inspection systems verify that logos, printed text, barcodes, and serialization codes are present, correctly aligned, and legible. Advanced VIS can even check print quality and detect smudges or fading ink.
Assembly Verification
This VIS ensures that all components are present, correctly placed, and properly aligned during assembly. It can check the orientation of screws, the fit of connectors, or whether a gasket is seated correctly. For example, in automobile assembly lines, vision systems confirm that airbags, seatbelt mounts, and electrical harnesses are installed in the correct position before the vehicle moves further down the line.
Surface Quality Inspection
Surface inspection detects flaws in paint, coatings, weld seams, glass surfaces, or PCB traces. For example, in consumer electronics, vision inspection detects scratches on smartphone screens, while in steel manufacturing, it identifies pitting, scaling, or scratches on rolled sheets.
Color and Shade Verification
Some products must adhere to exact color standards or finishes. These VIS systems compare captured colors with reference values to ensure color consistency.

Positioning and Alignment
Vision systems also serve as guides for robots and machines by providing feedback on the position and orientation of parts. For example, in pick-and-pack robotic systems used in electronics, VIS aligns chips with sub-millimeter accuracy before placement on PCBs.
Counting and Sorting
VIS can count items in a batch (e.g., the number of tablets in a blister pack or eggs in a tray) and automatically sort products into categories such as good/bad, size ranges, or defect types. This function is widely used in logistics, agriculture, and food processing.

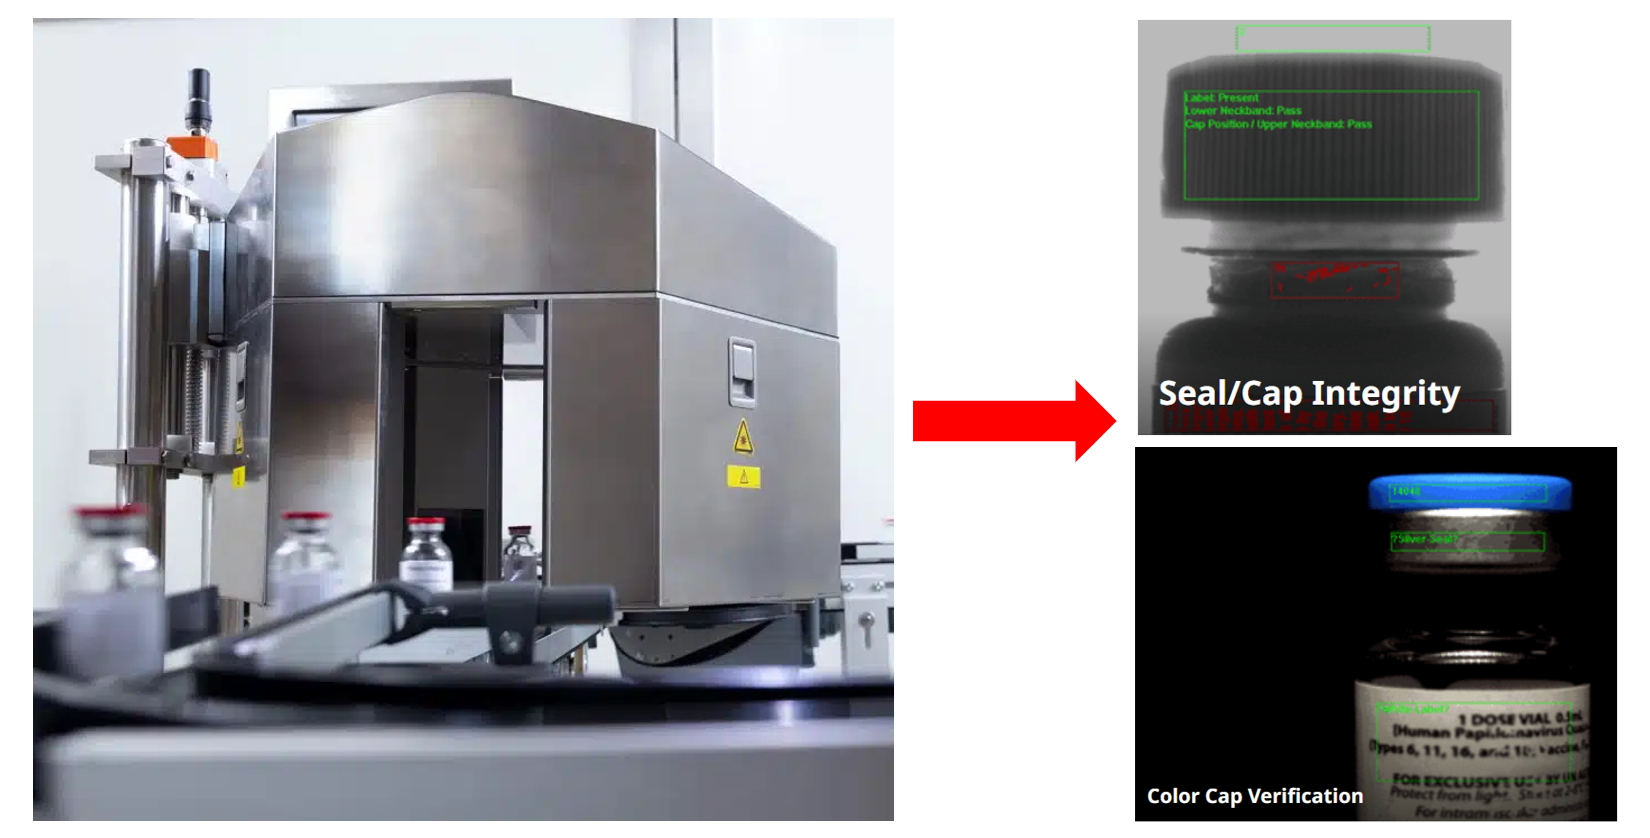
Safety and Compliance Checks
In regulated industries, VIS ensures that products meet safety markings, tamper-evidence seals, and regulatory symbols. For example, the VIS for pharmaceutical packaging check for missing child-safety labels or incorrect dosage markings.
Types of Vision Inspection Systems
VIS are often classified by how they capture images, how they analyze them, and how they are deployed. Here we discuss VIS based on three main categories.
1. Imaging Modality
Systems under this category can be classified by the type of imaging they use to capture product information. These are:
- 2D Vision Systems: These systems use area-scan or line-scan cameras for flat image capture. These systems are used in applications such as PCB checks, label verification, and bottle inspections.
- 3D Vision Systems: These systems use stereo vision, laser triangulation, structured light, or ToF cameras to capture depth and surface profiles. Applications are weld seam inspection, shape measurement, and robotic guidance.
- Multispectral/Hyperspectral Systems: These systems capture information beyond the visible spectrum (infrared, UV, hyperspectral) to detect chemical composition, contamination, or subtle defects.

2. Processing Approach
This category classifies systems based on how they process and analyze the captured images. These are:
- Rule-Based / Classical VIS: These systems rely on predefined features, thresholds, edge detection, and template matching. These systems are fast and explainable, but less flexible.
- Deep Learning Based VIS: These systems use CNNs and various other deep learning modern architectures for classification, detection, and segmentation. These systems are more robust against variations in lighting, orientation, or noise.
- Anomaly Detection VIS: These systems are trained only on “good” samples and flags deviations. These are useful when defective samples are rare (e.g., MVTec AD, Kolektor datasets).
3. Inspection Task
Systems under this category are grouped based on the specific task they perform. These are:
- Classification Systems: These systems perform pass/fail checks or assign defect categories (e.g., fabric OK vs NG).
- Object Detection Systems: These systems locate and identify defects or missing parts (e.g., PCB short, missing screw).
- Segmentation Systems: These systems provide pixel-level defect maps for measuring size/shape (e.g., cracks, steel surface flaws).
- OCR Systems: These systems read and verify printed or engraved text, serial numbers, barcodes, QR codes, and expiration dates on products.
How to Pick the Best Vision Inspection Tools
Picking the right vision inspection system starts with matching the tool to your use case. The first factor is imaging. Standard inspections, like checking PCBs, may only need regular camera inputs, while specialized tasks in food safety or pharmaceuticals may require multispectral or hyperspectral imaging.
Next, consider the processing approach. Classical rule-based vision is fast and explainable, but limited in flexibility. Deep learning models handle more variability and complexity, while anomaly detection is useful when defects are rare or hard to define. The best tools make it easy to train, deploy, and maintain models across these approaches.
You’ll also want to ensure the system supports your specific inspection task: classification for pass/fail, object detection for missing parts, segmentation for precise measurements, or OCR for text and serialization. Some platforms only cover one task, while others like Roboflow support them all under one roof.
Finally, think about scalability and integration. A good system should connect with your automation stack (APIs, edge devices, or industrial protocols like MQTT and OPC-UA) and scale from a prototype to full production.
Roboflow provides these capabilities in one platform. You can use any camera type - webcams, IP, RTSP, or industrial cameras - so you don’t need to replace existing hardware. The platform streamlines dataset management, annotation, model training, evaluation, and deployment.
Models can run flexibly on edge devices like Raspberry Pi or Jetson, or in the cloud through hosted APIs. With small-data training support, you can get started with only a few hundred annotated images. Workflows let you combine multiple inspection tasks into one process, and built-in monitoring tools help track model performance over time.
Together, these features make Roboflow a practical choice for building inspection systems that move quickly from early experiments to reliable production deployment.
How to Build a Visual Inspection System with Roboflow
Let's build a vision inspection system for PCB defects that detects “missing holes” in PCB. We will train a model in Roboflow, create a complete workflow, and then deploy it through a Flet application for live inspection.
Printed Circuit Boards (PCBs) are the backbone of modern electronics, and even the smallest defect can lead to malfunction, reduced reliability, or complete product failure. Visual inspection systems are therefore critical in PCB manufacturing to automatically detect flaws such as missing holes, mouse bites, open circuits, shorts, spurs, and spurious copper traces.
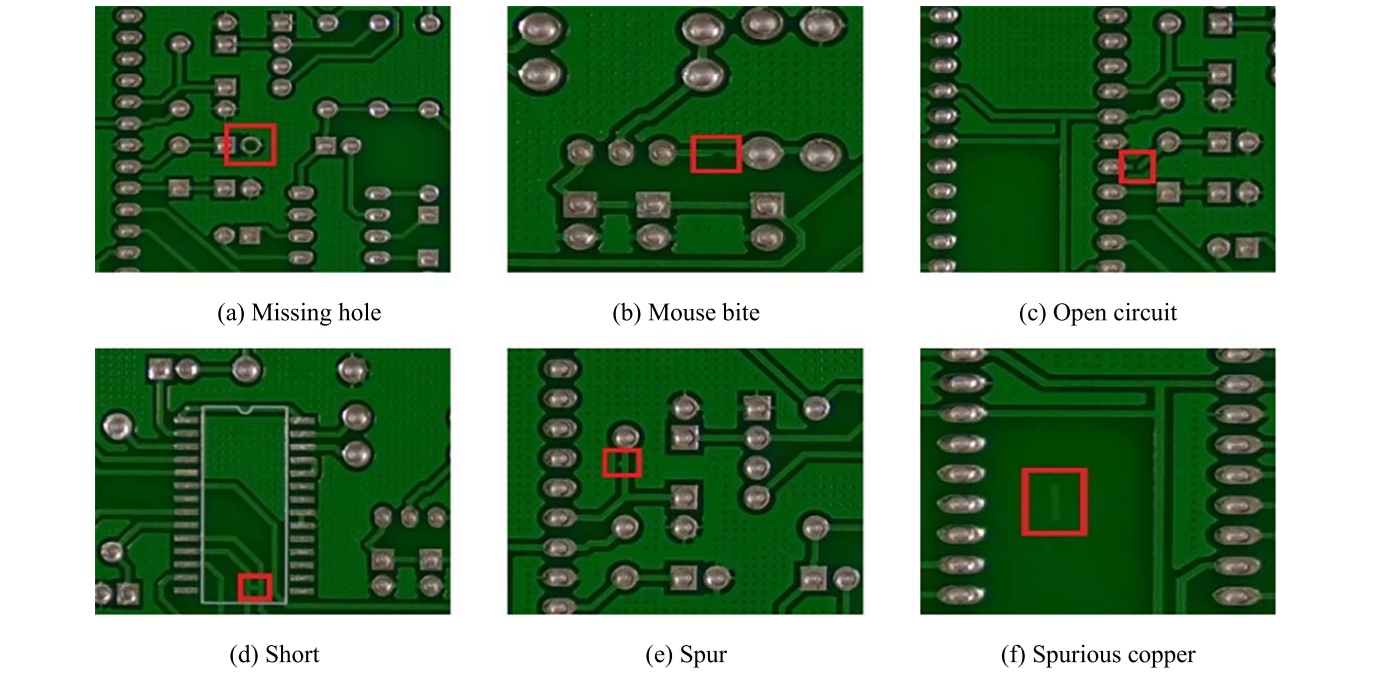
These defects, shown in the figure above, represent common but serious quality issues that must be identified before assembly and deployment. Automated vision inspection offers faster, more accurate, and more consistent results compared to manual inspection, making it indispensable in high-volume production environments. In this example, we focus on detecting missing holes, one of the most fundamental PCB defects, using Roboflow’s end-to-end computer vision workflow.
So, let’s get started.
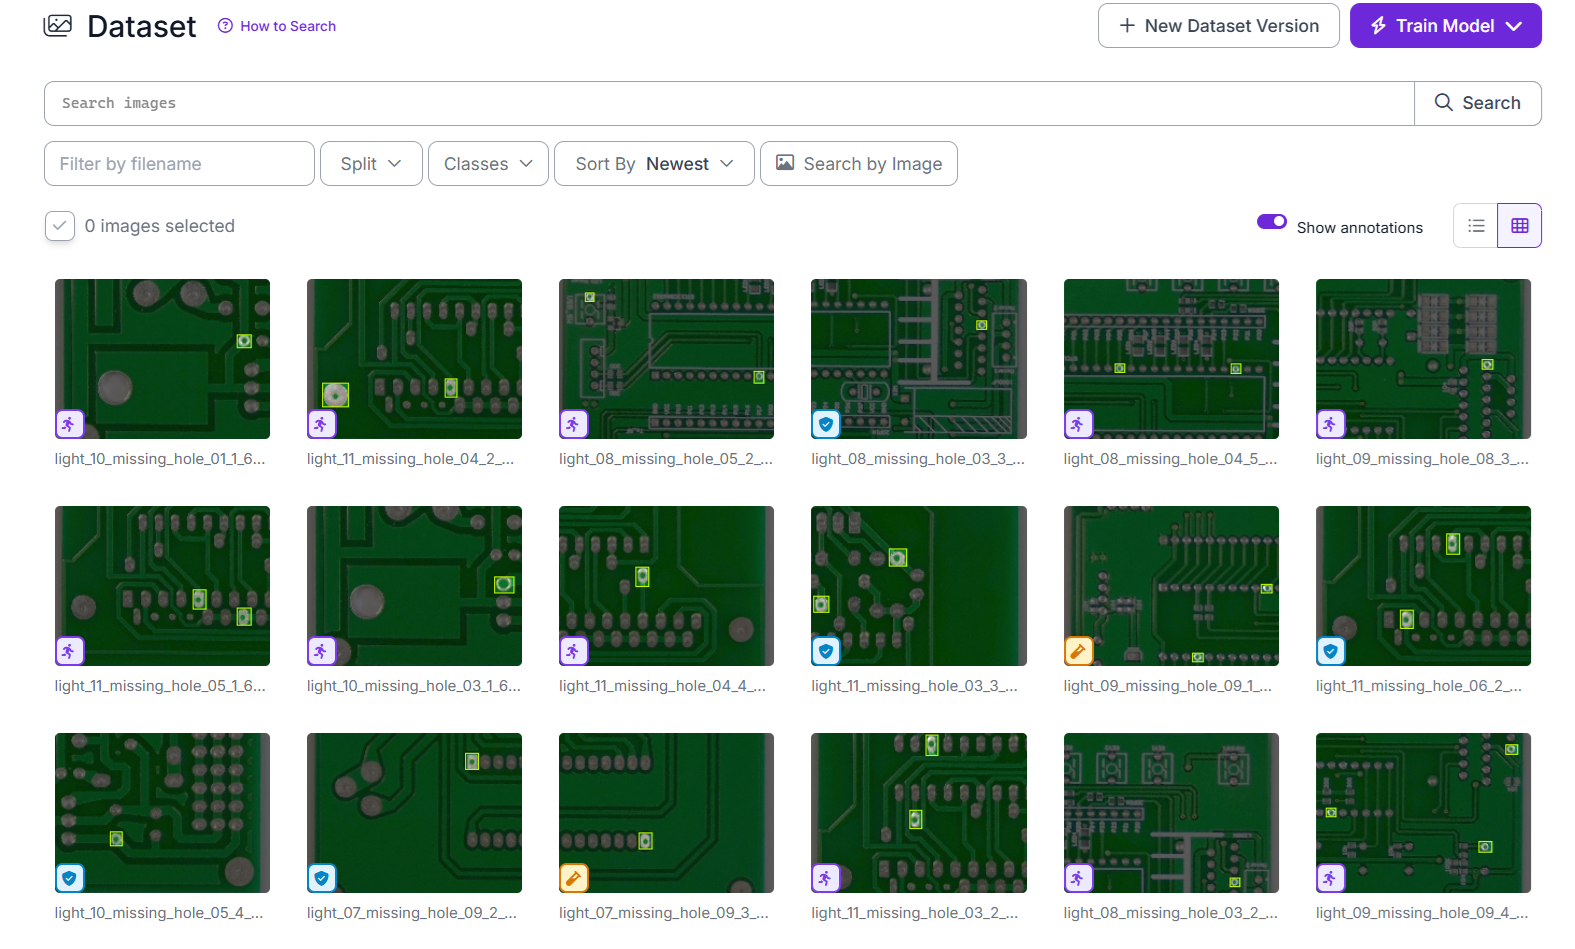
Step #1. Preparing a Dataset for PCB Defect Detection
The first step in building a PCB inspection system with Roboflow is to create a new Object Detection project. Upload images of printed circuit boards that include visible defects, focusing on the type you want to detect - in this case it's missing holes. Using the annotation tools, carefully draw bounding boxes around each missing hole on the board. Assign the label “missing hole” to every bounding box, or, if you want to extend the project, add other defect categories such as short, “open circuit”, or “spur”.
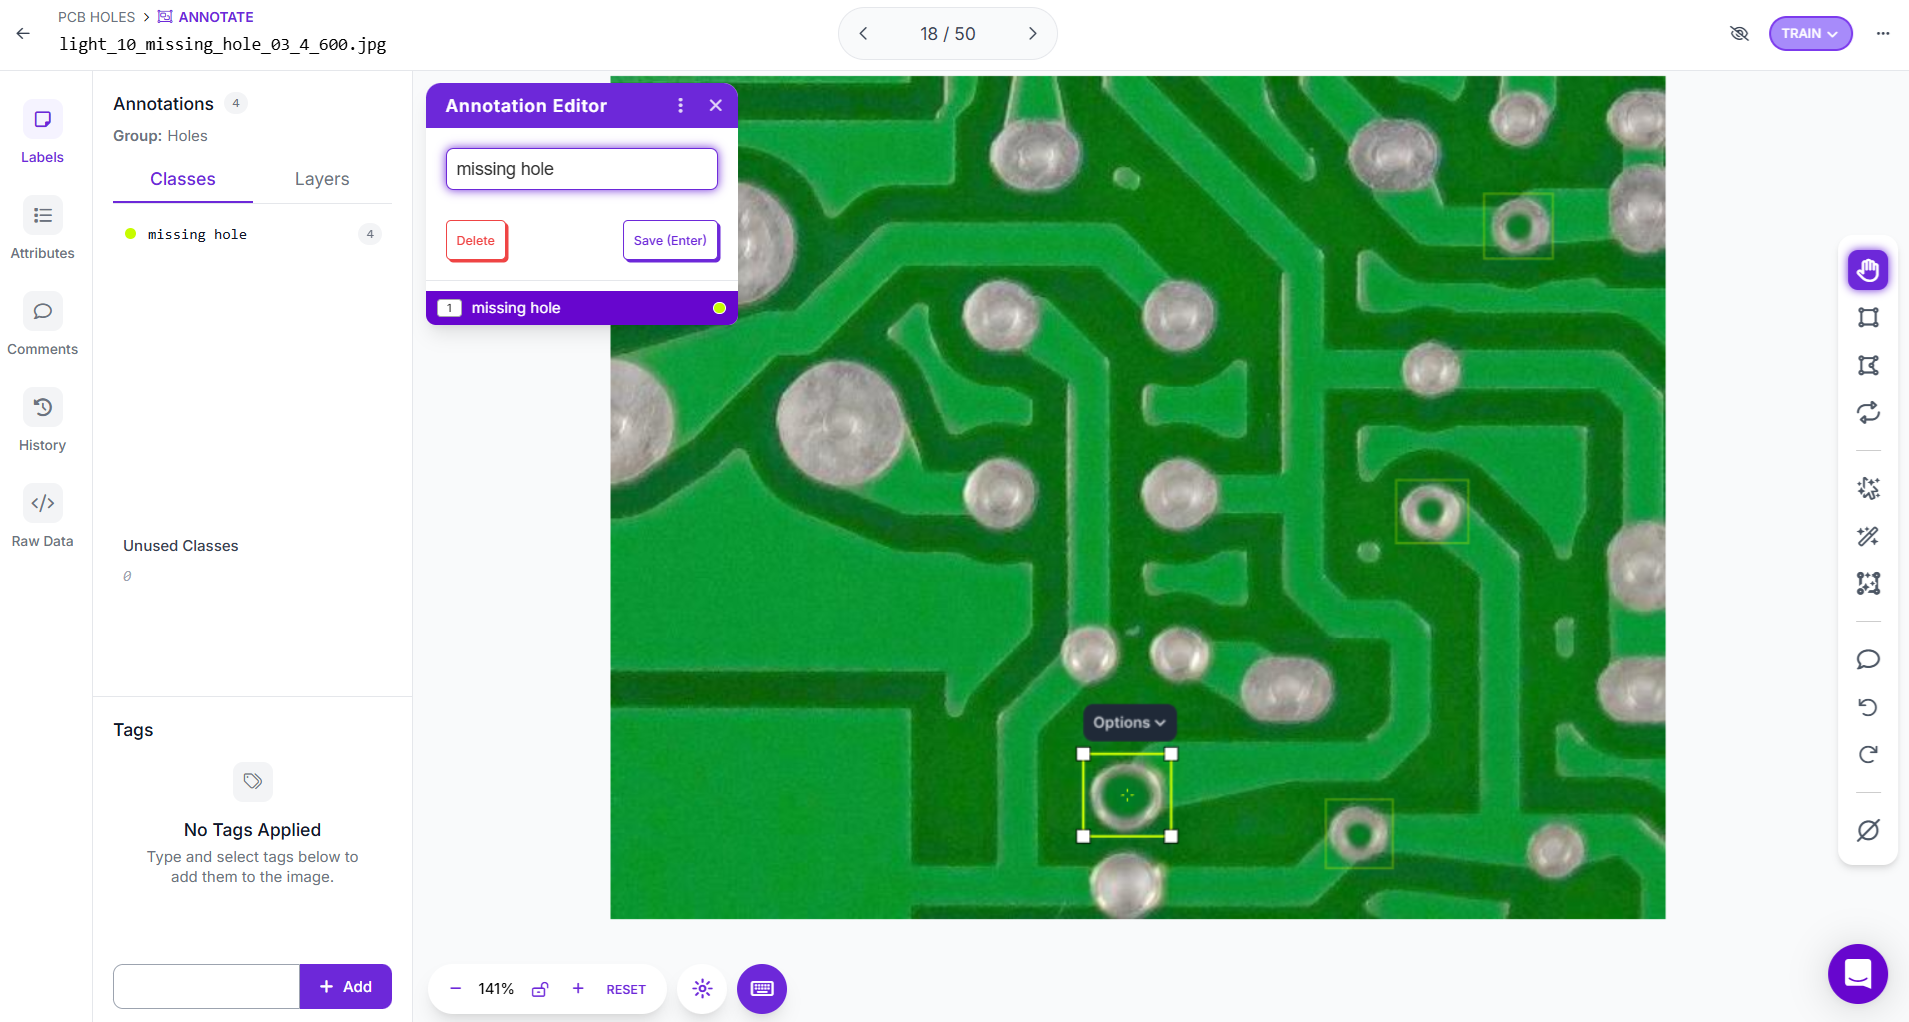
Accurate annotation is critical. Boxes should tightly cover the defective region without including unnecessary background, so that the model learns the specific features of the defect.
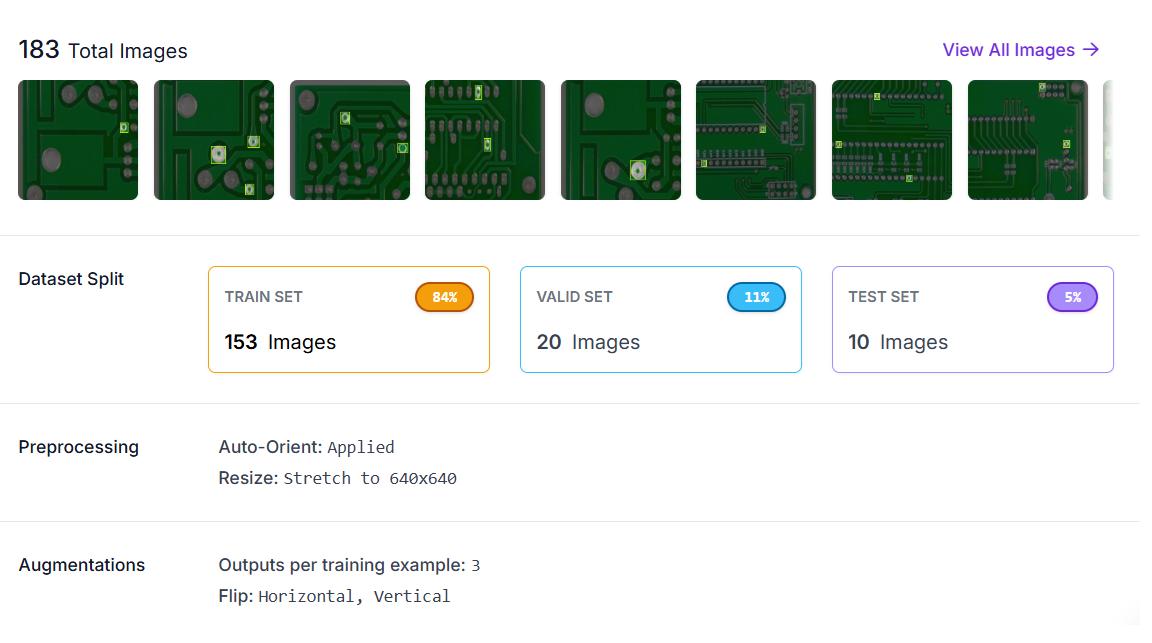
After annotation is complete, you can generate dataset versions within Roboflow. These versions can apply preprocessing steps like auto-orient, resizing, along with augmentation methods such as rotation, brightness adjustments, or cropping. These transformations make the model more robust to real-world variations in PCB images, such as differences in lighting or camera angle.
Roboflow also handles splitting the dataset into training, validation, and test sets to ensure fair evaluation. Each version preserves your original labels, giving you the flexibility to test multiple preprocessing and augmentation strategies, train different models, and compare their performance to build the most reliable PCB defect detection workflow.
Step #2. Train an Object Detection Model
With the dataset prepared, the next step is to train a PCB defect detection model. Training begins by selecting an architecture. Roboflow supports options such as RF-DETR, Roboflow 3.0, YOLOv11, and others, each with different strengths in accuracy, speed, and efficiency. For this project, I selected Roboflow 3.0 as the base model.
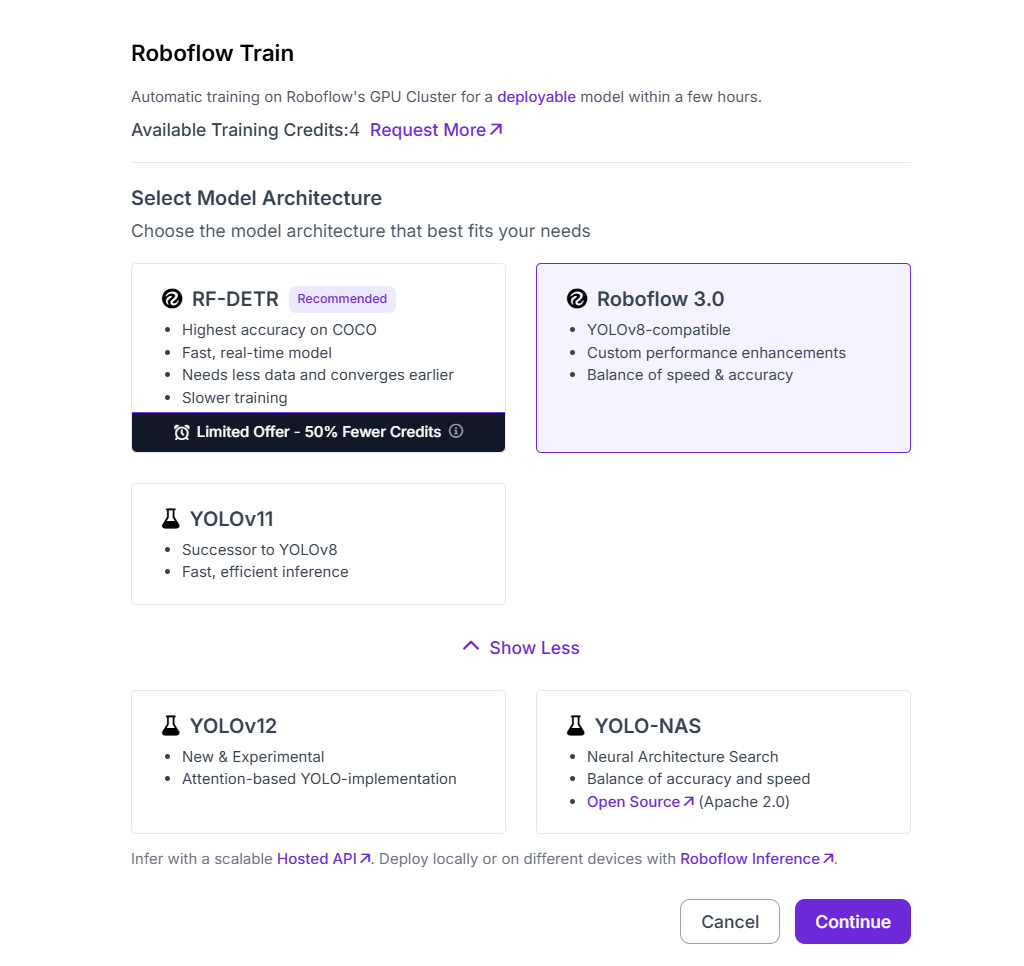
The next choice is the model size. Roboflow provides several sizes: Fast, Accurate, Medium, Large, and Extra Large, allowing you to balance speed and accuracy depending on deployment requirements. For PCB inspection, I chose the Accurate size to achieve reliable detection of small defects such as missing holes.
Roboflow also offers different training strategies:
- Train from Previous Checkpoint to continue improving an already trained model.
- Train from Public Checkpoint to start from pretrained weights on large datasets like MS COCO, then fine-tune for PCB defects.
- Train from Random Initialization to start training from scratch (not recommended unless you have very large datasets).
For this project, I selected Train from Public Checkpoint (MS COCO), which uses pretrained weights from a large benchmark dataset and adapts them to the PCB defect detection task.
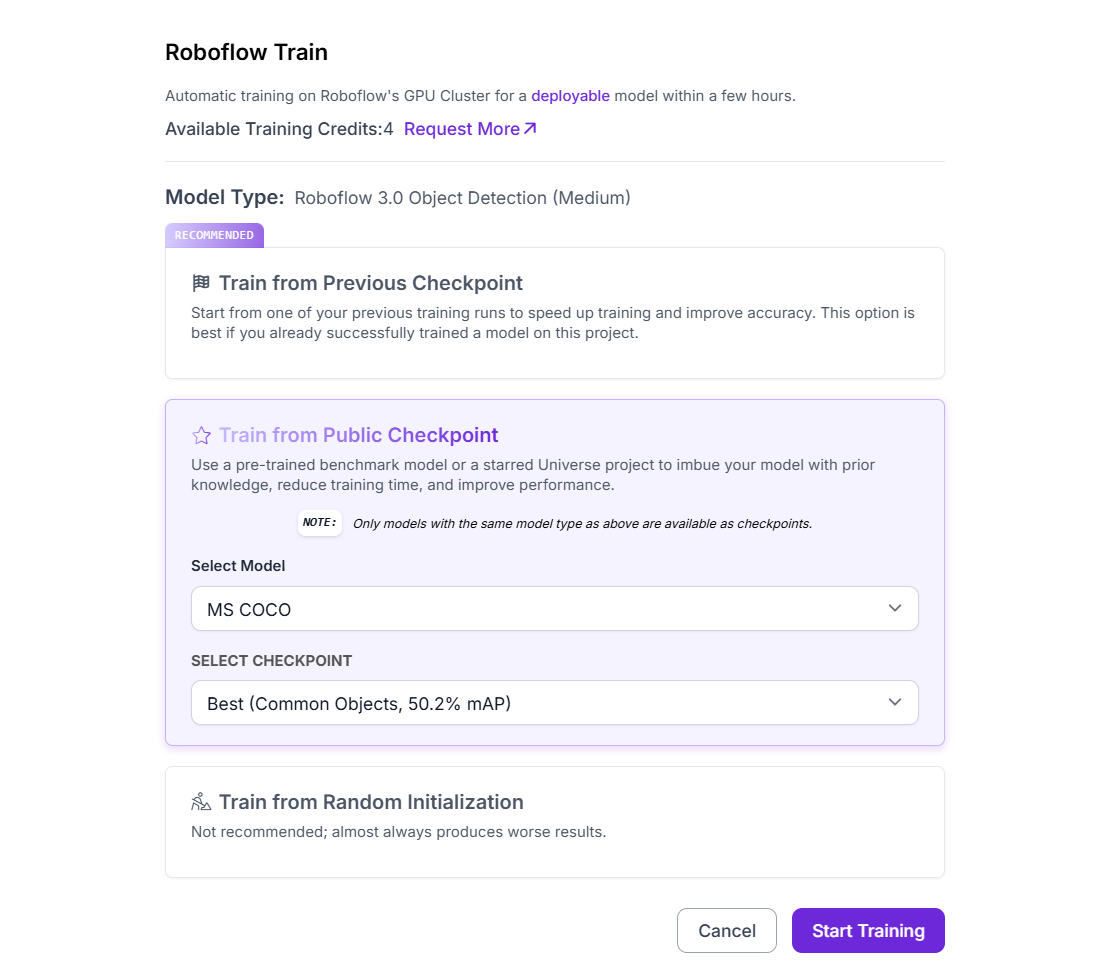
After confirming the setup, clicking Start Training launches the process. Once training is complete, the resulting model is ready for evaluation and live deployment in the PCB inspection workflow.
Step #3. Build the Roboflow Workflow
The next step is to create a PCB defect inspection workflow in Roboflow to connect the trained model with visualization and output blocks.
This workflow takes an input PCB image, processes it through the trained object detection model, and produces both visual outputs (bounding boxes around missing holes) and structured JSON outputs (coordinates and confidence scores). The workflow is built with the following blocks:
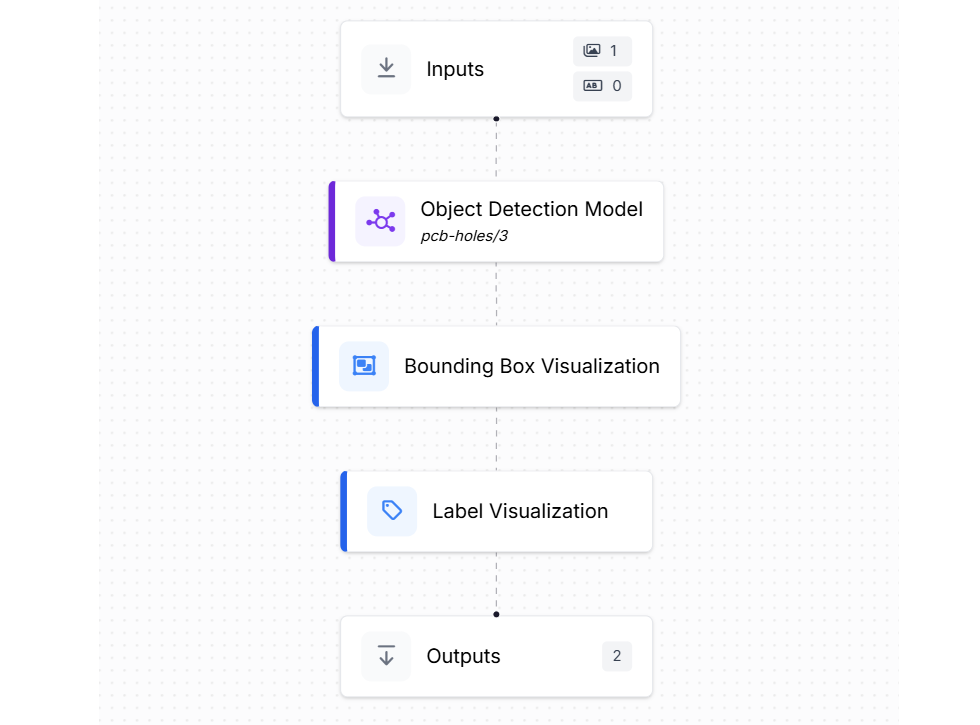
- Inputs: Defines the incoming data to the workflow. Here, the input is an image of a printed circuit board that may contain defects such as missing holes.
- Object Detection Model: Uses the trained PCB defect detection model (e.g., pcb-missing-hole-detection/5). The model predicts bounding boxes around each detected missing hole. For every prediction, the model outputs:
- Image width and height
- Bounding box center coordinates (x, y)
- Bounding box width and height
- Prediction confidence score
- Bounding Box Visualization: Overlays bounding boxes directly onto the PCB image, making it easy to visually confirm where missing holes were detected.
- Label Visualization: Displays the defect label (e.g., “missing hole”) together with the confidence score above each bounding box for quick interpretation.
- Outputs: Collects the final results in two forms:
- Visual output, the PCB image with bounding boxes and labels showing detected missing holes.
- Structured JSON output containing dimensions, bounding box coordinates, and confidence scores, which can be used for reporting, analysis, or integration into a production QA system.
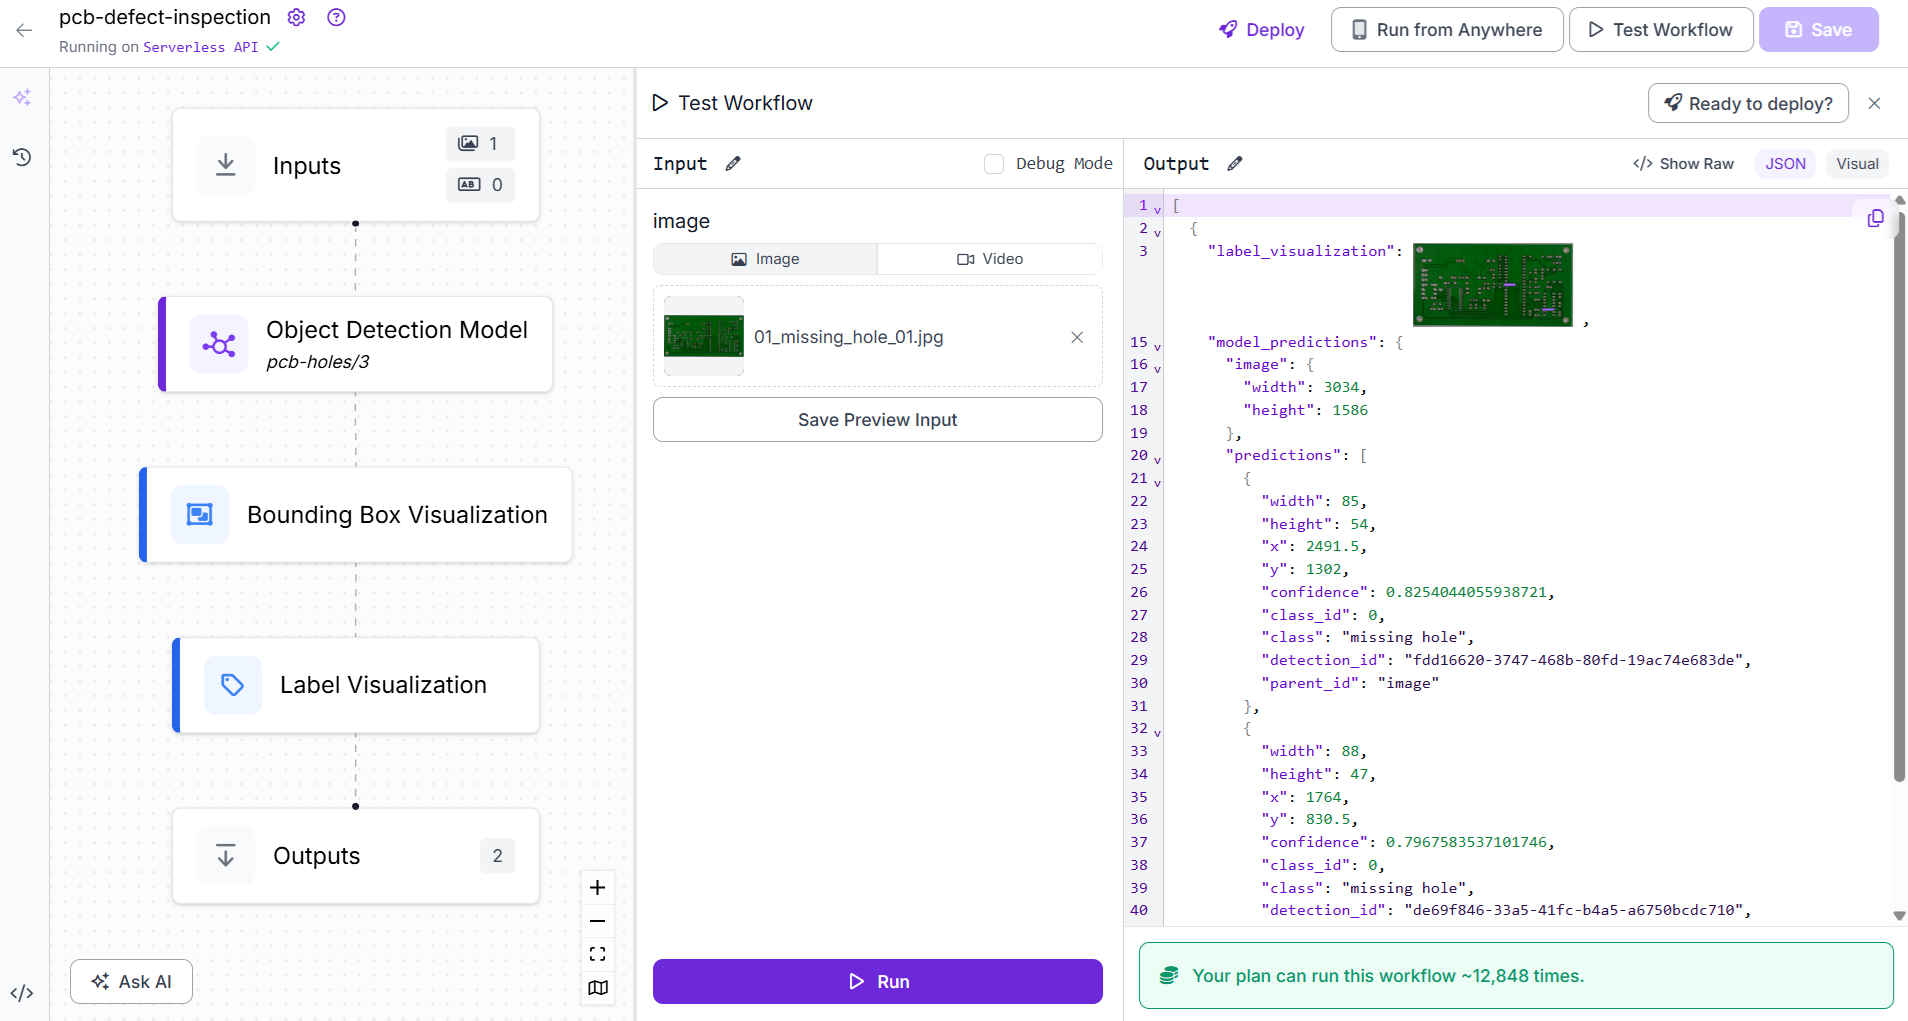
This workflow ingests PCB images, detects and localizes missing holes, provides an annotated image for fast inspection, and exports structured prediction data for use in downstream quality-control applications.
Step #4. Deploy the Roboflow Workflow
Once the workflow is ready, the final step is to deploy it into a live application. For this project, I built a Flet based desktop app that connects to the Roboflow workflow, processes video frames/live camera stream in real time, and presents both visual detections and live alerts to the user.
Following libraries are required for this example:
pip install inference-sdk fletHere’s the code for the app that you can save in app.py file:
# app.py
import base64
import threading
import cv2
import flet as ft
import numpy as np
import os
import time
from typing import Any, Dict, List, Tuple

from inference import InferencePipeline

TRANSPARENT_PX = (
    "iVBORw0KGgoAAAANSUhEUgAAAAEAAAABCAQAAAC1HAwCAA"
    "AAC0lEQVR42mP8/x8AAwMB/axpQX0AAAAASUVORK5CYII="
)

def np_to_b64_jpg(arr, assume_bgr=True, quality=85):
    if not assume_bgr:
        try:
            arr = cv2.cvtColor(arr, cv2.COLOR_RGB2BGR)
        except Exception:
            pass
    ok, buf = cv2.imencode(".jpg", arr, [cv2.IMWRITE_JPEG_QUALITY, quality])
    if not ok:
        return None
    return base64.b64encode(buf).decode("ascii")

def main(page: ft.Page):
    page.title = "Roboflow Workflow (Model Visualization + Snapshot + Alerts)"
    page.window_width, page.window_height = 1120, 780

    # Controls
    api_key = ft.TextField(label="API Key", password=True, can_reveal_password=True, width=360)
    workspace = ft.TextField(label="Workspace", value="tim-4ijf0", width=200)
    workflow_id = ft.TextField(label="Workflow ID", value="pcb-defect-inspection", width=240)
    source = ft.TextField(label="Video Source (0 / path / rtsp://...)", value="0", width=360)
    assume_bgr_chk = ft.Checkbox(label="Assume visualization is BGR", value=True)

    start_btn = ft.ElevatedButton("Start")
    stop_btn = ft.ElevatedButton("Stop", disabled=True)
    snapshot_btn = ft.ElevatedButton("Snapshot", disabled=True)
    status = ft.Text("Idle")
    info = ft.Text("")
    debug = ft.Text("", size=11, color=ft.Colors.GREY_700)  # shows parsed preds/frame
    save_info = ft.Text("")

    img_vis = ft.Image(src_base64=TRANSPARENT_PX, width=820, height=615, fit=ft.ImageFit.CONTAIN)

    # Alerts panel (right) — snapshot style (no scrolling/append)
    alerts_header = ft.Text("Alerts (live)", weight=ft.FontWeight.BOLD, size=16)
    alerts_count = ft.Text("No detections yet")
    clear_alerts_btn = ft.TextButton("Clear", icon=ft.Icons.CLEANING_SERVICES)

    # A Column we re-render entirely when detections change
    alert_list_col = ft.Column(spacing=6)  # no auto-scroll, no append spam

    alerts_panel = ft.Container(
        width=280,
        height=650,
        padding=10,
        bgcolor=ft.Colors.BLUE_GREY_50,
        content=ft.Column(
            [
                ft.Row([alerts_header, clear_alerts_btn], alignment=ft.MainAxisAlignment.SPACE_BETWEEN),
                alerts_count,
                ft.Divider(),
                alert_list_col,
            ],
            expand=True,
        ),
        border_radius=12,
    )

    left_col = ft.Column(
        [
            ft.Row([api_key, workspace, workflow_id]),
            ft.Row([source, assume_bgr_chk]),
            ft.Row([start_btn, stop_btn, snapshot_btn, status]),
            ft.Row([info]),
            img_vis,
            debug,
            save_info,
        ],
        spacing=8,
    )

    page.add(ft.Row([left_col, alerts_panel], alignment=ft.MainAxisAlignment.START, spacing=12))

    # Runtime state
    state = {
        "running": False,
        "pipeline": None,
        "thread": None,
        "started": False,
        "last_vis_bgr": None,
        "last_alert_signature": None,   # NEW: signature of last rendered detections
    }
    last_lock = threading.Lock()

    # Rendering helpers
    MAX_SHOW = 20  # cap cards shown to avoid overflow

    def make_alert_card(clz: str, x: float, y: float, conf: float, det_id: str) -> ft.Container:
        ts = time.strftime("%H:%M:%S")
        return ft.Container(
            bgcolor=ft.Colors.AMBER_50,
            border=ft.border.all(1, ft.Colors.AMBER_200),
            border_radius=8,
            padding=8,
            content=ft.Column(
                [
                    ft.Row(
                        [
                            ft.Icon(ft.Icons.WARNING_AMBER, size=16, color=ft.Colors.AMBER_700),
                            ft.Text(clz, weight=ft.FontWeight.BOLD, size=13, color=ft.Colors.AMBER_900),
                        ],
                        spacing=6,
                    ),
                    ft.Text(f"({x:.1f}, {y:.1f}) • conf {conf:.2%}", size=12, color=ft.Colors.GREY_800),
                    ft.Text(f"id: {det_id[:8]}…   at {ts}", size=11, color=ft.Colors.GREY_700),
                ],
                spacing=2,
            ),
        )

    def render_alert_snapshot(preds: List[Dict[str, float | str]]):
        """Replaces the alert panel contents with the current detections (no scrolling)."""
        alert_list_col.controls.clear()

        if not preds:
            # Calm empty state
            alert_list_col.controls.append(
                ft.Container(
                    bgcolor=ft.Colors.GREEN_50,
                    border=ft.border.all(1, ft.Colors.GREEN_200),
                    border_radius=8,
                    padding=10,
                    content=ft.Row(
                        [
                            ft.Icon(ft.Icons.CHECK_CIRCLE, color=ft.Colors.GREEN_600, size=18),
                            ft.Text("No defects detected", color=ft.Colors.GREEN_800, size=12),
                        ],
                        spacing=8,
                    ),
                )
            )
            alerts_count.value = "No detections"
        else:
            shown = 0
            for p in preds:
                if shown >= MAX_SHOW:
                    break
                alert_list_col.controls.append(
                    make_alert_card(p["class"], p["x"], p["y"], p["confidence"], p["detection_id"])
                )
                shown += 1
            plural = "s" if len(preds) != 1 else ""
            alerts_count.value = f"{len(preds)} detection{plural}"

    # Detections extractor
    def predictions_from_detections_obj(det_obj: Any) -> List[Dict[str, Any]]:
        """
        Extracts predictions from a Roboflow `Detections` object with fields:
        - xyxy: Nx4 -> [x1, y1, x2, y2]
        - confidence: (N,)
        - data: dict with arrays (e.g., 'class_name', 'detection_id')
        Returns list of dicts with keys: class, x, y, confidence, detection_id
        """
        preds: List[Dict[str, Any]] = []
        if det_obj is None:
            return preds

        xyxy = getattr(det_obj, "xyxy", None)
        conf = getattr(det_obj, "confidence", None)
        data = getattr(det_obj, "data", {}) or {}

        if xyxy is None or conf is None:
            return preds

        try:
            xyxy = np.asarray(xyxy)
            conf = np.asarray(conf)
        except Exception:
            return preds

        n = min(len(xyxy), len(conf))
        if n == 0:
            return preds

        class_names = (data.get("class_name") if isinstance(data, dict) else None)
        det_ids = (data.get("detection_id") if isinstance(data, dict) else None)

        try:
            class_names = np.asarray(class_names) if class_names is not None else None
        except Exception:
            class_names = None
        try:
            det_ids = np.asarray(det_ids) if det_ids is not None else None
        except Exception:
            det_ids = None

        for i in range(n):
            try:
                x1, y1, x2, y2 = [float(v) for v in xyxy[i]]
                cx = (x1 + x2) / 2.0
                cy = (y1 + y2) / 2.0
                c = float(conf[i])

                cls_name = None
                if class_names is not None and i < len(class_names):
                    cls_name = str(class_names[i])
                if not cls_name:
                    cls_name = "defect"

                did = None
                if det_ids is not None and i < len(det_ids):
                    did = str(det_ids[i])
                if not did:
                    did = f"{cls_name}@{round(cx)},{round(cy)}"

                preds.append(
                    {"class": cls_name, "x": cx, "y": cy, "confidence": c, "detection_id": did}
                )
            except Exception:
                continue

        return preds

    # Build a stable signature for the current detections set
    def signature_for_preds(preds: List[Dict[str, Any]]) -> Tuple:
        # Round numeric fields to reduce jitter; sort to make order-independent.
        sig_items = []
        for p in preds:
            sig_items.append((
                p.get("detection_id"),
                p.get("class"),
                round(float(p.get("x", 0.0)), 1),
                round(float(p.get("y", 0.0)), 1),
                round(float(p.get("confidence", 0.0)), 3),
            ))
        sig_items.sort()
        return tuple(sig_items)


    def on_prediction(result, video_frame):
        try:
            # Visualization
            lv = None
            if isinstance(result, dict):
                lv = result.get("label_visualization")
            elif hasattr(result, "label_visualization"):
                lv = getattr(result, "label_visualization")

            if lv is not None and hasattr(lv, "numpy_image"):
                vis_arr = lv.numpy_image
                if not state["started"]:
                    state["started"] = True
                    status.value = "Running"

                if assume_bgr_chk.value:
                    vis_bgr = vis_arr
                else:
                    try:
                        vis_bgr = cv2.cvtColor(vis_arr, cv2.COLOR_RGB2BGR)
                    except Exception:
                        vis_bgr = vis_arr

                with last_lock:
                    state["last_vis_bgr"] = vis_bgr.copy()

                b64 = np_to_b64_jpg(vis_arr, assume_bgr=assume_bgr_chk.value, quality=85)
                if b64:
                    img_vis.src_base64 = b64
                    h, w = vis_arr.shape[:2]
                    info.value = f"{w}x{h}"
                snapshot_btn.disabled = False

            # Extract predictions (Detections object)
            det_obj = None
            if isinstance(result, dict):
                det_obj = result.get("model_predictions")
            elif hasattr(result, "model_predictions"):
                det_obj = getattr(result, "model_predictions")

            preds = predictions_from_detections_obj(det_obj)

            # Update alerts ONLY if the set changed (signature diff)
            sig = signature_for_preds(preds)
            changed = sig != state["last_alert_signature"]

            if changed:
                render_alert_snapshot(preds)
                state["last_alert_signature"] = sig

            debug.value = f"Debug: parsed {len(preds)} preds; changed={changed}"
            page.update()

        except Exception as e:
            status.value = f"Frame error: {e}"
            page.update()

    def run_pipeline():
        src = source.value.strip()
        try:
            video_reference = int(src)
        except ValueError:
            video_reference = src

        try:
            status.value = "Starting pipeline..."
            state["started"] = False
            page.update()

            pipe = InferencePipeline.init_with_workflow(
                api_key=api_key.value.strip(),
                workspace_name=workspace.value.strip(),
                workflow_id=workflow_id.value.strip(),
                video_reference=video_reference,
                max_fps=30,
                on_prediction=on_prediction,
            )
            state["pipeline"] = pipe
            pipe.start()

            if hasattr(pipe, "join"):
                pipe.join()
            else:
                while state["running"]:
                    time.sleep(0.1)

        except Exception as ex:
            status.value = f"Start failed: {ex}"
            page.update()
        finally:
            stop_btn.disabled = True
            start_btn.disabled = False
            snapshot_btn.disabled = True
            status.value = "Stopped"
            page.update()
            state["running"] = False
            state["pipeline"] = None
            with last_lock:
                state["last_vis_bgr"] = None

    def start_clicked(e):
        if state["running"]:
            return
        state["running"] = True
        start_btn.disabled = True
        stop_btn.disabled = False
        snapshot_btn.disabled = True
        save_info.value = ""
        status.value = "Starting..."
        state["started"] = False
        state["last_alert_signature"] = None
        # Fresh empty panel
        alert_list_col.controls.clear()
        alerts_count.value = "Cleared. Waiting for detections…"
        debug.value = ""
        page.update()

        t = threading.Thread(target=run_pipeline, daemon=True)
        state["thread"] = t
        t.start()

    def stop_pipeline():
        try:
            if state["pipeline"] is not None:
                if hasattr(state["pipeline"], "stop"):
                    state["pipeline"].stop()
                elif hasattr(state["pipeline"], "terminate"):
                    state["pipeline"].terminate()
        except Exception:
            pass
        finally:
            state["pipeline"] = None

    def stop_clicked(e):
        status.value = "Stopping..."
        page.update()
        state["running"] = False
        stop_pipeline()
        stop_btn.disabled = True
        start_btn.disabled = False
        snapshot_btn.disabled = True
        page.update()

    def snapshot_clicked(e):
        with last_lock:
            frame = state["last_vis_bgr"].copy() if state["last_vis_bgr"] is not None else None
        if frame is None:
            save_info.value = "No frame available yet."
            page.update()
            return
        os.makedirs("snapshots", exist_ok=True)
        fname = time.strftime("snapshots/vis_%Y%m%d_%H%M%S.jpg")
        ok = cv2.imwrite(fname, frame)
        save_info.value = f"Saved: {fname}" if ok else "Failed to save snapshot."
        page.update()

    def clear_alerts(e=None):
        alert_list_col.controls.clear()
        alerts_count.value = "Cleared. Waiting for detections…"
        state["last_alert_signature"] = None
        page.update()

    clear_alerts_btn.on_click = clear_alerts

    def on_disconnect(e):
        state["running"] = False
        stop_pipeline()

    start_btn.on_click = start_clicked
    stop_btn.on_click = stop_clicked
    snapshot_btn.on_click = snapshot_clicked
    page.on_disconnect = on_disconnect

if __name__ == "__main__":
    ft.app(target=main)
The application is designed with two main panels. On the left, the live video or camera stream shows the PCB with bounding boxes drawn around detected defects. On the right, an alerts panel displays snapshot-style notifications whenever a defect (such as a missing hole) is detected. It refreshes the alert list whenever detections change, making it easier for operators to track the current status at a glance.
The app provides interactive controls where the user can enter their API key, workspace, and workflow ID, as well as select a video source such as a webcam, video file, or RTSP stream. It also includes start, stop, and snapshot buttons, enabling full control of the inspection session. Snapshots of the live visualization can be saved for reporting or record-keeping.
Behind the scenes, the app runs the Roboflow inference pipeline in a separate thread, continuously processing frames from the video source. Detected defects are converted into structured predictions (class, coordinates, and confidence scores), which are then displayed both on the live image and in the alerts panel. The system automatically clears alerts when no defects are present and updates counts when new detections appear.
You can run the code with following command:
flet run app.pyor
python app.pyYou will see output similar to following:

Following is the video demonstration:
Output of flet app
You can also run the same app as web application using following command.
flet run --web app.pyThis will start the web server and run the app in web browser. You should see output similar to following:
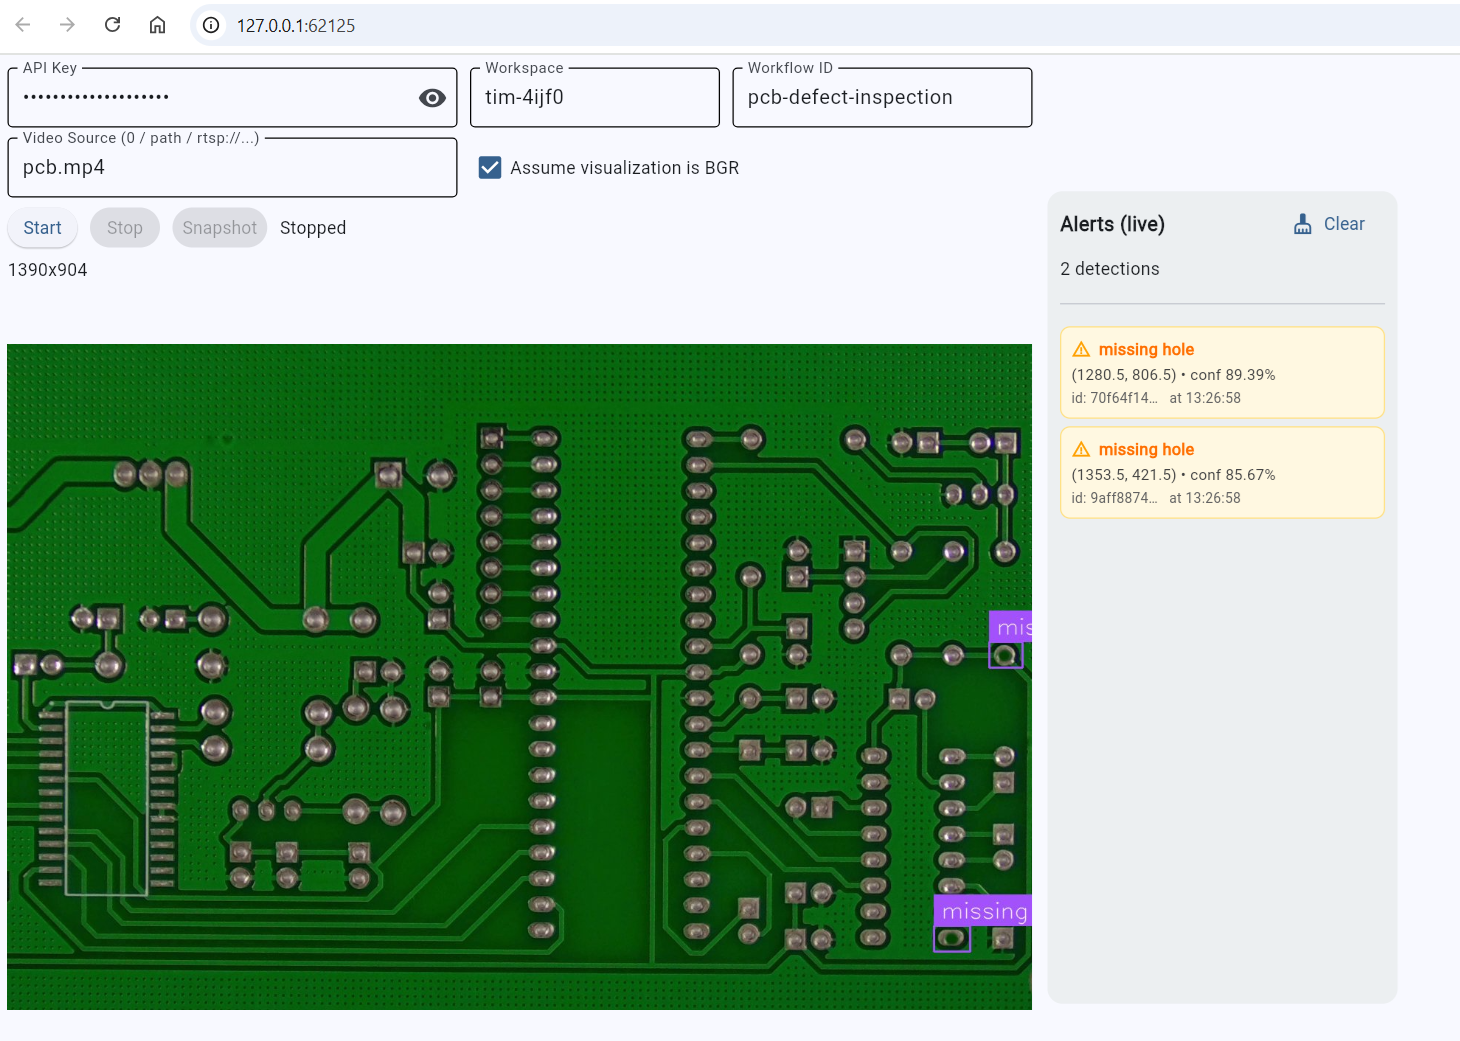
This deployment step turns the trained Roboflow workflow into a practical, operator-friendly inspection tool capable of real-time visualization, defect alerts, and snapshot capture making PCB inspection usable in real manufacturing environments.
Vision Inspection Systems Conclusion
Vision Inspection Systems have become essential in modern manufacturing, ensuring products meet strict quality, safety, and performance standards. From defect detection and measurement to label verification, counting, and compliance checks, computer vision now powers a wide range of inspection tasks across industries such as electronics, automotive, pharmaceuticals, and food processing. With advances in deep learning, imaging hardware, and deployment platforms, these systems are more accurate, scalable, and flexible than ever before.
In this blog, we explored the fundamentals of VIS including its types, components, and typical applications. We have also built a practical application to detect missing holes in printed circuit boards. This end-to-end example demonstrates how accessible it has become to design and deploy custom inspection solutions without needing to reinvent the wheel.
Cite this Post
Use the following entry to cite this post in your research:
Timothy M. (Sep 25, 2025). What Are Vision Inspection Systems?. Roboflow Blog: https://blog.roboflow.com/vision-inspection-systems/