
Pharmaceutical manufacturing operates under FDA 21 CFR Part 211, which mandates visual examination at multiple production stages. For injectable products, 100% inspection of every unit is required. For solid oral dosage forms such as tablets and capsules, AQL-based sampling triggers a full inspection when defect thresholds are exceeded.
The problem isn't whether to inspect, it's how. Manual inspection catches roughly 80% of defects, degrades with fatigue, and varies by inspector and shift. A single pharmaceutical recall averages $10–100 million, and the industry recalled over 680 million units in 2024 alone.
In this tutorial, you'll build a two-stage AVI pipeline in Roboflow: detect pills on a production line, classify each pill as good or defective, and output pass/fail results through a Workflow. This detection > crop > classification pattern mirrors how real pharmaceutical inspection systems work: isolate the object first, then assess its condition.
How to Automate Pharmaceutical Visual Inspection
A two-stage pipeline needs two datasets. We'll use two complementary datasets from Roboflow Universe:
- Pill Detection: 451 images, object detection, 1 class (pill). Already validated by the community (17k views, 595 downloads, 9 stars). This model learns where pills are in the frame.
- Defective Pill Classifier: 191 images, 2 classes: Normal and Edge Defect (1.8k views, 69 downloads). This dataset provides the defect classification labels for Stage 2.
1. Prepare Two Datasets: Detection + Classification
Fork the Defective Pill Classifier dataset, generate a version with Isolate Objects, then upload the cropped images into a new Single-Label Classification project.
Fork both datasets into your workspace and create new versions with no preprocessing or augmentation to establish clean baselines.

2. Train Two Models
Model 1: Pill Detection
Training configuration:
- Task: Object detection
- Architecture: RF-DETR, Small
- Initialization: Pretrained weights
- Train (70%), Valid (20%), Test (10%)
Go to your Pill Detection dataset version and click Custom Train. With 451 images, training completes in under an hour. This model only needs to locate pills; it doesn't assess quality. Prioritize high recall here: every pill in the frame must be detected, even if a few false positives slip through. A missed pill means a missed inspection, no jokes.
Model 2: Pill Classification
Training configuration:
- Task: Single-label classification
- Architecture: ViT Classification
- Train (70%), Valid (20%), Test (10%)
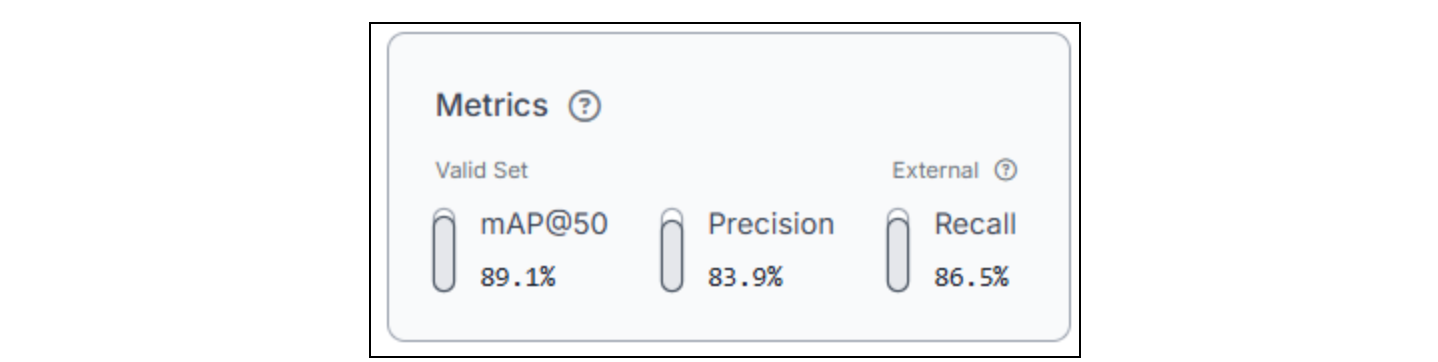
Train a single-label classification model on your converted Defective Pill Classifier dataset. This model receives cropped pill images (one pill per image) and predicts across two classes: Normal and Edge Defect. With a small dataset, training is fast. The key metric here is per-class accuracy; make sure the model reliably distinguishes defective pills from normal ones, not just achieves high overall accuracy.

The reason we're using two stages is because detection isolates the object of interest from a complex scene, conveyor belt, lighting reflections, other pills, and background clutter. Classification then focuses the model's full capacity on the actual quality question, defective or not, without environmental noise diluting the signal. Trying to do both in a single model requires far more training data and produces less reliable results than splitting the tasks.
3. Build a Two-Stage Inspection Workflow
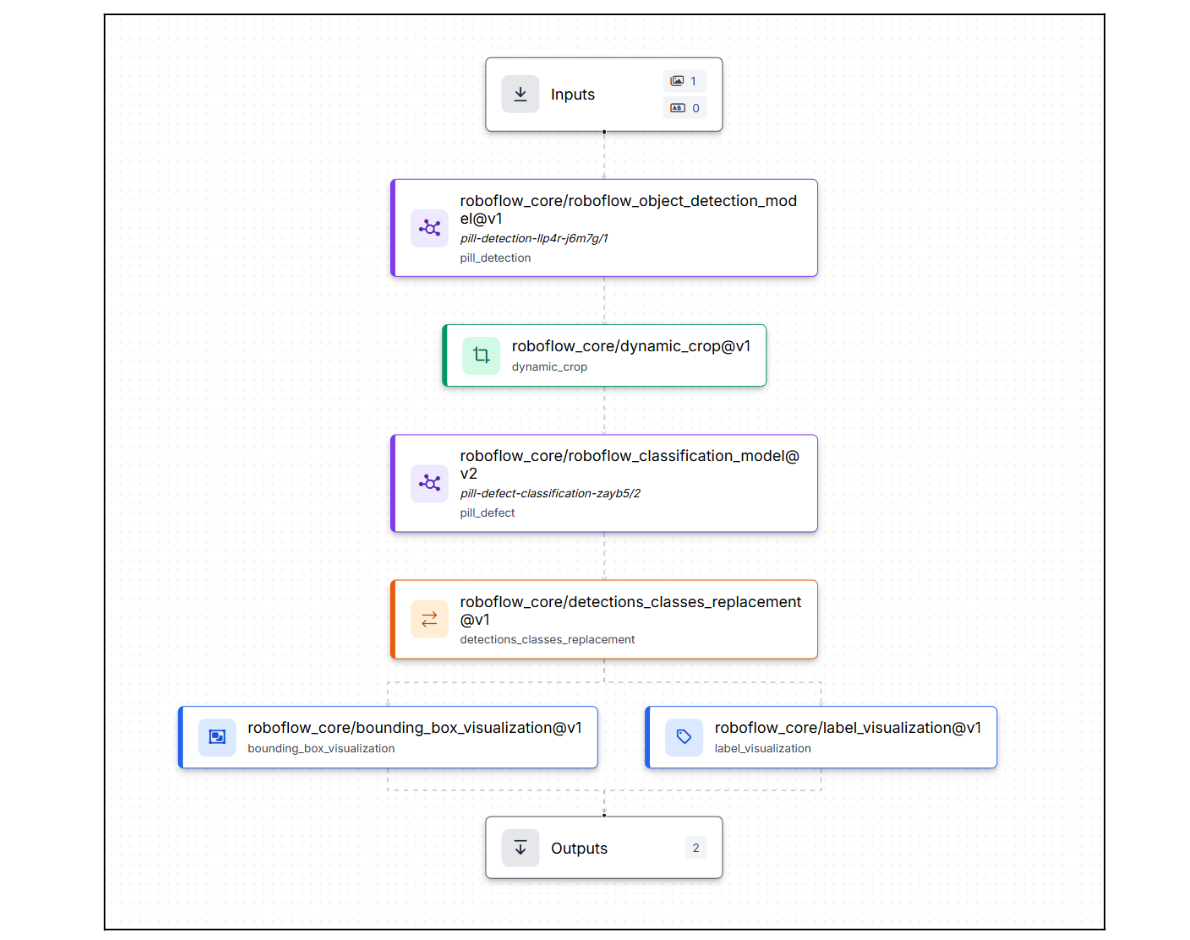
This is where two separate models become one inspection system. Roboflow Workflows connects detection, cropping, and classification into a single pipeline that processes each pill independently and outputs a pass/fail verdict.
The workflow: production image → detect pills → crop each pill → classify each crop → merge labels → visualize results. Here is the workflow we're building.
Step 1: Generate the Workflow Scaffold
Go to your trained detection model and click Try Workflows → Build My Own. Roboflow creates a basic workflow: Inputs → Object Detection Model → Outputs. From here, you'll extend it into a multi-stage inspection pipeline by adding cropping, classification, label replacement, and visualization blocks between the model and the outputs.
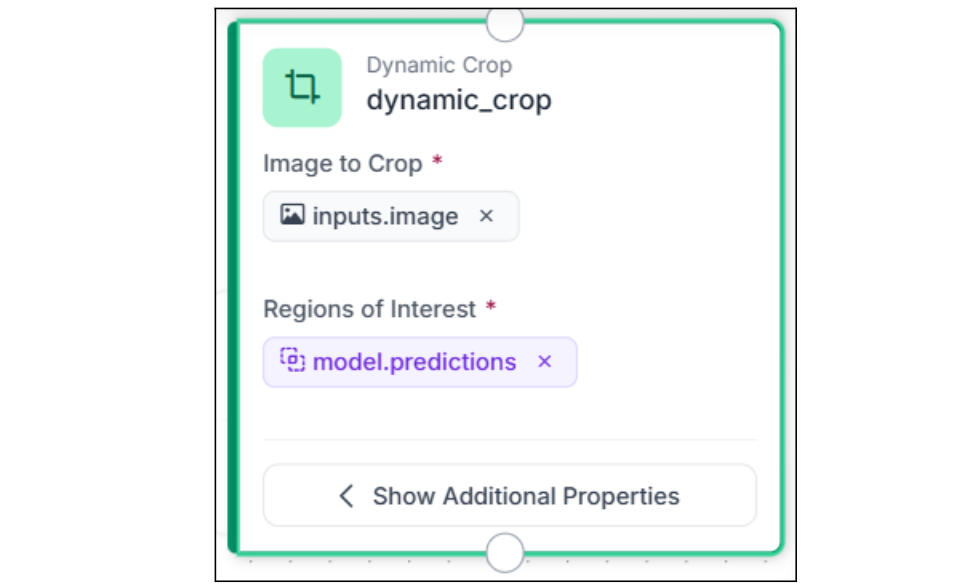
Step 2: Add Dynamic Crop
Add a Dynamic Crop block after the Object Detection model. This is the key connector in any two-stage workflow; it takes the detection bounding boxes and crops each detected pill into its own image. If the model detects 5 pills in one frame, you get 5 separate cropped images. Instead of the classification model seeing the entire production frame, with conveyor-belt texture, other pills, and background noise, it sees a clean, centered view of one pill at a time.
Connect images to $inputs. image and predictions to $steps.model.predictions. The block increases data dimensionality: one input image becomes multiple output crops, and every downstream block processes each crop independently.
Step 3: Classify Each Cropped Pill
Add a Single-Label Classification Model block and connect its images input to $steps.dynamic_crop.crops. Select your trained Pill Classification model.
Each cropped pill image is classified independently, and the model returns a class label (Normal or Edge Defect) and a confidence score for each. Because the Dynamic Crop block already isolated the pill, the classifier sees only the pill with no surrounding context, which significantly improves classification accuracy compared to running classification on the full frame.

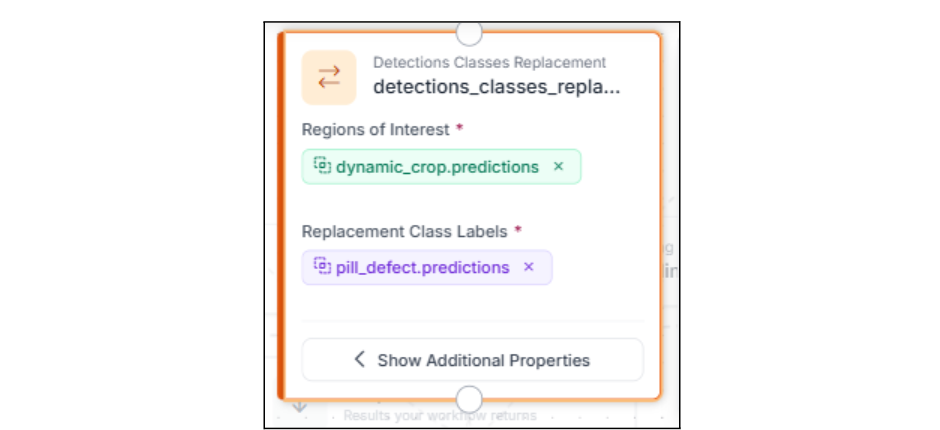
Step 4: Merge Classification Labels Back Into Detections
Add a Detections Classes Replacement block. This replaces the generic pill label from Stage 1 with the actual classification result from Stage 2. Now each bounding box carries the inspection verdict: the detection tells you where, and the classification tells you what.
This is the block that connects the two stages into a single coherent output. Without it, you'd have separate detection bounding boxes (all labeled pill) and separate classification results (labeled Normal or Edge Defect) with no way to visualize them together.
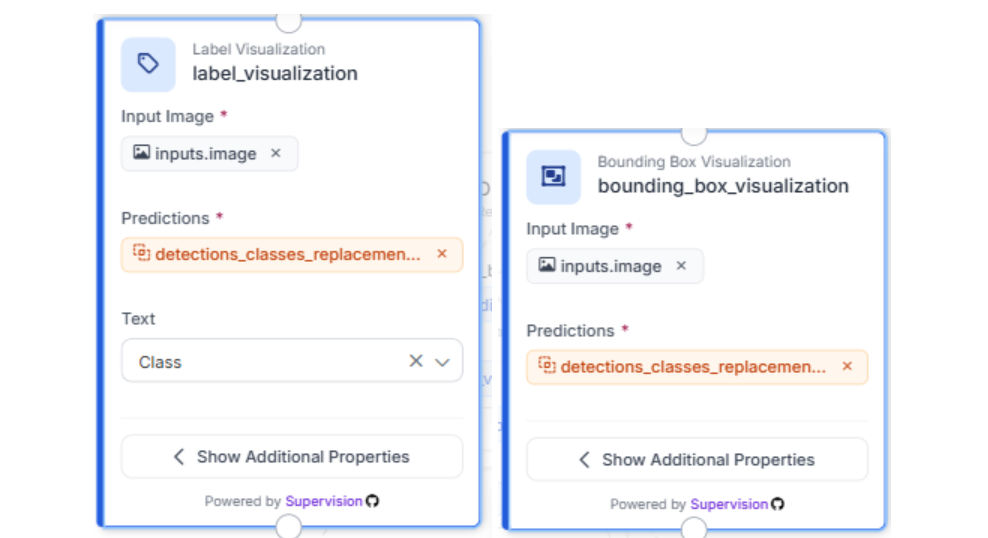
Step 5: Visualize the Results
Add Bounding Box Visualization and Label Visualization blocks so each pill gets a labeled bounding box showing its classification result. The bounding box shows the pill's location from Stage 1, and the label shows the class and confidence from Stage 2, all merged by the Detections Classes Replacement block. Convert the annotated image to JPEG via a Property Definition block for the final output.
Step 6: Define Outputs
In the Outputs block, add the annotated JPEG image as the workflow output. You can also add the raw predictions as a second output if you need structured data (class labels, confidence scores, bounding box coordinates per pill) for downstream integration with quality dashboards or rejection mechanisms.
Step 7: Test the Pipeline
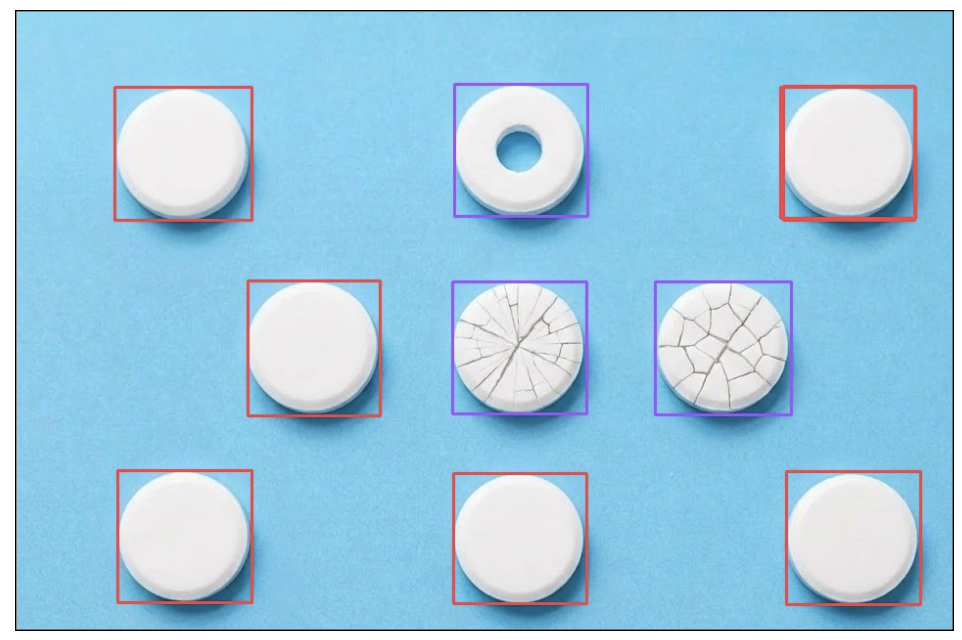
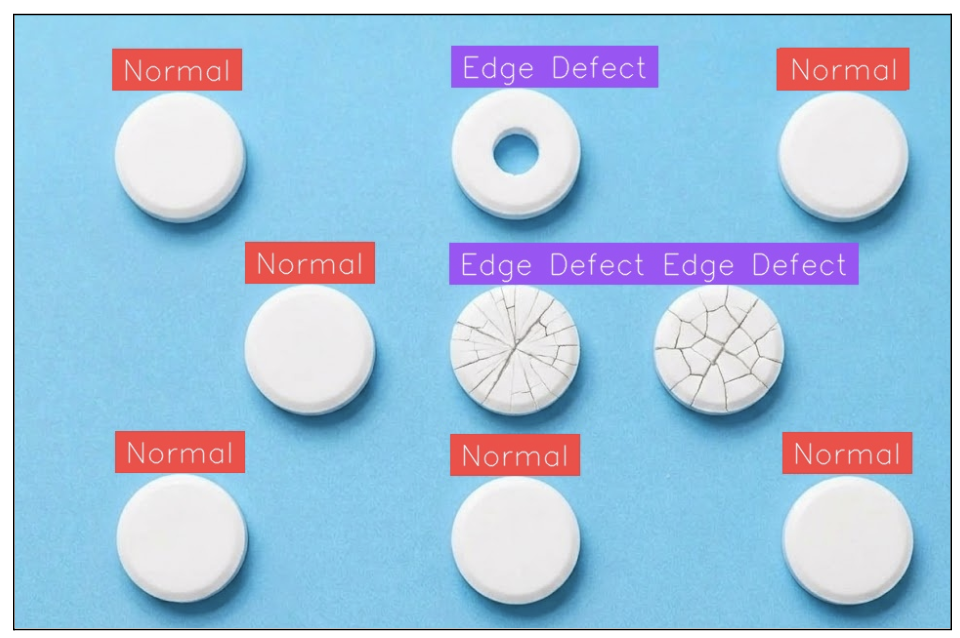
Run the workflow with a sample inspection image. Each pill in the frame should be detected, cropped, classified, and labeled independently.
This per-pill granularity is what separates a real inspection system from a frame-level binary classifier. Each pill gets its own verdict and a bounding box in the output.
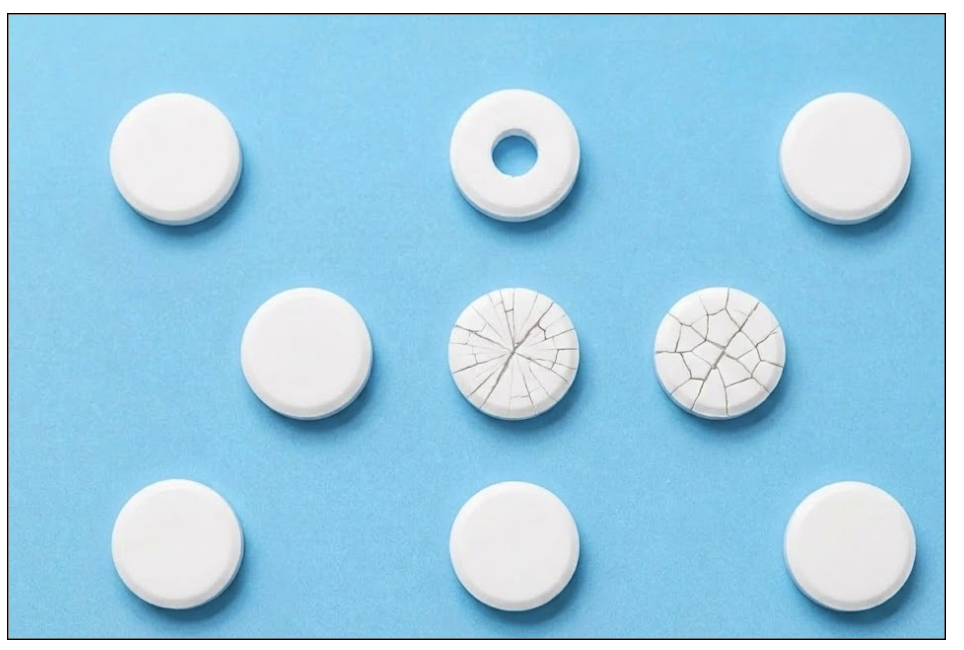
Input Image:
Output Images:
4. Scaling AVI Systems
The workflow you built is the core inspection loop. Here's how teams harden it for production.
Reduce false rejects by setting a confidence threshold (≥0.7) on the classification model; below that, route to human review instead of auto-rejecting. Use per-class thresholds tied to defect severity: an edge defect that compromises structural integrity (a chipped tablet that could crumble during packaging) warrants stricter thresholds than a minor cosmetic mark.
Monitor classification distributions as a process signal. A high-speed tablet press runs at 100,000–300,000 tablets per hour. If Edge Defect spikes from 1% to 8% on a specific press, that's a compression tooling issue (worn punch face, inconsistent granulation), not a model problem. That signal triggers a CAPA (Corrective and Preventive Action) investigation, exactly the kind of evidence regulators expect to demonstrate systematic quality oversight.
Expand to new products without rebuilding. The detection to dynamic crop to classification pattern applies to capsules, blister packs, vials, and syringes. Swap the models, keep the workflow. For new defect types, capture misclassified images from production and retrain the same iteration cycle used in any visual inspection system.
Automated Visual Inspection in Life Sciences Conclusion
In this tutorial, you built a two-stage AVI pipeline: an object detection model locates pills, a Dynamic Crop block isolates each one, and a classification model delivers a per-pill pass/fail verdict. This detection to crop to classification pattern scales to any pharmaceutical product that needs isolation before assessment, and Roboflow Workflows turns it into an operational inspection system. Detect, crop, classify, decide.
Further Reading
Below are a few related topics you might be interested in:
Cite this Post
Use the following entry to cite this post in your research:
Contributing Writer. (Mar 12, 2026). Automated Visual Inspection in Pharmaceuticals with Roboflow. Roboflow Blog: https://blog.roboflow.com/visual-inspection-in-pharmaceuticals/