
Manually entering shelf label information into a Point of Sale (POS) system to validate product prices can be time-consuming and error-prone. This blog presents a workflow that enables store employees to simply take a photo of a shelf, after which the workflow automatically validates the shelf labels against the POS database on a server, streamlining the entire process.
The workflow:
- Detects shelf labels in a given shelf image.
- Extracts product names and prices from the labels.
- Validates the extracted products and prices by querying the POS server via an API.
- Generates the shelf image with bounding boxes, highlighting correct and incorrect prices with color coding.
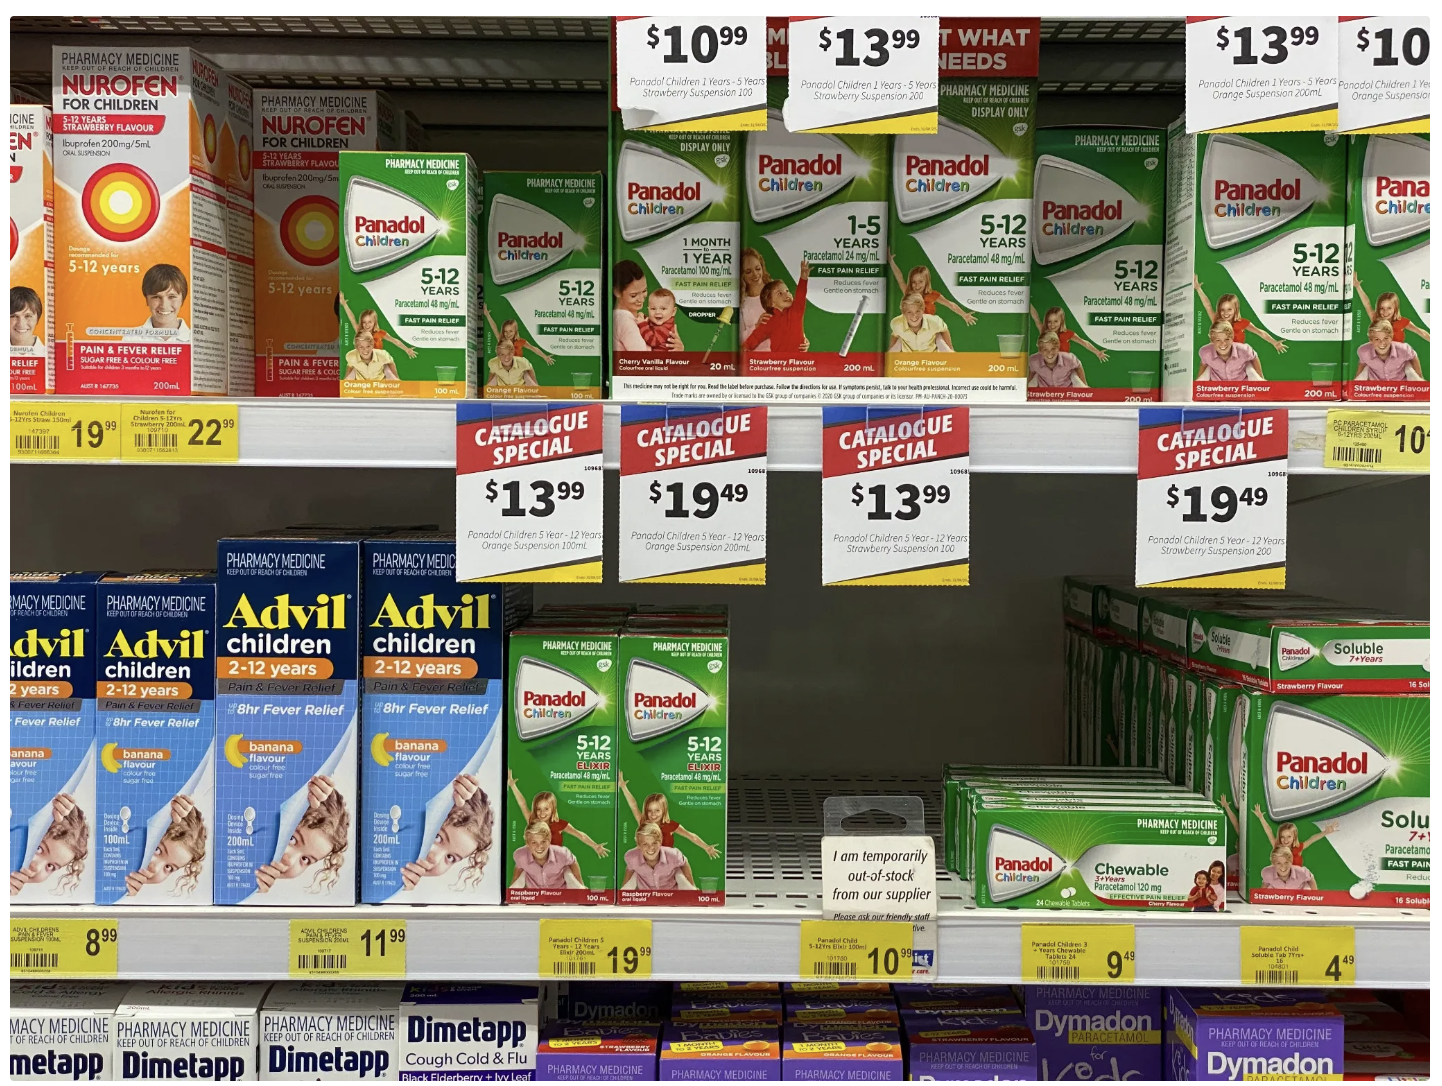
Below is an example of the input and output for this workflow:
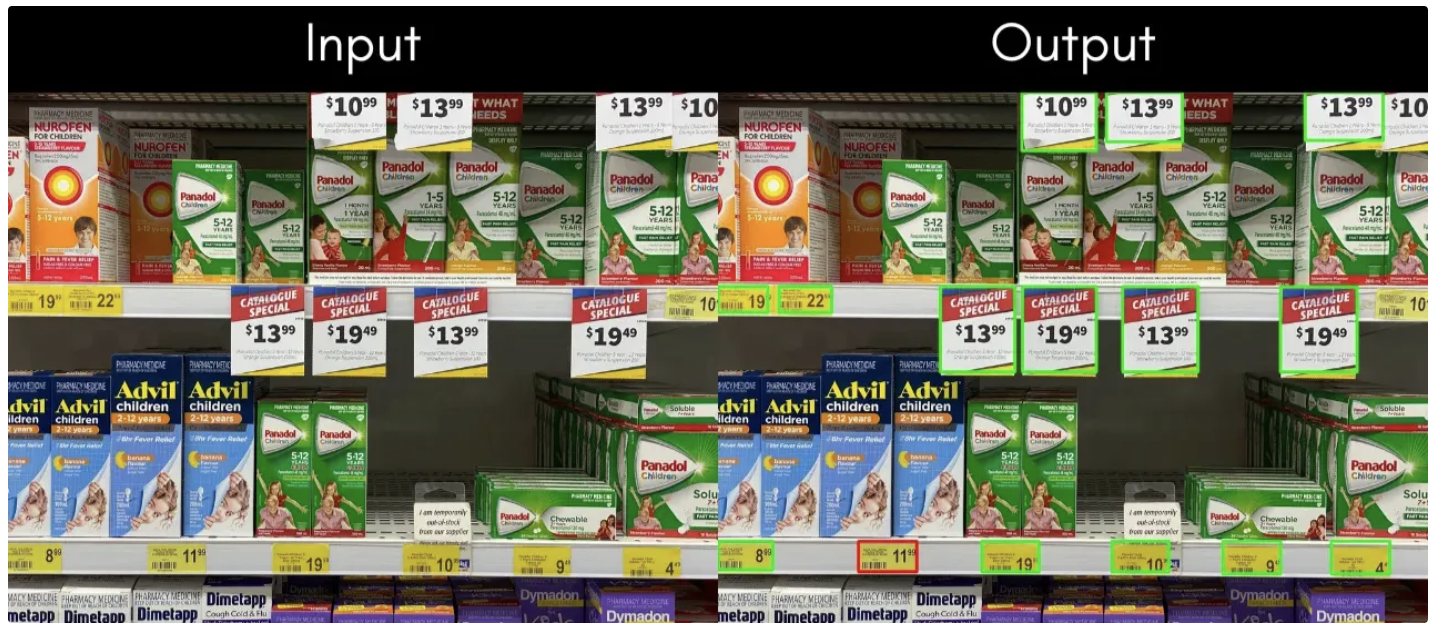
In the output image above, green bounding boxes indicate that the product and price on those shelf labels have been successfully verified against the POS database. Red bounding boxes indicate a mismatch, where the price on the shelf label does not match the price recorded in the POS database for that product.
Whereas shelf labels that did not appear within bounding boxes were not detected by the workflow, possibly due to poor image quality or labels being too small, you can retake a photo of the specific shelf label, moving the camera closer, to enable accurate verification of all shelf labels.
Building an AI-Powered Shelf Price Verification Workflow
In this blog, we'll be using Roboflow Workflows, a web-based tool for building visual AI applications. Roboflow Workflows lets us seamlessly chain multiple computer vision tasks, such as object detection, dynamic cropping, bounding box visualization, and more, while also providing the flexibility to integrate custom code blocks whenever needed. The video below demonstrates this workflow in action:
You can try out this AI-Powered Shelf Price Verification here.
Before trying it, ensure you’ve completed Step 7 and that you have updated the ANON_KEY and PROJECT_ID in the Python code of the Validate Against Server Prices block.
Also, remember to use your own Google Gemini API key.
Setup Your Roboflow Workflow
To get started, create a free Roboflow account and log in. Next, create a workspace, then click on “Workflows” in the left sidebar and click on Create Workflow.
You’ll be taken to a blank workflow editor, ready for you to build your AI-powered workflow. Here, you’ll see two workflow blocks: Inputs and Outputs.
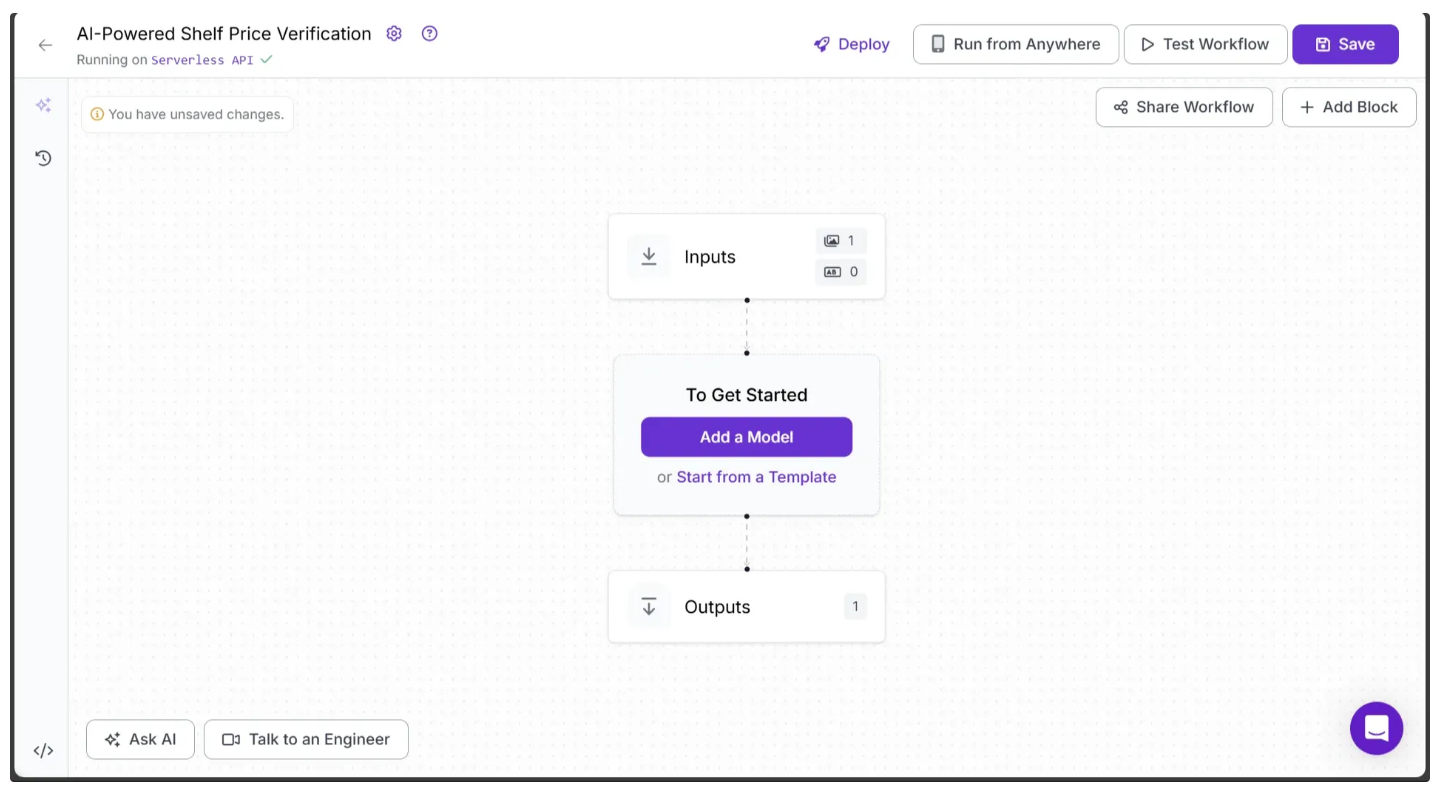
In the top left corner, you'll see either Running on Serverless Hosted API or Hosted API. Both of these options support common tasks such as object detection, dynamic cropping, and chaining logic blocks, but neither supports custom Python code blocks. If you need custom code in your workflow, you’ll need to use a Dedicated Deployment or self host your own Roboflow Inference server.
Since our workflow requires custom code, we'll switch to a locally hosted inference server. To do this, click the text that follows Running on in the top-left corner, then select Local Device.
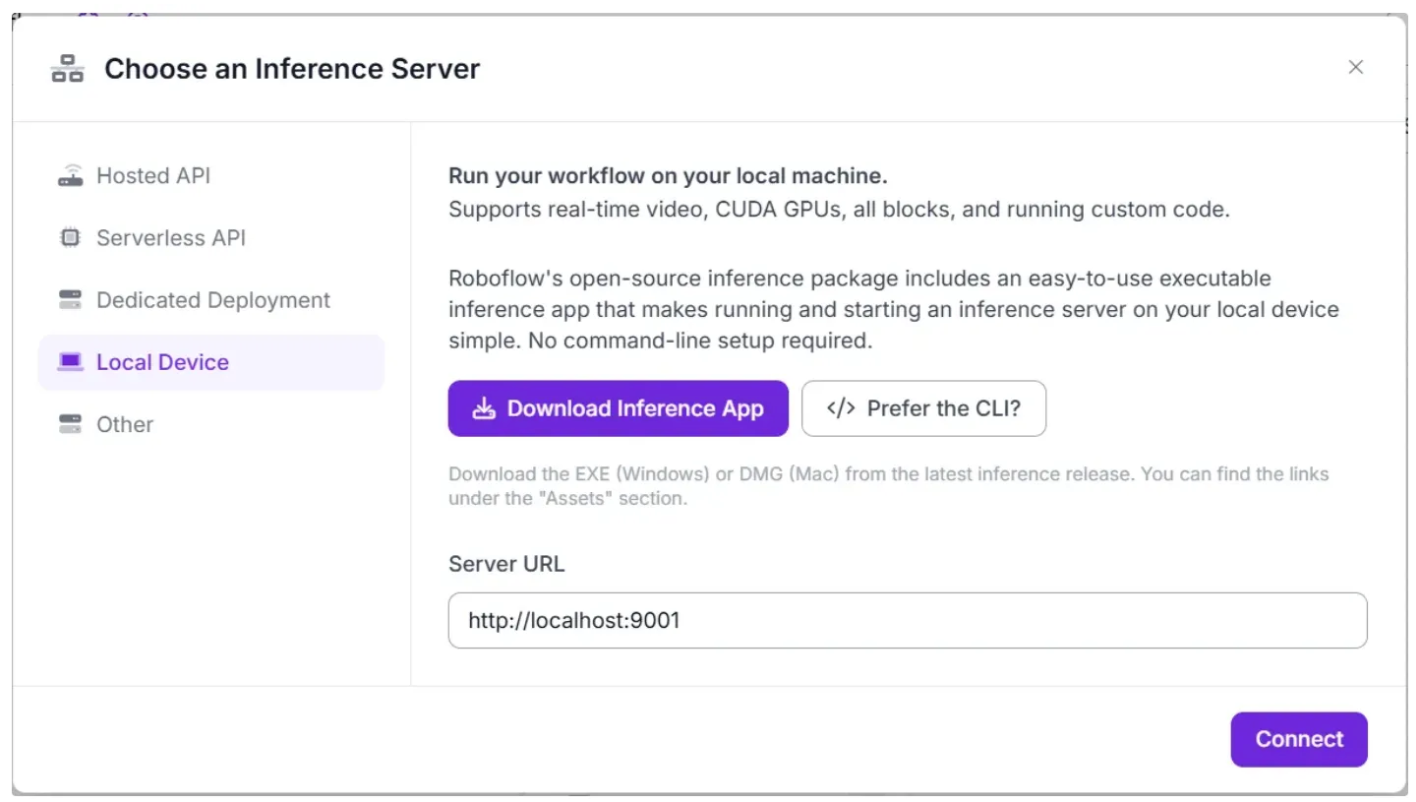
Before connecting to http://localhost:9001, you need to run an inference server on your local device. You can do this either by downloading and installing the Roboflow inference app and running it, which starts a local server on port 9001, or by following the command-line instructions provided here.
Once the local inference server starts, you can verify it by visiting http://localhost:9001 in your browser and click Connect. After connecting, your workflow will run locally on your device.
Step 1: Setup Additional Input Parameters
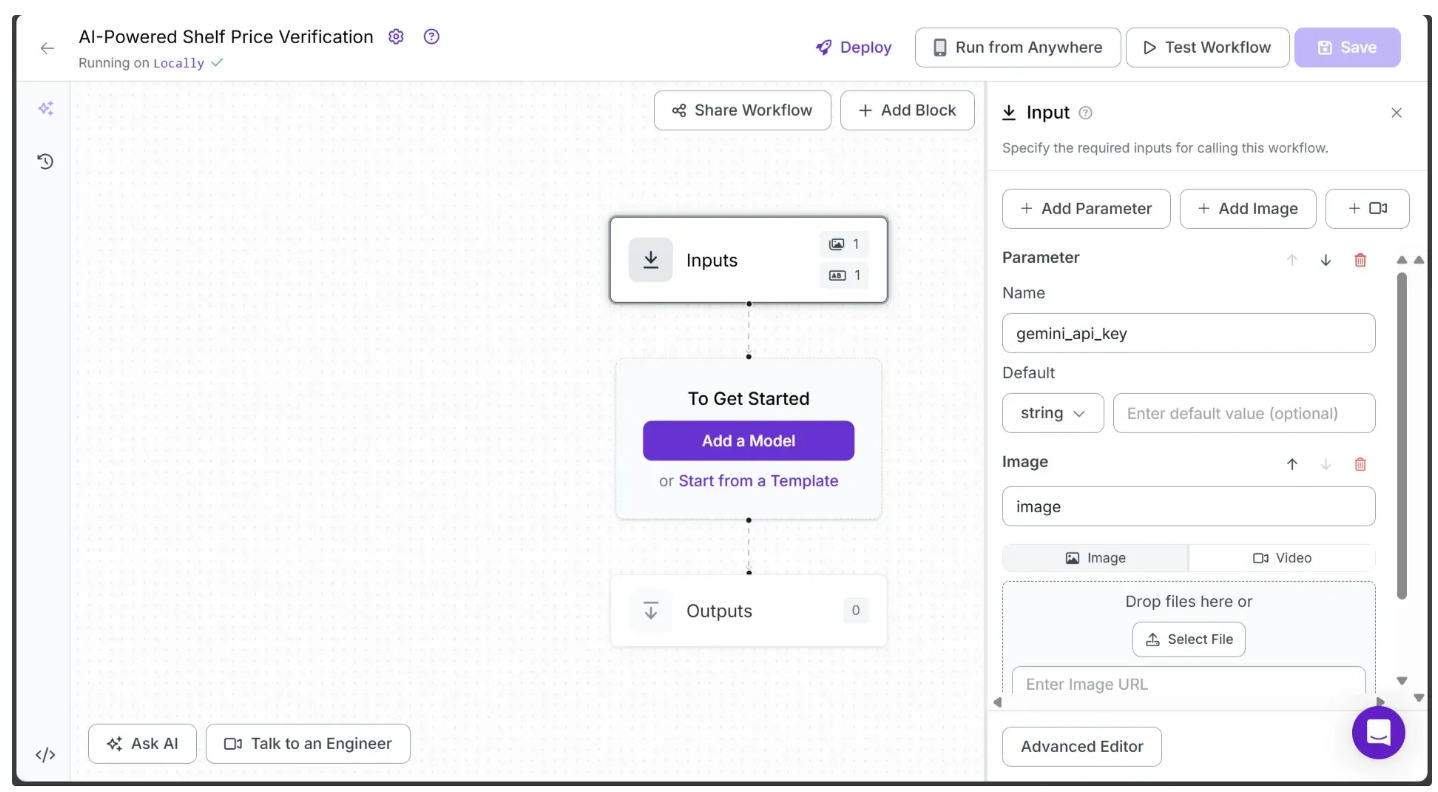
If you click on the Inputs block, a sidebar appears on the right displaying a default parameter called image, which lets you add an image as input to the workflow. The image to be added in this workflow is a picture of a shelf where the shelf labels are clearly visible.
You can also use the Add Parameter option to include additional parameters that control the workflow behavior.
In this workflow, we add an additional parameter, gemini_api_key, which takes a Gemini API key required to access the Gemini models used for Object Detection and Optical Character Recognition (OCR), as shown below:
Note: Don’t forget to save the workflow to keep your changes. The save option is available at the top-right corner of the workflow.
For this workflow, we'll use the following test image:
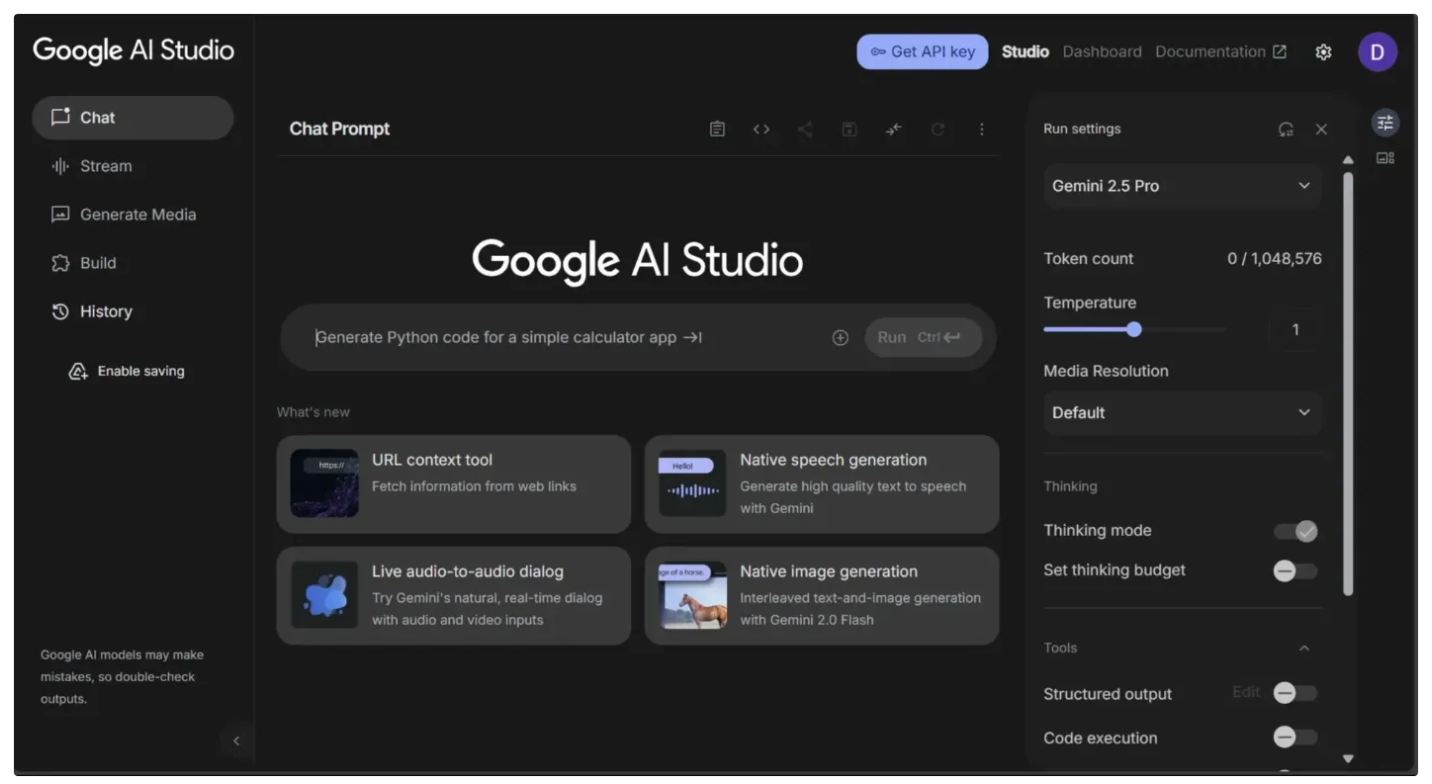
Step 2: Generate a Gemini API Key
This workflow uses Gemini Models, so you’ll need a Gemini API key. You can obtain one for free from Google AI Studio, as shown below:
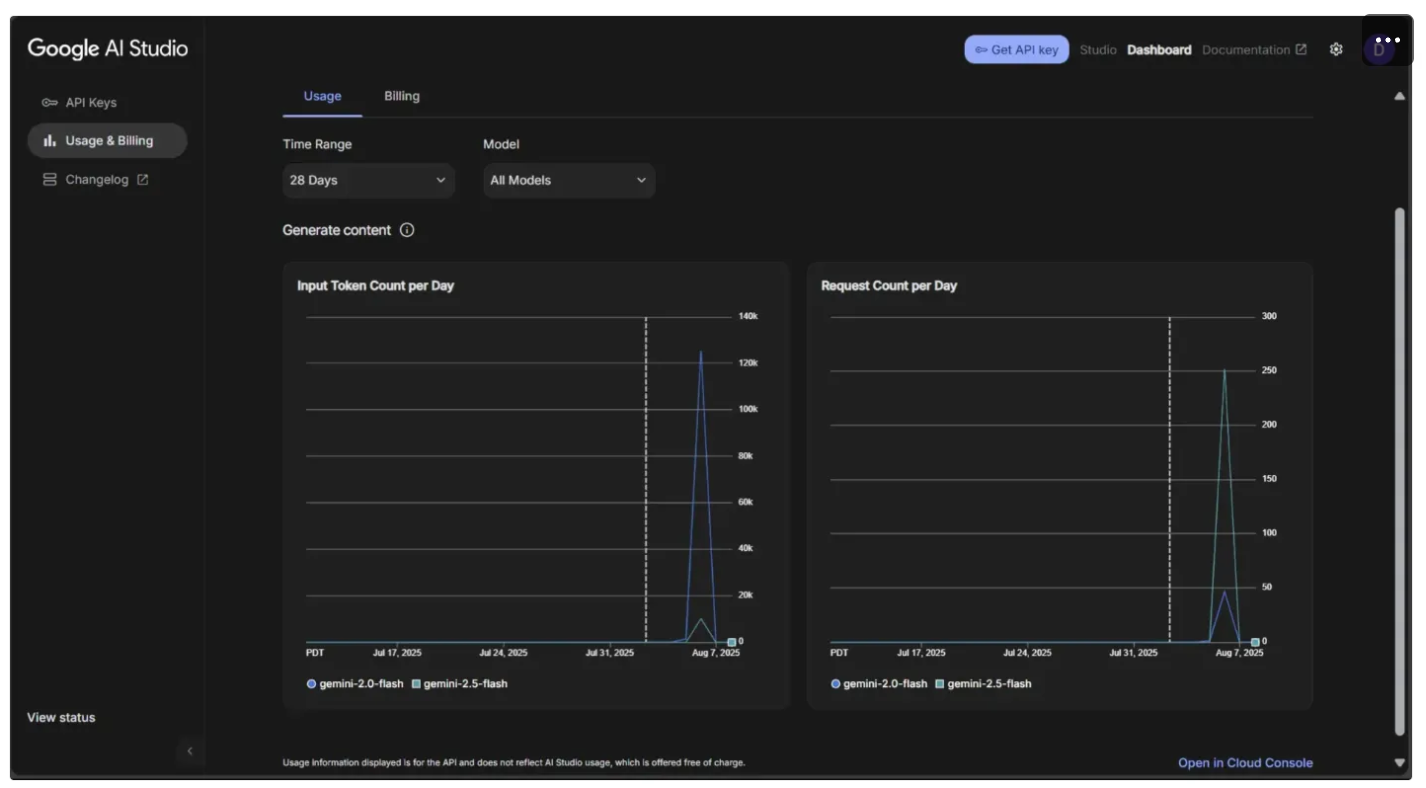
You also need to monitor your usage to avoid exceeding the rate limits imposed by the Free Tier of Google AI Studio, which could cause errors in the workflow. To do this, go to the dashboard in the top-right corner, then navigate to Usage and Billing from the sidebar on the left, as shown below:
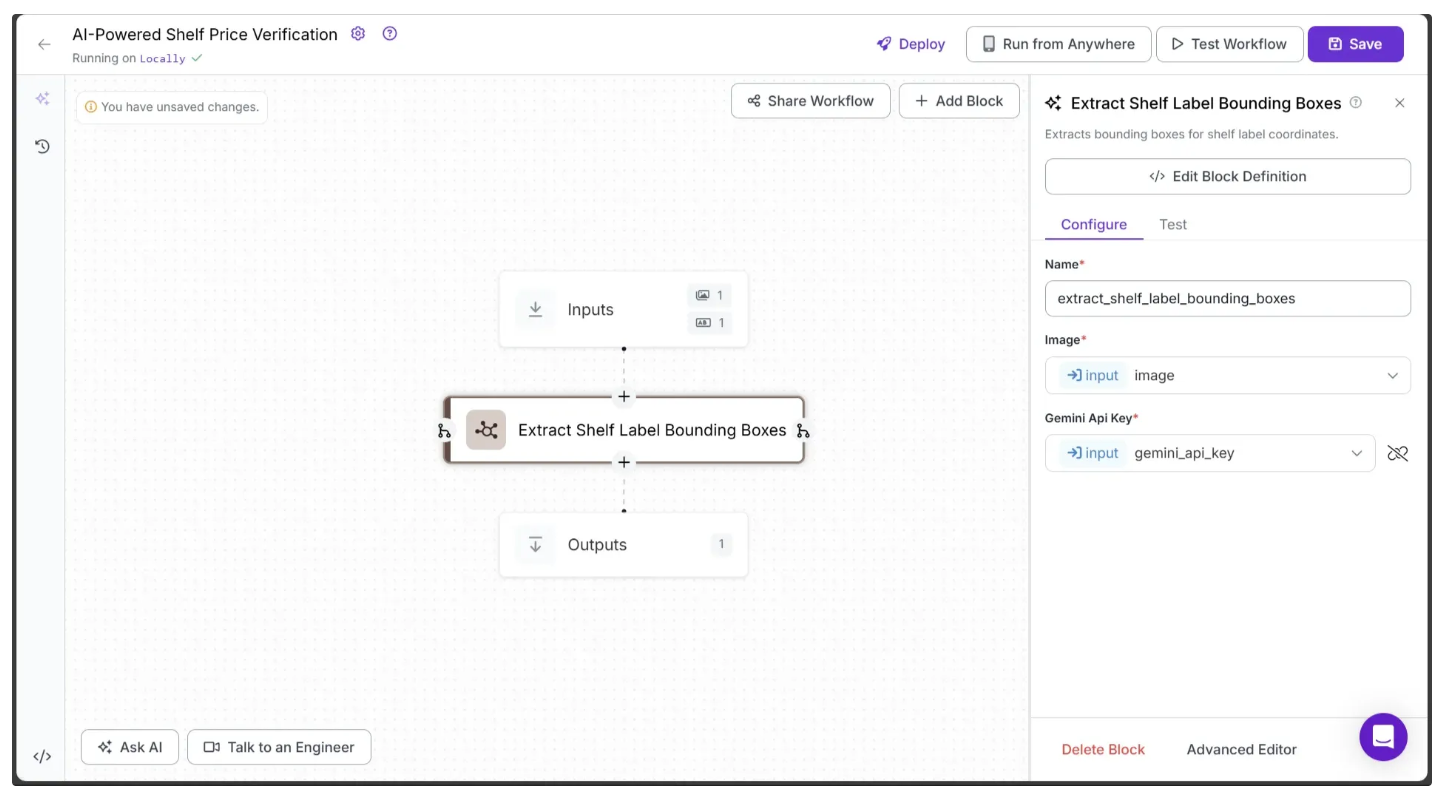
Step 3: Extract Shelf Label Bounding Boxes
To extract the bounding boxes of each shelf label from a provided shelf image, we use the Google Gemini API. Roboflow Workflows provides a Google Gemini block that lets you run Google’s Gemini model with vision capabilities for different use cases, such as Text Recognition, Visual Question Answering, Structured Output Generation, etc.
However, at the time of writing this blog, the current version of the Google Gemini block does not support the gemini-2.5-flash model, which is required for high-quality object detection. Support for this model is being added by the Roboflow team and may already be available by the time you read this, as noted in their post. It is recommended to use Google Gemini block once support is available.
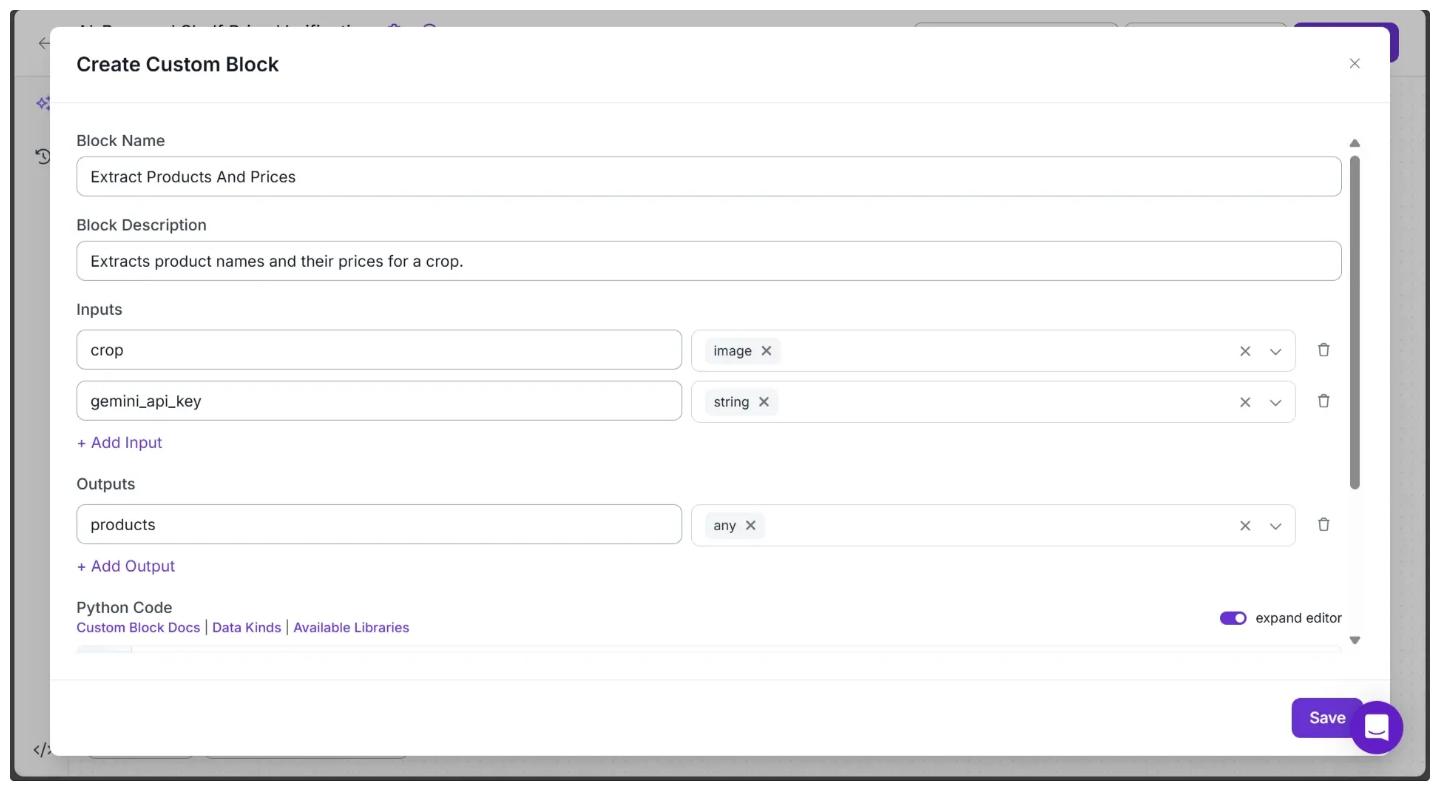
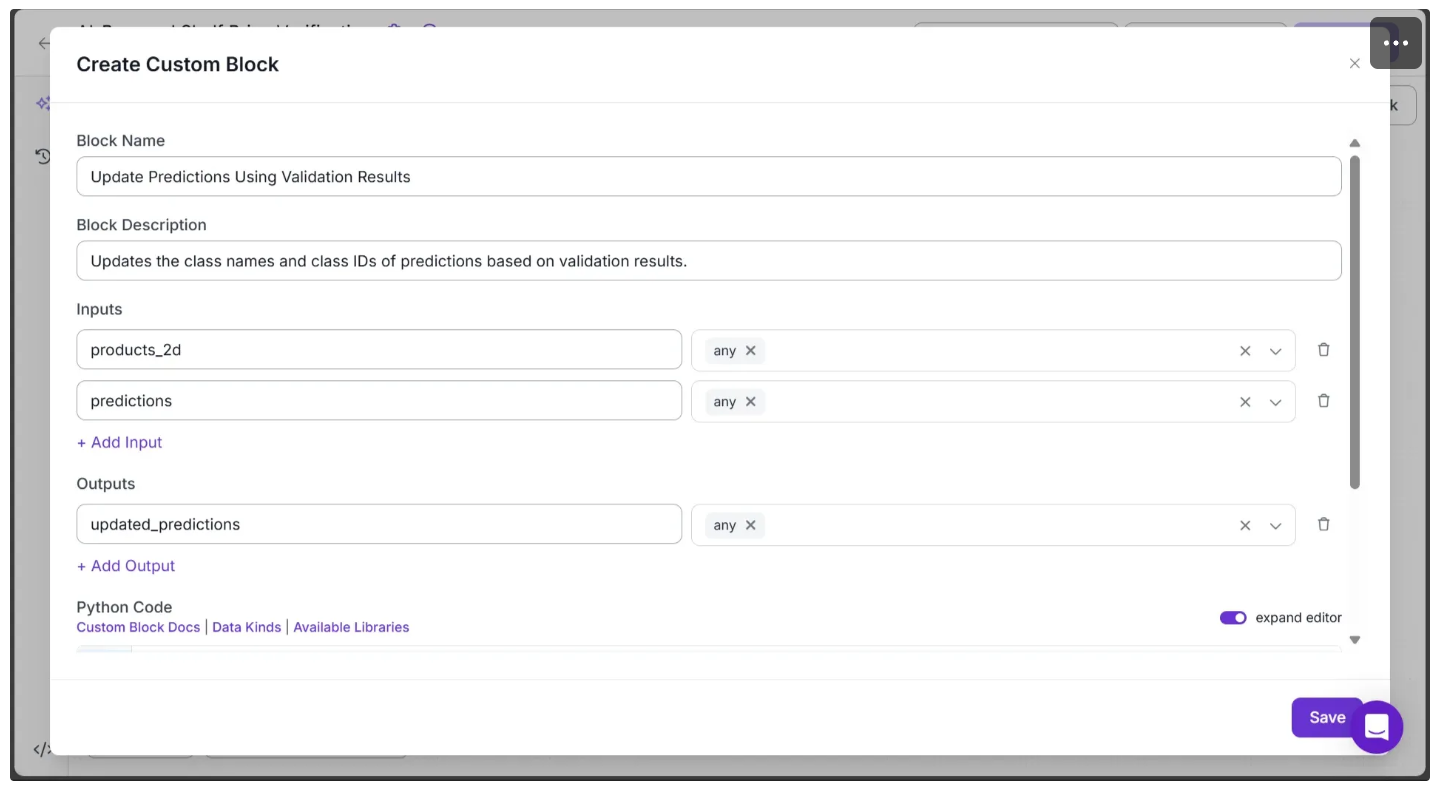
For now, to work around this limitation, Roboflow provides a Custom Python block, which we can use to call Gemini via the requests package in Python.
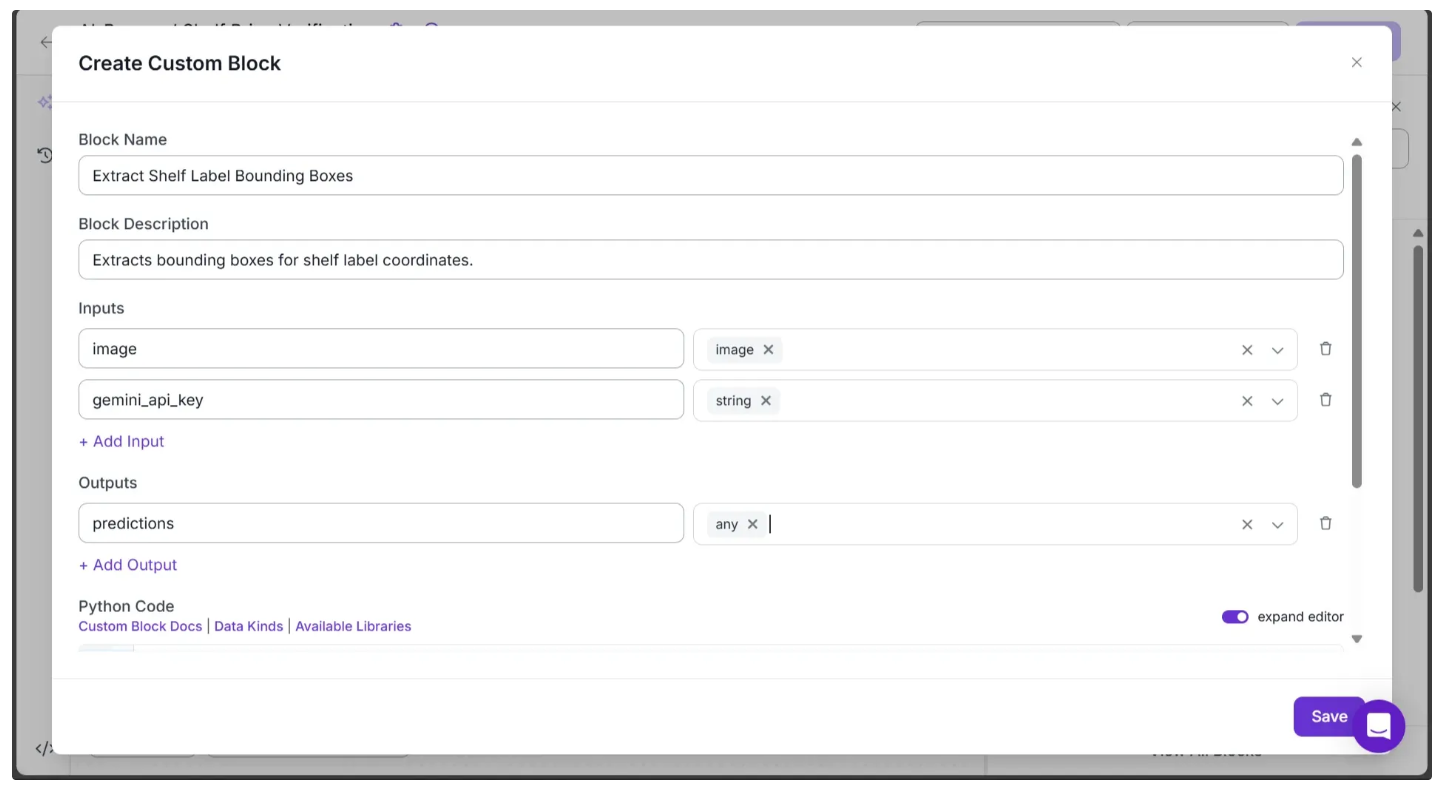
To add the block:
- Click + Add Block in the top-right corner.
- In the search bar, type “Custom Python block” and select it to insert the block into your workflow.
- Configure the block settings as shown below:
In the Python Code input box, paste the code provided below and hit save:
import requests
import json
import supervision as sv
import uuid
import numpy as np

def clean_results(results):
    """
    Clean the raw JSON output from the Gemini API.

    Removes Markdown-style code block delimiters and extra whitespace
    to prepare the text for JSON parsing.
    """
    return results.strip().removeprefix("```json").removesuffix("```").strip()

def shelf_detection_inference(image, gemini_api_key):
    """
    Perform shelf label detection using Google Gemini API.
    """
    # Prompt to instruct the model to detect shelf labels
    prompt = "Detect all the shelf label tags in the image."
    # Fixed, plotting function depends on this.
    output_prompt = "Return just box_2d, label and no additional text."
    temperature = 0  # Deterministic output

    # API endpoint for the Gemini model
    MODEL_ID = "gemini-2.5-flash"
    API_URL = f"https://generativelanguage.googleapis.com/v1beta/models/{MODEL_ID}:generateContent?key={gemini_api_key}"

    # Payload containing prompt text and the image encoded in base64
    payload = {
        "contents": [
            {
                "role": "user",
                "parts": [
                    {"text": prompt + output_prompt},
                    {"inlineData": {"mimeType": "image/jpeg", "data": image.base64_image}},
                ],
            }
        ],
        "generationConfig": {"temperature": temperature}
    }

    headers = {"Content-Type": "application/json"}

    # Send request to Gemini API
    response = requests.post(API_URL, headers=headers, data=json.dumps(payload))
    response.raise_for_status()  # Raise an exception if request fails

    # Extract the text portion of the model response
    result = response.json()
    return result["candidates"][0]["content"]["parts"][0]["text"]

def run(self, image, gemini_api_key) -> BlockResult:
    """
    Run the shelf detection pipeline on the given image.
    """
    # Get image dimensions
    h, w = image.numpy_image.shape[:2]

    print("Starting Inference on image for shelf label crops...")

    # Perform shelf label detection via Gemini API
    results = shelf_detection_inference(image, gemini_api_key)

    # Clean and parse API output
    cln_results = json.loads(clean_results(results))
    print(cln_results)
    print("Completed Inference on image for shelf label crops.")

    # Initialize lists to store detection results
    xyxy_list = []       # Bounding boxes in [x1, y1, x2, y2] format
    confidences = []     # Confidence scores
    class_ids = []       # Class IDs (defaulted to 0)
    class_names = []     # Class names (empty string by default)
    detection_ids = []   # Unique IDs for each detection

    # Process each detected shelf label
    for idx, item in enumerate(cln_results):
        # Gemini model returns [y1, x1, y2, x2] normalized to 0-1000
        y1, x1, y2, x2 = item["box_2d"]

        # Convert normalized coordinates to image pixels
        y1 = y1 / 1000 * h
        x1 = x1 / 1000 * w
        y2 = y2 / 1000 * h
        x2 = x2 / 1000 * w

        # Ensure coordinates are correctly ordered
        if x1 > x2:
            x1, x2 = x2, x1
        if y1 > y2:
            y1, y2 = y2, y1

        # Default class info and confidence
        class_name = ""
        class_id = 0
        confidence = 1  # Gemini returns detected boxes without confidence scores

        # Append detection info to lists
        xyxy_list.append([x1, y1, x2, y2])
        confidences.append(confidence)
        class_ids.append(class_id)
        class_names.append(class_name)
        detection_ids.append(str(uuid.uuid4()))

    # Convert lists to numpy arrays for Supervision Detections
    xyxy_array = np.array(xyxy_list, dtype=float)
    confidence_array = np.array(confidences, dtype=float)
    class_id_array = np.array(class_ids, dtype=int)
    mask_array = None  # No masks are provided

    # Add image dimensions for downstream blocks
    num_dets = xyxy_array.shape[0]
    image_dimensions_array = np.tile(np.array([h, w], dtype=float), (num_dets, 1))

    # Create a Supervision Detections object
    detections = sv.Detections(
        xyxy=xyxy_array,
        confidence=confidence_array,
        class_id=class_id_array,
        mask=mask_array,
        data={
            "class_name": np.array(class_names),
            "detection_id": np.array(detection_ids),
            "image_dimensions": image_dimensions_array,
        }
    )

    return {"predictions": detections}
This code uses Google’s Gemini API to detect shelf labels as bounding boxes in an image and packages the results into a Supervision Detections object. The object is returned under the key predictions, making it ready for visualization or further processing within the workflow.
Next, configure the Extract Shelf Label Bounding Boxes block to use the gemini_api_key and the image from the Inputs block. To do this, click the 🔗 icon next to the Gemini API Key and Image fields in the configuration tab, then select the corresponding input values, as shown below:
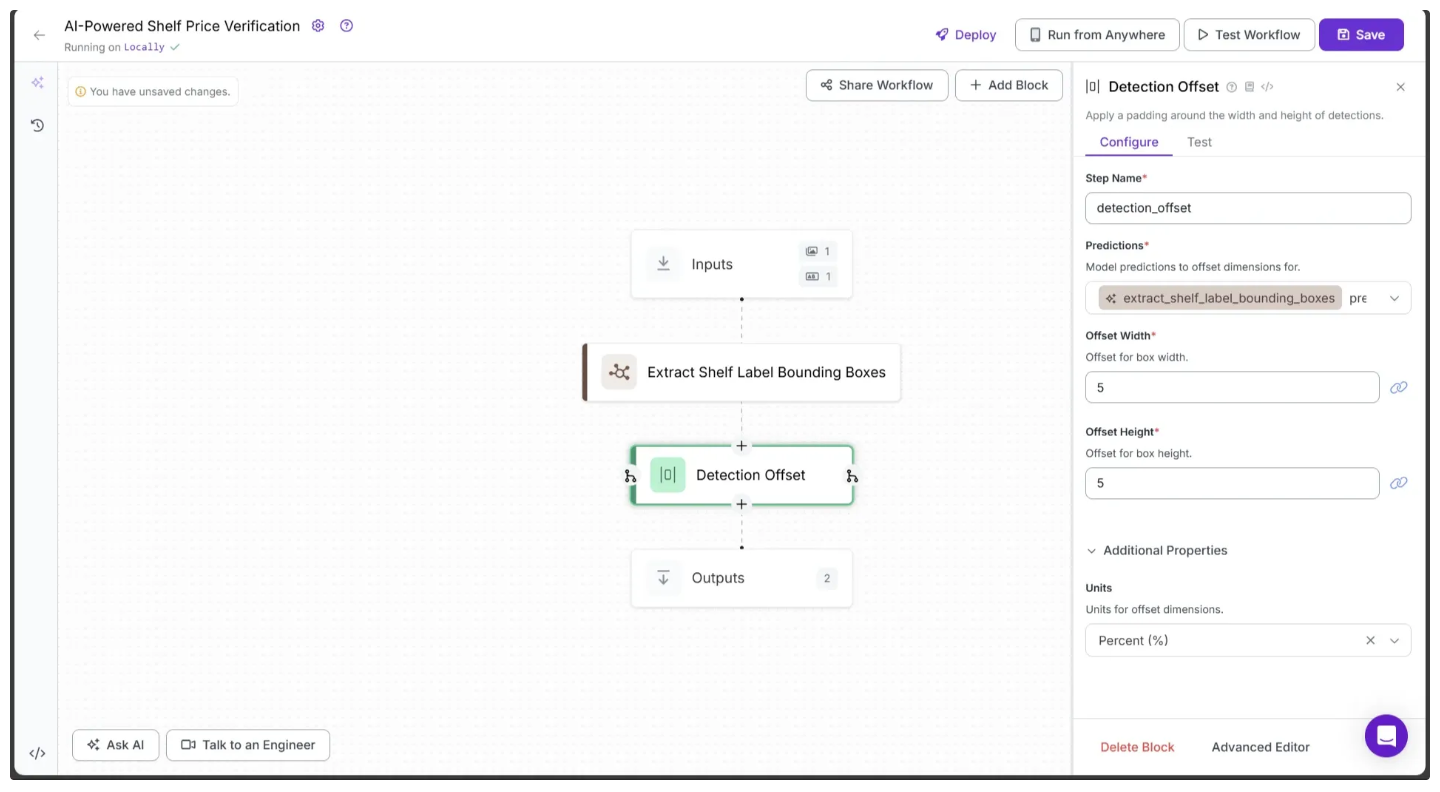
Step 4: Add a Detection Offset
The bounding boxes produced by Gemini can sometimes be too tight around the shelf labels, which may reduce OCR accuracy.
To fix this, we add an offset that slightly expands the bounding box area. The Roboflow Workflow UI provides a Detection Offset block for this purpose. To add it, hover over the Extract Shelf Label Bounding Boxes block, click the + icon that appears, and search for “Detection Offset” to insert it into your workflow. Now configure the Detection Offset as shown below:
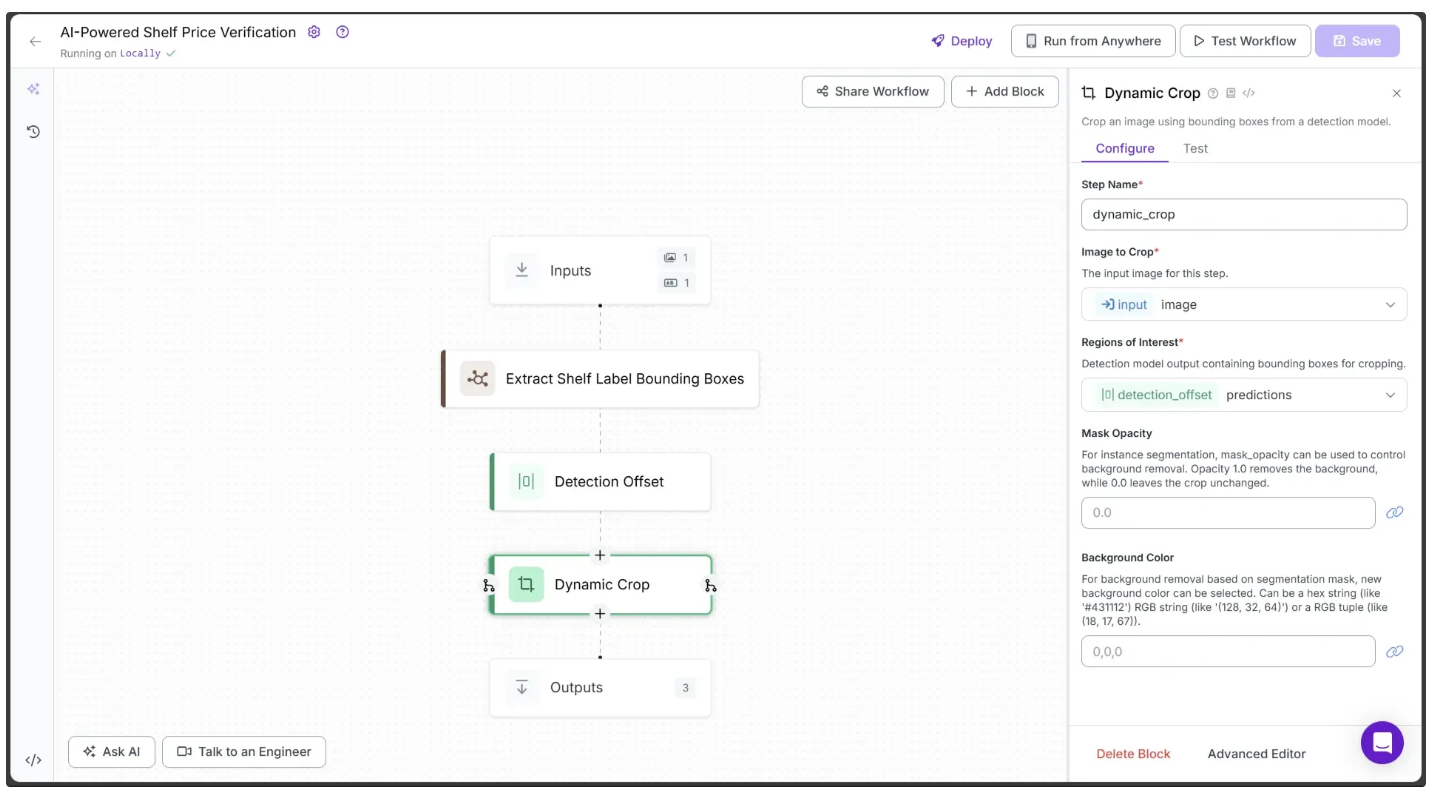
Step 5: Crop Shelf Labels
Now, based on the offset bounding boxes produced by Detection Offset, we crop out the shelf labels from the image. For this, we use the Dynamic Crop block provided by Roboflow Workflows. This block takes in Supervision Detections object and crops out each detection into a separate image.
To add Dynamic Crop to your workflow, hover over the Detection Offset block, click the + icon, and search for “Dynamic Crop.” Once added, configure the Dynamic Crop block as shown below:
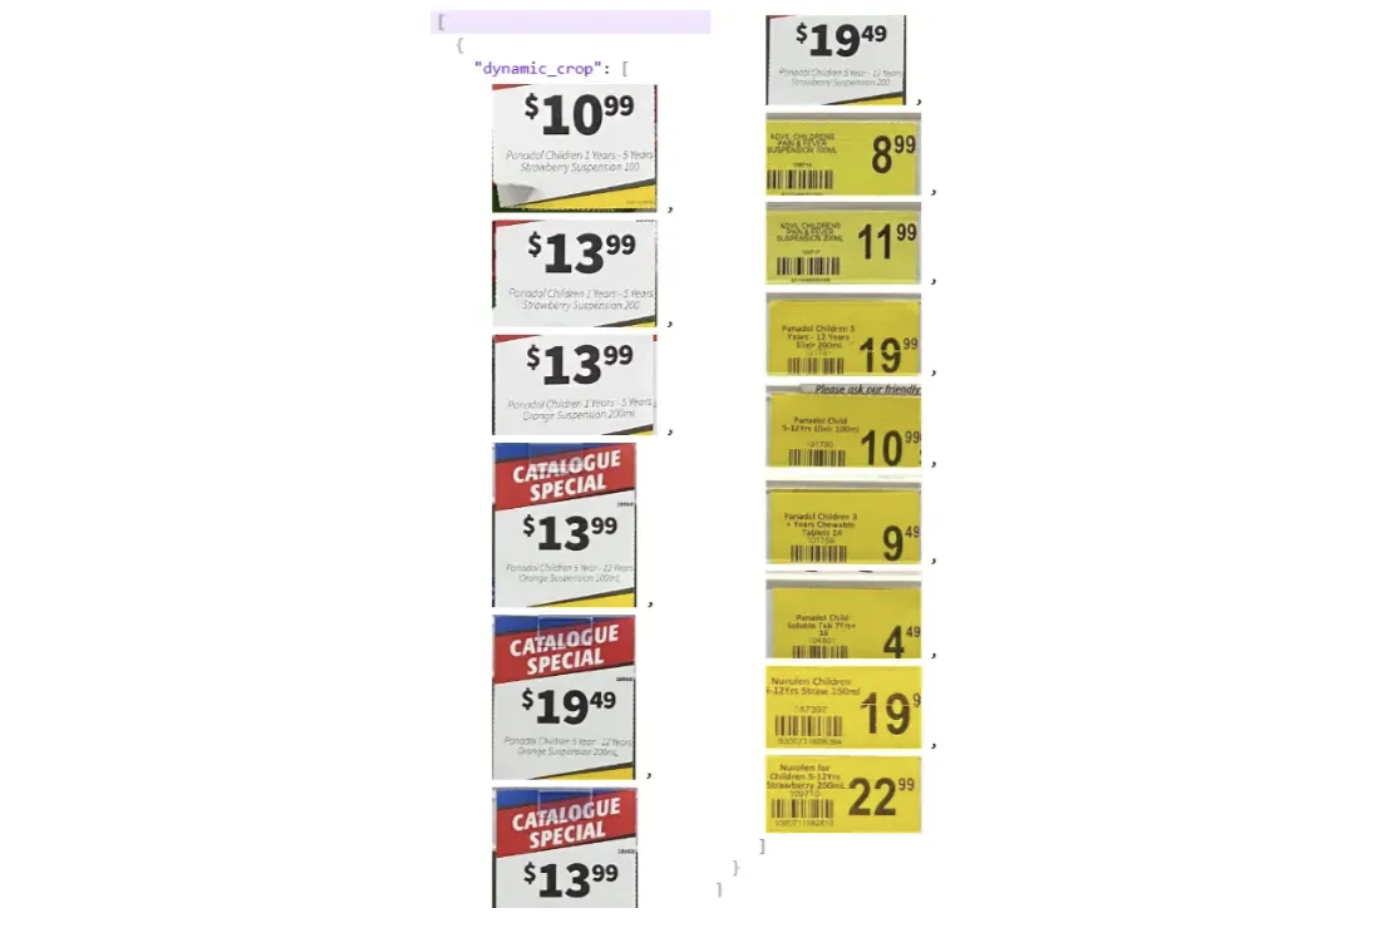
The output of just the Dynamic Crop in the workflow is shown below:
Step 6: Extract Products And Prices
After cropping the shelf label images, we can apply OCR to extract the product names and prices from each label.
While Roboflow offers multiple OCR options, such as Google Vision OCR, we specifically use Gemini. This is because each shelf label contains both a product name and its price, and Gemini’s reasoning capabilities are necessary to accurately extract both at the same time.
As before, we use a Custom Python block to make the Gemini calls. To add Custom Python block to your workflow, hover over the Detection Crop block, click the + icon, and search for “Custom Python block” Once added, configure the Custom Python block block as shown below:
In the Python Code input box, paste the code provided below and hit save:
import requests
import json
import time
from functools import wraps

MAX_RETRIES = 3  # number of retries

def retry(func):
    """Retry decorator: waits 65s for HTTP 429 errors to reset the Gemini API Free Tier requests-per-minute limit, 5s for other errors. Always prints the status code if available."""
    @wraps(func)
    def wrapper(*args, **kwargs):
        last_exception = None
        for attempt in range(MAX_RETRIES + 1):
            try:
                return func(*args, **kwargs)
            except requests.RequestException as e:
                last_exception = e
                wait_time = 5  # default wait time

                # Print HTTP status code if available
                status_code = getattr(e.response, "status_code", None)
                if status_code is not None:
                    print(f"[WARNING] HTTP status code: {status_code}")
                    if status_code == 429:
                        wait_time = 65

                if attempt < MAX_RETRIES:
                    print(
                        f"[WARNING] Attempt {attempt + 1} failed in function '{func.__name__}' "
                        f"with error: {e}. Retrying after {wait_time} seconds..."
                    )
                    time.sleep(wait_time)
                else:
                    print(
                        f"[ERROR] All {MAX_RETRIES + 1} attempts failed in function '{func.__name__}' "
                        f"with error: {e}"
                    )
                    raise
            except json.JSONDecodeError as e:
                last_exception = e
                wait_time = 5
                if attempt < MAX_RETRIES:
                    print(
                        f"[WARNING] JSON decode failed on attempt {attempt + 1} in function '{func.__name__}'. "
                        f"Retrying after {wait_time} seconds..."
                    )
                    time.sleep(wait_time)
                else:
                    print(
                        f"[ERROR] All {MAX_RETRIES + 1} attempts failed due to JSON decode error in function '{func.__name__}'"
                    )
                    raise
        raise last_exception
    return wrapper


def clean_results(results):
    """
    Clean the raw JSON output from the Gemini API.

    Removes Markdown-style code block delimiters and extra whitespace
    to prepare the text for JSON parsing.
    """
    return results.strip().removeprefix("```json").removesuffix("```").strip()


@retry
def ocr_inference(crop, gemini_api_key):
    MODEL_ID = "gemini-2.5-flash-lite"
    API_URL = f"https://generativelanguage.googleapis.com/v1beta/models/{MODEL_ID}:generateContent?key={gemini_api_key}"
    temperature = 0

    prompt_text = (
        "TASK: Extract all product names and prices from the provided Shelf Label. "
        "Return them as a JSON list of objects with 'item_name' and 'price'."
    )

    payload = {
        "contents": [
            {
                "role": "user",
                "parts": [
                    {"inlineData": {"mimeType": "image/jpeg", "data": crop.base64_image}},
                    {"text": prompt_text}
                ]
            }
        ],
        "generationConfig": {
            "thinkingConfig": {"thinkingBudget": 0},
            "responseMimeType": "application/json",
            "responseSchema": {
                "type": "array",
                "items": {
                    "type": "object",
                    "properties": {
                        "item_name": {"type": "string"},
                        "price": {"type": "string"}
                    },
                    "required": ["item_name", "price"]
                }
            },
            "temperature": temperature
        }
    }

    response = requests.post(API_URL, json=payload)
    print(f"[INFO] HTTP status code: {response.status_code}")
    response.raise_for_status()  # raises HTTPError if status != 200

    data = response.json()
    items = json.loads(clean_results(data['candidates'][0]['content']['parts'][0]['text']))

    if not items:
        items.append({"item_name": "miscellaneous", "price": ""})

    return items

def run(self, crop, gemini_api_key) -> BlockResult:
    print("Starting OCR inference on a crop...")
    products = ocr_inference(crop, gemini_api_key)
    print(products)
    print("Completed OCR inference on a crop.")
    return {"products": products}
Next, configure the Extract Products and Prices block to use the outputs from the previous blocks. To do this, click the 🔗 icon next to each parameter in this block’s configuration tab and select the corresponding input values, as shown below:
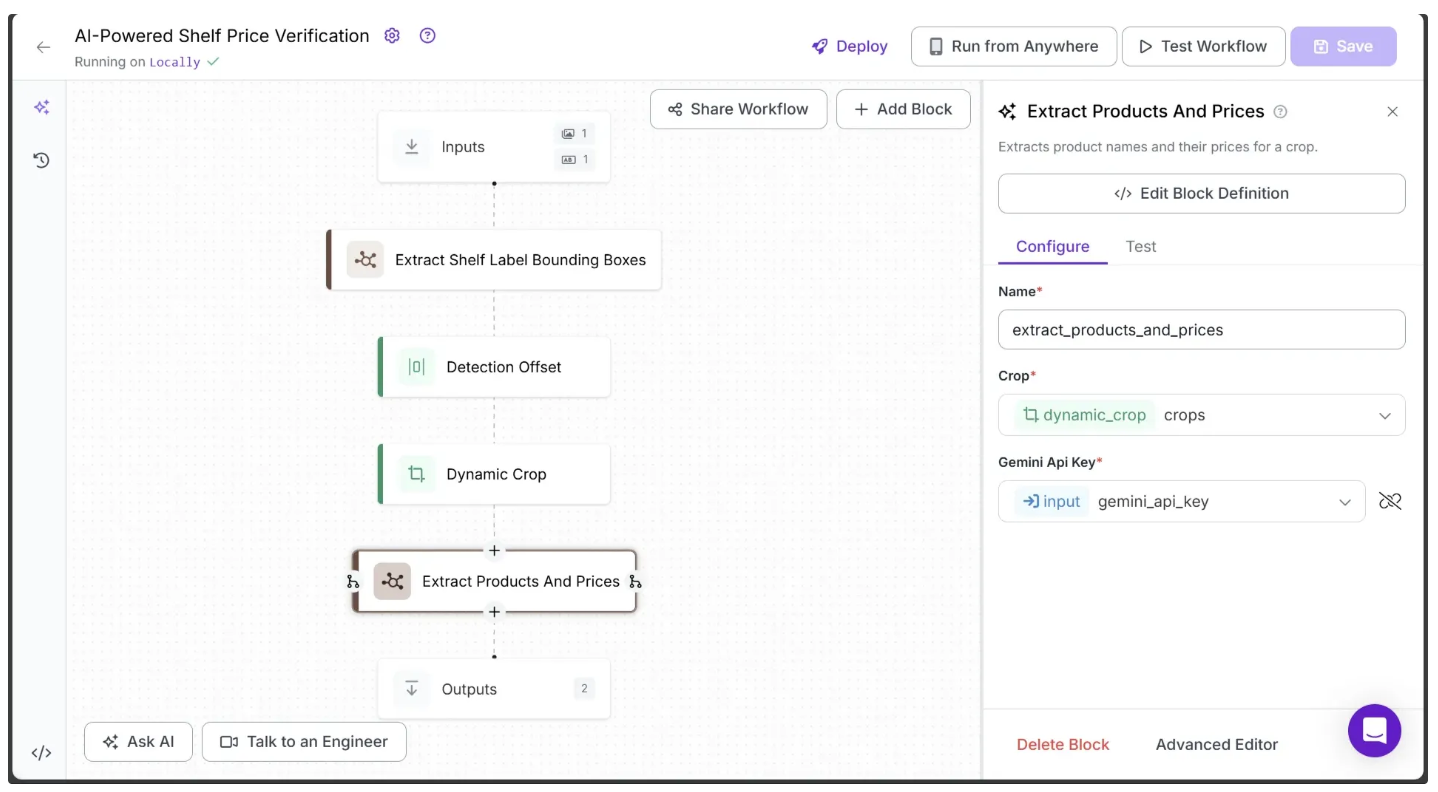
The Extract Products and Prices block is configured to receive all cropped images from the previous Dynamic Crop block. However, the run function in its Python code section receives and processes only one cropped image at a time.
The outputs from this block are collected in the same order as the inputs, so each cropped image’s output corresponds to its position in the input list, preserving the sequence in the final output.
The run function uses Google’s Gemini API to extract a list of products from a single cropped image. This time, however, we use the gemini-2.5-flash-lite model. Since the OCR calls are frequent and the free tier imposes stricter Rate Per Day limits on gemini-2.5-flash, the gemini-2.5-flash-lite model is a suitable and efficient choice for this task, providing sufficient accuracy for our needs.
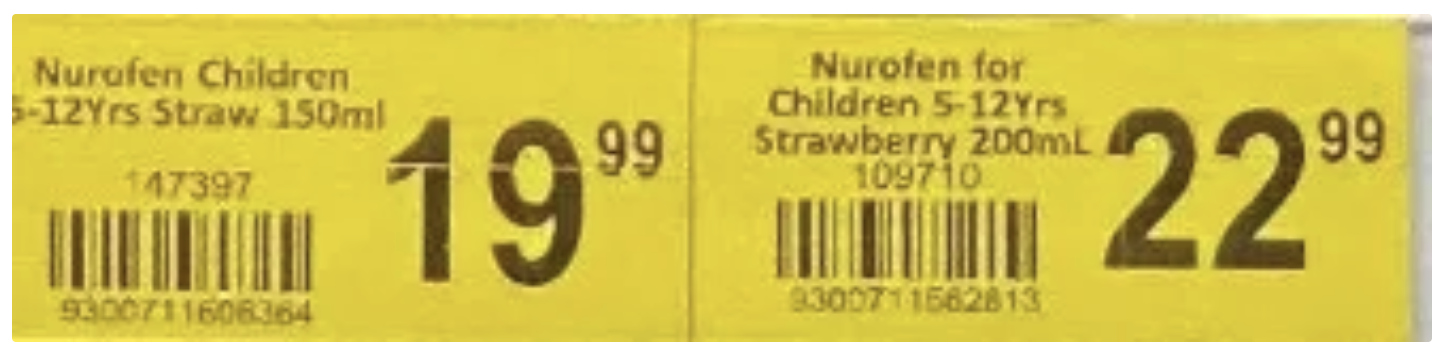
We use Google’s Gemini API to extract a list of products from a single cropped shelf label image because sometimes overlapping or touching labels are detected as a single label within the same bounding box. Extracting a list of products from each cropped image ensures that these cases are handled accurately. The given example below demonstrates this where one bounding box encapsulated two different shelf labels:
Step 7: Simulate a POS Server
Now that we have extracted the names and prices of products from each cropped shelf label image, we can use the product names to query the POS server and validate their prices.
In the real world, a POS server has access to a database, and this access is extended to all POS system nodes through backend APIs. To simulate this, we use Supabase, a Postgres development platform. Supabase allows us to create a Postgres database with authentication and instant APIs, enabling access to the database just like a real backend server.
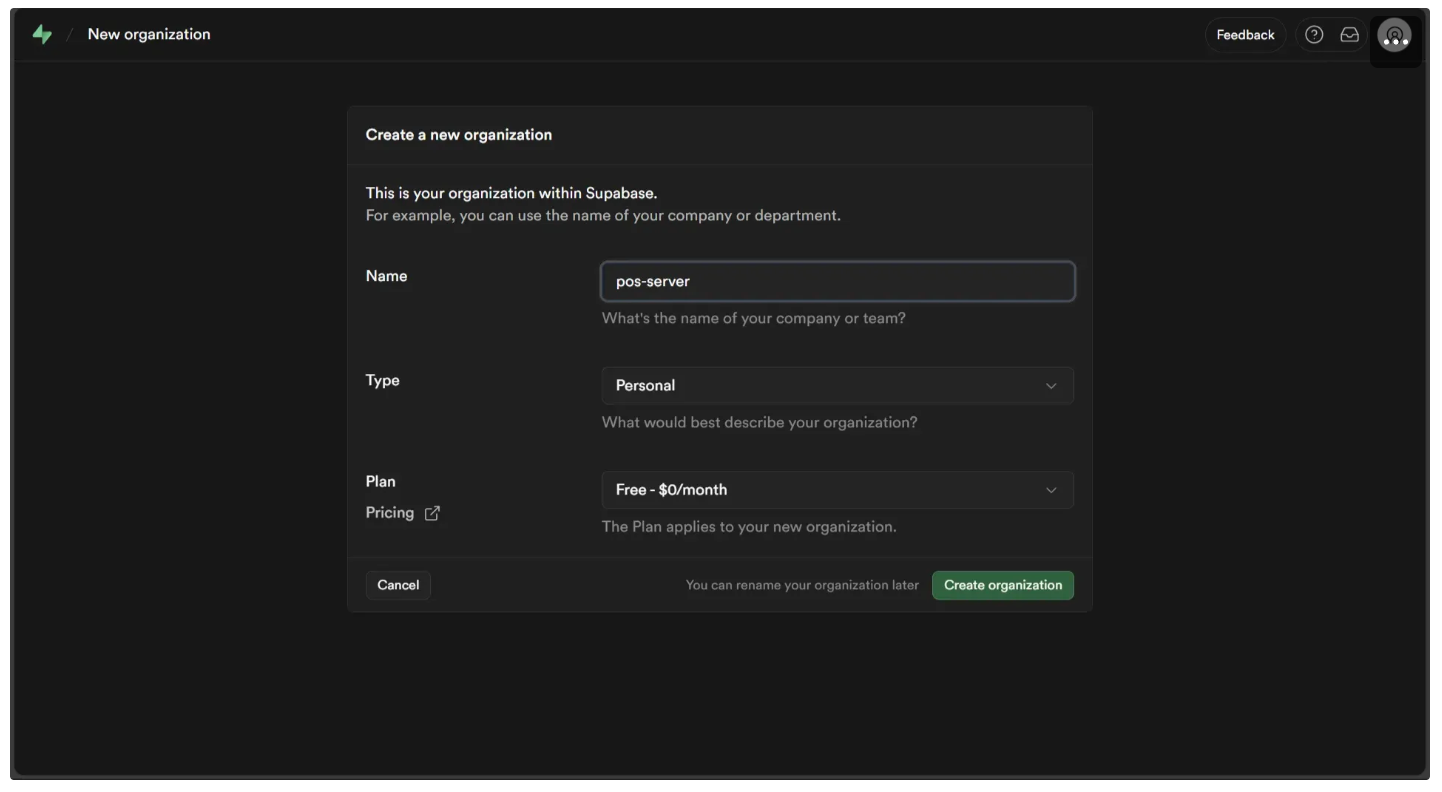
To access Supabase firstly go to signup and create an organization as below:
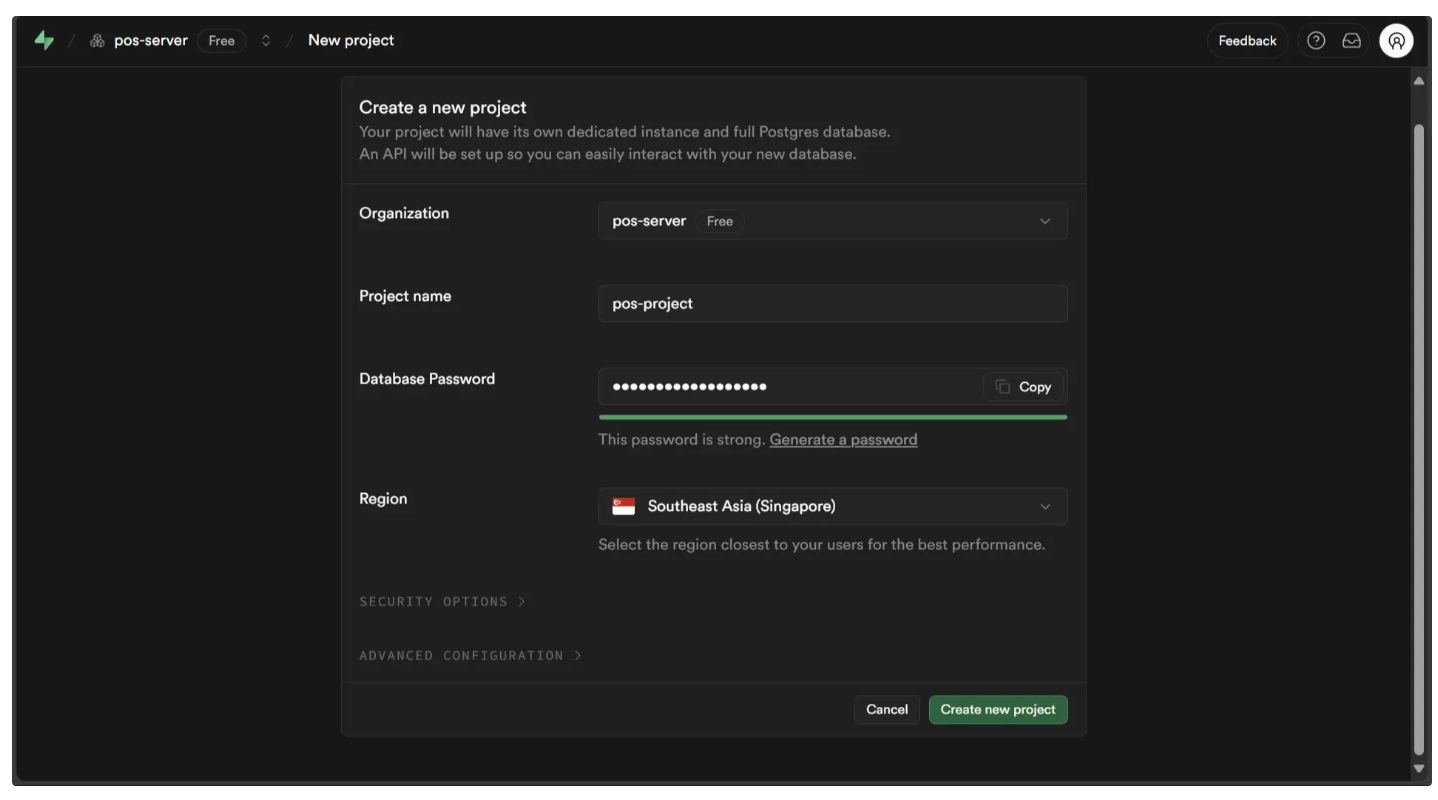
Followed by a project creation, fill in the password for database make sure to save this.
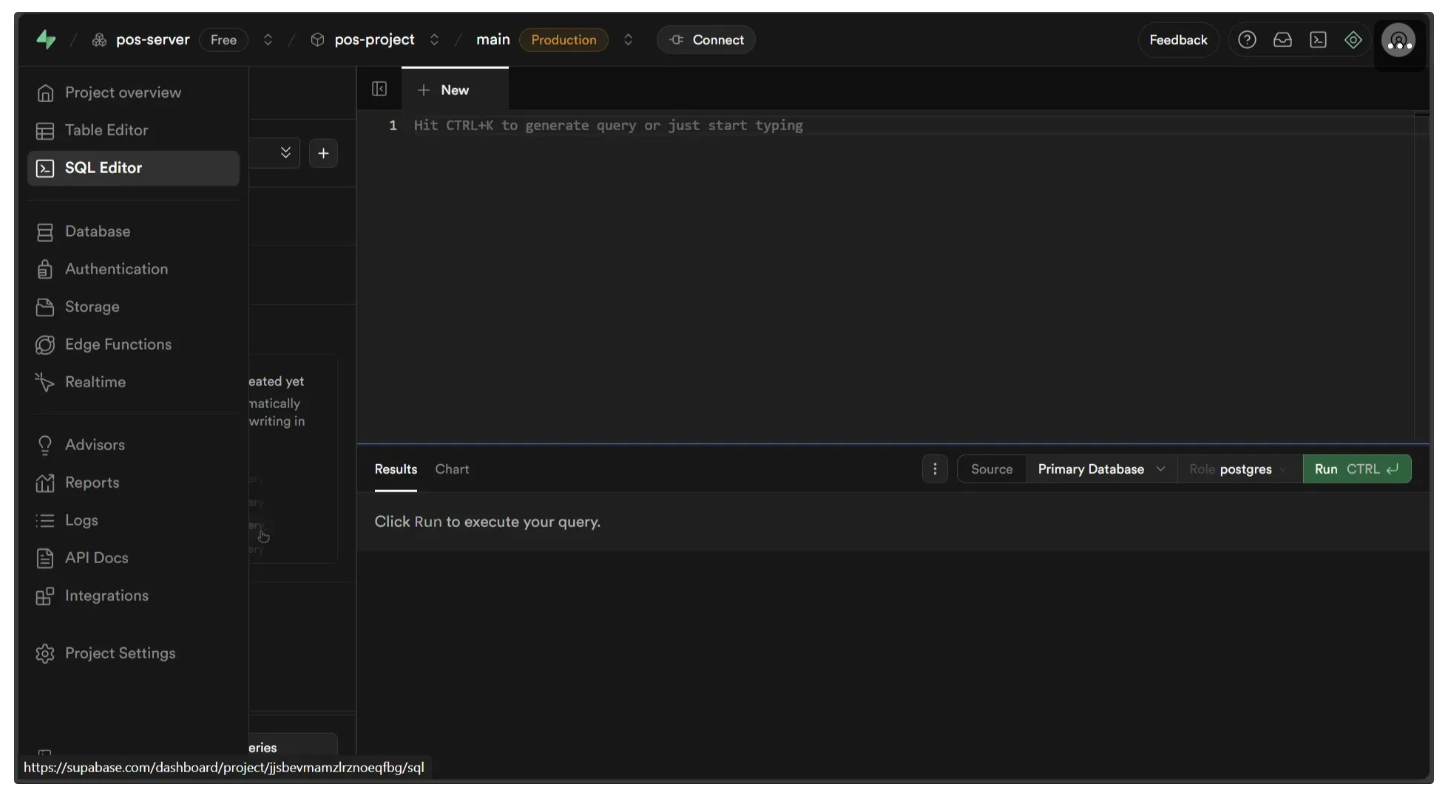
Now you should see a window like this. Access the SQL Editor in the left sidebar.
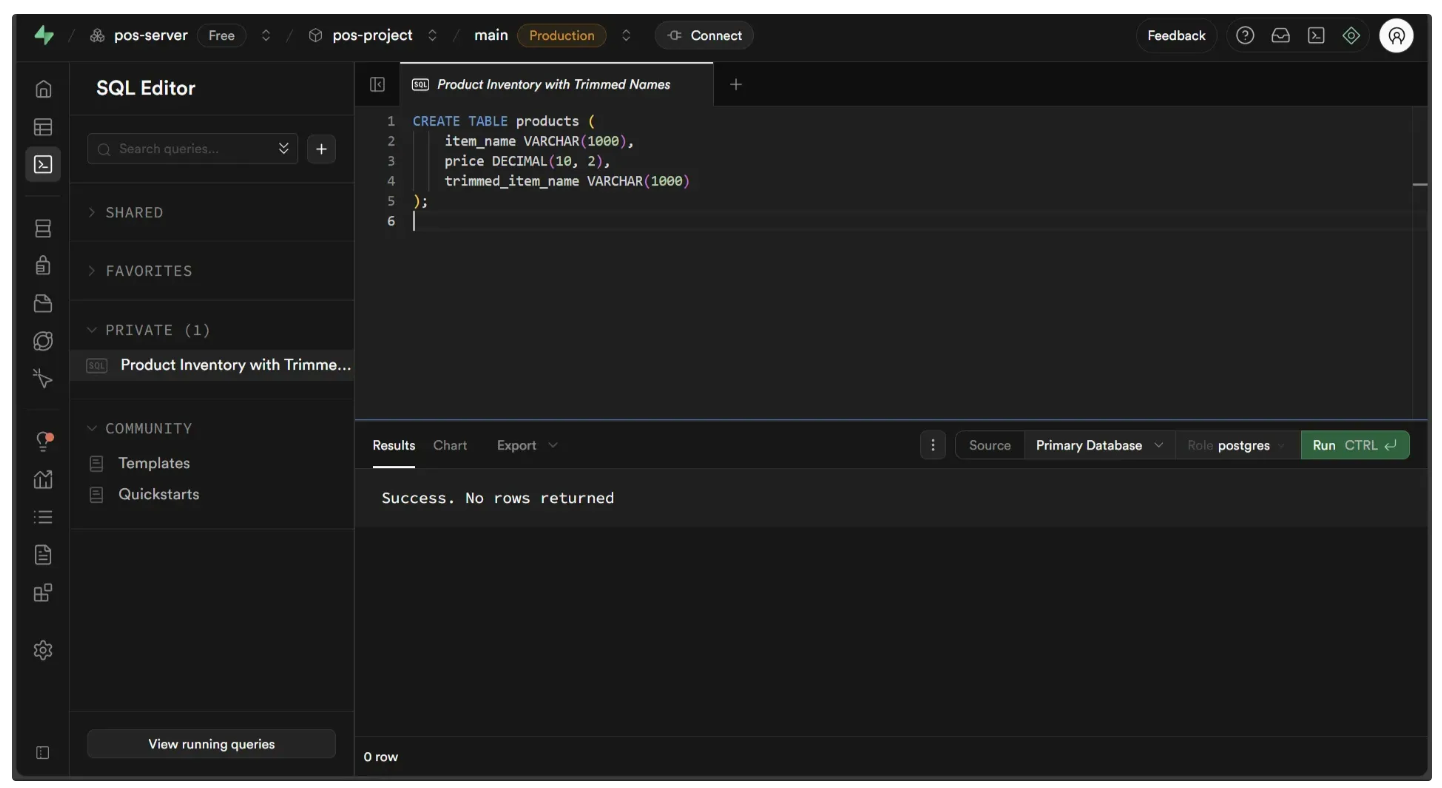
Execute the following query in the SQL Editor as demonstrated below:
CREATE TABLE products (
    item_name VARCHAR(1000),
    price DECIMAL(10, 2),
    trimmed_item_name VARCHAR(1000)
);
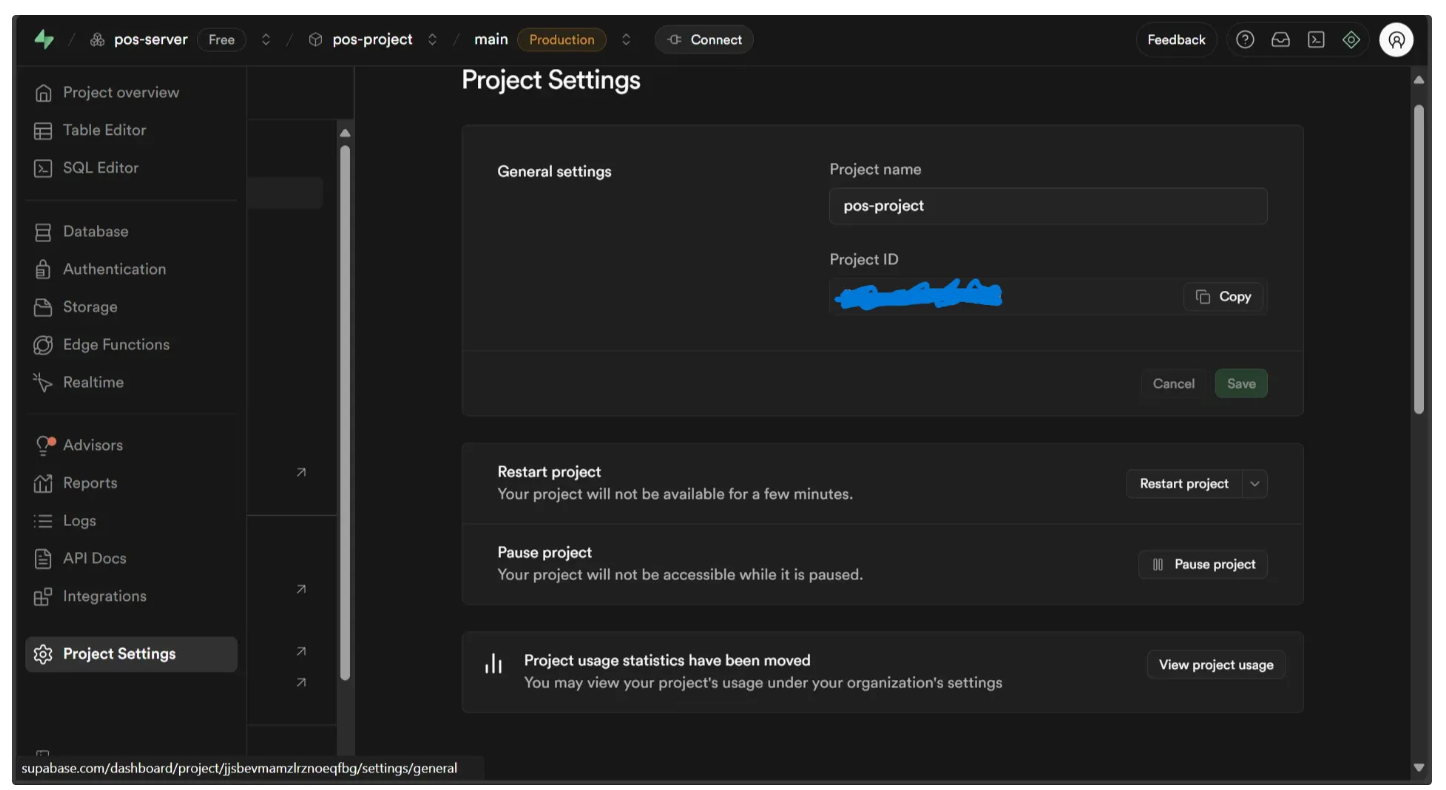
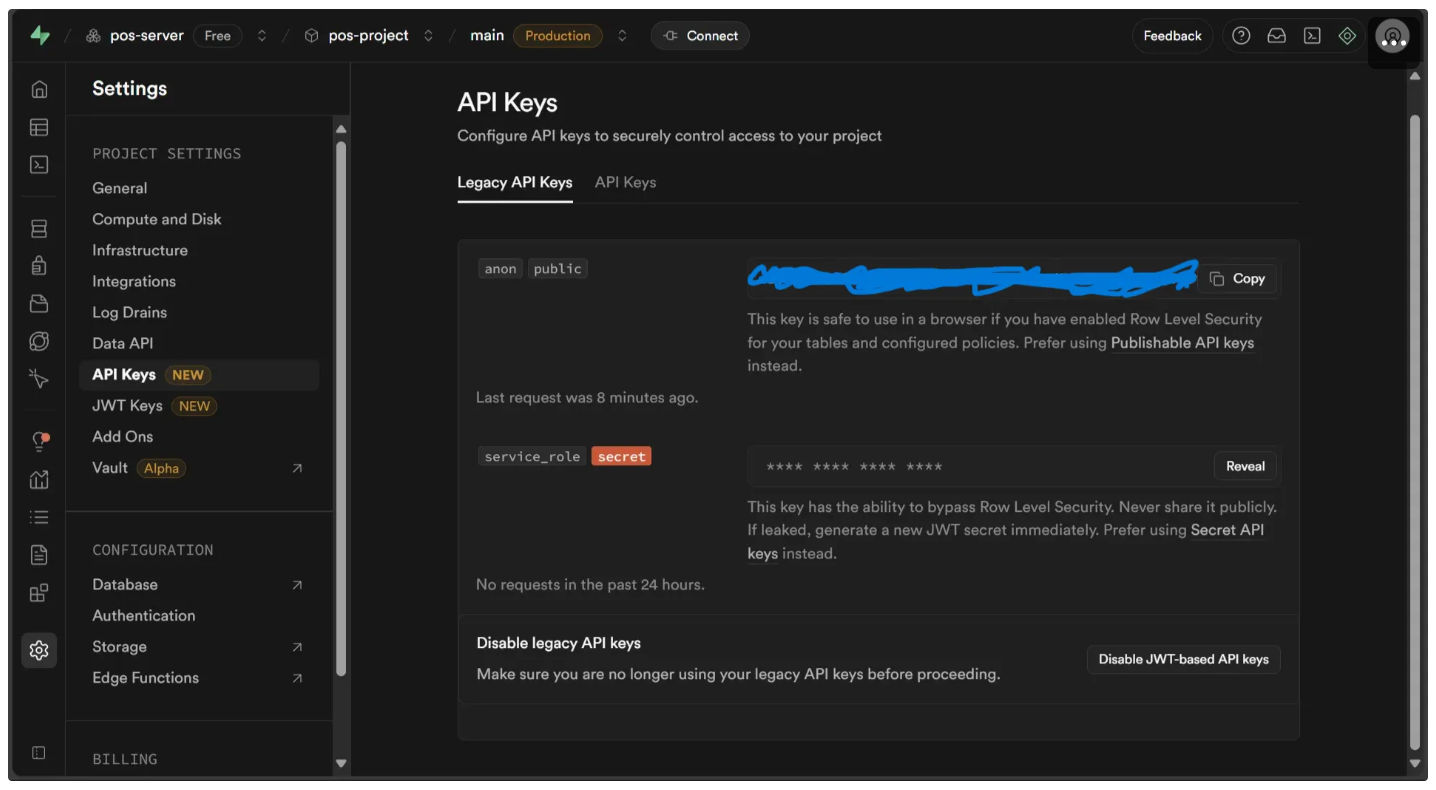
Now, go to the project settings to locate the project ID, as shown below. This ID will be used to make API calls to the POS server we created.
Similarly in the API Keys you will find an anon API key grab it:
After this, run the script below locally in your Python environment:
import requests

ANON_KEY = 'YOUR_ANON_KEY'
PROJECT_ID = 'YOUR_PROJECT_ID'

URL = f"https://{PROJECT_ID}.supabase.co/rest/v1/products"
HEADERS = {
    "apikey": ANON_KEY,
    "Authorization": f"Bearer {ANON_KEY}",
    "Content-Type": "application/json"
}

# These items are inserted to match the image used for testing the workflow
items = [
  {"item_name": "Panadol Children 1 Years - 5 Years Strawberry Suspension 100", "price": 10.99},
  {"item_name": "Panadol Children 1 Years - 5 Years Strawberry Suspension 200", "price": 13.99},
  {"item_name": "Panadol Children 1 Years - 5 Years Orange Suspension 200mL", "price": 13.99},
  {"item_name": "Panadol Children 5 Year - 12 Years Orange Suspension 100mL", "price": 13.99},
  {"item_name": "Panadol Children 5 Year - 12 Years Orange Suspension 200mL", "price": 19.49},
  {"item_name": "Panadol Children 5 Year - 12 Years Strawberry Suspension 100", "price": 13.99},
  {"item_name": "Panadol Children 5 Year - 12 Years Strawberry Suspension 200", "price": 19.49},
  {"item_name": "ADVIL CHILDRENS PAIN & FEVER SUSPENSION 100ML", "price": 8.99},
  {"item_name": "ADVIL CHILDRENS PAIN & FEVER SUSPENSION 200ML", "price": 13.99}, # Incorrect price added to test workflow; original was 11.99
  {"item_name": "Panadol Children 5 Years - 12 Years Elixir 200mL", "price": 19.99},
  {"item_name": "Panadol Child 5-12Yrs Elixir 100ml", "price": 10.99},
  {"item_name": "Panadol Children 3 + Years Chewable Tablets 24", "price": 9.49},
  {"item_name": "Panadol Child Soluble Tab 7Yrs+ 16", "price": 4.49},
  {"item_name": "Nurofen Children 6-12Yrs Straw 150ml", "price": 19.99},
  {"item_name": "Nurofen for Children 5-12Yrs Strawberry 200mL", "price": 22.99}
]


for item in items:
    # Create a normalized version of the item name for easier matching and comparison:
    item["trimmed_item_name"] = item["item_name"].lower().replace(" ", "").replace("&","and").replace("+","plus").replace("-","dash")

try:
    resp = requests.post(URL, headers=HEADERS, json=items)

    if resp.status_code == 201:
        print("Insertion successful!")
    else:
        print("Insertion failed. Status code:", resp.status_code)
except requests.exceptions.RequestException as e:
    print("Network error during insertion:", e)
The script above inserts rows of data containing products and their corresponding prices from the test shelf image provided in Step 1, with one price intentionally altered. This effectively simulates a real POS database, allowing data to be queried and then validated.
We also include a normalized version of each product name in the database to simplify matching with OCR outputs from Gemini. Since Gemini may introduce variations, such as extra spaces or using “and” instead of “&”, these normalized names help ensure that queries for the same product, even with slight differences, still succeed.
When you run the script above, the table will be populated. You can view it in the Table Editor located in the left sidebar.
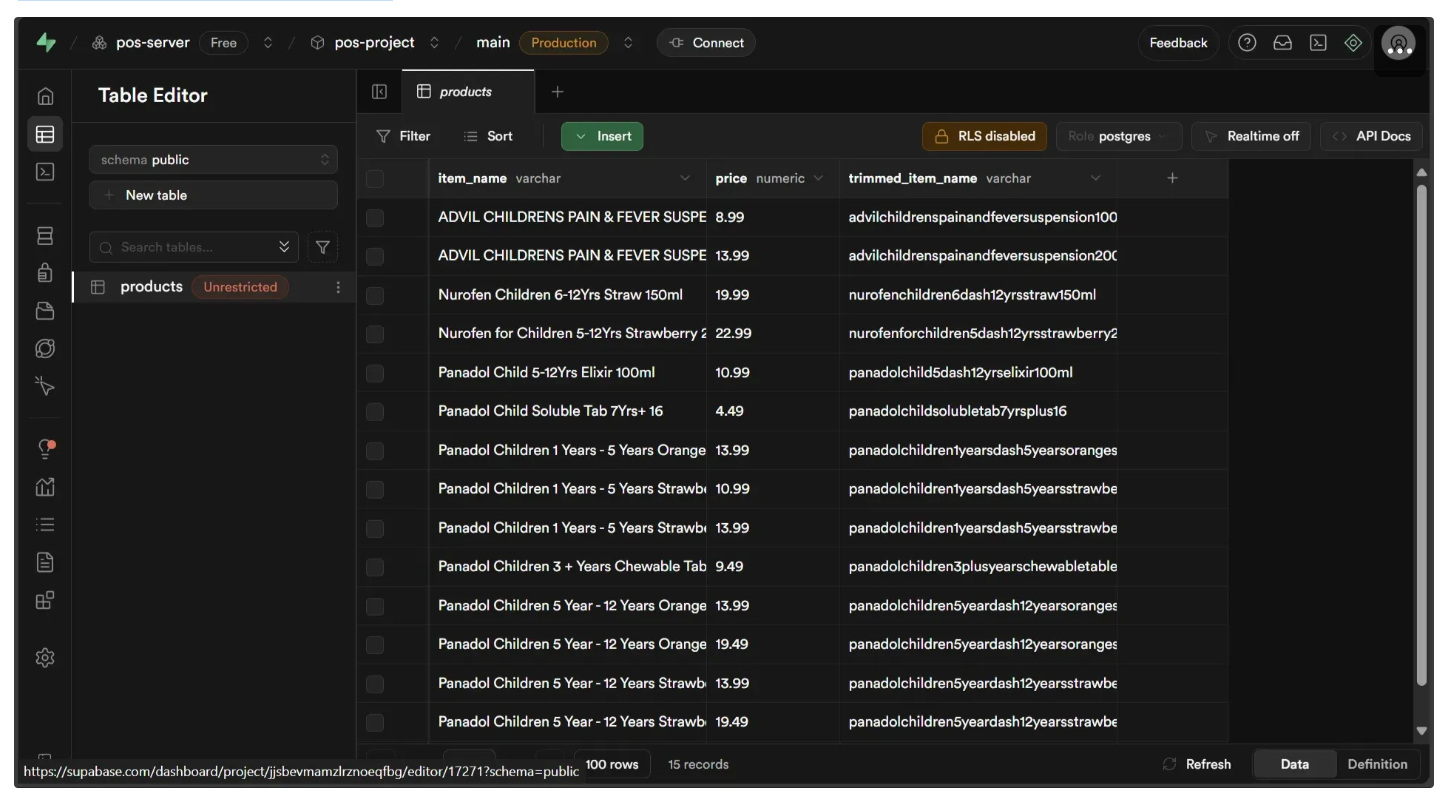
This table can be queried through an Supabase API within our workflow.
Step 8: Validate Against Server Prices
Now that the POS Server is populated and accessible via its API, we can integrate it into our workflow by using a Custom Python block to make API calls. Add the Custom Python block to your workflow below the Extract Products And Prices block, and then configure it as shown below:
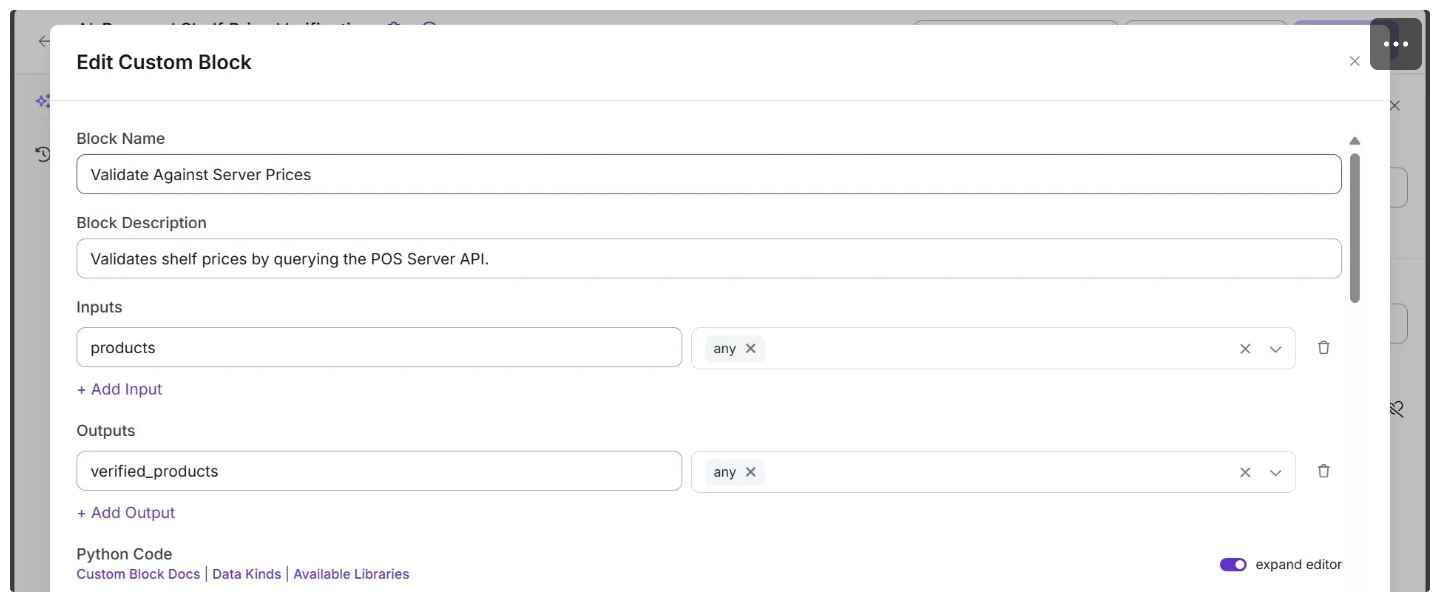
In the Python Code input box, paste the code provided below. Then, update the ANON_KEY and PROJECT_ID variables with your information from Supabase before hitting save.
import unicodedata
import requests

def remove_currency_symbols(text: str) -> str:
    return ''.join(
        ch for ch in text
        if unicodedata.category(ch) != 'Sc'  # 'Sc' = Symbol, Currency
    )


ANON_KEY = 'YOUR_ANON_KEY'
PROJECT_ID = 'YOUR_PROJECT_ID'

URL = f"https://{PROJECT_ID}.supabase.co/rest/v1/products"
HEADERS = {
    "apikey": ANON_KEY,
    "Authorization": f"Bearer {ANON_KEY}",
    "Content-Type": "application/json"
}

def get_product_by_name(item_name: str):
    """Query Supabase products table by item_name."""
    try:
        response = requests.get(URL + f"?trimmed_item_name=eq.{item_name}", headers=HEADERS)
        response.raise_for_status()
        results = response.json()
        if results:
            return results[0]  # return first matching row
        else:
            return None
    except requests.exceptions.RequestException as e:
        print("Query failed:", e, getattr(response, "text", "No response text"))
        return None

def run(self, products) -> BlockResult:
    """Verify a shelf item's price against the Supabase system price."""

    for product in products:
        normalized_name = (
            product["item_name"].lower()
            .replace(" ", "")
            .replace("&", "and")
            .replace("+", "plus")
            .replace("-", "dash")
        )

        # Query system for product
        server_product = get_product_by_name(normalized_name)

        if not server_product:
            comparison_msg = "PRODUCT_NOT_FOUND"
        else:
            try:
                shelf_price = float(remove_currency_symbols(product['price']))
                system_price = float(server_product["price"])
                comparison_msg = (
                    "PRICE_MATCH_FOUND"
                    if shelf_price == system_price
                    else "PRICE_MISMATCH_FOUND"
                )
            except ValueError:
                comparison_msg = "INVALID_PRICE_VALUE"

        product["system_price_comparison"] = comparison_msg
    return {"verified_products": products}
And configure the block parameters as shown below:

The run function inside the Validate Against Server Prices Python code processes products extracted from a single cropped shelf image at a time. For each product, it assigns one of four possible labels:
PRICE_MATCH_FOUNDThe product exists in the POS server database, and the shelf label price exactly matches the database price.PRICE_MISMATCH_FOUNDThe product exists in the POS server database, but the shelf label price does not match the database price.PRODUCT_NOT_FOUNDNo matching product was found in the POS server database for the given shelf item name.INVALID_PRICE_VALUEThe shelf label price was an invalid number. (e.g., prices like “2 for $3” on the shelf label).
Step 9: Dimension Collapse
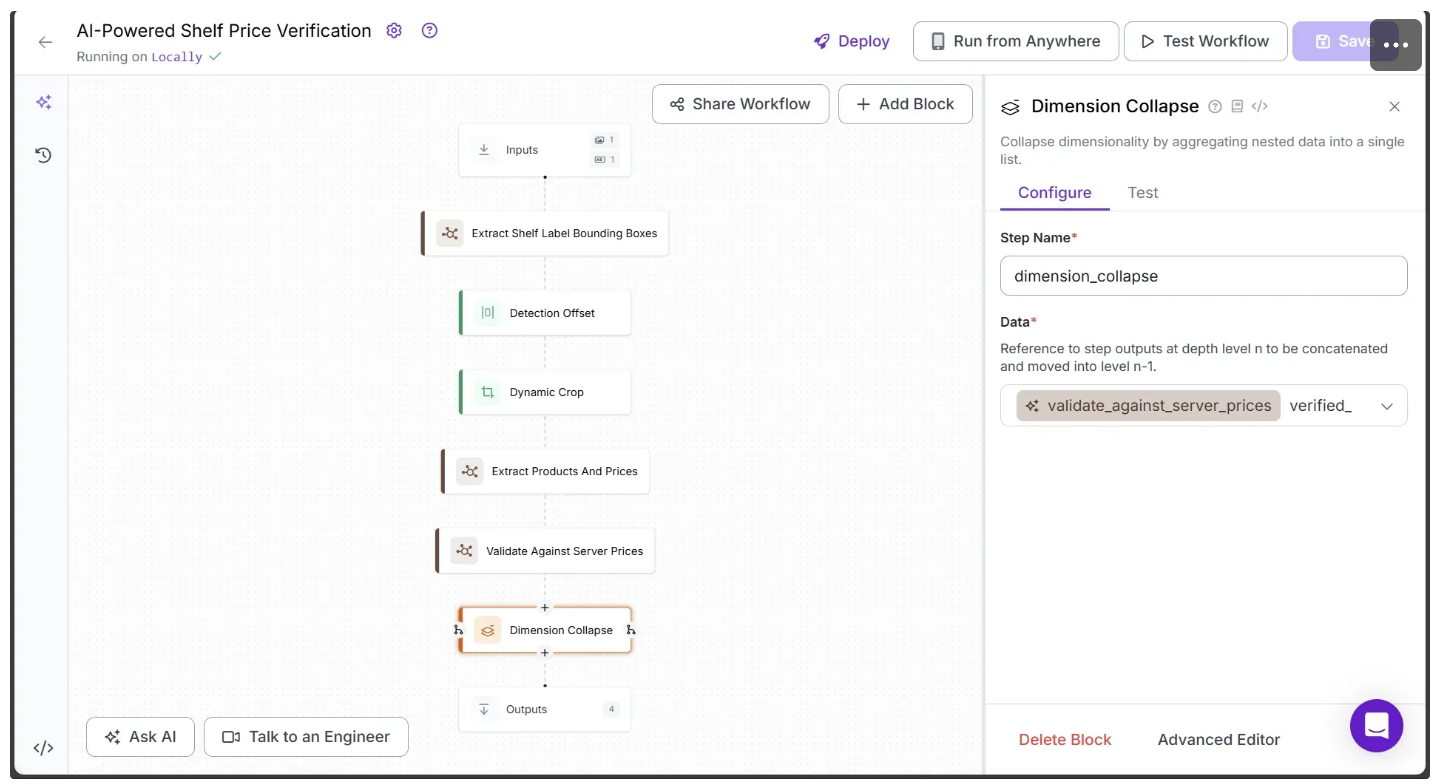
Now that we have extracted each product from the shelf labels and validated them against the POS Server database, the next step is to apply a Dimension Collapse.
This ensures that the downstream block’s run function processes the complete list of products from each shelf label as a single input, rather than processing individual shelf label products separately, as was the case with the Extract Products and Prices and Validate Against Server Prices blocks.
To add Dimension Collapse block to your workflow, hover over the Validate Against Server Prices block, click the + icon, and search for “Dimension Collapse” Once added, configure the Dimension Collapse block as shown below:
Step 10: Update Predictions using Validation Results
Previously, the Extract Shelf Label Bounding Boxes block produced a bounding box for each shelf label in the shelf image and packaged them into a Supervision Detections object, returning it under the key predictions. However, each bounding box initially had class_name and class_id set to an empty string and 0, respectively.
We now update each bounding box in the Supervision Detections object, assigning its class_name and class_id according to the validation results of the product represented by the shelf label contained within the bounding box.
This update is necessary because the class_name and class_id will determine the color of the bounding box in the final output image, visually indicating whether the product’s price on the shelf label is correct.
We’ll use a Custom Python block for this. Add it to your workflow below the Dimension Collapse block, then configure it as shown below:
In the Python Code input box, paste the code provided below and hit save:
import numpy as np

def run(self, products_2d, predictions) -> BlockResult:
    # Ensure lengths match
    n = len(predictions.class_id)
    if n != len(products_2d):
        raise ValueError(f"Length mismatch: {n} predictions vs {len(products_2d)} OCR results")

    # List of recognized class names and their IDs
    class_name_to_id = {
        "PRICE_MISMATCH_FOUND": 0,
        "PRICE_MATCH_FOUND": 1,
        "MULTIPLE_PRODUCTS_FOUND": 2,
        "PRODUCT_NOT_FOUND": 3, # Default
        "INVALID_PRICE_VALUE": 4
    }

    updated_class_ids = []
    updated_class_names = []

    for products in products_2d:
        if len(products) > 1:
            # If all products match the price, use PRICE_MATCH_FOUND, else MULTIPLE_PRODUCTS_FOUND
            if all(p.get("system_price_comparison", "") == "PRICE_MATCH_FOUND" for p in products):
                class_name = "PRICE_MATCH_FOUND"
            else:
                class_name = "MULTIPLE_PRODUCTS_FOUND"
        else:
            class_name = products[0].get("system_price_comparison", "PRODUCT_NOT_FOUND")

        class_id = class_name_to_id.get(class_name, 3)
        updated_class_ids.append(class_id)
        updated_class_names.append(class_name)

    # Update predictions
    predictions.class_id = np.array(updated_class_ids, dtype=int)
    predictions.data["class_name"] = np.array(updated_class_names, dtype=object)

    return {"updated_predictions": predictions}
And configure the block parameters as shown below:

The run function in this block processes the dimension-collapsed list of products from all shelf labels and updates the class_name and class_id for each bounding box generated by Extract Shelf Label Bounding Boxes. The update is based on the system_price_comparison value previously assigned to each product item in the Validate Against Server Prices block.
The class_id determines the color of the bounding box, while the class_name explains why that specific color was chosen.
The mapping is defined as follows:
PRICE_MISMATCH_FOUNDhas aclass_idof 0.PRICE_MATCH_FOUNDhas aclass_idof 1.MULTIPLE_PRODUCTS_FOUNDhas aclass_idof 2.PRODUCT_NOT_FOUNDhas aclass_idof 3.INVALID_PRICE_VALUEhas aclass_idof 4.
The MULTIPLE_PRODUCTS_FOUND class name is introduced in this block and is assigned when a shelf label crop contains multiple products, and none of them has a system_price_comparison result of PRICE_MATCH_FOUND.
Step 11: Bounding Box Visualizations
After updating the bounding box coordinates generated by the Extract Shelf Label Bounding Boxes block we use them to draw bounding boxes around all detected shelf labels.
The color of each bounding box in the output image is determined by the class_id assigned by the Update Predictions using Validation Results block.
Specifically:
- Red (
class_id= 0): The product exists in the POS server database, but the shelf label price does not match the database price. - Green (
class_id= 1): The product on the shelf label exists in the POS server database, and the shelf label price exactly matches the database price. - Blue (
class_id= 2): At least one of the multiple products on the shelf label has no matching price in the database, indicating that only that specific shelf label needs to be analyzed again. - Yellow (
class_id= 3): The product was not found in the database. - Magenta(
class_id= 4): The product was found in the database, but its shelf label price cannot be reliably compared with the server’s price (e.g., labels showing “2 for $3”).
To add the above color based bounding box visualization to the workflow, hover over the Update Predictions using Validation block, click the + icon, and search for “Bounding Box Visualization”. Once added, configure the Bounding Box Visualization block as shown below:

You need to:
- Link the Input Image parameter to the Input’s
image. - Link the Predictions parameter to Update Predictions using Validation Results block’s
updated_predictions. - Set the Color Palette to CUSTOM, using the colors: #FF0000, #00FF00, #0000FF, #FFFF00, #FF00FF.
- Set the Color Axis to
Class. - Set the Thickness to
7.
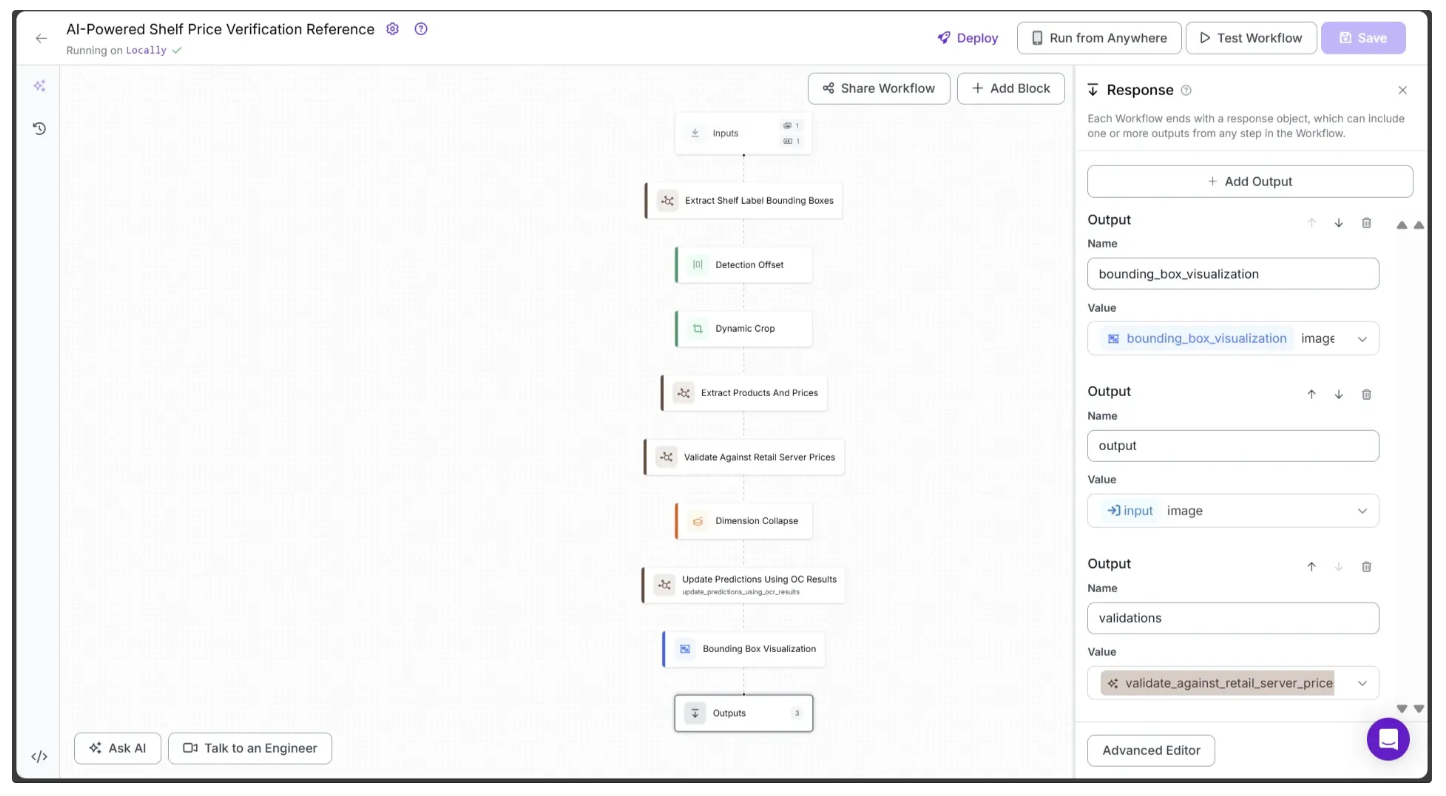
Step 12: Setup Outputs
You can now visualize the required outputs from this workflow by using the + Add Output button in the Configure tab of the Outputs block, as shown below:
Step 13: Running the workflow
Below is the final workflow, which takes the test image provided earlier of a shelf as input and outputs the same image with bounding boxes around the shelf labels. It provides validation information on the prices of each detected label using color coding.
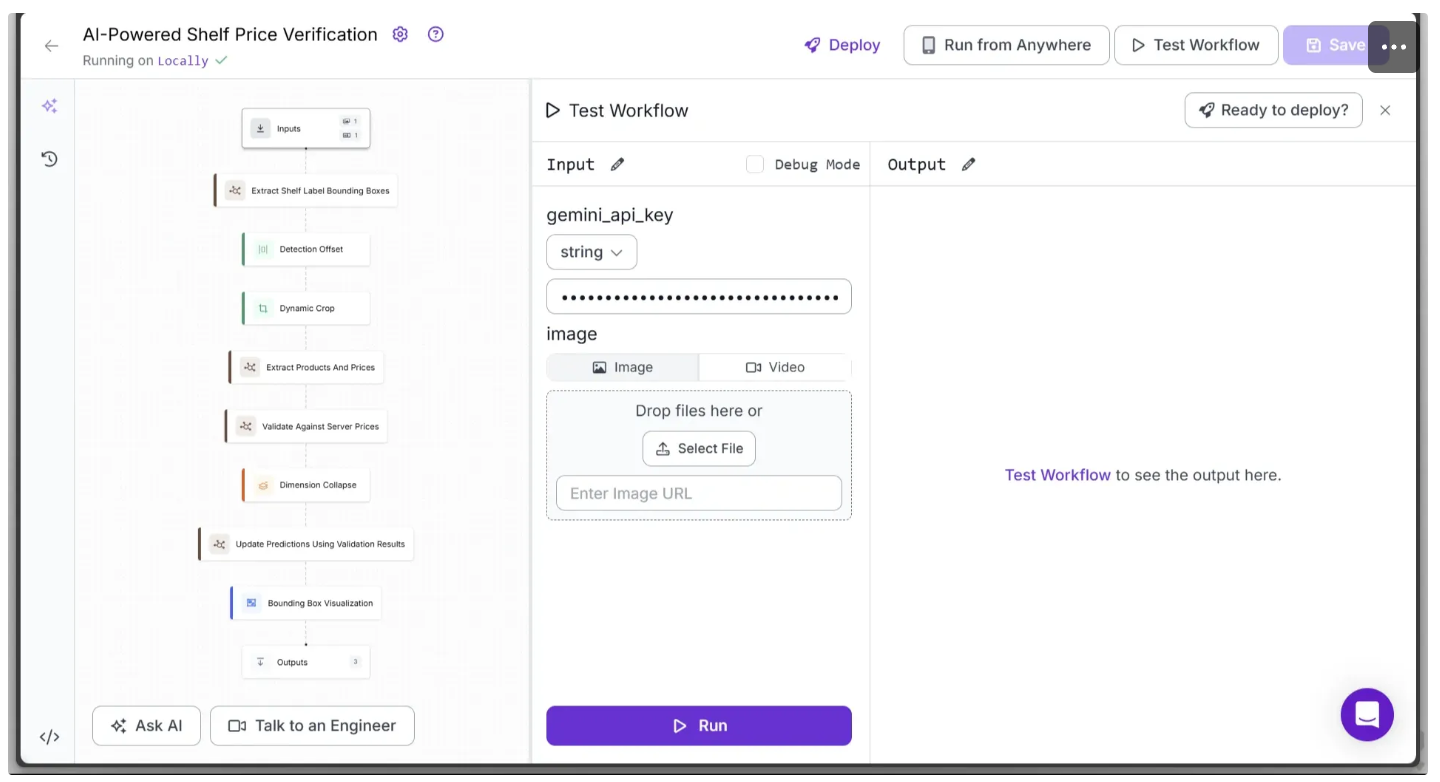
You can run this directly from the workflow’s UI by clicking the Inputs block, entering your previously claimed gemini_api_key, and providing a shelf image.
Since we have populated the POS Server with items from the test shelf image, use the same image from Step 1 to perform accurate color-coding validation with the workflow above.
Alternatively, you can run the workflow through the API, command line, or other supported methods. To access the code for these execution options, click the Deploy button in the top-right corner of the workflow.
For example, to access and run the workflow as an API using Python, start by running the following code:
pip install inference-sdkThen execute the below script:
from inference_sdk import InferenceHTTPClient
import base64

client = InferenceHTTPClient(
    api_url="http://localhost:9001",
    api_key="YOUR_ROBOFLOW_API_KEY"
)

result = client.run_workflow(
    workspace_name="your-workspace",
    workflow_id="your-workflow-id",
    images={
        "image": "SHELF_IMAGE.jpg"
    },
    parameters={
        "gemini_api_key": "YOUR_GOOGLE_GEMINI_API_KEY"
    },
    use_cache=True # cache workflow definition for 15 minutes
)


base64_data = result[0]['bounding_box_visualization']
# Decode and save to file
with open("shelf_image_validated.png", "wb") as f:
    f.write(base64.b64decode(base64_data))

print("Image saved as shelf_image_validated.png")
print(result[0]['validate_against_server_prices']) # JSON data listing prduct and prices
Use Cases of AI-Powered Shelf Price Verification
- Automating price verification for retail shelves
- Reducing human errors in manual price checks
- Accelerating store audits and inventory checks
- Identifying mislabeled or missing products quickly
- Supporting large-scale retail chains with minimal staff intervention
AI-Powered Shelf Price Verification Conclusion
This workflow demonstrates how AI can transform one of the most repetitive and error-prone tasks in retail. Traditionally, verifying prices on store shelves required staff to manually compare each label with the central POS database. By automating this process, employees can focus on correcting actual mismatches rather than searching for errors, enabling faster audits and fewer costly pricing mistakes.
Over time, such systems can scale across multiple branches, ensuring consistent pricing policies and delivering a more reliable customer experience.
Furthermore, Roboflow’s Deploy capabilities eliminate the need to manage hosting or infrastructure. Accessible via API, the workflow integrates seamlessly into applications, accelerating deployment and iteration. Get started free.
Roboflow Workflows also provide built-in blocks that implement advanced computer vision capabilities, including bounding box visualizations, dynamic cropping, and detection offsets, streamlining the development of sophisticated computer vision solutions.
To learn more about building with Roboflow Workflows, check out the Workflows launch guide.
You might also be interested in learning more about how to use computer vision to keep stock of inventory.
Written by Dikshant Shah.
Cite this Post
Use the following entry to cite this post in your research:
Contributing Writer. (Aug 21, 2025). AI-Powered Shelf Price Verification: Matching Labels to POS Data. Roboflow Blog: https://blog.roboflow.com/ai-shelf-price-verification/