
Roboflow Annotate gained eight new features in Launch Week 2023 aimed at reducing friction in team annotation workflows. The additions include inline image commenting with @-mentions, label assist for instance segmentation, per-image tags for metadata-driven search, an unassigned image preview, a loading indicator, and the ability to lock annotation ontologies so no new classes can be added accidentally. Dark mode is also now available in the annotation tool.
This post is part of Dataset Day in Roboflow Launch Week 2023, the day during which we have announced many new additions to our data management and annotation solutions. To see all of the announcements from launch week, check out the Roboflow Launch Week page.
One of our goals at Roboflow is to reduce the amount of time it takes to go from having an idea for a computer vision use case to having a model live in production.
Today, we are excited to announce a range of new utilities that supercharge collaboration in Roboflow Annotate, provide insights into how your annotation process is going, reduce the amount of time it takes to annotate data for instance segmentation models, and more. These features are:
- Commenting inline on images;
- Label assist for instance segmentation models;
- Associating tags with each image;
- Searching images through metadata;
- Previewing unassigned images;
- Loading indicator for changes;
- Lock annotation ontologies; and
- Dark mode.
In this guide, we’re going to review each of these features and how they can help boost your productivity in Roboflow Annotate. Without further ado, let’s get started!
Image Commenting
All members of your Roboflow project can leave comments on annotations. This means that everyone – annotators, project managers, annotation reviewers – can collaborate inline and work through questions that come up during the annotation process.
Using this feature, annotators can leave questions inline when they are unsure about how to annotate part of an image and managers can provide detailed feedback with reference to a specific region on an image.
To leave a comment on a feature, click the speech bubble icon in the right task tray on the Roboflow Annotate tool. Then, click the place on the page where you want to leave a comment. A box will appear in which you can leave a comment.
0:00/1×
You can tag team members by typing in an `@` sign followed by the name of the person in the workspace you want to tag.
A small icon appears on the page indicating a comment has been left. We can also view these comments from the sidebar in the dashboard:
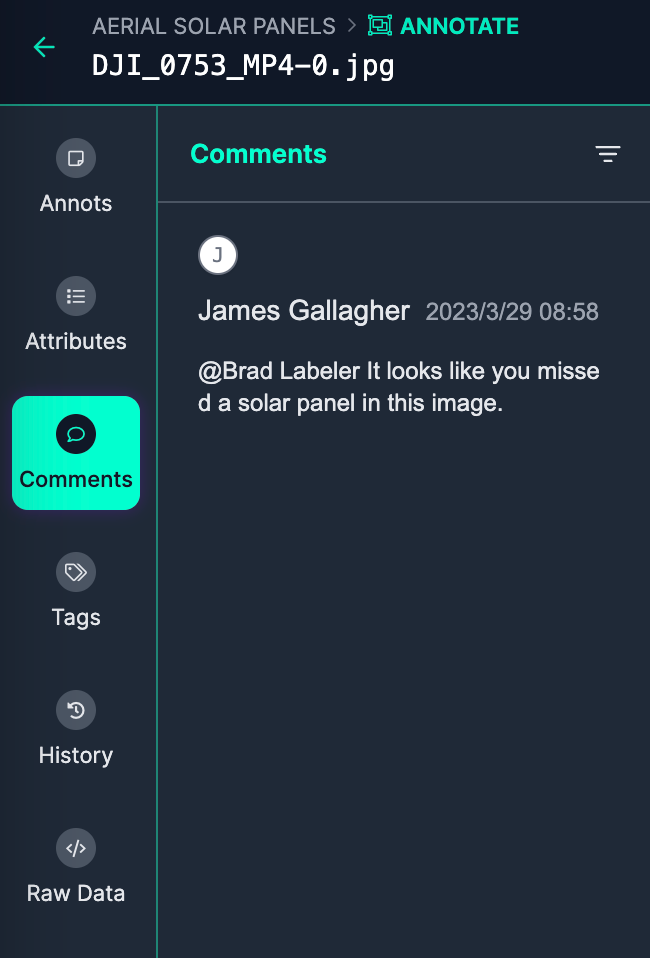
Brad will get an email from Roboflow informing him that a comment has been left on a dataset in which he has been tagged so he knows his attention is needed.
Label Assist for Instance Segmentation
Roboflow Label Assist, our assisted labeling tool where you can use another computer vision model to add annotations to new images in your dataset, now has support for instance segmentation models. Now, you can annotate images for instance segmentation models faster than ever with help from trained versions of your model and models on Roboflow Universe.
A new magic wand icon will show on all instance segmentation projects in your workspace. When clicked, this icon will let you choose a model to use for label assist. The following GIF shows label assist in action:
0:00/1×
When you enable label assist, the model you have chosen will automatically start annotating images as you load them in the browser. You can modify and refine the annotations added by the model to your requirements if needed.
During label assist setup, you can remap class names from the model you are using to the class names in your project. This is useful if you are using another model for label assist whose data labels may not match the ones in your dataset.
Add Tags to Images
You can now add tags to images in datasets from the Roboflow dashboard and API. With this feature, you can now add labels to represent metadata about an image. For example, you could add a tag to an image that represents the camera from which a photo was taken. Or, you could add identifiers to images that you are considering removing from a dataset.
You can search for images by tag using the web interface.
There are two ways to add a tag:
- On the image annotation page and;
- On your dataset management page.
To add a tag in our annotation tool, open an image and select “Tags” from the sidebar. Then, add the tag you want to associate with the image:
0:00/1×
To add a tag using the web interface, go to the Dataset page associated with your Roboflow project. To select images to which you want to add tags individually, hover over the image and click the checkmark icon.
0:00/1×
If you want to select multiple images, drag a box over the images you want to select, or select them individually:
0:00/1×
Then, click “Apply Tags to Selected Images”. Select – or, if necessary, create – the tag that you want to apply to an image, then click “Apply”.
If we want to search all the images in the tag, we can use the “Tags” filter in the search area:
0:00/1×
Search Image Metadata
The Roboflow Dataset search feature now has a few image metadata filters you can use to refine your search when looking for images in your dataset.
Here are the filters available:
like-image:<SOURCE_ID>: Sort by semantic similarity measured by CLIP.tag: Filter by user-provided tags.filename: Runs a search for file names that fully match the provided file name. Use * at the beginning and end of a query to run a partial match.split: Filters by split (train, test, valid).job:<JOB_ID>: Shows images with the provided job ID.min-width:X: Shows images with a width less than X.max-width:X: Shows images with a width greater than X.min-height:X: Shows images with a height less than X.max-height:X: Shows images with a height greater than X.min-annotations:X: Filters images with more than the specified number of annotations.max-annotations:X: Shows images with fewer than the specified number of annotations.classname:CLASS: Shows images that do not have any annotations with the provided label.
To apply a filter, type it in to the search bar. For example, we can use the min_annotations:3 search query to find all images that contain fewer than three annotations:

Preview Unassigned Images
You can now preview unassigned images on the Assign tab in the Roboflow dashboard. This lets you see a larger version of an image before assigning the responsibility for annotating that image to a member of your workspace.
To preview an unassigned image, go to the Assign tab in the dashboard, hover over the image you want to preview, and click on the enlarge icon (two arrows) in the top right corner of the image:
0:00/1×
Loading Indicator
Roboflow Annotate automatically stores annotations to hardened and encrypted cloud storage. But one of the worst possible things that can happen is losing (or thinking you've lost) your hard work. We've now added better loading indicators to signify issues like network connectivity errors. If you encounter a persistent error, contact support and we can help you get back on track.
Lock Annotation Ontologies
We understand the importance of precision in the annotation process. Accidentally adding new classes – either by making a typo when selecting a class, or by creating a new class when one already exists for a given object – will affect the quality of your resulting model.
We now have a feature to lock annotation ontologies. While you have the ontology lock active on your account, members of your project will not be able to add new classes to your project from any source (i.e. the annotation tool, during image upload).
To enable the ontology lock, open your project in the Roboflow dashboard. Then, click the three dots next to the name of the project and click “Project Settings”.
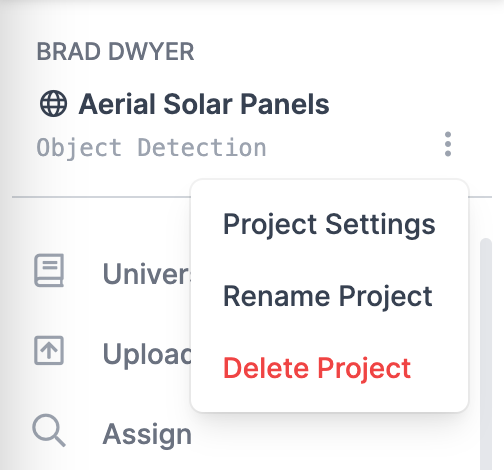
On this page, check the box next to the label “Lock Annotation Classes”:

Dark Mode
Roboflow Annotate now has two color schemes: light mode and dark mode. You can toggle between these colors using the toggle in the bottom left of the annotation tool:
0:00/1×
Conclusion
With the aforementioned changes, we strive to reduce the friction associated with annotating images and collaborating with your team during the annotation process. We are continually working on new features to allow you to annotate faster and improve the quality of your annotations.
All of the changes in this post are live so you can experiment with them today!
Cite this Post
Use the following entry to cite this post in your research:
James Gallagher. (Mar 29, 2023). Launch: Improving Collaboration and Productivity in Roboflow. Roboflow Blog: https://blog.roboflow.com/annotation-updates/