
Most computer vision tracking tutorials follow pedestrians walking down sidewalks in straight lines. Hockey is the opposite. Players crash into each other constantly, pile up along the boards, and disappear behind the net. Standard frame-by-frame detection draws fresh anonymous boxes every frame, losing track of who is who the moment two players cross paths.
Solving persistent identity on ice requires a deliberate tracking layer. This tutorial demonstrates how to build a tactical tracking system that combines a custom-trained RF-DETR detector with ByteTrack multi-object tracking to assign each player a stable identity across frames and visualize their movement trails. The result is a broadcast-style overlay that helps coaches and analysts read forecheck patterns, breakout routes, and defensive coverage without manual annotation.
How to Automate Hockey Tracking with Vision AI
Here is a step-by-step guide to transforming raw hockey footage into a broadcast-style analytics feed.
Step 1: Prepare the Dataset
We'll use a hockey computer vision dataset from Roboflow Universe. The dataset originally came with 69 placeholder classes labeled marker_00 through marker_68, which weren't semantically meaningful for hockey analytics. The goal here is player detection, not marker identification.
To clean this up, we'll consolidate all 69 marker classes into a single unified class called player during dataset preparation. This is a useful pattern for any project that starts with a messy class taxonomy: rather than retraining from scratch on a renamed dataset, simplify the labels to what actually matters for the end user, then create a new dataset version. The model now learns the visual signature of any skater on the ice as a generic player class, which is exactly what the downstream tracker needs.
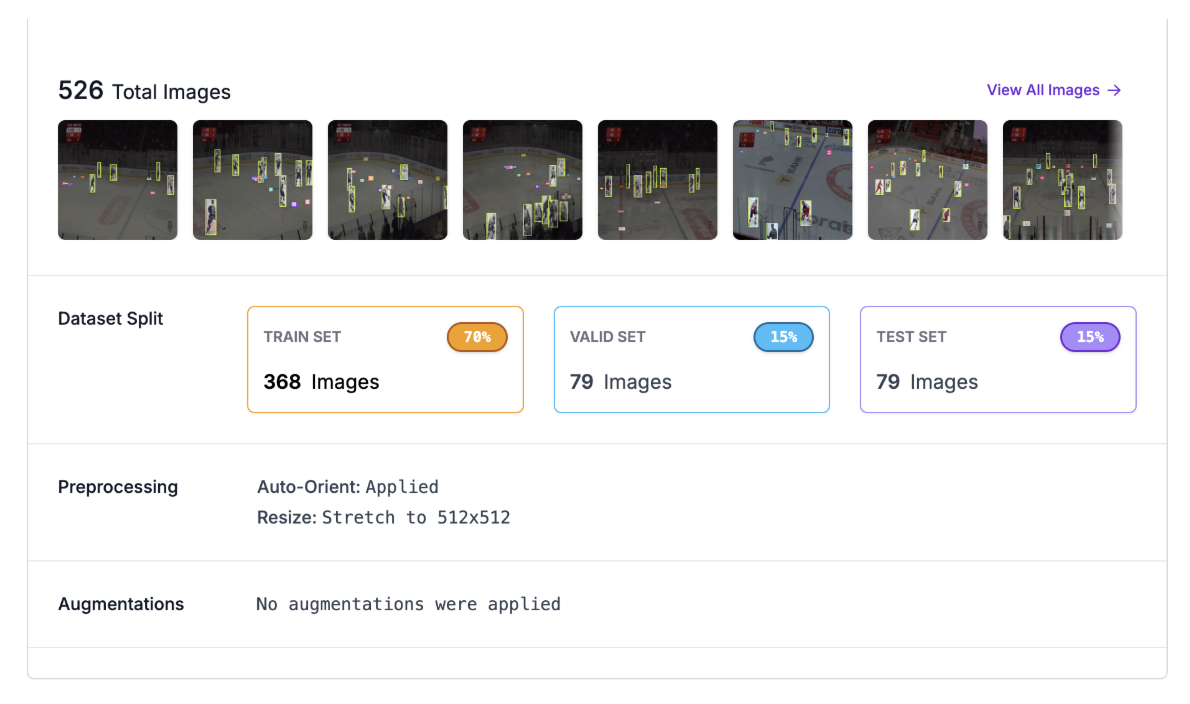
To begin training, navigate to the dataset in your Roboflow workspace and create a new version. Configure a 70/15/15 split for training, validation, and testing.
Step 2: Train the RF-DETR Model
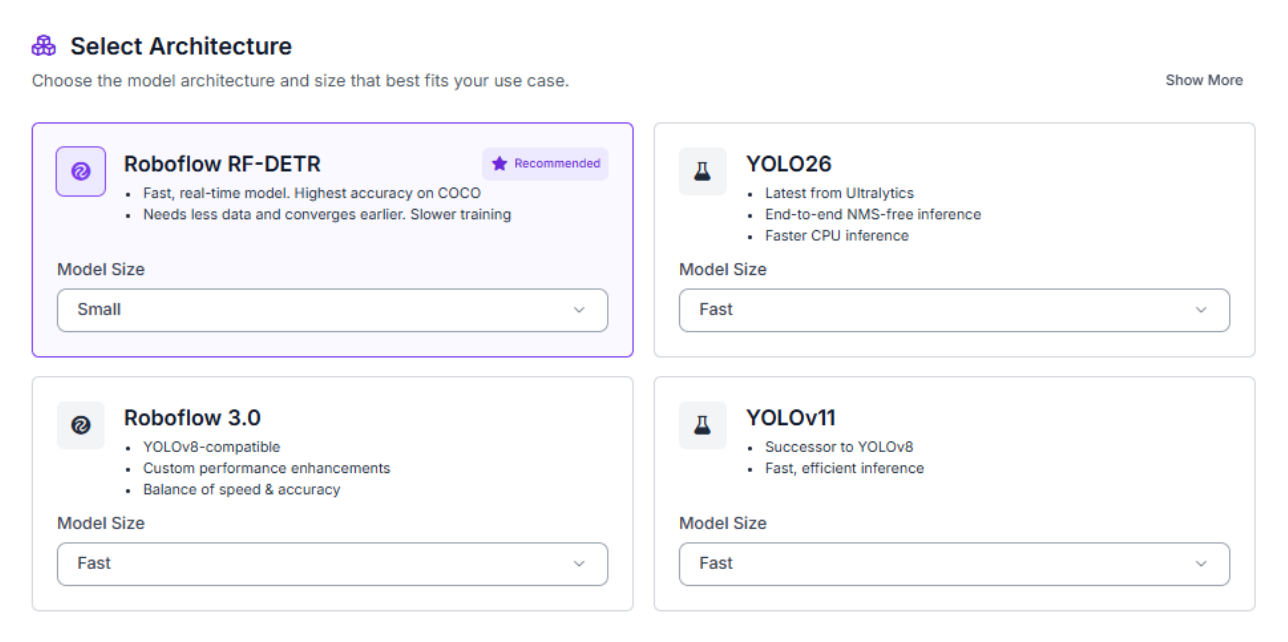
With your dataset version ready, click "Train Model" to configure your training job. Select RF-DETR, Roboflow's state-of-the-art object detection model that delivers exceptional accuracy while maintaining real-time inference speeds suitable for live broadcast and game-tape analysis.
For model size, choose Small. While larger models might achieve slightly higher accuracy, Small provides an excellent balance between performance and computational efficiency. It trains quickly, runs on mid-range hardware, and delivers strong results on hockey footage. For deployment scenarios like broadcast analysis or post-game review, Small offers the responsiveness needed for processing full match video.
Training typically completes within 45-60 minutes. The platform will email you when training finishes.
Step 3: Evaluate Metrics
Once training completes, review your model's performance metrics. Our model achieved strong results on the external validation set:
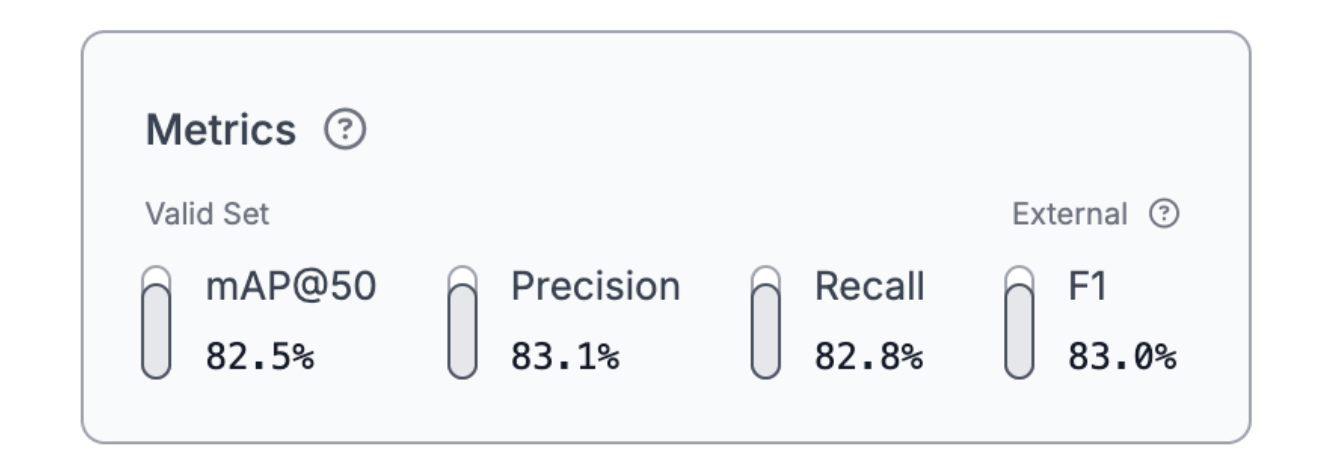
The 82.5% mAP@50 demonstrates reliable detection performance, with balanced 83.1% precision and 82.8% recall and an 83.0% F1 score. These numbers come from frames the model didn't see during training, which confirms it isn't overfitting to specific training images. Performance on different sources (other games, different arenas, amateur footage) will likely be lower, so consider expanding your dataset before deploying to a new context.
For production deployment, this performance level means the tracker has a consistent stream of detections to work with frame-to-frame, which is the foundation persistent identity tracking depends on.
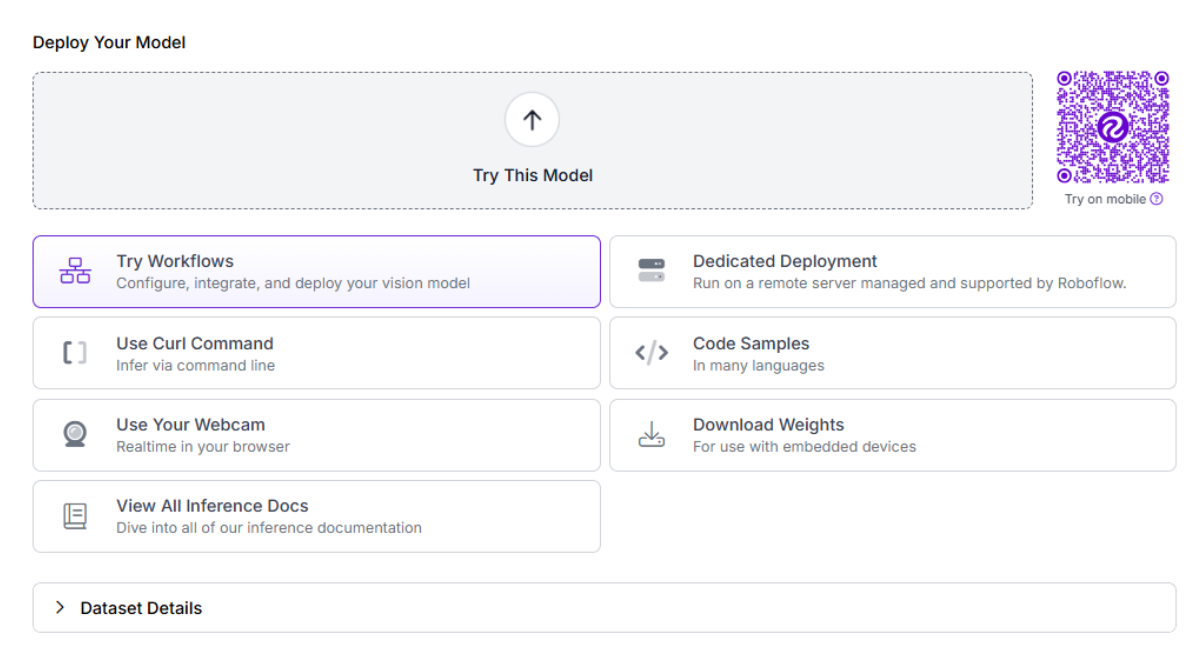
Step 4: Deploy to Workflows
After validating your model's performance, deploy it as an interactive workflow. Roboflow Workflows provides a visual interface for building computer vision applications that combine detection, tracking, and visualization.
Our final workflow connects five blocks: the RF-DETR model identifies every player on the ice, ByteTrack assigns each player a persistent tracker ID across frames, a trace visualization block draws 60-frame movement trails (for video tracking), a bounding box visualization block colors each player by tracker ID, and a label visualization block prints the tracker ID directly on each player.
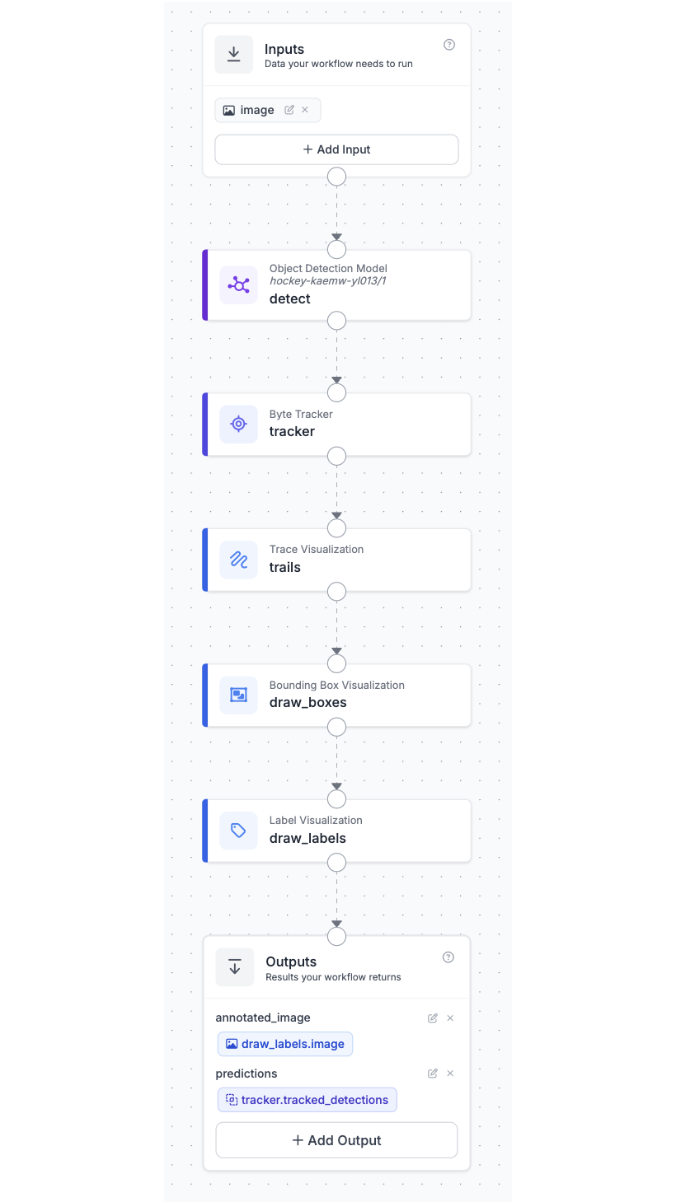
To create this workflow, click "Try Workflows" when viewing your trained model's deployment options. From the template gallery, select "Detect, Count, and Visualize" as your starting point.
Step 5: Add ByteTrack for Multi-Object Tracking
ByteTrack is the core intelligence of this pipeline. Add a Byte Tracker block immediately after the detector. The block takes the per-frame detections and assigns each one a persistent numeric tracker ID, maintaining identity across frames even when players collide or are briefly occluded.
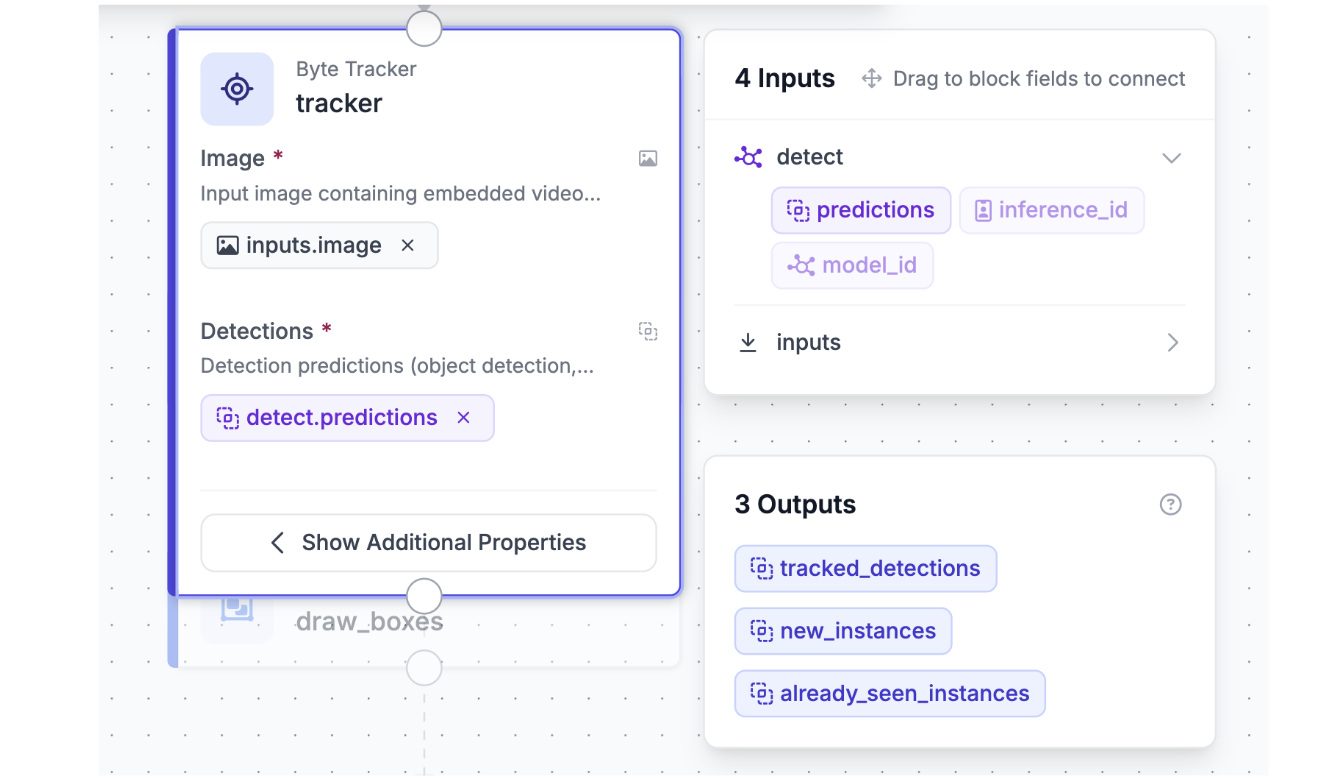
The default configuration works well for hockey: a track activation threshold of 0.25, lost track buffer of 30 frames for handling occlusions when players disappear behind the net, and a minimum matching threshold of 0.8 for IoU-based re-association.
ByteTrack was chosen specifically for its strong performance in occlusion-heavy scenarios without requiring appearance features. It relies purely on motion and spatial overlap, which makes it robust to the physical chaos of hockey unlike generic pedestrian trackers tested on calm street scenes.
The block outputs tracked detections augmented with stable tracker IDs that the visualization blocks will use to keep each player visually distinct.
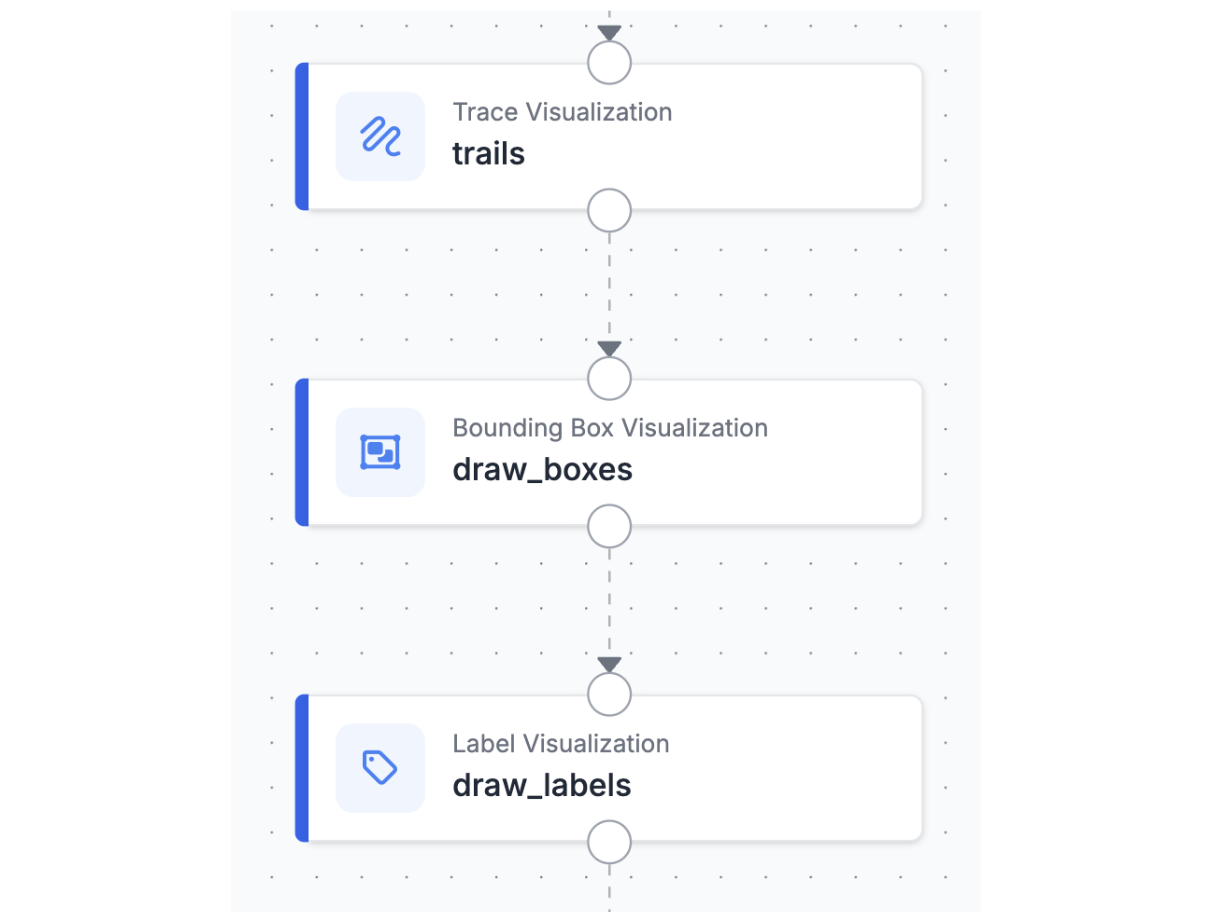
Step 6: Visualize Tracks
Add three visualization blocks in sequence to build up the broadcast-style overlay which are trace visualization, bounding box visualization, and label visualization.
Configure the trace visualization block with trace_length: 60 to show 60 frames of recent motion (roughly two seconds at 30 fps). Set color_axis: "TRACK" so each unique tracker ID gets its own color, and anchor the trail at the bounding box center. This creates a visual history of where each player has been, making skating patterns readable at a glance. For real-world coaching review, you can increase trace_length to 600 or 1800 frames (20 to 60 seconds) to capture full plays like breakouts or offensive zone cycles in a single view.
Use the same color_axis: "TRACK" setting on the bounding box block so a player's box and trail always match in color. This makes it easy to follow any single player across the frame.
Finally, add the label visualization block with text: "Tracker Id" to print each player's number (1, 2, 3, etc.) directly on their box. Even when players cross paths, the matching colors and persistent IDs keep them visually distinct.
Step 7: Test the Workflow
Click "Run" in the top-right corner to validate your pipeline. Upload a hockey video frame from a game, ideally one that captures multiple players in active play with some occlusions or collisions in the scene.
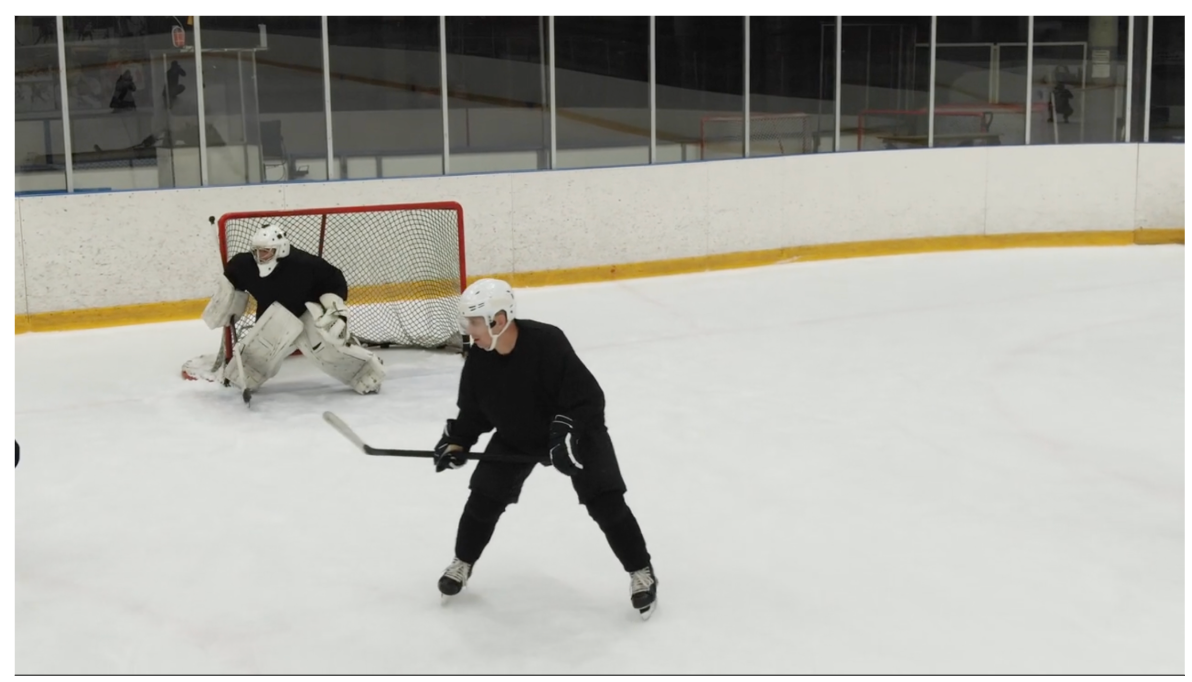
You'll receive a single output: the annotated image with trails, boxes, and tracker ID labels composited on top. This is your broadcast-style coaching tape, ready for review without any post-processing.
The resulting video shows each player's recent movement on the ice, with persistent IDs that hold up through collisions and brief occlusions. Coaches can use it to spot positional habits, review how a play developed, or compare two players' skating decisions on the same sequence. It's a foundation layer that makes raw video easier to analyze, not a finished tactical report adding velocity, zone occupancy, or team affiliation requires extending the workflow.
Using Roboflow Agent for Hockey Player Tracking
You can also use Roboflow Agent for hockey tracking. Agent is easily accessible on the Roboflow app homepage, and acts as a conversational layer on top of Roboflow’s tools, including models, datasets, and workflows.
Just describe what you want in plain English, and it handles the process of building it for you making it easier to create, test, and deploy computer vision applications without needing to write complex code. Here's an example of how you can use it to build your hockey analytics workflow.
Automate Hockey Tracking Analytics
You've built a complete hockey player tracking system that combines RF-DETR's object detection with ByteTrack's multi-object tracking to deliver tactical insight from raw match video. This workflow assigns persistent identity to every skater, draws colored movement trails, and produces a broadcast-style overlay that makes skating patterns readable at a glance.
For production deployment, consider extending the pipeline with velocity estimation blocks to measure player speed, zone occupancy blocks to track time spent in offensive vs defensive zones, or line crossing counters for shift-change analytics. Each block in Roboflow Workflows is modular, so the core detection and tracking layer stays the same as you add new analytics on top.
Further reading
Below are a few related topics you might be interested in:
Cite this Post
Use the following entry to cite this post in your research:
Contributing Writer. (May 11, 2026). Hockey Player Tracking with Roboflow. Roboflow Blog: https://blog.roboflow.com/automate-hockey-player-tracking/