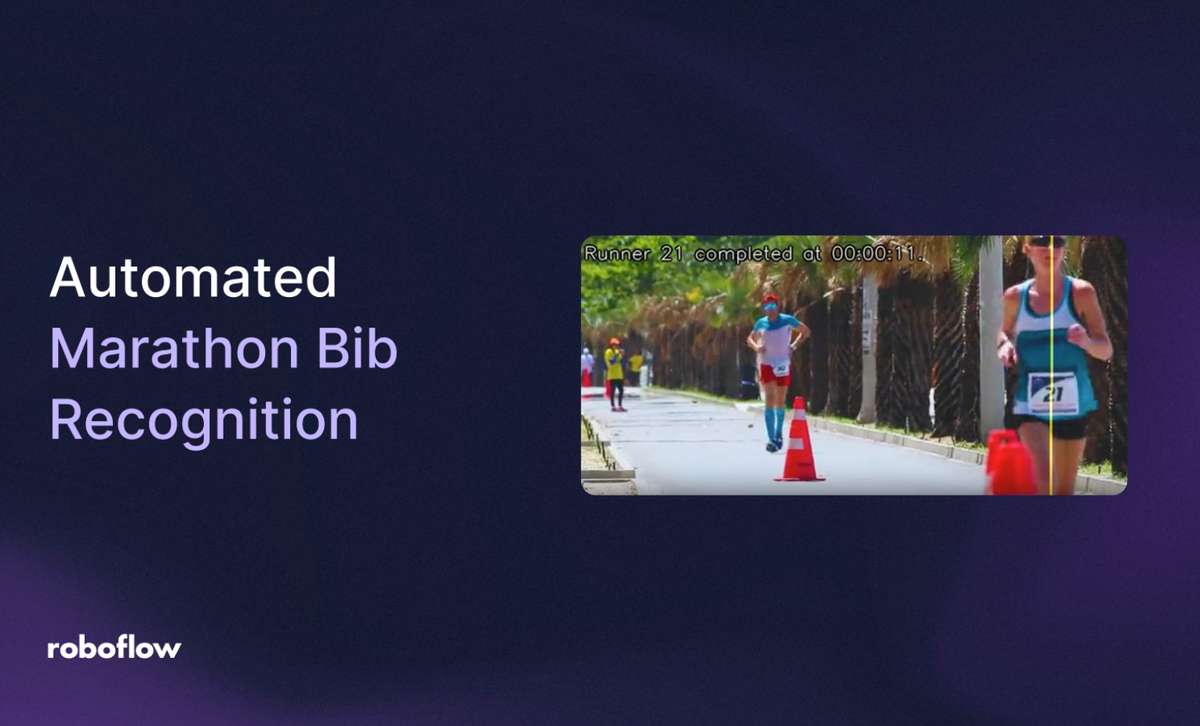
Every critical moment in a marathon occurs at a line, whether it’s the start, a split, or the finish. Capturing who crosses and when depends entirely on the runner’s bib number. Manually spotting and tagging bibs from videos at these lines is slow and error prone, compromising both timing accuracy and video documentation.
In this blog, I propose an automated bib recognition solution that detects the runner number in a video at the moment they cross a line and accurately records their time. Below is an example of the output of this solution:
In the video, the vertical yellow line represents the finish line that runners must cross to officially complete the race and have their times recorded.
The automated bib recognition solution we’ll build in this blog operates in two stages. The first stage uses a Roboflow Workflow to detect runners as they cross the finish line. The second stage leverages the outputs from this workflow to record each runner’s time and capture a photograph of the exact moment they cross the line.
Stage One: Building an AI Workflow to Detect Runners Crossing the Finish Line
We’ll use Roboflow Workflows to create a workflow that detects runners as they cross the finish line. Roboflow Workflows is a web-based platform that enables seamless chaining of multiple computer vision tasks, including object detection, dynamic cropping, bounding box visualization, and more.
You can also fork the workflow directly here. Below, you can see the visualized output for this stage:
Setup Your Roboflow Workflow
To get started, create a free Roboflow account and log in. Next, create a workspace, then click on “Workflows” in the left sidebar and click on Create Workflow.
You’ll be taken to a blank workflow editor, ready for you to build your AI-powered workflow. Here, you’ll see two workflow blocks: Inputs and Outputs, as shown below:
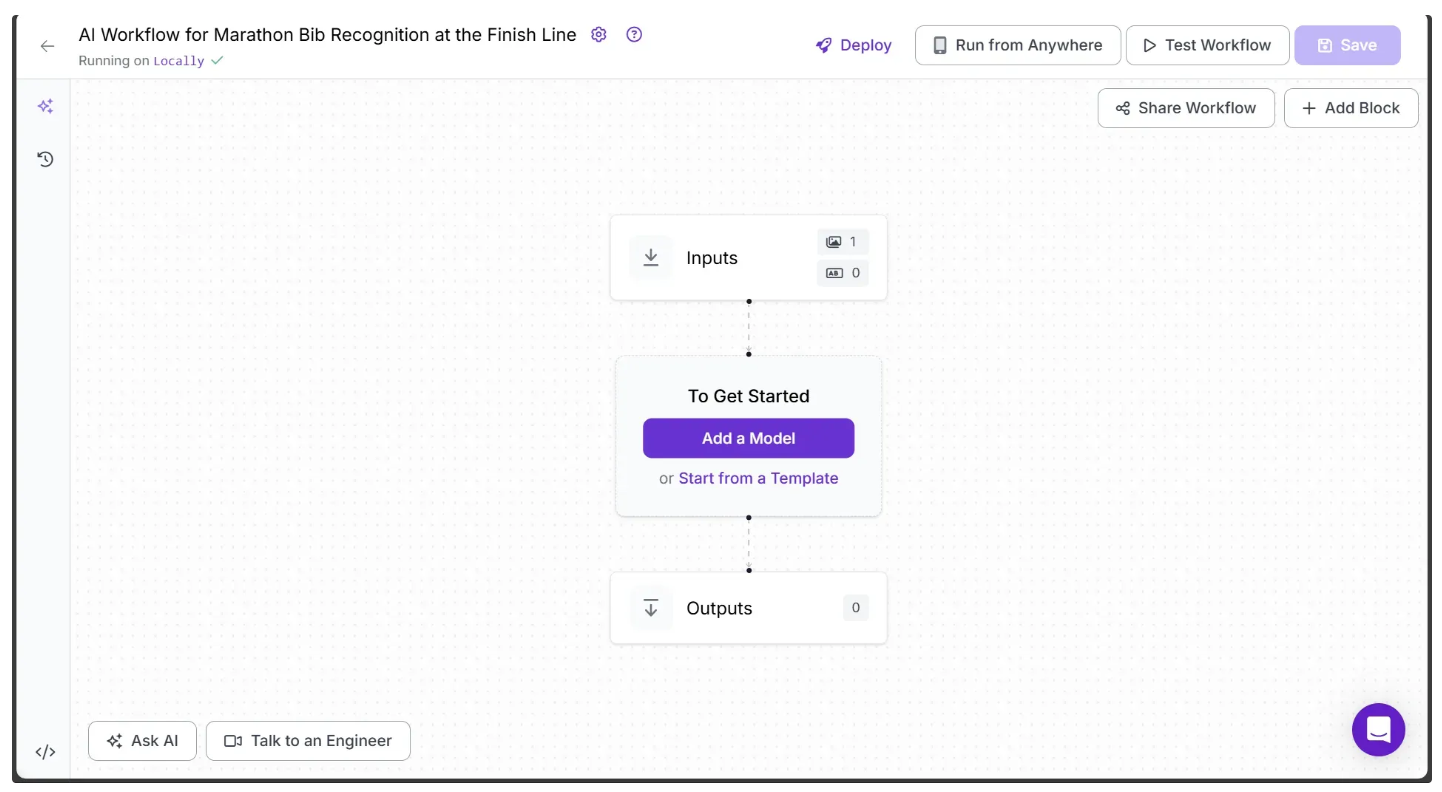
In the top left corner, you’ll see either Running on Serverless Hosted API or Hosted API. Both options support common tasks such as object detection, dynamic cropping, and chaining logic blocks, but neither can perform inference on videos. To include video support in your workflow, you’ll need a Dedicated Deployment or to self-host your own Roboflow Inference server.
Since our workflow requires video support, we'll switch to a locally hosted inference server. To do this, click the text that follows Running on in the top-left corner, then select Local Device.
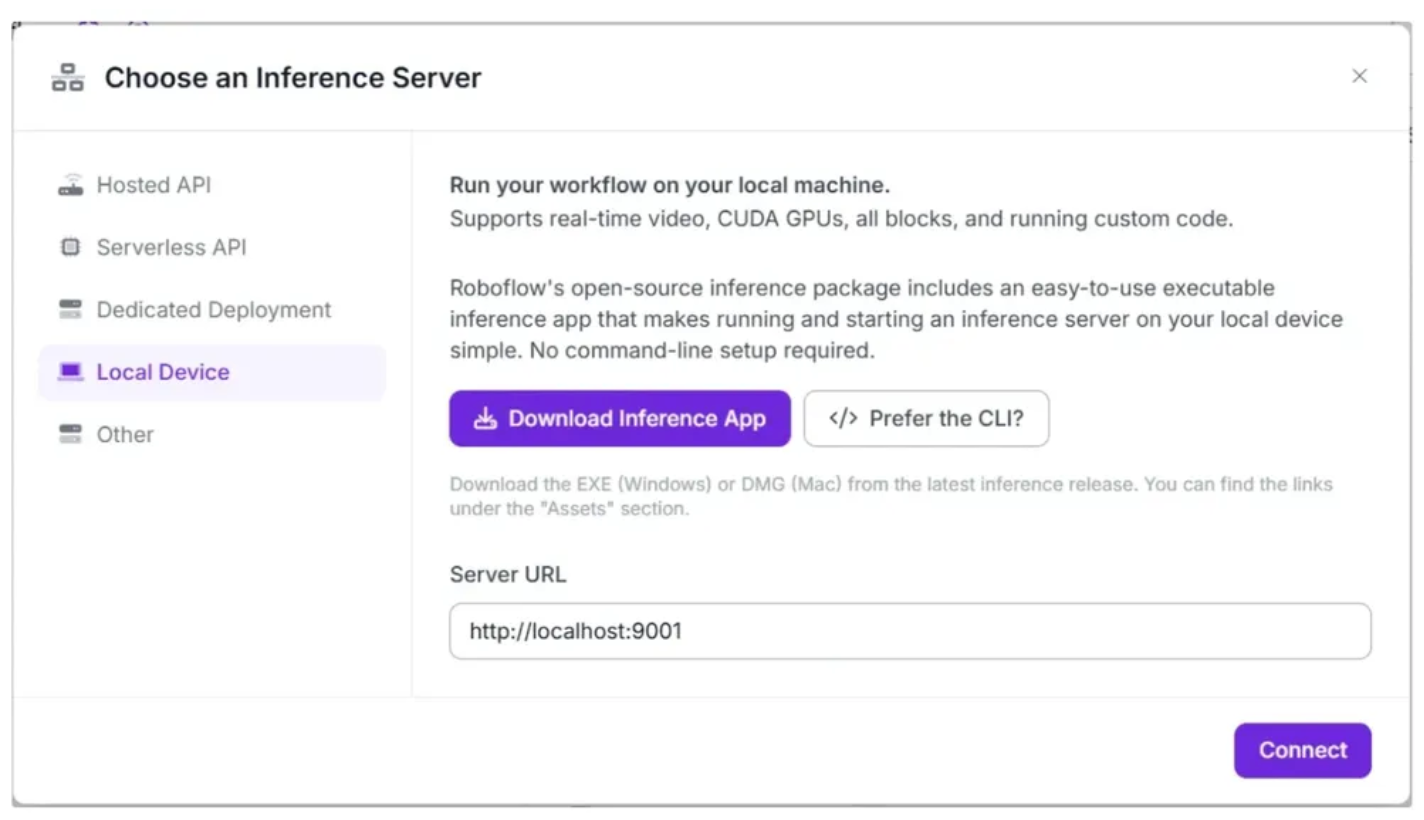
Before connecting to http://localhost:9001, you need to run an inference server on your local device. You can do this either by downloading and installing the Roboflow inference app and running it, which starts a local server on port 9001, or by following the command-line instructions provided here.
Once the local inference server starts, you can verify it by visiting http://localhost:9001 in your browser and click Connect. After connecting, your workflow will run locally on your device.
Step 1: Setup Additional Input Parameters
If you click on the Inputs block, a sidebar appears on the right, displaying a default parameter called image, which lets you add an image as input to the workflow. The workflow supports both image and video inputs. For videos, the image parameter represents individual video frames.
You can also use the Add Parameter option to include additional parameters that control the workflow’s behavior. In this workflow, we add a parameter called gemini_api_key, which accepts a Gemini API key required to access the Gemini models for Optical Character Recognition (OCR), as shown below:
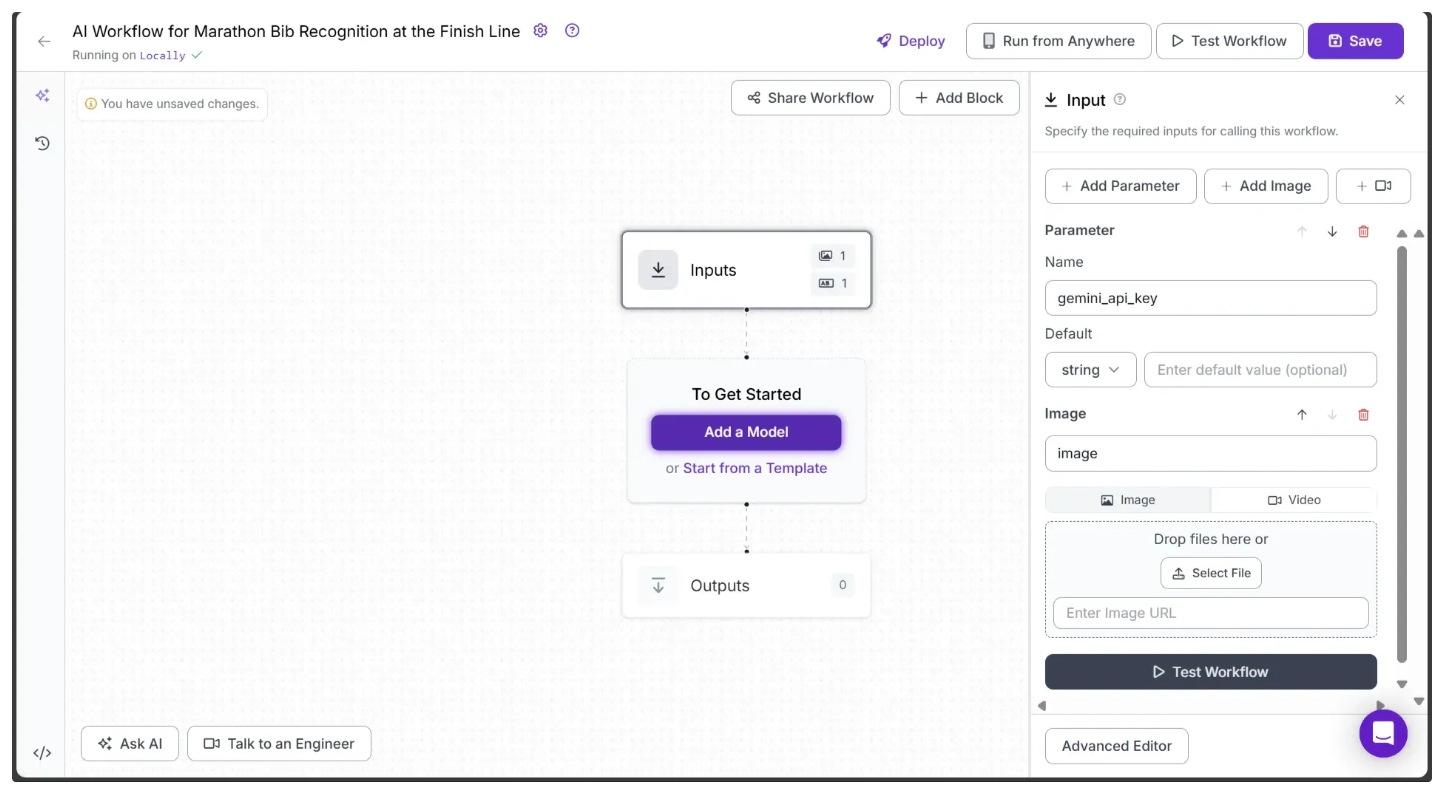
Note: Don’t forget to save the workflow to keep your changes. The save option is available at the top-right corner of the workflow.
For this workflow, we’ll use the following marathon test video. You can download the video here.
Step 2: Generate a Gemini API Key
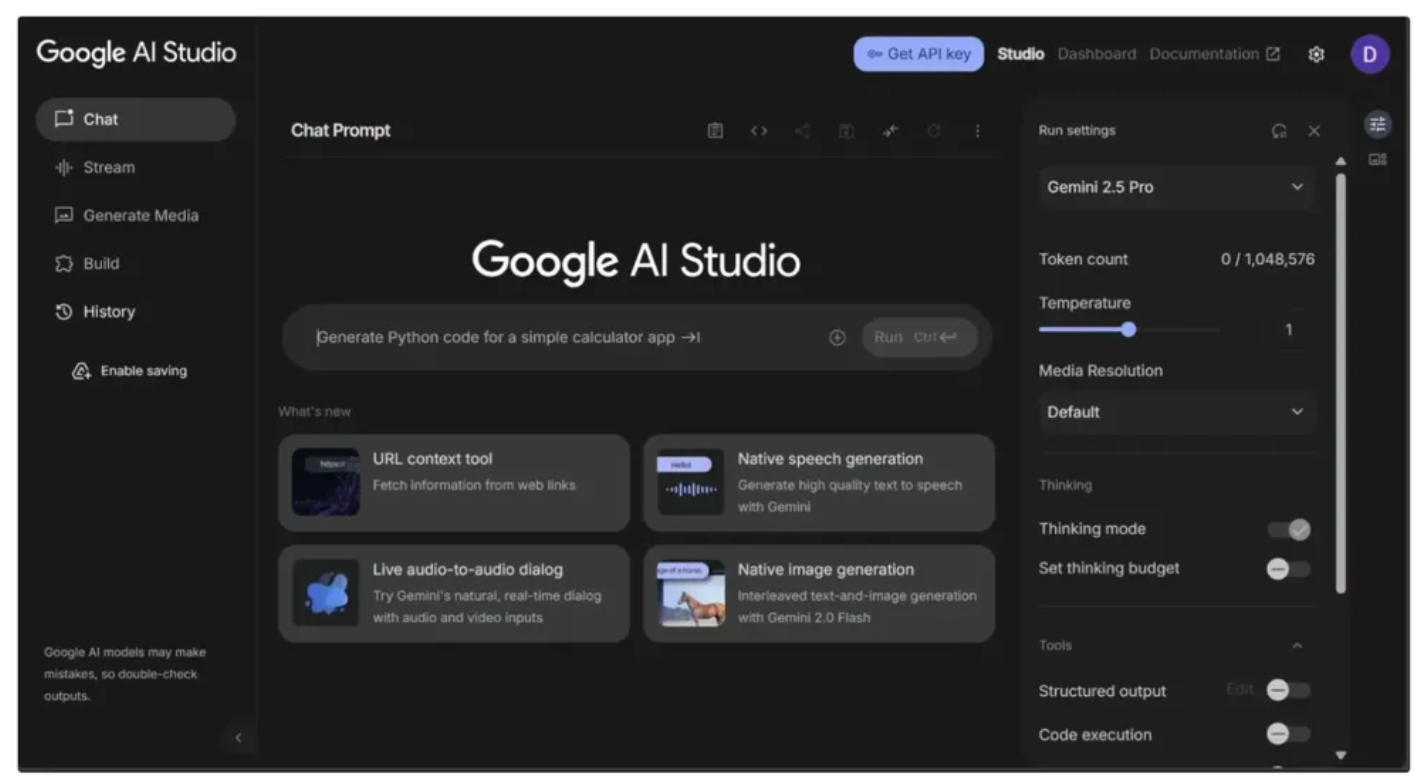
This workflow uses Gemini Models, so you’ll need a Gemini API key. You can obtain one for free from Google AI Studio, as shown below:
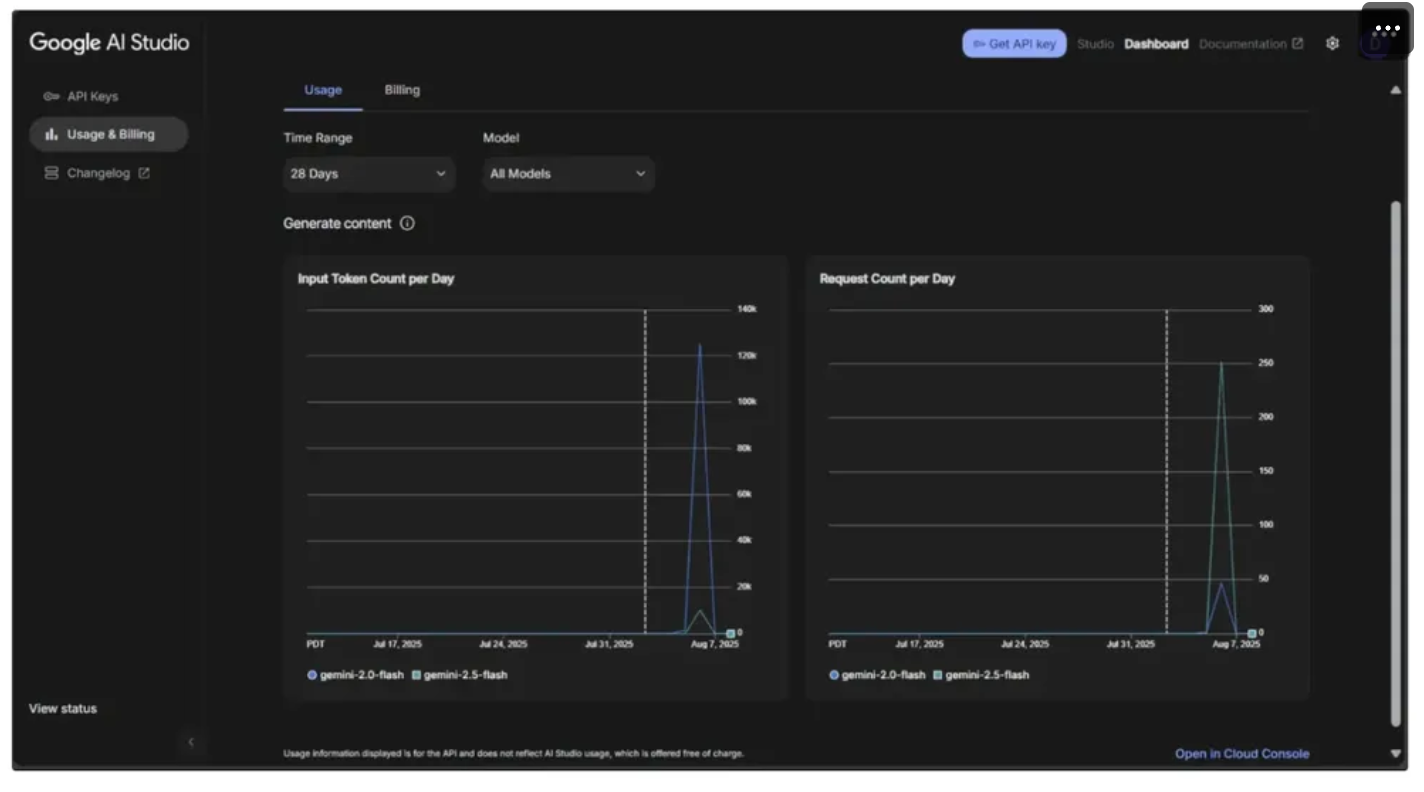
You also need to monitor your usage to avoid exceeding the rate limits imposed by the Free Tier of Google AI Studio, which could cause errors in the workflow. To do this, go to the dashboard in the top-right corner, then navigate to Usage and Billing from the sidebar on the left, as shown below:
Step 3: Add an Object Detection Model Block
In order to detect a marathon runner in a video frame, we need an Object Detection Model. We can do this by adding an Object Detection Model block to our workflow, which provides the exact bounding box coordinates for one or more objects present in the video frame.
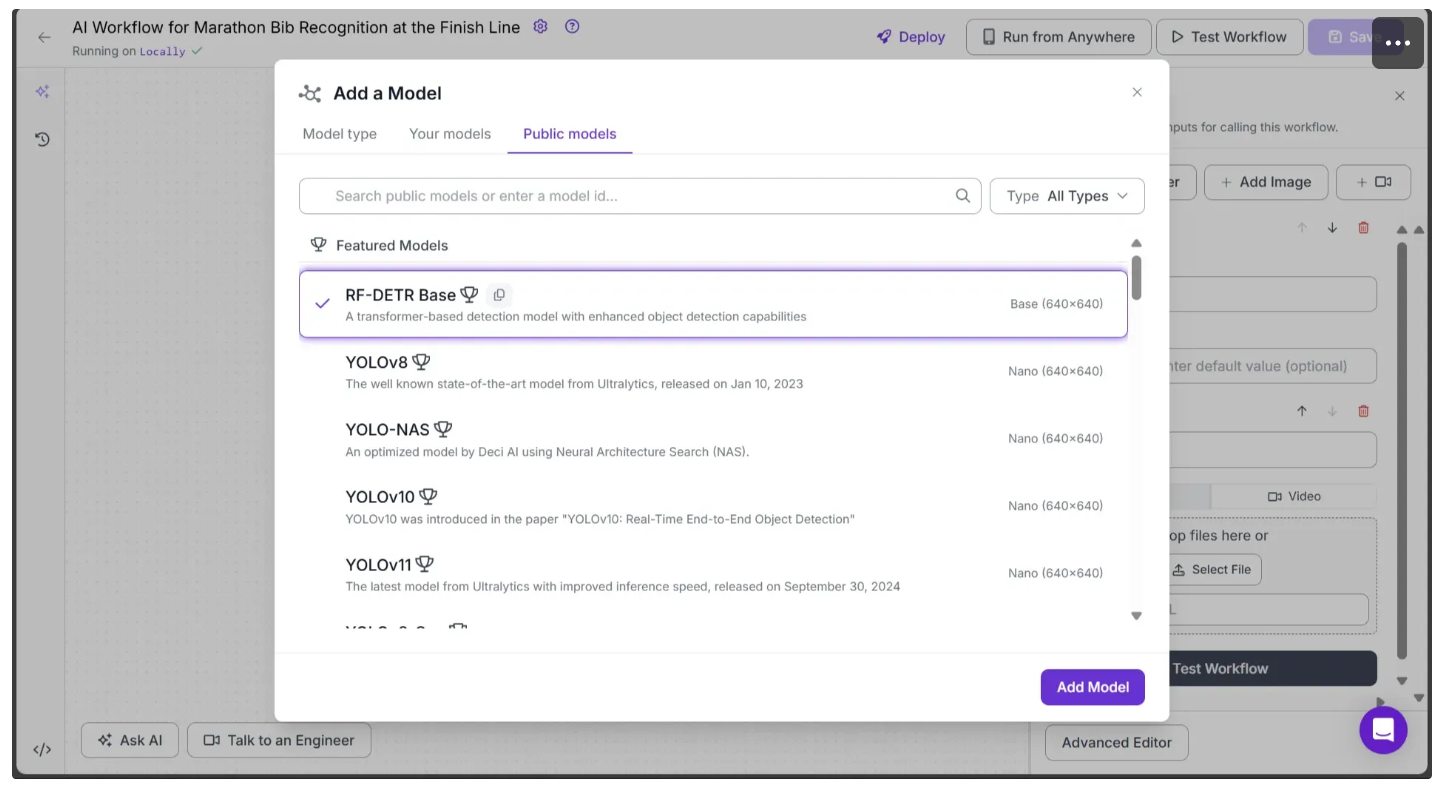
Roboflow offers a range of object detection models, including YOLOv8, YOLO-NAS, and more. For this workflow, we’ll use the RF-DETR model. RF-DETR is a state‑of‑the‑art, real-time object detection model architecture developed by Roboflow.
To add it, simply click on the Add a Model option present in between Inputs and Outputs block. Then go to Public Models and select RF-DETR Base and hit Add Model as shown below:
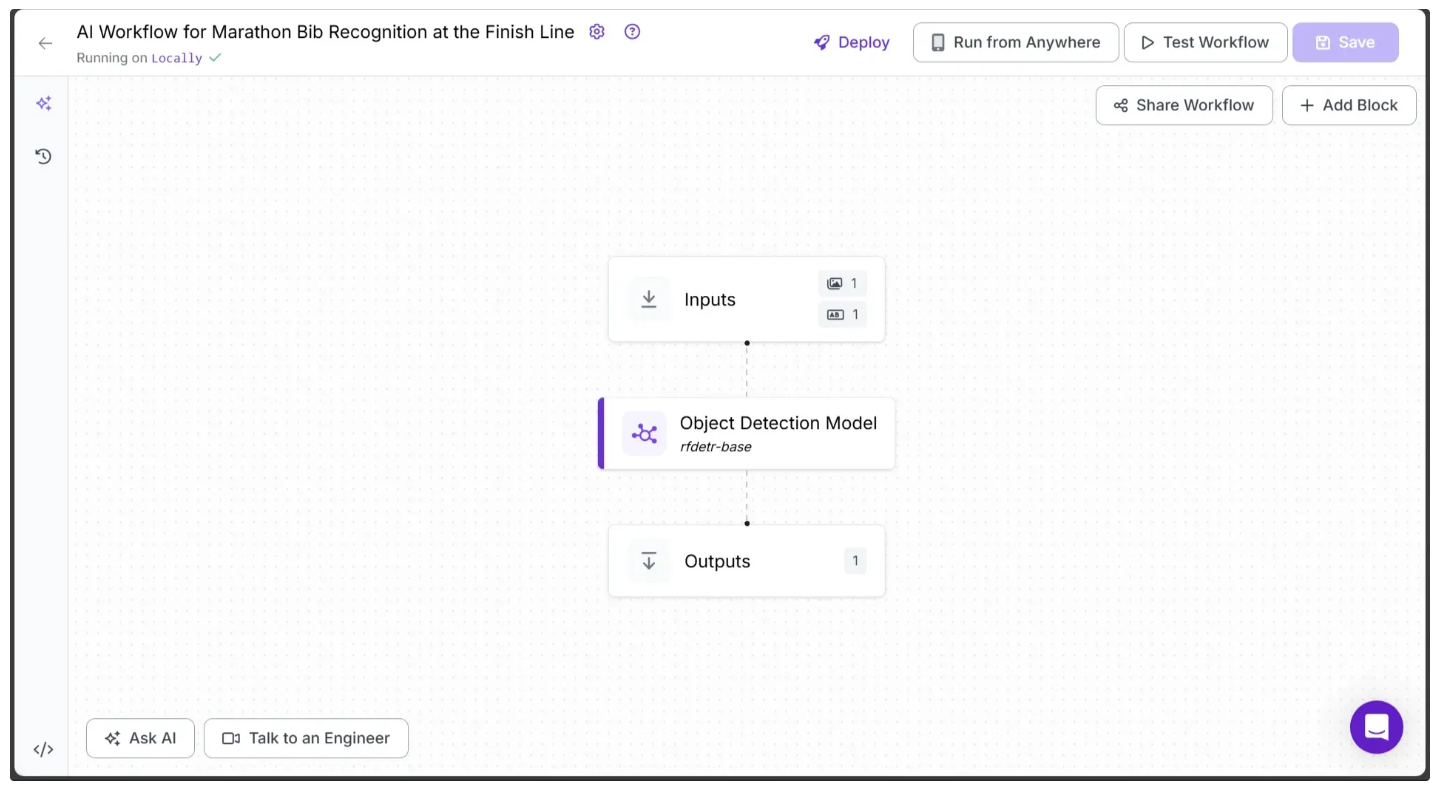
Your workflow should now look like this:
Next, configure the object detection model to detect only marathon runners in a video frame. To do this, click on the model, set its Class Filter property to ‘person’ as shown below, and then click Save:
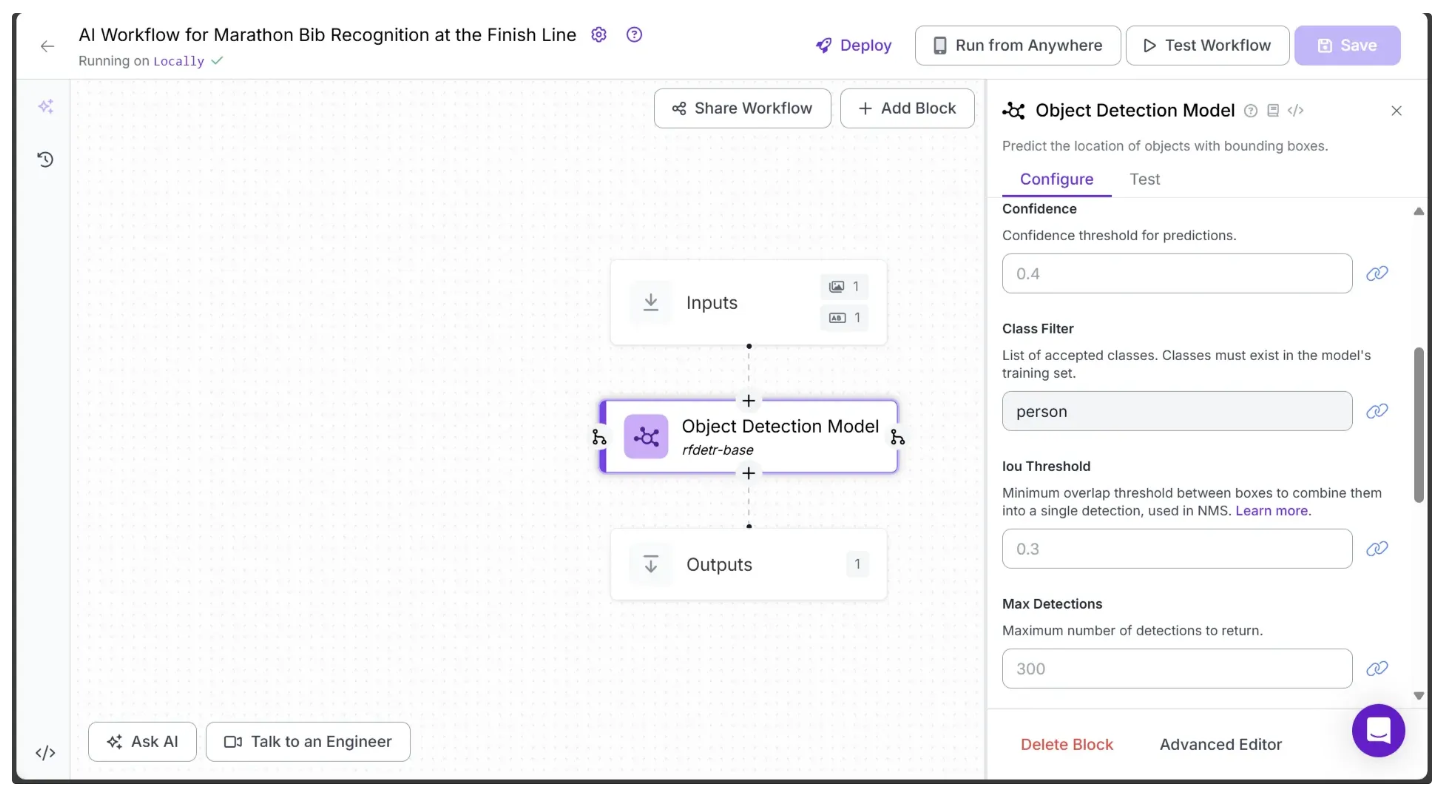
Setting the class to ‘person’ configures the model to detect only marathon runners in a video frame.
Step 4: Enable Object Tracking across Video Frames
In order to enable tracking of runners across video frames using the predictions from the object detection model, we add a Byte Tracker block to our workflow.
This block accepts detections and their corresponding video frames as input, initializing trackers for each detection based on configurable parameters like track activation threshold, lost track buffer, minimum matching threshold, and frame rate.
To add it, hover over the Object Detection Model block, click the + icon that appears below, and search for “Byte Tracker” to insert it into your workflow. Once added, the workflow should look like the one shown below:
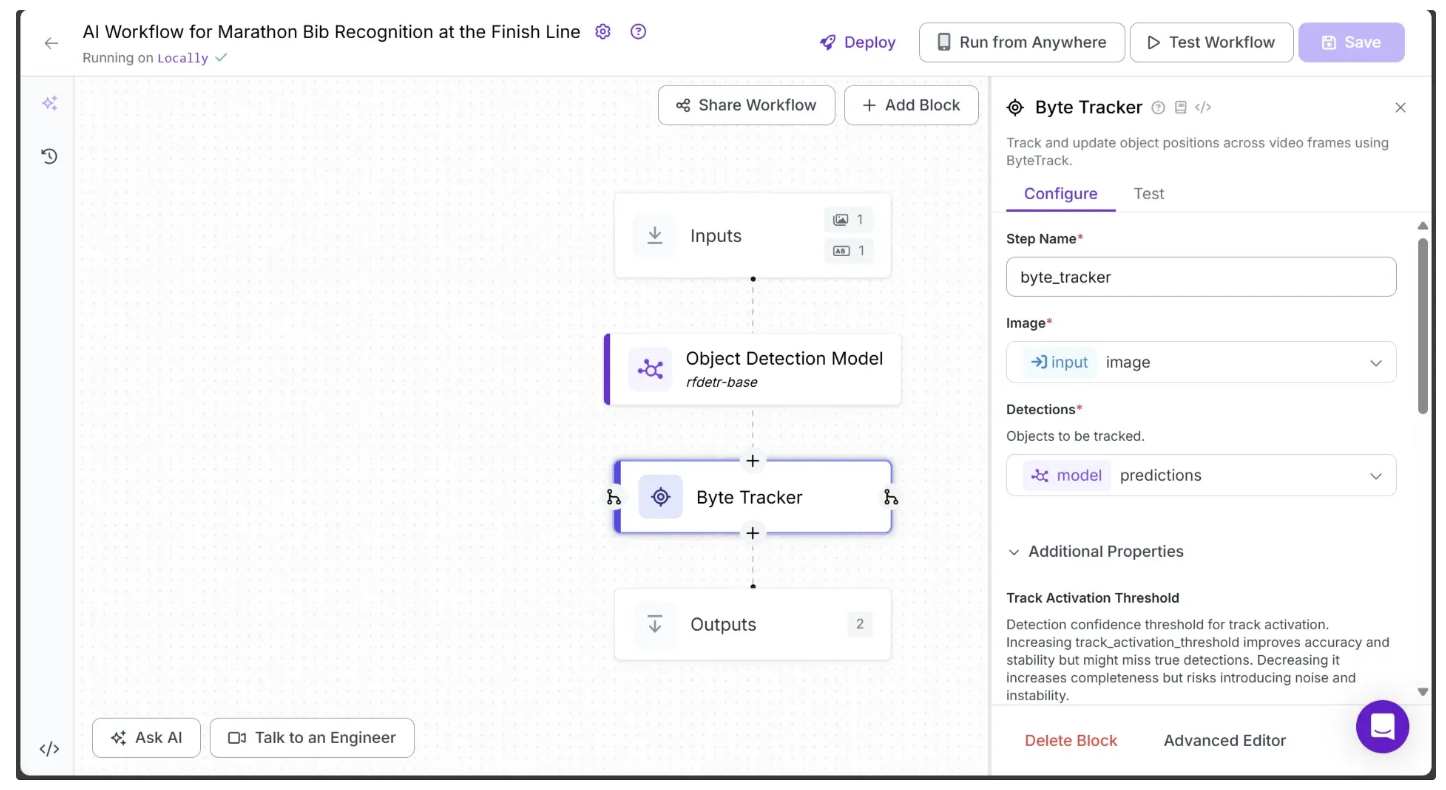
Step 5: Add a Line Counter
Now, let’s add a line to the video and count every detected runner that crosses it using Roboflow’s Line Counter block. This analytics block is designed specifically to track and count objects as they pass over a defined line.
To add it, hover over the Byte Tracker block, click the + icon that appears below, and search for “Line Counter” to insert it into your workflow. Once added, your workflow should look like the one shown below:
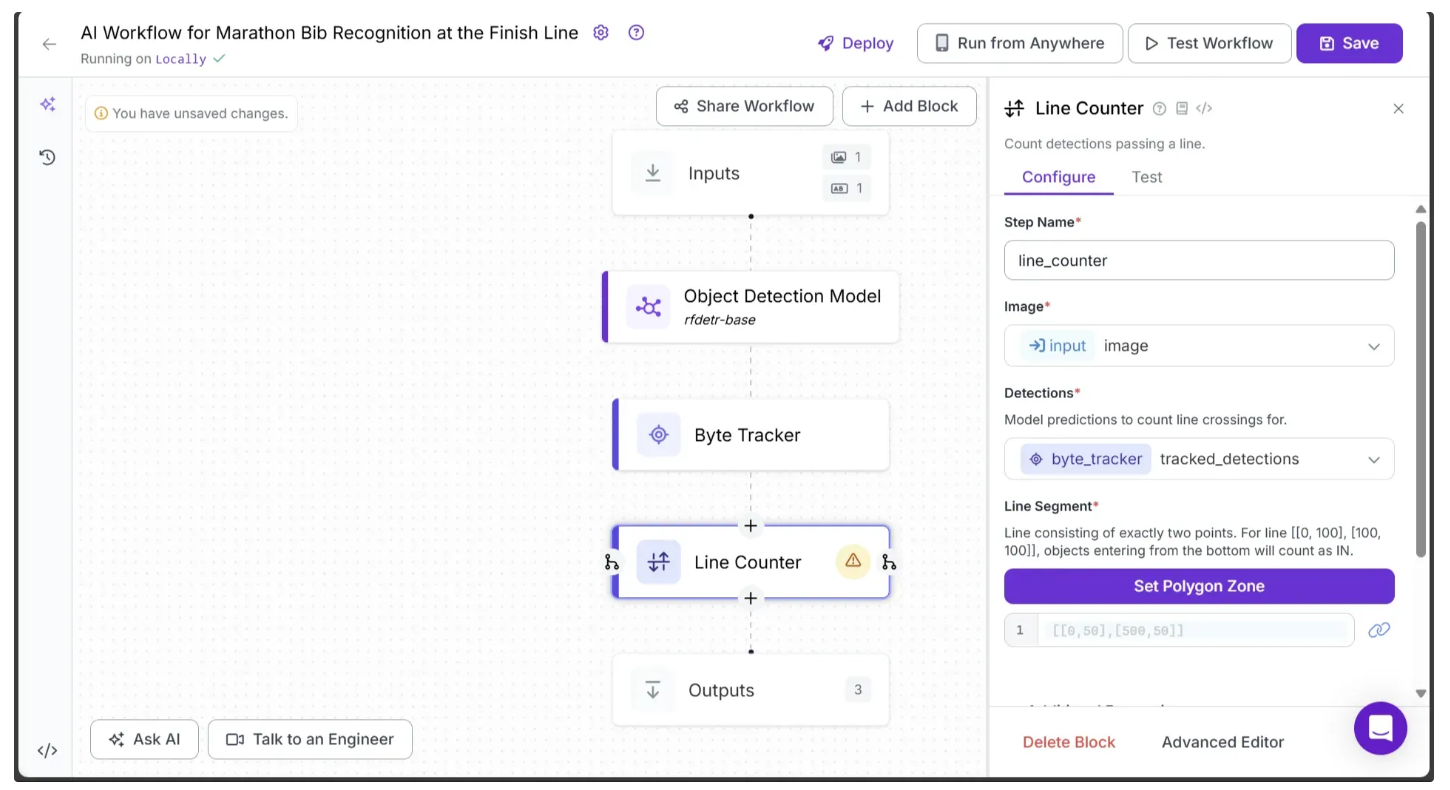
To set a line, click Set Polygon Zone in the Line Counter Configure tab. This will open a new tab where you can upload the test video from Step 1 by dragging and dropping it, as shown below:
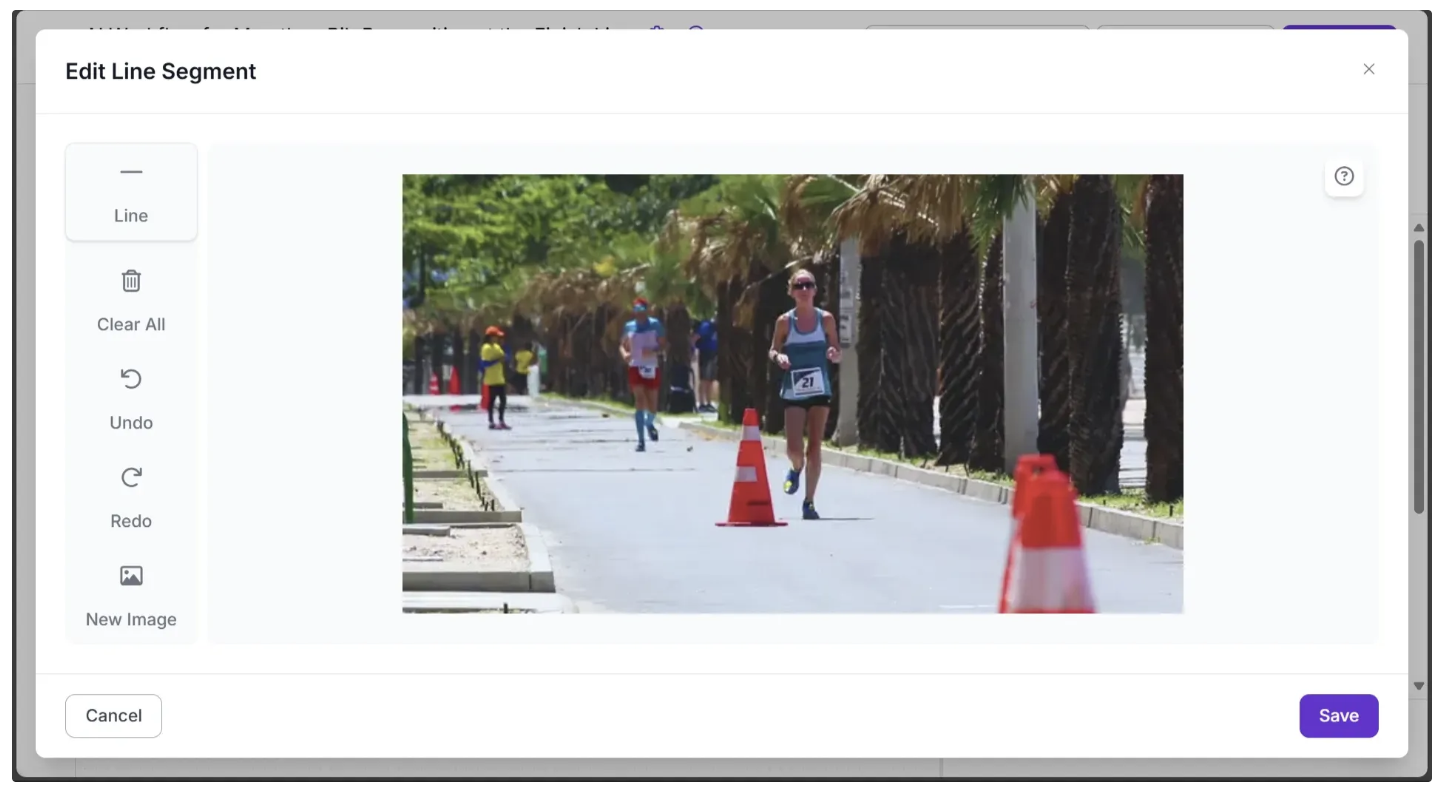
Now, use your mouse to draw a line on the image, as shown below:
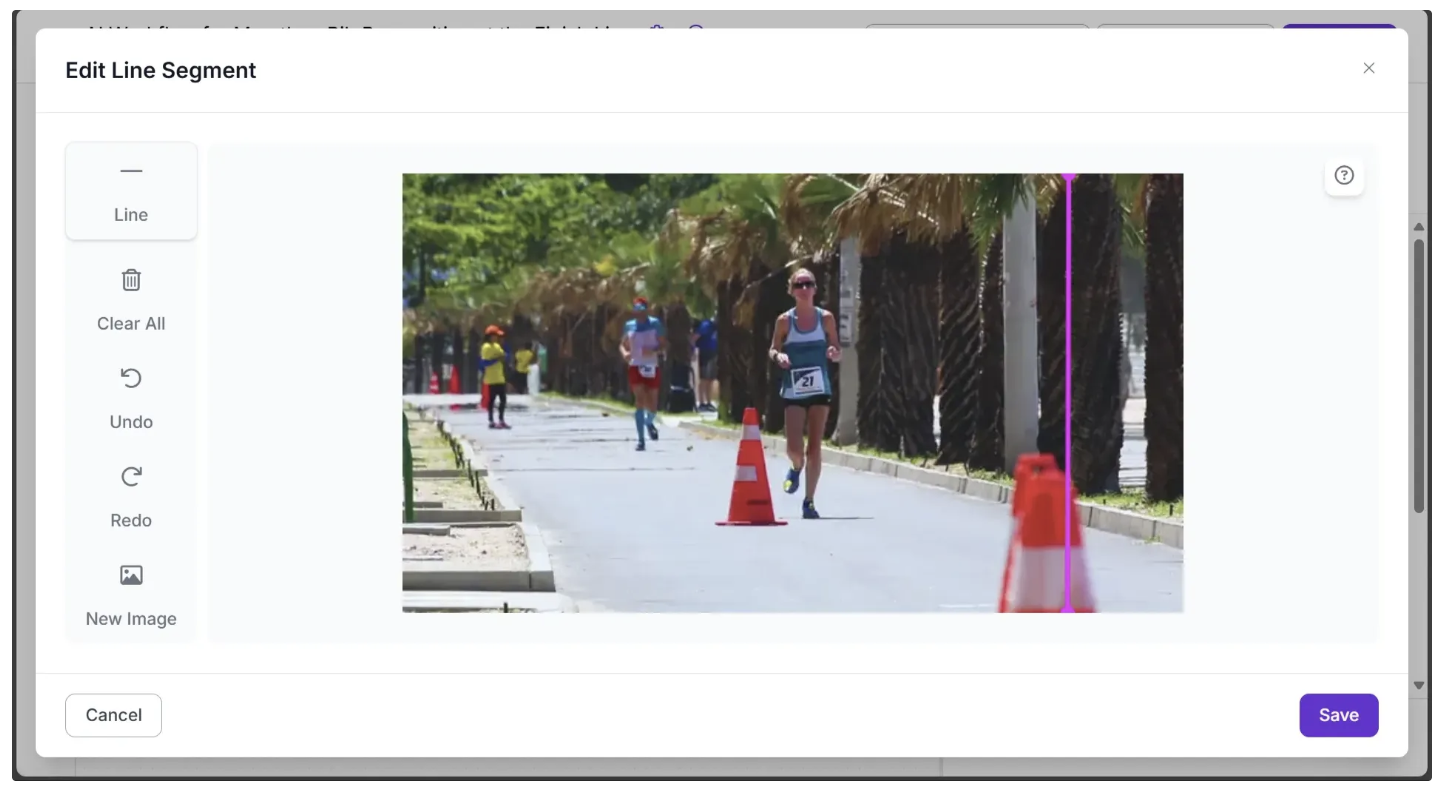
Once finished, click Save. This updates the Line Segment parameter with the new value. For example, in my case: [[546,0],[545,360]], as shown below:
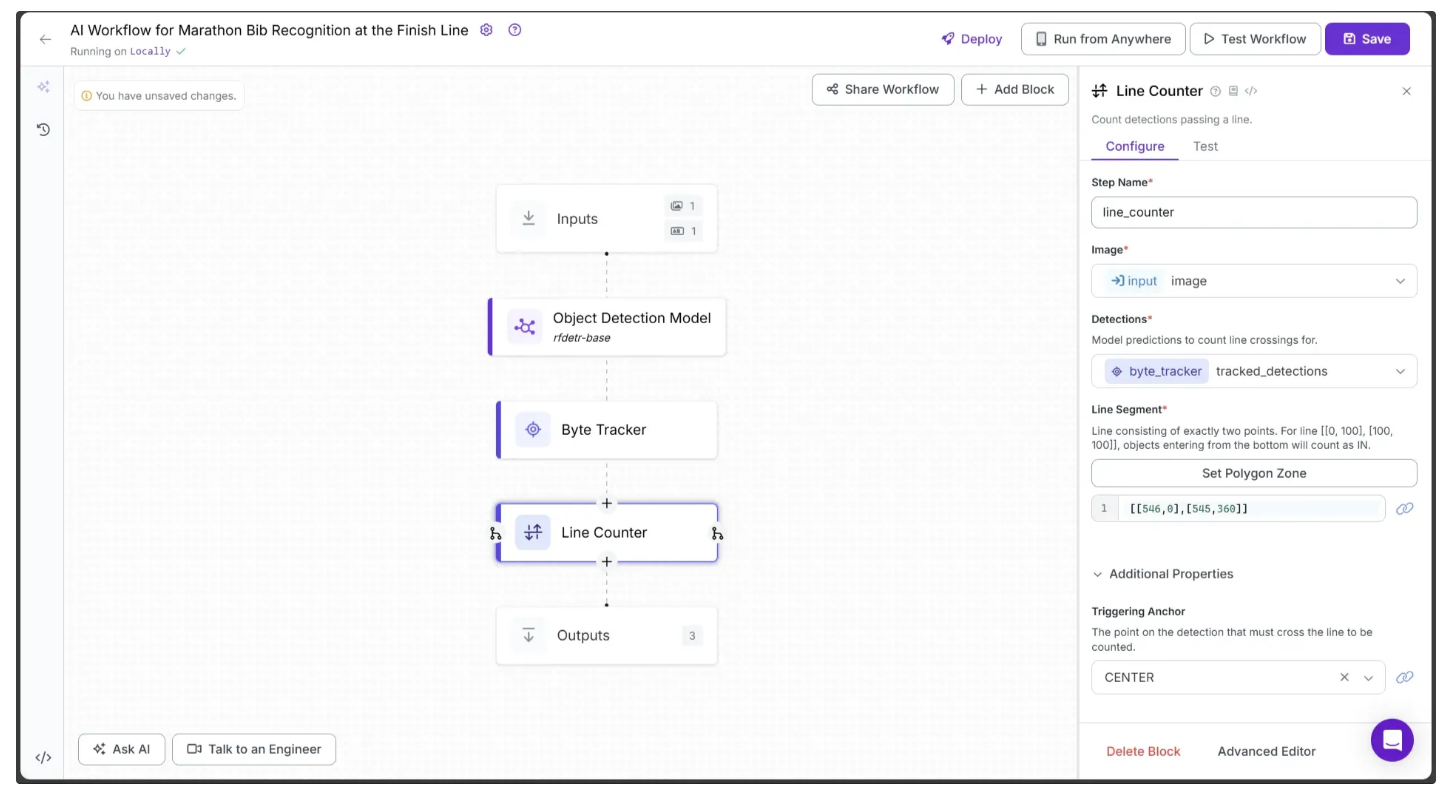
Note: For the line counter to work correctly, the workflow’s video inference must be run on videos with the same resolution as the one on which the line was drawn.
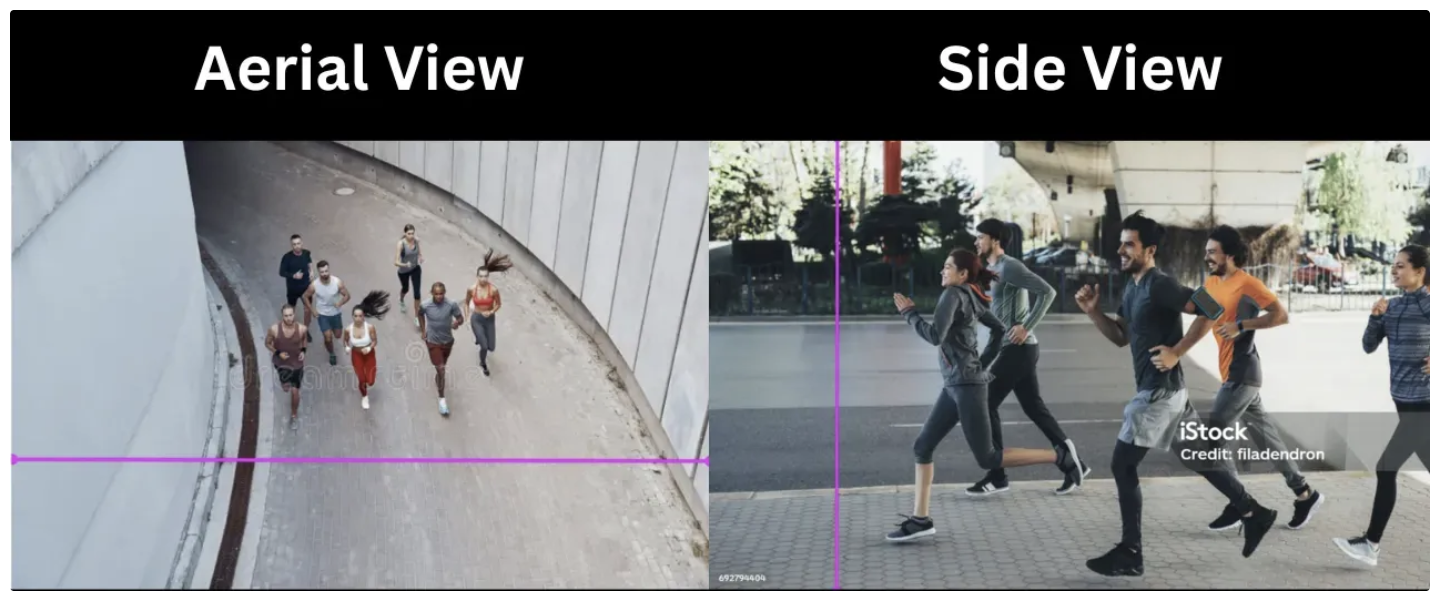
Here, we draw the finish line vertically and to the right of the frame, instead of horizontally and at the center, as the line counter operates on a 2D plane and can only track objects crossing a line from left to right or from top to bottom. In contrast, the runners in the video move through 3D space and exit on the right side of the frame.
In practice, the placement of the finish line depends on the camera angle. The image below illustrates different scenarios and their corresponding finish lines:
Step 6: Add Line Counter Visualizations
The Line Counter block detects runners passing the line but does not provide a visualization of the line or a count display for the runners. To add this output to our workflow, we use the Line Counter Visualizations block.
To add it, hover over the Line Counter block, click the + icon that appears below, and search for “Line Counter Visualization” to insert it into your workflow.
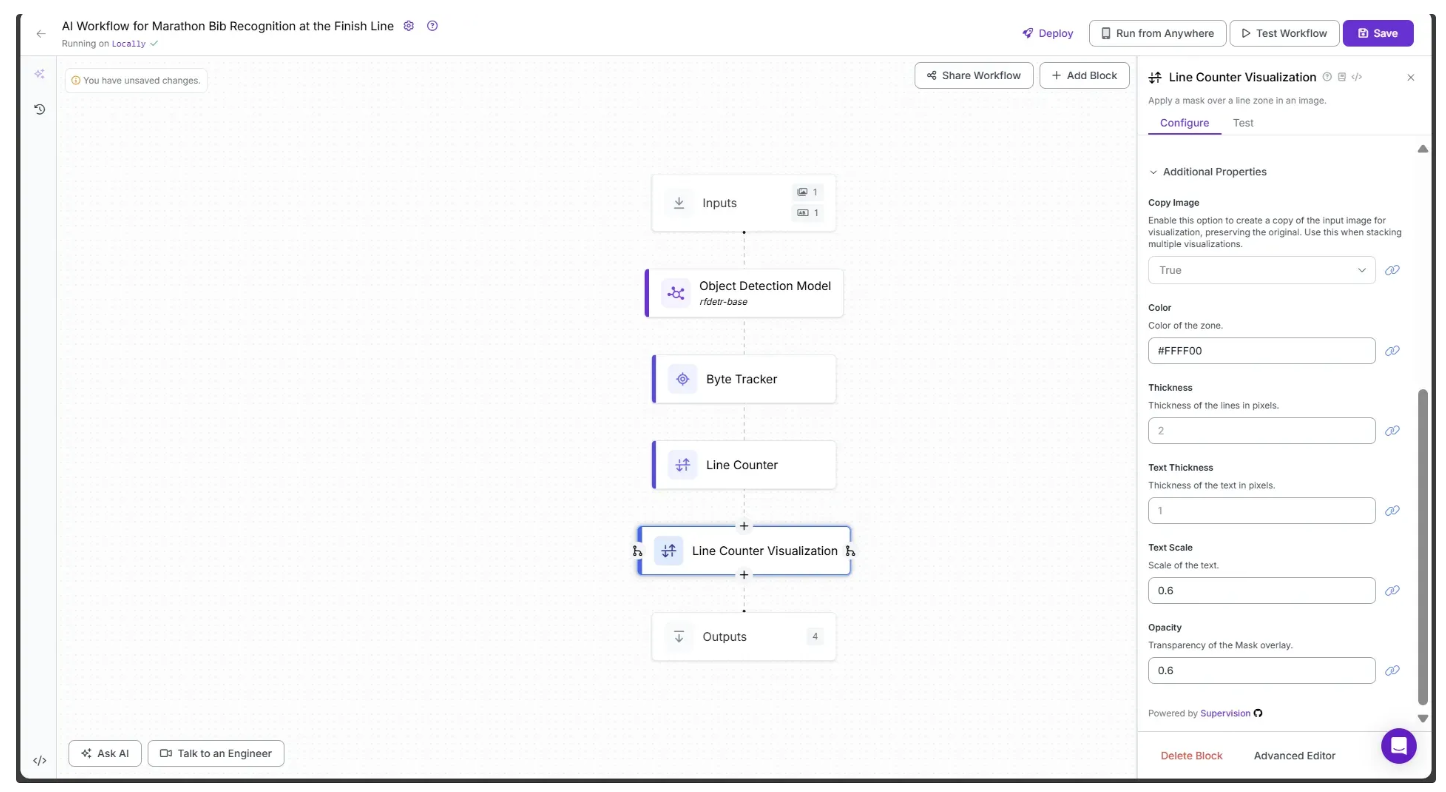
Then, configure the block as follows:
- Set the Zone parameter to the same value as the previously defined Line Segment parameter, e.g., [[546,0],[545,360]].
- Set Count In to the Line Counter’s count_in parameter by clicking the 🔗 icon next to Count In and selecting it from the dropdown.
- Set Color to #FFFF00.
- Set Text Scale to 0.6.
- Set Opacity to 0.6.
The first half of the Configure tab should now appear as shown below.
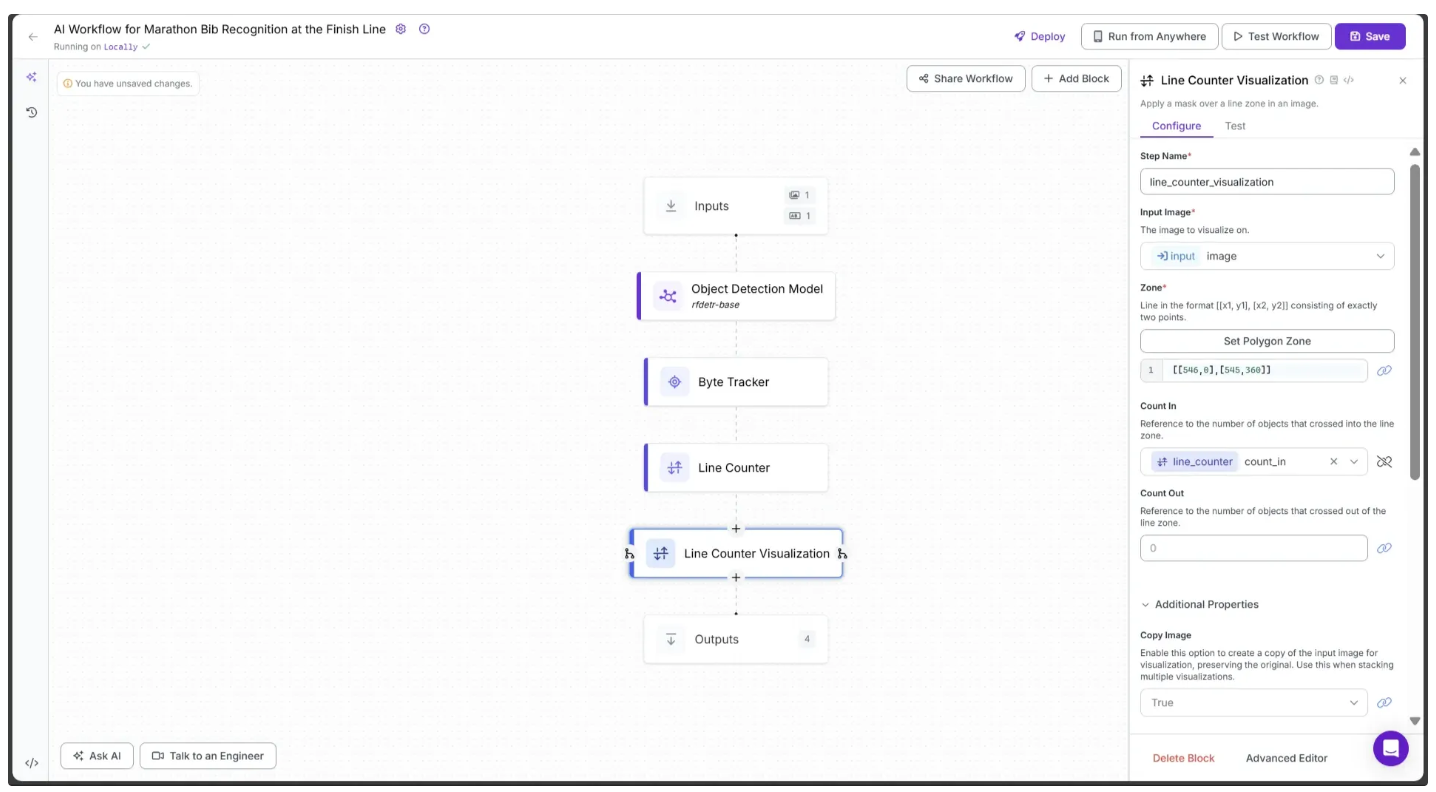
The second half of the Configure tab should now appear as shown below:
Step 7: Get Object Detections Post-Finish
The Line Counter block detects and counts any runner who crosses a line. To achieve our final output and determine exactly who crosses the line and when, we need the specific frame in which a runner passes it. For this, we use the Continue If block.
To add it, hover over the Line Counter Visualization block, click the + icon that appears below, and search for 'Continue If' to insert it into your workflow, as shown below:
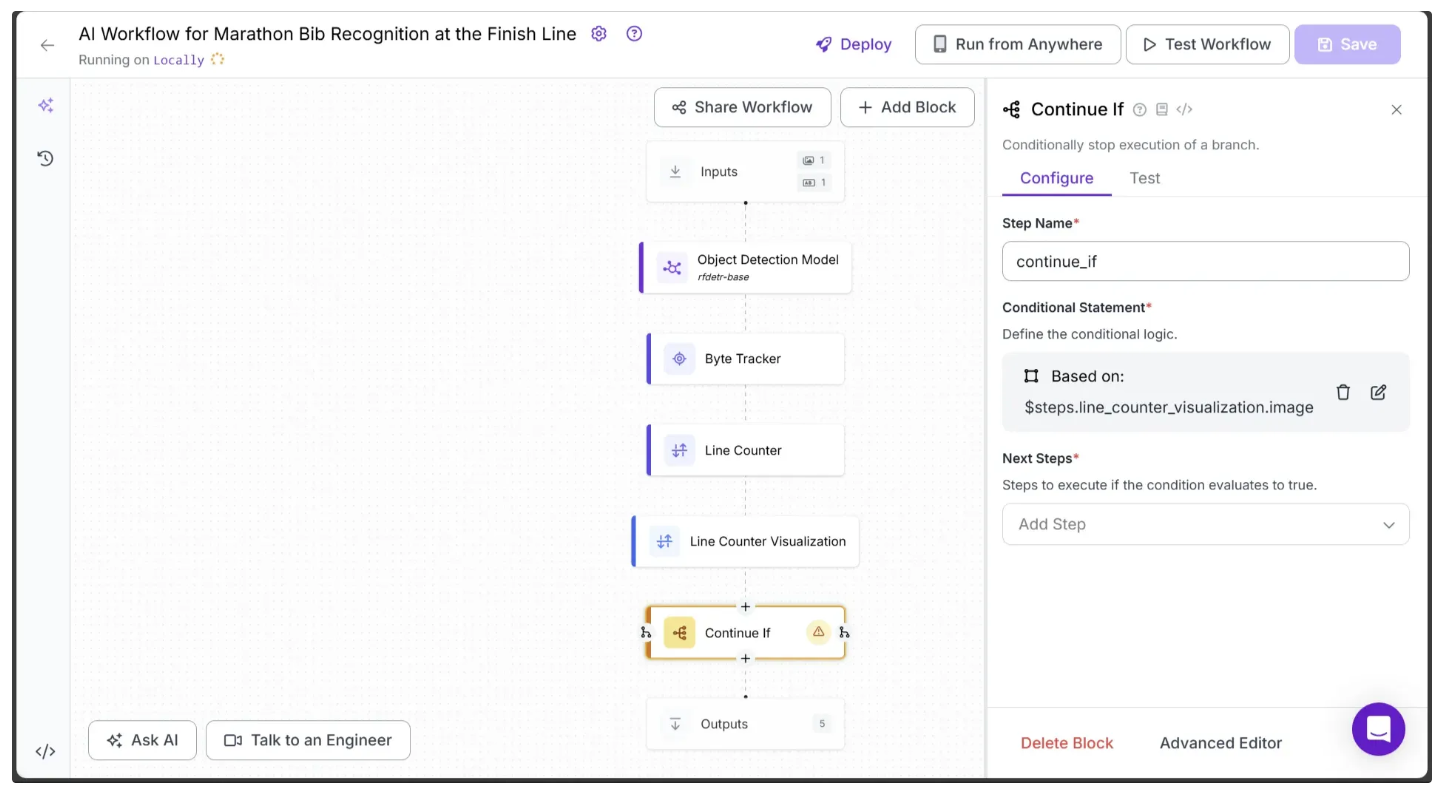
Next, configure the Continue If block to follow a different execution path for the video frames in which a runner crosses the line drawn in the earlier steps.
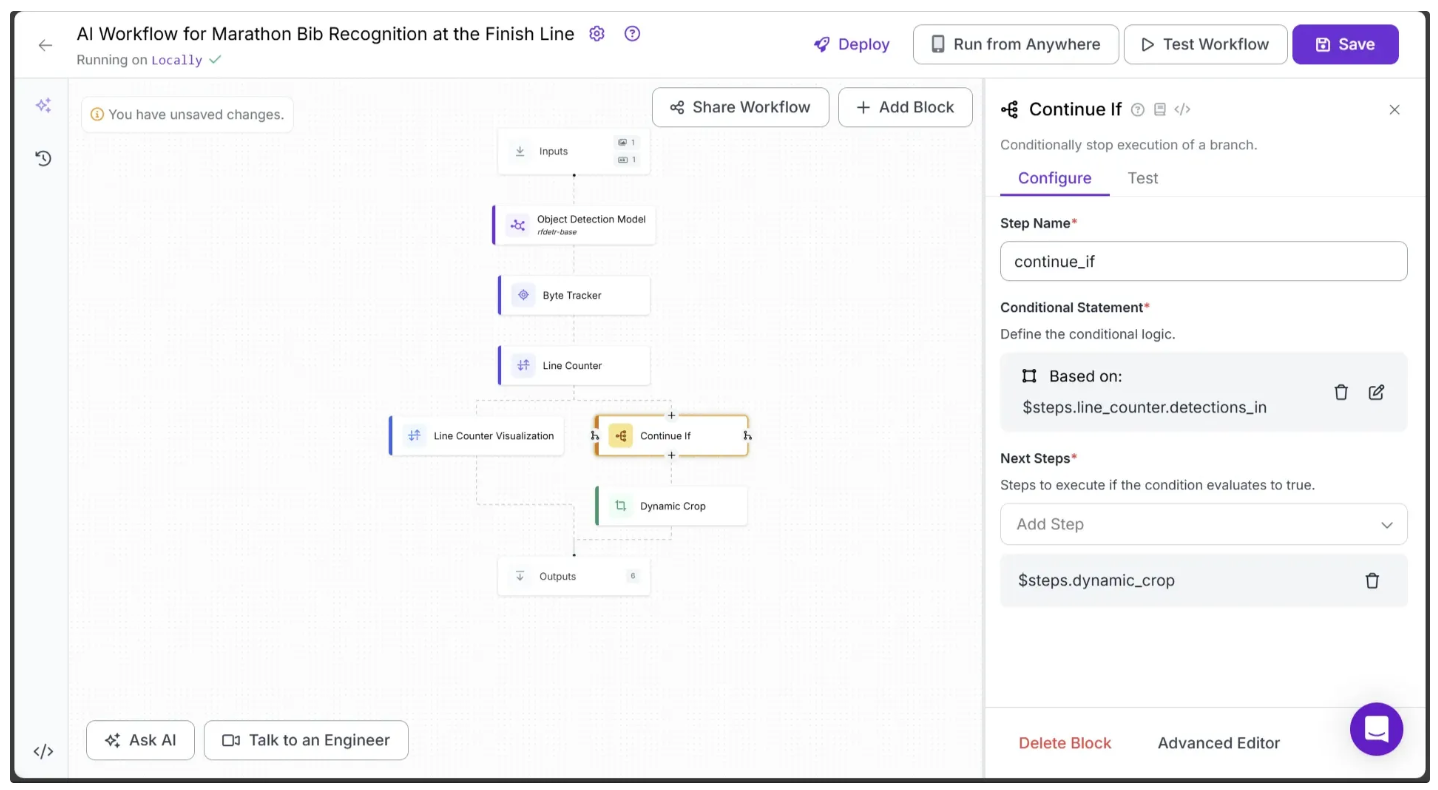
To do this, click on Continue If and open its Configure Tab. Under Conditional Statement, click the Edit option represented by the pencil icon ✍️, and then set up the condition as shown below:
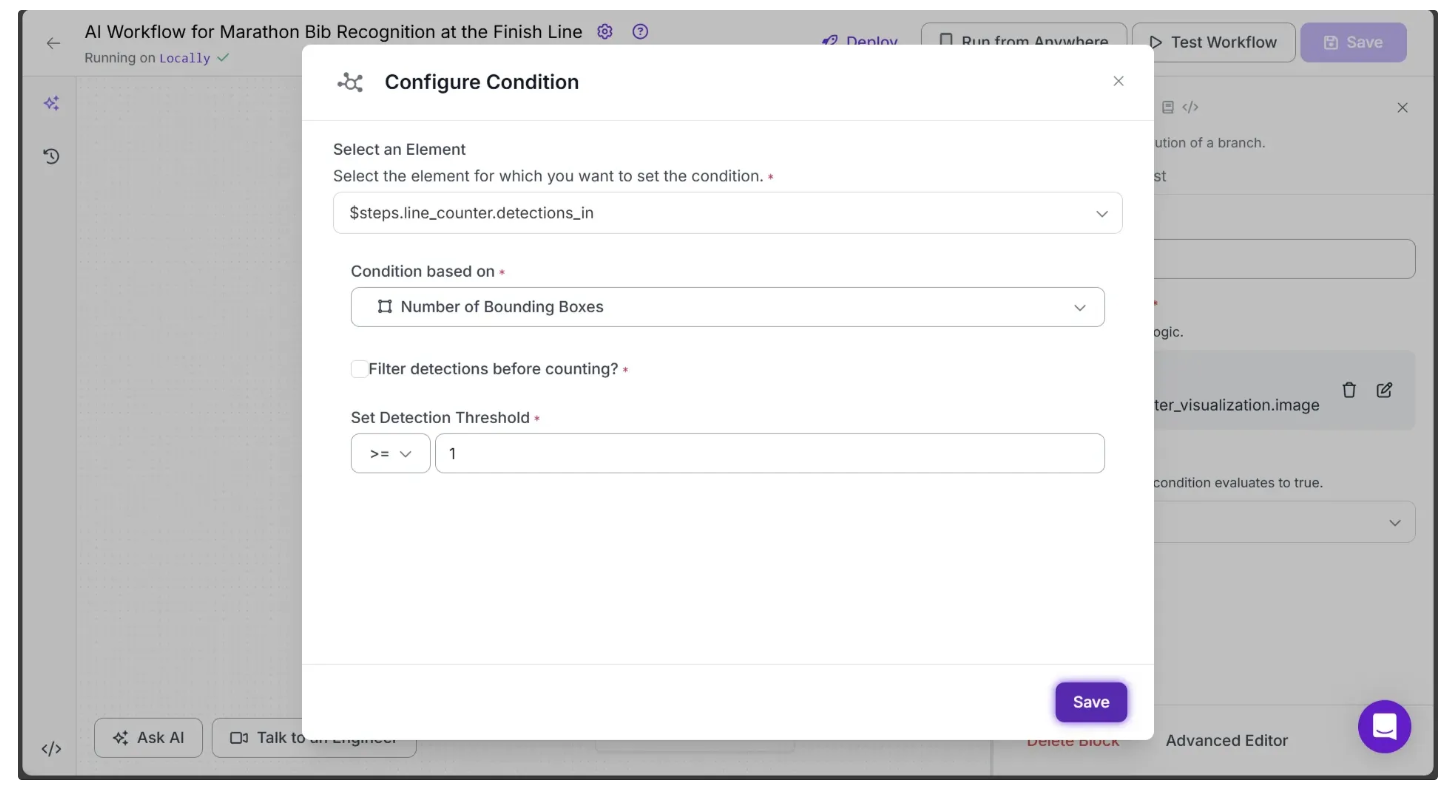
This will update your workflow to look like this:
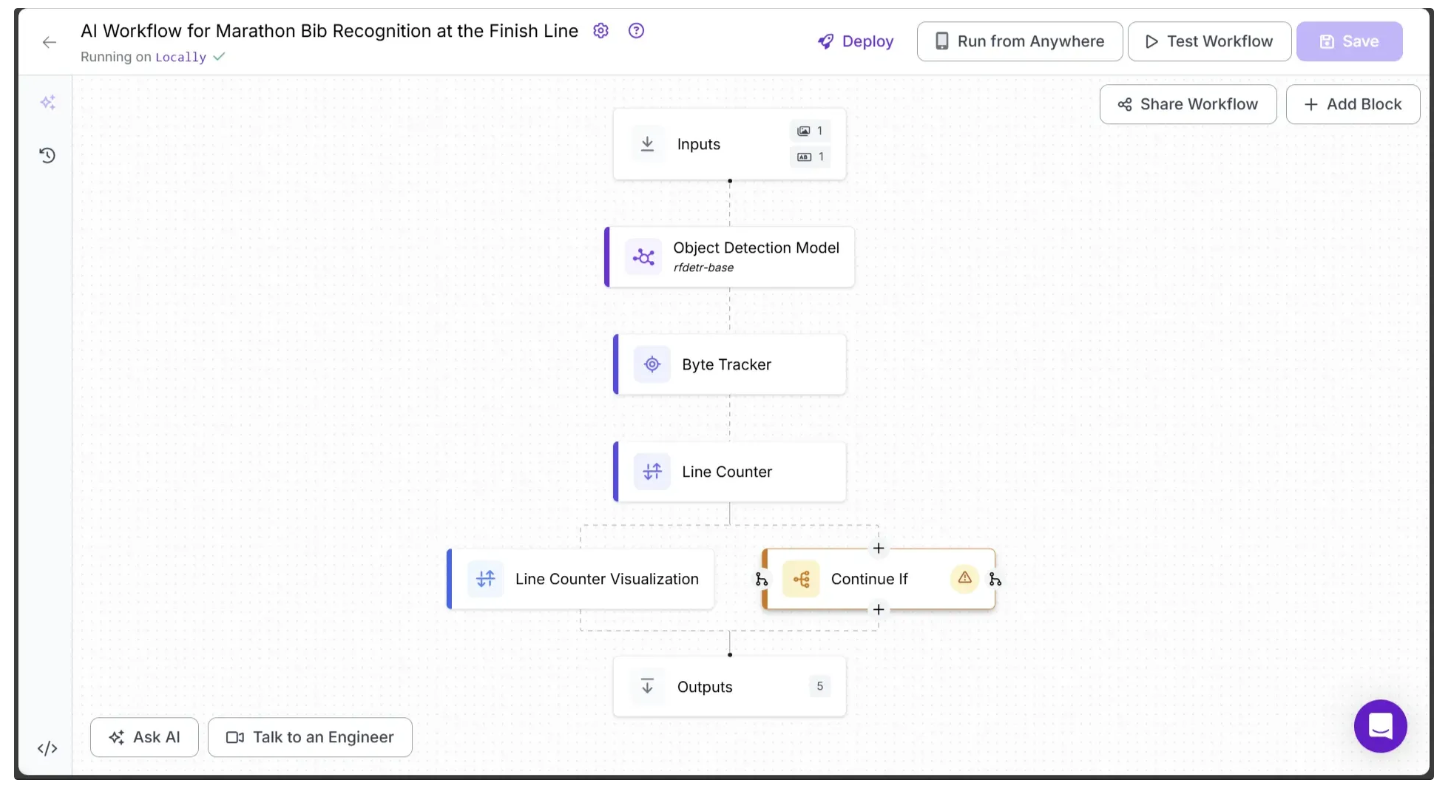
The Continue If block ensures that any video frame in which a runner crosses the line follows a different execution path.
Step 8: Crop the Runner
When the Continue If block detects that a video frame contains a runner crossing the line, we need to crop the runner from the frame to identify individual bib numbers. For this, we use the Dynamic Crop block provided by Roboflow Workflows.
To add it to your workflow, hover over the Continue If block, click the + icon that appears below, and search for “Dynamic Crop” as shown below. Then configure it as illustrated:
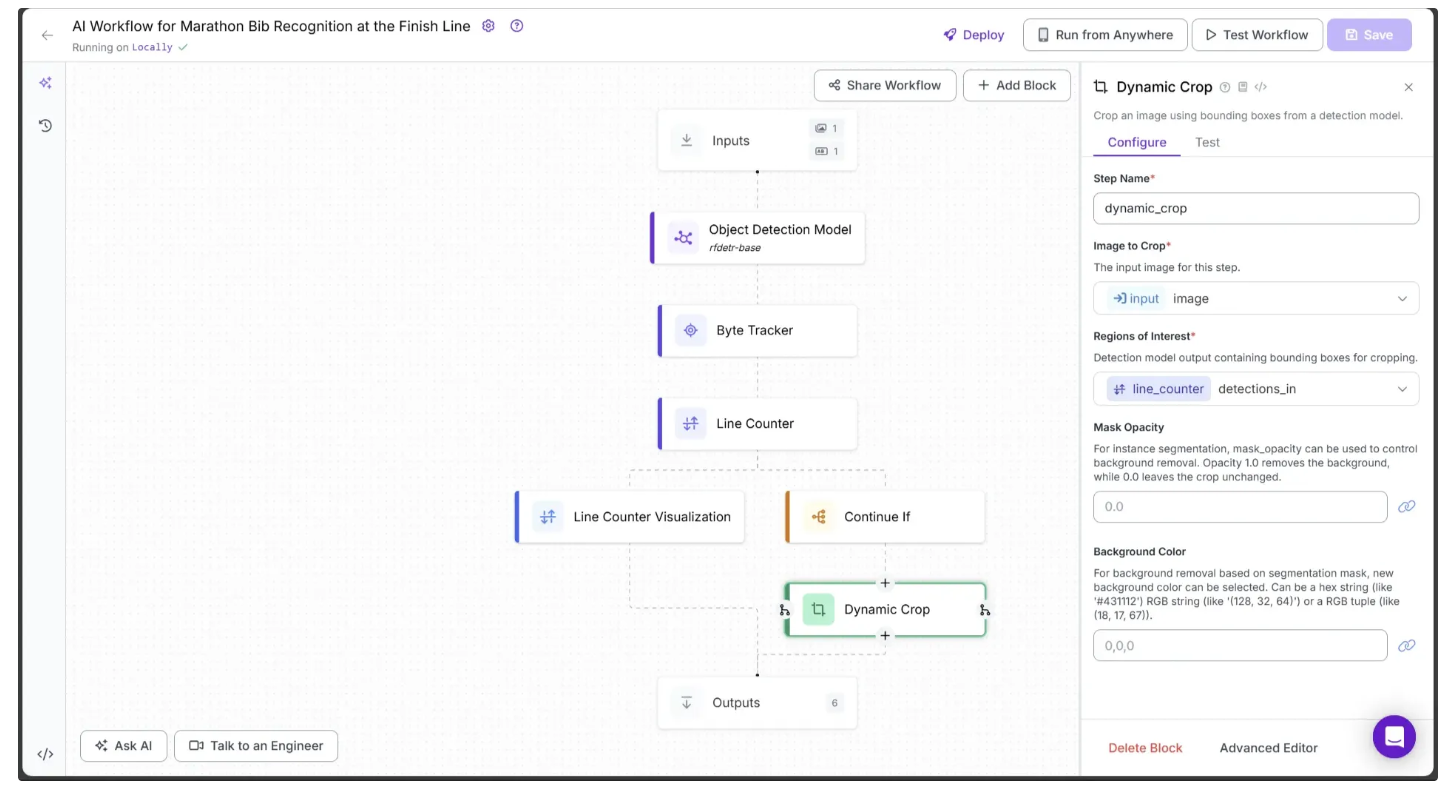
In the Dynamic Crop block, set Image to Crop to the Input’s image and Region of Interest to the detections_in from the Line Counter block.
Also, make sure the previous Continue If block points to Dynamic Crop by setting Next Steps to it, as shown below:
Step 9: Detect the Bib Number
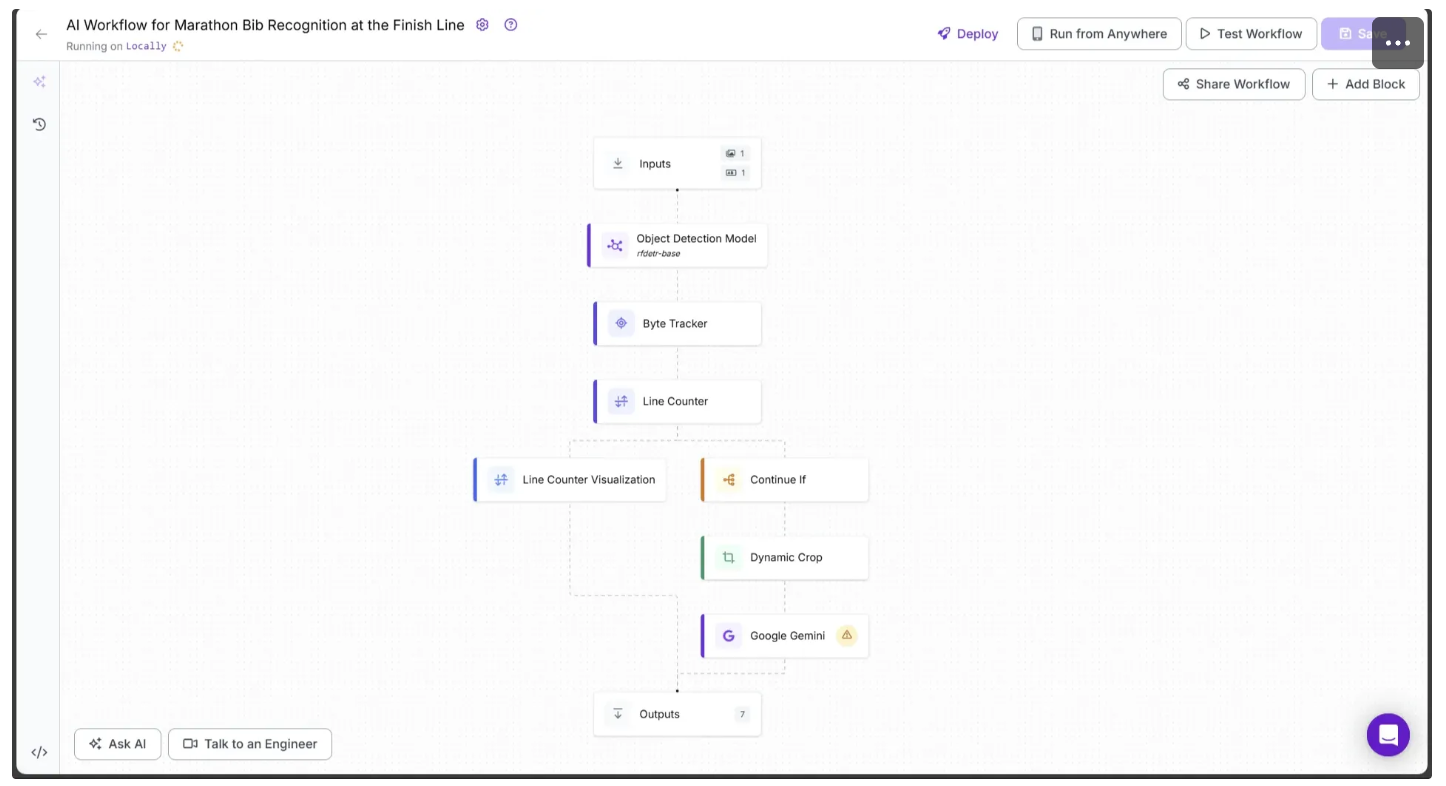
With the runner cropped from the previous step, we can run a Gemini Inference to detect the runner’s bib number. On Roboflow, Gemini is available as a vision-language model block called Google Gemini, and other vision models such as Llama-3.2 Vision and Qwen2.5-VL are also provided as workflow blocks for vision inference.
To add it to your workflow, hover over the Dynamic Crop block, click the + icon that appears below, and search for “Google Gemini” to insert it. Your workflow should now look like the one shown below:
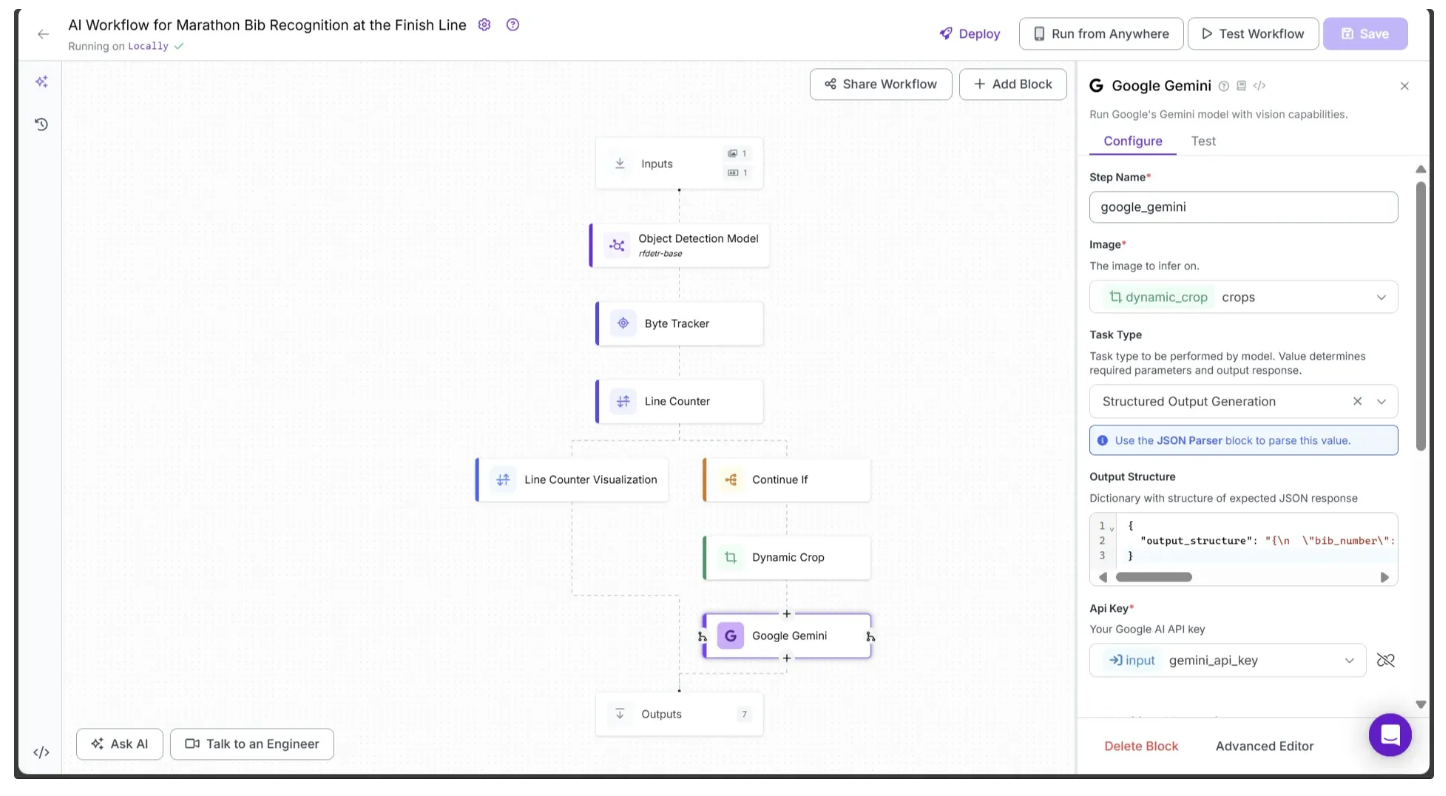
Now, configure the Google Gemini block as follows:
- Link the Image parameter to Dynamic Crop’s crops.
- Set the Task Type parameter to Structured Output Generation.
- Link the API Key parameter to Input’s gemini_api_key.
- Set the Output Structure to the JSON schema below exactly as shown:
{
  "output_structure": "{\n  \"bib_number\": {\n    \"type\": \"string\",\n    \"description\": \"The bib number of the marathon runner in the image.\"\n  }\n}"
}
The configuration should look like this:
Step 10: Parse the Raw String Outputs
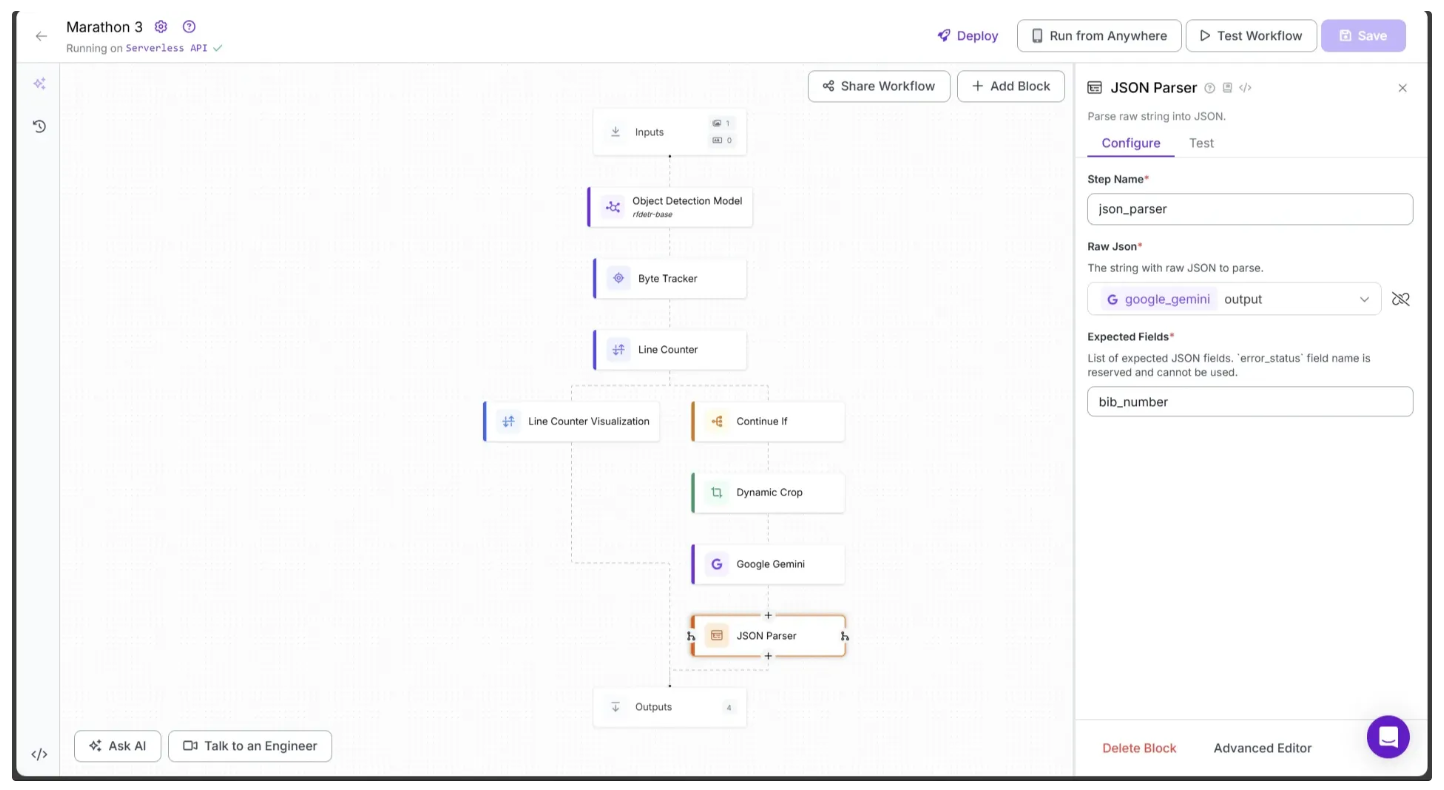
The output from the Google Gemini block is returned as a raw string, so it needs to be parsed into JSON. Roboflow provides a JSON Parser block specifically for this purpose.
To add it, hover over the Google Gemini block, click the + icon, and search for “JSON Parser” to insert it into your workflow.
Finally, configure the JSON Parser’s Expected Fields to bib_number, as shown below:
Step 11: Setup Outputs
With all the blocks added, our workflow is now complete, and we can define the desired outputs.
Begin by selecting the Outputs block. In the Configure tab, click the + Add Output button to add an output from the workflow. Remove any unnecessary outputs by clicking the 🗑️ icon, as shown below:
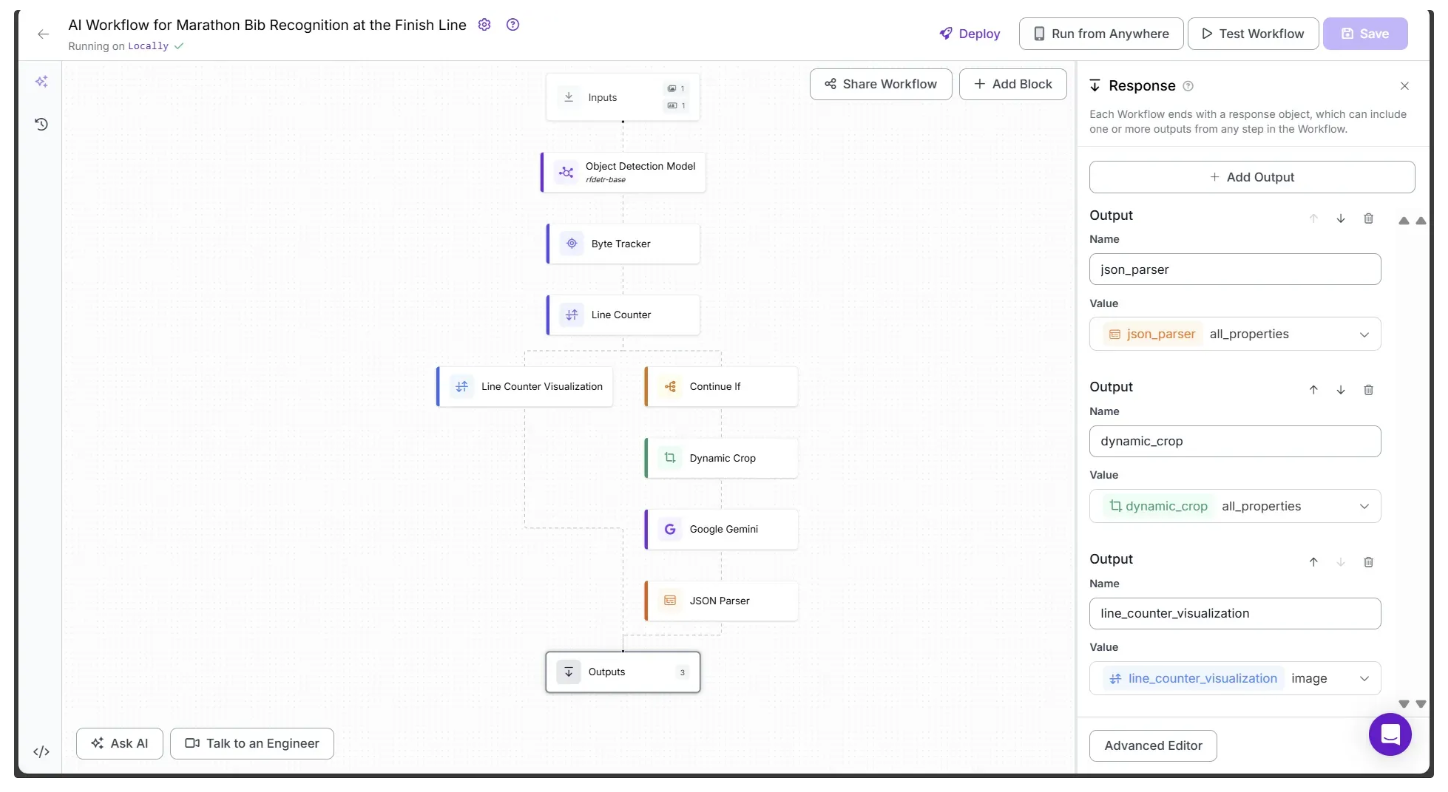
Ensure that json_parser, dynamic_crop, and line_counter_visualization are set as outputs of the workflow.
Step 12: Running the Workflow
Below is the final workflow, which takes the previously provided test marathon video as input and outputs a frame-by-frame analysis, counting each marathon runner as they appear.
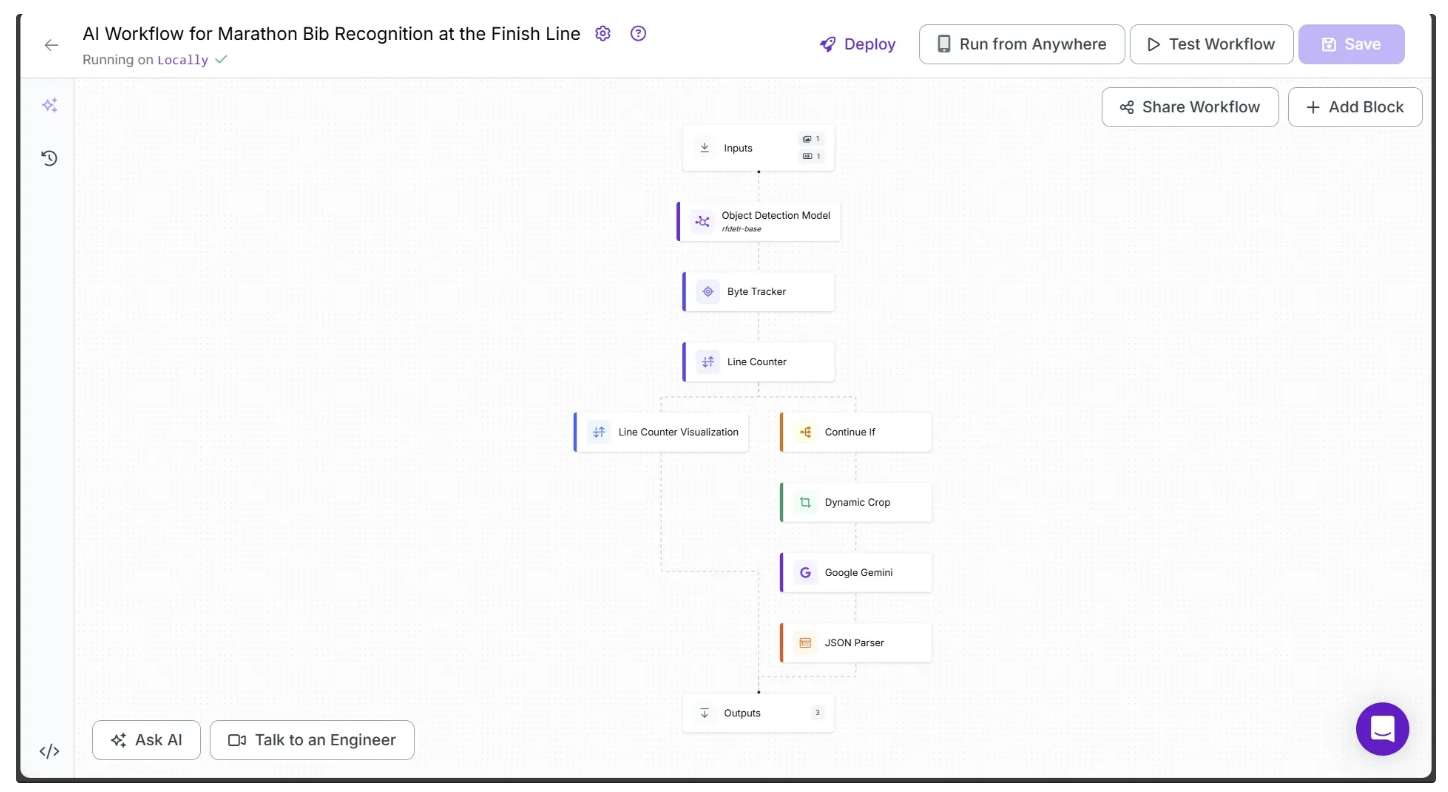
You can run the workflow via the API, command line, or other supported methods. To view the code for these execution options, click the Deploy button in the top-right corner of the workflow.
In our example, we will run the workflow using Python. Start by installing the following package in your Python environment:
pip install inferenceThen execute the below script:
# Import the InferencePipeline object
from inference import InferencePipeline
import cv2

def my_sink(result, video_frame):
    if result.get("line_counter_visualization"): # Display an image from the workflow response
        cv2.imshow("Workflow Image", result["line_counter_visualization"].numpy_image)
        cv2.waitKey(1)
    print(result) # Do something with the predictions of each frame


# Initialize a pipeline object
pipeline = InferencePipeline.init_with_workflow(
    api_key="YOUR_ROBOFLOW_API_KEY",
    workspace_name="your-blog-workspace",
    workflow_id="ai-workflow-for-marathon-bib-recognition-at-the-finish-line",
    video_reference="marathon_test.mp4", # Path to the marathon running test video provided in step 1
    max_fps=30,
    on_prediction=my_sink,
    workflows_parameters={
        "gemini_api_key": "YOUR_GOOGLE_GEMINI_API_KEY"
    }
)
pipeline.start() # Start the pipeline
pipeline.join() # Wait for the pipeline thread to finish
The following video shows what should happen when you run the script:
The workflow also outputs the following JSON schema in the console:
......
{'json_parser': [], 'dynamic_crop': [], 'line_counter_visualization': <inference.core.workflows.execution_engine.entities.base.WorkflowImageData object at 0x000001F45233FA60>}
{'json_parser': [{'bib_number': '21', 'error_status': False}], 'dynamic_crop': [{'crops': <inference.core.workflows.execution_engine.entities.base.WorkflowImageData object at 0x000001F453729750>, 'predictions': Detections(xyxy=array([[4.62951660e-01, 2.70388126e-01, 1.34738464e+02, 3.57669006e+02]]), mask=None, confidence=array([0.95722097]), class_id=array([1]), tracker_id=array([1]), data={'root_parent_id': array(['image.[0]'], dtype='<U9'), 'parent_id': array(['image.[0]'], dtype='<U9'), 'inference_id': array(['c5a35801-5b28-44ba-900c-5b13d52bca1b'], dtype='<U36'), 'image_dimensions': array([[360, 640]]), 'prediction_type': array(['object-detection'], dtype='<U16'), 'parent_coordinates': array([[0, 0]]), 'root_parent_dimensions': array([[360, 640]]), 'parent_dimensions': array([[360, 640]]), 'detection_id': array(['2f89de2f-3806-4e7b-84c0-0df5aaccf300'], dtype='<U36'), 'class_name': array(['person'], dtype='<U6'), 'root_parent_coordinates': array([[0, 0]])}, metadata={})}], 'line_counter_visualization': <inference.core.workflows.execution_engine.entities.base.WorkflowImageData object at 0x000001F45233FEB0>}
{'json_parser': [], 'dynamic_crop': [], 'line_counter_visualization': <inference.core.workflows.execution_engine.entities.base.WorkflowImageData object at 0x000001F45372B8E0>}
{'json_parser': [], 'dynamic_crop': [], 'line_counter_visualization': <inference.core.workflows.execution_engine.entities.base.WorkflowImageData object at 0x000001F4537288B0>}
......
Each line of the output corresponds to a video frame. For frames where a runner crosses the line, the outputs for json_parser and dynamic_crop contain data; otherwise, they remain empty lists.
Stage Two: Capturing Time and Photographs of Marathon Runners
We can now use the workflow outputs to record each runner’s time and capture a photograph of the exact moment they cross the line. The runner’s time is visualized directly on the video, and the photograph is saved to a local directory.
Step 1: Disable the Line Counter In-Out Visualization
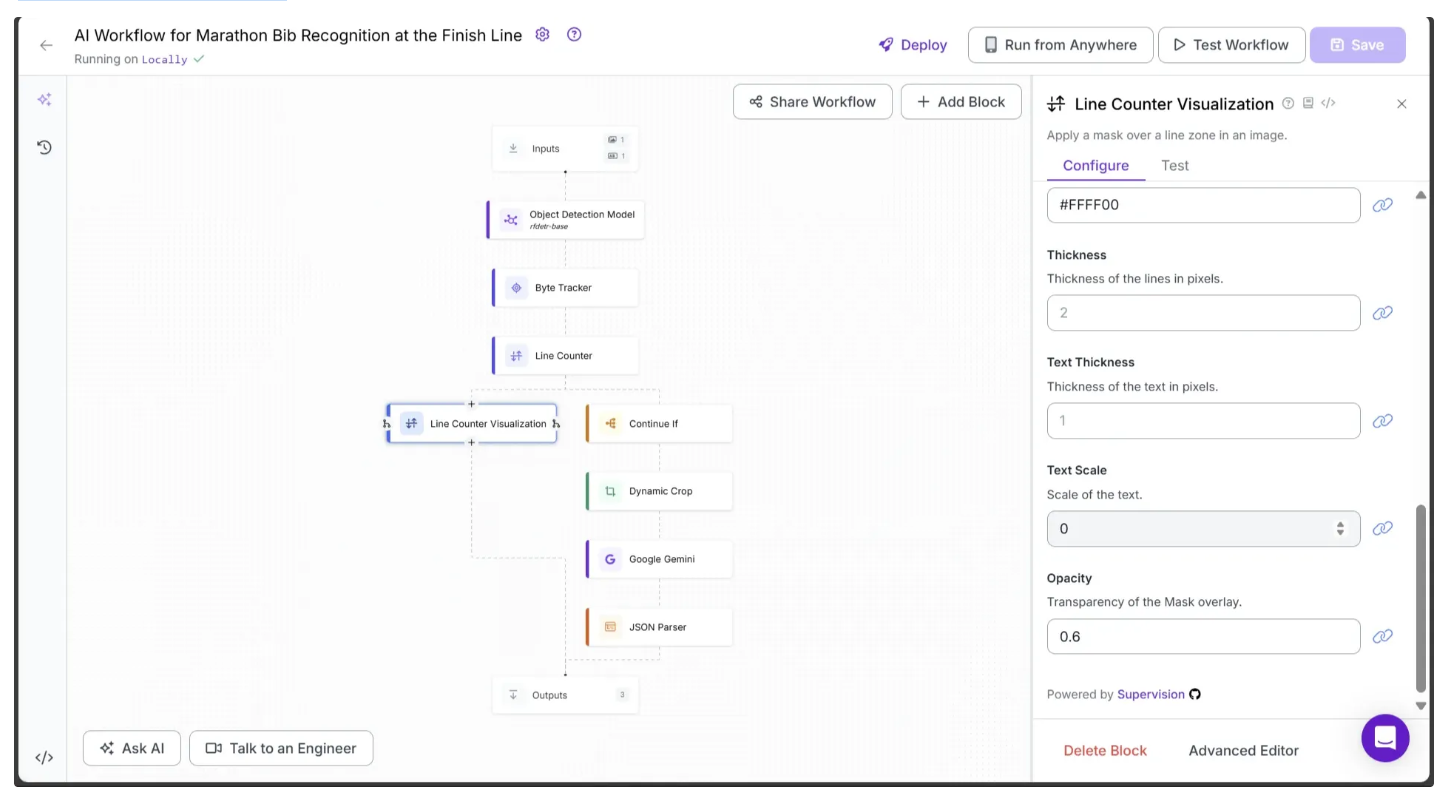
First, disable the Line Counter Visualization In-Out display, as we will be adding our own visualizations. To do this, click the Line Counter Visualization block and set Text Scale to 0 in the Configure tab.
Step 2: Visualizing Runner Finish-Line Timings
We can now use the workflow outputs to generate a new video that records each runner’s exact finish-line timing. To do this, create a new script containing all of the code blocks below:
Create Directories to store marathon photography
The code below creates three folders: one for saving video frames of the runner at the exact moment they cross the line, another for storing the same frames cropped to include only the runner, and a third temporary folder for line visualization frames, which will be used to display the timing visually.
from inference import InferencePipeline
import cv2
import shutil
import os

finish_line_photos_dir = "finish_line_photos"
dynamic_crops_dir = "dynamic_crops"
temp_line_vis_dir = "line_counter_vis"

dirs = [finish_line_photos_dir, dynamic_crops_dir, temp_line_vis_dir]

# Clear existing directories and recreate them
for d in dirs:
    if os.path.exists(d):
        shutil.rmtree(d)
    os.makedirs(d)
Extract Video FPS
To calculate the precise moment a runner crosses the finish line, we use the video’s FPS. The function below determines the FPS of the video:
def get_fps(video_path: str) -> float:
    """
    Return frames per second (FPS) of a video.
    """
    cap = cv2.VideoCapture(video_path)
    fps = cap.get(cv2.CAP_PROP_FPS)
    cap.release()
    return fps

video_file = "marathon_test.mp4" # Path to the marathon running test video provided in step 1
fps = get_fps(video_file)
Workflow Inference
Similar to Stage One, we can run inference on a video using the workflow shown below. The only difference is the sink function, which we have updated from the previous stage as follows:
def frame_to_time_str(frame_number: int, fps: float) -> str:
    """
    Convert a frame index into a timestamp string (HH:MM:SS)
    """
    total_seconds = int(frame_number / fps)
    hours = total_seconds // 3600
    minutes = (total_seconds % 3600) // 60
    seconds = total_seconds % 60
    return f"{hours:02d}:{minutes:02d}:{seconds:02d}"

def draw_text(img, text, pos, font, scale, color, thickness):
    """
    Draw text with an outline on an image.
    """
    cv2.putText(img, text, pos, font, scale, (0, 0, 0), thickness + 2, cv2.LINE_AA)  # Outline
    cv2.putText(img, text, pos, font, scale, color, thickness, cv2.LINE_AA)          # Text


def my_sink(result, video_frame):
    global frame_counter
    global crossed_bibs

    # Extract inference outputs
    dynamic_crop = result.get("dynamic_crop")
    gemini_result = result.get("json_parser")
    line_counter_vis = result.get("line_counter_visualization")
    cache_set = result.get("cache_set")

    # Handle frames with detected runners at the finish line
    if dynamic_crop and gemini_result:
        # Save cropped images of runners crossing the finish line
        for i, item in enumerate(dynamic_crop, start=1):
            img = item["crops"].numpy_image
            cv2.imwrite(f"{dynamic_crops_dir}/frame_{frame_counter:04d}_crop_{i:02d}.png", img)

        # Log detected bib numbers with their corresponding finish times
        for bib in gemini_result:
            time_str = frame_to_time_str(frame_counter, fps)
            crossed_bibs.append({"bib_number": bib["bib_number"], "time_str": time_str})

        # Save the snapshot of the finish line for this frame
        cv2.imwrite(f"{finish_line_photos_dir}/frame_{frame_counter:04d}.png", line_counter_vis.numpy_image)

    # Add overlay text showing runners who have crossed the line
    if line_counter_vis:
        img = line_counter_vis.numpy_image
        x, y = 10, 30
        line_gap = 30
        font = cv2.FONT_HERSHEY_SIMPLEX
        font_scale = 0.7
        thickness = 1

        lines = []

        if not crossed_bibs:
            lines.append("No runner has crossed the line.")
        else:
            for bib_info in crossed_bibs:
                lines.append(f"Runner {bib_info['bib_number']} completed at {bib_info['time_str']}.")

        for line_text in lines:
            draw_text(img, line_text, (x, y), font, font_scale, (255, 255, 255), thickness)
            y += line_gap

        # Save the visualization frame with overlays
        cv2.imwrite(f"{temp_line_vis_dir}/frame_{frame_counter:04d}.png", img)

    frame_counter += 1


# Global variables
frame_counter = 0               # Keeps track of current frame index
crossed_bibs = []               # Stores bib numbers with finish times

# Initialize and start the inference pipeline
pipeline = InferencePipeline.init_with_workflow(
    api_key="YOUR_ROBOFLOW_API_KEY",
    workspace_name="your-blog-workspace",
    workflow_id="ai-workflow-for-marathon-bib-recognition-at-the-finish-line",
    video_reference=video_file,
    max_fps=30,
    on_prediction=my_sink,
    workflows_parameters={
        "gemini_api_key": "YOUR_GOOGLE_GEMINI_API_KEY"
    }
)

pipeline.start()
pipeline.join()
The sink now uses the workflow outputs to record the runner’s timing directly onto each line visualization frame. It calculates the timing with the frame_to_time_str function, which uses the video’s FPS and the current frame number being processed by the sink.
Combine Visualization Frames to Video
We now combine all the line visualization frames, with each runner’s completion time recorded, into a single video using the following code:
# Combine processed frames into final output video
output_video_path = "marathon_timed.mp4"

frame_files = sorted(os.listdir(temp_line_vis_dir))
first_img = cv2.imread(os.path.join(temp_line_vis_dir, frame_files[0]))
height, width = first_img.shape[:2]

fourcc = cv2.VideoWriter_fourcc(*"mp4v")
out = cv2.VideoWriter(output_video_path, fourcc, fps, (width, height))

for fname in frame_files:
    img = cv2.imread(os.path.join(temp_line_vis_dir, fname))
    img = cv2.resize(img, (width, height))
    out.write(img)

out.release()

# Cleanup temporary visualization frames
shutil.rmtree(temp_line_vis_dir)
Step 3: Exploring the Outputs
Now run the script. The final output, marathon_test.mp4, displays the exact timing of each runner as they cross the finish line:
Alongside the video, in the finish_line_photos folder created by the script above, you can find images of the runners at the exact moment they cross the line:

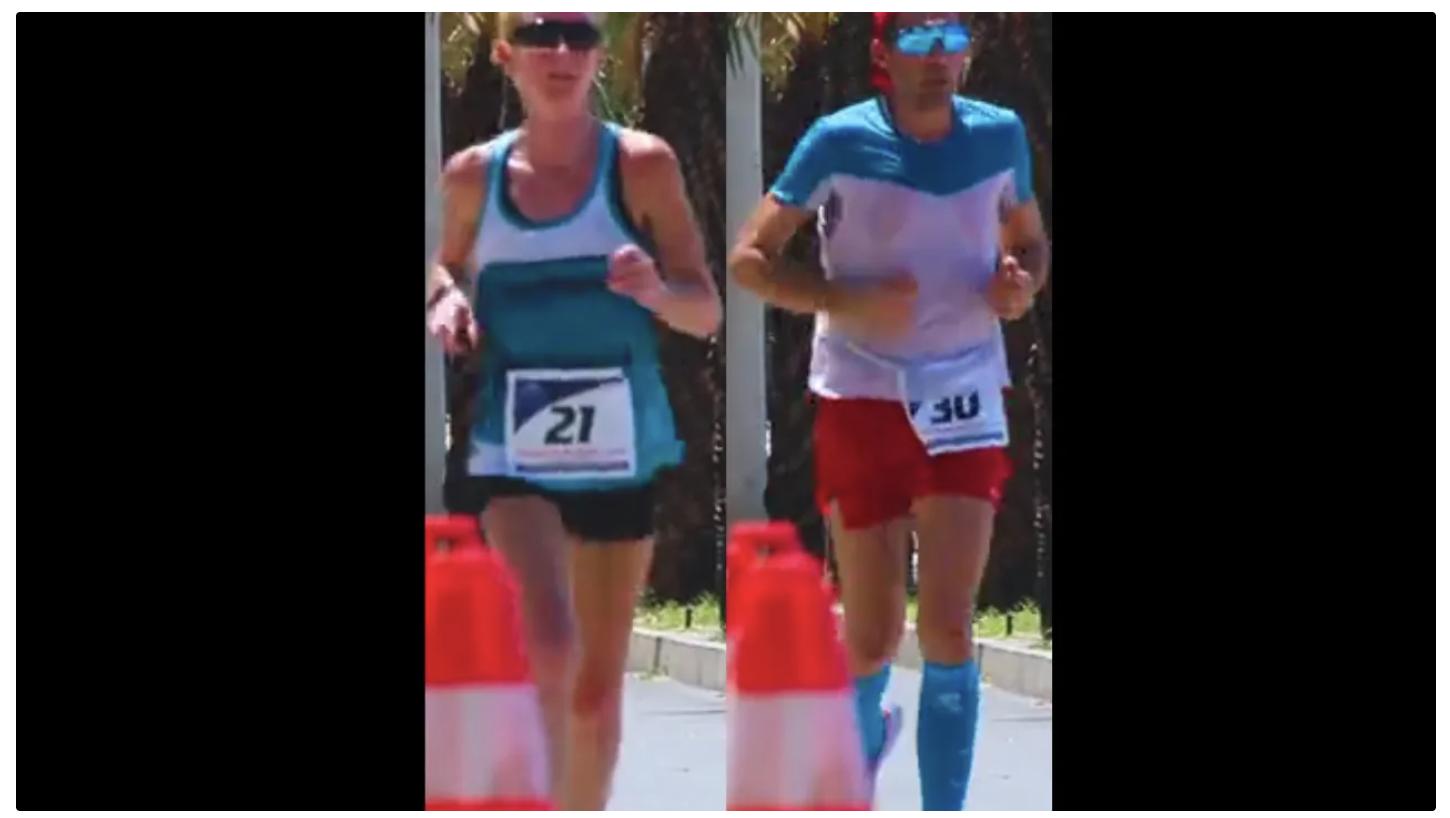
Meanwhile, the dynamic_crops folder contains cropped images of the runners at the exact moment they cross the finish line:
Use Cases of Marathon Bib Tracking
- Accurate Runner Timing: Automatically record the exact time each runner crosses checkpoints and the finish line.
- Race Results Automation: Generate official race results without manual entry, reducing human error.
- Live Tracking & Broadcasts: Provide real-time updates of runner positions for spectators and online streaming.
- Performance Analysis: Analyze split times, pacing, and runner performance across different sections of the course.
- Race Photography & Media: Automatically tag runners in photos and videos for easy access and distribution.
Marathon Bib Recognition With Computer Vision For Timing and Photography
Automating marathon bib recognition revolutionizes how race organizers, broadcasters, and analysts capture and utilize runner data.
Furthermore, Roboflow Workflows provides built-in blocks with advanced computer vision capabilities, such as object detection, line counter, visualizations, and more, which help streamline the development of our solution to detect runners, record their finish-line times, and capture photographs, saving significant time and effort in the process.
To learn more about building with Roboflow Workflows, check out the Workflows launch guide.
Written by Dikshant Shah
Cite this Post
Use the following entry to cite this post in your research:
Contributing Writer. (Aug 28, 2025). Automate Marathon Bib Number Recognition with Computer Vision. Roboflow Blog: https://blog.roboflow.com/automated-marathon-bib-recognition/
