
Promptable object detection lets you detect objects from a text prompt with no dataset and no training: in Roboflow Workflows, add a SAM 3 block, type a class like "soda can," and it returns boxes and masks for every match so you can count them instantly. Use it to prototype and validate an idea fast, then run SAM 3 across more images to auto-label a dataset and train an RF-DETR model for faster, cheaper, higher-accuracy production inference.
Building a traditional object detection model usually means collecting images, annotating data, and training a model before you can even see your first results. While this approach works well, it's not always the fastest way to test a new idea or prototype a computer vision application.
Promptable object detection offers a different approach. Instead of training a model on a fixed set of classes, you simply describe the object you want to detect with a text prompt and start testing immediately.
In this guide, we'll build a promptable object detection workflow in Roboflow that counts "soda cans on a retail shelf" using Meta's SAM 3 model. Along the way, we'll look at how promptable object detection works, when it's the right choice, how to improve your results by refining prompts, and how to transition to a trained model like RF-DETR when you're ready to deploy at scale.
What Is Promtable Object Detection?
Promptable object detection allows you to detect objects by describing them with a text prompt instead of training a model on a predefined set of classes. For example, rather than collecting and annotating a dataset of soda cans, you can simply provide the prompt "soda can" and begin detecting cans immediately.
Unlike traditional object detectors, promptable models don't require a custom dataset or a training run before you can start experimenting. This makes them well suited for rapidly prototyping ideas, exploring long-tail or niche object classes, and validating a computer vision application before investing time in training a dedicated model.
Promptable object detection is one application of open-vocabulary object detection, where models can detect objects beyond a fixed list of training classes using natural language. In this tutorial, we'll use SAM 3 to build a promptable object detection workflow that counts soda cans on a retail shelf. We'll also touch on Promptable Concept Segmentation and discuss when promptable models are the right choice for a project.
When to Use Promptable Object Detection (and When Not To)
Promptable object detection is a great choice when you want to quickly prototype a computer vision application without first collecting and annotating a dataset. It's particularly useful for exploring new ideas, detecting rare or long-tail objects, and validating whether a project is worth investing more time into.
That said, promptable models aren't always the best choice for production deployments. If your application needs to detect the same set of objects repeatedly, a fine-tuned model will typically provide faster inference, lower costs, and higher accuracy. Promptable object detection is best viewed as a way to get from idea to working prototype quickly. Once your application is proven, you can use those results to create a labeled dataset and train a dedicated model for production.
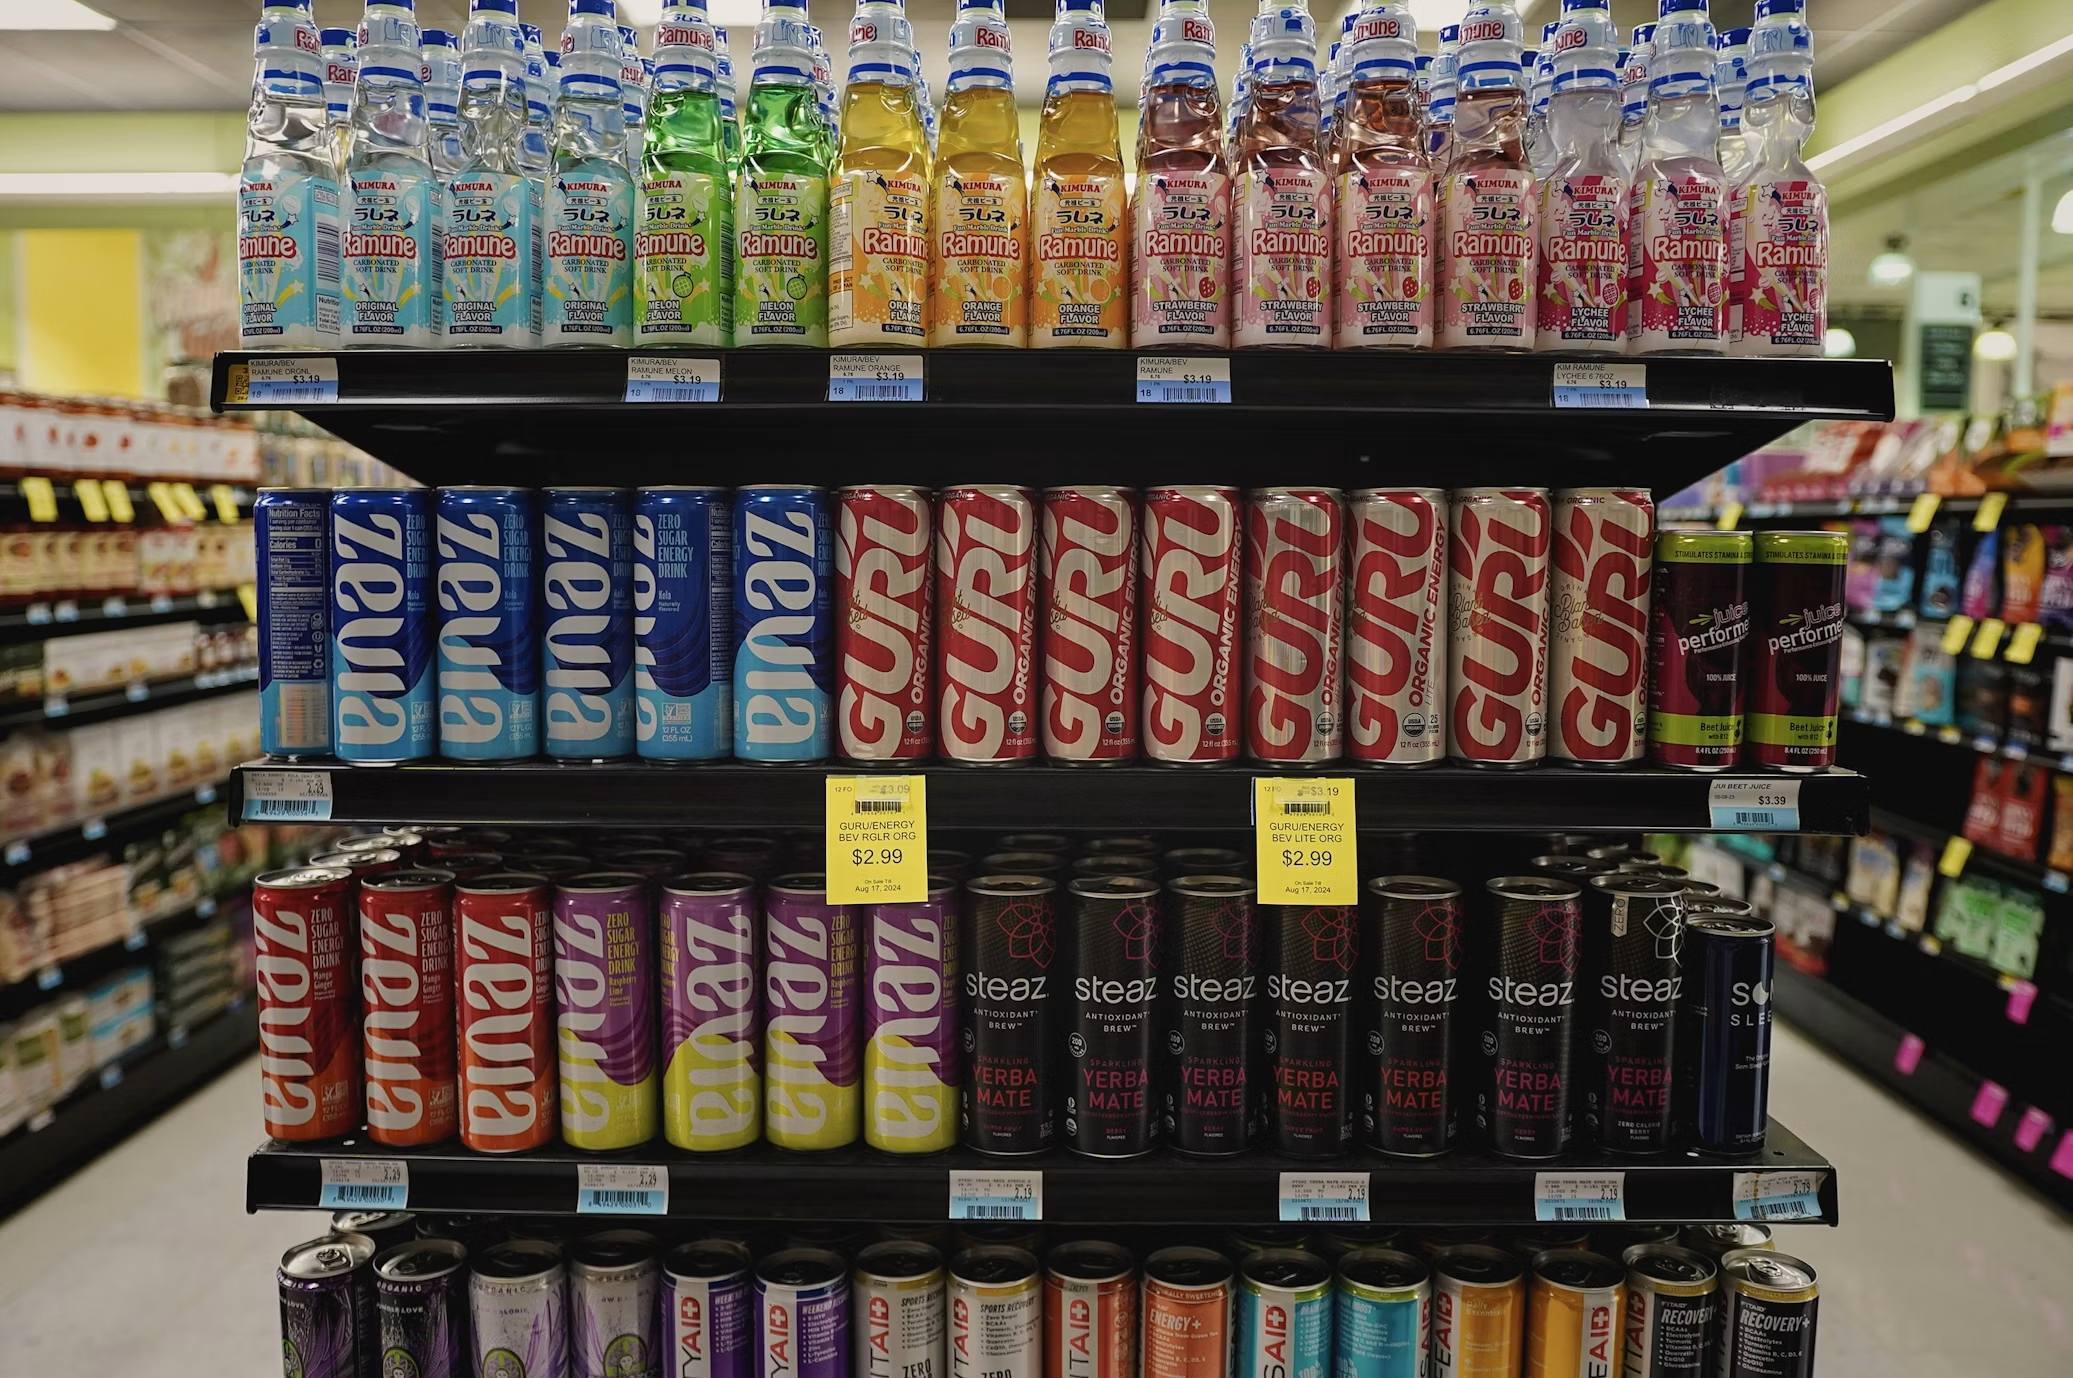
The Promptable Object Detection Project: Counting Soda Cans on a Retail Shelf
To see how this works in practice, we'll build a workflow that detects and counts soda cans on a retail shelf using the prompt "soda can." While we'll focus on this example throughout the guide, the same workflow can easily be adapted to other use cases by simply changing the prompt, whether that's detecting pallets in a warehouse, PPE on a construction site, or vehicles in a parking lot.
Roboflow Rapid offers another way to tackle this use case. Instead of manually building a workflow, you can upload a small set of images, provide a text description of the object you want to detect, and Rapid will generate a promptable detection endpoint for you. In this guide, however, we'll build the workflow directly in Roboflow Workflows to give us more control over the detection, counting logic, and visualization.
Picking a Promptable Model
Before building the workflow, you'll need to choose a promptable vision model. Roboflow Workflows supports several models capable of detecting objects from text prompts, each with different strengths depending on the application.
For this tutorial, we'll use SAM 3, which supports both text-prompted detection and segmentation through Promptable Concept Segmentation. Given a class name such as "soda can," SAM 3 identifies every matching object in the image and returns both a segmentation mask and a corresponding bounding box. This allows you to begin detecting objects without collecting a labeled dataset or training a dedicated model.
Although we'll use SAM 3 throughout this guide, it's not the only option. Other open-vocabulary models, such as YOLO-World, are also available and may provide faster inference depending on your application. For this workflow, however, SAM 3 offers an excellent balance of flexibility, segmentation capabilities, and detection quality.
Building the Promptable Object Detection Workflow with Roboflow
Now that we've covered the basics of promptable object detection, let's build a workflow that detects and counts soda cans on a retail shelf. We'll use Roboflow Workflows to create a pipeline that takes an input image, detects every soda can using a text prompt, counts the detections, and overlays the results on the image. By the end of this section, you'll have a complete workflow that can be tested locally in Roboflow before deploying it with just a few lines of code.
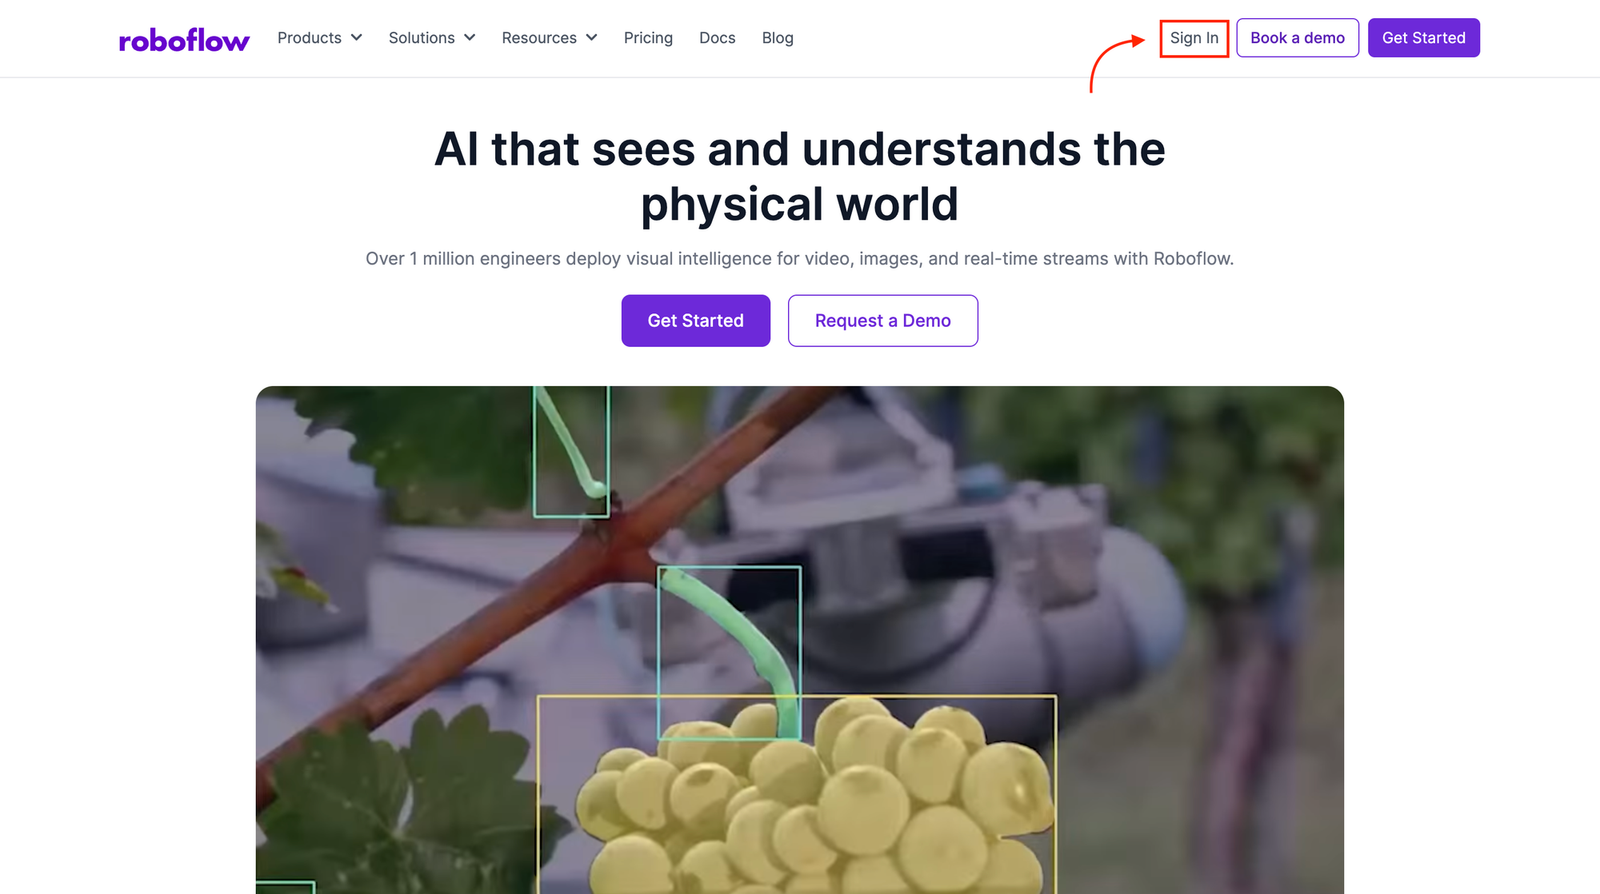
Step 1: Log in to Roboflow
Start by signing in to your Roboflow account. If you don't already have one, you can create a free account in just a few minutes. Once you're signed in, make sure you have a workspace available, as this is where you'll create and manage your workflows.
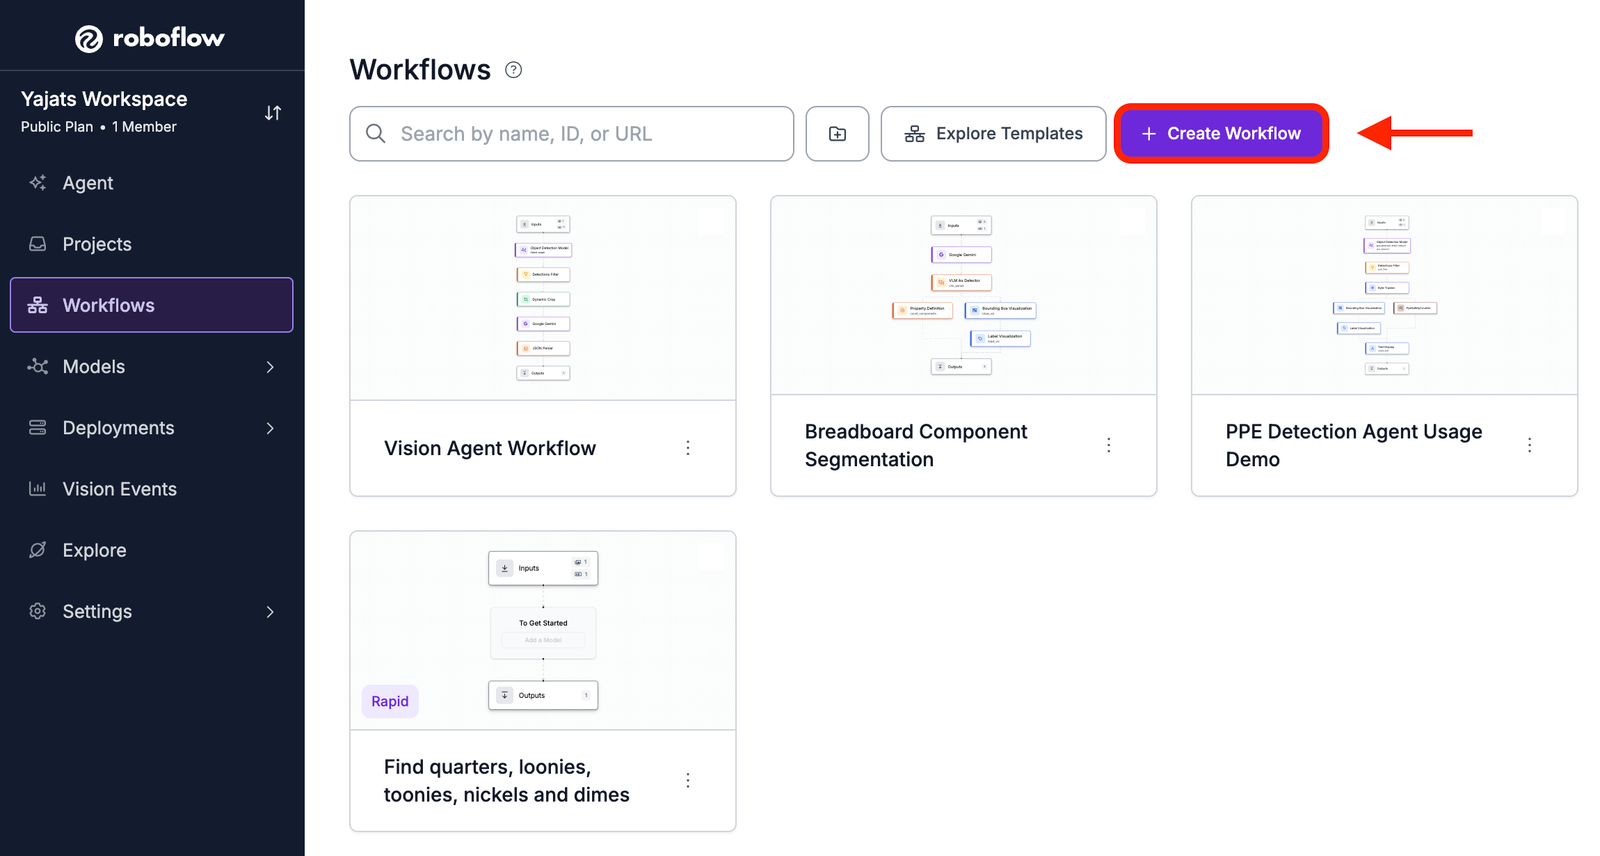
Step 2: Create a New Workflow
From the left-hand navigation menu, select Workflows, then click Create Workflow.
Roboflow Workflows uses a visual, drag-and-drop interface where you can connect different blocks to build your application. In this tutorial, we'll create a workflow that takes an input image, detects soda cans using a prompt, counts the detections, and visualizes the results before returning the final annotated image.
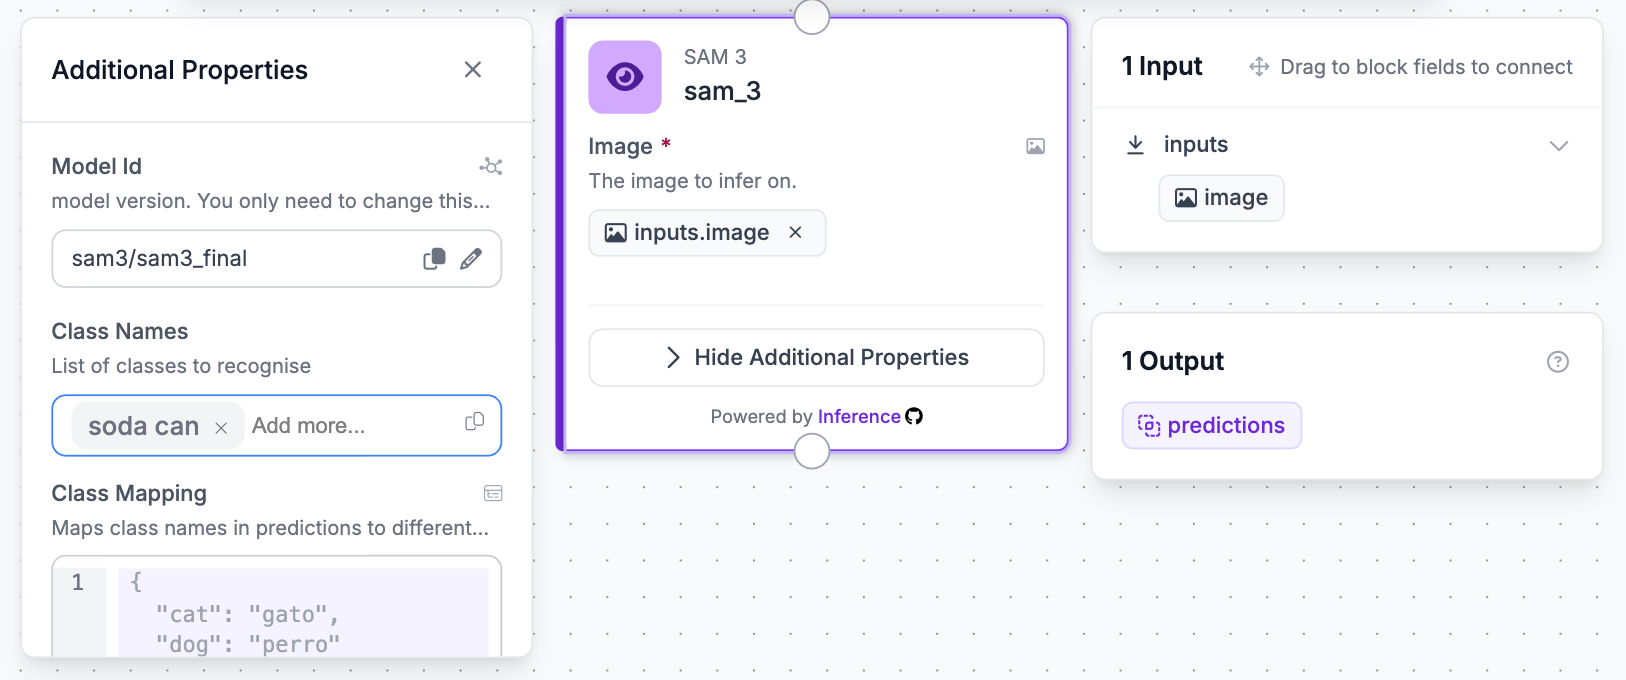
Step 3: Add the SAM 3 Block
Now that the workflow has been created, it's time to add the model that will perform the object detection. Click Add Block, search for SAM 3, and connect it to the Inputs block.
Once the block has been added, click on it to open its configuration panel. Click on Additional Properties to expand it. In the current version of Roboflow Workflows, prompts are entered as class names, so enter "soda can" as the class name. This tells SAM 3 which object to look for in the image.
If you scroll down within the Additional Properties section, you'll find the Confidence Threshold setting. This determines how confident the model must be before returning a detection. For this example, a value between 0.4 and 0.5 works well, since it strikes a good balance between detecting partially visible soda cans and filtering out low-confidence predictions. Depending on your images, you may find that a slightly higher or lower threshold produces better results.
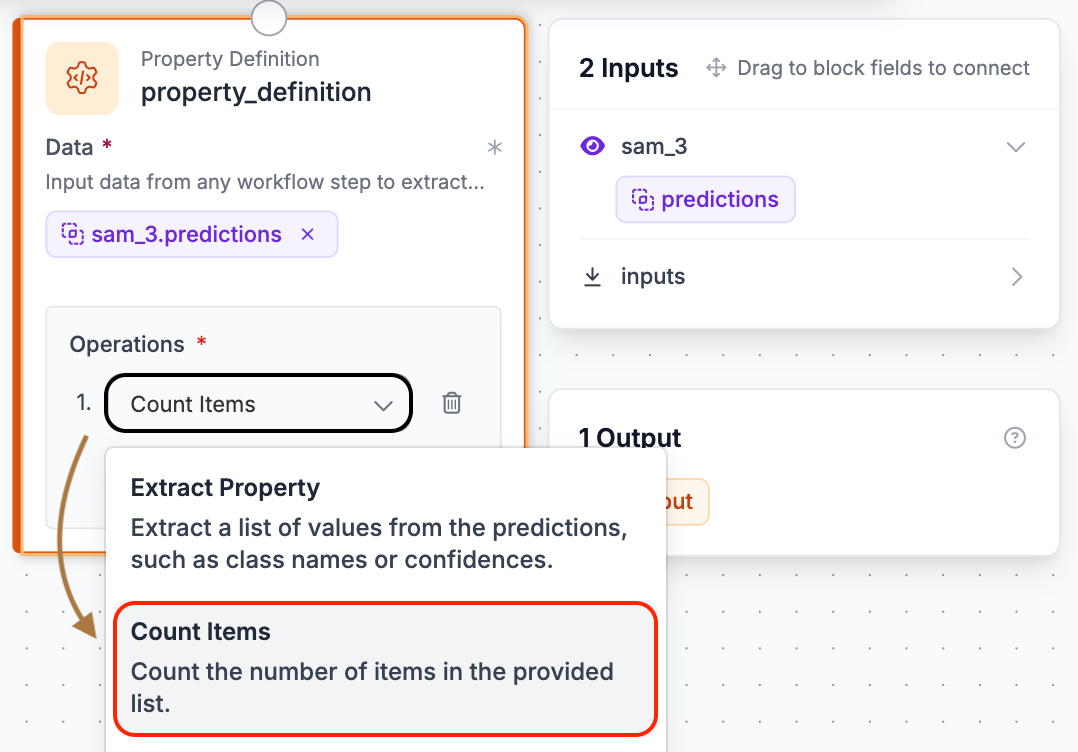
Step 4: Add a Property Definition Block
At this point, the workflow can successfully detect soda cans, but the detections are still returned as a list of individual objects. Since our goal is to count the total number of cans, we'll need to convert those detections into a single value.
Add a Property Definition block and connect it to the output of the SAM 3 block. Configure the operation to Count Items, which automatically counts the number of detections returned by the previous step. We'll use this value later in the workflow to display the total number of detected soda cans on the final image.
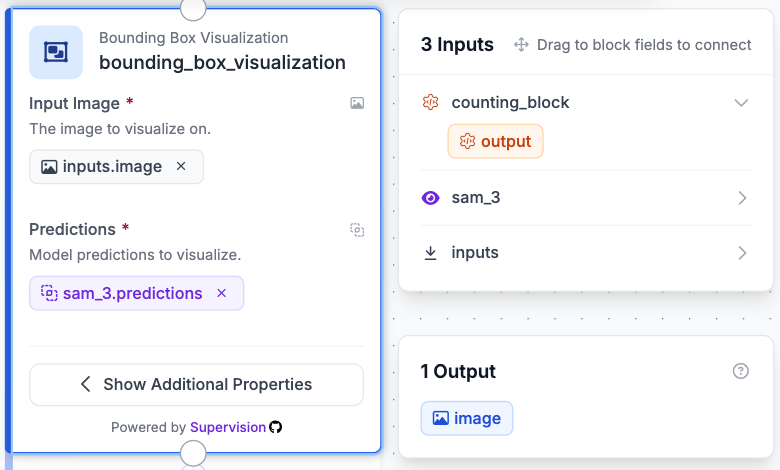
Step 5: Add a Bounding Box Visualization Block
The workflow can now detect and count soda cans, but the detections are still returned as raw prediction data. To make it easier to verify that the model is detecting the correct objects, we'll visualize each detection on the input image.
Add a Bounding Box Visualization block and connect it to the Property Definition block. This block draws a bounding box around every detected soda can, making it easy to confirm that the detections align with the correct products on the shelf.
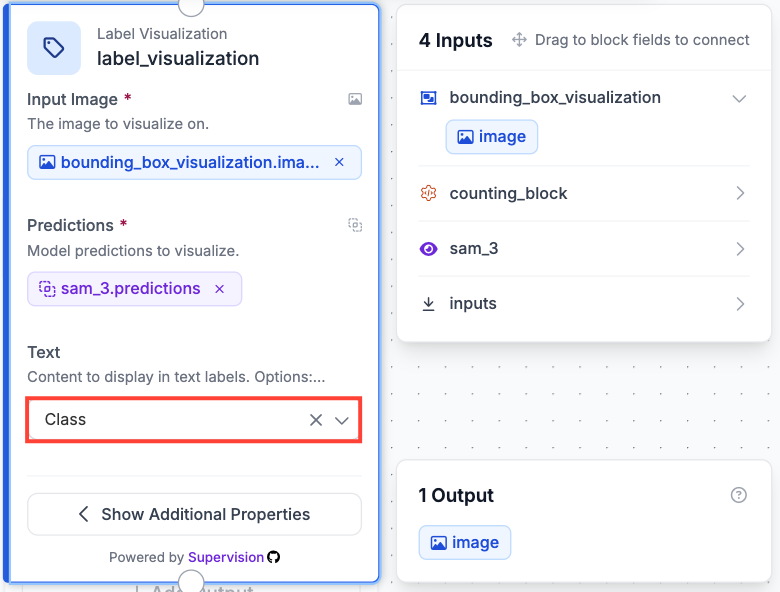
Step 6: Add a Label Visualization Block
Next, click Add Block and search for Label Visualization. Connect it to the Bounding Box Visualization block. This block displays the class name/confidence score for each detection. Under the Text dropdown, select Class.
Although this workflow only detects a single object class, labels are still useful because they provide additional confidence that the model is identifying the correct objects. They become even more valuable when working with multiple classes in the same workflow.
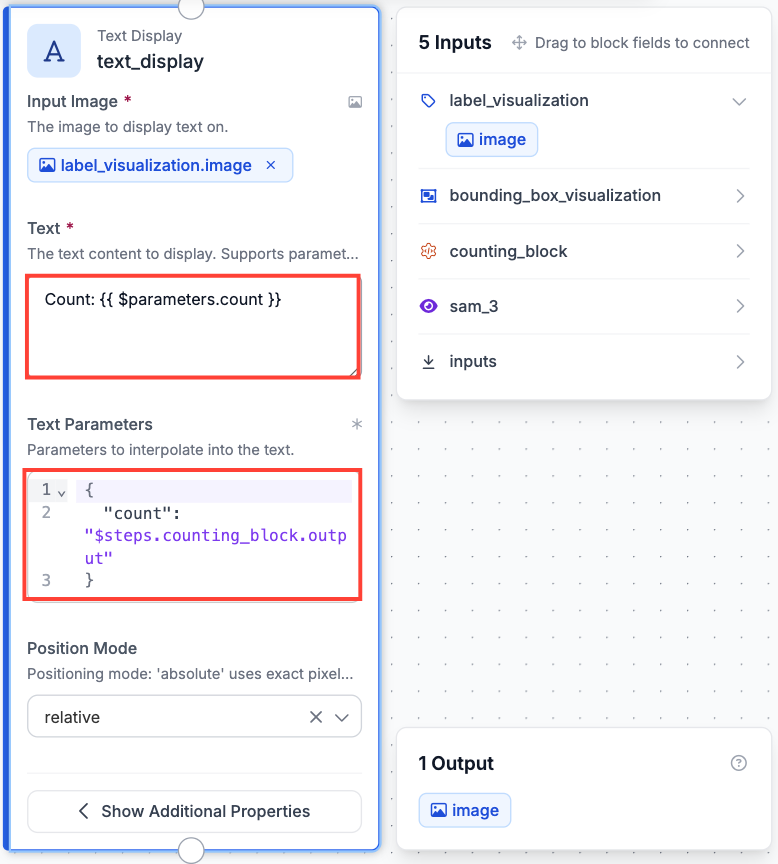
Step 7: Add a Text Display Block
The final step is to display the total number of detected soda cans on the output image. To do this, add a Text Display block and connect it to the Label Visualization block.
Click on the block to open its configuration panel. In the Text field, enter the following:
Count: {{ $parameters.count }}. Then, in the Text Parameters section, enter the following:
{
  "count": "$steps.counting_block.output"
}
This maps the count parameter in the text to the output of the Property Definition block, named counting_block in this workflow. Configuring the Text Display block this way overlays the total count directly onto the image, allowing the workflow to return both the detections and the final count in a single annotated result.
Step 8: Test the Workflow
With the workflow complete, it's time to see it in action. Click the Test icon in the top-right corner of the editor and upload an image of a retail shelf stocked with soda cans.
As the workflow runs, you should see bounding boxes appear around each detected soda can, along with labels and the total count displayed on the image. This is a good opportunity to confirm that the workflow is detecting the correct objects before moving on to deployment. If any cans are missed or incorrect detections appear, you can go back and adjust the prompt or confidence threshold before testing again.
Want to compare your workflow with the finished version? You can open the completed workflow used throughout this tutorial and copy it to your own workspace here: Open the completed workflow.
Testing and Refining The Prompt
One of the biggest advantages of promptable object detection is how easy it is to experiment with different prompts. Before deploying your workflow, it's worth trying a few variations to see how they affect the results.
For example, try changing the prompt from "soda can" to simply "soda." Because "soda" is much broader, SAM 3 may detect objects that aren't actually soda cans, leading to extra detections and a less accurate count. Switching back to "soda can" gives the model a much clearer description of what you're looking for, resulting in more accurate detections.
It's also possible to go too far in the other direction. A prompt like "red soda can" may be too restrictive, causing the model to miss soda cans that don't match that exact description. In many cases, you'll get the best results by describing the object clearly without adding unnecessary details.
Finding the right prompt usually only takes a few quick tests, but it can make a noticeable difference in the quality of your detections.
Deploying the Workflow
Once you're happy with how the workflow performs, it's time to deploy it. Deploying a workflow allows you to run it outside the Roboflow editor, making it easy to integrate into your own applications.
From the workflow editor, click Deploy. You'll see several deployment options depending on your use case. For this tutorial, select Cloud Hosted API. Roboflow automatically generates the code needed to call your workflow, along with the required installation command for your chosen programming language.
For Python, start by installing the Roboflow SDK Library:
pip install -U inference-sdkOnce the library has been installed, you can use the generated code below to connect to your deployed workflow and run inference on an image.
from inference_sdk import InferenceHTTPClient

# Connect to your workflow
client = InferenceHTTPClient(
    api_url="https://serverless.roboflow.com",
    api_key="YOUR_API_KEY"
)

# Run the workflow
result = client.run_workflow(
    workspace_name="YOUR_WORKSPACE",
    workflow_id="YOUR_WORKFLOW_ID",
    images={
        "image": "YOUR_IMAGE.jpg"
    },
    use_cache=True
)

# Print the results
print(result)
In this example, you'll need to replace YOUR_API_KEY, YOUR_WORKSPACE, YOUR_WORKFLOW_ID, and YOUR_IMAGE.jpg with your own values. Running the script sends the image to your deployed workflow and returns the results, including the detections, labels, and the total soda can count.
If you'd prefer to run the workflow locally instead of using Roboflow's hosted infrastructure, select the Self-Hosted API option on the deployment page instead of Cloud Hosted API. Roboflow will then walk you through the setup process, including installing Roboflow Inference and starting a local inference server. Once the server is running, you can call the workflow locally without sending images to the cloud.
Graduate the Workflow to a Trained Model
At this stage, the workflow is fully functional. It can detect and count soda cans using nothing more than a text prompt, making it an excellent way to prototype a computer vision application without collecting a dataset or training a model.
As your application grows, however, promptable models may no longer be the best option. If you're processing thousands of images or repeatedly detecting the same object, a dedicated object detection model can provide faster inference, lower costs, and improved accuracy.
One of the biggest advantages of promptable object detection is that it can help you create that dedicated model. By running your workflow across a larger collection of images, SAM 3 can automatically generate detections for each soda can. After reviewing and correcting those detections in Roboflow Annotate, you can use the resulting dataset to train an RF-DETR model.
The final RF-DETR model is optimized specifically for detecting soda cans rather than interpreting arbitrary text prompts. This makes it better suited for production deployments while allowing you to use promptable object detection to rapidly validate your idea and generate training data. In other words, promptable detection helps you get from an idea to a working prototype, while a trained model helps you scale that prototype into a production-ready application.
Promptable Object Detection Conclusion
In this tutorial, we built a promptable object detection workflow in Roboflow that detects and counts soda cans on a retail shelf using SAM 3. Along the way, we explored when promptable object detection is the right choice, how prompt wording can affect detection performance, and how to deploy the completed workflow.
Although we focused on a retail shelf example, the same workflow can be adapted to a wide range of applications by simply changing the prompt. Whether you're detecting pallets in a warehouse, PPE on a construction site, or vehicles in a parking lot, promptable object detection provides a fast and flexible way to prototype computer vision applications before investing in a dedicated model.
Ready to build your own promptable object detection workflow? Get started for free with Roboflow and start experimenting with your own prompts and use cases.
Cite this Post
Use the following entry to cite this post in your research:
Yajat Mittal. (Jun 29, 2026). How to Build a Promptable Object Detection Project. Roboflow Blog: https://blog.roboflow.com/build-a-promptable-object-detection-project/