
What if your webcam could reward you for eating an apple and punish you for reaching for a cookie? That's exactly what SnackTrack does. It's a real-time snack detection web app that uses computer vision to monitor your eating habits. Hold an apple up to your mouth and gain 15 points, grab a cookie and lose 10.
In this article, I'll walk you through the entire build process: how I collected and annotated data, trained a custom object detection model on Roboflow, integrated it with a Flask backend, and connected everything together with a live webcam feed. By the end, you'll be able to replicate this project step-by-step, and extend it to detect any snacks you like.
How to Build a Real-Time Snack Detection Web App with Roboflow
Here's a preview of what we'll build:
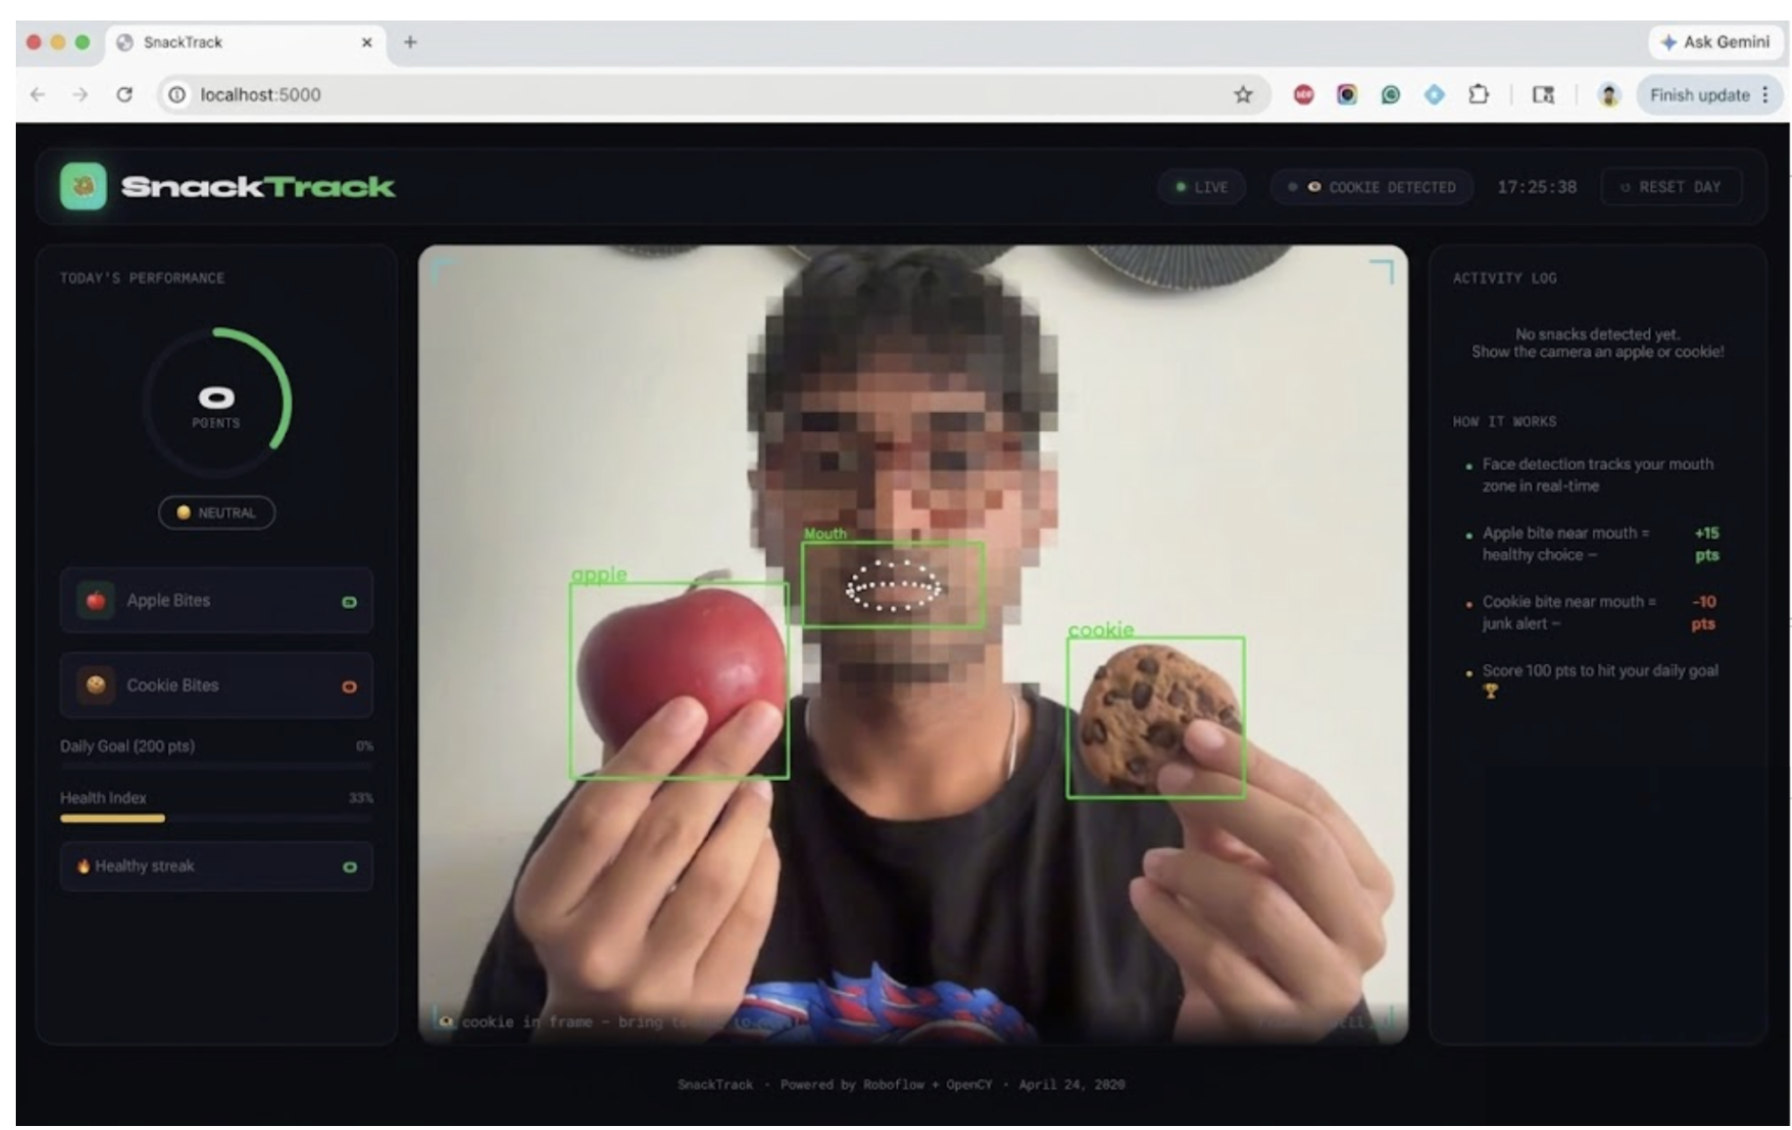
What We're Building
SnackTrack combines two primary components:
- Roboflow Object Detection: A custom-trained model that identifies apples and cookies in a video frame using bounding boxes.
- MediaPipe Face Landmarker: Detects your mouth position so the web app knows when you're actually bringing a snack to your face (not just holding it nearby).
When both bounding boxes overlap, meaning snack near mouth, the app logs an eating event and updates your score in real time via Server-Sent Events (SSE).
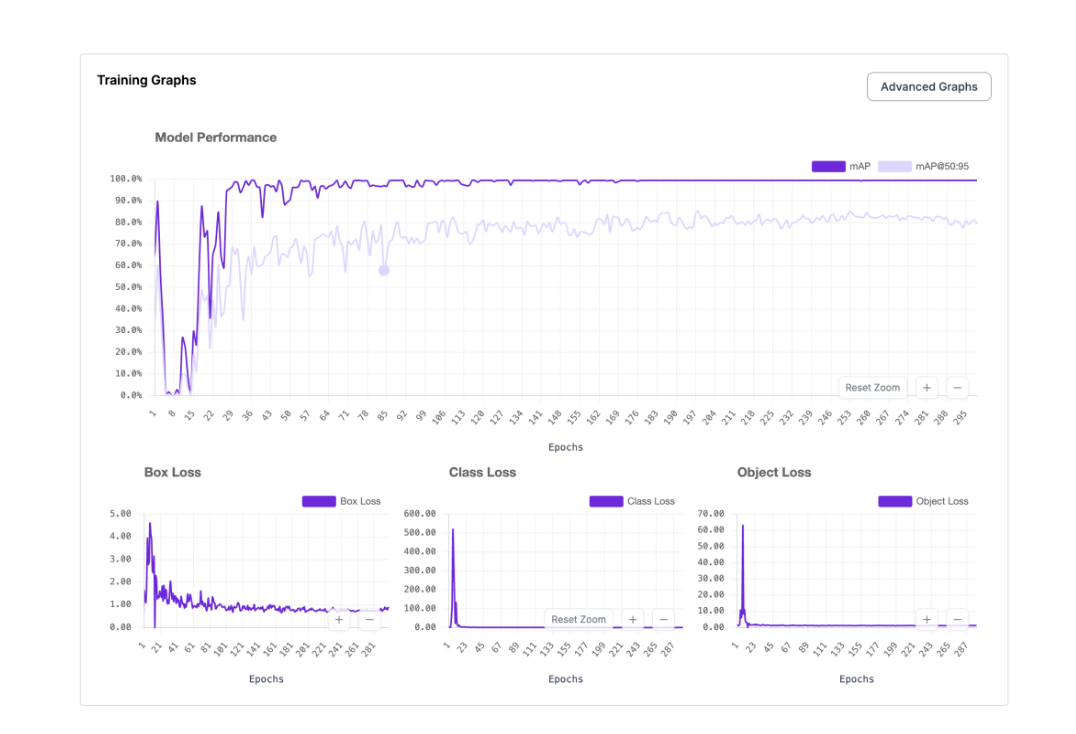
Final model performance (for my custom-trained model):
- mAP@50: 90.1%
- Precision: 100%
- Recall: 90.0%
- F1 Score: 94.4%
- Dataset size: 103 hand-annotated images
Tech Stack
Prerequisites
Before we start, you'll need:
- Python >=3.10 and <3.13 (this range is required for recent inference-sdk versions)
- A webcam (built-in or external)
- A free Roboflow account
- Git installed
Python version matters. The inference-sdk package requires Python >=3.10 and <3.13. If you use Python 3.9 or 3.13+, installation will fail with dependency conflicts. Always create a dedicated virtual environment for this project. I personally used Python 3.11.
Part 1: Setting Up Your Roboflow Account
Create an Account
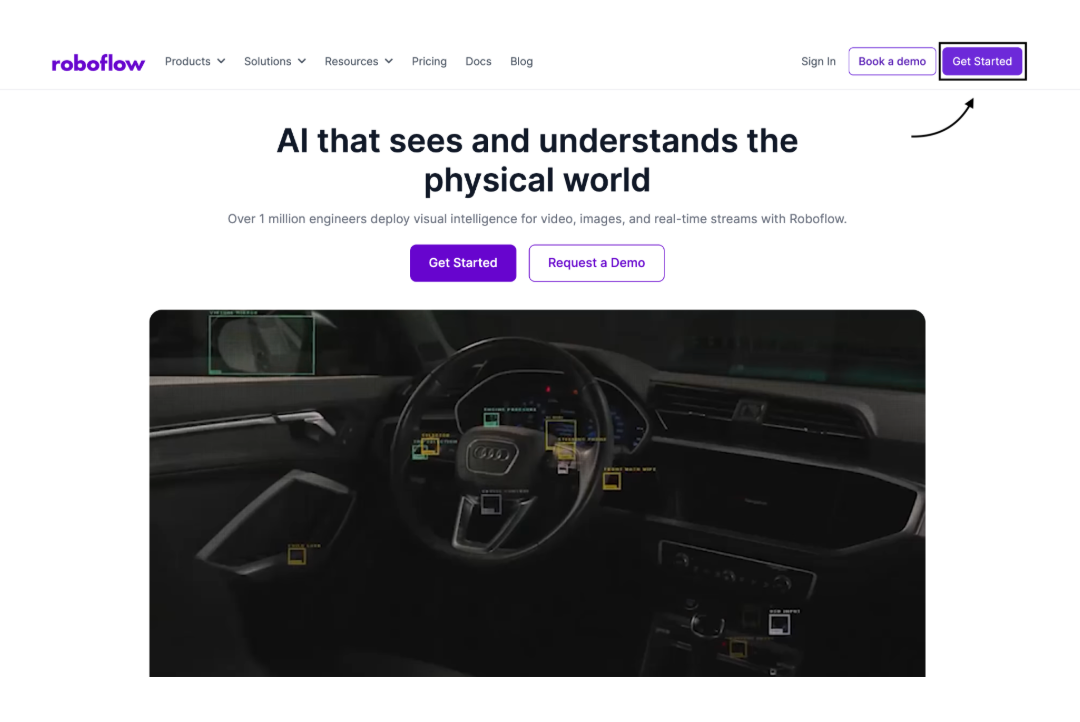
Go to app.roboflow.com and sign up for a free account. The free tier gives you everything you need for this project.
Find Your API Key
Your API key is what connects your Python code to your Roboflow models. Here's how to find it:
- Click on the settings button, and select API keys from the dropdown
- Your API key will be displayed on this page, from where you will have to copy it somewhere safe
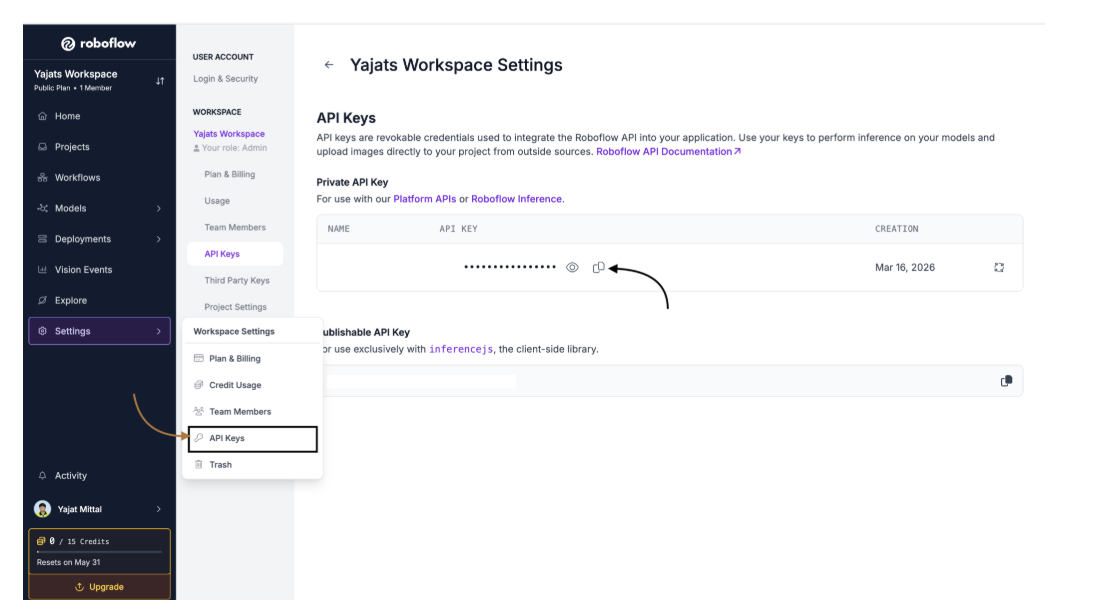
You can store this key in a .env file later, as you should never hardcode it directly into your source files.
Part 2: Creating the Roboflow Project
Create a New Project
- From your Roboflow dashboard, click "Create New Project"
- Give it a name (I used Snack Detection)
- Set the Project Type to "Object Detection"
- Click "Create Public Project"
Object Detection is the right choice here because we want bounding boxes around each snack, not just an image-level classification. This lets us later check whether the bounding box overlaps with the mouth region.
Collect Your Images
Good data is the foundation of a good model. For this project, I needed images of apples and cookies in conditions similar to how they'd appear in real life: held in a hand, close to a face, under typical indoor lighting.
Collecting your own data is a great learning experience; however, when aiming for accuracy, datasets with many more images can be found on Roboflow Universe.
How I collected images:
- Photographed apples and cookies in my kitchen with varying lighting (natural light, overhead light, dim light)
- Captured images from multiple angles like top-down, side-on, slightly overhead
- Used different backgrounds (table, hand-held, light background, dark background)
- Took images at varying distances from the camera
- Included some "edge cases," for example partially eaten apple, cookie broken in half, apple inside a bag
I ended up with a total of 103 images across both classes. For a small, focused use case like this, that's enough to get strong results, but more diverse data always helps.
Here are some tips for better data:
- Match your training environment to your deployment environment. Since SnackTrack runs via a desk webcam, I photographed snacks the same way I'd hold them in front of a webcam.
- Balance your classes. Try to have a similar number of apple and cookie images.
- Incorporate varying backgrounds, as models can overfit easily to a single background colour.
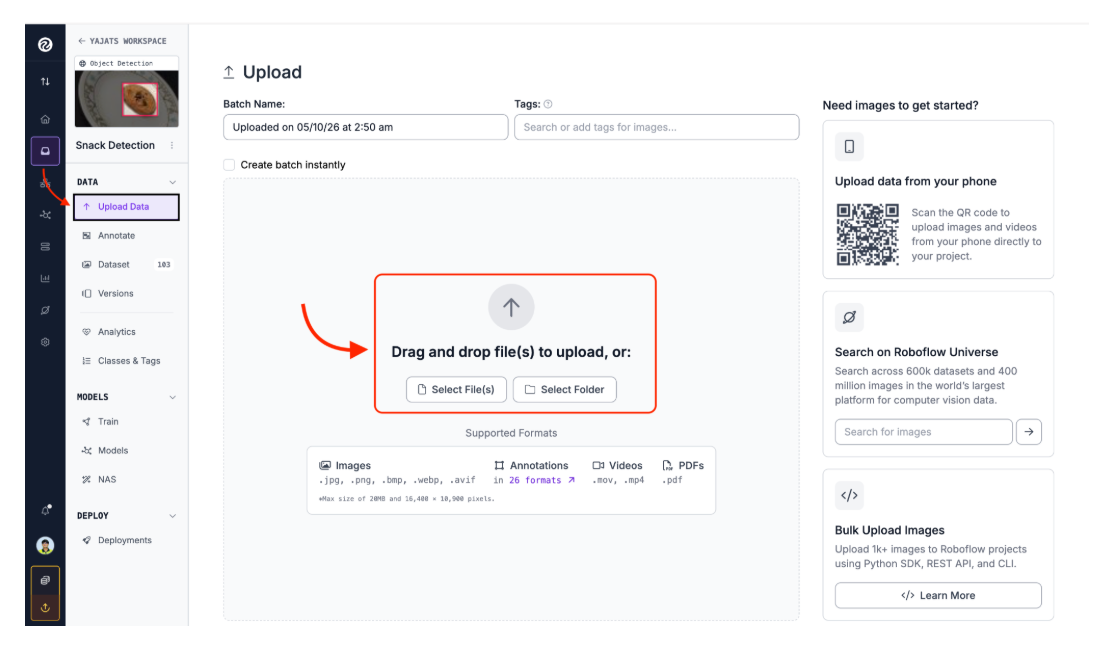
Upload Images to Roboflow
- In your project, click "Upload Data"
- Drag and drop your images (or click to browse)
- Roboflow will process them and show you a preview
- Click "Save and Continue"
Part 3: Annotating Your Dataset
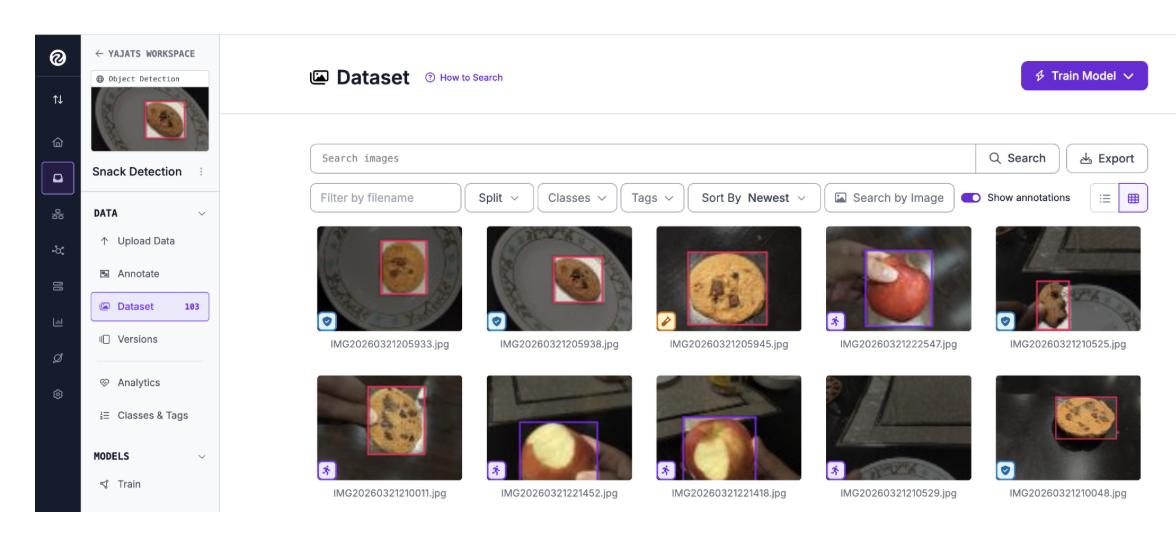
This is the most hands-on part of the process. Annotation means drawing bounding boxes around each snack in every image and labelling what class it belongs to.
Open the Annotation Tool & Draw Bounding Boxes
After uploading, click "Annotate" in the left sidebar. From there, you will see an option to “Label Myself.” Once you click on that, you'll see your images listed and ready to label.
For each image:
- Select the bounding box tool (shortcut: B)
- Click and drag to draw a tight rectangle around the snack
- A label option will appear; type or select the class name (apple or cookie)
- Repeat for every snack visible in the image
Annotation best practices:
- Draw boxes tightly around the object
- If the snack is partially out of frame, still annotate the visible portion
- Be consistent with your class names; “apple” and “Apple” are different labels
- When in doubt about a poor-quality or blurry image, it's better to delete it than annotate it poorly
Review and Save
Once you've annotated all images, click "Add [N] images to Dataset". Roboflow will ask how you want to split the dataset into training, validation, and test sets.
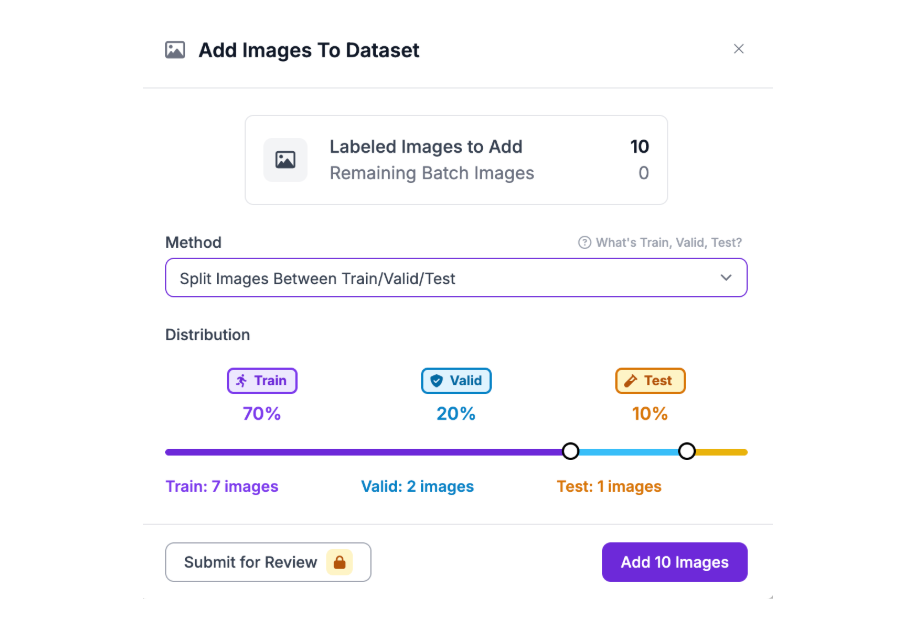
The default split (typically 70% train / 20% validation / 10% test) works well for this project. Click "Add Images" to confirm.
Part 4: Preprocessing and Augmentation
Before training, Roboflow lets you apply preprocessing steps and augmentations to improve your model's accuracy.
Generate a Dataset Version
Click "Generate New Version" in the left sidebar. This is where you configure preprocessing and augmentation.
Preprocessing & Augmentation Settings I Used:
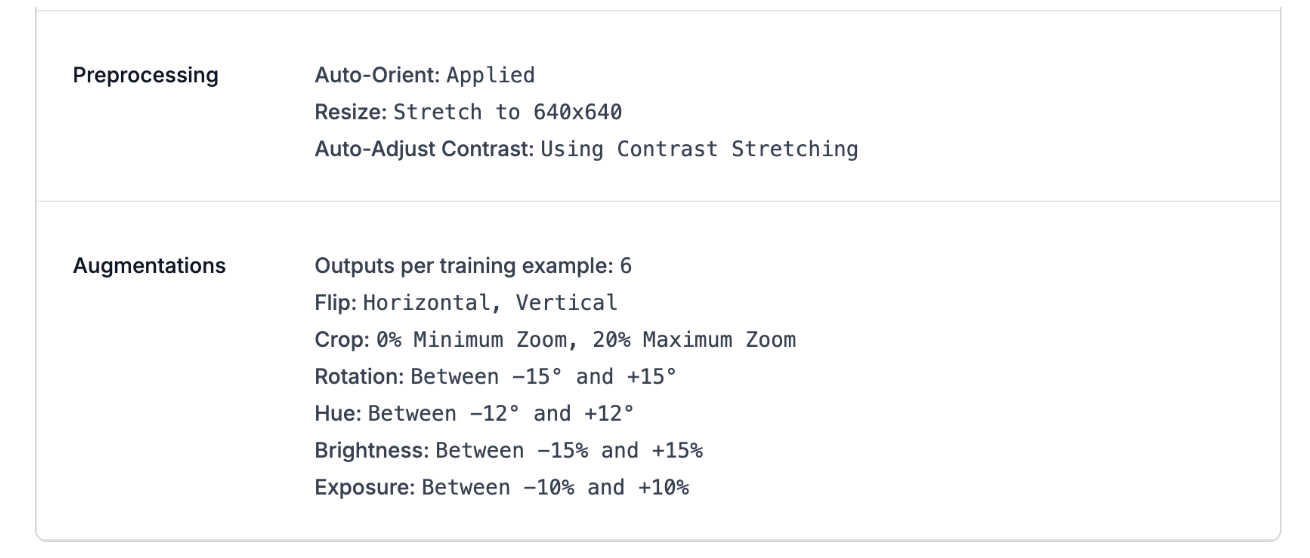
Why augmentation matters: Augmentation allows you to expand your dataset. With 103 source images and augmentation, Roboflow can generate 2-3x more training examples, making the model perform better without collecting new data.
Finally, click "Create" and wait for Roboflow to process the version.
Part 5: Training the Model
Train on Roboflow
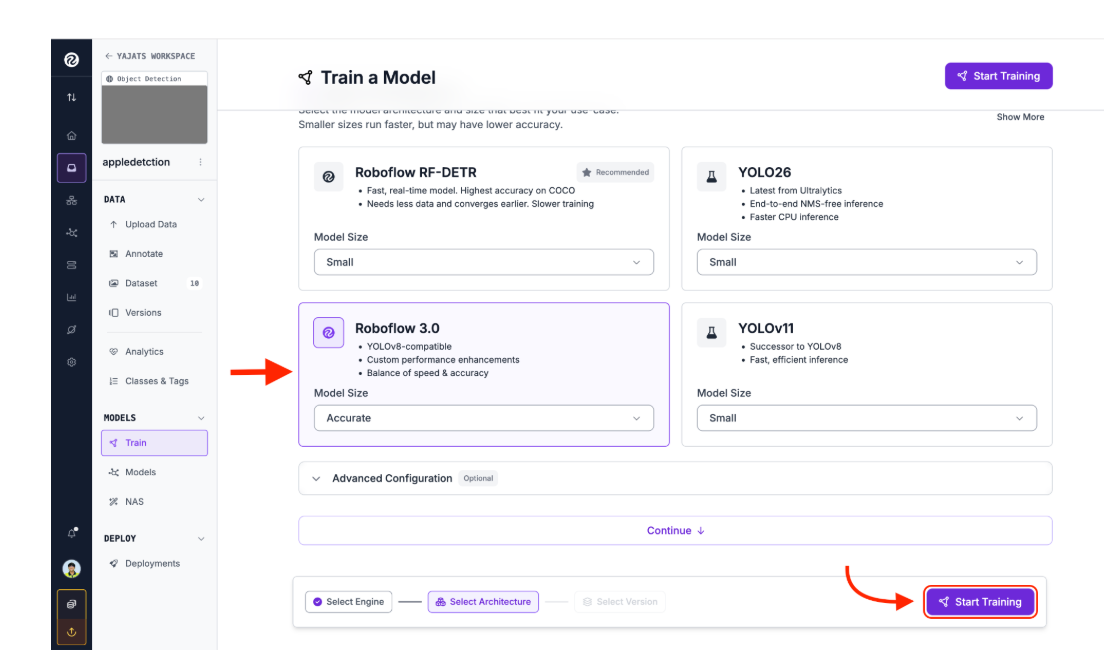
Once your dataset version is ready, click "Train" and then “Custom Training”.

I used the Roboflow 3.0 Object Detection (COCO) model for this project. For a small dataset like ours, this transfer learning approach is far better than training from scratch.
Click "Start Training" to begin training the model. Roboflow will train the model on their servers, which typically takes 15-30 minutes for a small dataset.
Review Model Performance
Once training is complete, Roboflow will show you your model's performance metrics.
Test the Model Visually
Before integrating into code, test the model directly in the Roboflow UI. Click "Visualize" and upload a test image or use your webcam.
This is a quick preliminary check. If the model misses obvious snacks or draws bounding boxes in the wrong places, you likely need more training data or better annotations.
Part 6: Getting Your Model Deployment Details
You'll need two pieces of information to call your model from code:
- API Key: get from your account settings (found in Part 1)
- Model ID: the unique identifier for your trained model version
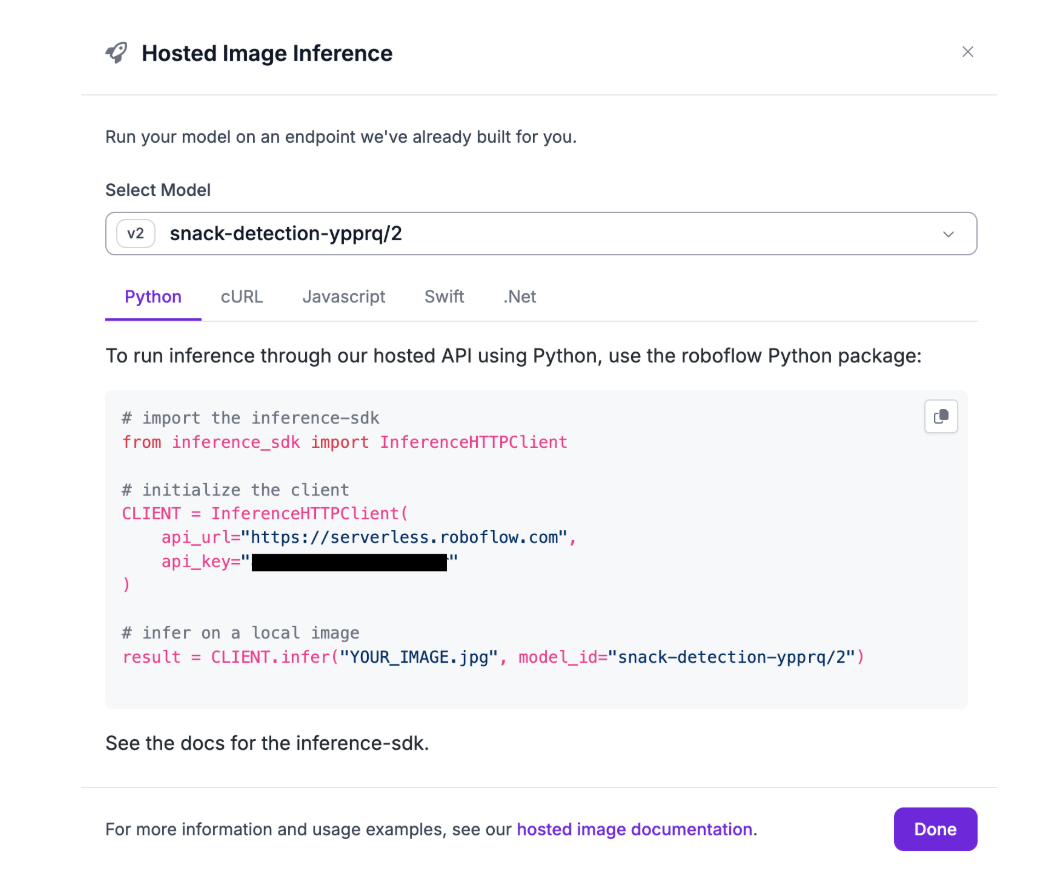
Finding Your Model ID & Calling Your Model Through Code
In Roboflow, navigate to your trained model version. From there, click on the “View Code” button for the “Hosted Image Reference” option. This will provide a code snippet, which includes your API key and Model ID, allowing you to call your model directly from code. Since this project is coded in Python, select Python as the coding language for the code snippet.
Part 7: Setting Up the Project Locally
Now let's build the application. Here's the complete file structure:
SnackTrack/
├── backend/
│   ├── __init__.py          # Makes backend a Python package
│   ├── .env                 # Environment variables (NOT committed)
│   ├── detectors.py         # Mouth and snack detection classes
│   ├── drawing.py           # OpenCV drawing utilities
│   ├── tracker.py           # Scoring and state management
│   ├── face_landmarker.task # MediaPipe model file
│   └── scores.json          # Persistent state file (auto-created)
├── static/
│   ├── script.js            # Frontend logic and SSE handling
│   └── style.css            # Stylesheet
├── templates/
│   └── index.html           # Main web page
├── app.py                   # Flask server entry point
├── config.py                # Constants and configuration
├── requirements.txt         # Python dependencies
├── .gitignore
└── README.md
A couple of things worth noting about the file structure:
- The .env file lives inside backend/. This is where detectors.py loads the Roboflow API key from to initialize the Roboflow client.
- backend/__init__.py makes the backend folder a proper Python package, allowing app.py at the root to import from it with “from backend.detectors import …”
- config.py sits at the root so both app.py and the backend modules can import shared constants cleanly
- static/ holds script.js and style.css which Flask serves automatically; templates/ holds index.html which Flask renders via render_template()
Clone the Repository
git clone https://github.com/YajatMittal/SnackTrack.git
cd SnackTrack
Create a Virtual Environment
Using a virtual environment isolates dependencies and avoids Python version conflicts.
# Make sure you're using Python 3.10, 3.11, or 3.12
python --version

# Create the virtual environment using Python 3.10, 3.11, or 3.12
python -m venv .venv

# Activate it
# On macOS/Linux:
source .venv/bin/activate

# On Windows:
.venv\Scripts\activate
You should see (.venv) prepended to your terminal prompt, confirming the environment is active.
Install Dependencies
pip install -r requirements.txtSet Up Your Environment Variables
Create a .env file inside the backend/ directory:
touch backend/.envAdd your Roboflow API key to the .env file:
ROBOFLOW_API_KEY=your_api_key_hereNever commit your .env file to Git. The .gitignore in this project already excludes it. If you accidentally commit your API key, rotate it immediately in your Roboflow account settings.
Download the MediaPipe Face Landmarker Model
The web app uses MediaPipe's Face Landmarker to detect your mouth position. Download the model file:
- Download MediaPipe Face Landmarker (official model download)
- Place it inside the backend/ directory
Part 8: Understanding the Backend Code
Now, I will walk you through how each component of the backend works.
Constants (config.py)
This file centralizes all configuration, improving reusability since users only need to change variables here instead of across multiple files:
MOUTH_LANDMARKS = [
   61, 185, 40, 39, 37, 0, 267, 269, 270, 409,
   291, 375, 321, 405, 314, 17, 84, 181, 91, 146,
   61,78, 191, 80, 81, 82, 13, 312, 311, 310, 415,
   308, 324, 318, 402, 317, 14, 87, 178, 88, 95,
   78
]

MOUTH_BOX_WIDTH_SCALE = 0.32
MOUTH_BOX_HEIGHT_SCALE = 0.15

MODEL_ID = "snack-detection-ypprq/2"
APPLE_PTS    = 15
COOKIE_PTS   = -10

EATING_FRAME_THRESHOLD = 5
INFER_EVERY  = 2
SCORE_FILE = "backend/scores.json"
IMG_SIZE = (640,640)
The Heart of the Vision Pipeline (backend/detectors.py)
This is where Roboflow and MediaPipe come in. The SnackDetector class uses the Roboflow Inference SDK to run your trained model on each webcam frame, while the MouthDetector class uses MediaPipe to locate the mouth:
import cv2
import os
from dotenv import load_dotenv
import mediapipe as mp
from mediapipe.tasks import python
from mediapipe.tasks.python import vision
from inference_sdk import InferenceHTTPClient
from config import MOUTH_LANDMARKS, MOUTH_BOX_HEIGHT_SCALE, MOUTH_BOX_WIDTH_SCALE, IMG_SIZE, MODEL_ID

load_dotenv()


class MouthDetector:
   def __init__(self, model_path="face_landmarker.task"):
       base_options = python.BaseOptions(model_asset_path=os.path.join(os.path.dirname(__file__), model_path))
       options = vision.FaceLandmarkerOptions(
           base_options=base_options,
           running_mode=vision.RunningMode.IMAGE,
           num_faces=1,
       )
       self.landmarker = vision.FaceLandmarker.create_from_options(options)

   def detect(self, frame):
       h, w, _ = frame.shape
       rgb_frame = cv2.cvtColor(frame, cv2.COLOR_BGR2RGB)
       mp_image = mp.Image(image_format=mp.ImageFormat.SRGB, data=rgb_frame)
       result = self.landmarker.detect(mp_image)

       if not result.face_landmarks:
           return None

       face = result.face_landmarks[0]

       # lip landmarks
       upper_lip = face[13]
       lower_lip = face[14]

       # upper and lower lip landmark pixels
       px_upper = int(upper_lip.x * w)
       py_upper = int(upper_lip.y * h)
       px_lower = int(lower_lip.x * w)
       py_lower = int(lower_lip.y * h)

       # finding face height
       face_h = abs(face[152].y - face[10].y) * h

       # determining bounding box width and height for mouth based on face height
       box_w = int(MOUTH_BOX_WIDTH_SCALE * face_h)
       box_h = int(MOUTH_BOX_HEIGHT_SCALE * face_h)

       # determining mouth center
       mouth_x = (px_upper + px_lower) // 2
       mouth_y = (py_upper + py_lower) // 2

       landmark_pixels = [
                   (int(face[landmark].x * w), int(face[landmark].y * h))
                   for landmark in MOUTH_LANDMARKS
               ]

       return {
           "landmark_pixels": landmark_pixels,
           "box": (mouth_x - box_w, mouth_y - box_h, mouth_x + box_w, mouth_y + box_h),
       }

class SnackDetector:
   def __init__(self, model_id=MODEL_ID):
       self.client = InferenceHTTPClient(
           api_url="https://serverless.roboflow.com",
           api_key=os.getenv("ROBOFLOW_API_KEY"),
       )
       self.model_id = model_id

   def detect(self, frame):
       predictions = self.client.infer(frame, model_id=self.model_id)["predictions"]

       if not predictions:
           return None

       prediction = predictions[0]
       x_cen, y_cen, w, h = int(prediction["x"]), int(prediction["y"]),  int(prediction["width"]), int(prediction["height"])

       x1 = int(x_cen - w/2)
       y1 = int(y_cen - h/2)
       x2 = int(x_cen + w/2)
       y2 = int(y_cen + h/2)
        return {
           "label": prediction["class"],
           "box": (x1, y1, x2, y2),
       }
Flask Server and Detection Loop (app.py)
This is the main entry point of the application. It runs a background thread that constantly reads frames from the webcam, processes them through both detectors, checks for overlap, and then streams the updated frames to the browser in real time.
import json
import time
import threading
import queue
from flask import Flask, Response, jsonify, render_template, stream_with_context
import cv2

from backend.tracker import SnackTrack, StateManager
from backend.detectors import MouthDetector, SnackDetector
from backend.drawing import draw_mouth, draw_snack
from config import EATING_FRAME_THRESHOLD, SCORE_FILE

app = Flask(__name__)

# setup
cap = cv2.VideoCapture(0)
state_manager = StateManager(SCORE_FILE)
state_manager.load_state()
mouth_detector = MouthDetector()
snack_detector = SnackDetector()
snack_tracker = SnackTrack(state_manager)

eating_frames = 0
state_lock = threading.Lock()
frame_lock = threading.Lock()
event_queue = queue.Queue(maxsize=128)
latest_frame_jpg = None  # shared between capture thread and /video route


def push_event(event):
   try:
       event_queue.put_nowait(event)
   except queue.Full:
       pass


def capture_loop():
   """Runs in background thread -- handles camera, detection, state updates."""
   global eating_frames, latest_frame_jpg

   while True:
       success, frame = cap.read()
       if not success:
           time.sleep(0.1)
           continue

       mouth = mouth_detector.detect(frame)
       snack = snack_detector.detect(frame)

       if mouth:
           draw_mouth(frame, mouth)
       if snack:
           draw_snack(frame, snack)

       if mouth and snack and snack_tracker.overlaps(snack["box"], mouth["box"]):
           eating_frames += 1
       else:
           eating_frames = 0

       if eating_frames == EATING_FRAME_THRESHOLD and snack:
           snack_tracker.snack_counter(snack["label"])
           last_log = state_manager.state.get("log", [])
           if last_log:
               latest_entry = last_log[-1]
               push_event({
                   "type": "score",
                   "item": snack["label"],
                   "pts": latest_entry.get("pts", 0),
               })

       # update state
       with state_lock:
           state = state_manager.state
           state["face_detected"] = bool(mouth)
           state["snack_detected"] = snack["label"] if snack else None
           state["eating"] = eating_frames >= EATING_FRAME_THRESHOLD
           state["last_item"] = snack["label"] if state["eating"] and snack else state.get("last_item")

       # encode and store latest frame
       success, jpg = cv2.imencode(".jpg", frame)
       if success:
           with frame_lock:
               latest_frame_jpg = jpg.tobytes()

       time.sleep(0.033)
Key design decision (the eating_frames threshold): Instead of logging a snack detection on every frame (which would result in dozens of detections per second), I have designed the web app to require the snack and mouth to overlap for EATING_FRAME_THRESHOLD consecutive frames (set to 5). This eliminates cases such as the snack briefly passing near your mouth.
Routes (app.py)
@app.route("/")
def index():
   return render_template("index.html")


@app.route("/video")
def video():
   def gen():
       while True:
           with frame_lock:
               jpg = latest_frame_jpg
           if jpg:
               yield b"--frame\r\nContent-Type: image/jpeg\r\n\r\n" + jpg + b"\r\n"
           time.sleep(0.033)
   return Response(gen(), mimetype="multipart/x-mixed-replace; boundary=frame")


@app.route("/state")
def get_state():
   with state_lock:
       s = state_manager.state
       return jsonify({
           "score": s["score"],
           "apples": s["apple_bites"],
           "cookies": s["cookie_bites"],
           "streak": s["healthy_streak"],
           "last_item": s.get("last_item"),
           "eating": s.get("eating", False),
           "face_detected": s.get("face_detected", False),
           "snack_detected": s.get("snack_detected"),
           "log": s["log"],
           "date": s["date"],
       })


@app.route("/events")
def events():
   def stream():
       yield "data: {\"type\":\"connected\"}\n\n"
       while True:
           try:
               ev = event_queue.get(timeout=15)
               yield f"data: {json.dumps(ev)}\n\n"
           except queue.Empty:
               yield "data: {\"type\":\"ping\"}\n\n"
   return Response(stream_with_context(stream()),
                   mimetype="text/event-stream",
                   headers={"Cache-Control": "no-cache", "X-Accel-Buffering": "no"})


@app.route("/reset", methods=["POST"])
def reset():
   with state_lock:
       state_manager.reset()
       state_manager.state["face_detected"] = False
       state_manager.state["snack_detected"] = None
       state_manager.state["eating"] = False
       state_manager.state["last_item"] = None
   return jsonify({"ok": True})


if __name__ == "__main__":
   # start camera in background thread
   t = threading.Thread(target=capture_loop, daemon=True)
   t.start()
   print("\n🎮 Snack Tracker running → http://localhost:5000\n")
   app.run(host="0.0.0.0", port=5000, threaded=True, debug=True)
Why Server-Sent Events instead of WebSockets? SSE is one-directional (server → client) and much simpler to implement in Flask. Since the browser only needs to receive score updates, not send data back, SSE was the right choice here. The /events endpoint sends a JSON payload whenever an eating event occurs, and the frontend JavaScript listens and updates the score display accordingly.
Part 9: The Frontend
The frontend consists of three main files: templates/index.html, static/style.css, and static/script.js.
templates/index.html
The live video is displayed using an <img> tag that points to the Flask /video endpoint, which streams MJPEG frames:
<img id="cam-feed" src="/video" alt="camera feed">The score dashboard displays rings, counters, and an activity log, which are all updated dynamically by JavaScript.
Real-Time Updates (static/script.js)
The JavaScript connects to the SSE endpoint and updates the UI whenever a score event arrives:
// Connect to the Server-Sent Events stream
function connectSSE() {
 const es = new EventSource('/events');
 es.onmessage = (e) => {
   const ev = JSON.parse(e.data);
   if (ev.type === 'score') {
     showToast(ev.item, ev.pts);
     fetchState();
   }
 };
 es.onerror = () => { setTimeout(connectSSE, 2000); es.close(); };
}
connectSSE();

// Poll /state every second for face/snack detection status
function fetchState() {
 fetch('/state').then(r => r.json()).then(updateUI).catch(() => { });
}
setInterval(fetchState, 800);
fetchState();

// RESET
function resetData() {
 if (!confirm('Reset today\'s score and log?')) return;
 fetch('/reset', { method: 'POST' }).then(() => fetchState());
 document.getElementById('feed-list').innerHTML =
   '<div style="color:var(--muted);font-size:0.78rem;text-align:center;padding:20px 0">No snacks yet!</div>';
}
Part 10: Running SnackTrack
With everything set up, start the application (make sure you are in the venv):
python app.pyYou should see the following once you run:
🎮 Snack Tracker running → http://localhost:5000Open your browser and navigate to http://localhost:5000. Grant camera permissions when prompted.
Here’s a quick demo of everything in action:
Hold an apple up to your webcam near your mouth. The overlay will draw a bounding box around the apple and a mesh around your mouth. When they overlap, the score updates. Try a cookie and watch the points drop.
Part 11: Customizing SnackTrack for Your Own Snacks
Okay, now what if you want to detect bananas and donuts instead? Here's exactly what to change:
1. Create a new Roboflow project with your snack classes: follow Parts 2–5 above with your own images.
2. Update config.py accordingly
MODEL_ID = "your-new-project"
APPLE_PTS = 15   # rename this variable
COOKIE_PTS = -10  # adjust scoring as you like
3. Update backend/tracker.py: go through the tracker.py file and update all the variable names and change the labels to the snacks you like, for example bananas and donuts.
4. Update templates/index.html: update the display labels in the score dashboard to reflect your new snack names.
Automating Snack Tracking with AI
In this blog, we went from zero to a deployed real-time computer vision web app:
- Collected and annotated a 103-image dataset on Roboflow
- Applied preprocessing and augmentation to improve robustness
- Trained a Roboflow 3.0 Object Detection model
- Integrated the trained model using the Roboflow Inference SDK
- Combined it with MediaPipe face detection for context-aware scoring
- Developed a real-time web app with Flask, MJPEG streaming, and Server-Sent Events
The full source code is available at github.com/YajatMittal/SnackTrack and the dataset on Roboflow Universe. You can fork it, swap in your own snacks, and build something fun.
Written by Yajat Mittal
Cite this Post
Use the following entry to cite this post in your research:
Contributing Writer. (Jun 3, 2026). Building a Real-Time Snack Detection Web App. Roboflow Blog: https://blog.roboflow.com/build-real-time-snack-detection-app/