
CLIP embedding models support zero-shot image classification, semantic search, dataset deduplication, and retrieval-augmented generation, but general-purpose checkpoints often lack the domain specificity needed for specialized use cases. This guide covers training a custom CLIP projection layer on the Intel Gaudi2 chip using Hugging Face Transformers and Optimum Habana, preparing the model for production deployment, and benchmarking both training throughput and inference speed, with measured results of roughly 55 CLIP vectors per second on a single Gaudi2 HPU.
The Contrastive Language Image Pretraining (CLIP) architecture is a foundation of modern computer vision. You can use the CLIP architecture to train embedding models that can be used for image and video classification, Retrieval Augmented Generation (RAG), image similarity computations, and more.
The CLIP architecture, released by OpenAI, has several public checkpoints changed on large datasets. The first model using the CLIP architecture was released by OpenAI and, since then, many companies have trained their own CLIP models: Apple, Meta AI, and more. But, these models are rarely tuned to a specific use case: rather, they are trained for general purposes.
The Gaudi2 chip, combined with Hugging Face Transformers and its Gaudi2 Optimum Habana optimizations, can be used to train a projection layer for a custom CLIP model. This CLIP model can be encoded to learn concepts related to the specific domain in which you are working.
In this guide, we are going to demonstrate how to train a CLIP projection layer using Gaudi2. We will also show how to prepare your model for deployment. We will report on training and inference times from the model we build in this article, so you can evaluate what you can expect in terms of performance during training and deployment.
Without further ado, let’s get started!
What is CLIP?
Contrastive Language Image Pretraining (CLIP) is a multimodal vision model architecture developed by OpenAI. You can use CLIP to calculate image and text embeddings. CLIP models are trained on pairs of images and text. These pairs are used to train an embedding model that learns associations between the contents of an image, with reference to the text caption associated with the image.
CLIP models can assist with many enterprise applications. For example, you can use CLIP to assist with:
- Classifying images of parts on assembly lines;
- Classifying videos in a media archive;
- Moderating image content at scale, and in real time;
- Deduplicate images before you train large models;
- And more.
CLIP models can run at several frames per second, depending on the hardware you use. Hardware tailored for AI development, such as the Intel Gaudi2 chip, are ideal for running models like CLIP. For example, we found a single Gaudi2 chip was able to compute 66,211 CLIP vectors in 20 minutes. This speed is enough to solve for many real-time applications; additional chips could be added for higher performance.
While out of the box CLIP models such as the checkpoint released by OpenAI solve for many use cases, for more specific use cases, or use cases that involve enterprise data on which existing large models would never be able to train, standard CLIP models fall short.
This is where training your own CLIP model can be useful.
How to Train a CLIP Model on Gaudi2
You can train your own CLIP model to classify images according to your own needs. For example, you can train a model that can distinguish between specific parts that you manufacture, or to classify if specific defects are present in products, or identify different landmarks.
To train a CLIP model, you need:
- A dataset of images, and;
- Detailed captions that describe the contents of each image.
Captions should be a few sentences long, and accurately describe what is visible in each image.
One way to train a CLIP model is to use HuggingFace Transformers, which has support for training vision-language models such as CLIP. HuggingFace Transformers has partnered with Intel to accelerate performance of training and inference on Gaudi2 chips through the Optimum Habana Transformers extensions. We will be using Transformers and the Optimum Habana Transformers example to train a model in this guide.
For this guide, we will use the COCO dataset, which features more than 100,000 images with captions that we can use for training.
Step #1: Download and Configure a Dataset
To train a CLIP-like model, you need an image dataset with captions that correspond to each image. These captions should be dense in information, enough from which the model can learn about the contents of an image.
For this guide, we will use the COCO dataset, which comes with visual captions for over 100,000 images.
The Hugging Face team has prepared a script that allows you to train a CLIP model using Gaudi2 hardware acceleration for AI training. This script takes in a dataset in the COCO JSON format and trains a CLIP model on the dataset.
For this guide, we will be using the default dataset. With that said, you can use any dataset in the COCO JSON format. To learn more about the COCO JSON format, refer to the Microsoft COCO dataset web page.
Images in your dataset should have the following features in COCO JSON format:
["image_id", "caption_id", "caption", "height", "width", "file_name", "coco_url", "image_path", "id"]Your dataset needs a train, test, and valid dataset.
For this guide, let’s download the CLIP dataset to our Gaudi2 machine. To get started, run:
mkdir data
cd data
wget http://images.cocodataset.org/zips/train2017.zip
wget http://images.cocodataset.org/zips/val2017.zip
wget http://images.cocodataset.org/zips/test2017.zip
wget http://images.cocodataset.org/annotations/annotations_trainval2017.zip
wget http://images.cocodataset.org/annotations/image_info_test2017.zip
cd ..
You will also need to install the Hugging Face Transformers library, which we will use in model training:
pip install transformersWith the dataset downloaded, you are ready to start training your CLIP model.
Step #2: Download Optimum Habana Training Script
Next, we need to download the scripts we will use for training. You can download these scripts from the Optimum Habana GitHub repository.
First, clone the Optimum Habana GitHub repository:
git clone https://github.com/huggingface/optimum-habanaThen, navigate to the examples/contrastive-image-text folder:
cd examples/contrastive-image-textNext, install the project requirements
pip3 install -r requirements.txtThis folder contains all of the training scripts we will use in this guide.
You should work in this folder for the rest of this guide.
Step #3: Create a Model Stub
The Hugging Face script uses a pre-trained text and vision encoder. You can train the projection layer of the model on your dataset. To download the required weights and model configurations, create a new Python file and add the following code:
from transformers import (
    VisionTextDualEncoderModel,
    VisionTextDualEncoderProcessor,
    AutoTokenizer,
    AutoImageProcessor
)

model = VisionTextDualEncoderModel.from_vision_text_pretrained(
    "openai/clip-vit-base-patch32", "roberta-base"
)

tokenizer = AutoTokenizer.from_pretrained("roberta-base")
image_processor = AutoImageProcessor.from_pretrained("openai/clip-vit-base-patch32")
processor = VisionTextDualEncoderProcessor(image_processor, tokenizer)

# save the model and processor
model.save_pretrained("clip-roberta")
processor.save_pretrained("clip-roberta")
In this code, we load a CLIP model and save a pre-trained vision-text encoder. We can then tune the projection layer using the roberta-base tokenizer and our captions.
Step #4: Train the Model
You can train your model on a single or multiple HPUs.
To train your model, use one of the following commands:
Train with a Single HPU
    python run_clip.py
--output_dir ./clip-roberta-finetuned
--model_name_or_path ./clip-roberta
--data_dir $PWD/data
--dataset_name ydshieh/coco_dataset_script
--dataset_config_name=2017
--image_column image_path
--caption_column caption
--remove_unused_columns=False
--do_train --do_eval
--per_device_train_batch_size="512"
--per_device_eval_batch_size="64"
--learning_rate="5e-5" --warmup_steps="0" --weight_decay 0.1
--overwrite_output_dir
--save_strategy epoch
--use_habana
--use_lazy_mode
--use_hpu_graphs_for_training
--use_hpu_graphs_for_inference
--gaudi_config_name Habana/clip
--throughput_warmup_steps 3
--dataloader_num_workers 16
--bf16
Train with Multiple HPUs
    python ../gaudi_spawn.py --world_size 8 --use_mpi run_clip.py
--output_dir ./clip-roberta-finetuned
--model_name_or_path ./clip-roberta
--data_dir $PWD/data
--dataset_name ydshieh/coco_dataset_script
--dataset_config_name=2017
--image_column image_path
--caption_column caption
--remove_unused_columns=False
--do_train --do_eval
--per_device_train_batch_size="512"
--per_device_eval_batch_size="64"
--learning_rate="5e-5" --warmup_steps="0" --weight_decay 0.1
--overwrite_output_dir
--save_strategy epoch
--use_habana
--use_lazy_mode
--use_hpu_graphs_for_inference
--gaudi_config_name Habana/clip
--throughput_warmup_steps 3
--dataloader_num_workers 16
--mediapipe_dataloader
--use_hpu_graphs_for_training
--bf16
--distribution_strategy fast_ddp
CLIP Training Benchmark on Gaudi2
To evaluate the performance of CLIP training on Gaudi2, we ran a training job on a single HPU using the COCO dataset. We recorded the amount of time the training job took to complete, from start to finish, using the time command. This training time includes dataset initialization, but does not include data download since we downloaded our dataset prior to training.
Our model took 15 minutes and one second to train for three epochs across the entire COCO dataset.
Of note, we are not training a CLIP model from scratch in this guide. Rather, we are tuning a projection layer on our own dataset, which we can use to help CLIP learn new concepts based on our data.
How to Deploy CLIP to Gaudi2
WIth a trained model ready, there is one question left to answer: how do we deploy the model to production? You can benefit from Gaudi2 AI acceleration for both training and inference with the Hugging Face Transformers package. CLIP has been accelerated to use specific Gaudi2 operations to speed up training and inference through the Optimum Habana project
In this section, we will discuss how to use the model we trained in the previous section to deploy a CLIP-like model.
Step #1: Write a CLIP Inference Script
To start deploying CLIP on Gaudi2, you will need an inference script that calculates CLIP vectors using your model.
This script can then be adjusted for a range of use cases, including zero-shot image classification, video classification, dataset deduplication, image search, and more. We will discuss some of these use cases, with reference to code Roboflow has already written, in the “Prepare Model for Production” section later in this guide.
Let’s create a script that allows us to calculate CLIP vectors with our model:
import json
import os

import faiss
import habana_frameworks.torch.core as htcore
import tqdm
from PIL import Image
from transformers import (
    AutoImageProcessor,
    AutoTokenizer,
    VisionTextDualEncoderModel,
    VisionTextDualEncoderProcessor,
)


def get_image_embedding(image):
    inputs = processor(images=[image], return_tensors="pt", padding=True).to("hpu")

    outputs = model.get_image_features(**inputs)

    return outputs.cpu().detach().numpy()


def get_text_embedding(text):
    inputs = processor(text=text, return_tensors="pt", padding=True).to("hpu")

    outputs = model.get_text_features(**inputs)

    return outputs.cpu().detach().numpy()

model = VisionTextDualEncoderModel.from_vision_text_pretrained(
    "openai/clip-vit-base-patch32", "roberta-base"
).to("hpu")

tokenizer = AutoTokenizer.from_pretrained("roberta-base")
image_processor = AutoImageProcessor.from_pretrained("openai/clip-vit-base-patch32")
processor = VisionTextDualEncoderProcessor(image_processor, tokenizer)

print(get_image_embedding(Image.open(“image.jpeg”)))
In this code, we define functions that let us calculate text and image embeddings. We then calculate an image embedding for an image called image.jpeg and print the results to the console.
Our model successfully calculates and returns a CLIP embedding.
Step #2: Prepare Model for Production
Now that we have a model configured, we can write custom logic that uses our model to solve a business problem.
There are many applications for CLIP in the enterprise. For example, you can use CLIP for:
- Dataset Deduplication: Find and remove duplicate images in a dataset to ensure your dataset is ready for training. Deduplication will help you ensure duplicate images do not end up in your train and valid datasets when your data is split, which can compromise training quality. Deduplication will also ensure your model is not training on several examples of the same image, which is inefficient.
- Image Search: Create a semantic image search engine. This allows you to search a library of images using text and image queries. This is ideal for helping people find relevant images in a large corpus of image data. For example, a news organization could use a semantic image search to find images that would be relevant to an article.
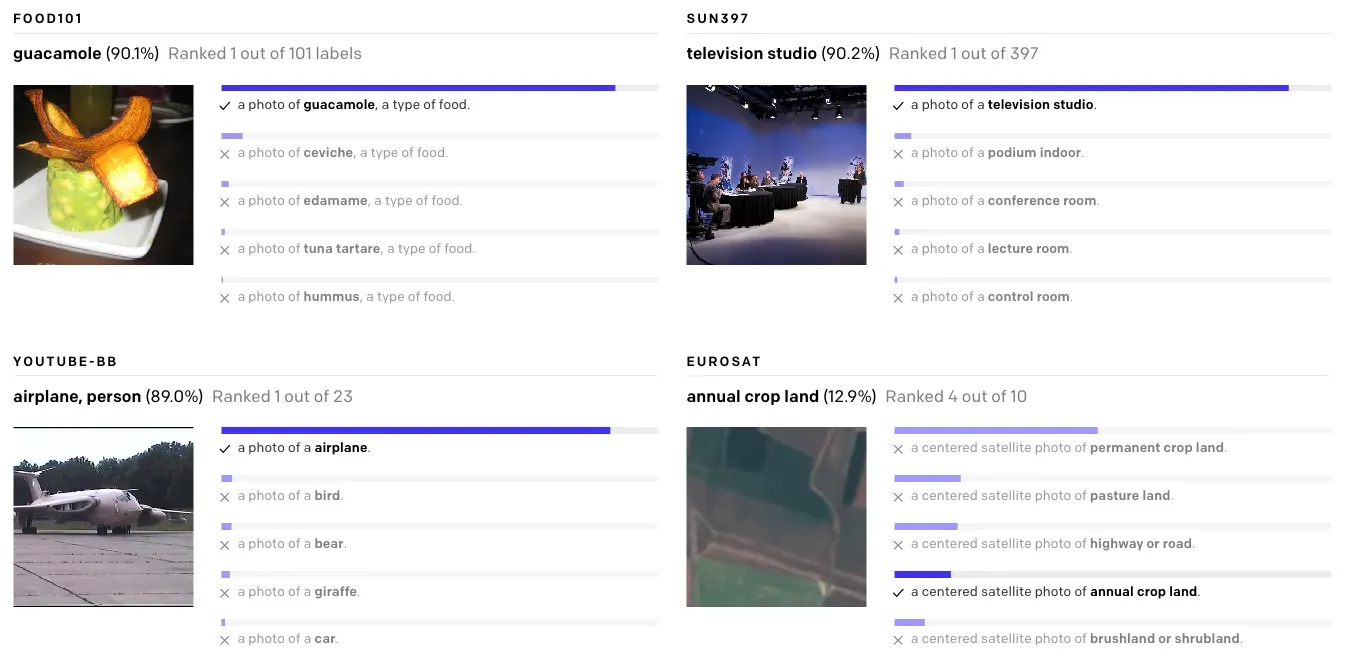
- Image Classification: Assign a single or multiple labels to an image. Image classification can be used for consumer-facing applications (i.e. wildlife applications where someone can take a photo to learn more about an animal), content moderation, and more.
- Video Classification: Identify if specific scenes are present in a video. This is ideal for media indexing use cases where you want to identify the timestamps at which different features are present on a screen. You can also use video classification to identify if a video contains NSFW content.
- Retrieval Augmented Generation: You can use CLIP to retrieve images that can be used as candidates in RAG-based systems, including RAG systems that integrate with Large Multimodal Models (LMMs) like GPT-4 with Vision.
The Roboflow team has prepared several tutorials you can reference when building enterprise applications with CLIP and Gaudi2:
- Build an Image Search Engine with CLIP using Intel Gaudi2 HPUs
- Build Enterprise Datasets with CLIP for Multimodal Model Training Using Intel Gaudi2 HPUs
- Multimodal Video Analysis with CLIP using Intel Gaudi2 HPUs
CLIP Inference Benchmark on Gaudi2
The Roboflow team calculated CLIP vectors for 66,211 images using a single Gaudi HPU chip to benchmark performance. We used the out-of-the-box CLIP model so you can understand how the model available in Transformers will perform on your system.
We chose the out-of-the-box CLIP model to offer a standard benchmark, as opposed to using a fine-tuned model where model performance may vary.
In our benchmarking, we found a single Gaudi2 HPU could calculate CLIP vectors for 66,211 images in 20m11s using the default CLIP weights. Broken down, our system calculated ~3,310 CLIP vectors per minute, or ~55.2 CLIP vectors per second.
This performance is ideal for powering both batch processing and real-time applications for which calculating CLIP vectors are required.
Conclusion
Contrastive Language Image-Pretraining (CLIP) models are embedding models that can be used for zero-shot image and video classification, semantic search applications, dataset deduplication, Retrieval Augmented Generation (RAG) that involves images, and more.
In this guide, we walked through how to use CLIP with the Gaudi2 system. We demonstrated how to train a CLIP-like model using the Hugging Face Transformers library. We loaded a dataset in the COCO JSON format, then trained a projection layer to encode information from our custom dataset.
We then demonstrated how to run inference on a CLIP model using the Gaudi2 system, with reference to guides that delve into specific use cases like dataset deduplication and video classification.
Cite this Post
Use the following entry to cite this post in your research:
James Gallagher. (Mar 26, 2024). Ultimate Guide to Using CLIP with Intel Gaudi2. Roboflow Blog: https://blog.roboflow.com/clip-intel-gaudi2/