
Computer vision (CV) is transforming industries like agriculture, healthcare, retail, and manufacturing by allowing machines to interpret visual data. Tasks that once demanded advanced ML expertise, like object detection or image classification, are now accessible to anyone thanks to large language models (LLMs) and Roboflow’s developer-friendly platform. With these tools, you can create production-ready vision apps in just a few hours, even without a coding background.
This walkthrough shows how to build a CV application using Cursor, an AI-powered coding and deployment platform, alongside Roboflow’s API. You’ll learn how to find pre-trained models in Roboflow Universe, adjust parameters such as confidence thresholds, deploy directly from Cursor, and check license terms to ensure compliance.
As a practical example, we’ll build an avocado counter that demonstrates how seamlessly Cursor and Roboflow work together from prototype to deployment.
Why Use Cursor with Roboflow?
Many LLM tools integrate well with Roboflow, but this guide highlights Cursor because of its built-in execution and hosting. Cursor lets you search for models, adjust parameters, and deploy applications without needing code. Other LLMs, like Claude, are helpful for tasks like documentation or model discovery. But Cursor shines when it comes to running and shipping apps.
Roboflow’s API-first design integrates smoothly with Cursor, an intelligent development environment that lets you generate, run, and host applications with natural language prompts. Cursor reduces manual coding by scaffolding full-stack apps (often in Python or JavaScript) directly from your requests.
Unlike LLMs that only output static code, Cursor executes and hosts your apps instantly, so you get interactive interfaces without the overhead of configuring servers.
Step-by-Step Guide to Building CV Apps with Cursor and Roboflow
We’ll walk through creating an avocado-counting app using Cursor and Roboflow.
Step 1: Get Your Roboflow API Key
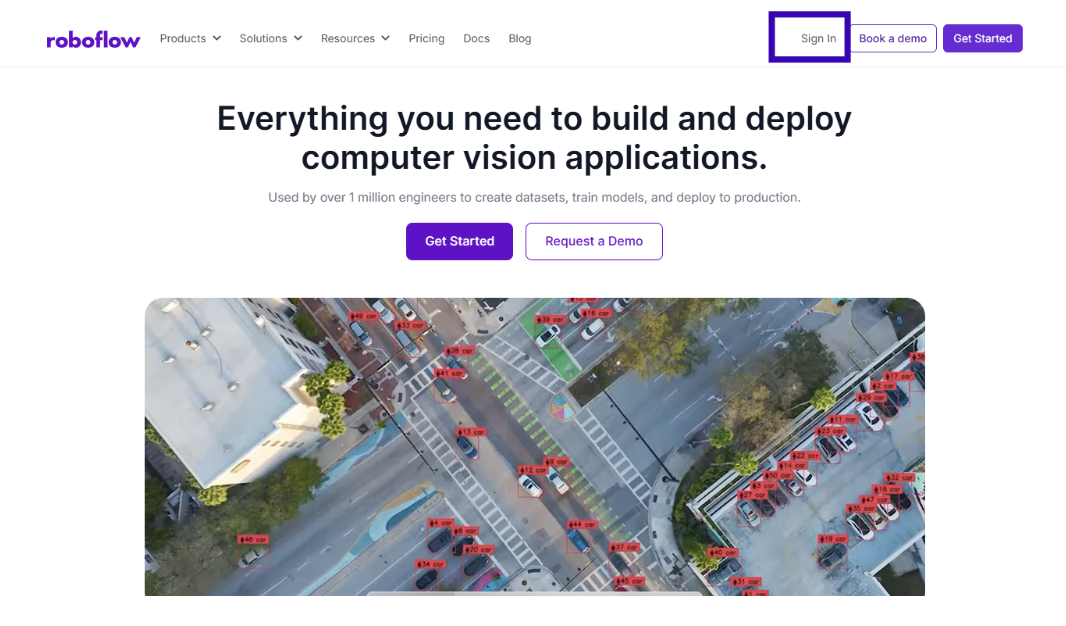
Sign up at roboflow.com
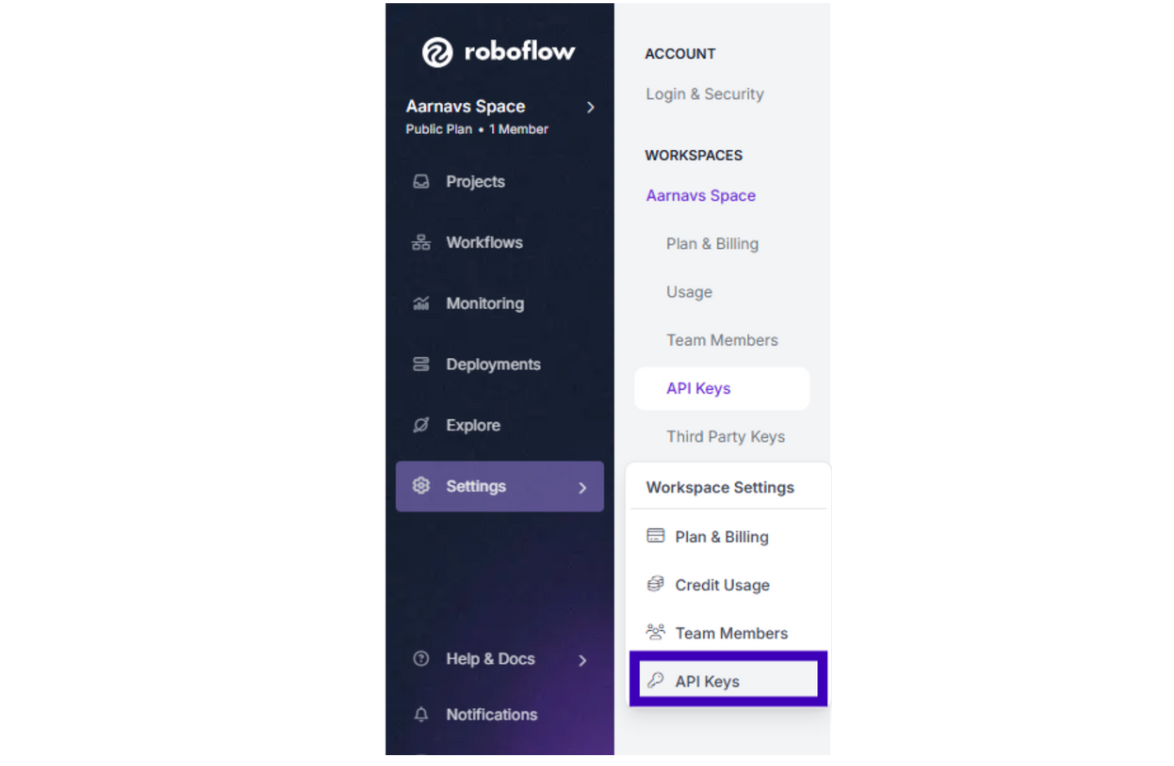
Go to Settings > API Key to copy your private key
Provide this key to Cursor in a secure way (e.g., via environment variables). For production, avoid hardcoding, use .env files or secret managers.

Step 2: Find a Model with Cursor
Roboflow Universe has 50,000+ pre-trained models and 250,000+ datasets. Cursor can query these models directly.
Sample Prompt for Cursor:
“Search Roboflow Universe for a model to detect avocados in images. Return only the model link.”
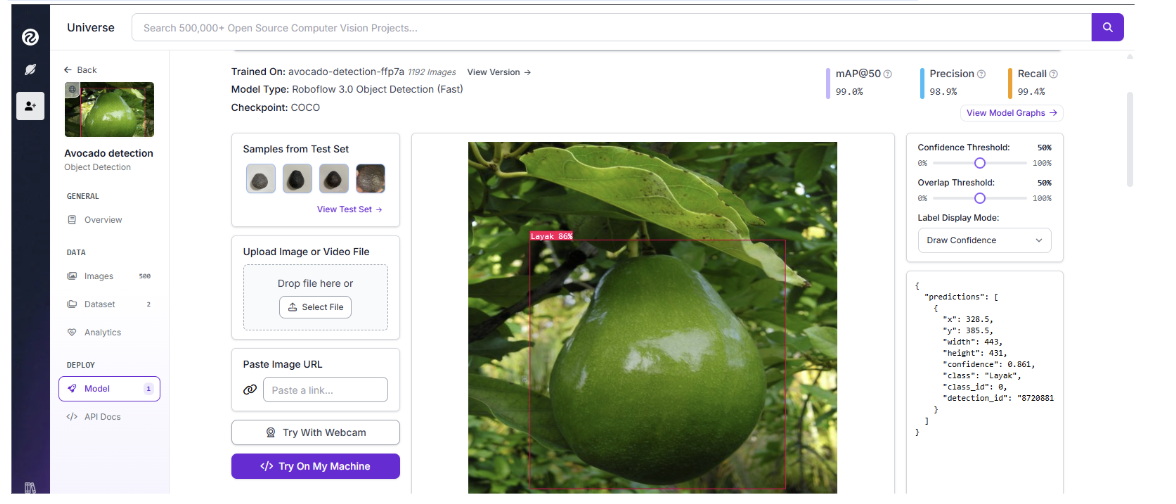
Cursor might suggest something like: https://universe.roboflow.com/yo-man-engm8/avocado-detection-ffp7a
From there, go to the Model tab to note the model ID (e.g., avocado-detection-ffp7a/2). Test the model on Universe with sample images to check accuracy before moving on.
Step 3: Run Inference with Cursor and Roboflow’s API
Using the model ID and API key, prompt Cursor to perform inference via Roboflow’s API and create an interactive interface for uploading images.
How to Obtain the Model URL:

Find the model URL on the Roboflow Universe model page under the “Model” tab.
Sample Prompt for Cursor:
“Adjust the confidence of this model: https://universe.roboflow.com/yo-man-engm8/avocado-detection-ffp7a/model/2 to 0.5 using my api key (insert your own API key). Put this API_key in an .env file. Let me run a GUI using my own images.”
Cursor will spin up a web app with an upload button, bounding boxes, and avocado counts, without you writing any code.
After this request, Cursor will provide you with some code, which you can run like so:
Step 4: Optimize Model Parameters
You can refine your app’s accuracy and performance using Cursor prompts:
- Confidence Threshold: “Set confidence to 0.6” → reduces false positives.
- Model Version: “Switch to avocado-counter-xy34/3” → ensures you’re using the latest version.
- IoU Threshold: “Set IoU to 0.3” → prevents duplicate detections.
- Batch Processing: “Process 10 images at once” → increases efficiency.
Example Prompt:
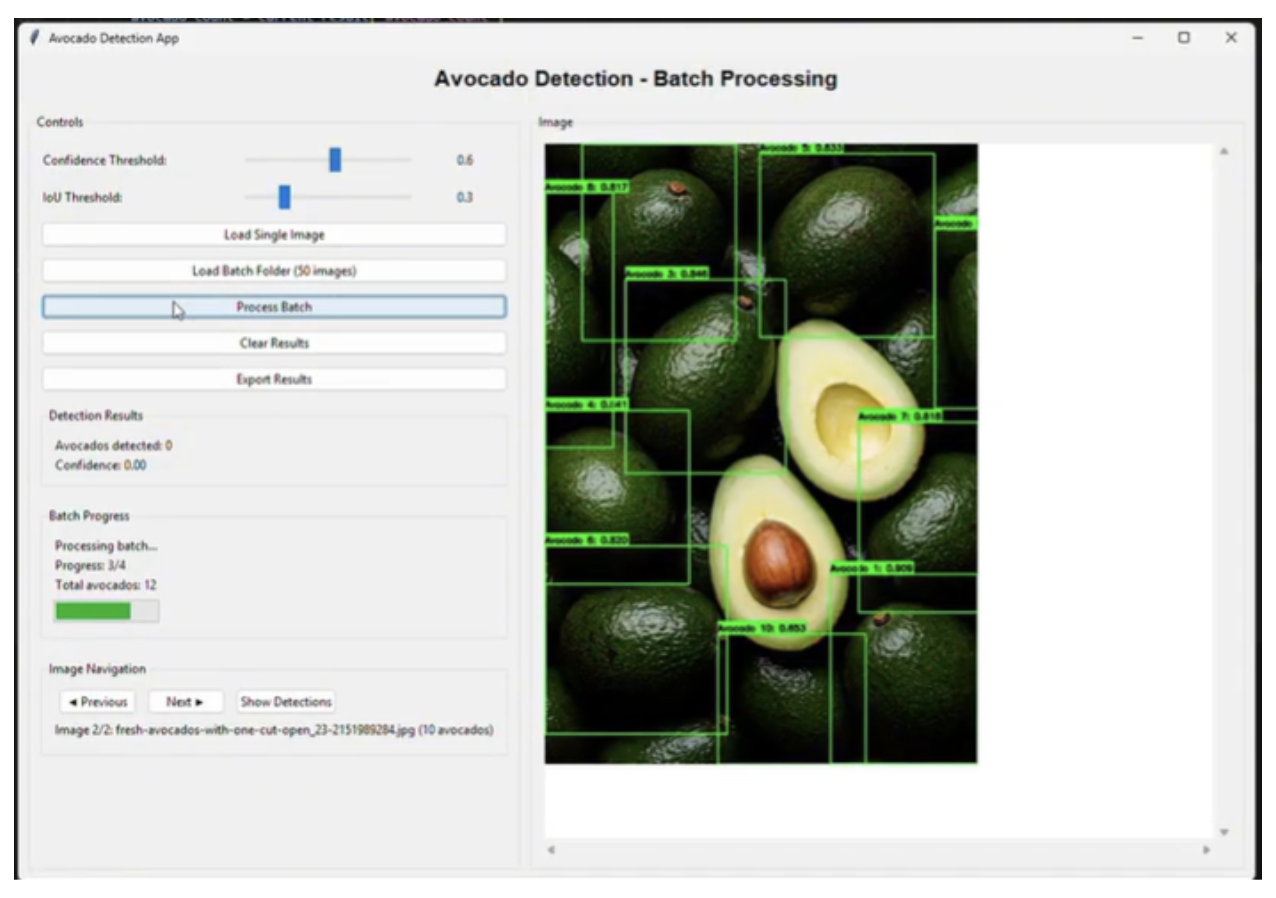
“Create an app with model ID avocado-detection-ffp7a/2, confidence 0.6, IoU 0.3, to count avocados in 50 images.”
Cursor then executes and hosts the updated version:
Step 5: Real-World Applications
Here are ways you can extend what you’ve built:
- Agriculture: Count fruit yields, detect pests
- Retail: Monitor shelf stock
- Healthcare: Flag anomalies in scans
- Manufacturing: Detect defects on parts
- Security: Track objects in live video feeds
Each use case combines Roboflow’s models with Cursor’s fast deployment.
Deploying Your App with Cursor + Vercel
For any questions along the way of this next part, you can always ask Cursor.
For reference, you can also check this video.
Step 1: Add a requirements.txt File
Your project needs to tell Vercel which Python packages to install.
In Cursor, simply ask “Add a requirements.txt file based on my code for Vercel deployment”
Or run inside Cursor’s terminal:
pip freeze > requirements.txtCursor can execute this for you automatically.
Step 2: Add a vercel.json File
This tells Vercel how to run your Flask app.
Ask Cursor “Create a vercel.json file to deploy this Flask app. If it’s not already a Flask app, change it to be one!”
For Flask, use (if not already done for you by Cursor):
{
  "version": 2,
  "builds": [
    { "src": "app.py", "use": "@vercel/python" }
  ],
  "routes": [
    { "src": "/(.*)", "dest": "app.py" }
  ]
}
If you used Streamlit instead of Flask, use Streamlit Cloud instead of Vercel (since Vercel doesn’t support Streamlit directly).
Step 3: Push to GitHub (with Cursor)
Inside Cursor’s terminal, ask it to run (this is assuming you already have git set up; if not, ask Cursor to help set it up):
git init
git add .
git commit -m "first commit"
git branch -M main
git remote add origin https://github.com/your-username/avocado-counter.git
git push -u origin main
Cursor will handle all Git commands for you. Now your project is on GitHub!
Step 4: Deploy with Vercel CLI (Inside Cursor)
Instead of clicking through the website, do everything via code (or ask Cursor to do this).Run in Cursor’s terminal:
# Install Vercel CLI
npm install -g vercel


# Log in (GitHub or email-based, Cursor shows you a link)
vercel login


# Deploy the app
Vercel .
- The first Vercel command will ask a few setup questions (project name, scope, etc.).
- Once answered, Vercel builds and deploys your app.
- At the end, you’ll get a live URL you can share.
For future updates:
vercel --prod
This redeploys your latest version.
Step 5: Test & Update
- Visit your live URL and upload avocado images.
- Change code in Cursor → run git push or vercel --prod → instantly redeployed.
- Add environment variables (like your Roboflow key) by running:
vercel env add ROBOFLOW_API_KEY
Licensing Considerations
Always review a model’s license before deploying. Some (like AGPL-3.0) require source code disclosure, which may not fit commercial goals.
Best choices for flexibility:
- Apache 2.0
- MIT
Roboflow clearly lists licensing details on Universe model pages and offers commercial licenses for restrictive models through Pro plans. Visit roboflow.com/licensing or contact Roboflow sales for customized solutions.
Conclusion: Cursor Object Detection
With Cursor and Roboflow, building vision apps is no longer just for ML experts. In a single afternoon, you can spin up scalable, license-compliant apps, whether you’re counting avocados, analyzing medical scans, or inspecting products on a factory line.
Here are some additional tutorials you might also enjoy, where you can learn how to leverage LLMs using Roboflow, build computer vision apps with Vercel V0, build computer vision apps with Replit, and build Lovable Apps with Roboflow.
Written by Aarnav Shah
Cite this Post
Use the following entry to cite this post in your research:
Contributing Writer. (Oct 2, 2025). Cursor Object Detection: Building Vision Apps with Roboflow. Roboflow Blog: https://blog.roboflow.com/cursor-object-detection/