
The CLIP Video Investigator is an open source tool that runs the CLIP model against video frames in real time and plots text-image similarity scores using Plotly, letting you see exactly which frames align with a given text description. Built on OpenCV for frame processing, it is useful for finding specific moments in long videos, auditing training data, and understanding how multimodal models interpret visual content across a sequence.
The digital world is awash with videos, from social media clips to professional documentaries. While it's one thing for humans to understand and interpret what's happening in these videos, it's a different challenge to get a machine to do the same. That's where computer vision, particularly the use of models like CLIP (Contrastive Language–Image Pretraining), comes into play.
CLIP, an open source model by OpenAI, has the remarkable ability to understand both textual descriptions and visual content, making it ideal for tasks that involve comparing or associating text with images or video frames. But how can you visualize this capability in real-time? How do you identify those 'eureka moments' in a video where the textual description perfectly—or not so perfectly—matches the frame?
We're showcasing a tool to bring you real-time insights into how text and image embeddings align or misalign during video playback. By leveraging OpenCV for video processing and Plotly for live data visualization, this tool lets you both watch a video and see a graphical representation of how text strings describe what is in the video frames.
In this blog post, you'll learn:
- How CLIP works and why it's a game-changer for video analysis.
- A live demo of the CLIP Video Investigator tool in action.
- How to set up and optimize the tool for your own use.
Whether you're a researcher diving into the nuances of multimodal models or an engineer looking to up your game in video content analysis, this post is for you!
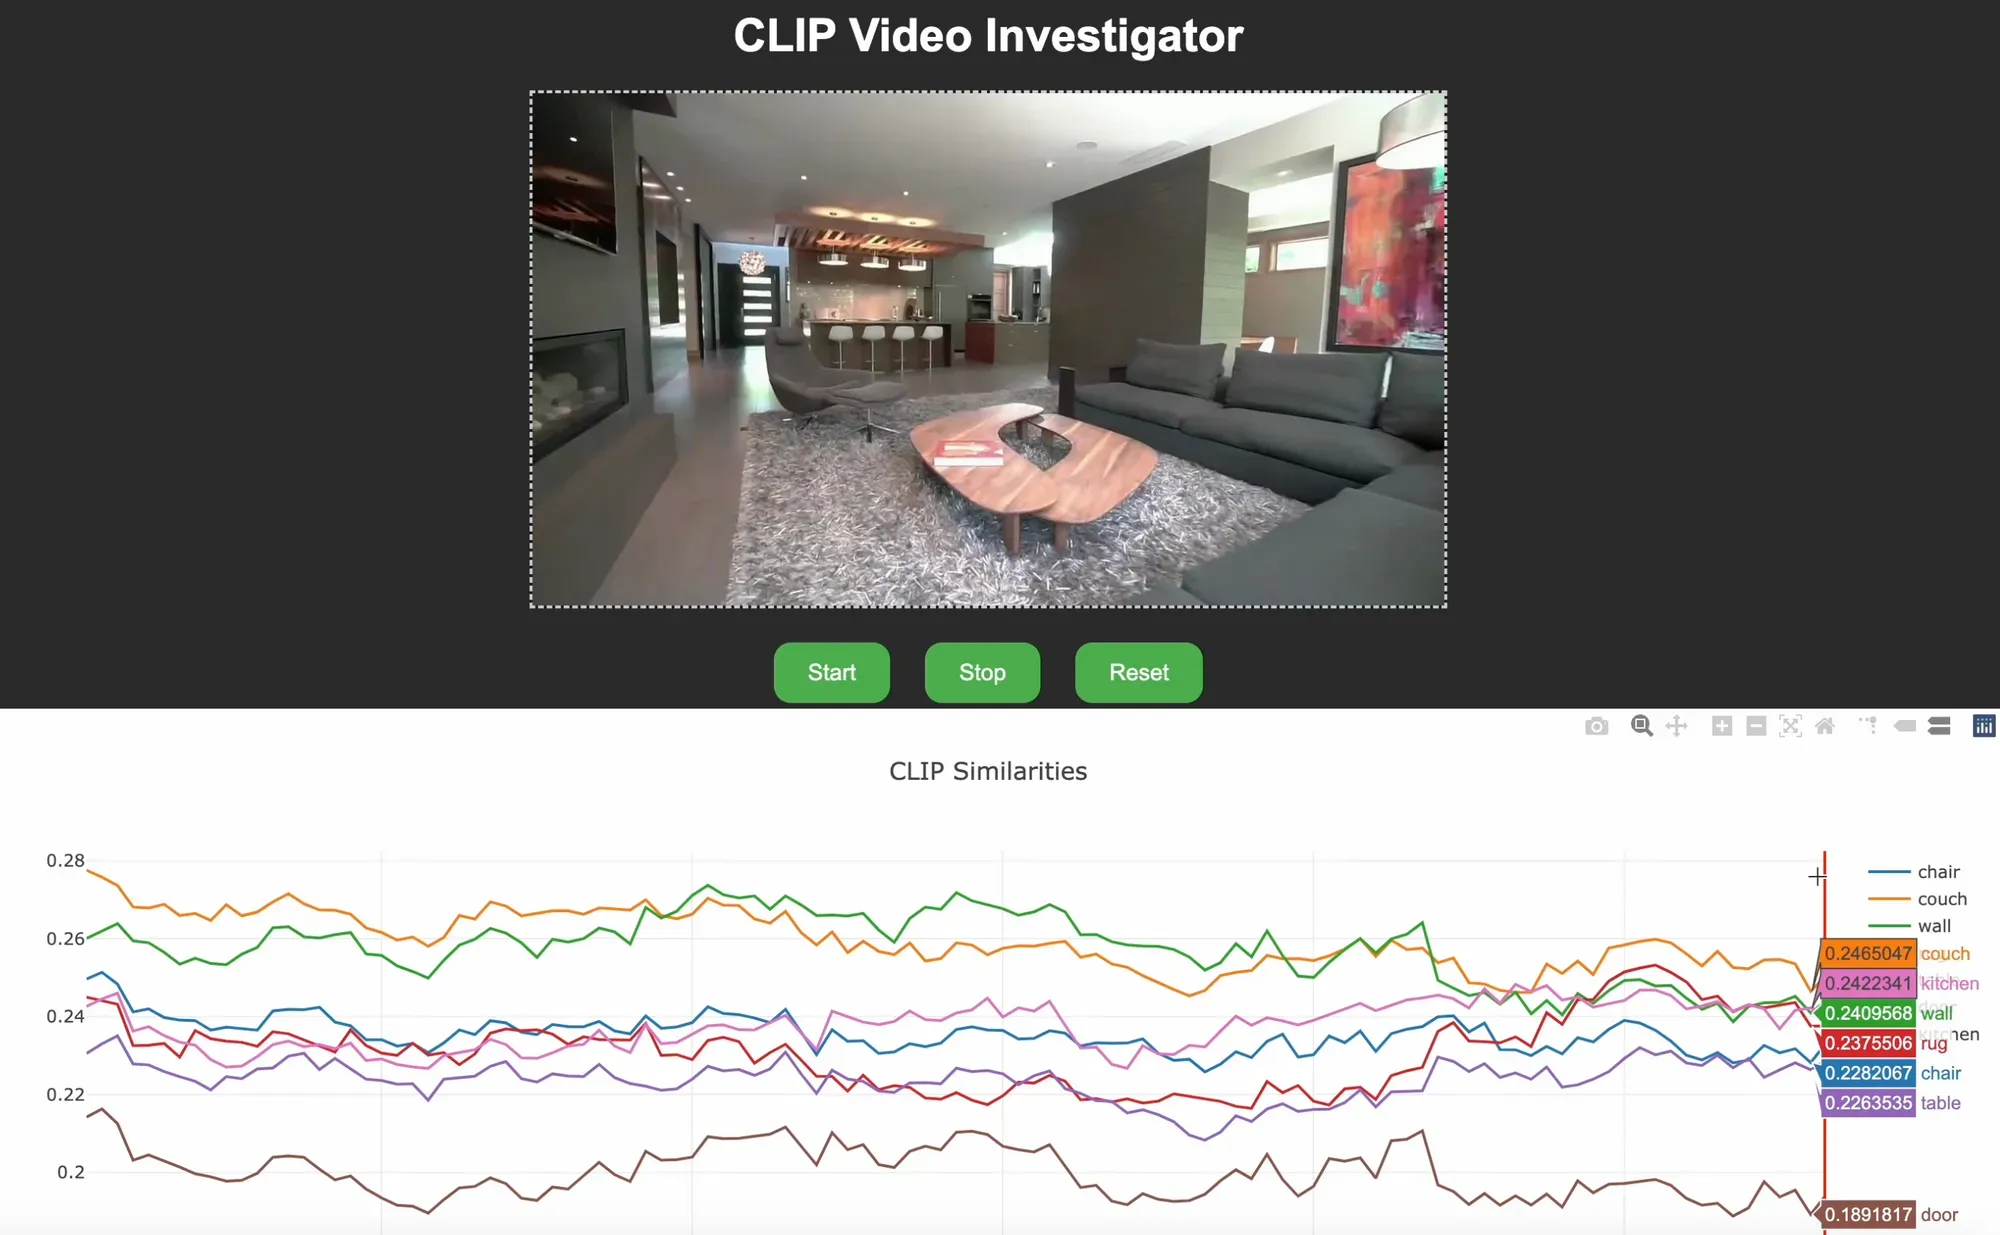
The below image shows the CLIP Video Investigator running on a video. The history of text prompts provided (i.e. "chair", "couch") are displayed on a graph below the video, allowing users to visualize, in real time, a video frame and how similar it is to each of the provided text prompts.
How Does CLIP Work?
Understanding the nuts and bolts of CLIP is crucial for anyone looking to fully exploit its capabilities for video analysis. At its core, CLIP is designed to bridge the gap between textual and visual data. But how does it do this?
CLIP is trained in a way that it understands both text and images within the same shared embedding space. This means that when you input a piece of text or an image into the model, what you get out is a high-dimensional vector (embedding) that represents the essence of that input.
By comparing these embeddings, you can gauge the similarity between a given text and image. This is particularly useful for tasks like object recognition, caption generation, and, as demonstrated by this tool, video frame analysis.
For video frame comparison with CLIP, we can use the following workflow:
- Text Embedding: A textual description is processed by the text encoder, generating a text embedding.
- Image Embedding: Concurrently, the image (or video frame) is processed by the vision encoder to produce an image embedding.
- Comparison: These embeddings are then compared to determine their similarity.
In practice, this often involves using cosine similarity to quantify how closely aligned the text and image embeddings are. A high cosine similarity score indicates a strong match, while a low score suggests a misalignment.
By providing a common ground for text and images, CLIP enables a slew of exciting possibilities for multimodal tasks, like tagging videos with textual descriptions or even more complex endeavors such as intelligent video summarization.
So, when you're using this CLIP Video tool, what you're using this powerful translation mechanism that understands and compares the 'language' of videos and text.
Fun Fact: Every image uploaded to Roboflow is embedded using CLIP, which allows users to search their images using text descriptions.
CLIP Video Tool in Action
CLIP Video Investigator is a Flask-based web application designed to compare text and image embeddings using the CLIP model. The application integrates OpenCV for video processing and Plotly for data visualization to accomplish the following:
- Play a video in a web browser.
- Pause and resume video playback.
- Compare CLIP embeddings of video frames with text embeddings.
- Visualize the similarity between text and image embeddings in real-time using a Plotly plot.
- Jump to specific frames by clicking on the Plotly plot.
Why This is Useful?
Understanding the relationship between text and image embeddings can provide insights into how well a model generalizes across modalities. By plotting these values in real-time, researchers and engineers can:
- Identify key frames where text and image embeddings are highly aligned or misaligned.
- Debug and fine-tune the performance of multimodal models.
- Gain insights into the temporal evolution of embeddings in video data.
- Enable more effective search and retrieval tasks for video content.
How to Install the Tool
First, make sure you have Python 3.8+ installed on your machine. Next, clone the project repository from GitHub:
git clone https://github.com/roboflow/clip_video_app.gitNavigate to the project directory:
cd clip_video_appNext, install the project dependencies:
pip install -r requirements.txtNow we can start configuring the application.
Configuration
A config.yaml file is used to specify various settings for the application:
roboflow_api_key: ""  # Roboflow API key
video_path: ""  # Path to video file
CLIP:
  - wall
  - tile wall
- large tile wallroboflow_api_key: Your Roboflow API key.video_path: The path to the video file you want to analyze.CLIP: A list of text inputs for which you want to generate CLIP embeddings.
Usage
For this tool, you must also be running the a Roboflow Inference server locally. You can run Inference locally using the following commands:
pip install inference
inference server start- Update the
config.yamlfile with your Roboflow API key and the path to your video file (or use sample file in /data folder). - Start the Flask application.python scripts/clip_app.py
- Open a web browser and navigate to
http://localhost:5000. - Use the "Start" and "Stop" buttons to control video playback. When you first make a request, results may not come in for a minute or two. This is because the model weights need to be downloaded by Inference before they can be used.
- View real-time data related to the video in the Plotly plot below the video.
- Click on the Plotly plot to jump to specific video frames.
Optional: Embedding Caching
If you find yourself working with the same videos frequently, you can take advantage of the embedding caching feature. This saves pickle files of the text and image frame embeddings in an /embeddings folder, reducing the computation time for subsequent analyses. These embedding caches are automatically created for each video / text set.
And that's it! You should now have CLIP Video Investigator tool up and running on your machine.
Useful Tips and Tricks
Once you have the CLIP application up and running, you'll want to make the most out of its capabilities. Here are some tips and tricks that can help you work more efficiently and gain deeper insights into your video analysis tasks.
Experimenting with Text Embeddings
- Vary Phrasing: The choice of words in your text prompt can lead to varying results. Experiment with synonyms or different sentence structures.
- For example: If you initially used the text prompt "Person riding a bike" and got less accurate results, you could try a synonym like "Individual on a bicycle" to possibly improve the similarity scores.
- Include Context: Sometimes, providing more contextual information in the text prompt may improve alignment with the video content.
- For example: Instead of a general text prompt like "Dog," you might get more aligned results with a more specific and contextual prompt like "Golden Retriever playing in the park."
- Iterative Refinement: Start with a broad text prompt and gradually narrow it down based on the results you get.
- For example: You can begin with "Sports" as a general category. As you iterate, you might narrow it down to "Outdoor sports" and finally to "Man skateboarding in a skate park" to zero in on specific video segments that align with the refined prompt.
Interpreting Frame-to-Frame Results
- Temporal Smoothing: Consider using a moving average or other smoothing techniques to reduce noise in frame-to-frame similarity scores.
- For example: If your video shows a person gradually entering the frame and the similarity scores are fluctuating, apply a 5-frame moving average to see a smoother entry pattern in the Plotly plot.
- Threshold Analysis: Set a similarity score threshold to automatically flag frames of interest.
- For example: In a wildlife monitoring video, set a similarity score threshold of 0.8 for "bear sighting." Frames that exceed this score will be automatically flagged for review.
- Frame Differencing: Use frame differencing to understand the rate of change in similarity scores. Sudden spikes could be of particular interest.
- For example: In an educational video about cooking, frame differencing can highlight moments when the chef changes tasks, such as moving from chopping to sautéing, as indicated by spikes or drops in similarity scores.
Plotly Filters
- Apply Real-Time Filters: Toggle on or off certain text similarities and focus on the ones that are important / interesting.
- Focus on Specific Ranges: Adjust the filter settings to hone in on particular ranges of similarity scores.
Conclusion
By now, you should have a solid understanding of how this CLIP Video tool can empower your video analysis tasks, from identifying key frames to fine-tuning multimodal models. But why stop here?
If you're interested in leveraging the power of CLIP for video analysis at scale or in a production environment, our team at Roboflow is here to help.
The Roboflow team is made up of people with years of experience in computer vision and machine learning. Our team can help you build and scale computer vision solutions in your workflow.
Ready to take your video analysis projects to the next level? Contact the Roboflow sales team.
Cite this Post
Use the following entry to cite this post in your research:
Reed Johnson. (Nov 1, 2023). How to Detect Segments in Videos with Computer Vision. Roboflow Blog: https://blog.roboflow.com/detect-video-segments/