

Find your model's edge cases with a Roboflow Workflow that runs the model on unlabeled production images, flags anything with no detections or a confidence below 0.60, and has Gemini explain what made each flagged image hard. Label the flagged images in Roboflow Annotate and retrain.
A model can pass validation with strong metrics and still fail once it hits production. Validation sets are built from the same distribution the model was trained on, so they typically don't capture the lighting changes, occlusions, or rare defect types a camera on a real line eventually sees. Those gaps accumulate as missed or misclassified images.
So today we'll take a look at how to find computer vision edge cases in production. This tutorial builds a Roboflow workflow that runs a trained model against unlabeled production images, flags the ones it struggles with, and asks a VLM to explain why. The results export to a CSV for review, and the loop closes with labeling and retraining.
What Counts as an Edge Case?
An edge case is any image that falls outside what a model reliably handles. In computer vision, that generally means: rare conditions the training data barely covered; hard negatives that look deceptively similar to what the model was trained to detect; and distribution gaps, differences in lighting, texture, or camera setup between training and production data.
These matter more than overall accuracy suggests, since averages hide the small slice of real-world variation a model consistently fails on.
(One quick clarification: "edge case" here has nothing to do with edge devices, the Jetsons and Raspberry Pis a model might run on.)
Methods for Finding Edge Cases
- Mining low-confidence and disagreement frames: flag predictions below a confidence threshold or images with no detections at all, what this tutorial's Workflow does directly.
- Comparing train vs production distributions: run a model trained on one dataset against a separate, unseen dataset to surface a real distribution gap, demonstrated here by using two different fabric datasets.
- Reviewing the confusion matrix off-diagonal: use Roboflow's Model Evaluation to see which classes get confused with each other or missed entirely.
- Clustering embeddings to find sparse regions: group images by visual similarity and look for small, isolated clusters that suggest underrepresented conditions.
- Using a VLM to describe outliers: ask a vision-language model to explain what makes a flagged image hard, what Gemini does in this tutorial's Workflow.
How to Find Edge Cases in a Computer Vision Dataset
Let's get started.
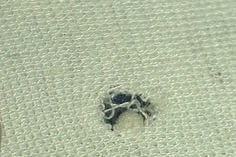
Fork the Fabric Defect Detection dataset to use as your training set.
Then fork the Fabric Defects 5 Class dataset to use as unlabeled production images.
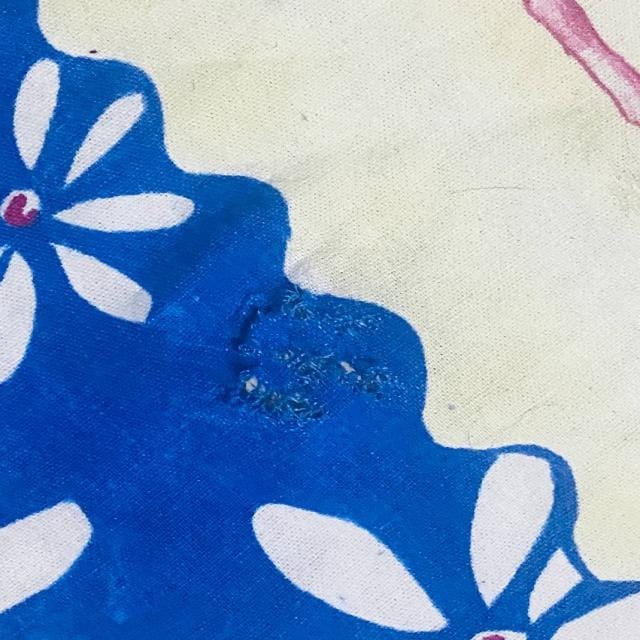
The difference between these two images is the whole premise of this tutorial. The training set's hole sits on a plain, high-contrast background, easy to learn and easy to detect. The production set's holes are smaller and buried in a busy, multi-color pattern, the kind of gap that shows up later as low confidence or missed detections.
Train the Baseline Model
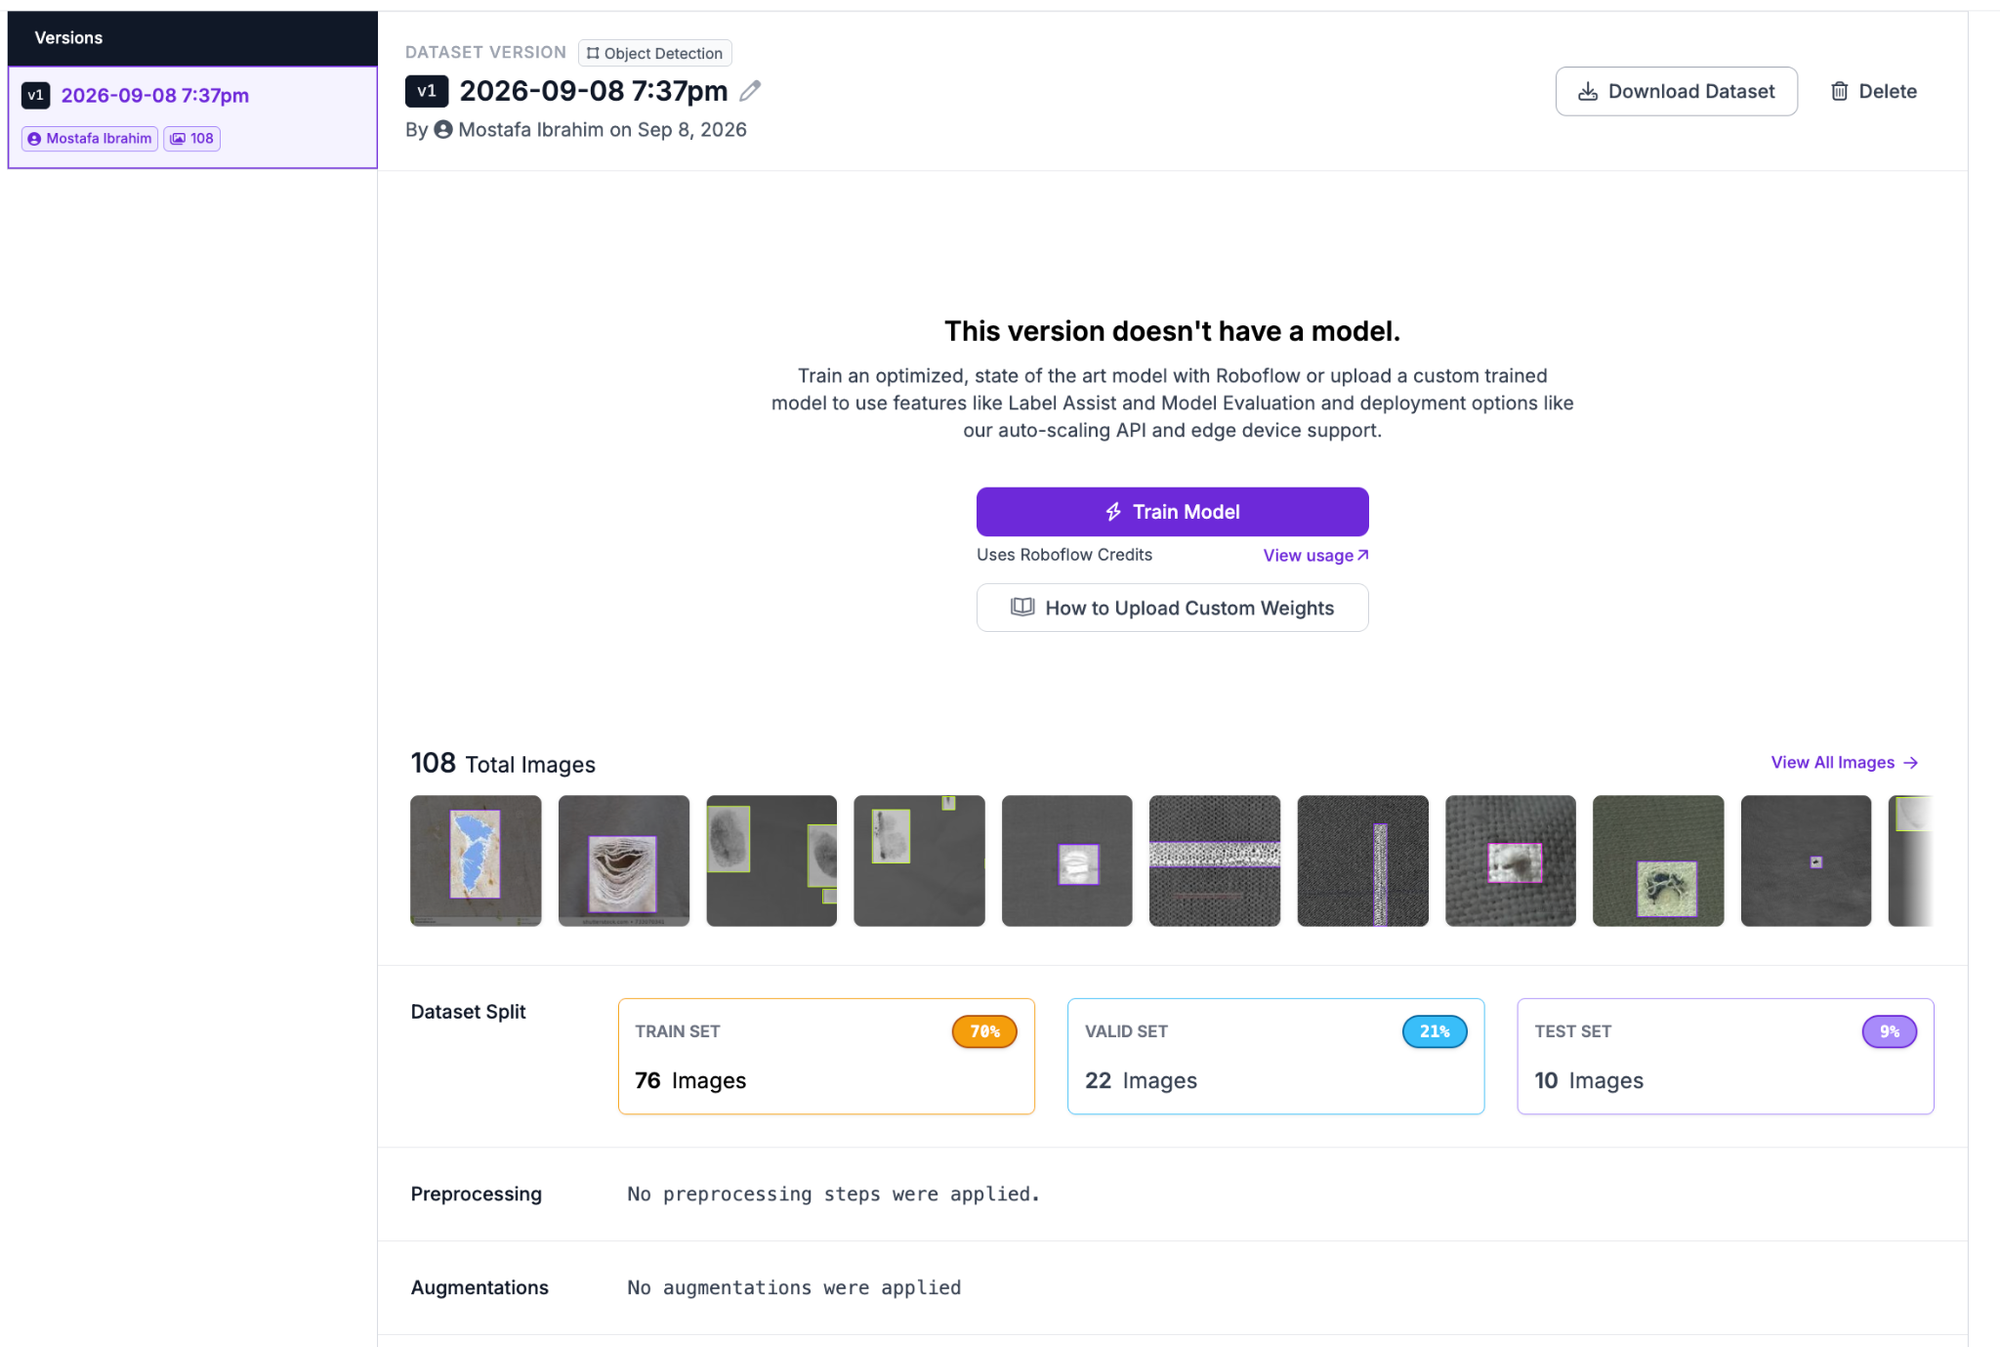
Generate a new dataset version from the training set using a 70/20/10 train/validation/test split.
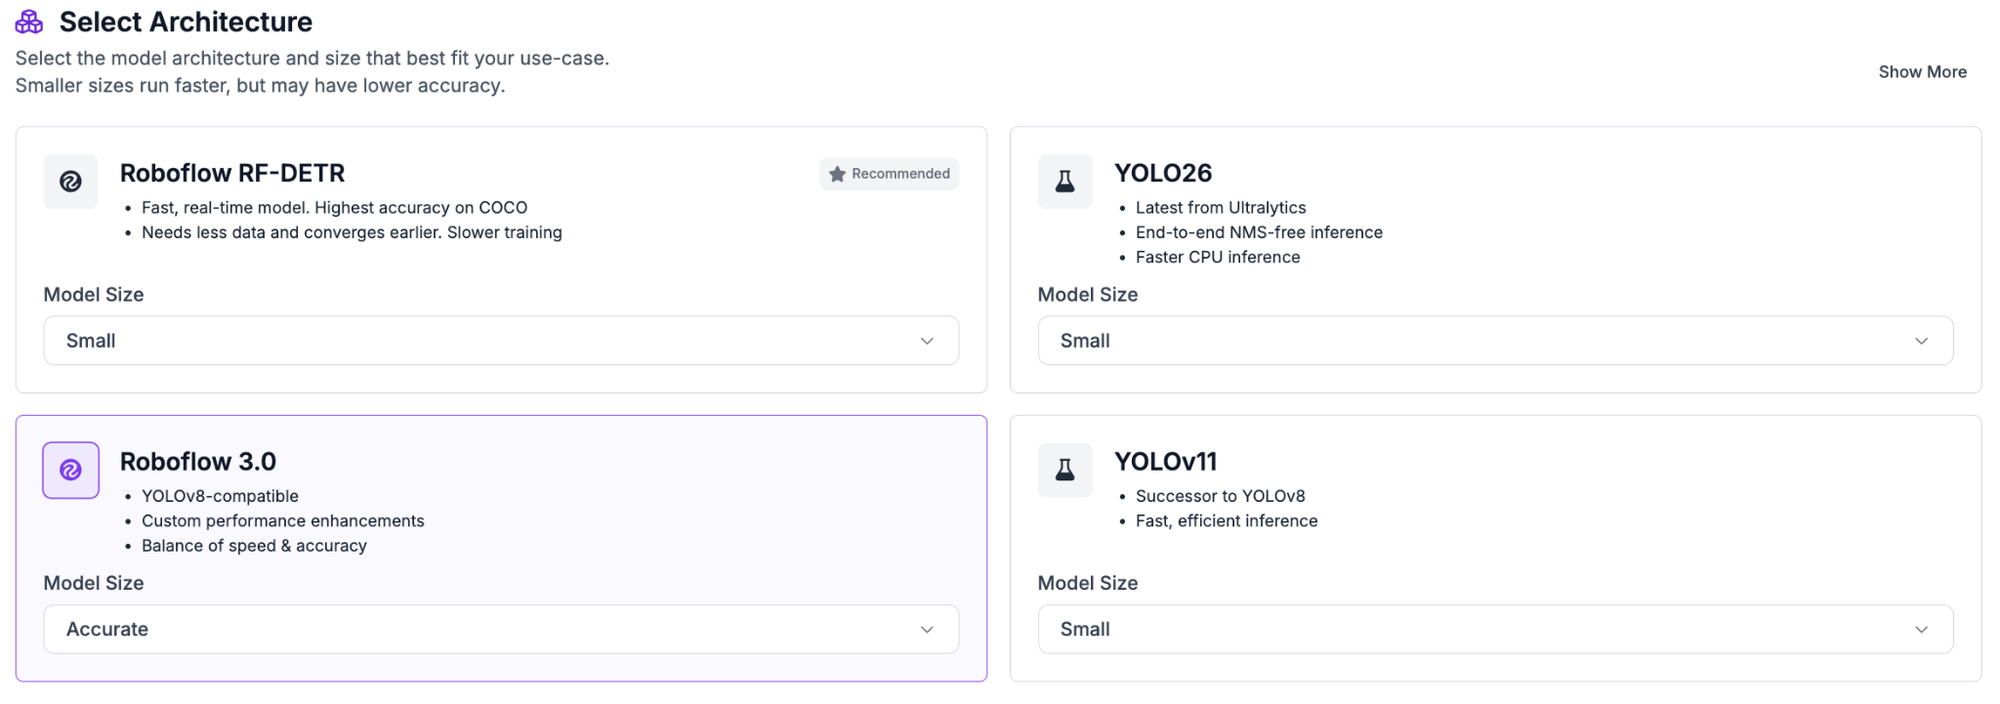
Click Custom Train and choose whichever model type fits your needs. For this tutorial, Roboflow 3.0 was selected.
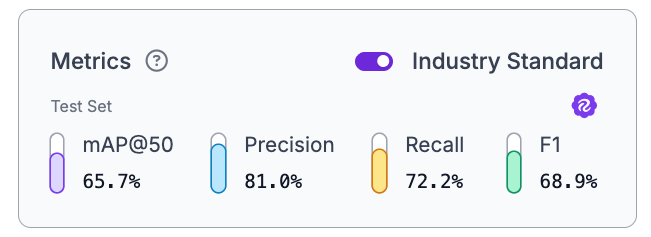
Once training finishes, review the model metrics. This baseline run reached 65.7% mAP@50, 81.0% precision, 72.2% recall, and 68.9% F1, numbers that look reasonable on paper but leave real room for missed and misclassified defects.
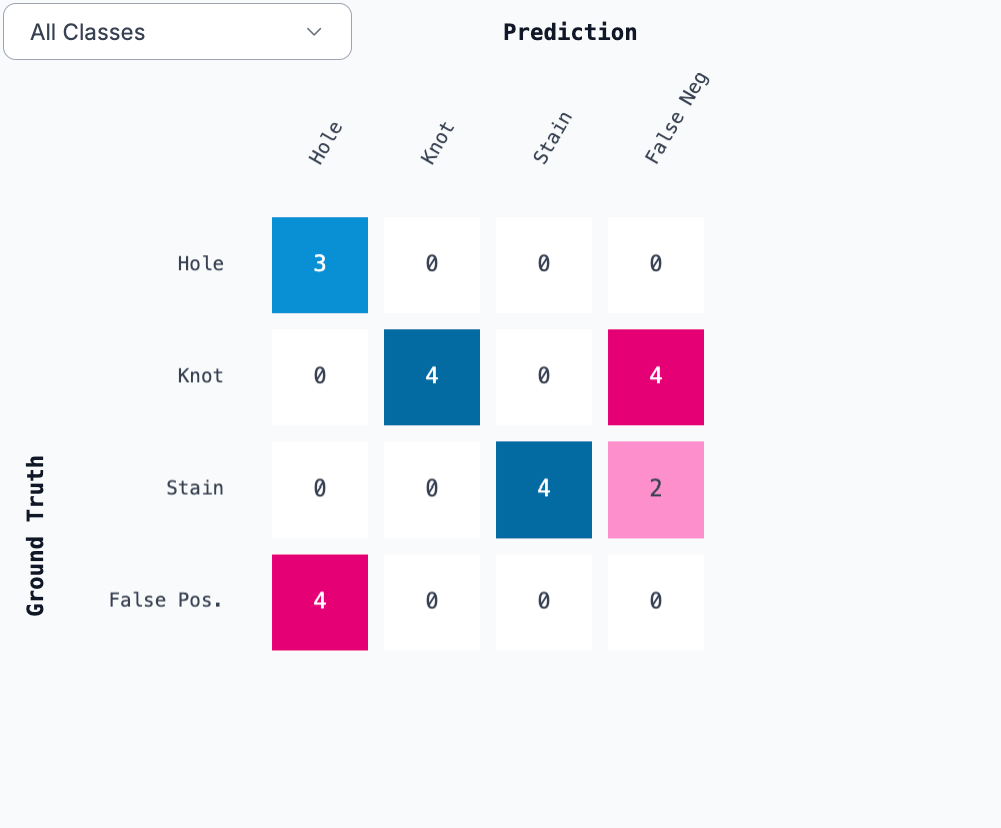
The confusion matrix tells a more specific story. Hole predictions are clean: three correct with no false negatives, but four background regions got incorrectly predicted as holes. Knot has zero misclassifications between classes but four missed detections entirely, and Stain shows the same pattern with two missed detections. In other words, when the model does identify a class, it tends to get it right, but it's missing a meaningful share of knots and stains altogether.
Build the Edge Case Mining Workflow
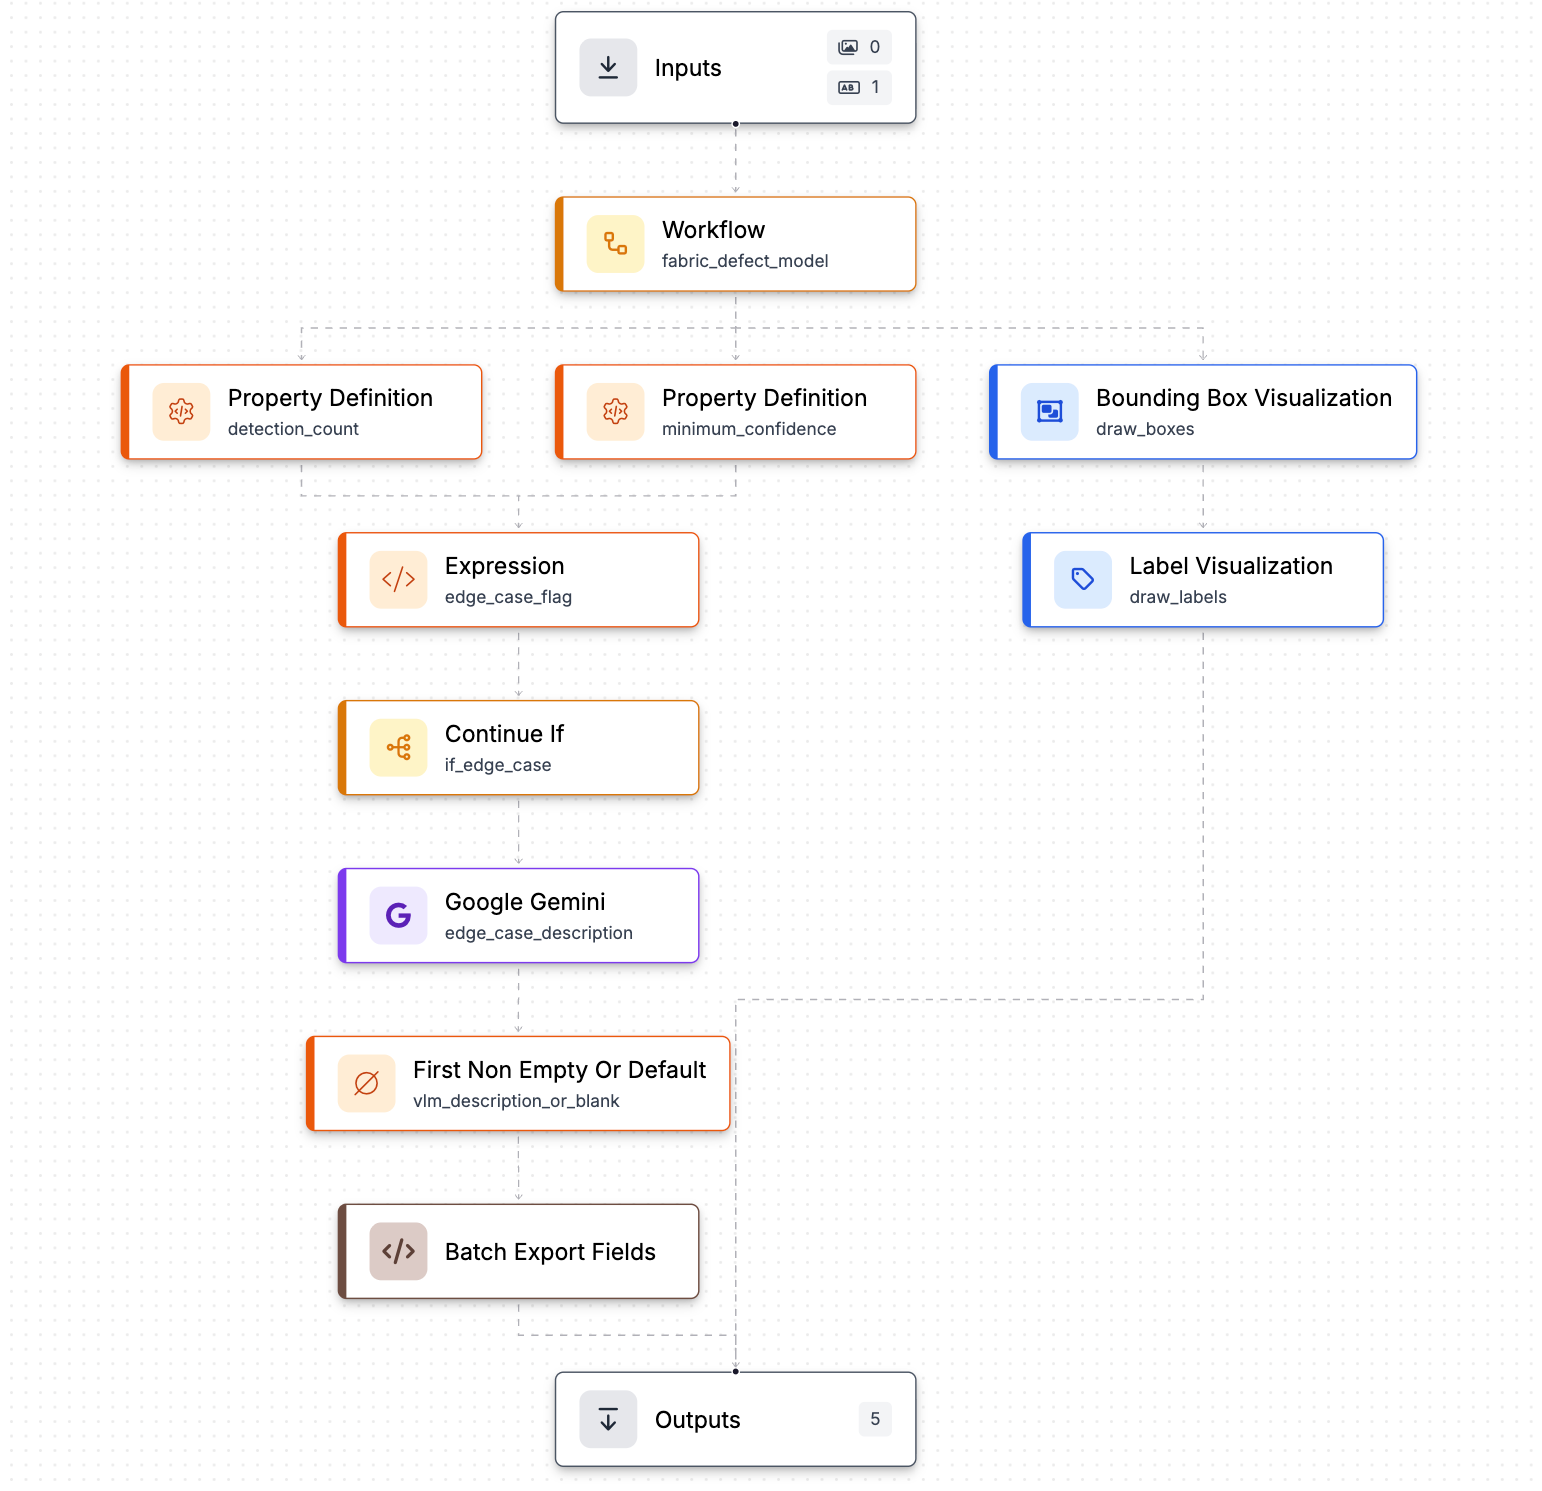
In the steps that follow, we'll build a Workflow that runs a trained model on unlabeled production images, flags the ones it struggles with, and asks Gemini to explain why. Here's the workflow we'll build. Here's what each block does:
- Fabric Defect Model: Runs the trained model on the image and returns defect predictions.
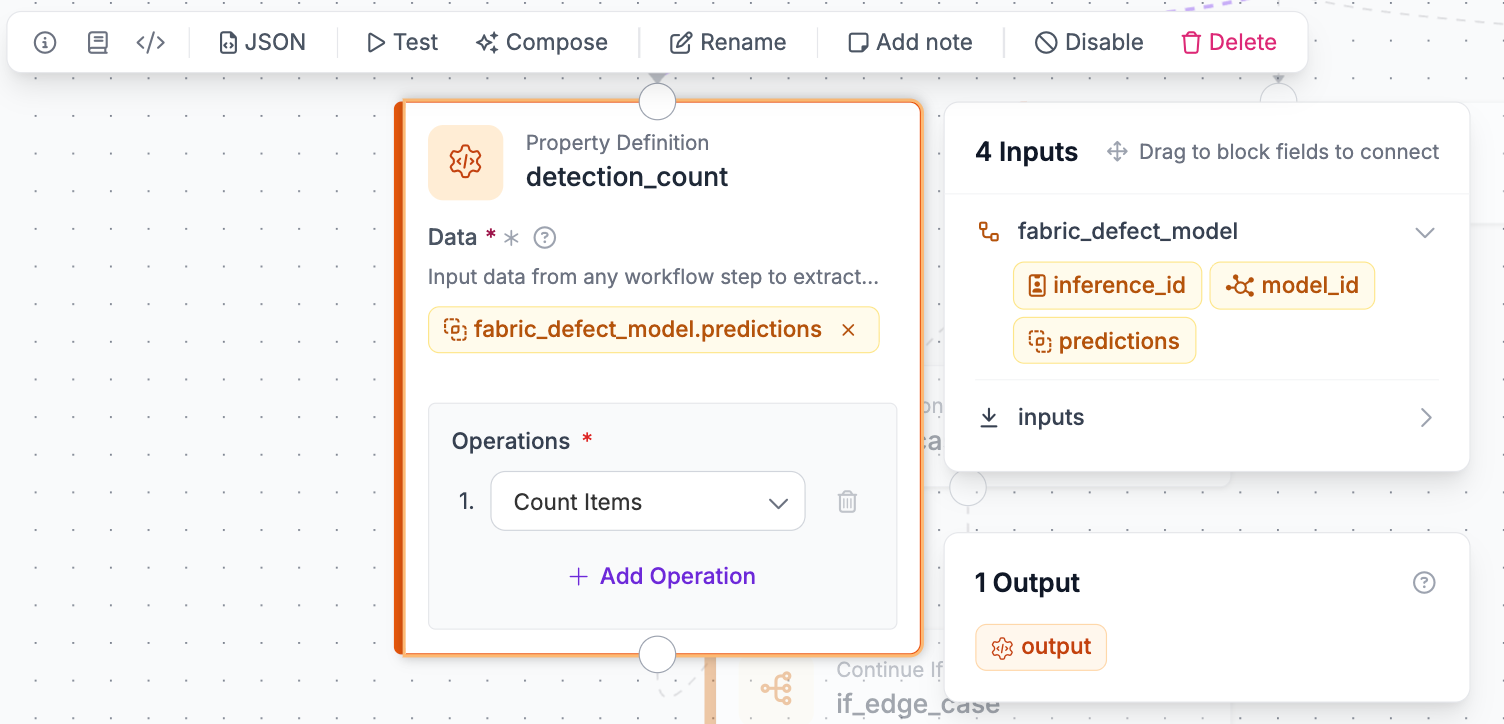
- Detection Count: Counts how many defects were found. Zero is treated as a potential edge case.
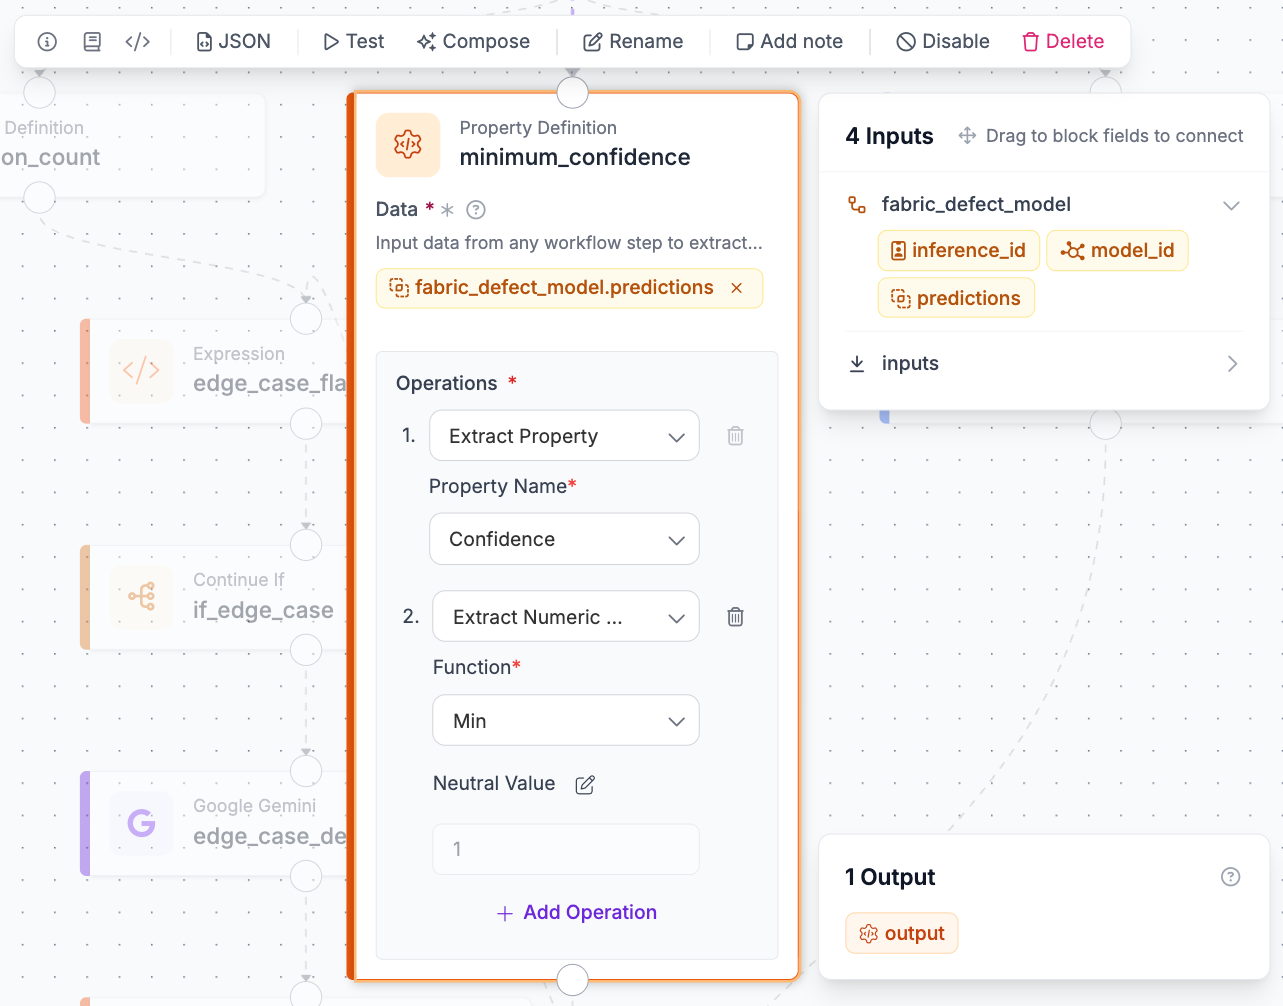
- Minimum Confidence: Returns the lowest confidence score among the detections.
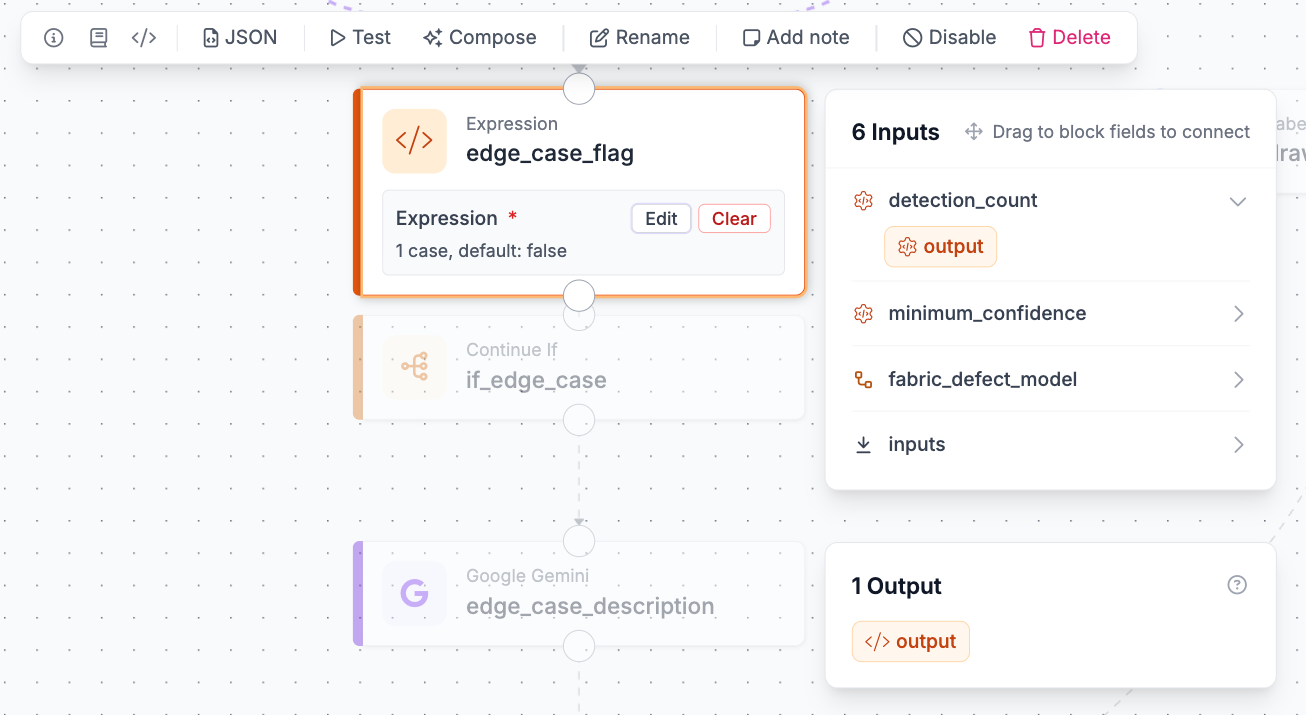
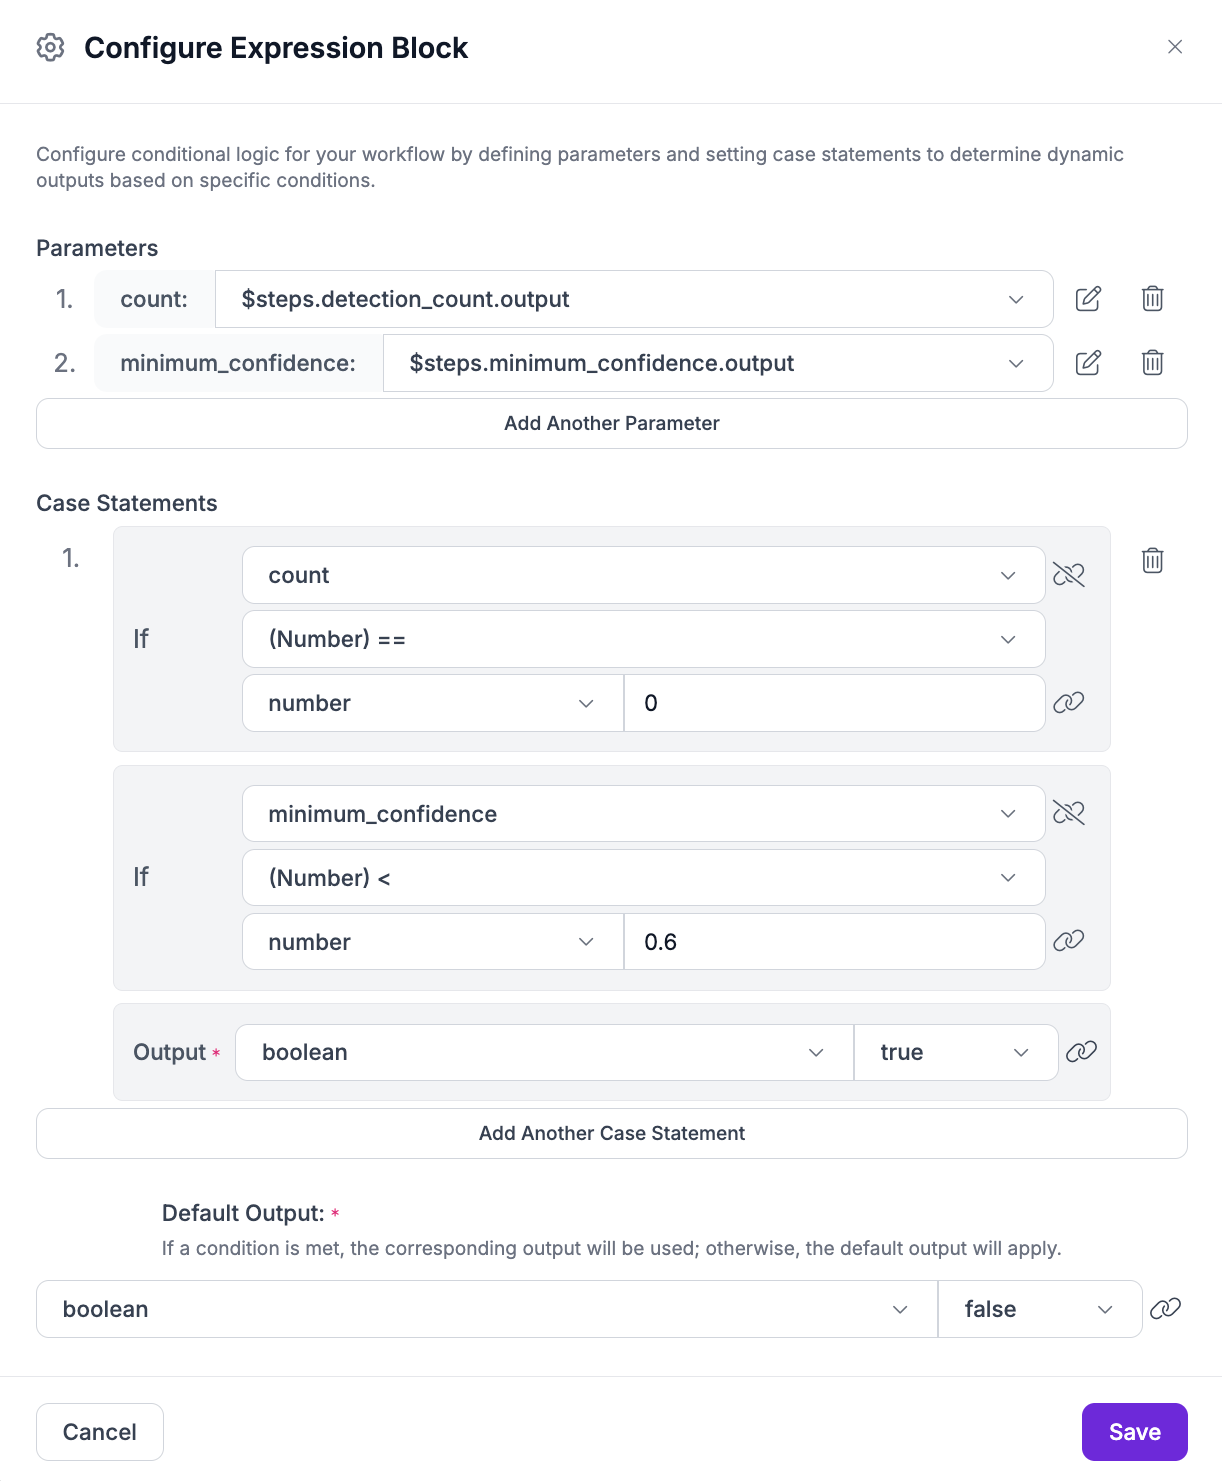
- Edge Case Flag: Flags the image as an edge case if there are no detections or the minimum confidence falls below a threshold.
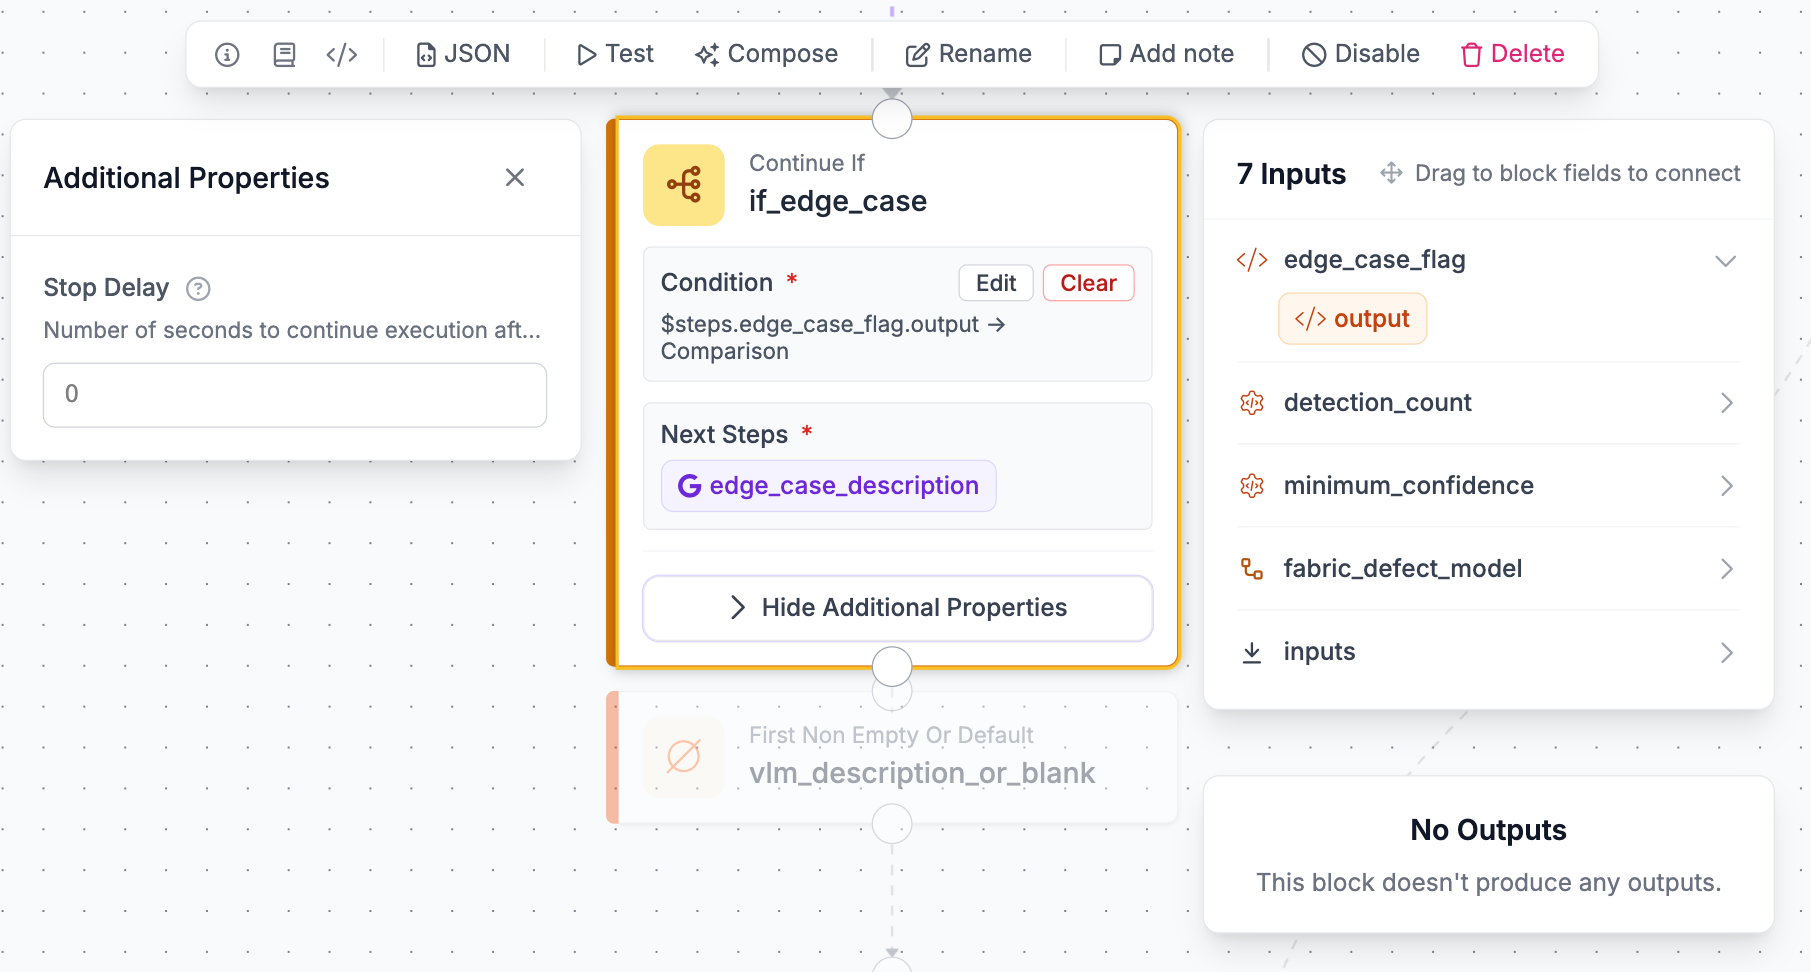
- If Edge Case: Only lets flagged images continue to the Gemini branch, saving unnecessary VLM calls.
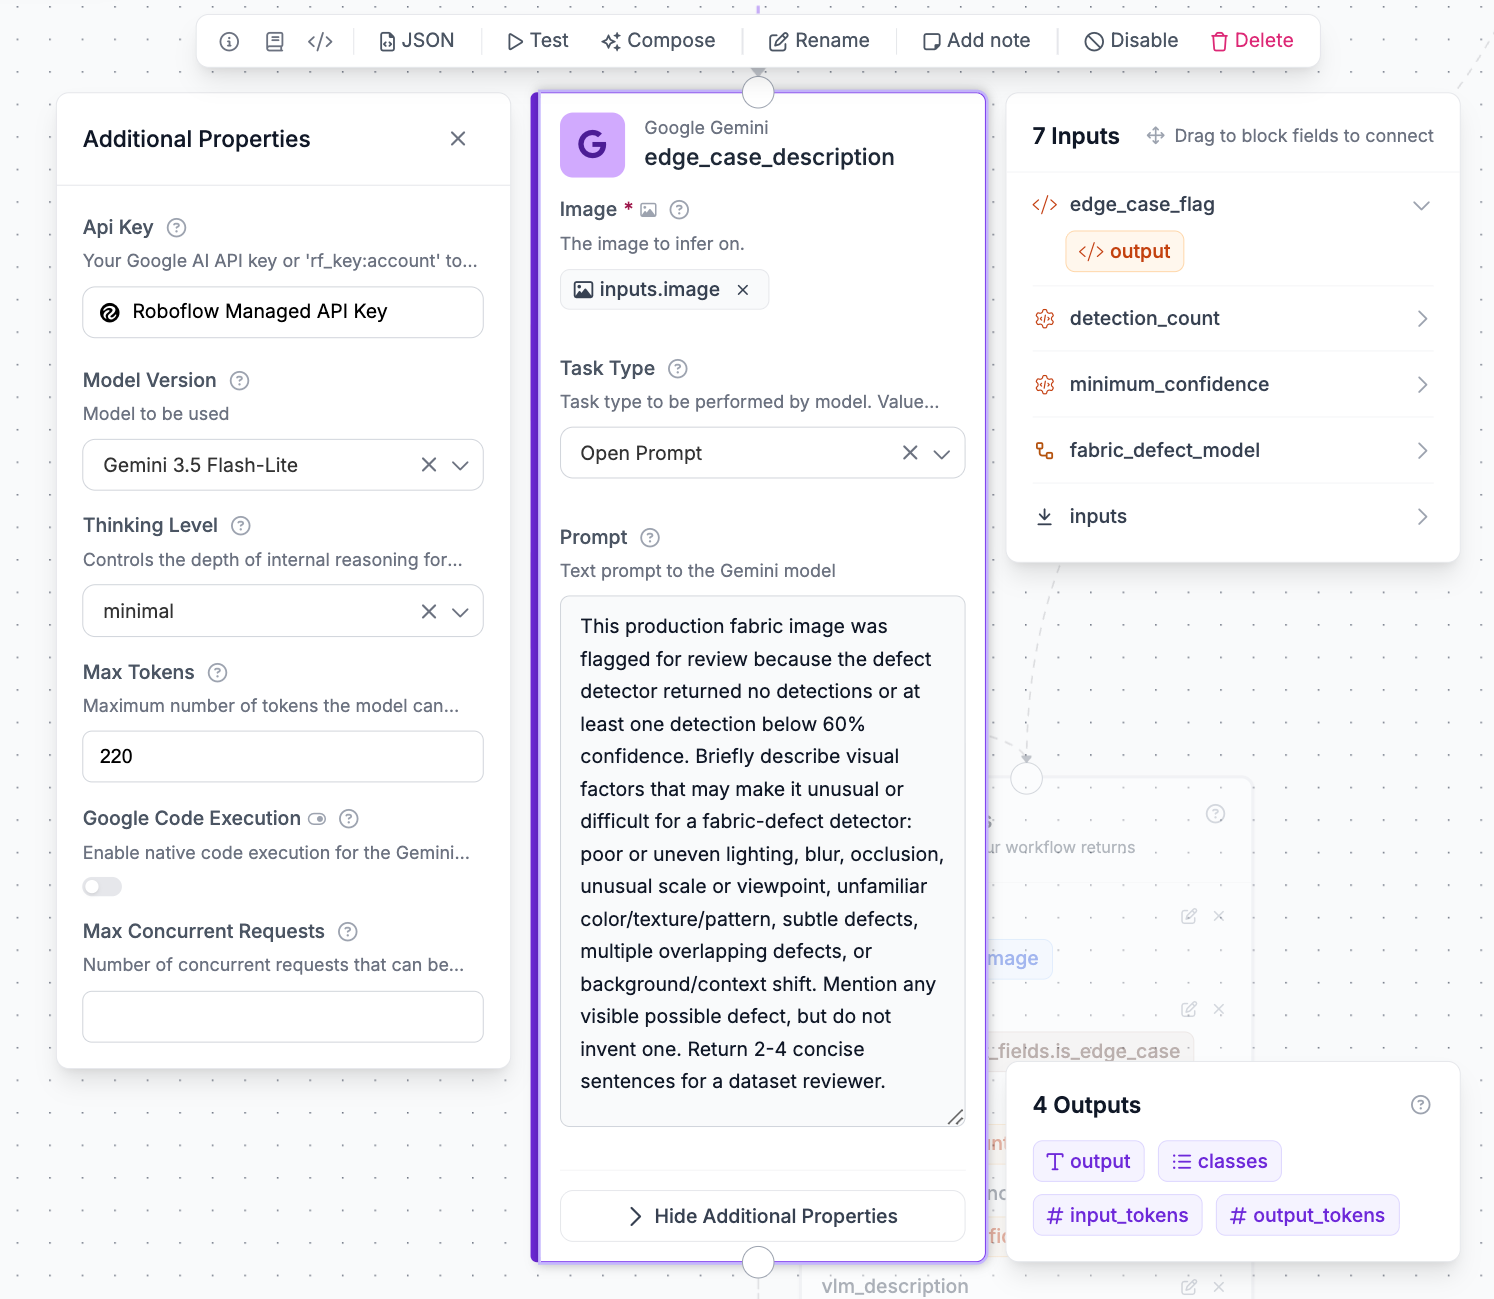
- Edge Case Description: Asks Gemini to describe what might have made the image hard for the model.
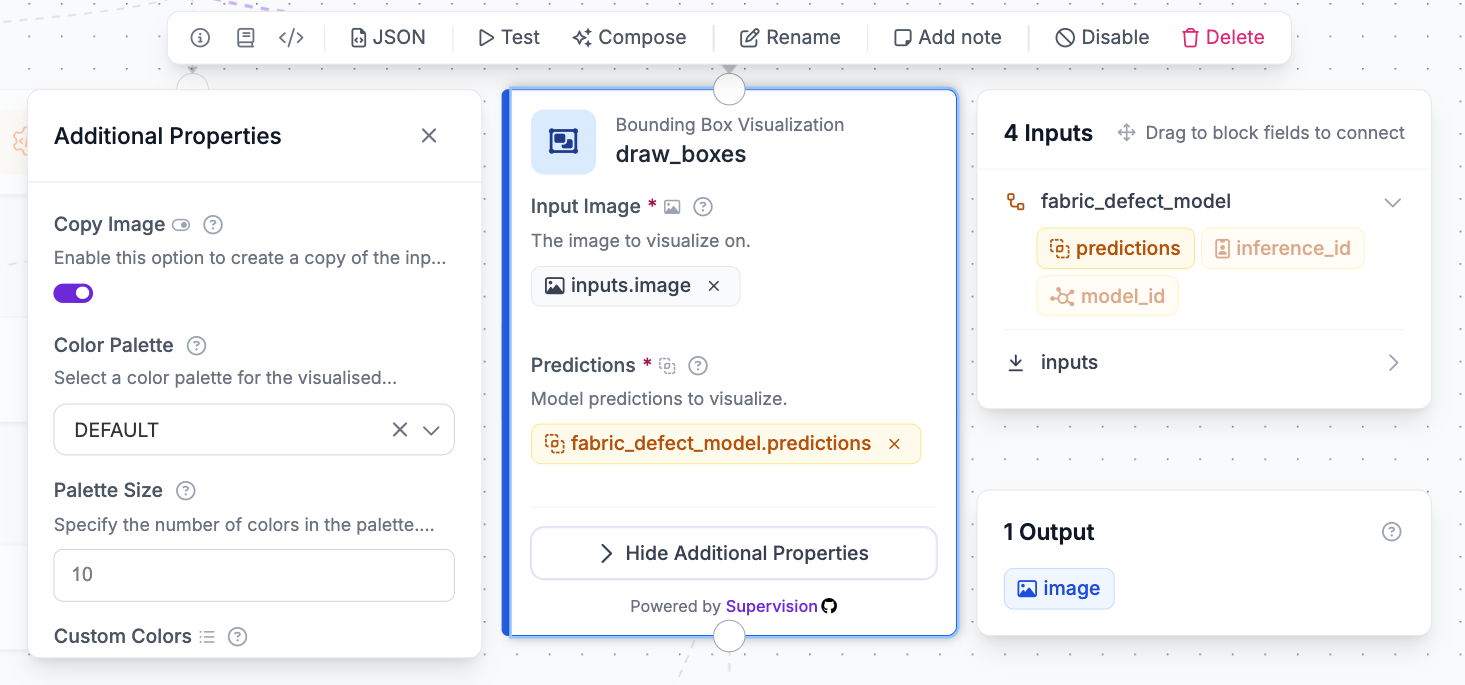
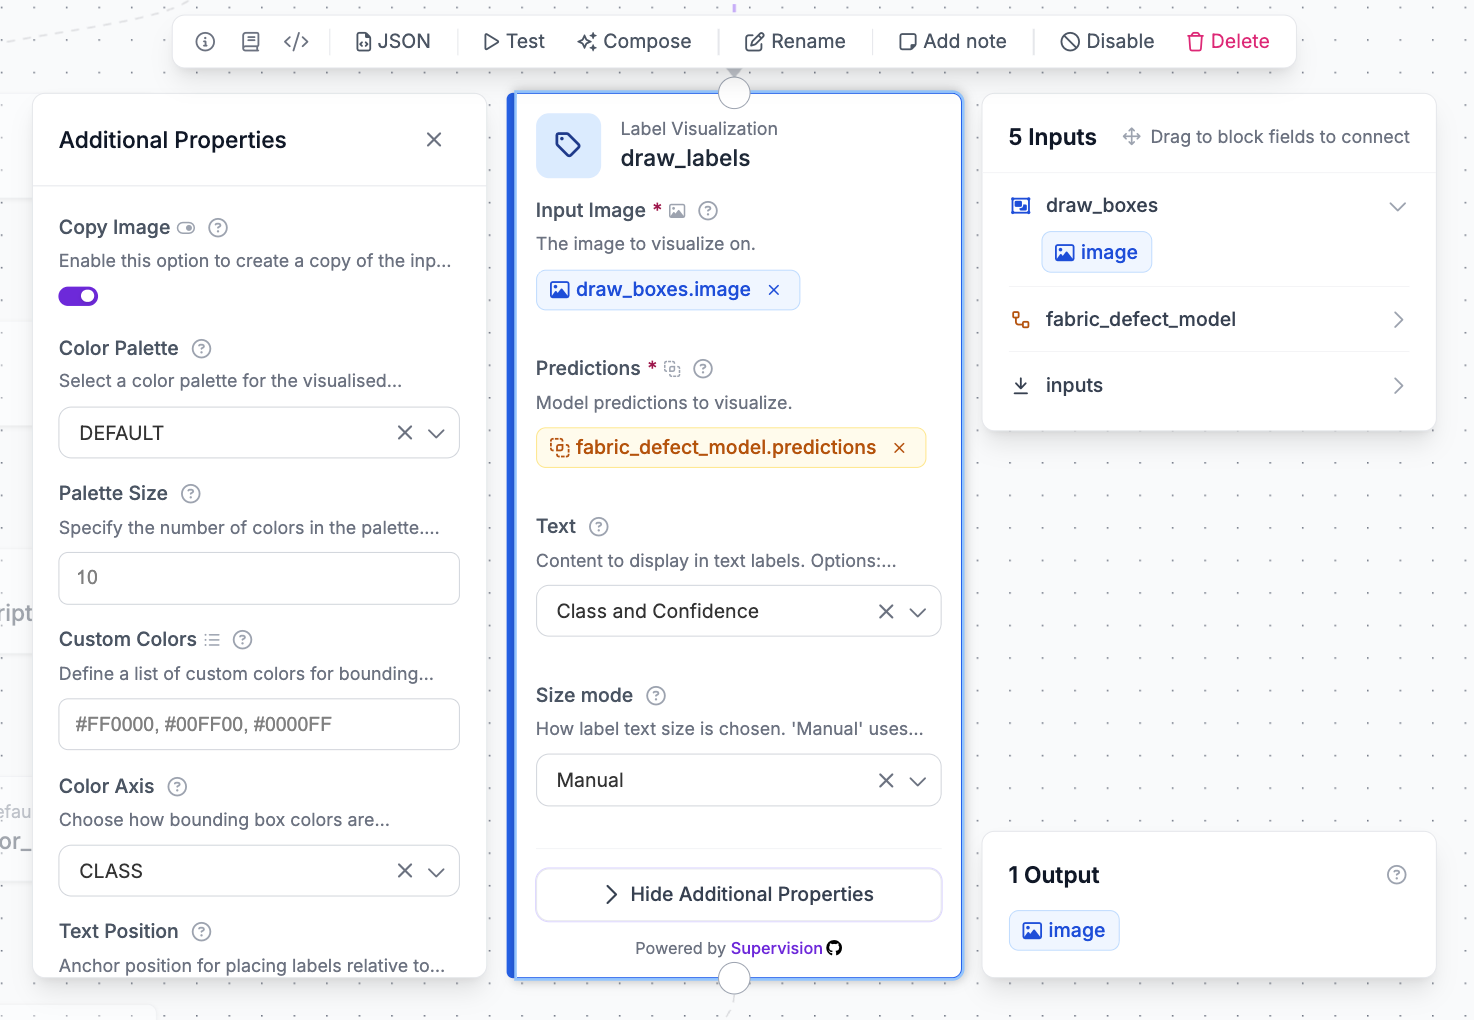
- Draw Boxes: Draws bounding boxes around the model's predictions.
- Draw Labels: Adds class names and confidence scores to each box.
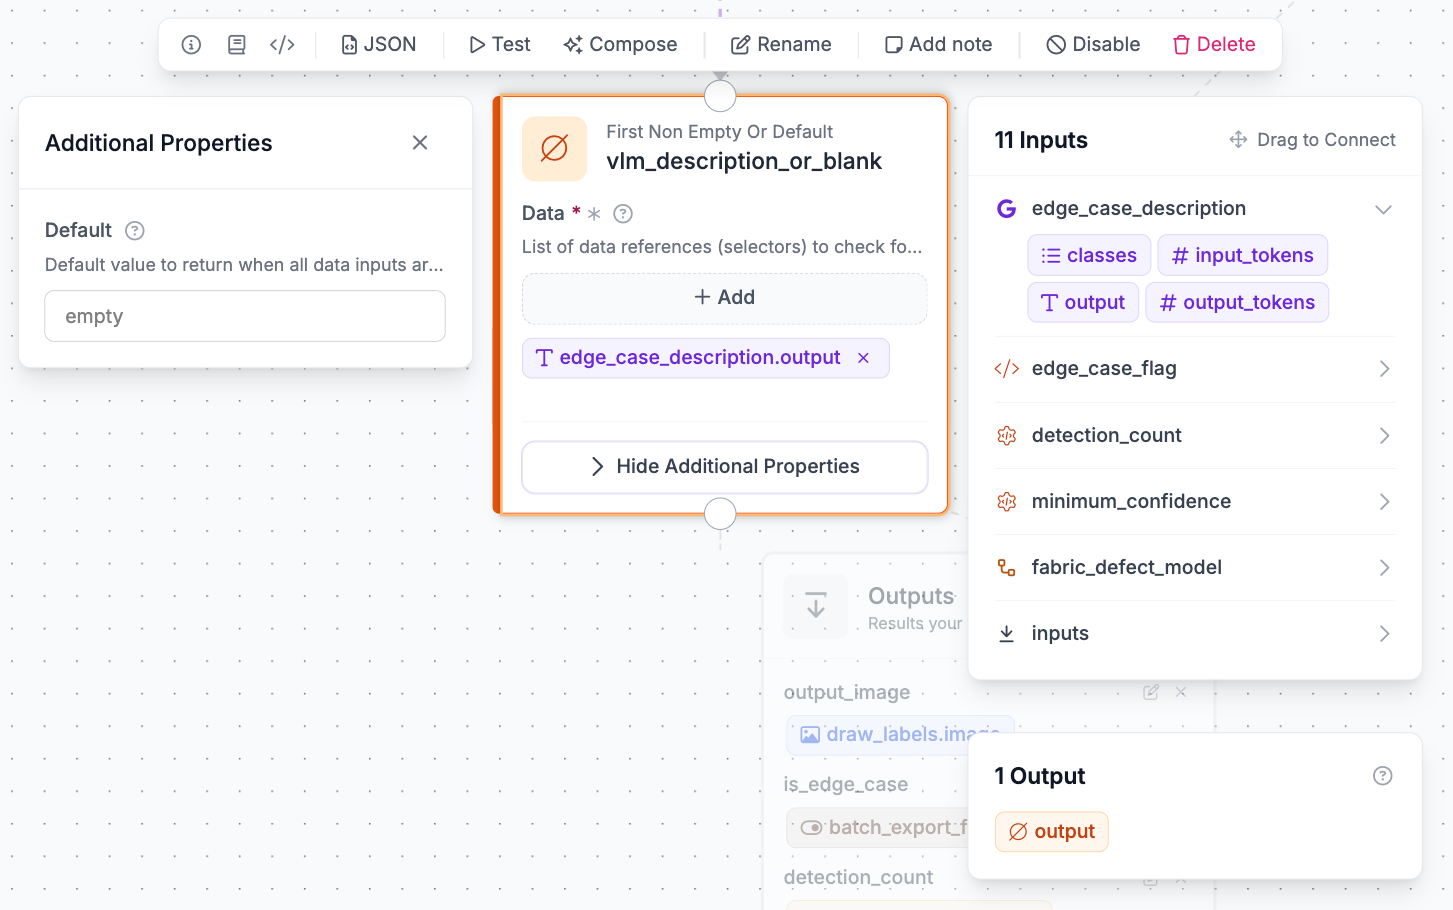
- VLM Description or Blank: Uses Gemini's description when available, or an empty string otherwise.
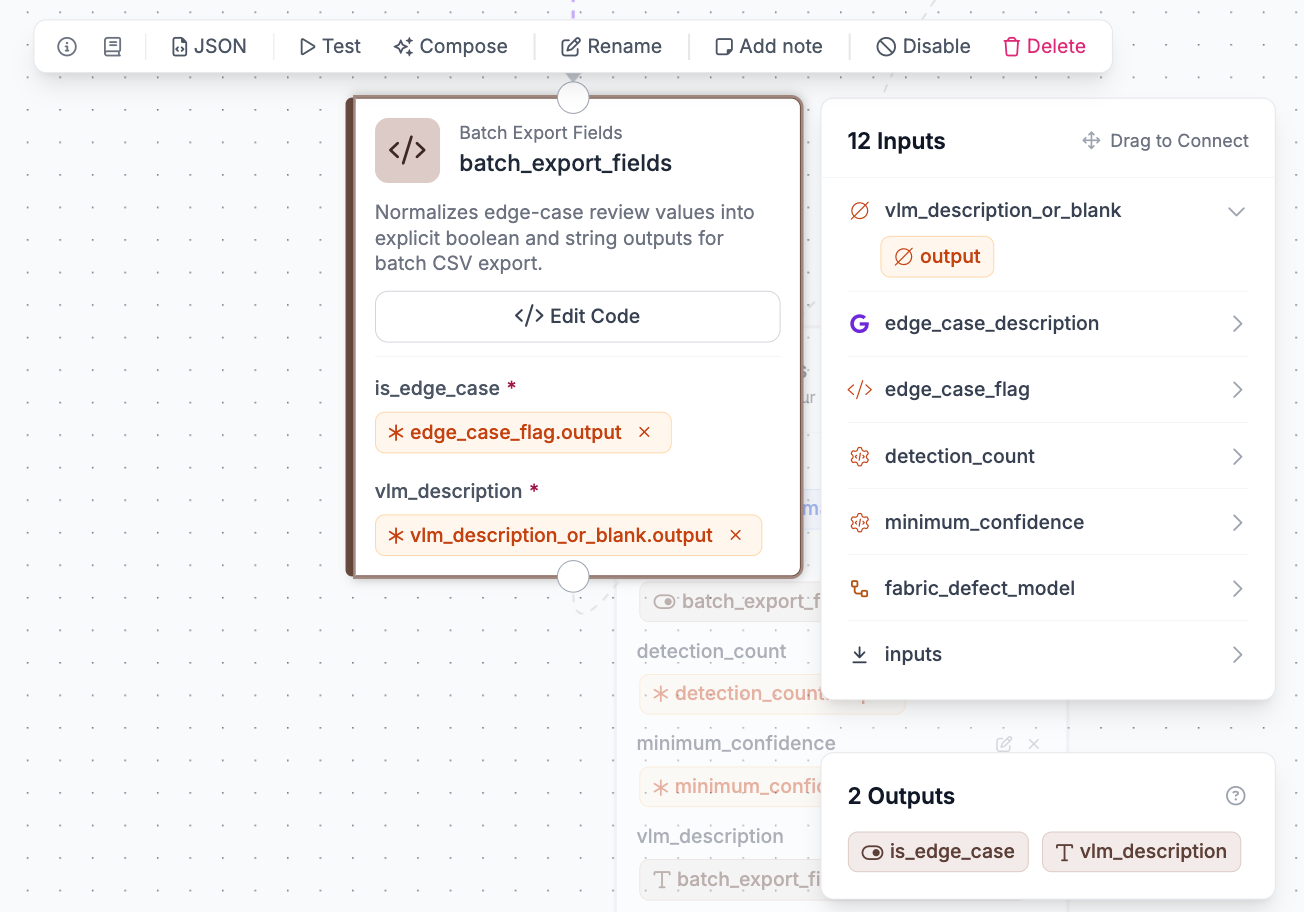
- Batch Export Fields: Normalizes the output types for the CSV export script.
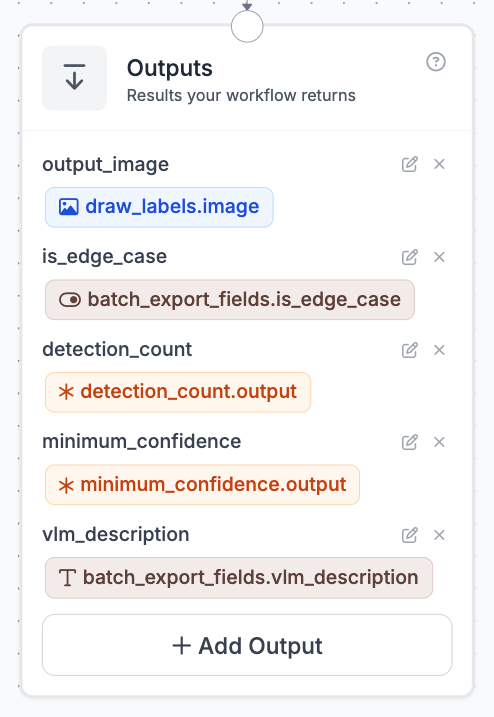
- Outputs: Returns the annotated image, edge case flag, detection count, minimum confidence, and VLM description.
Step 1: Add the Fabric Defect Model
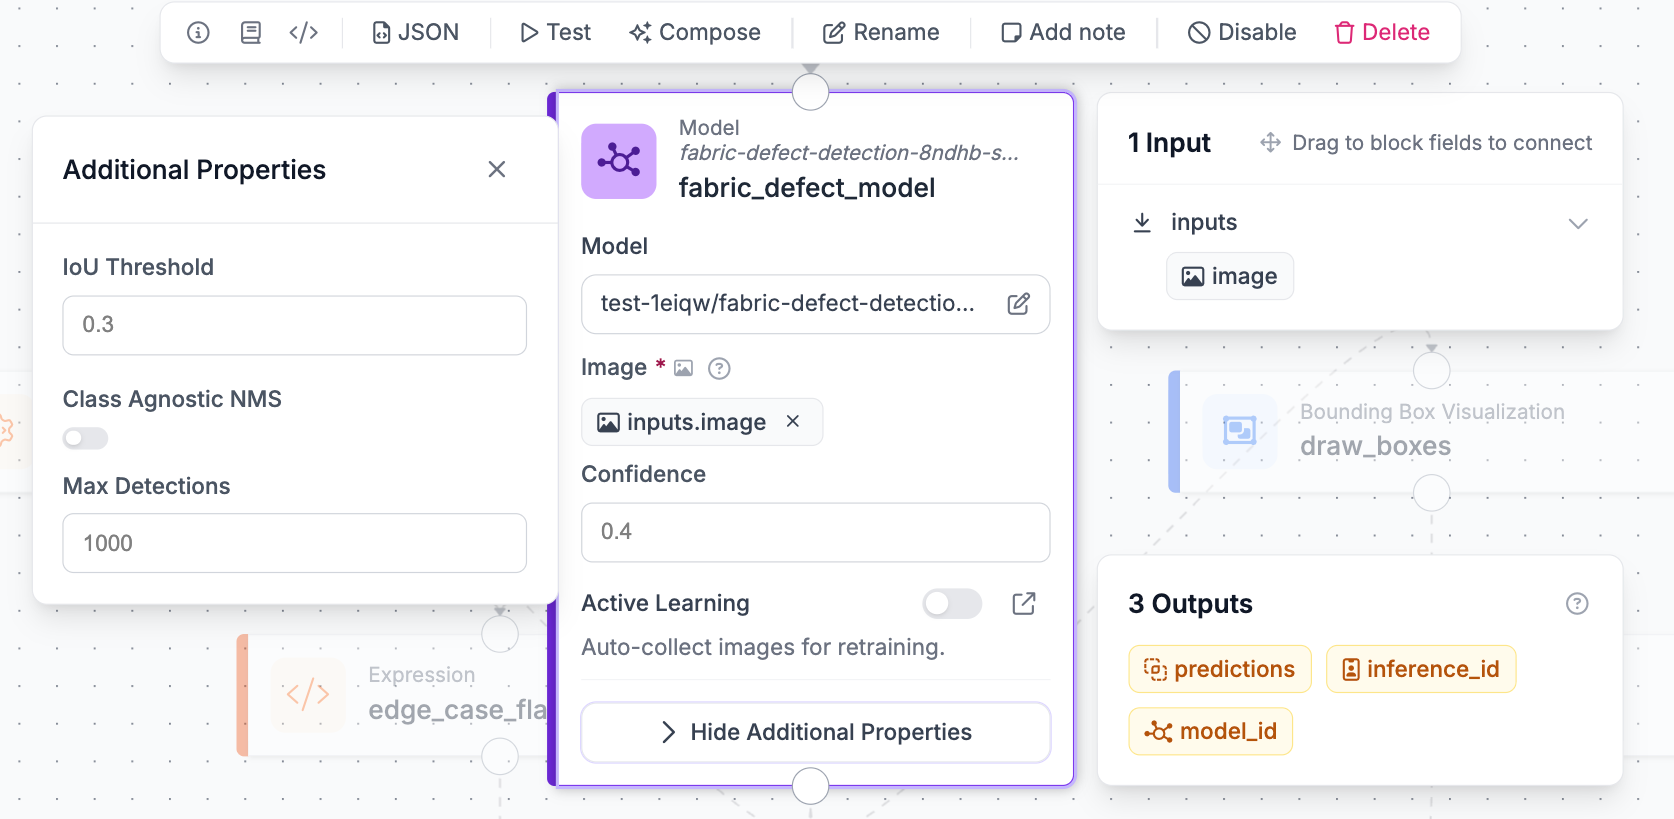
Add a Model block and connect its image input to inputs.image. Select your trained Fabric Defect model.
Step 2: Add Detection Count
Add a Property Definition block named `detection_count`. Connect its input to the Fabric Defect Model's predictions, and set the operation to count the number of detections.
Step 3: Add Minimum Confidence
Add a Property Definition block named `minimum_confidence`, connected to the Fabric Defect Model's predictions, set to extract the lowest confidence value. With no detections, it returns 1.0 as a neutral default, since Detection Count already handles that case separately.
Step 4: Add the Edge Case Flag
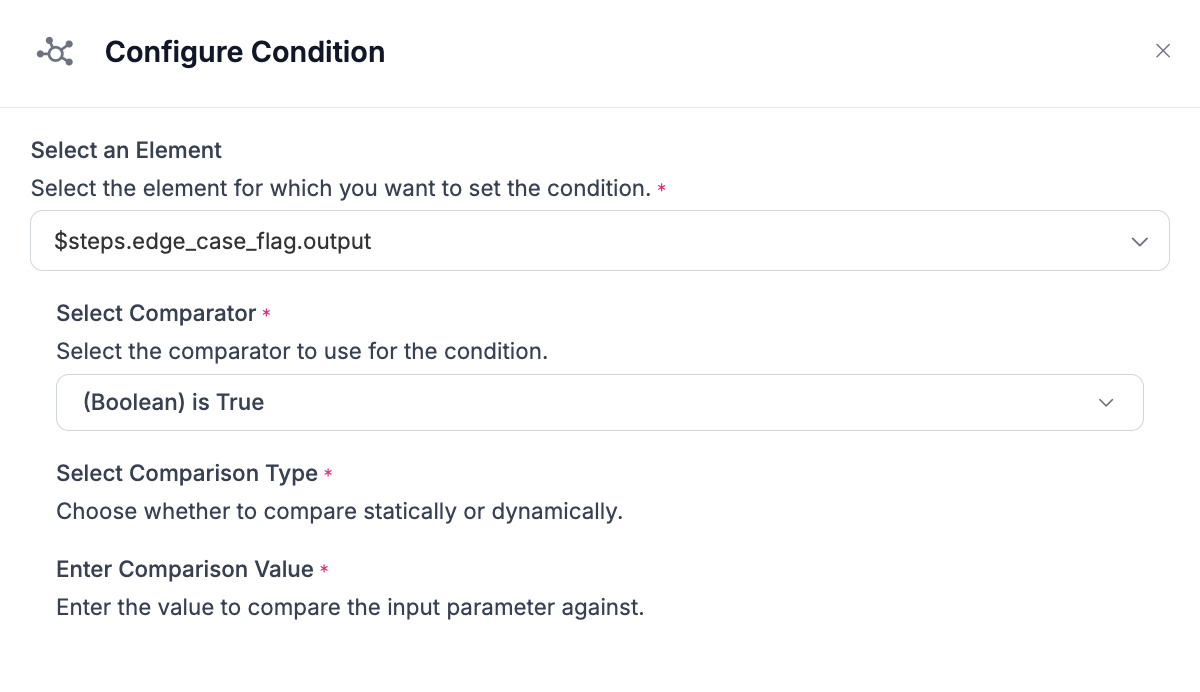
Add an Expression block named `edge_case_flag`. Set the condition to output `true` when `detection_count` equals 0 or `minimum_confidence` is below 0.60, and `false` otherwise.
Step 5: Add If Edge Case
Add a Continue If block named `if_edge_case`. Set the condition to check whether `edge_case_flag` is `true`, and set the Gemini block as the next step. This way, the workflow only runs the VLM on images actually flagged as edge cases, saving unnecessary calls.
Step 6: Add Edge Case Description with Gemini
Add a Google Gemini block named `edge_case_description`, using Gemini 3.5 Flash Lite. Connect its image input to the original image, and write a prompt asking Gemini to review the flagged image and describe in 2 to 4 sentences what might have made it hard for the model, such as blur, poor lighting, unusual texture, subtle defects, occlusion, or a distribution shift from the training data. Tell it not to invent defects it can't actually see.
Step 7: Add Draw Boxes
Add a Bounding Box Visualization block named `draw_boxes`. Connect its predictions input to the Fabric Defect Model's output. This draws a box around each detected defect on the image.
Step 8: Add Draw Labels
Add a Label Visualization block named `draw_labels`. Connect its image input to draw_boxes.image and its predictions input to the Fabric Defect Model's output. This adds the predicted class and confidence score to each box, and its result becomes the annotated `output_image`.
Step 9: Add VLM Description or Blank
Add a First Non Empty Or Default block named `vlm_description_or_blank`. Set it to use edge_case_description's output when available, falling back to an empty string when Gemini didn't run because the image wasn't flagged.
Step 10: Add Batch Export Fields
Add a Custom Python Block named `batch_export_fields`. Connect `edge_case_flag` and `vlm_description_or_blank` as inputs, and have it return `is_edge_case` as a boolean and `vlm_description` as a string. This keeps both fields in a consistent type for the CSV export script to read later.
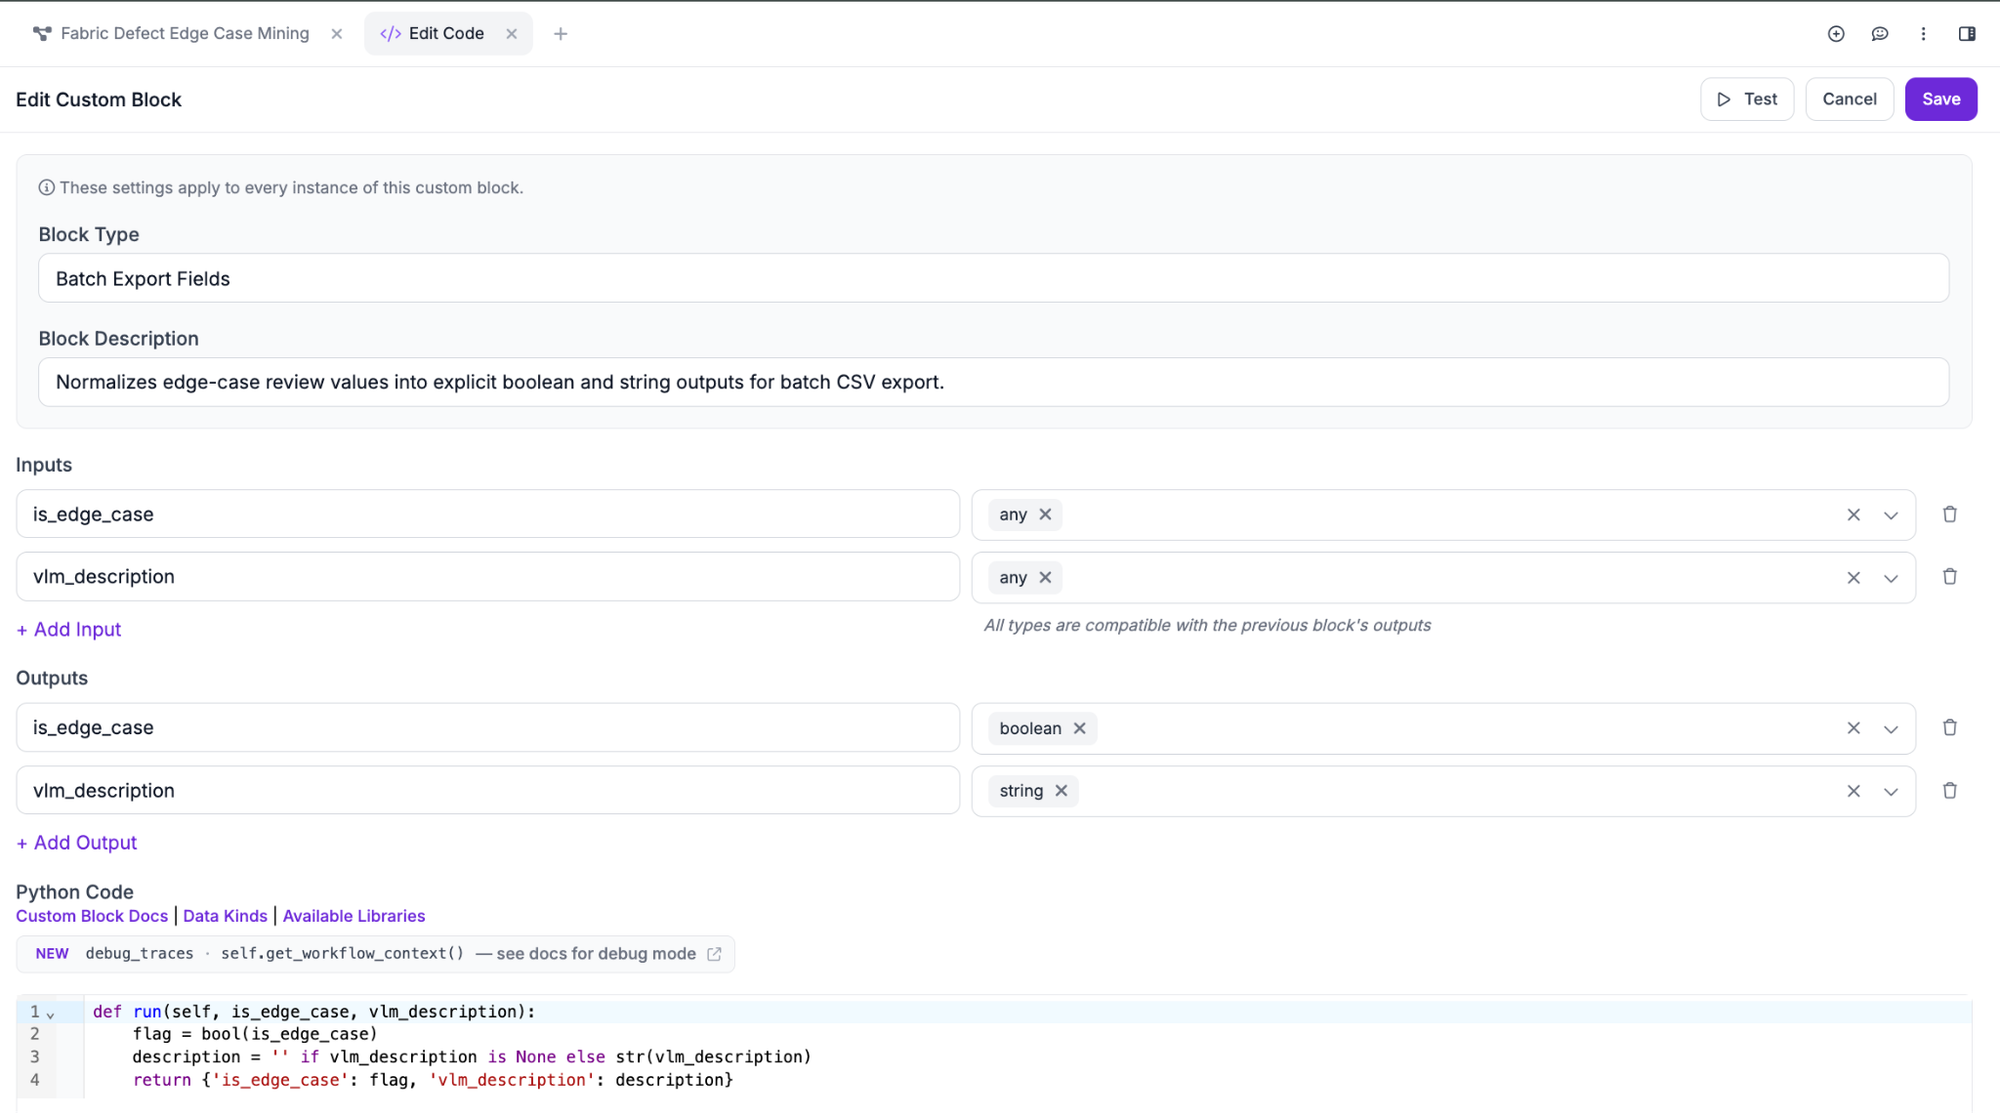
def run(self, is_edge_case, vlm_description):
   flag = bool(is_edge_case)
   description = '' if vlm_description is None else str(vlm_description)
   return {'is_edge_case': flag, 'vlm_description': description}
This code makes sure the flag is a true boolean and the description is never `None`, just an empty string when Gemini didn't run. Without this step, small type mismatches between blocks could turn into formatting problems in the final CSV.
Step 11: Configure Outputs
Connect the outputs as shown below. This returns everything the CSV export script needs from every run of the workflow.
Use Roboflow Agent
You don't have to build this block by block. Roboflow Agent can take a plain language description of the pipeline you want and configure it automatically.
Run the Workflow Against Production Images
With the Workflow built, the next step is running it against a real batch of unlabeled production images. Two scripts handle this: one pulls a random sample from the production dataset, and the other runs the Workflow across that sample and writes the results to a CSV.
Install the dependencies both scripts need, then export your API key as an environment variable:
pip install -U inference-sdk roboflow requests pillow
export ROBOFLOW_API_KEY="YOUR_ROBOFLOW_API_KEY"
Pull a random batch with download_random_100.py
import os, random, shutil, requests
from io import BytesIO
from pathlib import Path
from PIL import Image
from roboflow import Roboflow


KEY = os.environ["ROBOFLOW_API_KEY"]
ALLOWED = {"hole", "stain", "knot"}
COUNT = 100


project = Roboflow(api_key=KEY).workspace("test-1eiqw").project(
   "fabric-defects-5-class-b2mwz-mgtfe"
)


images = sum(project.search_all(
   in_dataset=True,
   limit=250,
   fields=["id", "url", "annotations"]
), [])


eligible = []
for image in images:
   annotations = image.get("annotations") or {}
   classes = set((annotations.get("classes") or {}).keys())


   if classes and classes <= ALLOWED:
       eligible.append(image)


if len(eligible) < COUNT:
   raise RuntimeError(f"Only {len(eligible)} matching images found.")


selected = random.Random(42).sample(eligible, COUNT)


output = Path("fabric_random_100")
shutil.rmtree(output, ignore_errors=True)
output.mkdir()


for number, image in enumerate(selected, 1):
   response = requests.get(image["url"], timeout=60)
   response.raise_for_status()


   with Image.open(BytesIO(response.content)) as source:
       source.convert("RGB").save(
           output / f"{number:03}_{image['id']}.jpg",
           "JPEG",
           quality=95,
       )


   print(f"Downloaded {number}/{COUNT}")


shutil.make_archive(str(output), "zip", output)
print(f"Created {output}.zip")
Replace `YOUR_WORKSPACE_NAME` and `YOUR_PROJECT_NAME` with your own. This pulls every production image whose classes fall within hole, stain, and knot, samples 100 with a fixed seed for reproducibility, and saves them as JPEGs into a `fabric_random_100` folder, zipped for convenience.
Move the images into a folder named `input_images`, since that's what `export_edge_cases.py` reads from.
Run the Workflow with export_edge_cases.py
import csv
import os
from pathlib import Path


from inference_sdk import InferenceHTTPClient, InferenceConfiguration


INPUT_DIR = Path("fabric_random_100")
OUTPUT_CSV = Path("fabric_edge_cases.csv")
API_KEY = os.getenv("ROBOFLOW_API_KEY", "YOUR_ROBOFLOW_API_KEY")


client = InferenceHTTPClient(
   api_url="https://serverless.roboflow.com",
   api_key=API_KEY,
).configure(InferenceConfiguration(api_key_transport="header"))


extensions = {".jpg", ".jpeg", ".png", ".webp"}
images = sorted(
   path for path in INPUT_DIR.iterdir()
   if path.suffix.lower() in extensions
)


if API_KEY == "YOUR_ROBOFLOW_API_KEY":
   raise RuntimeError(
       "Set ROBOFLOW_API_KEY or replace YOUR_ROBOFLOW_API_KEY."
   )


if not images:
   raise RuntimeError(f"No images found in {INPUT_DIR.resolve()}")


with OUTPUT_CSV.open("w", newline="", encoding="utf-8") as file:
   writer = csv.DictWriter(
       file,
       fieldnames=["image", "is_edge_case", "vlm_description"],
   )
   writer.writeheader()


   for number, image_path in enumerate(images, 1):
       print(f"[{number}/{len(images)}] Processing {image_path.name}")


       try:
           result = client.run_workflow(
               workspace_name="test-1eiqw",
               workflow_id="fabric-defect-edge-case-mining",
               images={"image": str(image_path)},
               use_cache=True,
           )


           output = result[0] if isinstance(result, list) else result


           writer.writerow({
               "image": image_path.name,
               "is_edge_case": output.get("is_edge_case", False),
               "vlm_description": output.get("vlm_description", ""),
           })


       except Exception as error:
           print(f"  Error: {error}")


           writer.writerow({
               "image": image_path.name,
               "is_edge_case": True,
               "vlm_description": f"Workflow error: {error}",
           })


       file.flush()


print(f"Finished. CSV saved to: {OUTPUT_CSV.resolve()}")
Replace `YOUR_WORKSPACE_NAME` here too. This sends every image in `input_images` through your Workflow and writes `is_edge_case` and `vlm_description` to a row in `fabric_edge_cases.csv`. Failed calls still get logged as edge cases with the error message instead of being skipped.
The resulting CSV
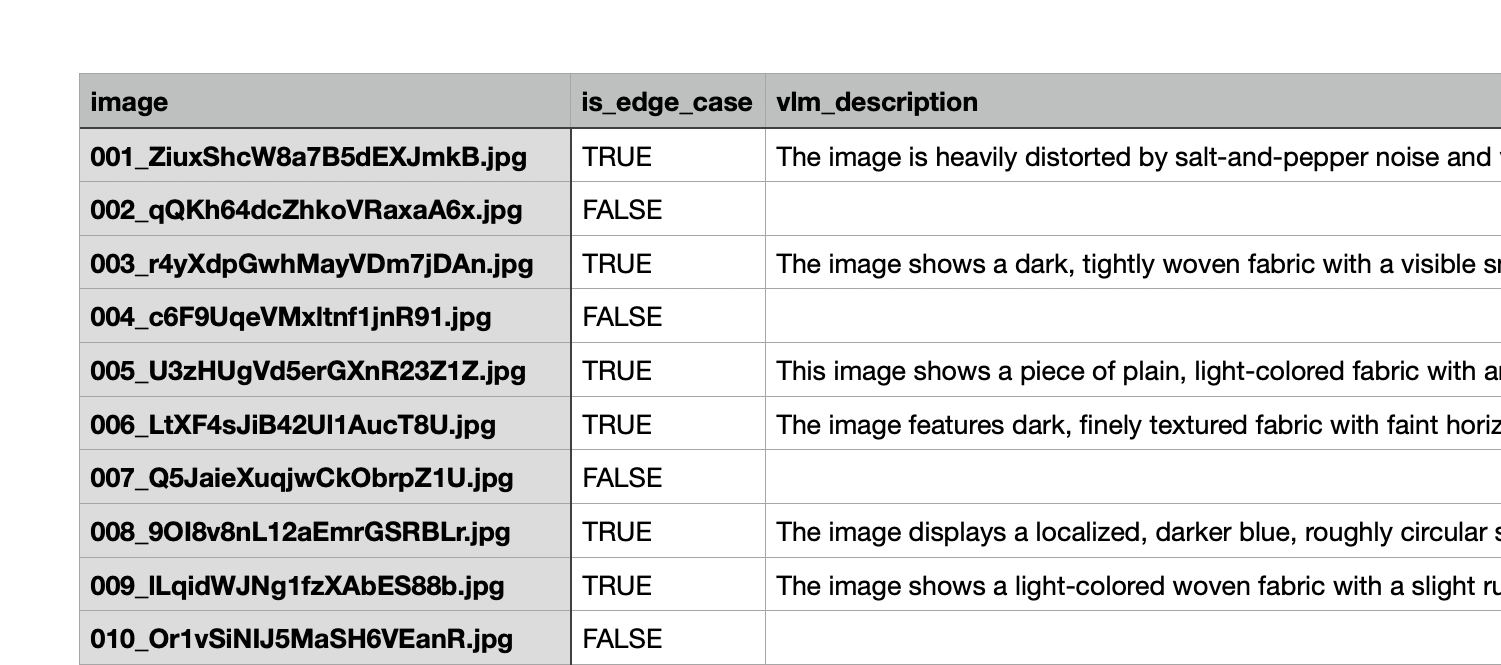
Each row corresponds to one image, with `is_edge_case` showing whether the Workflow flagged it and `vlm_description` holding Gemini's explanation for flagged rows, left blank for the rest. This file is what you'll filter and hand off for labeling in the next step.
Review and Label the Flagged Edge Cases
Open `fabric_edge_cases.csv` and filter for rows where `is_edge_case` is `true`. Each row's `image` column gives you the filename to look up inside your `input_images` folder, so you can pull the actual flagged images out and set the rest aside.
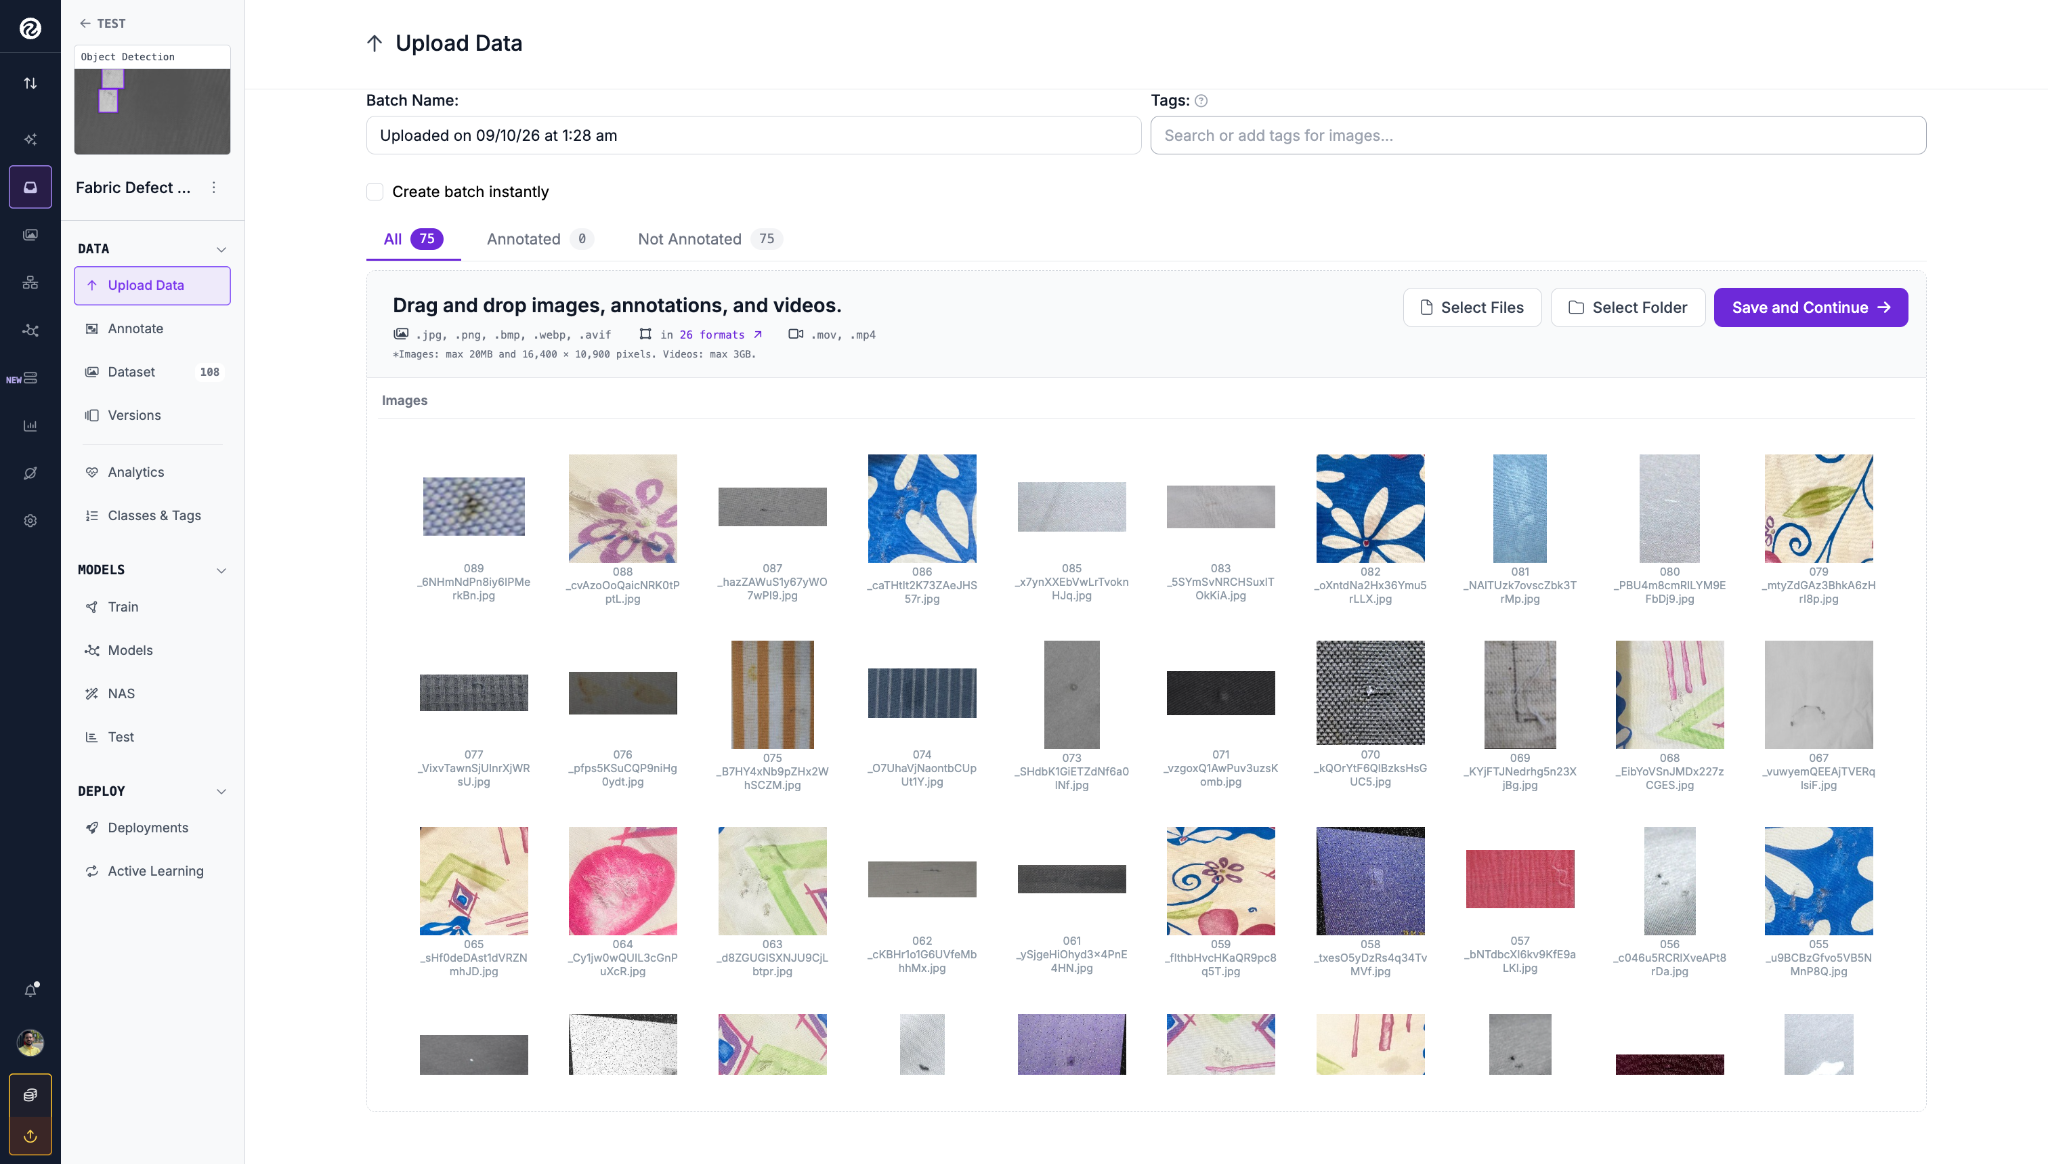
Upload these flagged images to your training project as a new batch. They arrive unannotated, ready for review.
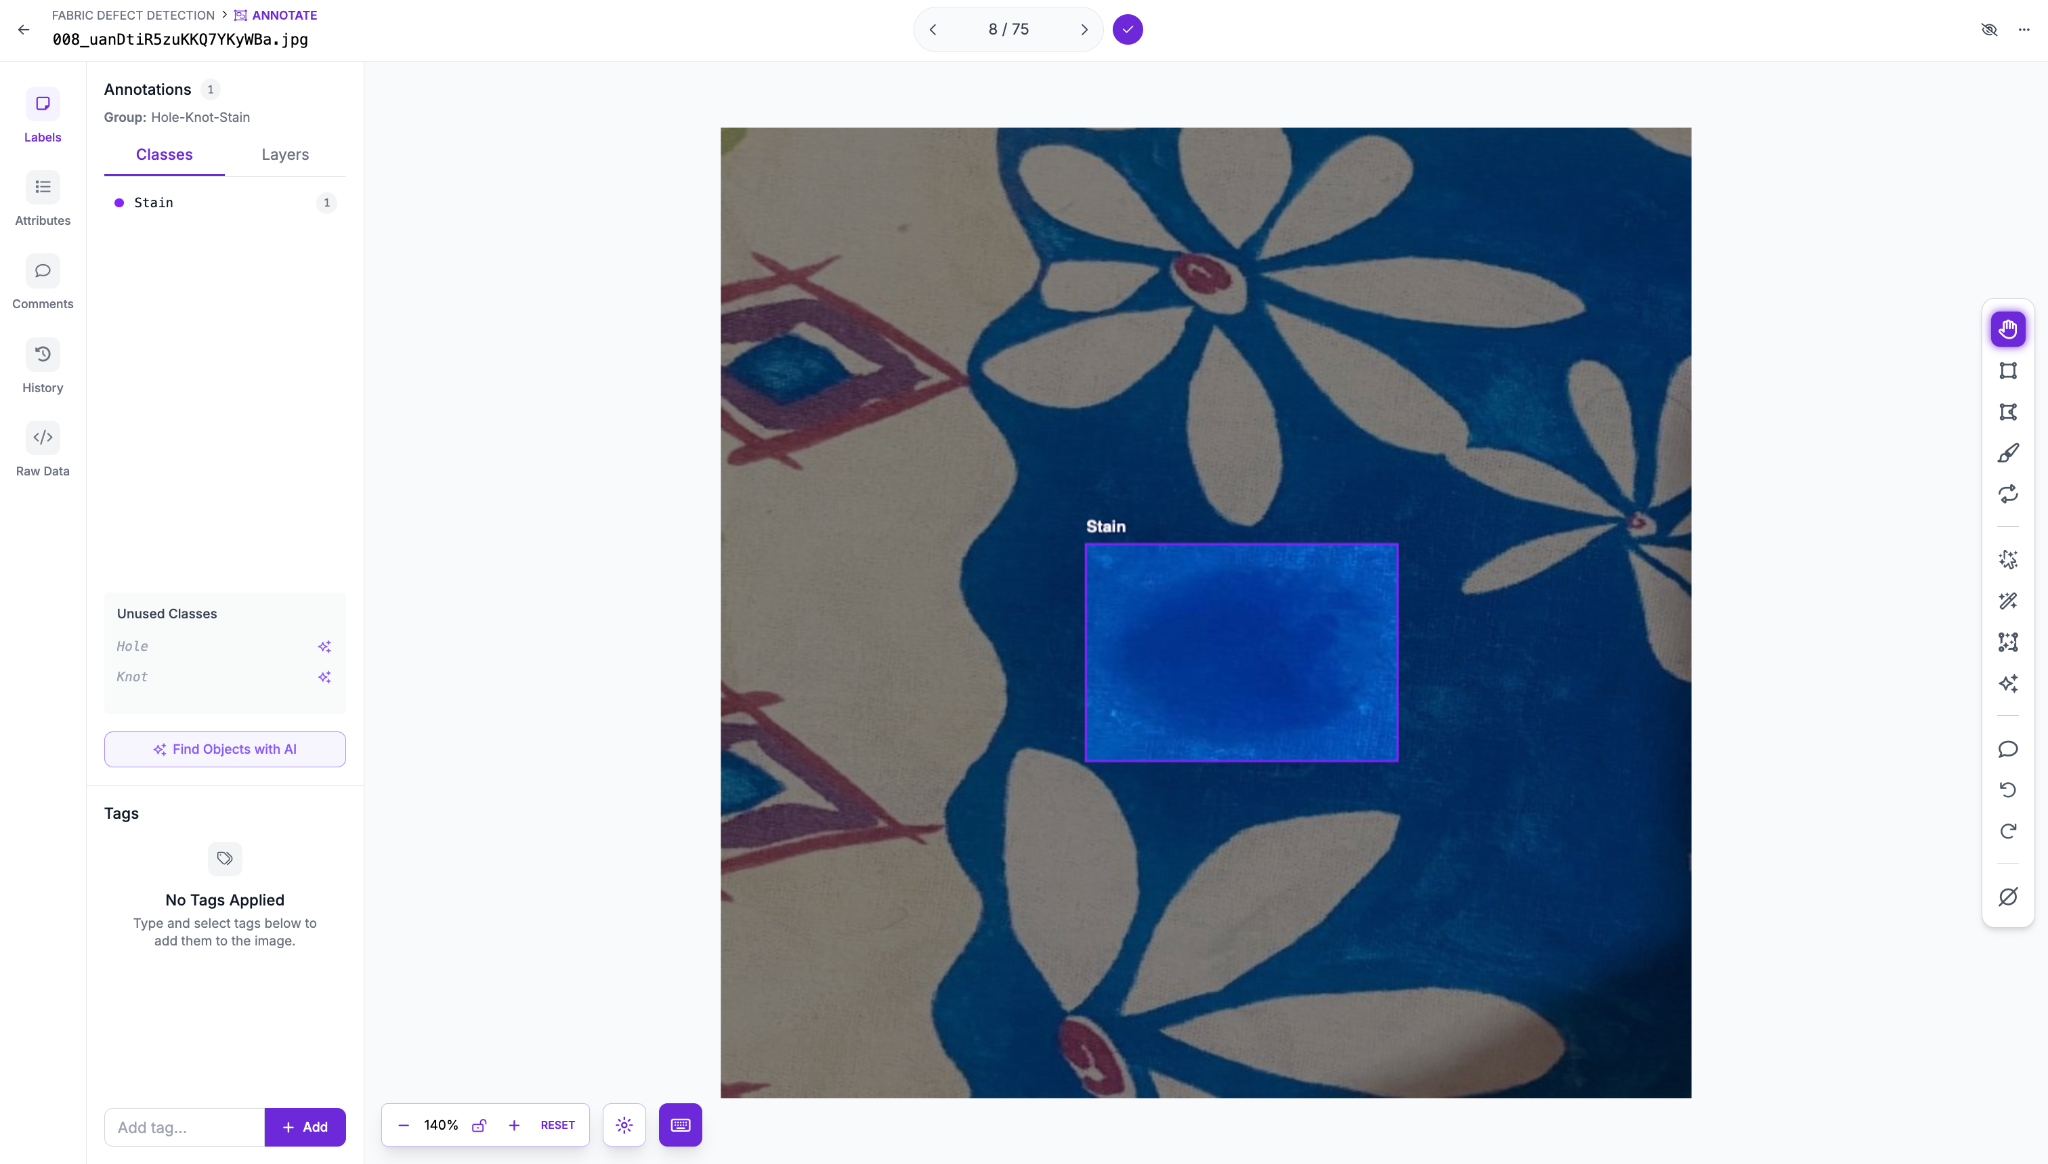
Open the batch in Roboflow Annotate and label each image manually, drawing boxes around any hole, knot, or stain you find. This is the step that turns a hard example into something the model can actually learn from.
Once every image in the batch is labeled, add them to your dataset. These images now become part of the pool you'll train on in the next step.
Checklist: Edge-Case Dimensions to Watch For
A few dimensions worth watching for while reviewing flagged images:
- Lighting: shadows, glare, or conditions the training set didn't capture
- Occlusion: the object partially blocked or overlapping something else
- Part or product variants: colors, patterns, or versions not seen in training
- Camera drift: a shifted angle, distance, or resolution from training
Retrain and Measure the Lift
With the flagged edge cases labeled and added to your dataset, generate a new version. Roboflow will include the newly labeled images alongside your original training data in the split.
Click Custom Train and select Roboflow 3.0 again, keeping the model type consistent with the baseline for a fair comparison.
Once training finishes, review the new metrics.
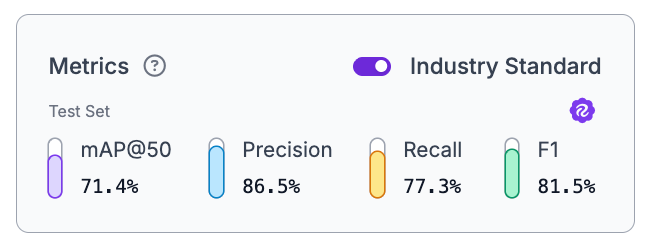
Every metric moved up from the baseline: mAP@50 climbed from 65.7% to 71.4%, precision from 81.0% to 86.5%, recall from 72.2% to 77.3%, and F1 from 68.9% to 81.5%. That's a real lift, and it came entirely from adding a small batch of the images the baseline model struggled with most.
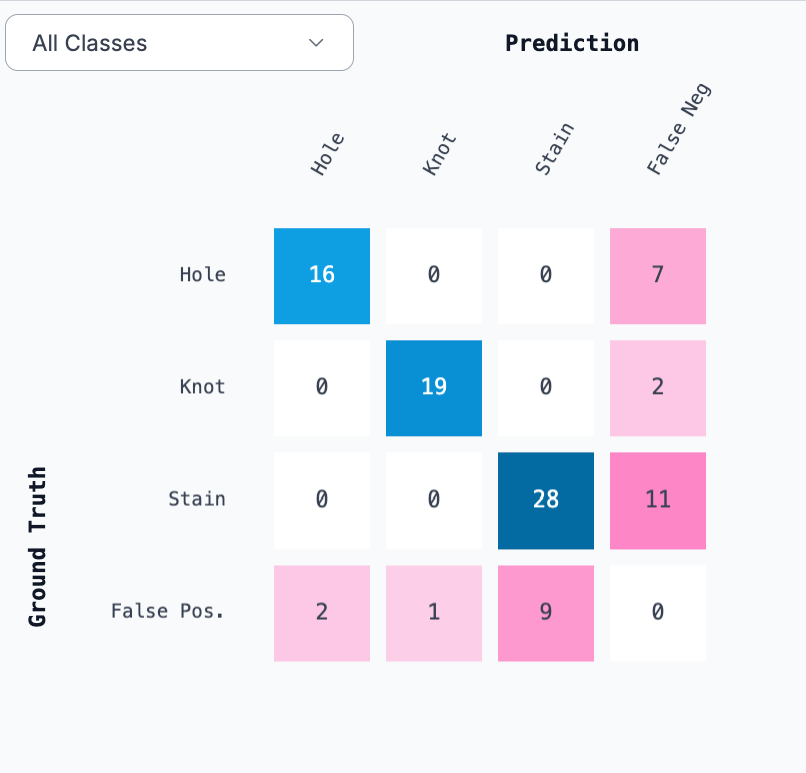
The confusion matrix shows where that lift came from: correct Hole detections rose from 3 to 16, Knot from 4 to 19, and Stain from 4 to 28, with far fewer missed detections across the board.
Beyond a one-time retrain, Model Monitoring can track confidence and class-level performance continuously once a model is live, with alerts that flag drift before it requires someone to manually run a batch like this to find it.
Conclusion
This tutorial built a loop for finding and fixing what a model gets wrong: mine unlabeled images for edge cases, review the flagged ones, label them in Roboflow Annotate, retrain, and measure the lift with Model Evaluation. Validation metrics only tell you how a model performs on data resembling what it trained on, real images rarely stay that well-behaved, and that gap is where edge cases live. Closing it isn't a one-time fix, it's a loop you run again every time the model meets something new.
Further reading:


Cite this Post
Use the following entry to cite this post in your research:
Mostafa Ibrahim. (Sep 2, 2026). Finding Edge Cases in a Computer Vision Dataset. Roboflow Blog: https://blog.roboflow.com/finding-edge-ases-in-a-computer-vision-dataset/