
Building an automated defect detection system with computer vision follows a repeatable pipeline: collect images of the target product, annotate defects, train a model, and deploy it to trigger automated actions like removing a part from an assembly line. This guide walks through each step using ceramic tile defect data sourced from Roboflow Universe, with annotation, training, and testing handled inside Roboflow. The same approach extends to any manufactured product where visual quality checks currently depend on manual inspection.
The earlier you can catch defects in product manufacturing pipelines, the better: faster detection aids in diagnosing any potential issues that caused the defect, and ensuring that the defect does not make its way further through a manufacturing process.
While manual defect detection and visual inspection is effective, adding an automated step increases the chance errors and defects are caught before advancing through a manufacturing pipeline. This automated step can be implemented using computer vision.
Today I'll walk you through building an AI defect detection system.
How Can Computer Vision Help with Defect Detection?
With computer vision, you can detect any defects visible to a camera. When a defect is detected, you can trigger automated systems such as removal of a product from an assembly line. Or, if defect rate reaches a defined incidence level, you can alert workers that there may be an issue on the assembly line.
In this guide, we are going to talk through how to build an automated defect detection system with Roboflow. Roboflow is trusted by large enterprises around the world for computer vision tasks, from Rivian to USG. We will show:
- How computer vision models can help solve defect detection problems
- Collecting data for a computer vision model
- Labeling and preparing data for model training
- Training and testing a model
- Deploying a model
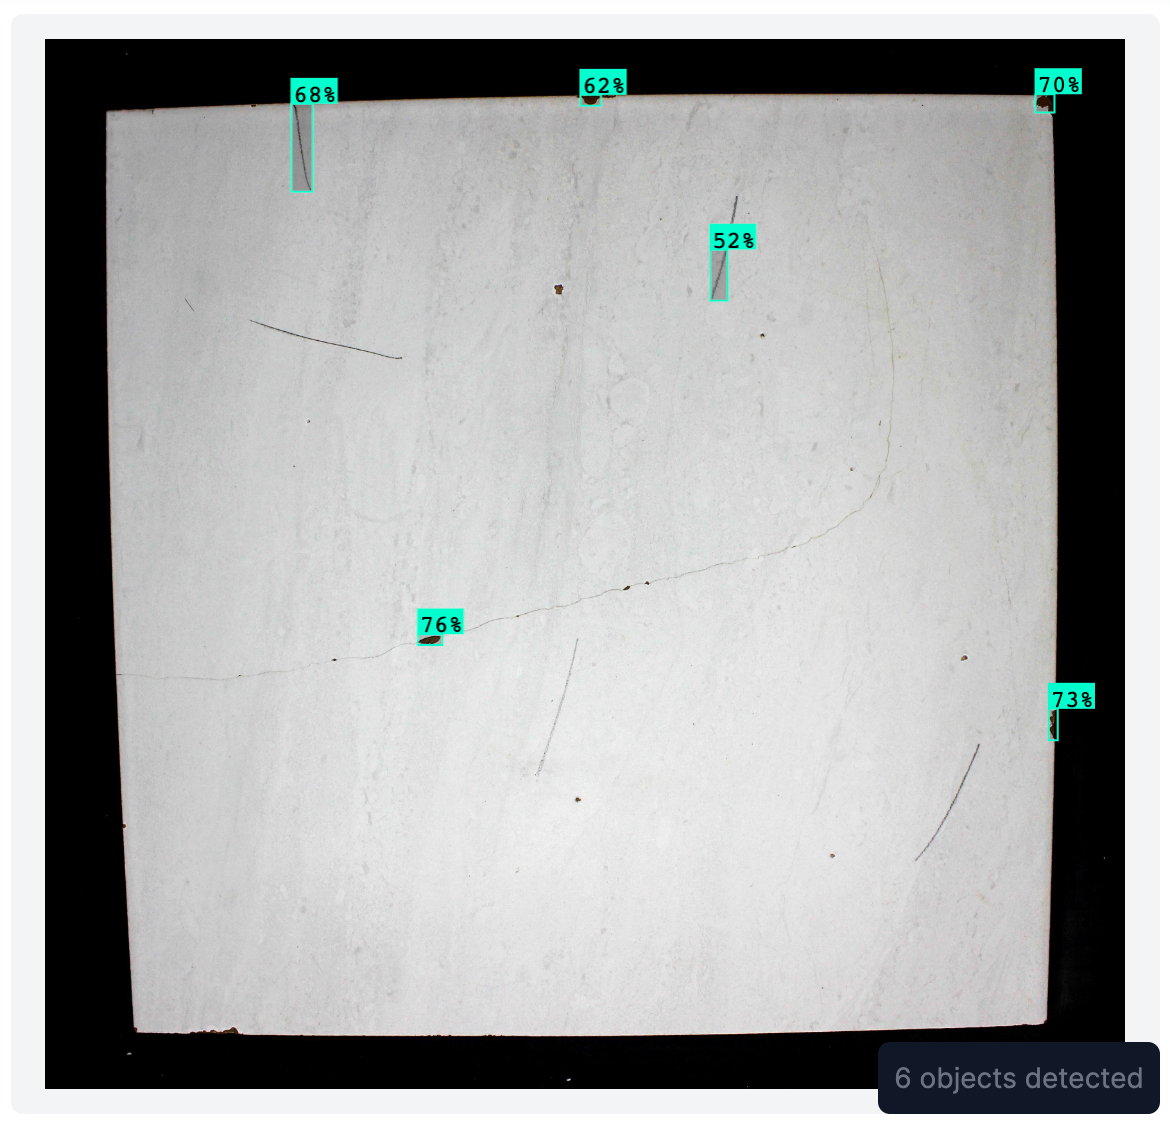
We will build a computer vision model to identify defects in ceramic tiles, although the example could extend to any defect. Here is an example output from the system we are going to build:
Without further ado, let’s get started!
What Is Defect Detection?
Defect detection refers to methods of identifying issues in a product. Defect detection can refer to a vast range of methods of assuring the quality of a product, including measuring the size of a product, checking for the presence or absence of components, and checking for damage in components.
Computer vision systems can monitor assembly lines in real time and check for defects. Consider a scenario where you are manufacturing ceramic tiles. You want to make sure no scratches have been made in a tile before the material moves to the next stage of production. Computer vision can inspect every tile automatically, raising an alert when a scratch is found.
Using computer vision, businesses can proactively detect defects in products and rectify issues as they happen. Further, you can check for the presence or absence of components as part of automated quality assurance (QA) processes.
Over time, this data can be used to better understand points of concern in a manufacturing process. For instance, if a particular defect is identified more when a product or part goes through a particular machine, it may be indicative that there is an issue with that specific machine.
Computer vision is a boon to QA processes. With computer vision, you can detect defects in real time and alert QA employees so they can manually assess the situation and determine whether any action is needed after defects are found.
How to Build an Automated AI Defect Detection System
To build an automated defect detection or visual inspection system, you will need:
- A camera that you can connect to a computer. “Edge deployment” cameras such as the Luxonis OAK, or webcams attached to an NVIDIA Jetson, and WiFi-enabled cameras that can use the Roboflow hosted API are common choices.
- A consistent source of power to the camera and computer.
- A computer vision model that identifies a defect, or multiple types of defect.
Below, we will show how to identify ceramic tile defects with a computer vision model. This model will be able to identify edge chipping, holes in the ceramic, and lines that should not be present on the tile.
Step #1: Collect Data
If you already have data, skip to the next step!
First, we need to collect data relevant to our use case. Gathering data representative of your use case – and the environment in which your model will be deployed – is key to achieving high model performance.
Roboflow has a few tools you can use to collect data. You can use Roboflow Collect, an automated data collection tool, to gather data for your project. With Roboflow Collect, you can gather data using a webcam that is uploaded directly to Roboflow for use in your project. Collect allows you to provide text prompts that will be used to determine if an image is relevant, or to set guidance that images must be sufficiently different before being collected.
You can also search for data from Roboflow Universe, a community with over 200,000 computer vision datasets across different use cases.
Both of the above methods allow you to quickly gather data relevant to your use case that you can use for training the first version of your model.
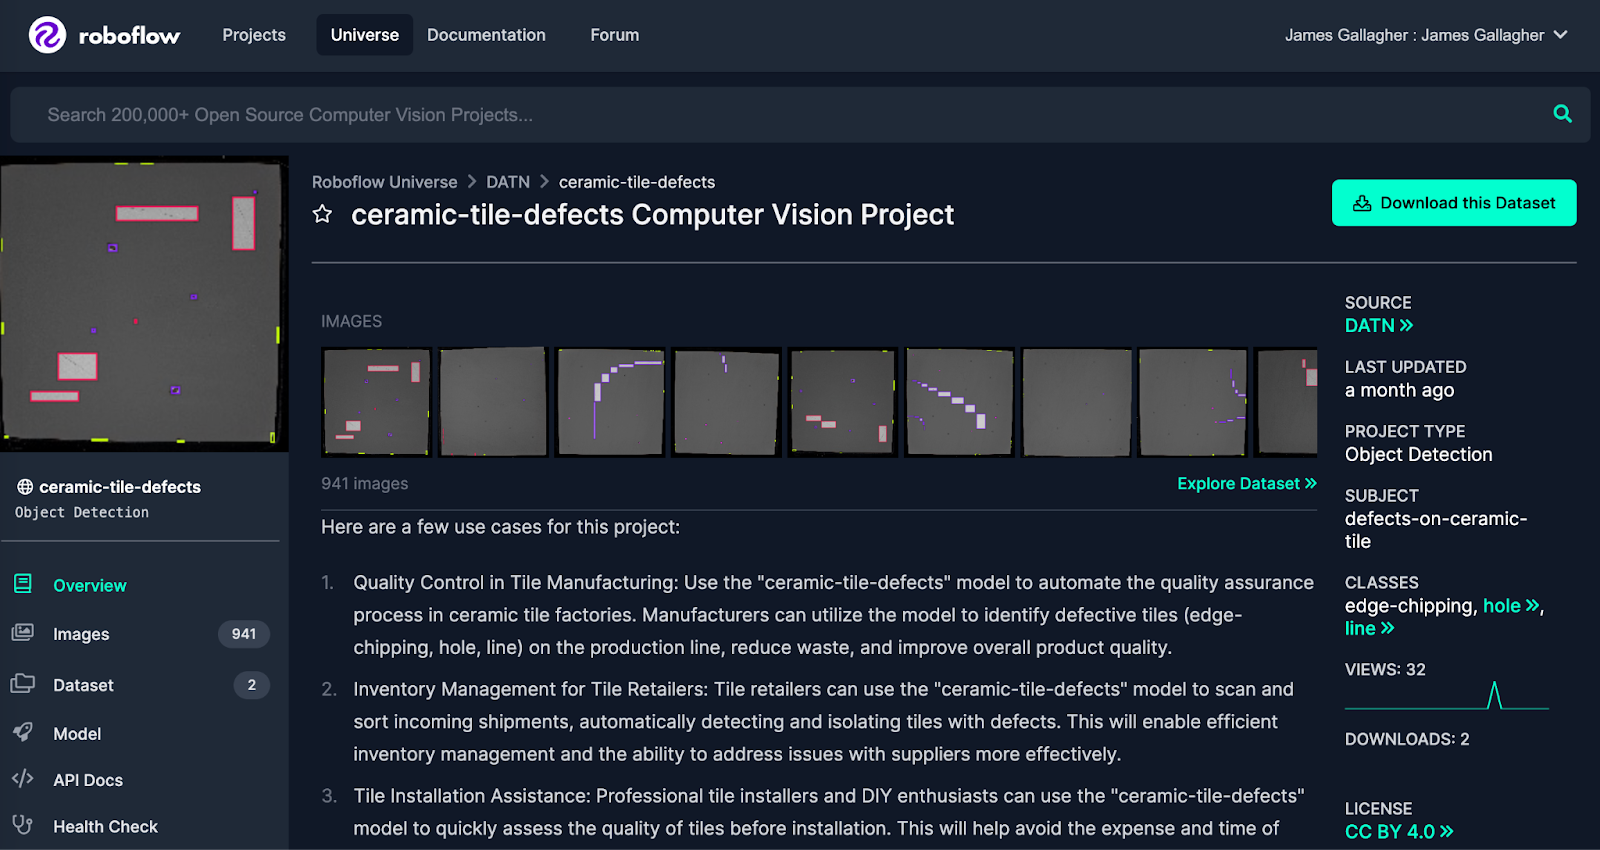
For this guide, we are going to use a ceramic tile dataset from Roboflow Universe. This dataset contains annotated images of ceramic tiles, such as this one:
To download the dataset for this guide, click “Download this Dataset” on the Universe project page, then click the checkbox to download the dataset as a ZIP file. Unzip this file, as we will use the data inside in the next step.
With our data ready, we can upload it to Roboflow.
First, create a Roboflow account, then click “Create New Project” on the dashboard:
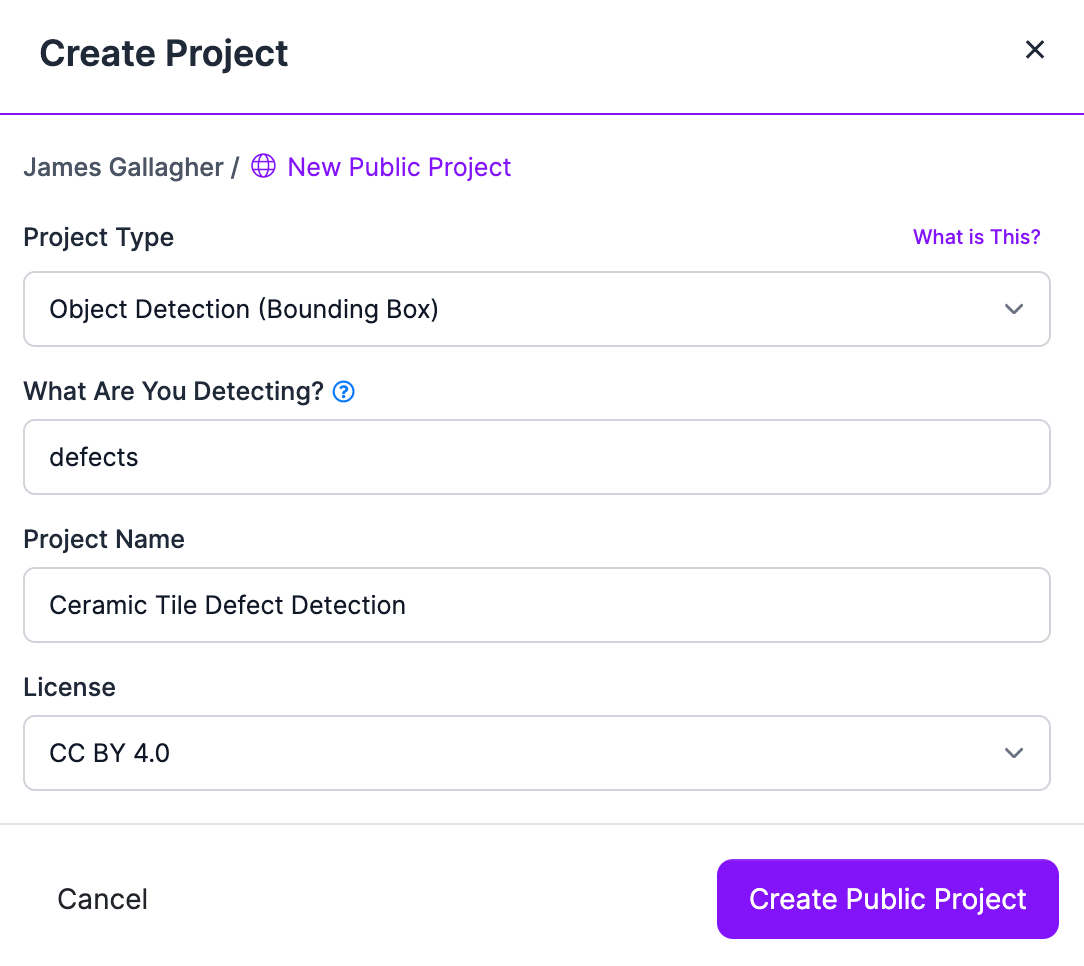
Choose a project name and specify “Object Detection” as the project type to use. Object detection allows you to identify the location of different objects in an image or video.
Next, we need to upload data to Roboflow. To do so, drag and drop all images and annotations you want to use in training your model:
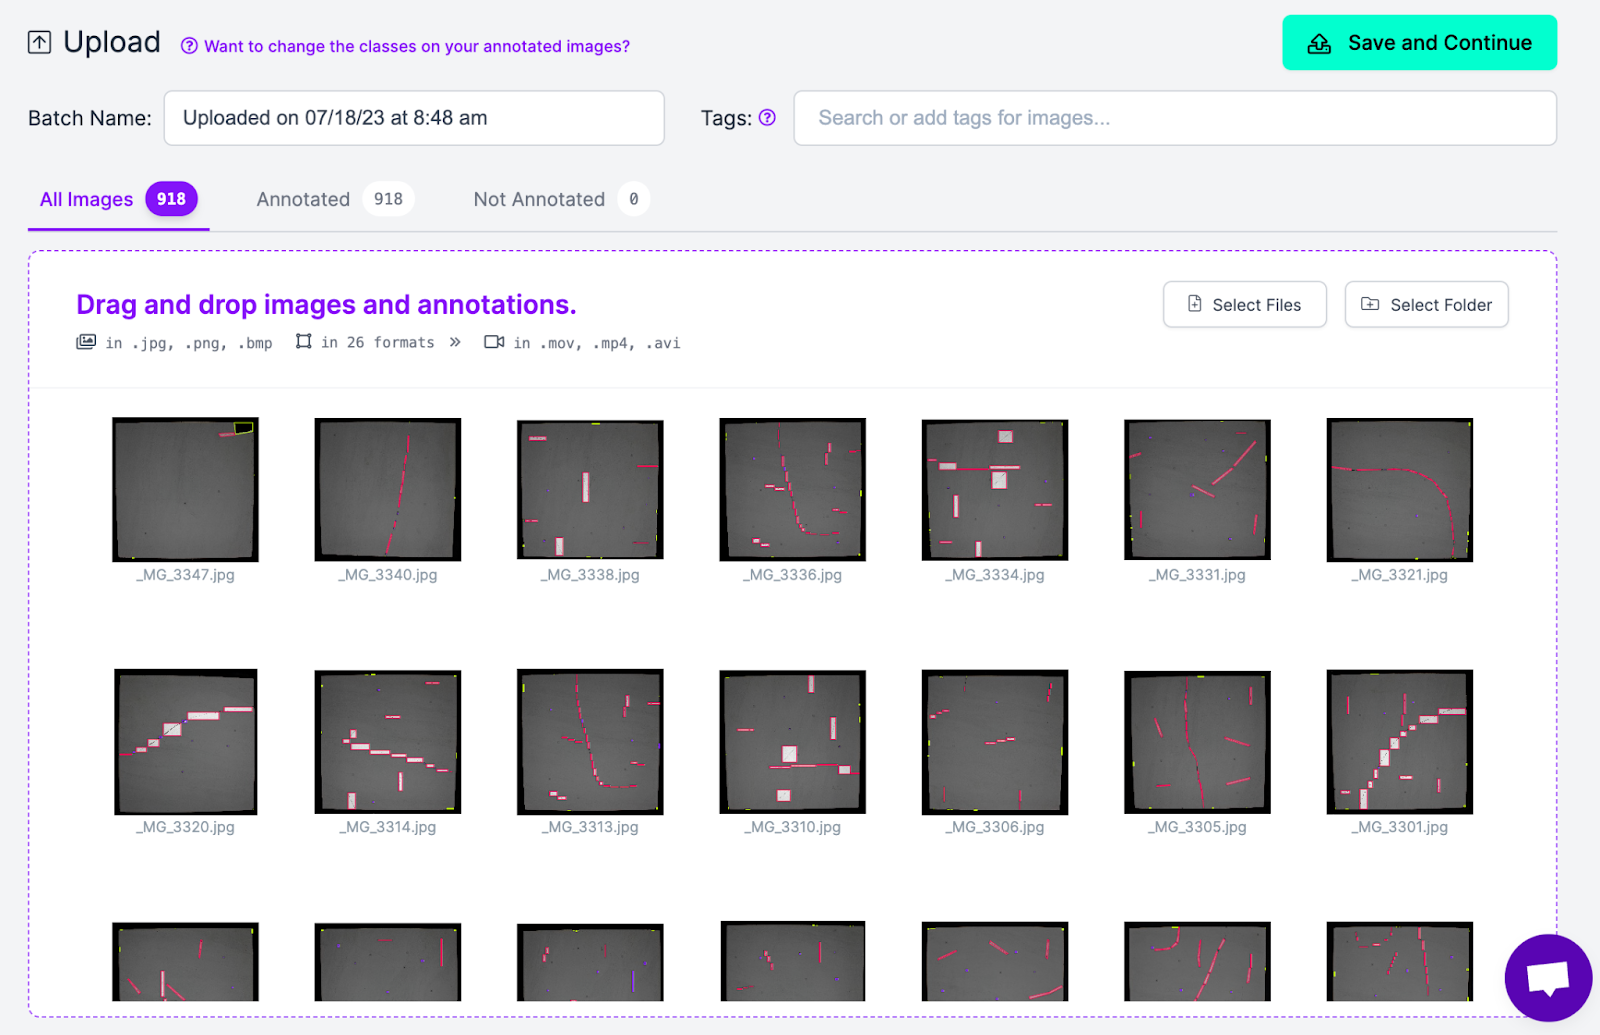
This step will take a few moments depending on how many images you want to upload.
With our images uploaded, we can move to the next step: annotating images.
Step #2: Annotate Images
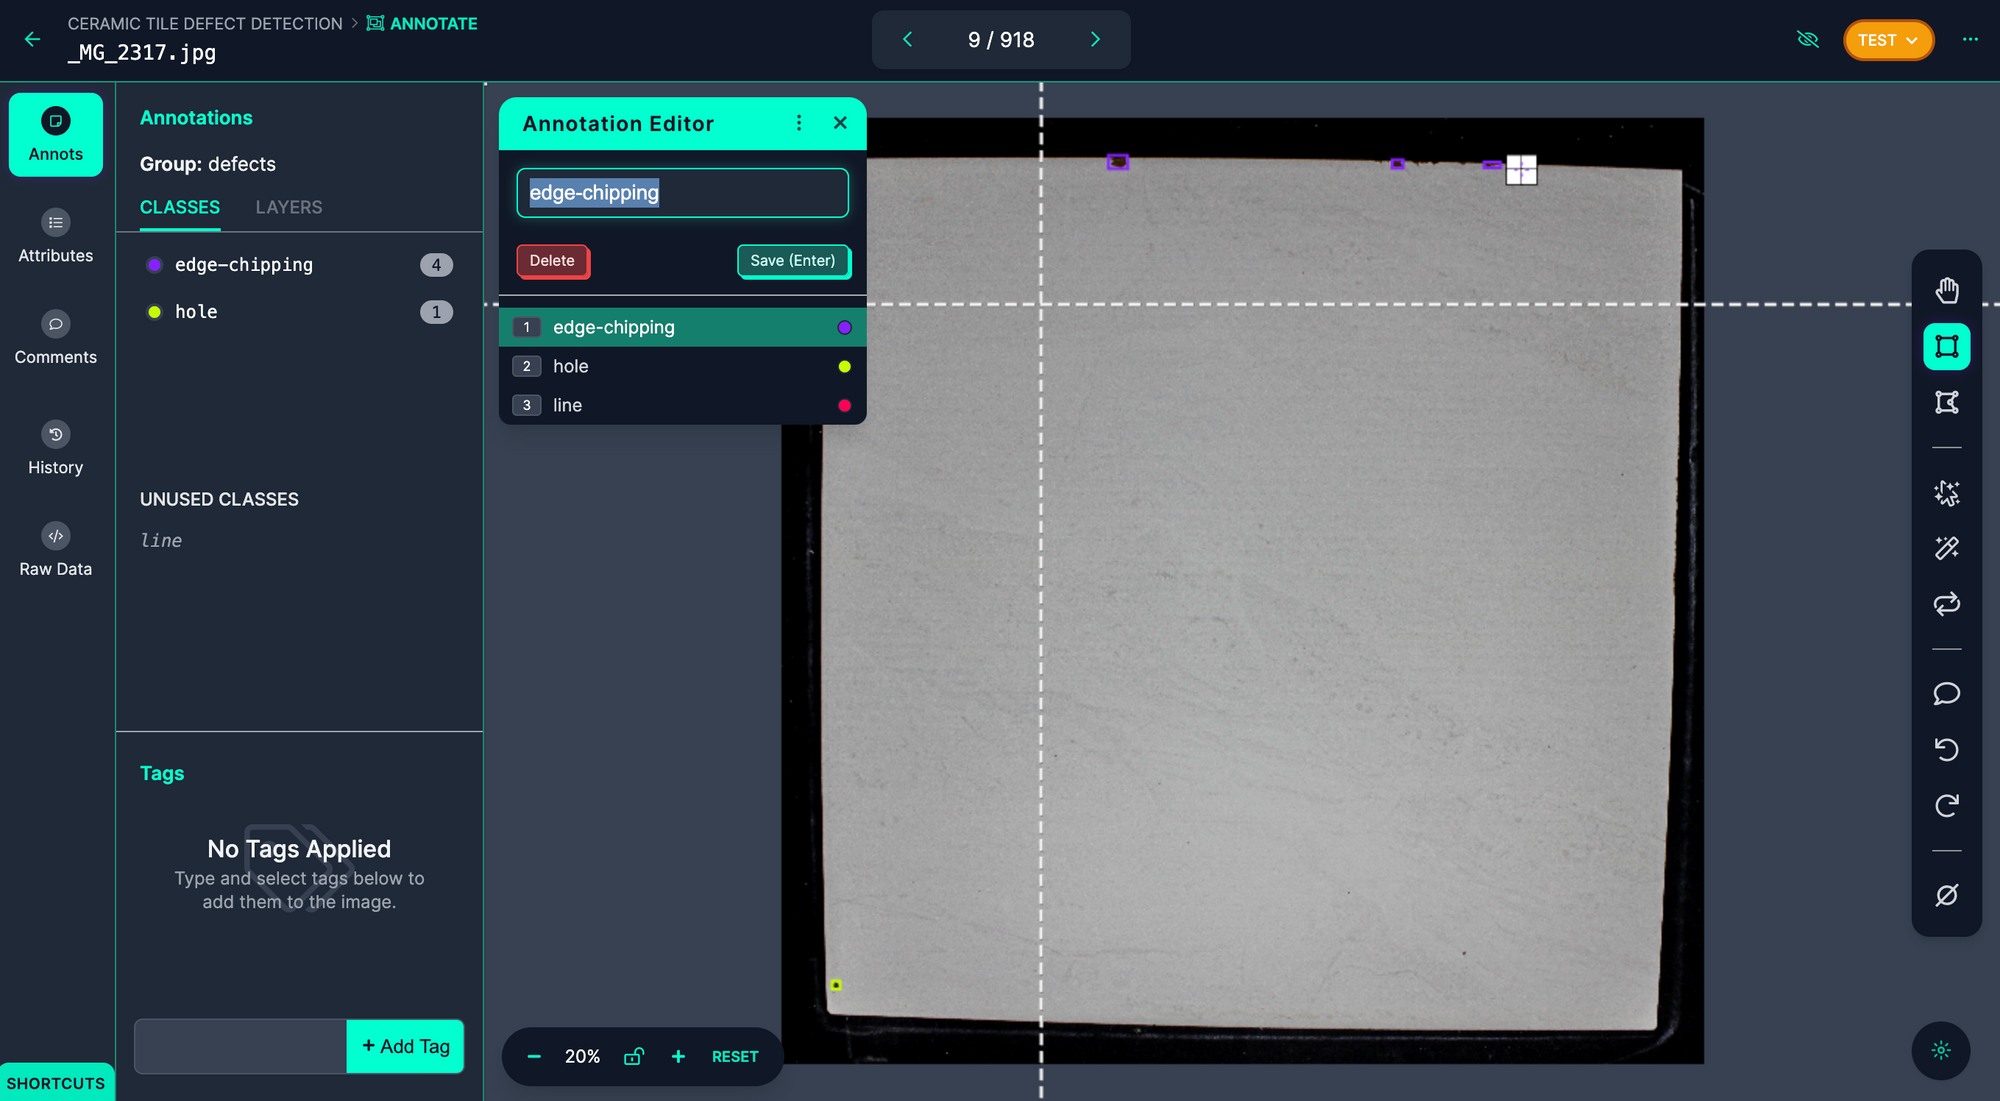
Roboflow Annotate provides an interactive web interface through which you can annotate images. Click “Annotate” in the sidebar of your project in the Roboflow dashboard, then click an image to start annotating. This will open the image in an annotation view.
To annotate the image, click the bounding box tool in the right sidebar, then drag your cursor around each object of interest you want to annotate. After you drag a box around an annotation, you will be asked to choose a class to add to the annotation. You can choose from existing classes you have created, or create a new one. Then, press the Enter key on your keyboard to save your annotation.
There are a few tools you can use to speed up annotation in Roboflow, including Smart Polygon. Smart Polygon allows you to annotate images with polygons. Polygon annotations allow you to achieve better model performance, but used to take more time to create than boxes. With Smart Polygon, you can create polygon annotations with a click.
To use Smart Polygon, click the magic wand icon in the right sidebar. Once you have configured Smart Polygon following the on-screen instructions, you can hover over any object in the image. Smart Polygon will recommend an annotation. You can learn more about Smart Polygon in the Roboflow Annotate documentation.
Once you have annotated all of your images, you are ready to create a dataset version.
Step #3: Create a Dataset Version
Before you can train a model, you need to create a dataset version. Dataset versions are frozen-in-time, allowing you to maintain the state of a dataset at a point in time.
To create a dataset version, click “Generate” in the Roboflow sidebar. A page will appear where you can configure data preprocessing and augmentations. For first versions of a model, we recommend setting no pre-processing or augmentation steps. This allows you to measure baseline performance with your annotated data.
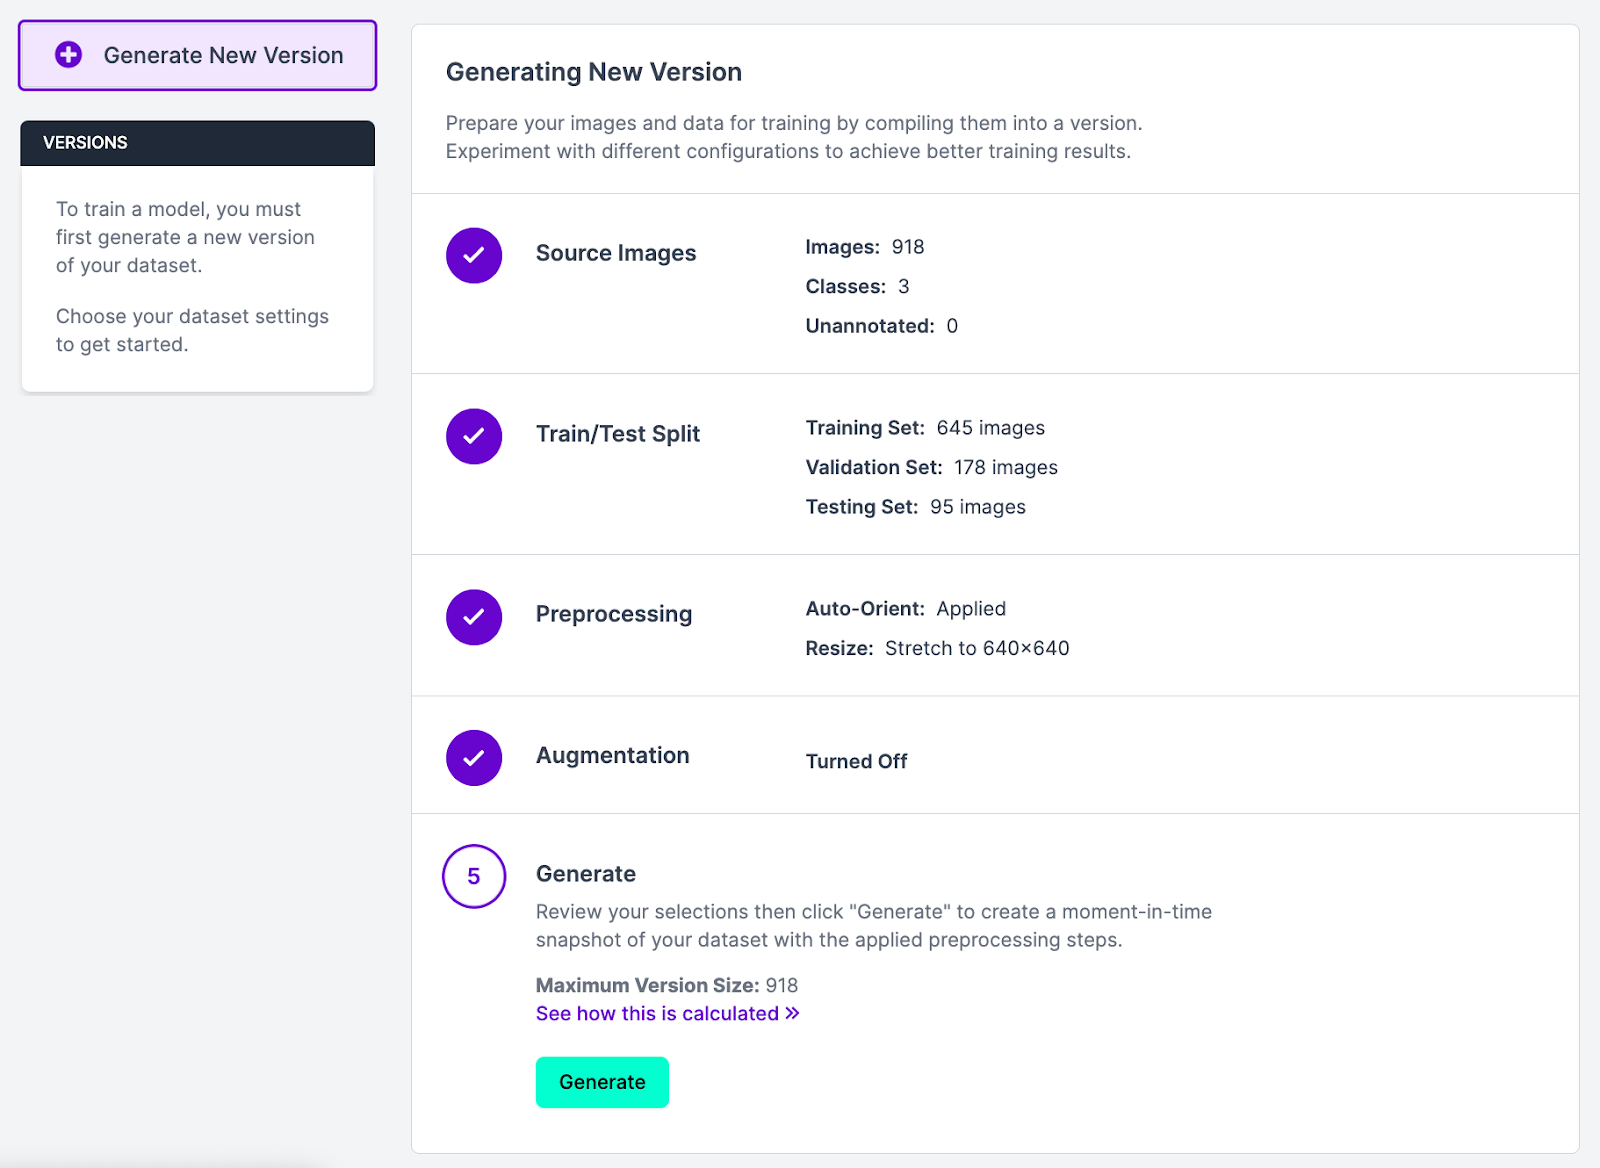
Let’s leave the preprocessing and augmentation values blank for now. At the bottom of the page, click “Generate” to create a version of your dataset.
Generating a dataset version can take a few minutes depending on how large your dataset is. Once you have created a dataset version, you can train the first version of your defect detection model. We’re one step closer to identifying ceramic tile defects using computer vision.
Step #4: Train a Computer Vision Model
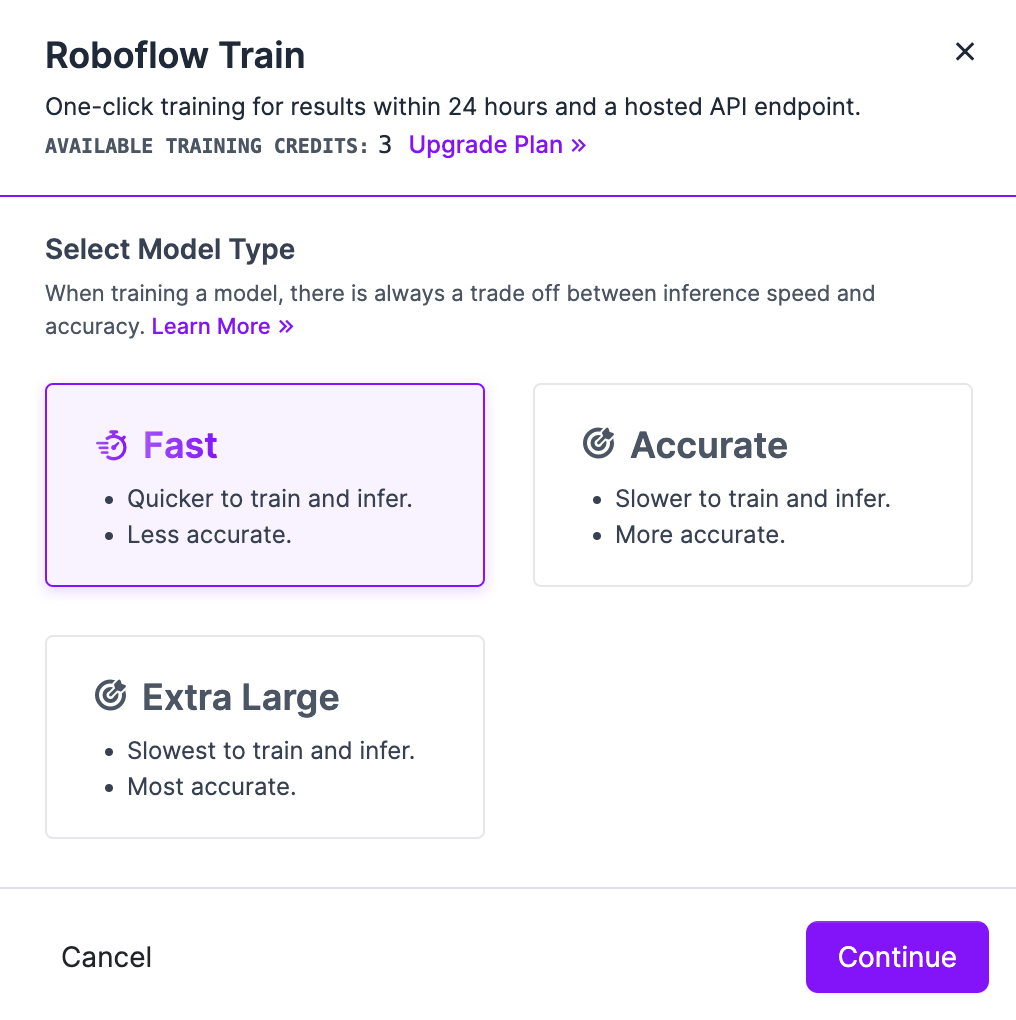
You can train computer vision models on Roboflow in a few clicks with Roboflow Train. Click “Train a Model'' on the dataset version page to which you were taken after creating a dataset version. You will be asked to select a training option. Choose “Fast”:
In the next pop up, choose the “Train from Public Checkpoint” option and make sure “MS COCO” is selected. We recommend training from the MS COCO checkpoint for the first version of your model.

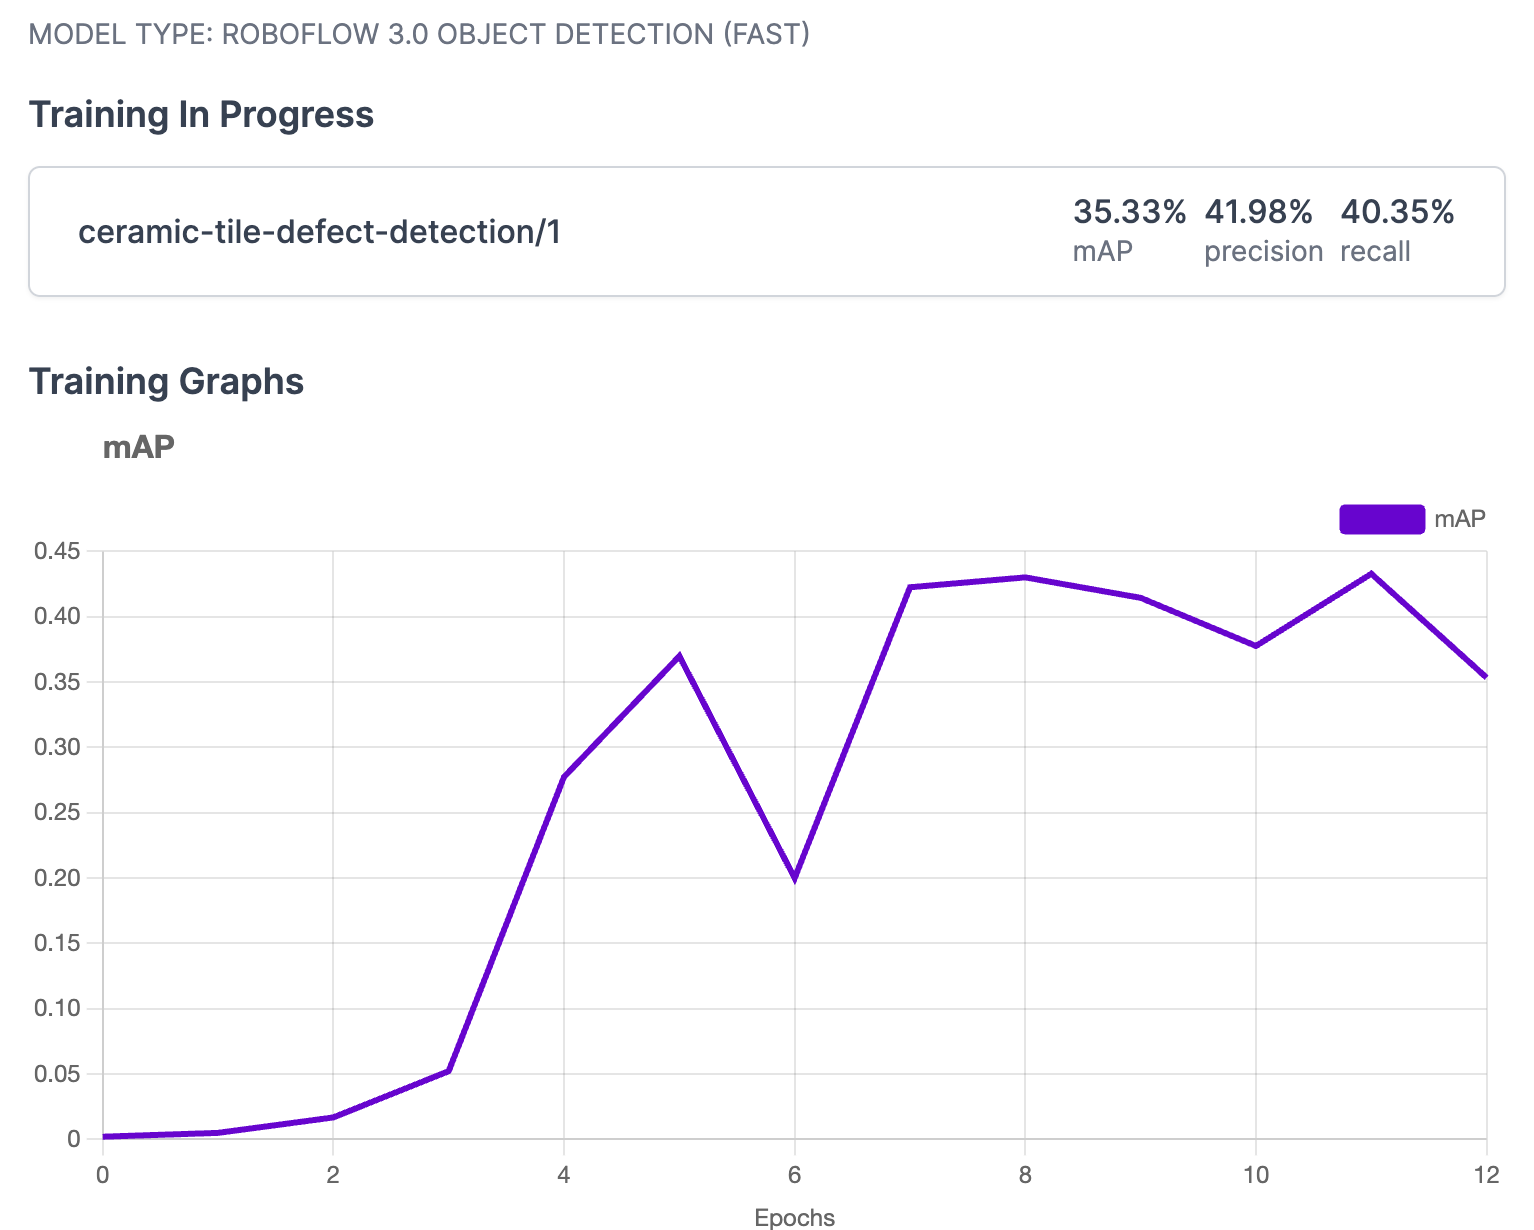
After following all on-screen instructions, a cloud-hosted computer will be assigned your training job. The amount of time it takes to train a model depends on how many images you have used. As your model trains, a graph on the page will update showing model performance for each training step.
You will receive an email when your defect detection model is ready to use.
Step #5: Test the Defect Detection Model
When your model has been trained, you can test it out using the Roboflow Deploy page. Click “Deploy” in the Roboflow sidebar. A box will appear in which you can run inference on images from your test set (images not used for training) to see how your model performs on unseen data. You can also upload new images to test.
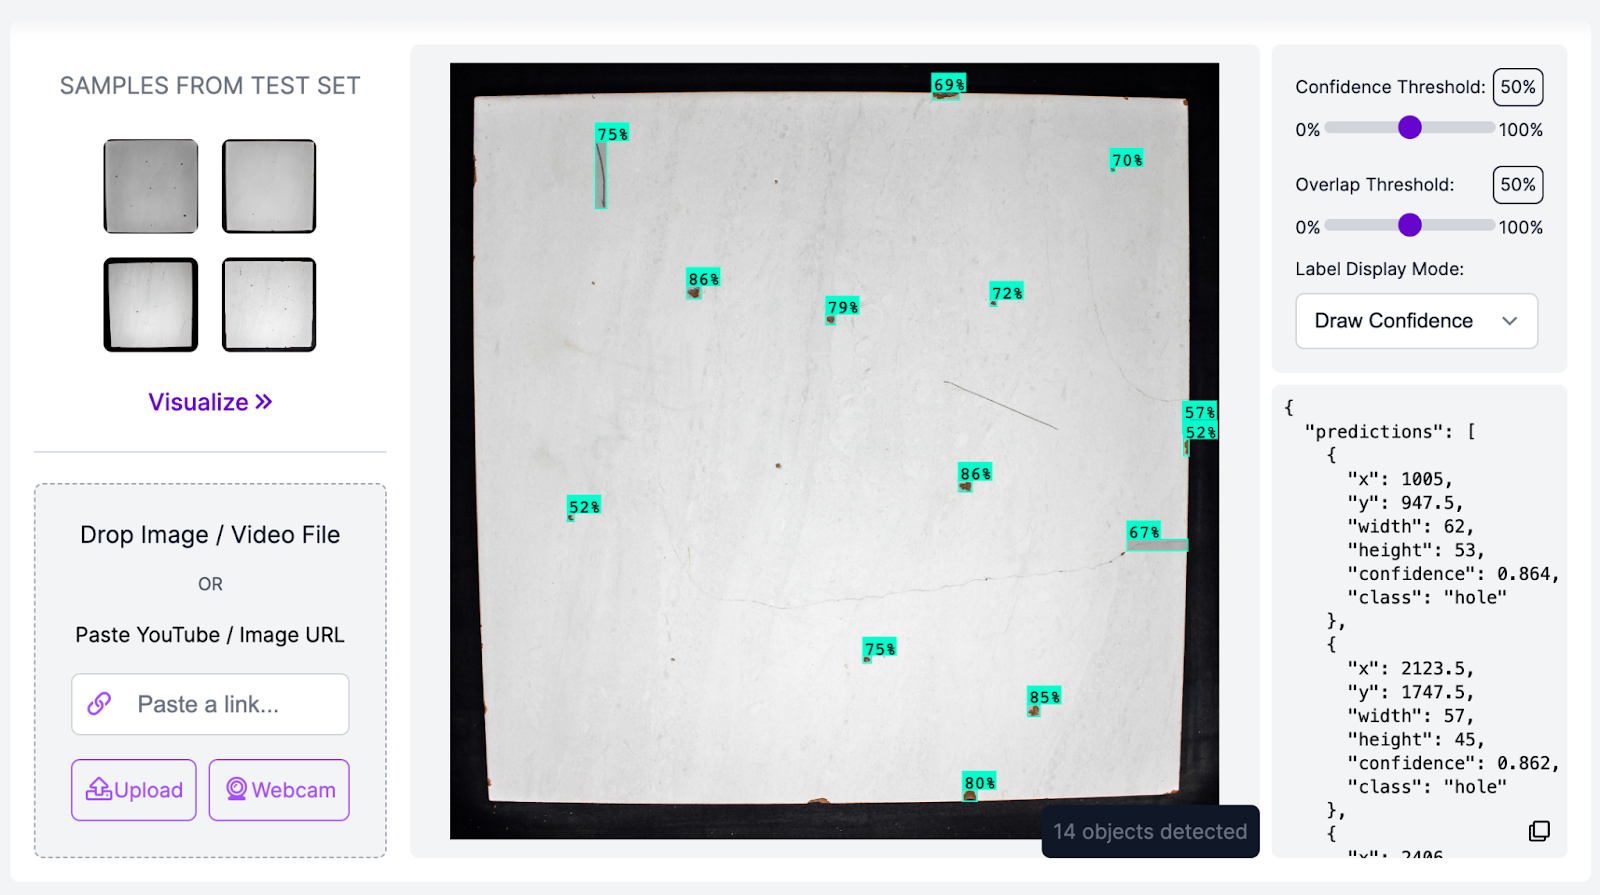
Above, our model successfully identified various defects present in a ceramic tile.
Step #6: Deploy Model to Production
With a model ready, there is one big question left to answer: how can you deploy the model for use in production? Roboflow provides a range of SDKs and tools for use in deploying your model. You can deploy your model to the following devices:
To learn more about each deployment option available for your model, refer to the deployment compatibility matrix published in the Roboflow documentation.
Once you have chosen a deployment option, you will need to configure the device(s) on which you want to use your model. The list above links to our guides for each deployment option.
Whatever deployment device you choose, you can develop logic that meets your business requirements. For example, if you need to visually inspect for the presence of certain objects (i.e. four screws present in each corner of an image), you can build that logic using the results from your model.
Conclusion: Defect Detection AI
In this guide, we have demonstrated how to build an automated visual inspection and defect detection system with computer vision. We used Roboflow Universe to collect data for ceramic tile defects. We then labeled images and generated a dataset version. Next, we trained a model using our dataset, and tested it in the Roboflow web interface.
Manufacturing businesses like USG, Rivian, and TruParts Manufacturing use Roboflow to build computer vision systems for automated quality assurance, product inspection, anomaly detection, and more. Our manufacturing customers have built hundreds of custom computer vision systems with Roboflow, taking what used to be manual processes, automating them in just a few days, and scaling them across thousands of locations.
Cite this Post
Use the following entry to cite this post in your research:
James Gallagher. (Jul 18, 2023). How to Build an AI Defect Detection System. Roboflow Blog: https://blog.roboflow.com/how-to-build-a-defect-detection-system/