
Almost any IP camera that supports RTSP, HTTP-MJPEG, ONVIF, or RTMP can feed a computer vision pipeline, meaning teams in manufacturing, retail, or logistics rarely need to replace hardware to start running models on live video. This guide shows how to stream a camera feed through MediaMTX and FFmpeg into a Roboflow Workflows inference pipeline, covering everything from RTSP setup to decoupling inference from display. Smartphones running an RTSP app work as drop-in substitutes for anyone without a networked camera on hand.
What if the security or factory cameras you already have could spot problems, count items, or send alerts, all without buying anything new?
Most modern cameras already stream video in standard ways. With a simple setup, you can connect those streams to a computer vision system, label a few examples, train a model, and start getting real-time insights.
In this guide, we’ll show you how to do that quickly using Roboflow - no new hardware required. If you run or support cameras in a store, a warehouse, a retail aisle, a manufacturing facility, or around a site, and want to know how to add AI without a big IT project, this guide is for you.
What you’ll build (at a glance):
- Connect a camera stream (most “IP cameras” support standard protocols like RTSP/HTTP. Think “a link to the live video”).
- Capture a small set of frames from your real environment.
- Label a handful of examples (with AI assistance to speed things up).
- Train a detector that recognizes what you care about (e.g., PPE, pallets, products).
- Run the model on the live stream.
No IP camera? We’ll also show how to simulate a camera using a sample video or a lightweight RTSP server so you can follow along.
You’ll leave with a working real-time AI workflow you can expand across more cameras and use cases.
Using Existing Cameras For AI Is Easier Than You Think
When starting a new computer vision project, it’s easy to assume you’ll need to invest in specialized, high-end camera hardware to connect with your pipeline. In reality, that’s not the case. Almost any IP camera will do, as long as it supports common streaming protocols like RTSP, HTTP-MJPEG, ONVIF, or RTMP.
That means even a traditional CCTV camera can serve as the “eyes” of your computer vision project. Better still, your smartphone can act as an IP camera with the right app installed, allowing you to stream video over RTSP directly into your workflow.
Reusing existing cameras has several advantages:
- Cost savings: You avoid the upfront cost of buying new hardware and make use of what you already own.
- Flexibility: From old CCTV setups to webcams to phones, you can connect almost any device that supports IP streaming.
- Ease of integration: Standard protocols mean your workflow doesn’t care what the device looks like, as long as it sends video in the right format.
- Scalability: If you need to expand your project, you can add more IP cameras without worrying about compatibility with specialized equipment.
In short, you don’t need to chase the newest hardware to build powerful computer vision systems. Start with the cameras you already have, and you’ll often find they’re more than capable of meeting your needs.
Recommended: Using RTSP Streams for Computer Vision
End-to-End: How to Add AI to Your Current Cameras
Let’s walk through how to connect an existing camera to build a vision app. Workflows in Roboflow can process both images and video streams, which makes it straightforward to bring your own camera into the loop. To get started, you’ll need three things:
- An IP camera (or a device acting as one).
- A Roboflow Workflow (you can create a new one or use an existing workflow).
- A way to stream the video frames from your camera into the workflow.
Once connected, the workflow processes the incoming video and returns the outputs in real time.
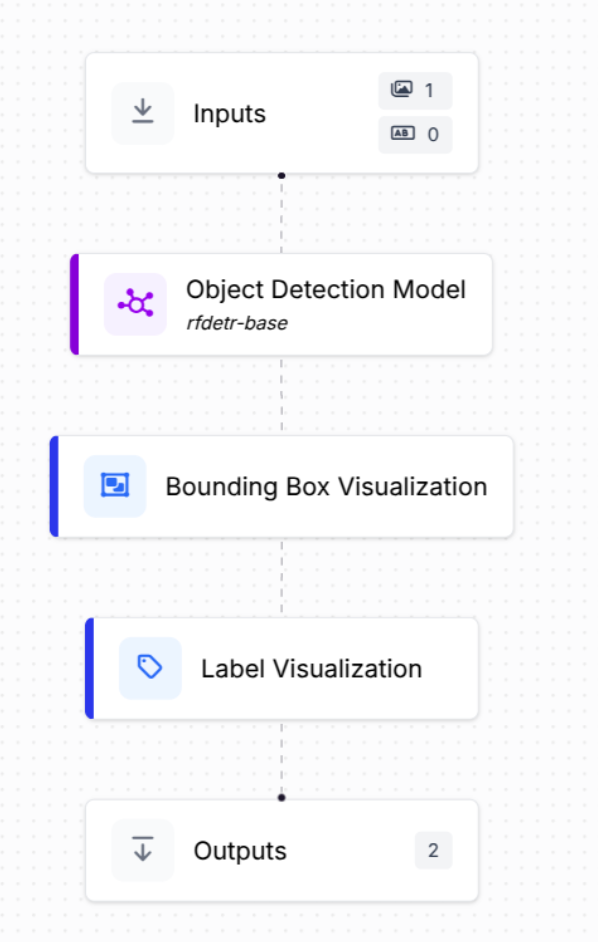
For example, let’s build a simple workflow for object detection:
- Start with an Input Block to receive the video stream.
- Add a Model Block using RF-DETR as the object detection model.
- Finally, include Visualization Blocks to render bounding boxes and labels on the detected objects.
Recommended: How to Use the Roboflow Workflows Expression Block
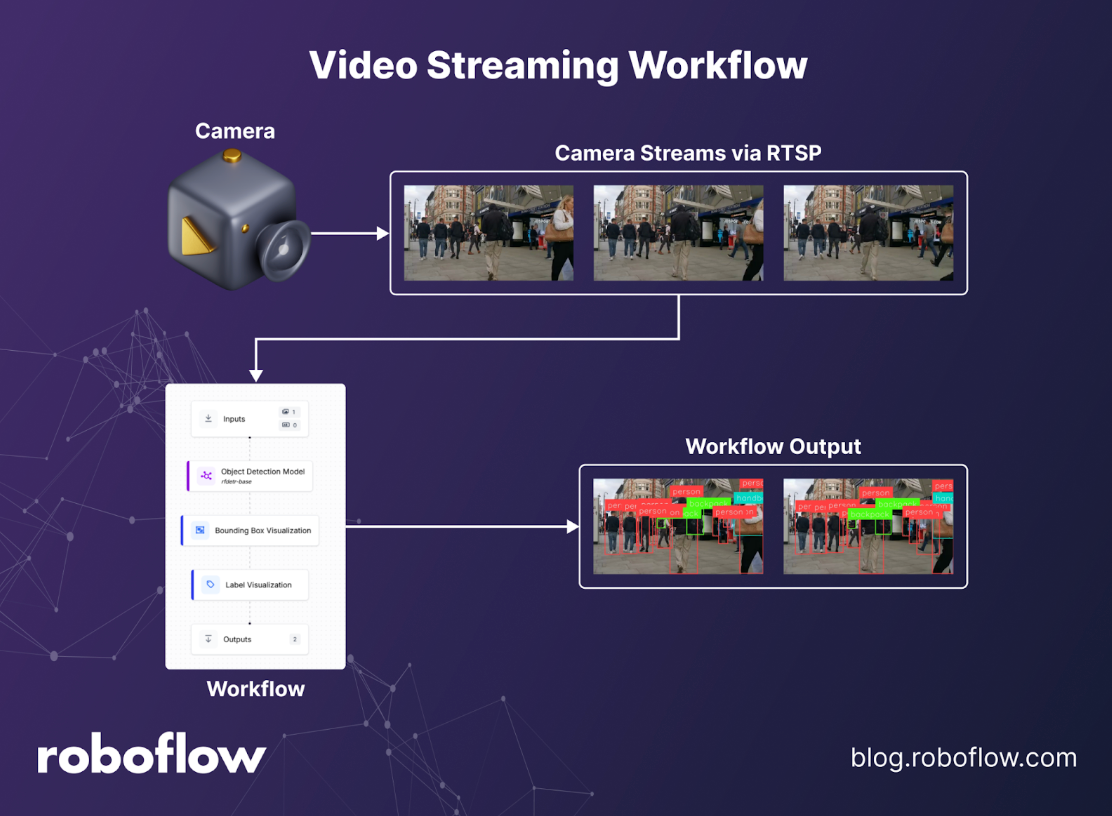
With this setup, any IP camera stream you send into Roboflow will automatically be analyzed, and the results will be displayed in real time.
Try it now: Clone this workflow in one click →
Now that our workflow is ready, we can put everything together. The workflow will take the live video feed from the camera, process each frame through the model, and return an annotated stream with bounding boxes and labels drawn on the detected objects.
Building the Inference Application
Next, let’s build the inference application that will interact with our workflow. The two key tools we’ll use are Roboflow Inference and OpenCV.
First, install both libraries:
pip install inference opencv-python
With Roboflow Inference, you can easily connect to any video stream by specifying its video reference (this could be a webcam, an IP camera, or even a video file).
Then, by defining a callback function, we can process the workflow’s outputs and use OpenCV to display the annotated results in a window.
from inference import InferencePipeline
import cv2

def my_sink(result, video_frame):
    if result.get("label_visualization"):
        cv2.imshow("Workflow Image", result["label_visualization"].numpy_image)
        cv2.waitKey(1)

# initialize a pipeline object
pipeline = InferencePipeline.init_with_workflow(
    api_key="YOUR_API_KEY",
    workspace_name="YOUR_WORKSPACE_NAME",
    workflow_id="YOUR_WORKFLOW_ID",
    video_reference='0',
    max_fps=30,
    on_prediction=my_sink
)

pipeline.start() #start the pipeline
pipeline.join() #wait for the pipeline thread to finish
In the example above, the video reference is set to 0, which corresponds to the default webcam on your computer. You can easily swap this out for a different source, such as an RTSP streaming link.
To demonstrate, create an RTSP stream using MediaMTX. MediaMTX is a real-time multimedia streaming server that makes it simple to publish and consume streams.
1. Install and run MediaMTX
Download and install MediaMTX from here. Once installed, you can launch the server from the command line:
./mediamtx
This starts the MediaMTX server, ready to handle incoming streams.
2. Stream a video to MediaMTX with FFmpeg
Open a new terminal window and run the following command to stream a video file:
ffmpeg -re -stream_loop -1 -i your_media_file.mp4 -c copy -f rtsp rtsp://127.0.0.1:8554/mystream
Here’s what’s happening:
- -re ensures the video is streamed in real-time.
- -stream_loop -1 loops the video infinitely.
rtsp://127.0.0.1:8554/mystream is the RTSP link where the stream is published.
3. Use the RTSP link as your video reference
With the server running, your RTSP link is: rtsp://127.0.0.1:8554/mystream
Now you can replace the 0 (webcam reference) in your inference application with this RTSP link, and the workflow will consume the video stream from MediaMTX instead of your webcam.
Decoupling Inference From Display
So far, our workflow has been tightly coupled: the same script performs inference and handles visualization using OpenCV. While this works, it limits flexibility. A more scalable approach is to decouple inference from display.
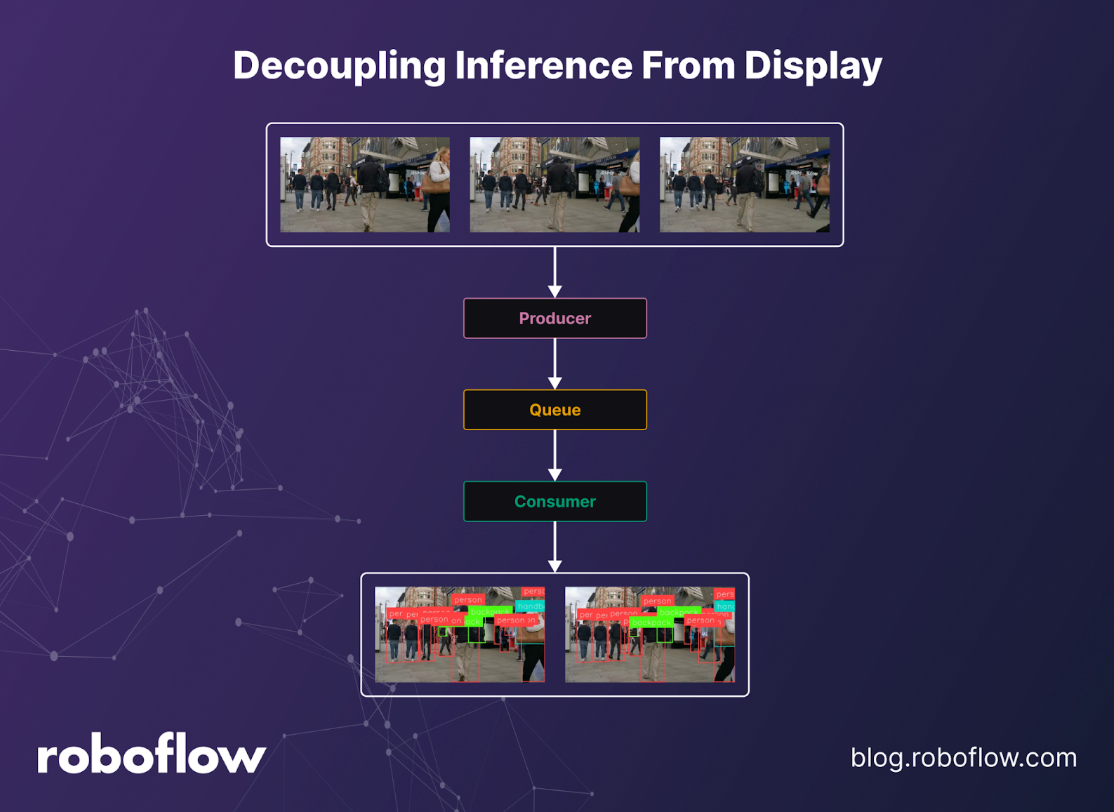
Instead of rendering frames immediately, you can publish annotated frames to a message queue, allowing other programs to consume and display them. This way, inference and visualization become independent processes.
To achieve this, we’ll use ZeroMQ (ØMQ) a high-performance messaging library via its Python implementation pyzmq:
pip install pyzmq
Grab the full source code here.
Producer: Inference Publisher
This producer script would take the streams from the RTSP streams and then add the annotated frames to the message queue. Now any consumer can consume this and do whatever they want.
import cv2
import zmq
import pickle
from inference import InferencePipeline

context = zmq.Context()
socket = context.socket(zmq.PUB)
socket.bind("tcp://*:5555")  # publish frames on port 5555

def my_sink(result, video_frame):
    if result.get("label_visualization"):
        frame = result["label_visualization"].numpy_image
        # Serialize with pickle (could also use JPEG encode for speed)
        data = pickle.dumps(frame)
        socket.send(data)

    print("Worked!", result)

pipeline = InferencePipeline.init_with_workflow(
    api_key="YOUR_API_KEY",
    workspace_name="YOUR_WORKSPACE_NAME",
    workflow_id="YOUR_WORKFLOW_ID",
    video_reference='rtsp://localhost:8554/mystream',
    max_fps=30,
    on_prediction=my_sink
)

pipeline.start()
pipeline.join()
Consumer: Display Subscriber
This script subscribes to the published frames and displays them in a resizable OpenCV window:
import cv2
import zmq
import pickle

context = zmq.Context()
socket = context.socket(zmq.SUB)
socket.connect("tcp://localhost:5555")
socket.setsockopt_string(zmq.SUBSCRIBE, "")  # subscribe to all

# Create a resizable window
cv2.namedWindow("Annotated Stream", cv2.WINDOW_NORMAL)
cv2.resizeWindow("Annotated Stream", 1280, 720)  # set desired size

while True:
    data = socket.recv()
    frame = pickle.loads(data)

    # Optional: scale frame to fit the window size (if source is small)
    frame = cv2.resize(frame, (1280, 720))

    cv2.imshow("Annotated Stream", frame)

    if cv2.waitKey(1) & 0xFF == ord("q"):
        break

cv2.destroyAllWindows()
Running the Full Inference Workflow
Before running the full pipeline, make sure your MediaMTX server and FFmpeg streaming command are up and running to provide a video stream.
Next, save the producer script as producer.py and run it:
python producer.pyDo the same for the consumer script by saving it as consumer.py and starting it in a separate terminal:
python consumer.pyThis will open an OpenCV window (as shown in the demo video below) that performs real-time object detection on the streamed video.
By separating inference from visualization, we unlock several advantages:
- Lightweight & reusable inference pipeline – the producer focuses purely on running inference.
- Flexible consumers – any application (Python, JavaScript, or others) can subscribe to the ZeroMQ stream and handle the results.
- Scalability – multiple consumers can connect to the same inference stream without overloading the producer.
This modular design makes the workflow inference more flexible, scalable, and production-ready. You can easily connect it to a real IP camera, swap out workflows, or integrate the output into other applications, all without changing your core inference pipeline.
Grab the full source code here.
Industry Snapshots: Where This Works Now
Several industries can benefit from using existing camera hardware to power AI workflows. From manufacturing floors to retail stores, organizations are finding ways to unlock new value without buying new equipment. Let’s take a look at a few examples.
Manufacturing: Existing cameras can spot defects, ensure PPE compliance, or count parts in real time. With RTSP streams feeding into workflows, you can label “defect types” or “PPE present/absent.” The payoff: less manual inspection and higher first-pass yield.
Retail: Overhead and shelf cameras enable planogram compliance, out-of-stock detection, and queue monitoring. By labeling shelf segments or SKU zones and running a workflow powered by a vision-language model (VLM) that incorporates context, you can automatically trigger “restock” or staffing alerts. The result: fewer out-of-stock minutes and faster, more reliable audits.
Logistics and Warehousing: Dock cameras can count pallets, detect forklifts crossing geofences, or monitor bay occupancy. Robust augmentations handle low light or occlusion; RF-DETR helps with crowded scenes. Deploy at the edge for real-time Slack or PA alerts. Results show higher dock throughput and fewer safety incidents.
Smart Cities and Security: Street or building cameras can be enhanced with computer vision to power intrusion detection, loitering alerts, and traffic flow analysis. With access to the wide range of models and datasets on Roboflow Universe, you can quickly adapt these workflows to address unique, domain-specific scenarios.
Best Practices For Leveraging Existing Cameras for AI
While existing cameras can be leveraged for AI, following a few best practices ensures smooth and reliable performance:
- Network: Ensure a stable, low-latency connection for continuous video streaming.
- Lighting and Camera Placement: Avoid strong backlight, secure mounts to reduce shake, and lock exposure settings for consistency.
- Model Selection: Know when to use a multimodal model for context versus a classic object detection model for speed and simplicity.
- Versioning: Always version datasets and models, and A/B test different workflows before deployment.
- Security: Apply the principle of least privilege, rotate stream credentials regularly, redact PII, and maintain audit logs.
- Data Storage: Plan for safe and reliable storage of camera streams. Ensure retention policies are in place and enough memory is allocated for stored data.
Conclusion: How to Use Your Existing Cameras for Computer Vision
If you’ve been thinking that modern computer vision requires brand-new, expensive camera hardware, think again. The real breakthroughs haven’t come from the lenses or sensors; they’ve come from the algorithms. Your existing cameras are still powerful “eyes”; what’s changed is the intelligence we can apply to the video they capture.
By pairing your current infrastructure with AI-powered workflows, you can unlock advanced capabilities like defect detection, real-time alerts, and traffic analysis, all without ripping and replacing hardware.
Head over to Roboflow Workflows, design a pipeline that fits your exact use case, connect it to your existing cameras, and start realizing the potential of computer vision today. The future isn’t about replacing what you have; it’s about making what you already own smarter.
What to Do Next
- Ready to experience these workflows firsthand? Test and fork the workflow.
- Grab the full source code here.
Cite this Post
Use the following entry to cite this post in your research:
Contributing Writer. (Aug 21, 2025). How to Use Your Current Cameras for AI. Roboflow Blog: https://blog.roboflow.com/how-to-use-existing-cameras/