
Tracking objects across video frames is a critical step in many computer vision applications. While object detection models can identify what is present in a single frame, they do not inherently capture motion or maintain continuity over time. This is where tracking algorithms come into play.
In this blog, you will learn how to use the SORT tracking within Roboflow Workflows to transform frame-by-frame detections into continuous object tracks.
I will guide you through setting up a workflow, integrating a detection model, and configuring SORT tracker to maintain object identities across video streams, enabling you to build smarter, more dynamic computer vision applications.
What is SORT?
SORT, introduced in the 2016 paper “Simple Online and Realtime Tracking” (revised 2017), is an object tracking algorithm that combines motion estimation with data association techniques to assign consistent IDs to moving objects, enabling real-time trajectory tracking.
At the time of its release, SORT set new benchmarks for speed and accuracy. While more advanced trackers have since emerged, SORT remains a strong choice for low-resource environments and applications where simplicity and real-time performance are essential.
Let’s take a look at its pros and cons:
Pros
- It's Super lightweight: requires little extra memory and runs on CPU.
- It's simple: only uses a combination of well-known methods, without special handling of edge cases.
- It’s really fast: in the paper (2017) it ran at 260 frames per second, while having a top accuracy.
- It's model independent: you can use any Object Detector with it, and it hasn't a trainable model behind.
Cons
- Doesn’t consider appearance features: matching is only based on the position and estimated trajectory of the object.
- Can’t handle objects that disappear from the scene: because of the lack of appearance features in the track, once that the object disappears from the scene, there is no mechanism to recover the track.
- Might confuse when objects overlap: when 2 trajectories are similar it might confuse because it doesn’t account for object appearance.
- Can fail to track objects that have a big change in velocity: this is due to the linear constant velocity model used by the Kalman filter
To learn more about how the SORT algorithm works, check out this blog.
Building an End-to-End Object Tracking Workflow with SORT in Roboflow
Roboflow Workflows allow you to visually design video AI pipelines by connecting blocks for detection, tracking, zone analysis, and visualization. This approach simplifies complex logic, reduces the need for extensive coding, and enables you to build scalable, production-ready workflows quickly.
In this blog, we will build a motorcycle tracking workflow that detects and tracks each motorcycle across a video using the SORT tracker. Each object is assigned a consistent ID, allowing it to be followed reliably from frame to frame.
The video below shows the output of this workflow applied to this sample video.
Step 1: Set Up Your Roboflow Workflow
To get started, create a free account on Roboflow and log in. Next, create a workspace, navigate to Workflows from the left sidebar, and click Create Workflow.
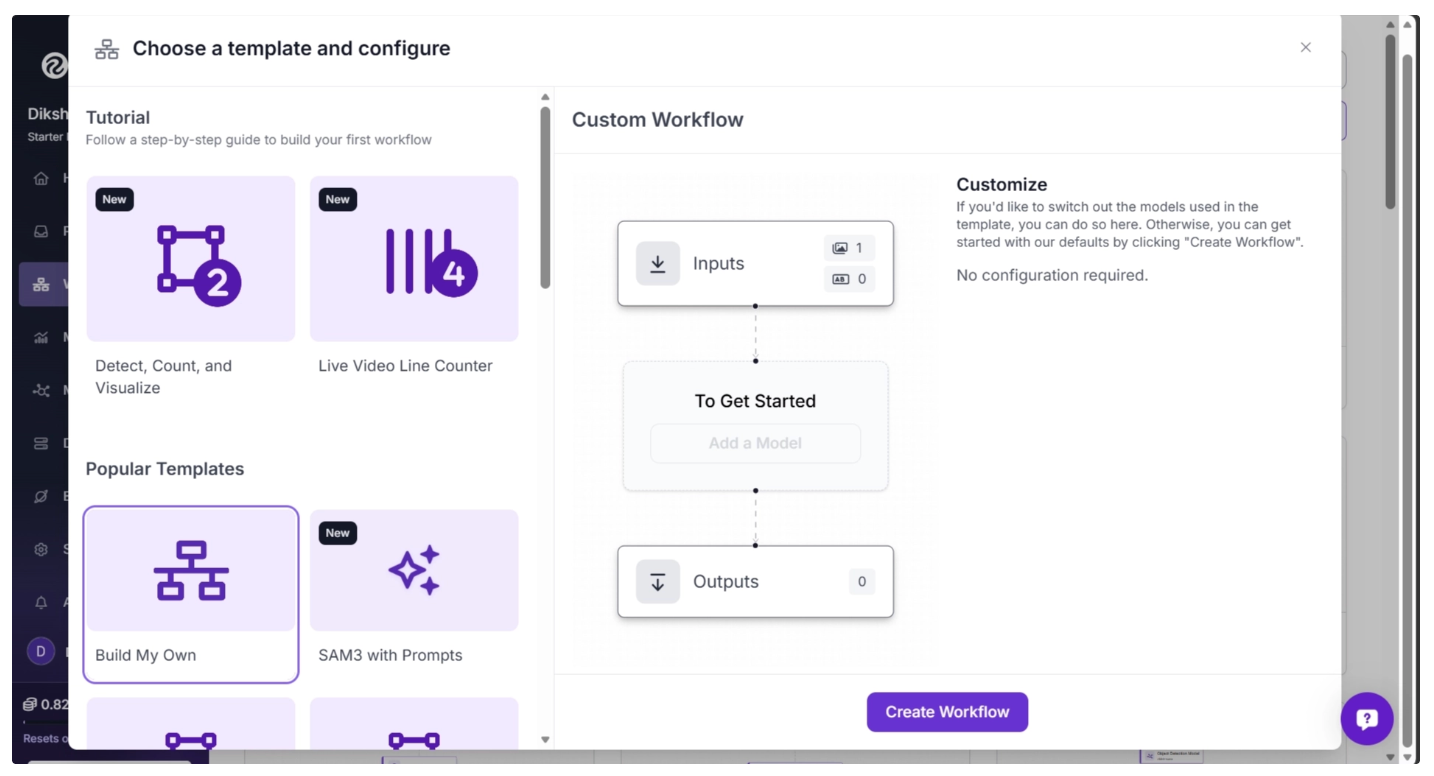
A setup modal will appear, allowing you to choose from a variety of prebuilt templates such as segmentation, OCR, small object detection, and more.
For this tutorial, select “Build My Own” as shown below:
You will then be taken to a blank workflow editor, ready to start building your pipeline.
By default, you will see two blocks: Inputs and Outputs, along with an AI Assistant pop-up that can help generate workflows from prompts. You can minimize the pop-up for now and focus on building the workflow step by step.

An example prompt you can use to generate the workflow described in this blog is shown below. While you may need to adjust some settings to better fit your specific use case, it provides a solid starting point.
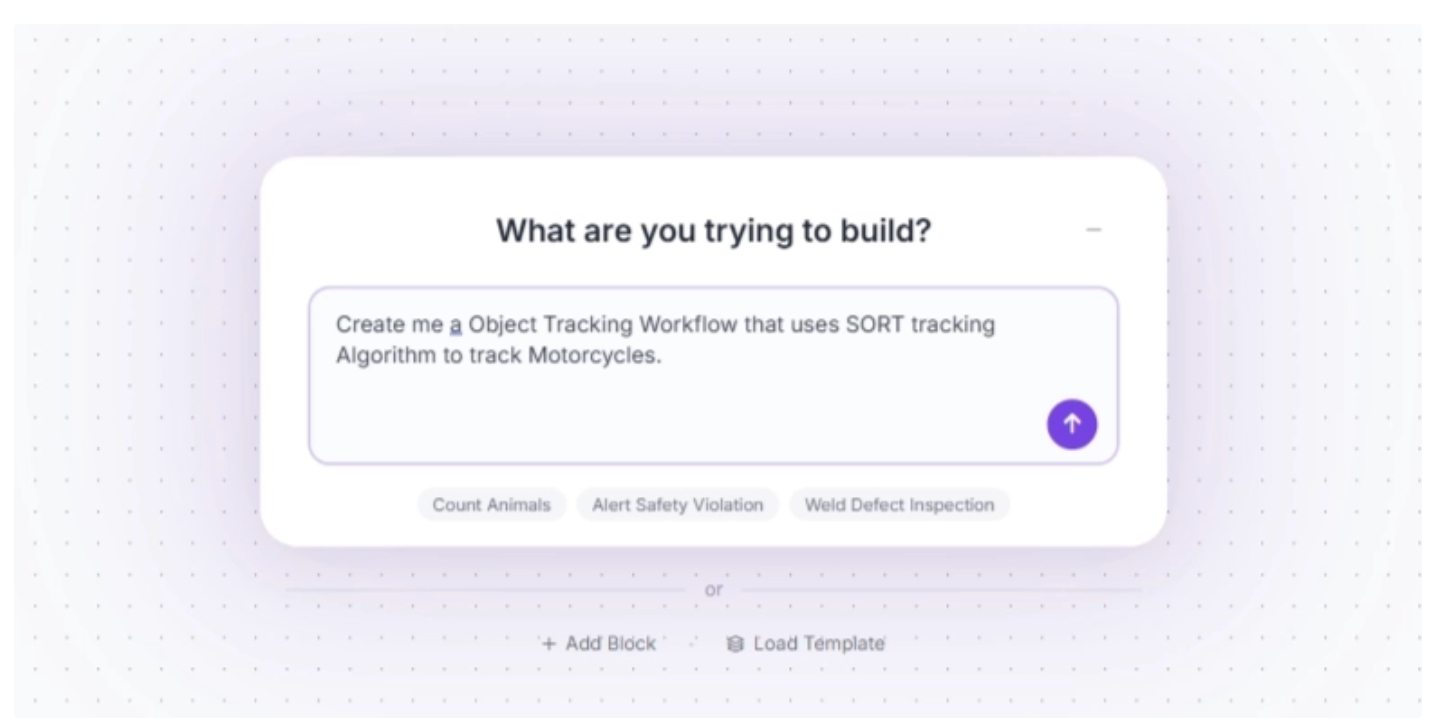
In this blog, however, we will build the workflow step by step using individual blocks so you can clearly understand how each component works and how they fit together. You can minimize the AI Assistant pop-up for now.
You can also rename your workflow by clicking the ⚙️ icon in the top-left corner. This opens the workflow configuration modal, as shown below:

Once renamed, you can return to the home page and reopen the workflow from the Workflows section in the left sidebar to continue building.
Step 2: Add and Configure the Object Detection Model
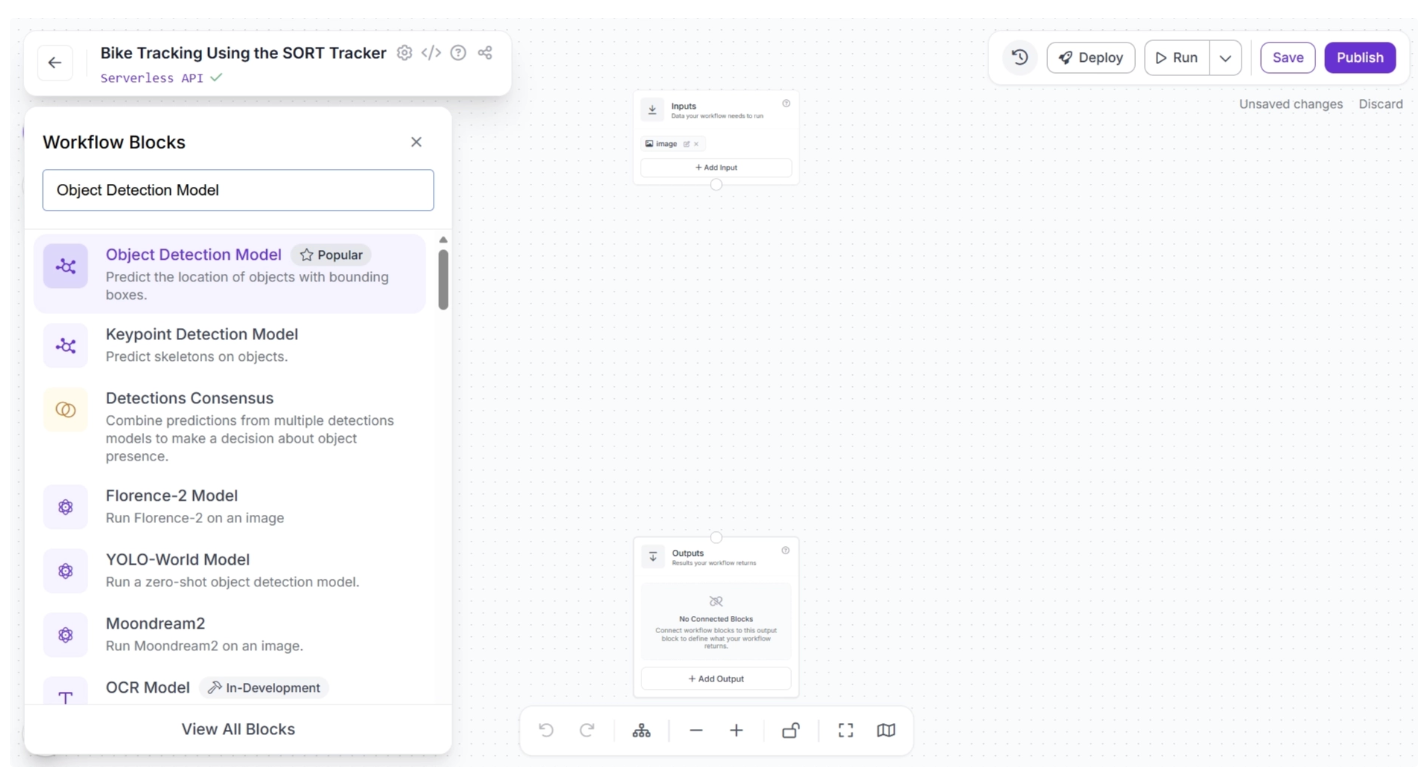
Next, we’ll add object detection to the workflow using the Object Detection Model block. This block allows you to run models such as RF-DETR to detect motorcycles in each frame.
To add it, click the “+” button in the top-left corner of the canvas. A menu of available blocks will appear, as shown below. Search for “Object Detection Model” and insert it into your workflow.
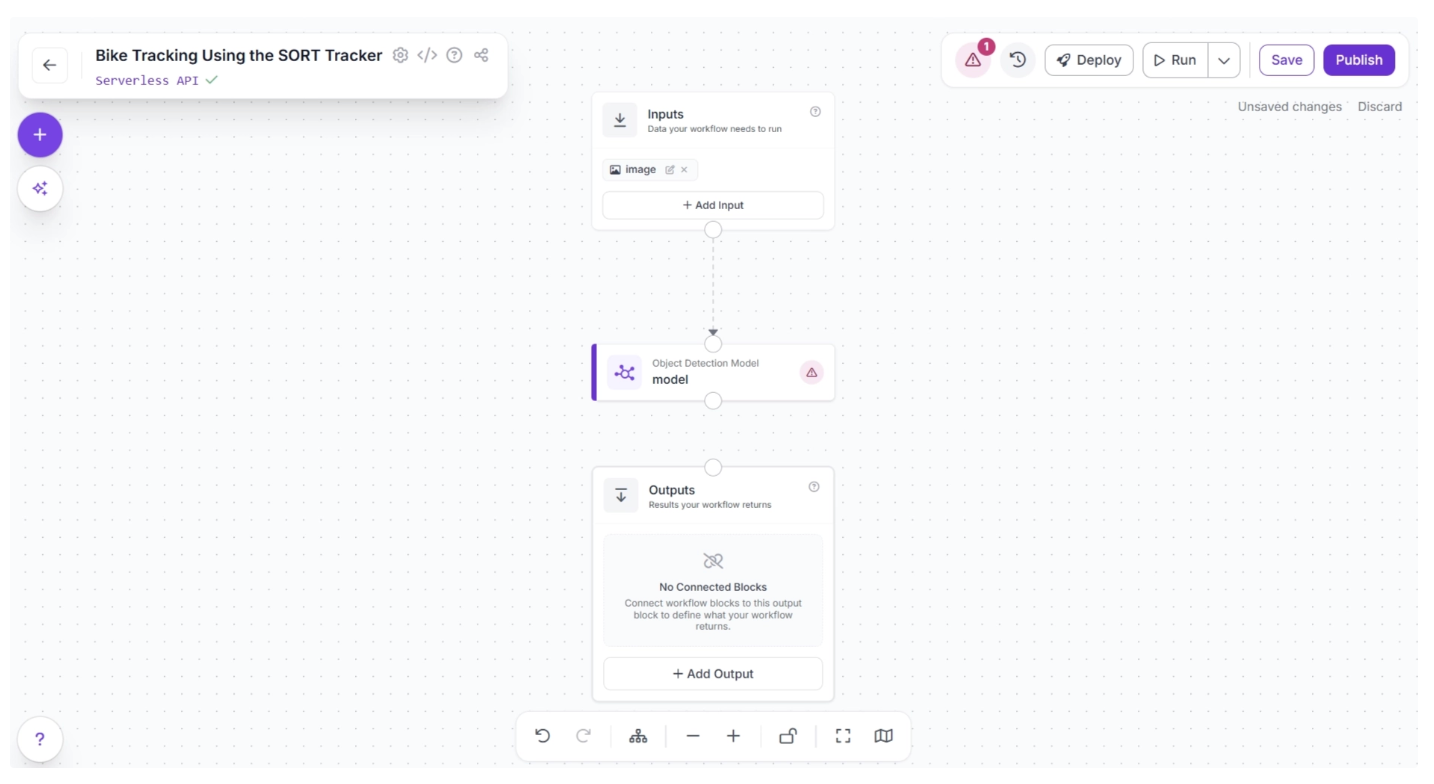
Once added, connect the Inputs block to the Object Detection Model block. This ensures that the input data flows into the model for inference.
When a connection is made between two blocks, the downstream block receives the output from the upstream block, which can then be used as input for its parameters.
After connecting the blocks, click Auto Layout (to the left of the zoom controls at the bottom) to neatly organize the canvas. Your workflow should now look like this:
Now, configure the detection model to use. Select the Object Detection Model block to expand its parameters, then click the ✏️ icon under the Model parameter.
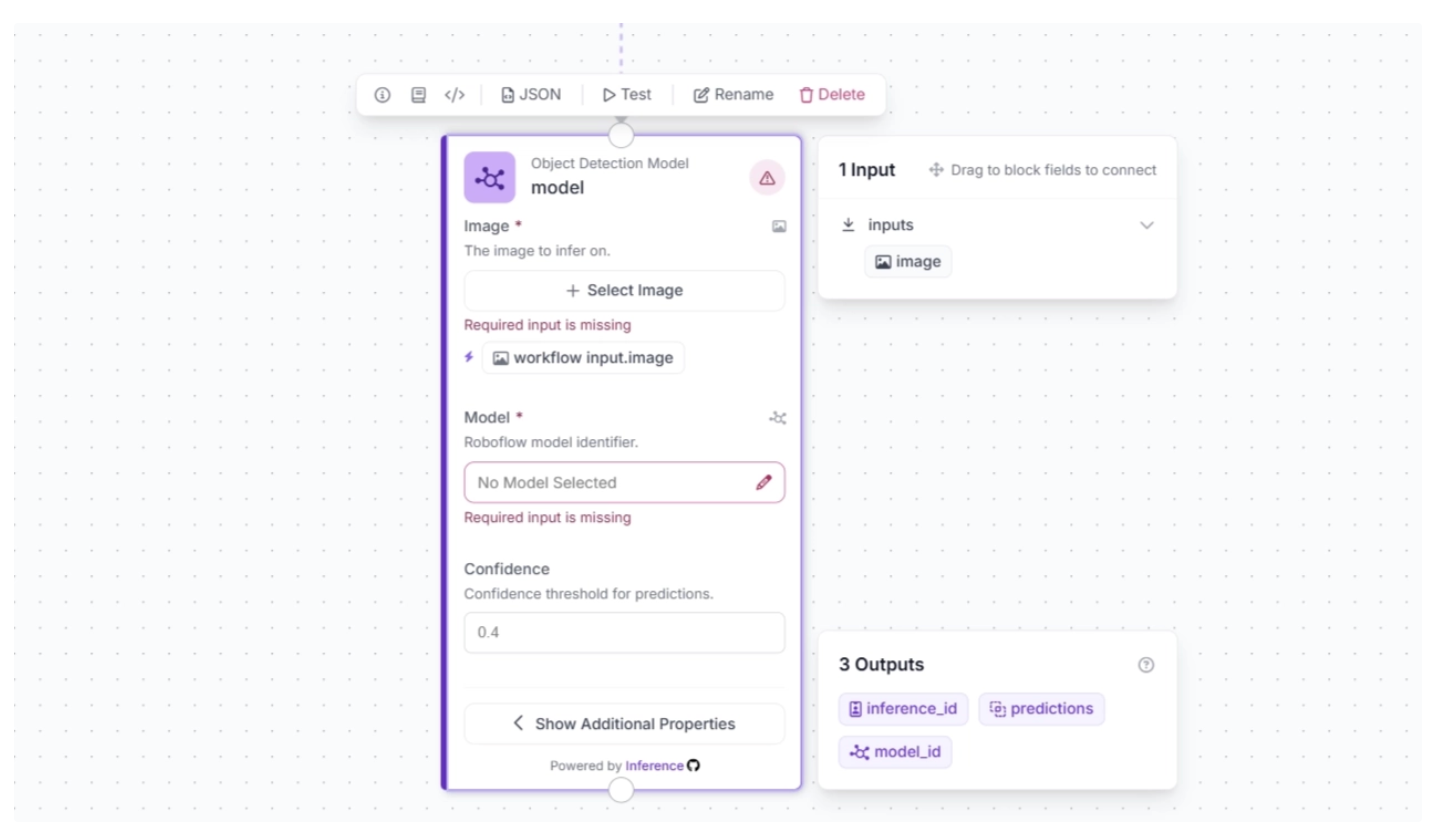
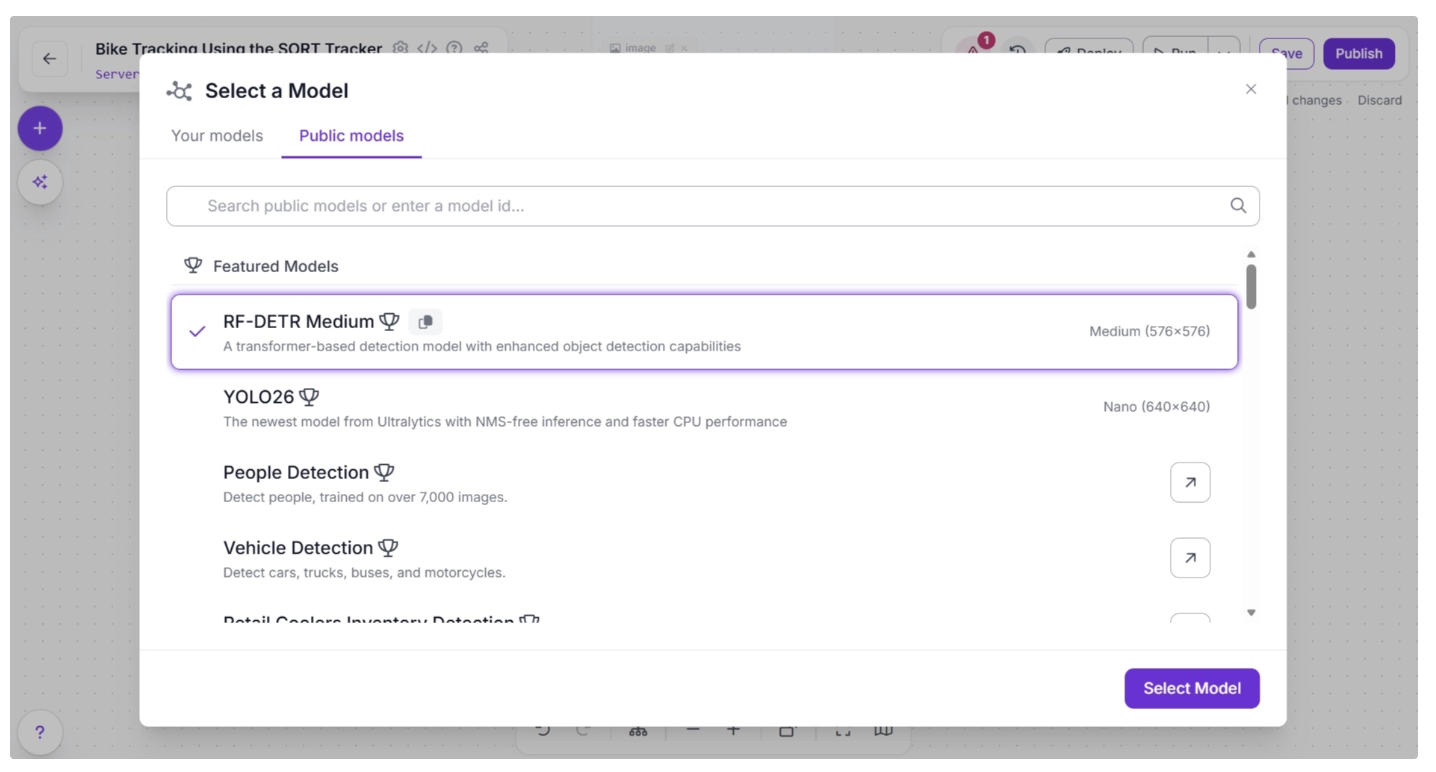
Once you click the pencil icon, a pop-up will appear. In the pop-up, select “Public Models,” then browse the available object detection models. Search for RF-DETR and choose the Medium variant.
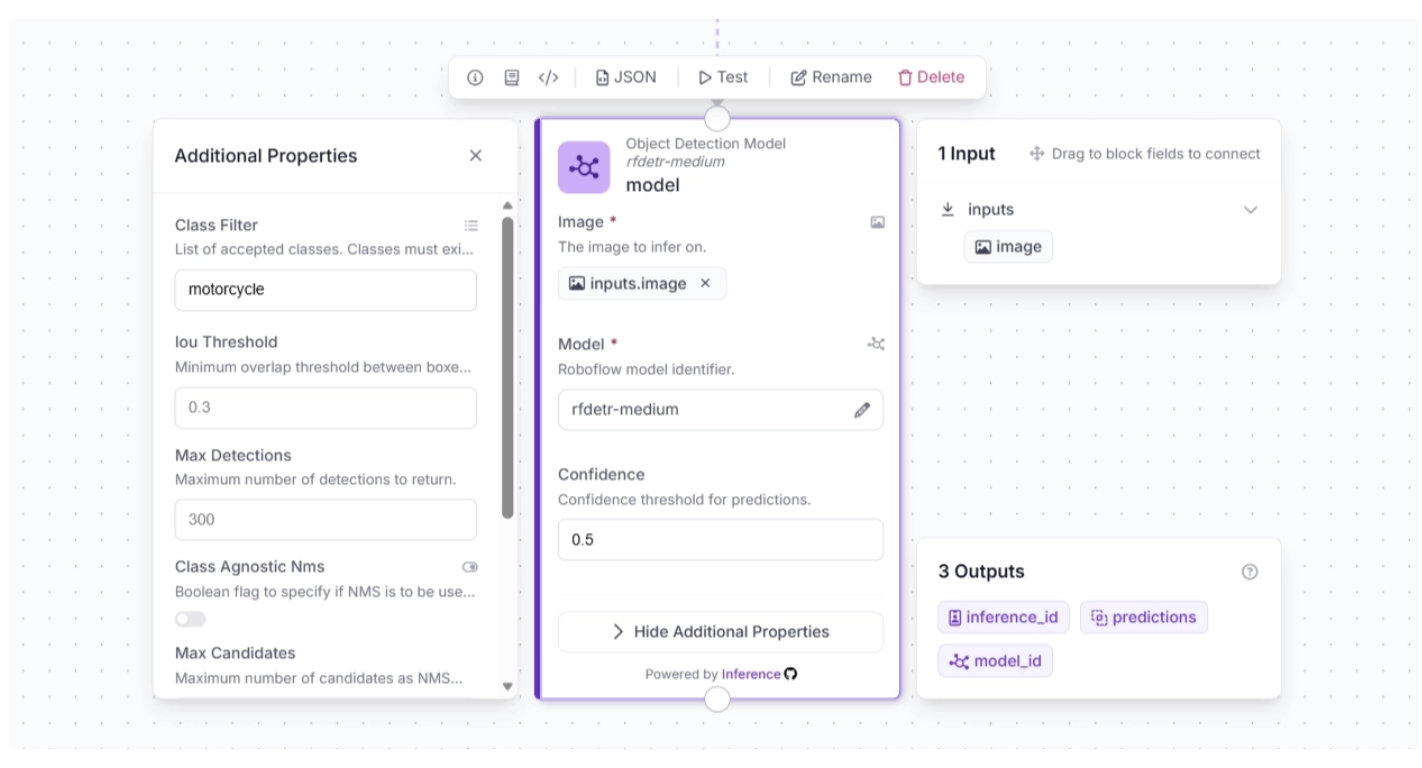
Once the model is selected, you can configure the confidence score. For this use case, set the confidence to 0.5. Then, click the ‘input.image’ button next to the lightning icon (⚡) under the Image parameter in the block. This links the input image from the upstream Inputs block to the Object Detection Model, allowing it to be used for inference.
The lightning icon (⚡) automatically assigns input values from the upstream block to the most relevant parameters of the selected block.
Next, click “Show Additional Properties.” This will reveal more parameters for the Object Detection Model block.
One such parameter is ‘Class Filter,’ which filters out all detection classes except the one specified. We will use this to make the model detect only motorcycles. To do this, add “motorcycle” as the value for the ‘Class Filter.’
The block should then be configured as shown below.
Make sure you publish the workflow after adding a few blocks to save your changes.
Step 3: Integrate the SORT Tracker for Multi-Frame Tracking
The object detection model operates on a frame-by-frame basis, detecting objects in each frame independently without any temporal context. To track objects across video frames, a SORT tracker is required. You can integrate it into your workflow by adding a SORT Tracker block.
This block takes object detections and their corresponding video frames as input, initializing trackers for each detection based on configurable parameters such as:
- minimum_iou_threshold: The minimum Intersection-over-Union (IoU) required to match a detection to an existing track. Higher values make matching stricter.
- minimum_consecutive_frames: The number of consecutive frames a potential track must appear in before it is considered a confirmed track with a real track ID.
- lost_track_buffer: The number of frames the tracker will keep a track alive after it no longer matches a detection, helping maintain identity across brief occlusions.
- track_activation_threshold: The minimum detection confidence score required to create a new track. Higher values reduce noise, while lower values allow weaker detections to spawn tracks.
- instances_cache_size: The size of the cache storing historical track IDs to determine whether a detection belongs to a new object or one seen before. Larger sizes let the tracker remember more past objects.
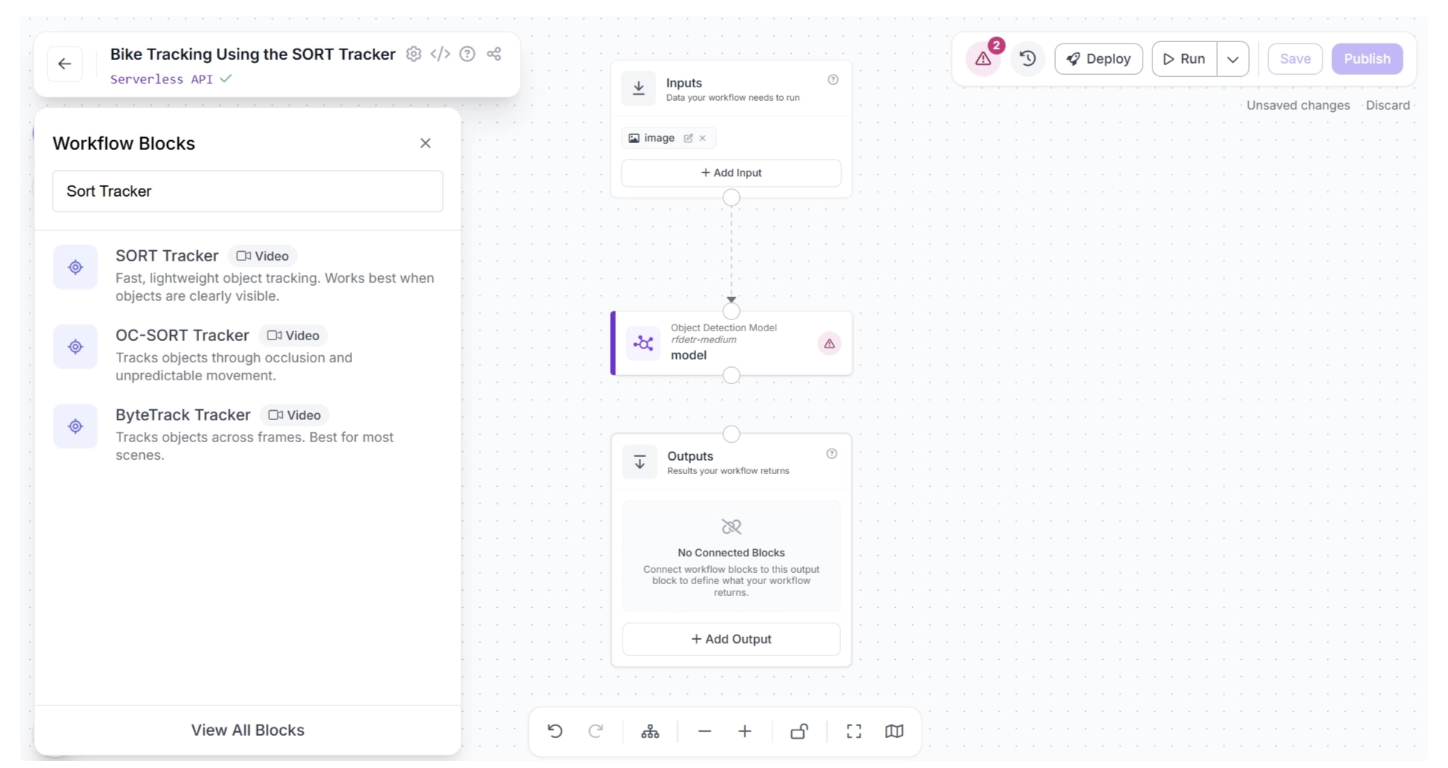
To add this block, click the “+” button in the top-left corner of the workflow canvas. A pop-up menu with workflow blocks will appear. From there, search for “Sort Tracker” and select it to insert it into your workflow.
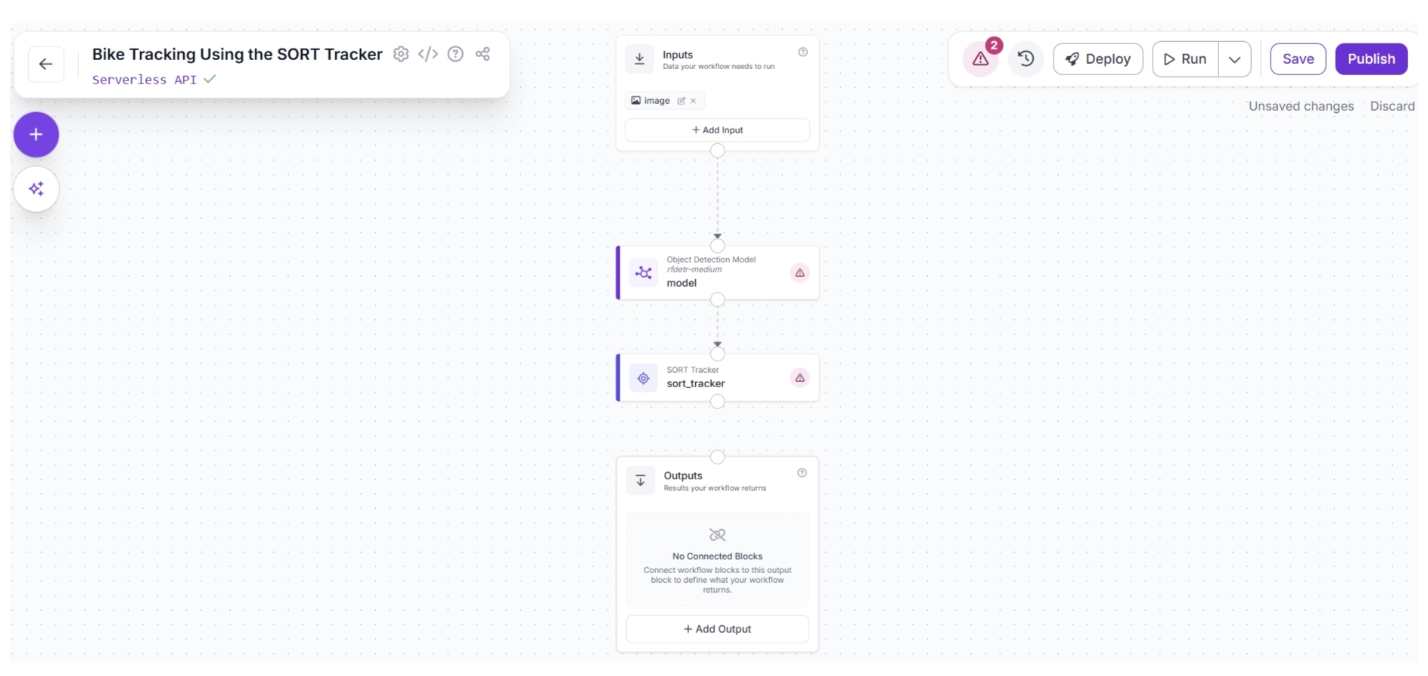
Once added, create a connection from the Object Detection Model block to the SORT Tracker block. This ensures that the outputs of the Object Detection Model block are available to the SORT Tracker block.
The canvas should then appear as shown below:
After making the connection, select the SORT Tracker block. This will expand the block and display its configurable parameters.
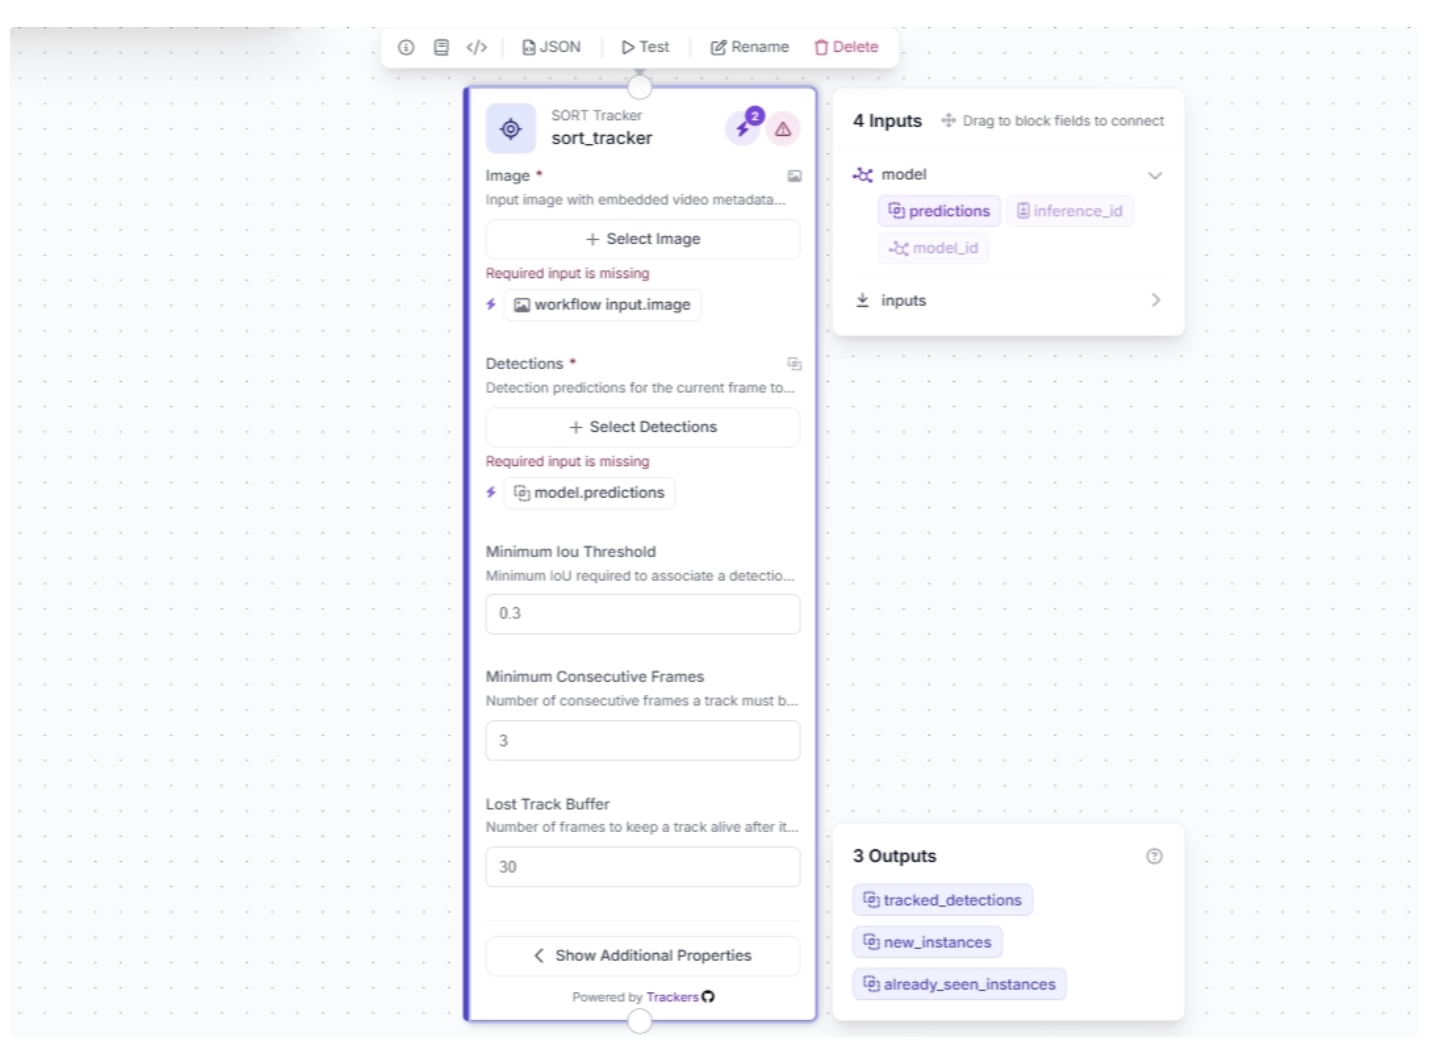
Click the lightning icon (⚡) in the top-right corner of the SORT Tracker block to accept “input suggestions,” as shown below.
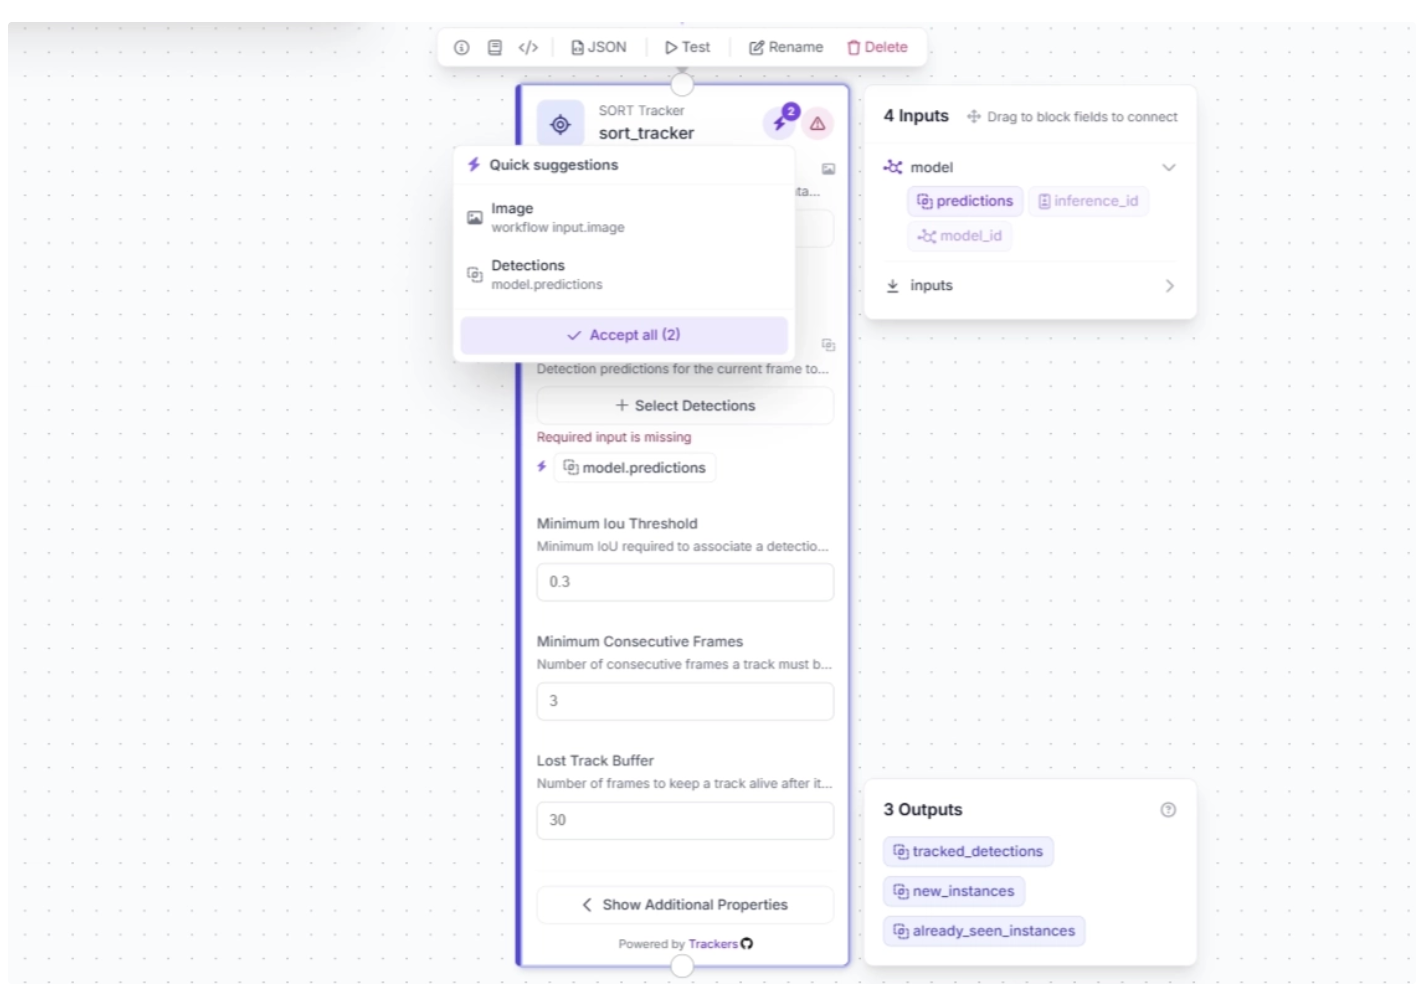
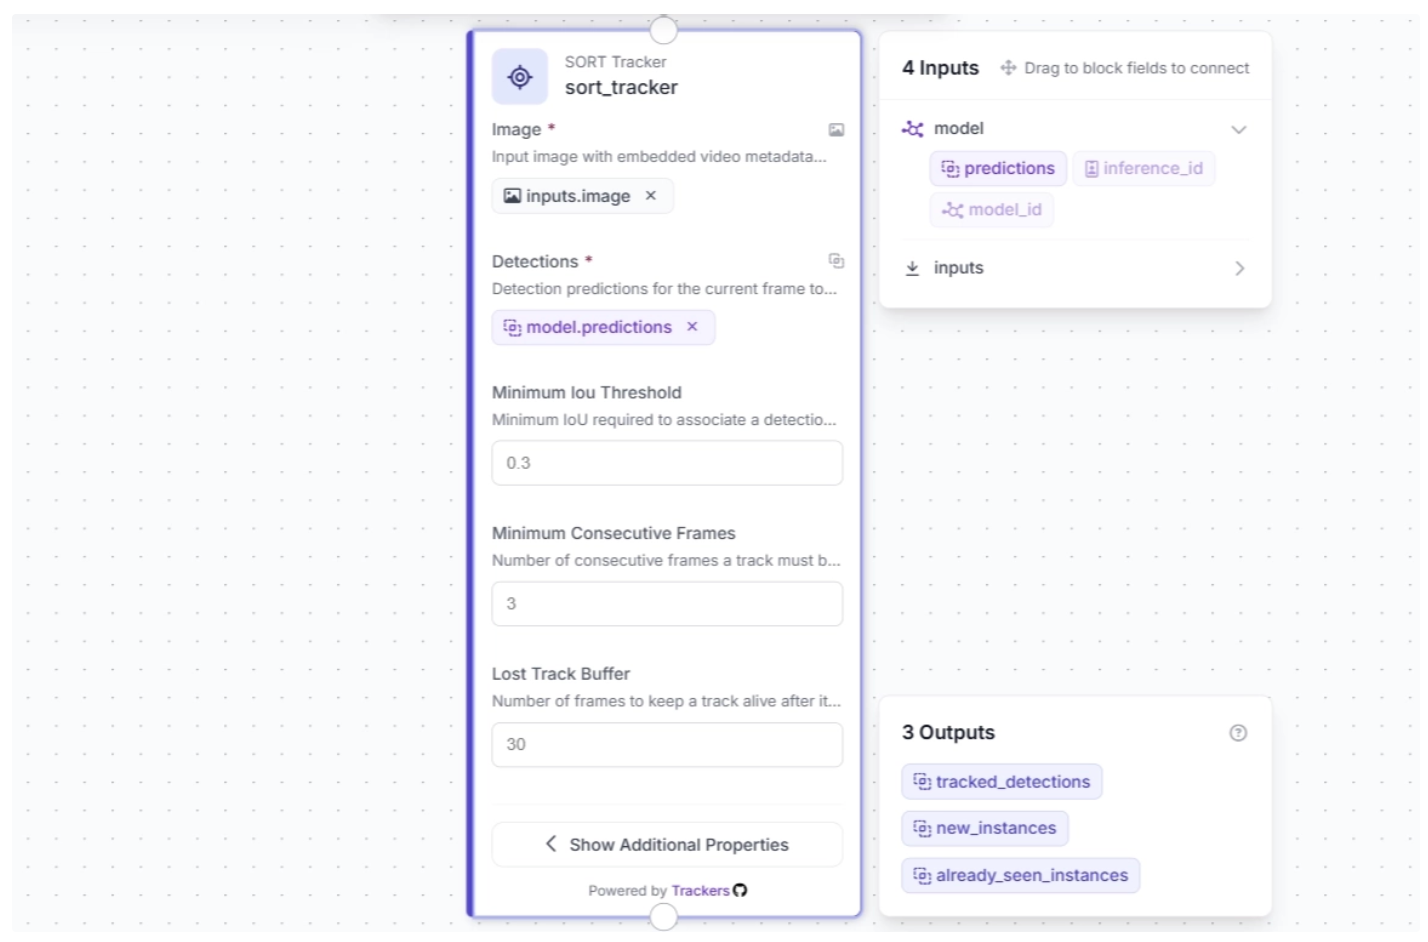
The SORT Tracker block parameters should then be auto-configured as shown below:
Step 4: Visualize Detections with Bounding Boxes
The SORT Tracker block receives outputs from the Object Detection Model block and initializes trackers for each detected object. These detections can then be visualized as bounding boxes in the video frames using the Bounding Box Visualization block.
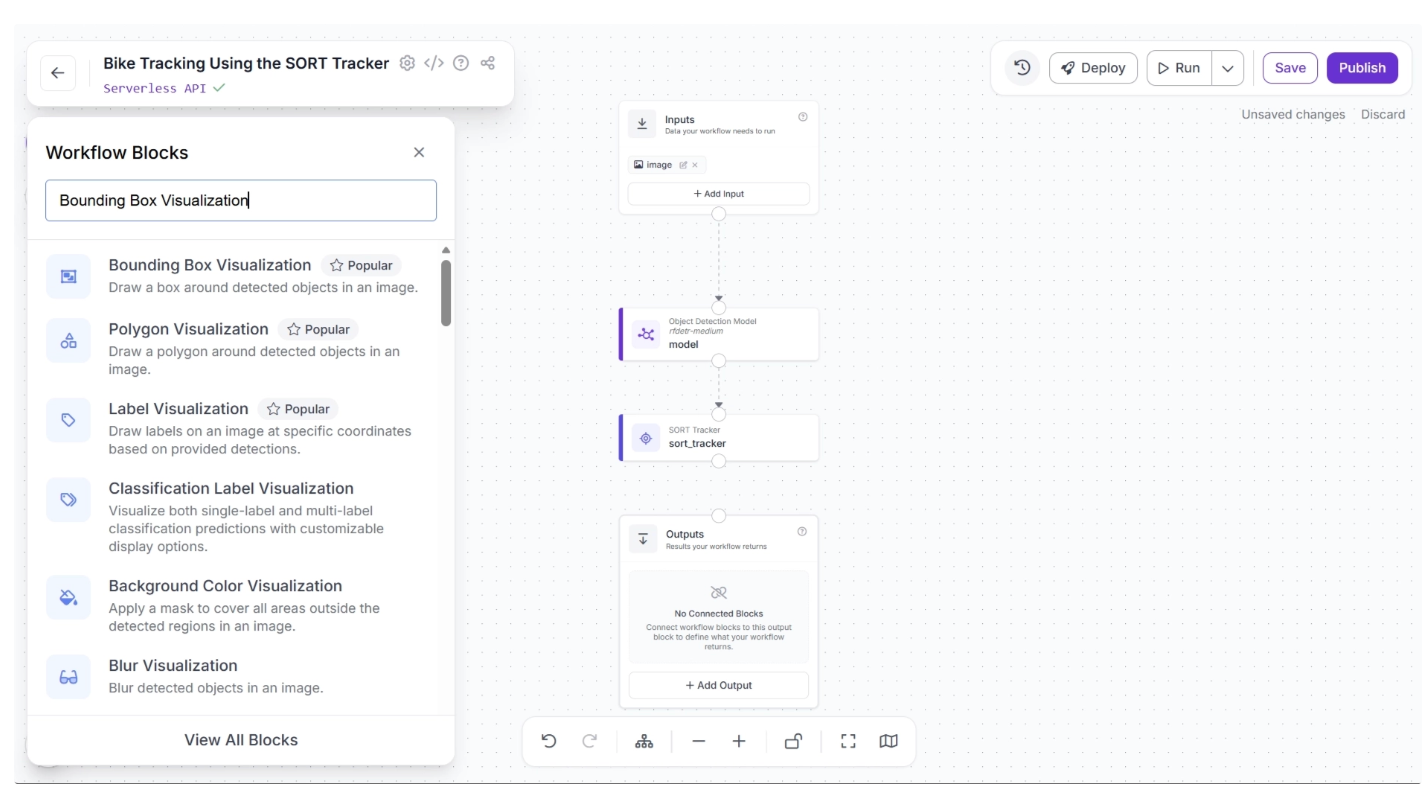
To add this block, click the “+” button in the top-left corner of the workflow canvas. A pop-up menu with workflow blocks will appear. From there, search for “Bounding Box Visualization” and select it to insert into your workflow.
Once added, create a connection from the SORT Tracker block to the Bounding Box Visualization block. This ensures that the tracked detection outputs from the SORT Tracker block are available to the Bounding Box Visualization block.
After making the connection, select the Bounding Box Visualization block. This will expand the block and display its configurable parameters.
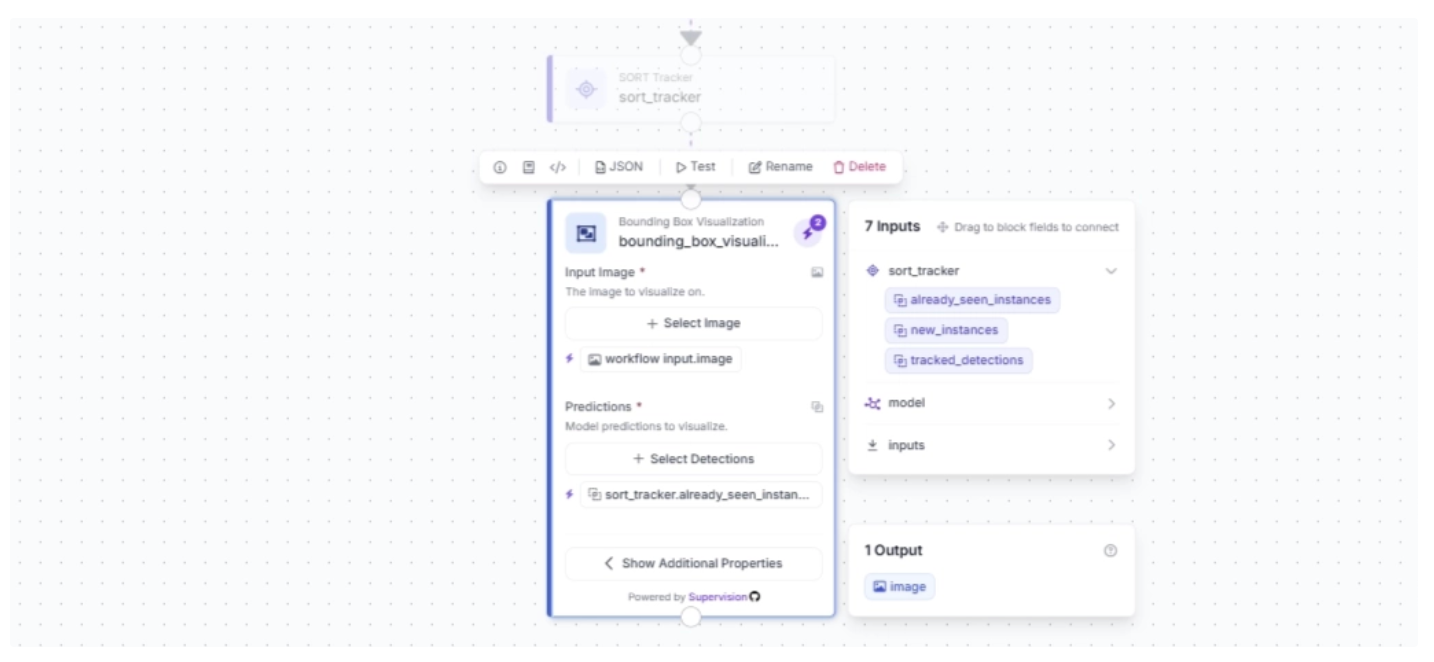
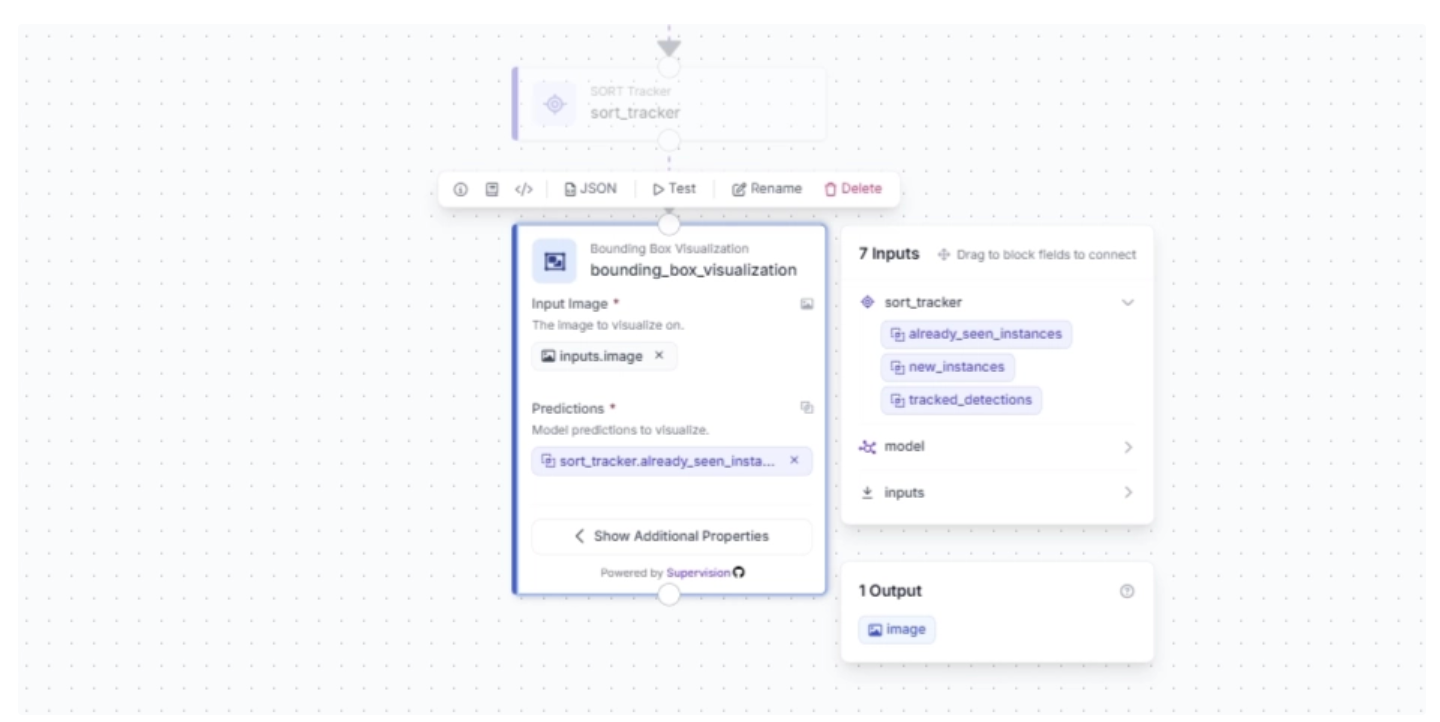
Click the lightning icon (⚡) in the top-right corner of the Bounding Box Visualization block to accept “input suggestions,” as shown below.
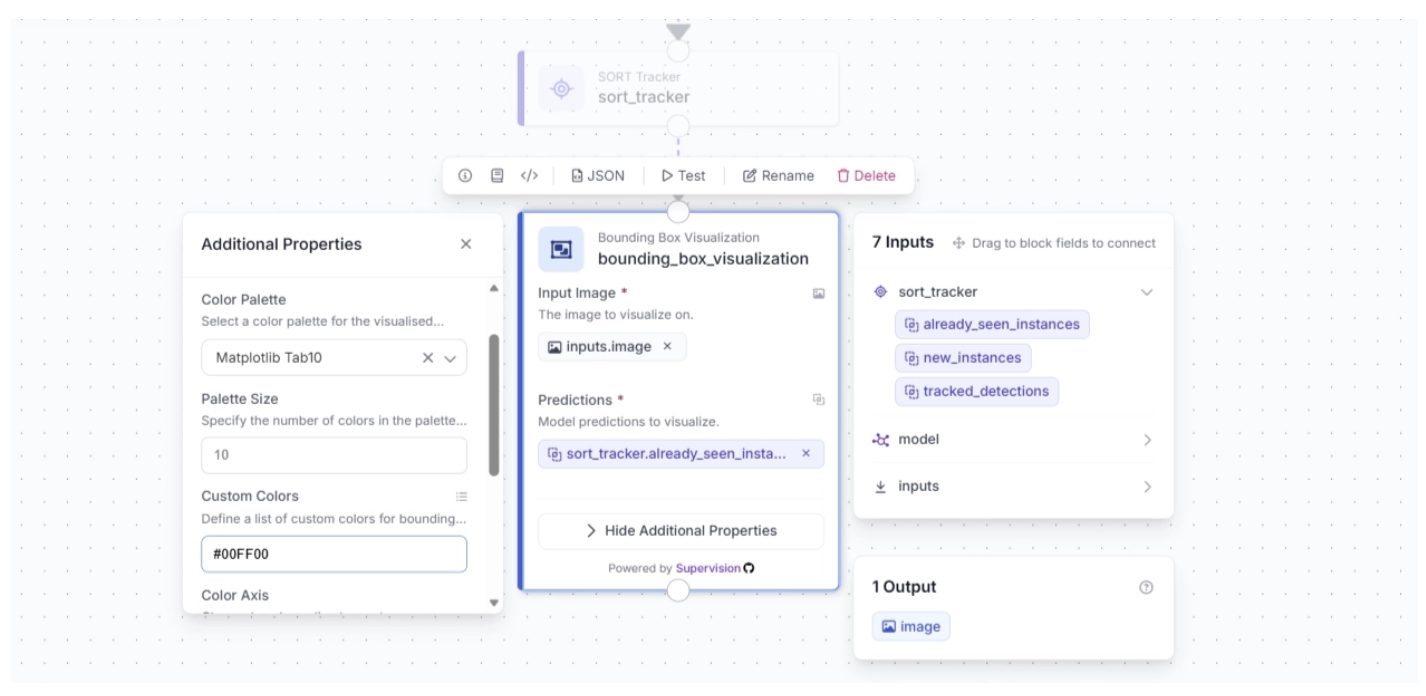
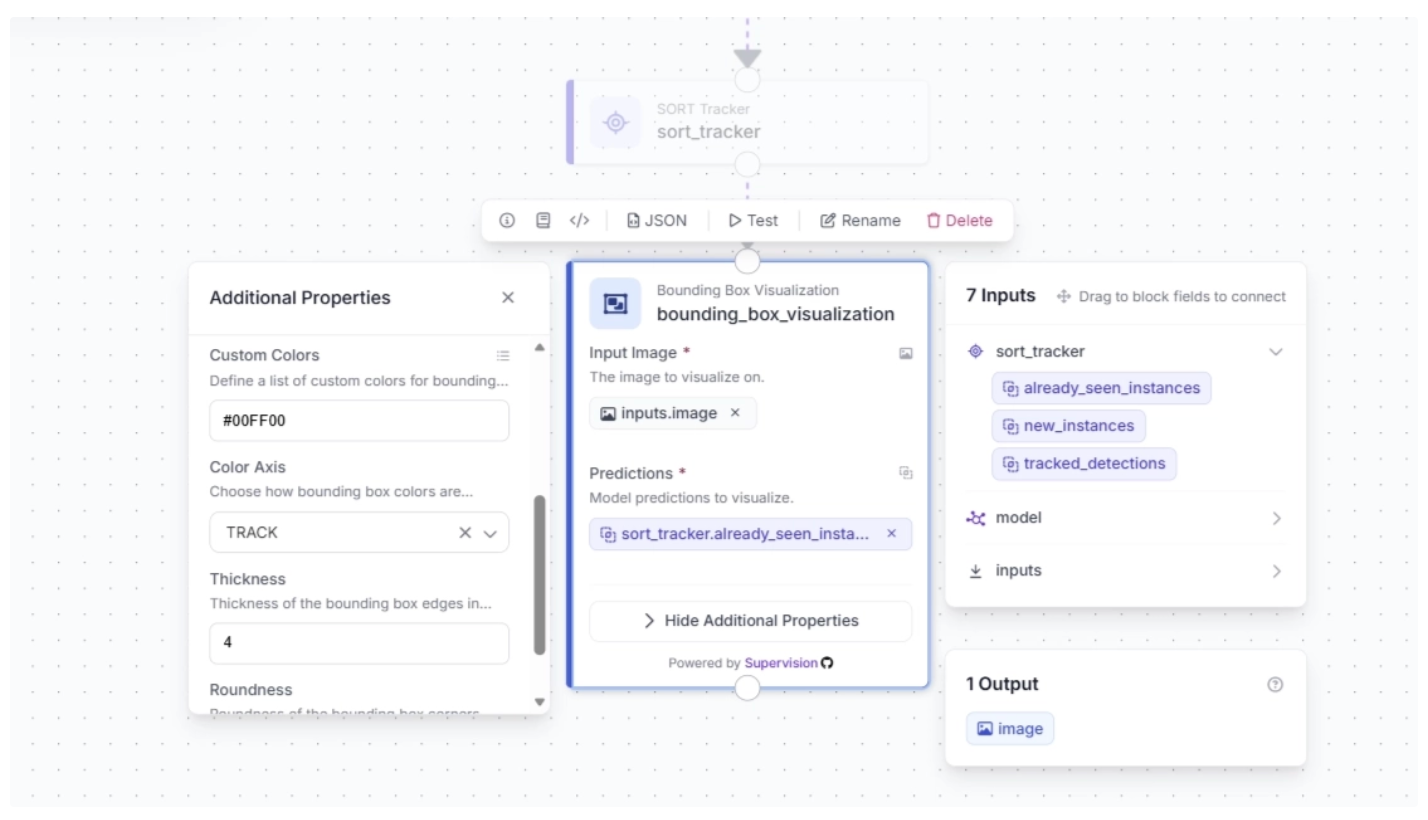
Under the Bounding Box Visualization block’s additional properties, you can configure the color palette for the bounding boxes overlaid on detected objects and specify custom colors.
For this example, set the color palette to “Matplotlib Tab10” and the custom color to “#00FF00,” as shown below.
You can also configure the color axis and thickness of the bounding boxes. For this example, set the color axis to “TRACK” and the thickness to 4, as shown below.
Step 5: Display Tracker IDs as Labels
The SORT Tracker block outputs trackers along with bounding box coordinates generated by the Object Detection Model block for each detected object in the video. These trackers can then be visualized as labels on the video frames using the Label Visualization block.
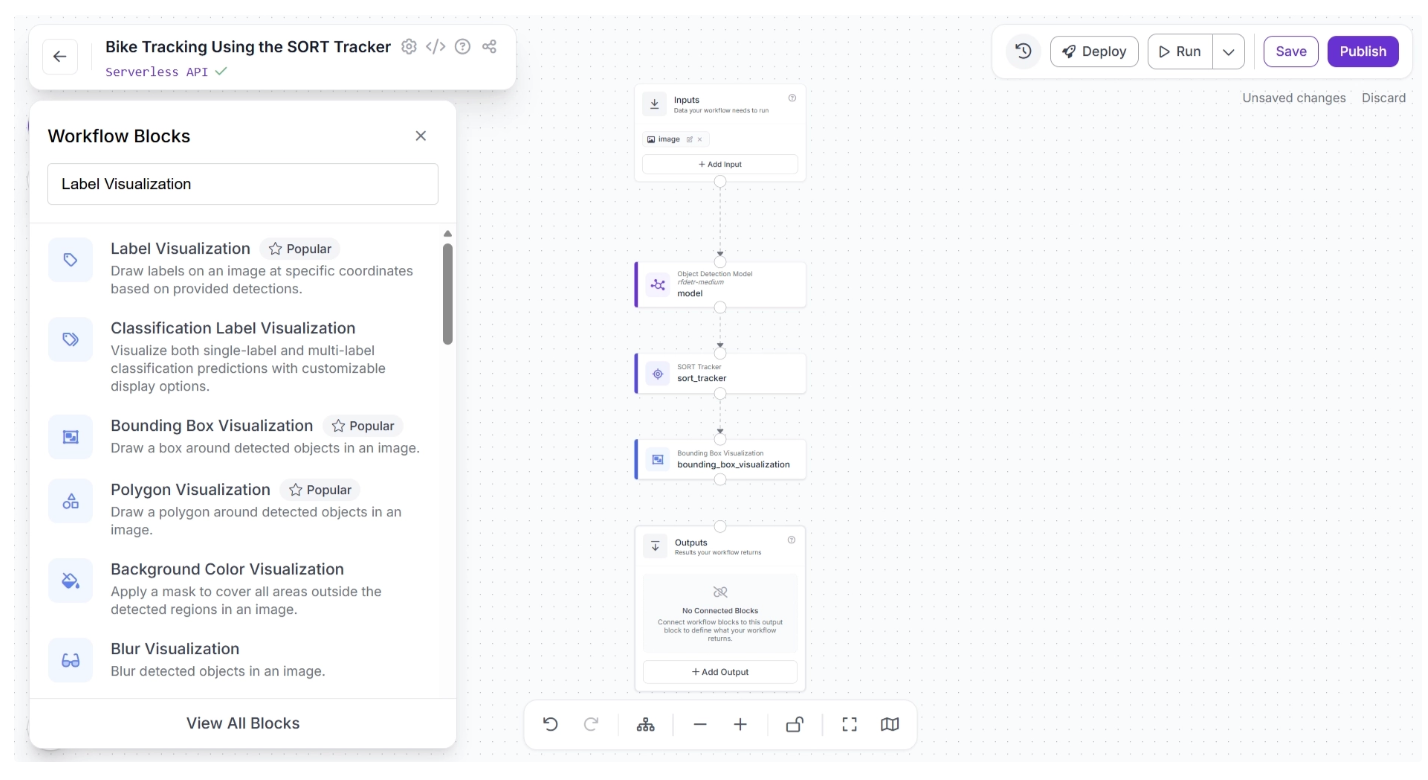
To add this block, click the “+” button in the top-left corner of the workflow canvas. A pop-up menu with workflow blocks will appear. From there, search for “Label Visualization” and select it to insert into your workflow.
Once added, create a connection from the Bounding Box Visualization block to the Label Visualization block.
This ensures that the tracked detection outputs from the SORT Tracker, along with the bounding box–visualized frames, are available to the Label Visualization block, as all upstream outputs from each block are accessible to downstream blocks.
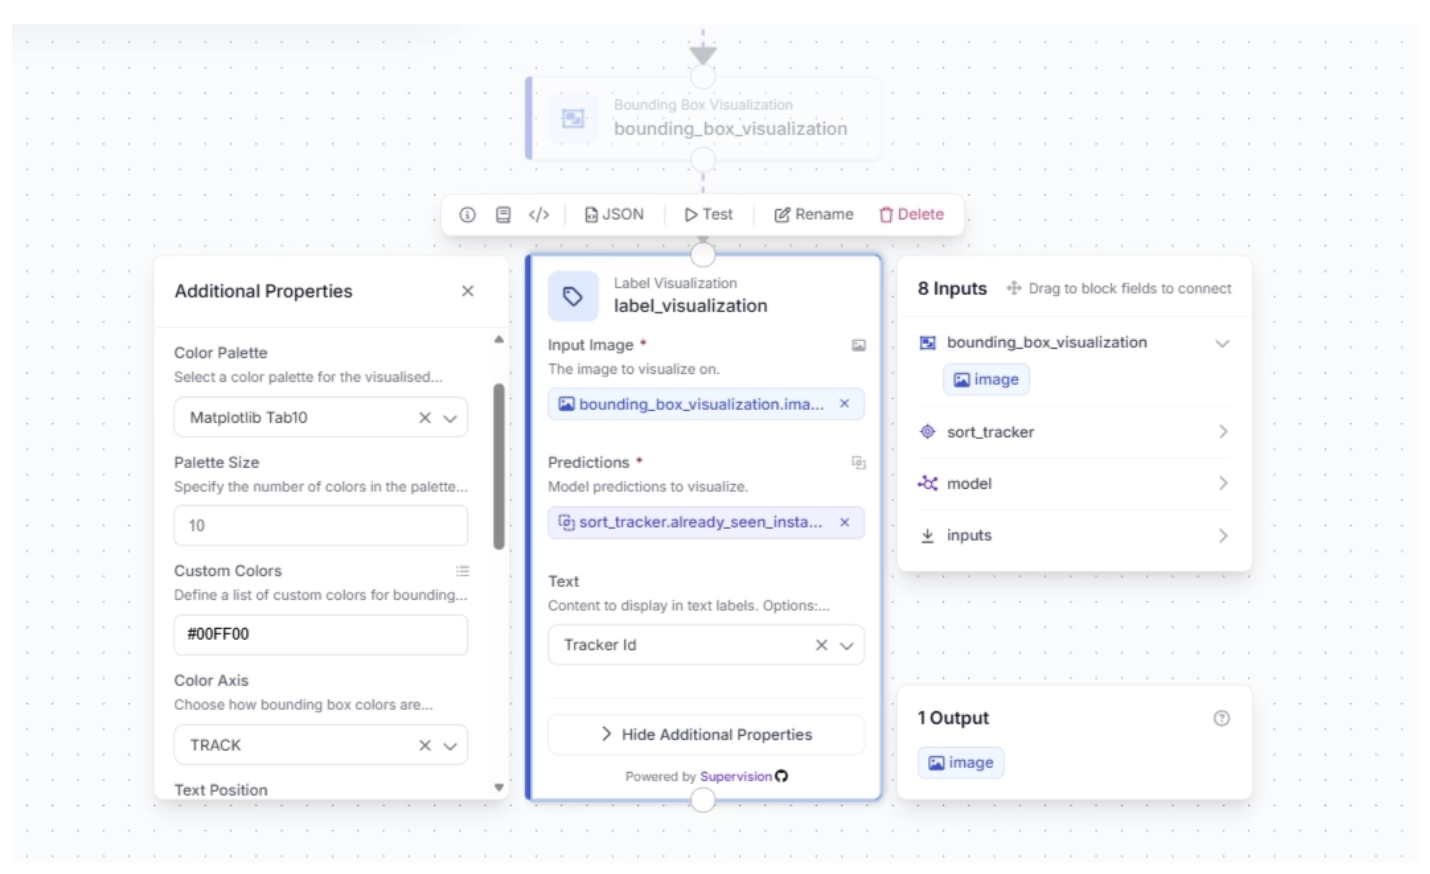
After making the connection, select the Label Visualization block. This will expand the block and display its configurable parameters.
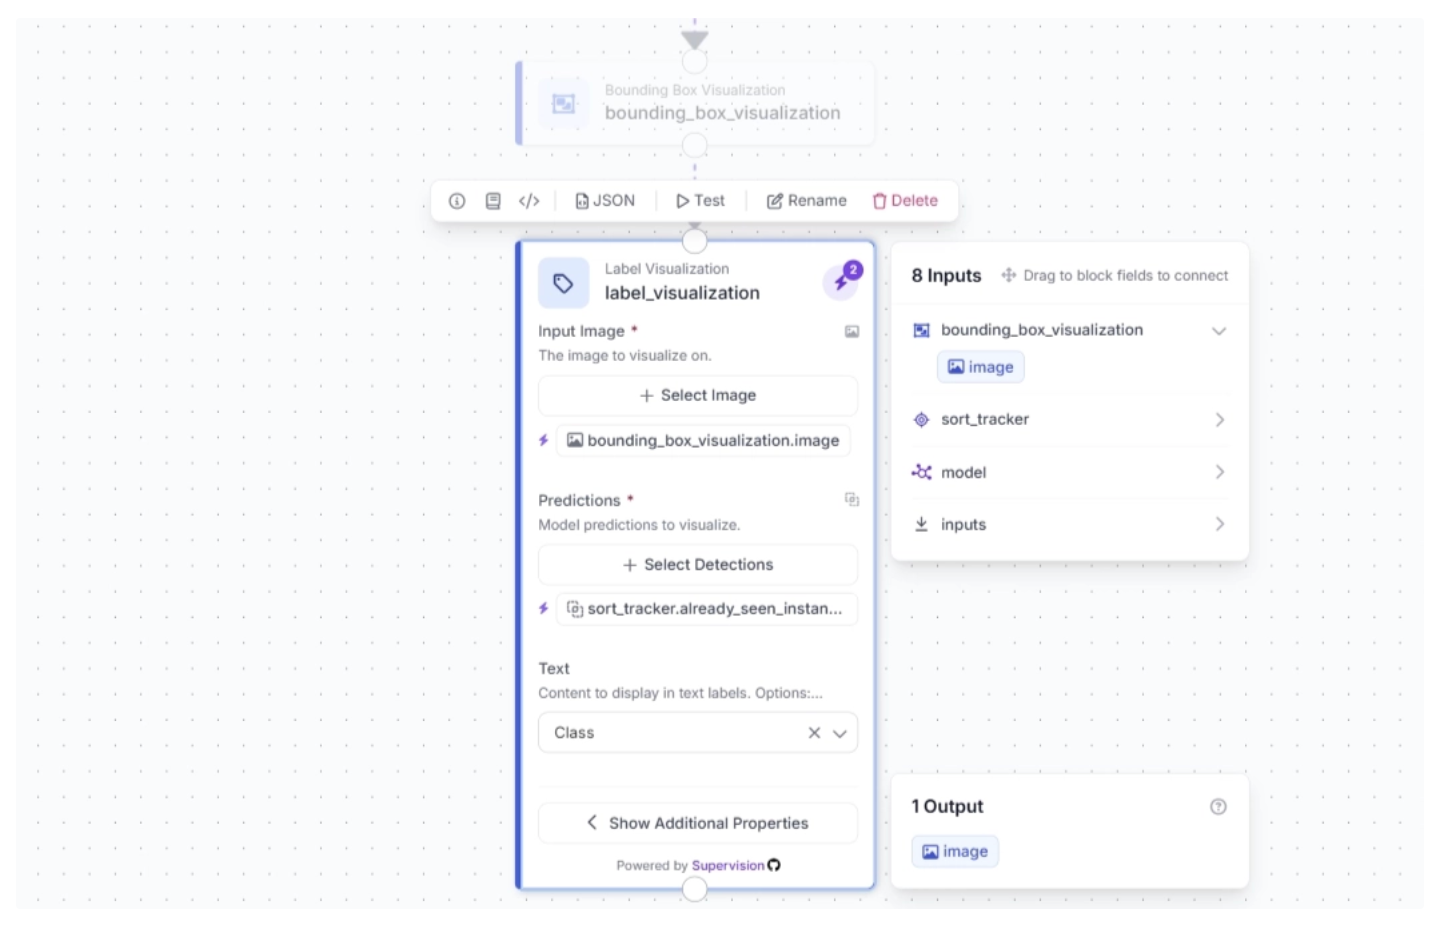
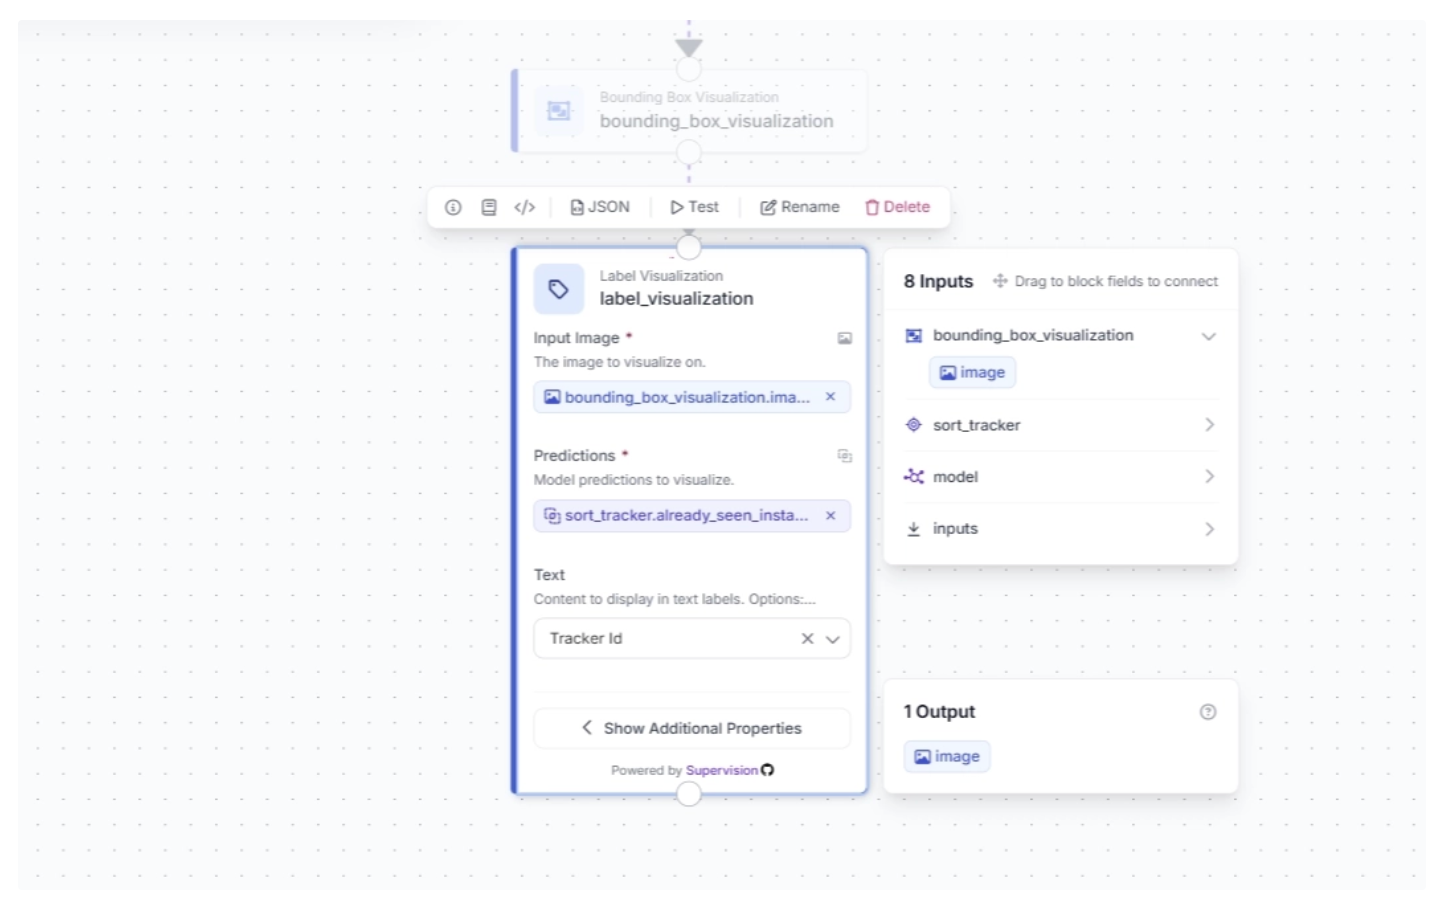
Click the lightning icon (⚡) in the top-right corner of the Label Visualization block to accept “input suggestions.” Make sure the Text parameter is set to Tracker Id.
The input image for the Label Visualization block is linked to the bounding box–visualized image, ensuring that the labels are drawn on images with bounding boxes so both can be visualized in the final video frames.
Under the Label Visualization block’s additional properties, you can configure the color palette for the labels overlaid on detected objects and specify custom colors.
For this example, set the color palette to “Matplotlib Tab10” and the custom color to “#00FF00”, keeping it consistent with the bounding box colors used earlier.
Step 6: Visualize Object Trajectories with Traces
You can also visualize the trajectories of tracked objects over time using Traces. This allows you to analyze object motion patterns and understand behavior across frames.
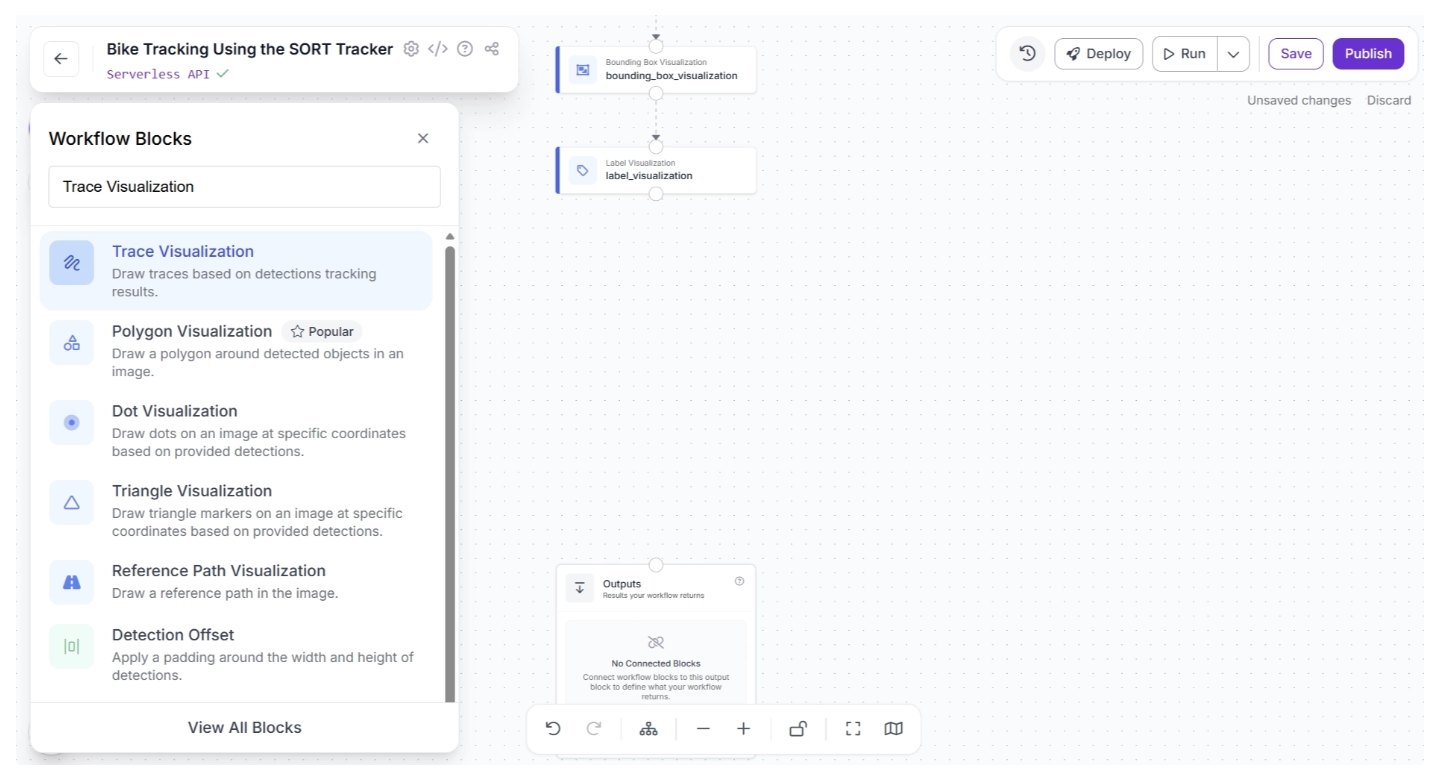
To add this capability to your workflow, click the “+” button in the top-left corner of the workflow canvas. A pop-up menu with available workflow blocks will appear. From there, search for “Trace Visualization” and select it to insert into your workflow.
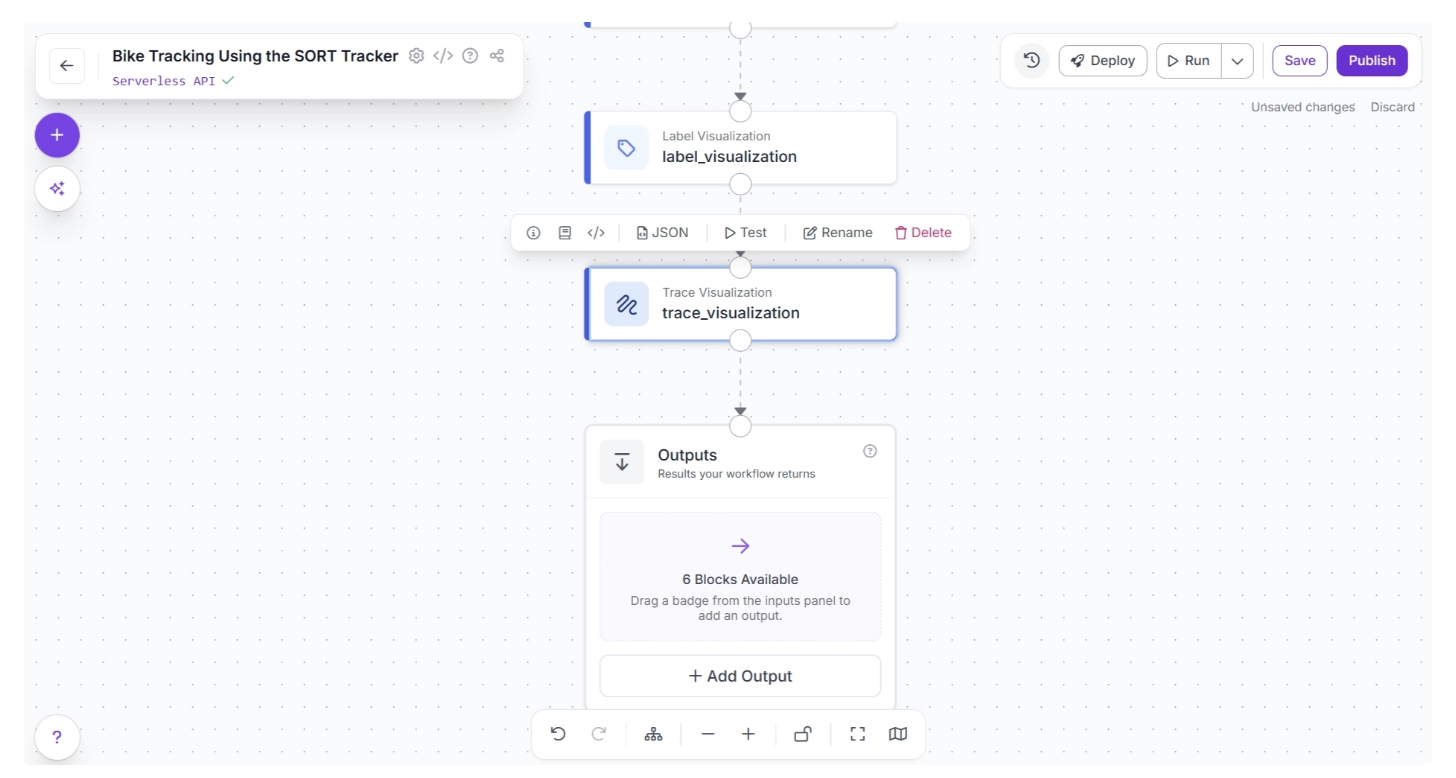
Once added, create a connection from the Label Visualization block to the Trace Visualization block. After the connection is made, select the Trace Visualization block. This will expand the block and display its configurable parameters, as shown below:
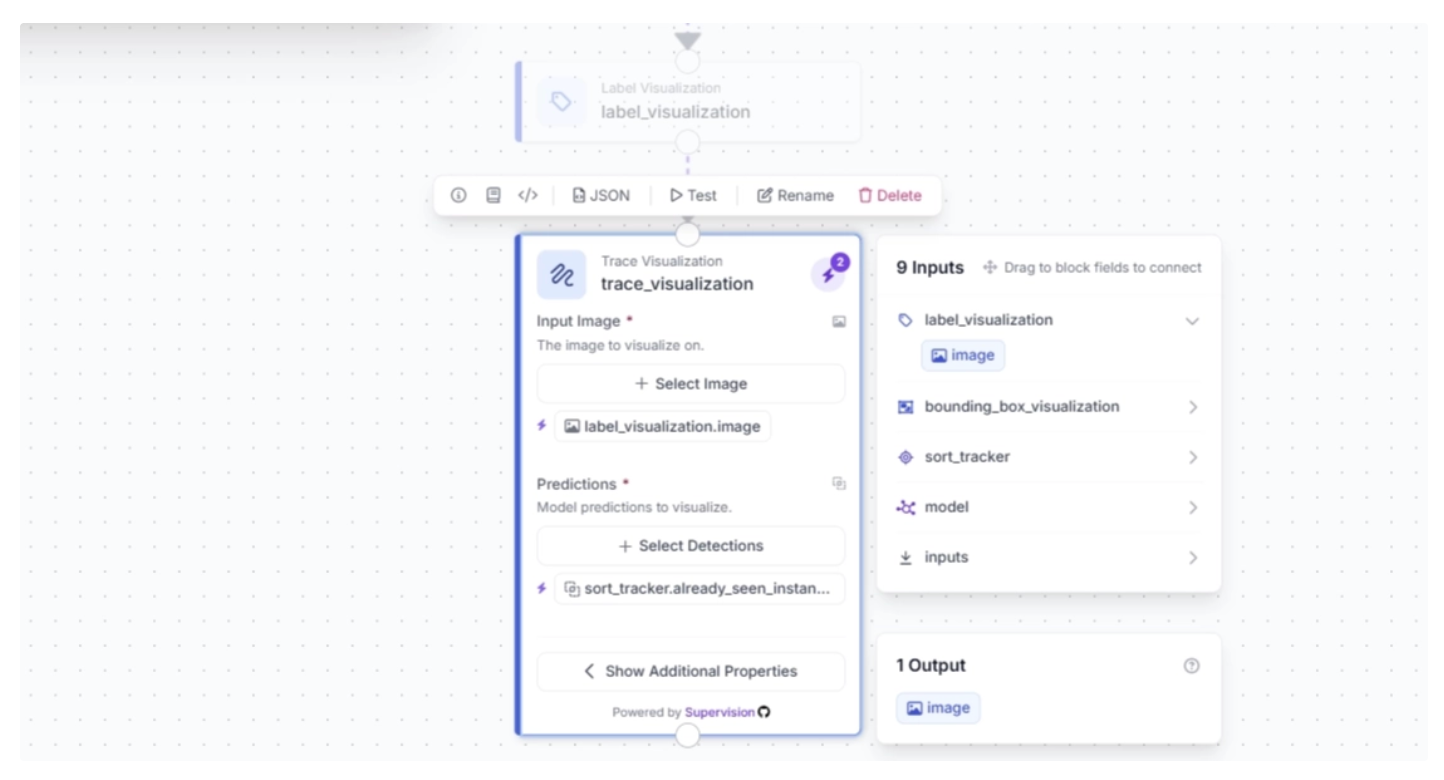
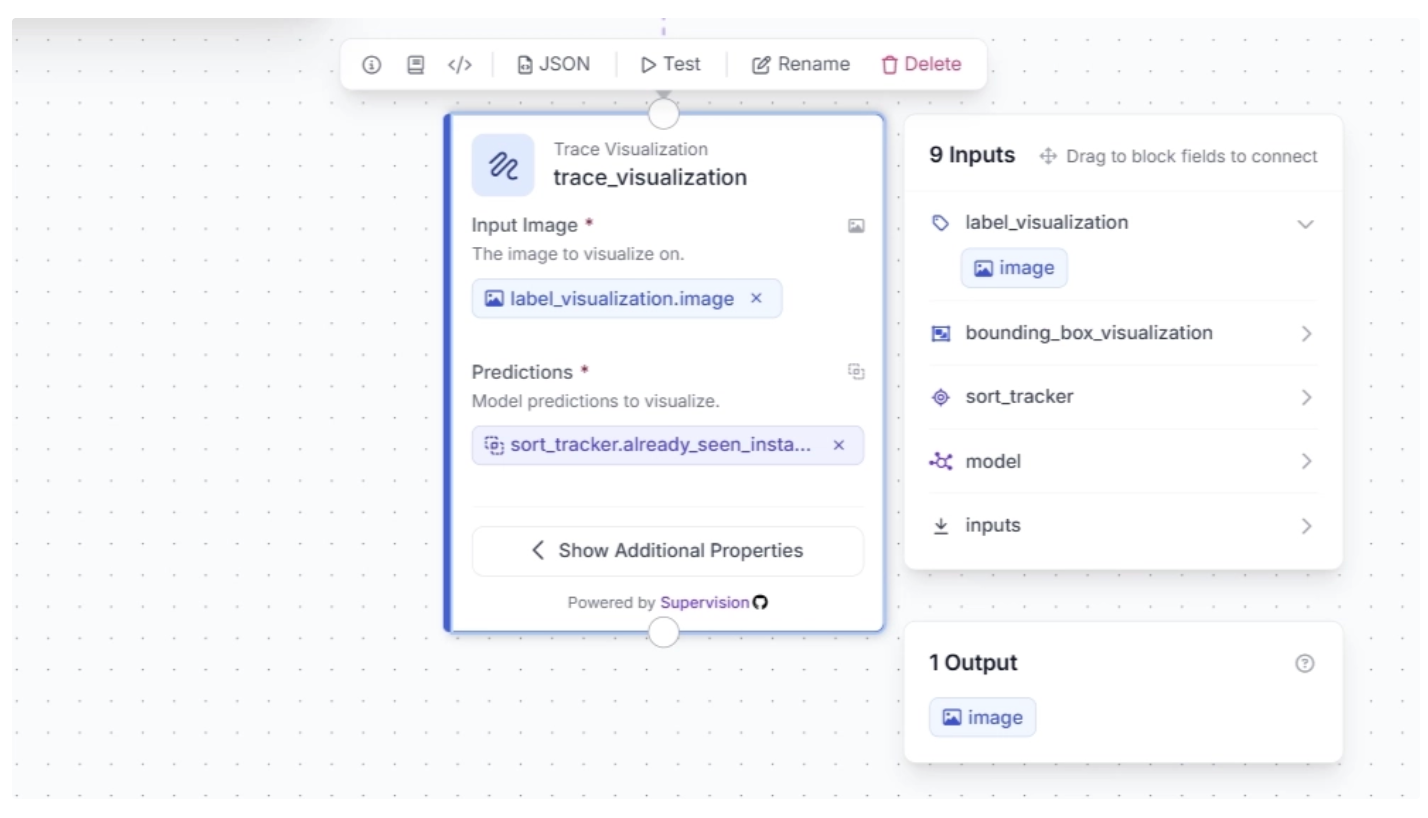
Click the lightning icon (⚡) in the top-right corner of the Trace Visualization block to accept “input suggestions,” as shown below:
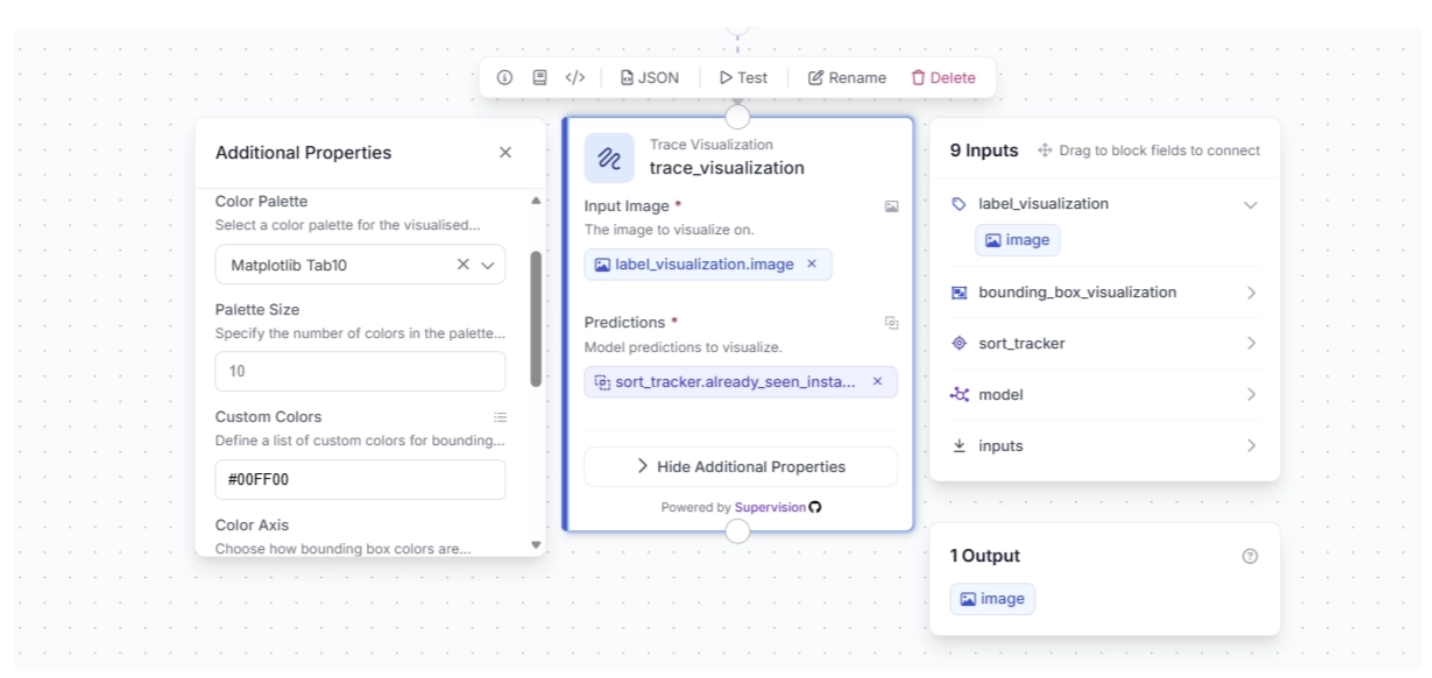
Under the Trace Visualization block’s additional properties, you can configure the color palette for the traces overlaid on detected objects over time and specify custom colors.
For this example, set the color palette to “Matplotlib Tab10” and the custom color to “#00FF00”, keeping it consistent with the bounding box and label colors used earlier.
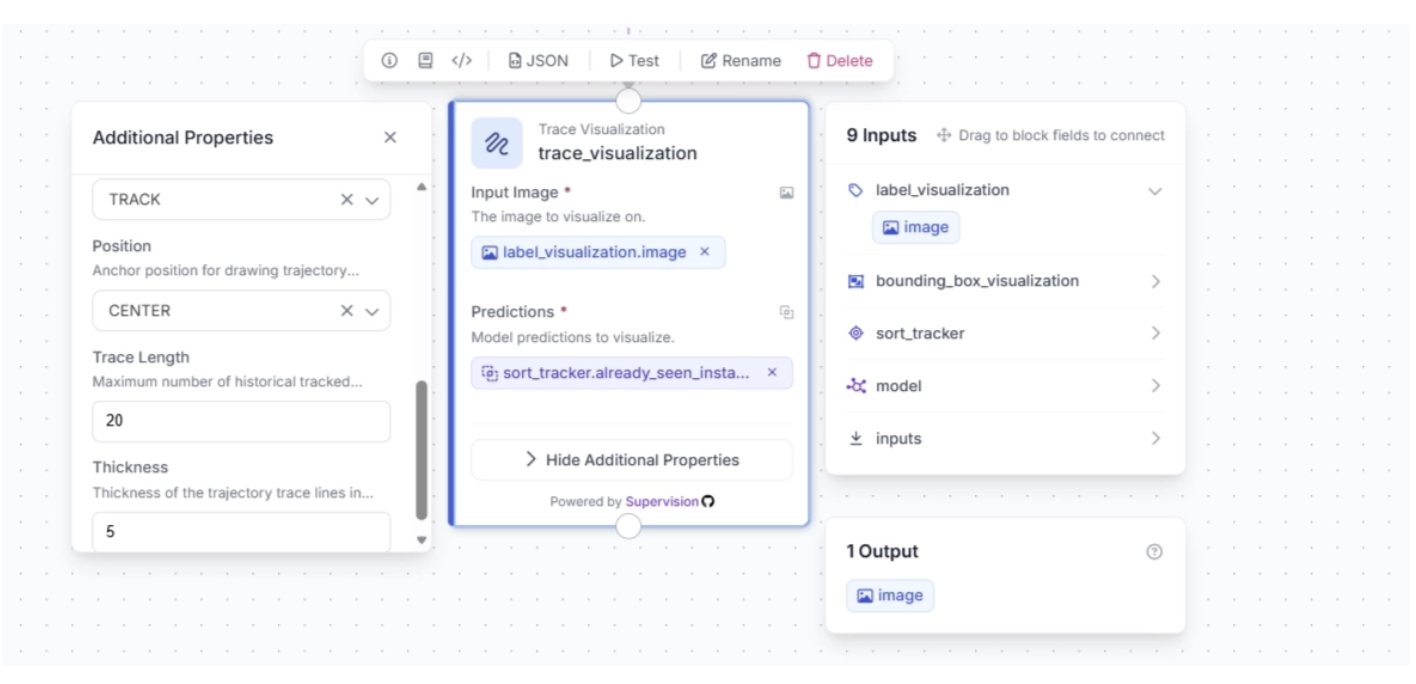
You also need to set the Color Axis to “TRACK”, and under additional properties, configure Trace Length (how many past positions are shown) and Thickness (how wide the trace line appears).
For this example, set the Trace Length to 20 and the Thickness to 5, as shown below:
Step 7: Configure Workflow Outputs
To output the trace-visualized video, create a connection from the Trace Visualization block to the Outputs block, as shown below. This ensures that the outputs from the Trace Visualization block, along with upstream blocks, are available to the Outputs block.
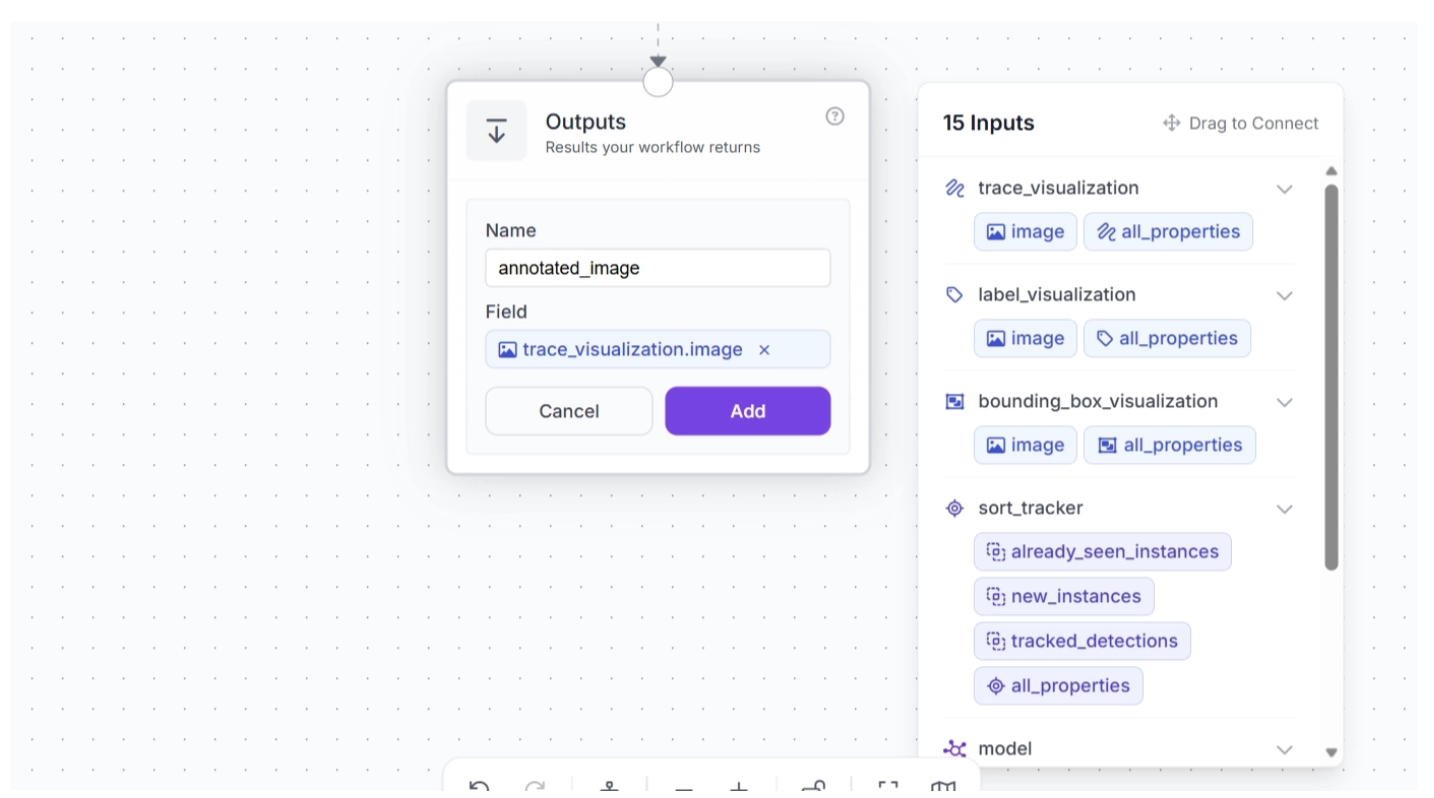
Click the “+ Add Output” button to reveal all possible outputs from the workflow, as shown below:
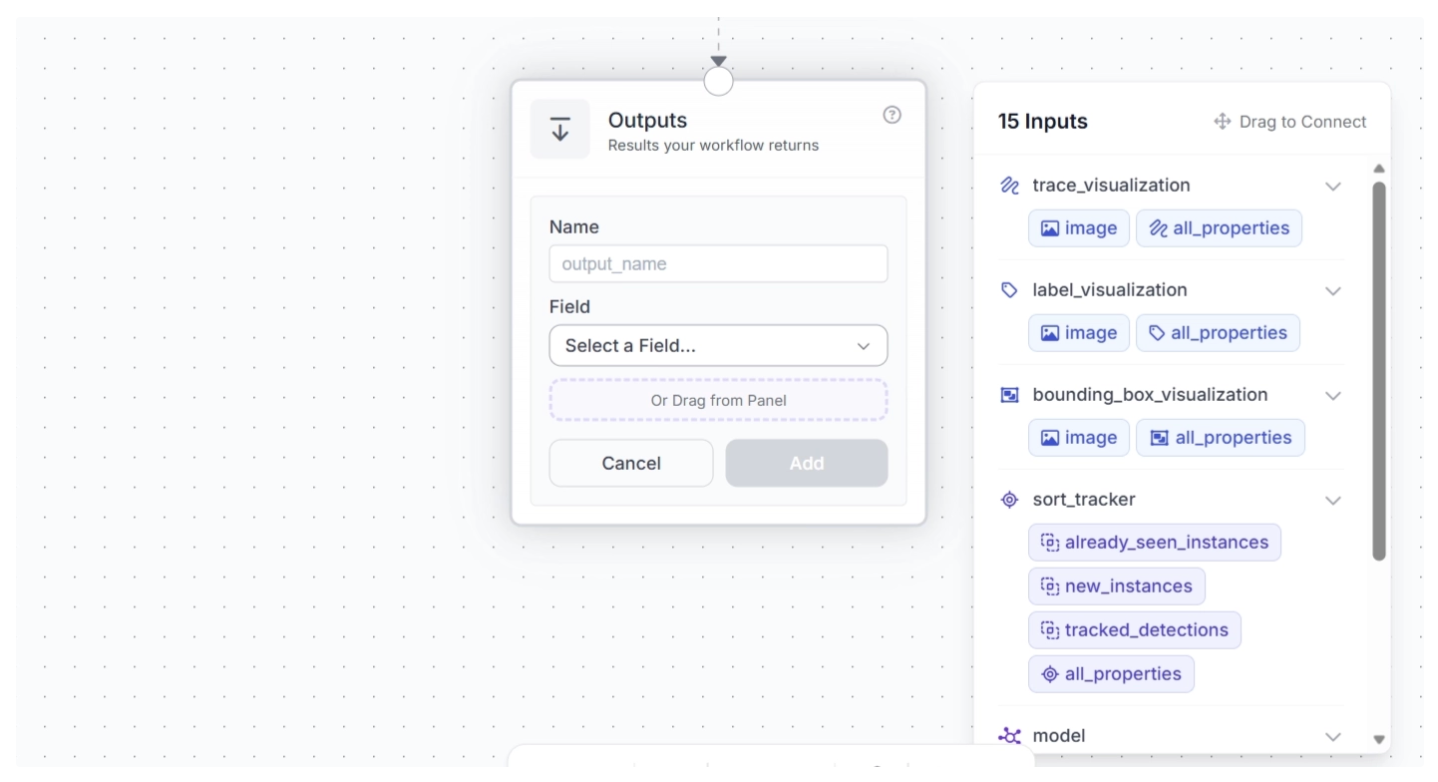
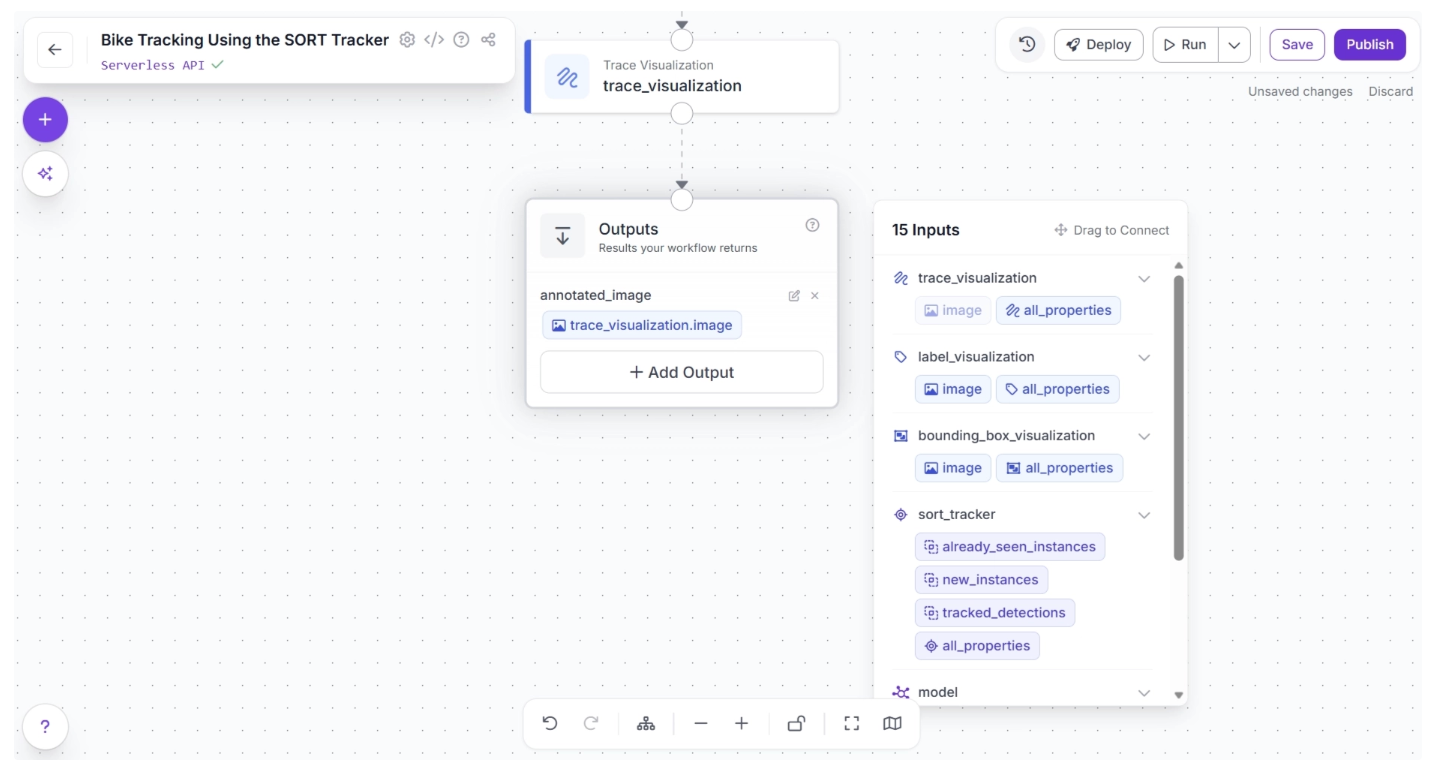
Next, drag and drop the image under ‘trace_visualization’ into the Outputs block and enter a parameter name for this output. In this example, we chose ‘annotated_frame’, as shown below:
Once done, click “Add.” This ensures that your workflow takes in a video stream and outputs a video stream where motorcycles are detected, labeled with tracker IDs, and their traces are visualized across frames.
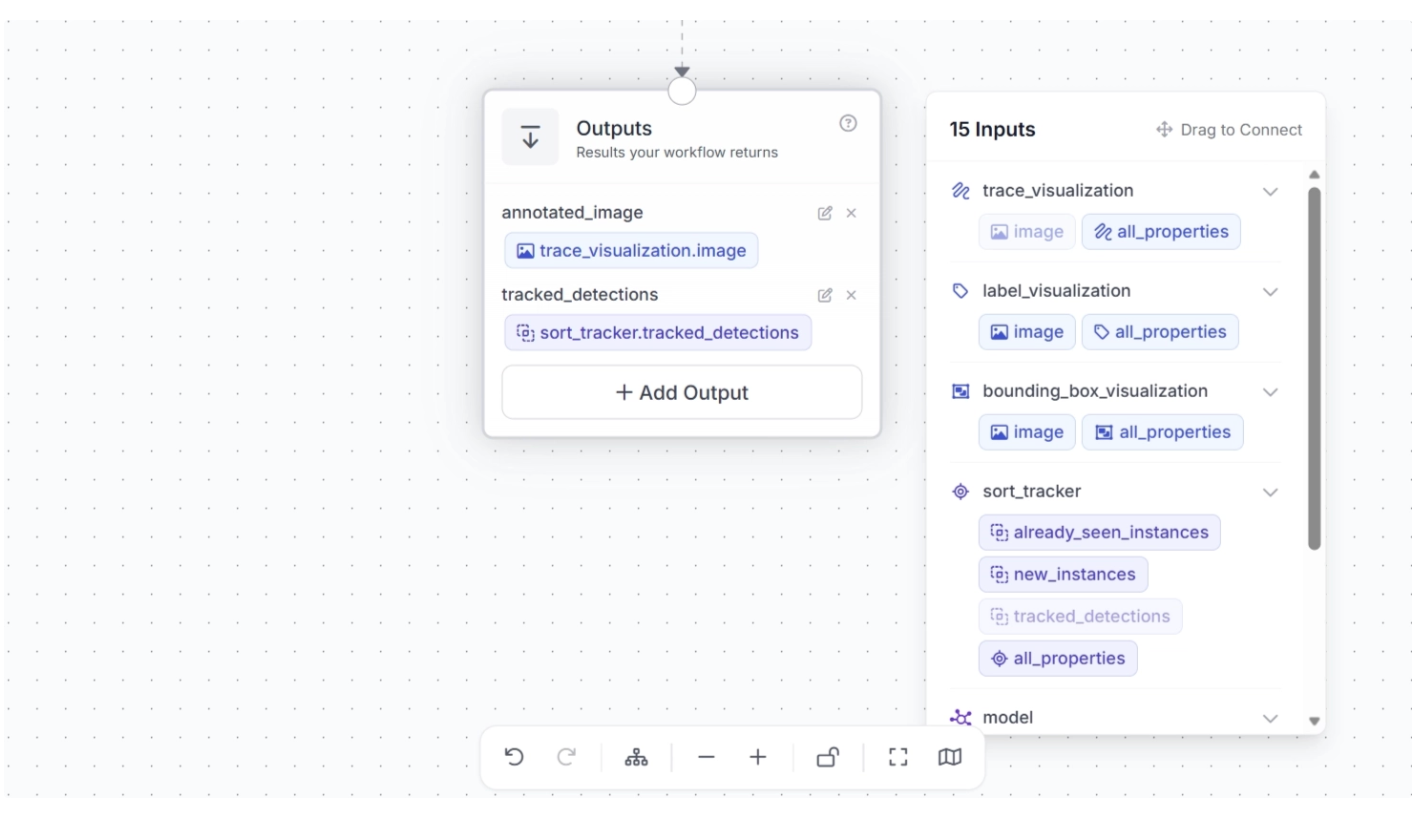
You can also output the SORT tracked detections from the workflow. To do this, click “+ Add Output,” drag and drop ‘tracked_detections’ under ‘sort_tracker’ into the Outputs block, and enter a parameter name for this output. In this example, we chose ‘tracked_detections’, as shown below:
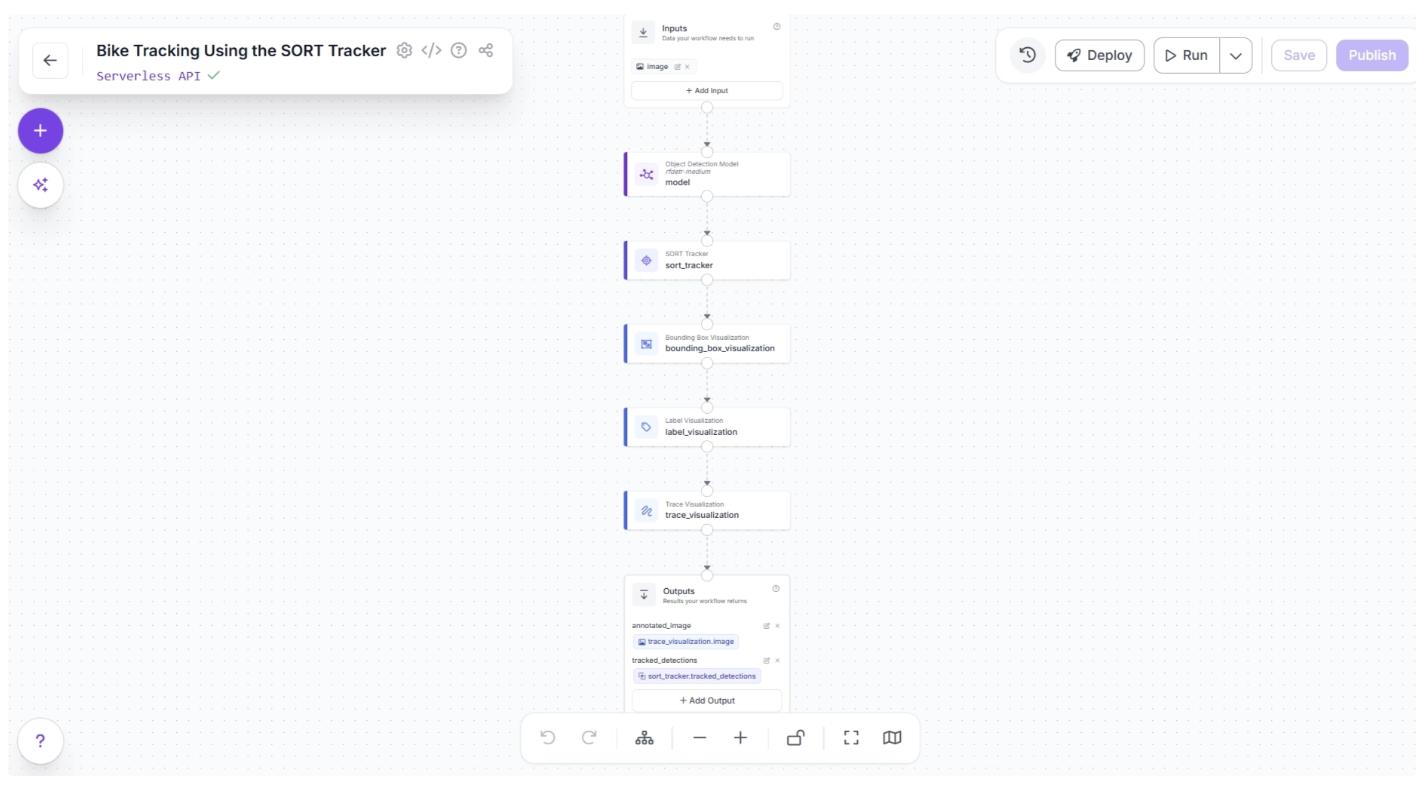
This completes our workflow: Motorcycle Tracking Workflow.
Step 8: Run the Workflow
With our workflow complete, you can now run it. Click the “Run” button in the top-right corner of the editor. This opens a sidebar where you can upload a video and execute the workflow:
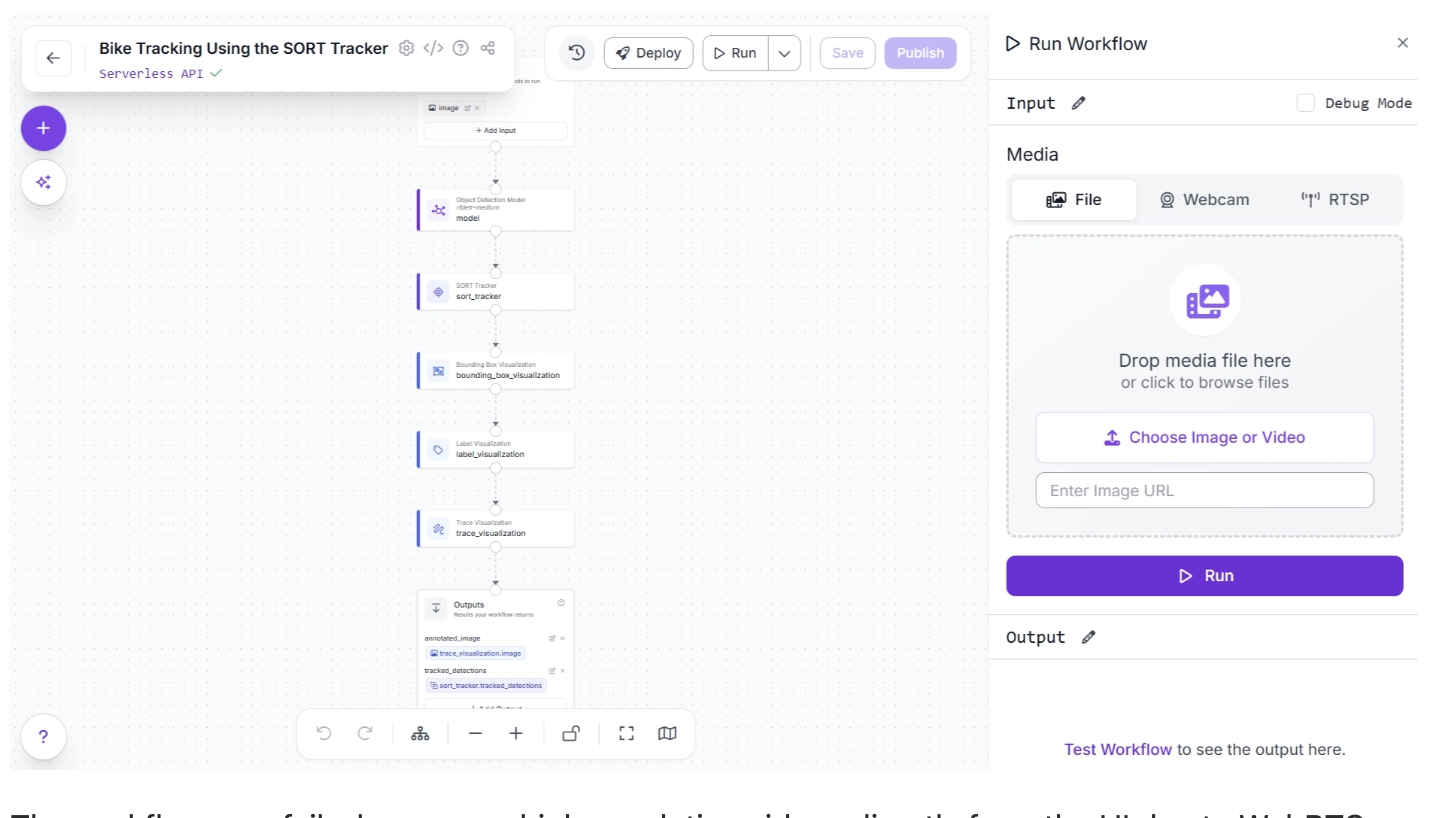
The workflow may fail when run on high-resolution videos directly from the UI due to WebRTC connection issues. In such cases, use an inference server (Docker recommended) to run the workflow locally.
First, set up the inference server and ensure it is running at http://localhost:9001, then install the inference-sdk package:
pip install -U inference-sdkAnd then execute the script below:
import cv2
import base64
import numpy as np
from inference_sdk import InferenceHTTPClient
from inference_sdk.webrtc import VideoFileSource, StreamConfig, VideoMetadata

client = InferenceHTTPClient.init(
    api_url="http://localhost:9001",
    api_key="YOUR_ROBOFLOW_API_KEY"
)

source = VideoFileSource("bikes-1280x720-1.mp4", realtime_processing=False)  # Buffer and process all frames

VIDEO_OUTPUT = "annotated_image"
DATA_OUTPUTS = ["tracked_detections"]

config = StreamConfig(
    stream_output=[], # We request all data via data_output for video files
    data_output=["annotated_image","tracked_detections"],
    # requested_plan="webrtc-gpu-medium",
    # requested_region="us",
)

session = client.webrtc.stream(
    source=source,
    workflow="bike-tracking-using-the-sort-tracker",
    workspace="YOUR-WORKSPACE",
    image_input="image",
    config=config
)

frames = []

@session.on_data()
def on_data(data: dict, metadata: VideoMetadata):
    # print(f"Frame {metadata.frame_id} predictions: {data}")

    if VIDEO_OUTPUT and VIDEO_OUTPUT in data:
        timestamp_ms = metadata.pts * metadata.time_base * 1000
        img = cv2.imdecode(np.frombuffer(base64.b64decode(data[VIDEO_OUTPUT]["value"]), np.uint8), cv2.IMREAD_COLOR)
        frames.append((timestamp_ms, metadata.frame_id, img))
        print(f"Processed frame {metadata.frame_id}")
    else:
        print(f"Processed frame {metadata.frame_id} (data only)")

session.run()

if VIDEO_OUTPUT and len(frames) > 0:
    # Stitch frames into output video
    frames.sort(key=lambda x: x[1])
    fps = (len(frames) - 1) / ((frames[-1][0] - frames[0][0]) / 1000) if len(frames) > 1 else 30.0
    h, w = frames[0][2].shape[:2]
    out = cv2.VideoWriter("output.mp4", cv2.VideoWriter_fourcc(*"mp4v"), fps, (w, h))
    for _, _, frame in frames:
        out.write(frame)
    out.release()
    print(f"Done! {len(frames)} frames at {fps:.1f} FPS -> output.mp4")
elif VIDEO_OUTPUT:
    print("No video frames collected.")
The Python script above is taken from the “Deploy” menu, where you can also find your API key. When executed, it generates a video with objects detected, tracked, and their traces visualized.
Step 9: Deploy Your Workflow for Production Use
Roboflow offers several deployment options for workflows. You can access them by clicking the “Deploy” button, located to the left of the “Run” button in the top-right corner of the canvas. This opens a pop-up window, as shown below:
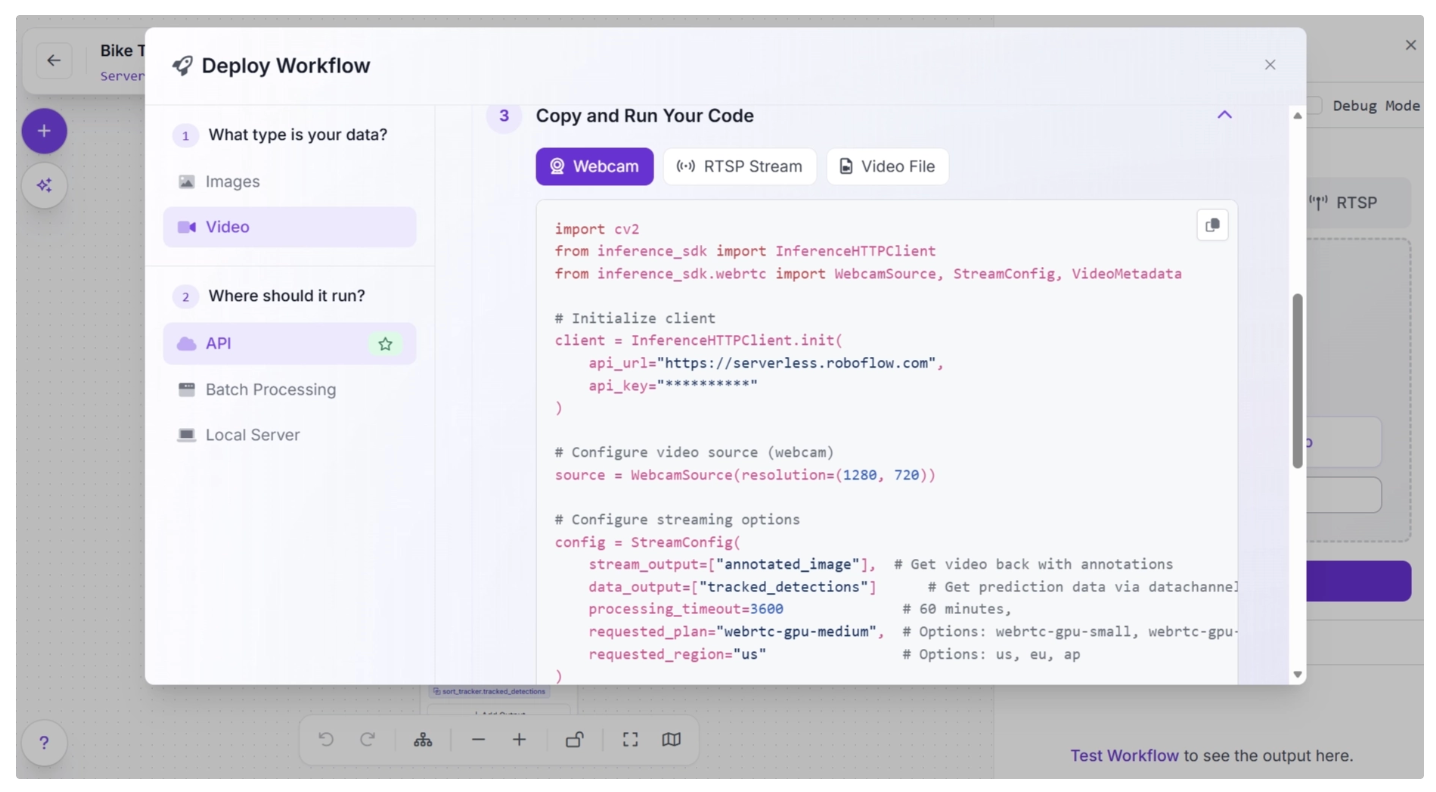
Various deployment options exist for running inference on the workflow. Cloud deployment options include API and Batch Processing, while Local Server is an edge deployment option.
When to Use Alternatives: SORT, ByteTrack, and OC-SORT
While SORT is great for fast and lightweight tracking, more advanced trackers like ByteTrack and OC-SORT can improve performance in specific scenarios:
SORT: Best for simple, fast, real-time tracking in low-resource environments. Avoid using it in crowded scenes, during frequent occlusions, or when objects leave and re-enter the frame, as it can lose identities or confuse tracks.
ByteTrack: ****Improves SORT in crowded and occluded scenes by associating even low-confidence detections. Best when many objects overlap or disappear temporarily.
OC-SORT: Improves SORT in handling abrupt or non-linear motion, producing smoother and more stable trajectories. Best for objects with irregular motion patterns.
Conclusion: SORT Tracker in Roboflow Workflows
The SORT tracker offers a practical and efficient way to bridge the gap between frame-level detection and real-world understanding of motion. By assigning consistent IDs to objects across frames, it transforms isolated detections into meaningful trajectories that can be analyzed, counted, and acted upon.
While SORT has its limitations, especially in handling occlusions and appearance changes, its simplicity, speed, and model-agnostic design make it an excellent choice for many real-time applications.
With Roboflow Workflows, building and deploying SORT Tracker–powered systems becomes far more accessible. Instead of managing complex logic, you can focus on designing, iterating, and scaling your computer vision pipelines, while leaving the underlying orchestration to Roboflow through its workflow blocks.
From here, you can experiment further by tuning tracker parameters, switching detection models, or exploring other tracking algorithms such as ByteTrack and OC-SORT, both readily available as workflow blocks, to better adapt the workflow to your specific use case.
Try SORT Tracker through Roboflow Workflows for free.
Learn more about Trackers here.
Written by Dikshant Shah
Cite this Post
Use the following entry to cite this post in your research:
Contributing Writer. (Apr 9, 2026). Real-Time Object Tracking with SORT & Roboflow Workflows. Roboflow Blog: https://blog.roboflow.com/how-to-use-sort-tracker/